1
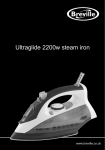
Steam Generator
Generator Iron
Steam
Iron
Instructions for Use
PLEASE RETAIN THESE INSTRUCTIONS FOR FUTURE REFERENCE.
These instructions refer to the Breville Steam Generator Iron VIN067 / IR70 / IR72.
FEATURES
2
7
8
9
6
5
4
3
10
2
11
1
The illustrations used in these instructions may differ slightly from the actual unit supplied.
2
FEATURES
1
Steam Generator Base unit
The base unit is large and should
always be positioned on a stable
work surface.
2
Water tank with Anti-Calc system
This water tank incorporates an anticalc cartridge which removes
limescale deposits and prolongs
the life of your iron. This is situated
inside the water tank.
3
Maximum water level indicator
Water should only be added up to
the ‘MAX’ level indication
(maximum water capacity: 1 litre).
4
Water inlet
The water tank can be removed and
filled at the sink. Do not exceed the
MAX level marking.
5
Stainless steel soleplate
This durable soleplate transfers
heat evenly during ironing to
produce professional results.
6
Steam button
Press and hold this button to
produce a continuous burst of
steam to remove stubborn creases.
The steam button will also work
when the iron is held vertically.
This is ideal for removing creases
and wrinkles from delicate fabrics
or difficult to iron items, such as
curtains.
3
7
Temperature settings display
The selected temperature light will
flash when iron is heating. When
the iron has reached the desired
temperature, the light will stop
flashing and light continuously.
The temperature indicator lights will
flash on and off during ironing as
the iron maintains the soleplate
temperature.
8
Temperature / Standby select
button
To set the soleplate temperature,
press the temperature select button
to cycle through the four
temperature settings.
9
Steam / Power pipe
The steam / power pipe feeds
steam and power from the base
unit into the iron.
10
Control panel
This panel allows you to set the
desired amount of steam. The
display clearly indicates when the
filter cartridge is fitted correctly and
when it needs to be changed.
11
Iron rest
The iron rest provides a stable rest
for the iron. The heat-resistant
rubber fins hold the iron securely in
place and protect the soleplate.
3
THE CONTROL PANEL
4
1
2
3
7
6
4
5
1
2
3
4
5
6
7
Power On/Off
Steam level selector
Steam level indicator
On/Off indicator
Change anti-calc cartridge indicator
Pump active indicator
Heat indicator
Temperature settings display
1
2
3
4
Standby indicator
Temperature setting
indicators
One dot = Coolest heat
Two dots = Medium heat
Three dots = High heat
Maximum heat setting
indicator
Temperature / Standby
Select Button
3
2
1
1
4
4
BEFORE USE
1
Remove all packaging materials
including any soleplate
protection, taking care not to
damage the soleplate or hot
water pipe. Position the steam
generator iron horizontally on
your ironing board (if large
enough) or on a heat resistant,
secure surface at the same
height as your ironing board.
Never position the steam
generator on an unstable
surface.
5
Fill with cold tap water and
empty. This will rinse out any
foreign particles which may
remain from the manufacturing
process.
6
Refill the water tank with cold
water before replacing the anticalc filter.
7
Insert the tank into the base unit,
ensuring that it latches securely
into place.
8
Connect the plug to the mains
supply and turn the power on.
NOTE:
Before connecting to the
mains supply, ensure that
the supply voltage is the
same as the one indicated
on the underside of this
appliance.
2
Unwind and straighten the power
cord and hot water pipe.
3
Remove the water tank, by
pressing the release button
located on the underside of the
tank. (Fig 1).
4
Fig 1
Release Button
Remove the anti-calc cartridge by
lifting from the tank. (Fig 2).
Fig 2
5
5
USING YOUR IRON
6
First time use
1
When the iron is connected to the
mains supply and the power ON/
OFF button is pressed you will
hear a single beep.
2
The heat indicator on the control
panel will light to show that the
steam generator is preheating.
3
The minimum (LOW) steam
setting is selected by default.
Select the highest setting (HIGH).
4
5
Press the steam button for 30
seconds to clean the steam
generating system.
NOTE:
You will hear a repeated
buzzing sound as the pump is
primed ready for use. The
noise will subside after a
short time. This is NOT a
fault.
6
Press the temperature / standby
select button on the iron handle
to set the soleplate temperature
to its maximum setting.
The iron will now start to heat up
and the temperature indicator
light on the handle will flash.
When the iron has reached the
desired temperature, the light will
stop flashing and light
continuously. The iron is now
ready to use.
Iron an old towel to ensure that
any residues inside the iron are
not transferred to your good
laundry.
If you find it necessary to clean
the soleplate, allow the iron to
completely cool down then wipe
over it with a slightly damp cloth.
WARNING!
During use the hot water
pipe and iron rest become
very hot, avoid contact,
especially if you have
sensitive skin.
The temperature indicator lights
will flash on and off during
ironing as the iron maintains the
soleplate temperature.
If the iron is not up to full
temperature before you use it,
water will leak through the
soleplate. If this happens, stop
using the iron until the
temperature indicator light stops
flashing to indicate that the iron is
up to temperature again.
6
USING YOUR IRON
Steam ironing
IMPORTANT
Ensure that the soleplate has reached the correct operating
temperature before steam ironing garments. Too low a temperature
will result in water dripping from the soleplate.
NOTE:
For correct steam operation, always ensure that the iron temperature is
.
set to the two dot (••), three dot setting (•••) or maximum heat setting
1
Ensure that the water reservoir has been filled.
2
Press the temperature / standby select button on the iron handle to set the
soleplate to the desired temperature. The iron will now start to heat up and
the temperature indicator light on the handle will flash. When the iron has
reached the desired temperature, the light will stop flashing and light
continuously. The iron is now ready to use.
3
Set the desired amount of steam (see page 8). Use the HIGH steam setting
when ironing thicker fabrics, such as denim or linen on the three dot setting
(•••) or maximum heat setting
.
Use the LOW steam setting when ironing more delicate fabrics on the two
dot setting (••).
NOTE:
Steam should never be used on fabrics like nylon, acrylic and
synthetics.
4
When the iron is on the garment, press the steam button for a couple of
seconds. It is not necessary to hold the button down continuously, as steam
will still be emitted from the soleplate for a short time after the button has
been released.
If more steam is required, press and hold the steam button.
Always release the button and allow any residual steam to be released
before replacing the iron on its stand.
7
7
USING YOUR IRON
8
Adjusting the amount of steam
1
The steam setting defaults to
LOW each time the iron is
switched on. The LOW steam
indicator will be illuminated.
2
Press the steam level selector
button ONCE for MEDIUM steam.
The MED steam indicator will be
illuminated.
3
Press the steam level selector
button TWICE for MAXIMUM
steam. The MAX steam indicator
will be illuminated.
4
Press the steam level selector
button THREE TIMES to switch the
STEAM OFF. The MAX, MED and
LOW steam indicators will be
extinguished.
•
Press the steam level selector
button again to repeat steps 1-4.
Dry ironing
You may see this ‘Do not
steam’ symbol on certain
delicate fabrics.
If you intend to dry iron fabrics,
there is no need to fill the water
tank. However, if water is already
in the water tank, you do not need
to empty it.
1
Press the temperature / standby
select button to set the soleplate
to the desired temperature.
2
Press the steam level selector
button until the MAX, MED and
LOW steam indicators are all off.
3
Iron your clothes as usual.
Auto Off function
WARNING!
If the steam button is not pressed for
more than 20 minutes, you will hear
two beeps. The iron then enters
‘sleep’ mode, whereby the iron and
the lights are switched off.
ALWAYS turn the iron off
and disconnect from the
power source after use.
NEVER leave the iron
unattended with the Auto Off
function in operation.
Press the ON/OFF button to switch the
iron and the lights on again.
8
USING YOUR IRON
Anti-calc system
Fig 1
The anti-calc cartridge should be
replaced when the ‘change cartridge’
indicator illuminates. If a new
cartridge is not immediately available,
you may continue ironing, using
distilled water in place of tap water.
Release Button
IMPORTANT
Fig 2
When the anti-calc
cartridge is exhausted, do
NOT continue to use the iron
with tap water as this may
damage the iron.
NEVER attempt to use the
iron without the anti-calc
cartridge in place.
Replacing the anti-calc
cartridge
1
Switch off and unplug the steam
generator at the mains supply.
2
Remove the water tank, by
pressing the release button
located on the underside of the
tank. (Fig 1).
NOTE:
Lift the anti-calc cartridge from
the water tank and dispose in
the household waste (Fig 2).
4
It is recommend that you empty
and refill the water tank with cold
water at this point. Do not fill the
water tank above the ‘MAX’ mark.
Insert the new cartridge into the
top of the water tank. Push the
cartridge down, ensuring the
water-outlet rests in the recess
on the water tank.
6
Insert the tank into the base unit,
ensuring that it latches securely
into place.
Resetting the Anti-calc system
after replacing the cartridge
The cartridge will contain a
small amount of water. Keep
the cartridge tilted upwards to
minimise dripping from the
connecting tube.
3
5
9
1
Switch off and unplug the steam
generator at the mains supply.
2
Whilst pressing and holding the
Power on/off button and the
Steam level selector, plug the
steam generator back into the
mains supply.
3
Release both buttons.
4
This will reset the Anti-calc
system and the ‘change
cartridge’ indicator will turn off.
9
FABRIC CHART
10
If the ironing instructions are missing from the garment, but you know the type of
fabric, the following table may help you.
Note:
This symbol means the item of clothing should not be
ironed (e.g. chlorofibre, elastodiene)
Label
Textile
Synthetic
Fibre
Acetate
Acetate
Modacryl
Polypropylene
Polyamide (Nylon)
Synthetic
Polyurethane
Synthetic
Triacetate
Metallized
Cupro
Temperature
●
●●
●●
Silk
Wool
All types
●●
Cotton
●●●
(Steam or Dry)
Linen
Please note that this table is for guidance only, always follow instructions on
garments.
10
CARE AND CLEANING
Care and Cleaning
CAUTION!
Do not use harsh abrasives,
chemical cleaners, or
solvents to clean the exterior
of your iron, as these will
damage the surface.
WARNING!
Disconnect the unit from the
electrical mains before
cleaning.
Cleaning the Stainless Steel
Soleplate
NOTE:
We do not recommend the
addition of starches,
conditioners, proprietary
fabric fragrances or any other
chemicals to the water tank.
Such products can impair the
performance of your steam
generator.
Allow the soleplate to cool fully before
using a stainless steel or metal
cleaner, then rub gently with a damp
cloth and wipe dry.
Caution: Do not use scouring pads,
abrasive or harsh cleaners to clean
the soleplate of your iron, as these will
scratch and damage the surface.
Cleaning the Steam holes
To remove build-up from the steam
holes, which may affect steam
performance, use a cotton wool tip
moistened in methylated spirit. Wipe
over with a damp cloth.
Cleaning the Exterior
To clean the exterior of your iron, wipe
over with a damp soft cloth and wipe
dry. Ensure the soleplate is dry.
11
11
STORAGE
12
Storage
1
Always allow the iron to cool fully on the iron rest before storing away.
2
Once the iron is cool, empty the water tank and store the iron in a cool, dry,
safe place out of the reach of children. NEVER wrap the cord around the
iron, but store it coiled safely by the side of the iron. Ensure that the cord
doesn't overhang any work surface and poses no hazard.
12
HINTS AND TIPS
Cotton: iron slightly damp on the right side with a hot iron.
Linen: iron damp on the right side with a hot iron.
Silk:
iron slightly damp on the right side with a warm iron.
Wool (knitted): iron dry or nearly dry on the wrong side with a warm iron or
steam.
Acrylic: iron on the wrong side with a cool iron. Do not use steam or a damp
cloth as this could cause stretching.
Nylon or Polyester: iron nearly dry on the wrong side with a cool iron to prevent
glazing.
Acetate: iron evenly damp on the wrong side with a cool iron.
How to avoid shine or iron marks
•
Use a well padded ironing board (especially for wool).
•
Iron garments inside out whenever possible.
•
Use a press cloth such as a clean pillow case. For some fabrics, e.g. wool,
use steam or press with a slightly damp cloth, using light pressure.
•
Always iron delicate fabrics, inside out on a low temperature setting.
•
Keep the iron moving.
Ironing does not need to be tiring
•
Stand upright when ironing and always adjust the ironing board to the
correct height (the iron handle should be at the same level as your elbow).
Experiment until you find the position that suits you best.
•
Keep your elbow over the ironing board and only move your lower arm when
ironing. If you move the iron slowly it is less tiring.
•
Allow the weight of the iron to do the work, do not press down unnecessarily.
13
13
HINTS AND TIPS
14
General Advice
WARNING!
Take care to avoid skin coming into contact with the iron’s soleplate
or steam.
Sort your washing into different temperature groups before you start ironing.
Start with the low temperature items then work your way up to those which
require a higher temperature.
Take great care when ironing clothing fitted with zips or metal studs, to avoid
scratching the soleplate.
If you are in any doubt about ironing a delicate/unusual fabric, always refer to the
garment label, iron at a low temperature and test an inconspicuous area first if
possible.
Ensure that the soleplate is clean before ironing.
Do not iron the front of t-shirts and sweatshirts which have screen-printed or
embossed graphics. Always iron inside-out on a low temperature to avoid
damage.
Avoid ironing over buttons - iron around them. Use a teaspoon to protect very
delicate fabric covered or ‘designer’ buttons.
Place embroidered items face down on a towel and iron gently on the reverse to
avoid crushing the embroidery.
Always iron collars from tip to seam to avoid pulling creases to the tip.
To minimise creasing, allow freshly ironed clothes to cool completely before
wearing, or storing away.
Always iron dark linen on the wrong side only to avoid marking.
When ironing sheets or tablecloths, you will achieve the best results if you can
set up your ironing board in front of a large table. Commence with the fabric at
your feet and, as each section is ironed, push it back onto the table. This will
minimise creasing and make the fabric much easier to handle. For best results,
iron tablecloths immediately before use to avoid creasing during storage.
14
HINTS AND TIPS
Velvets
Velvet should be ironed in one direction only, and with a light pressure. Always
keep the iron moving. To help raise the nap, finish by holding the steam iron
above the fabric and allow the steam to penetrate without applying pressure.
Finally, shake or brush the fabric gently.
Polyester
Polyester has a very low melting point, always use a low temperature and press
gently through a cotton cloth. If you iron fabrics made of a blend of fibres, set the
temperature dial for the most delicate fibre. Never use the burst of steam on
silks or synthetics.
Lined Garments
Remember that a garment lining may require a different temperature to the
exterior fabric. Always start with a very low temperature and keep the iron
moving. Test in an inconspicuous area first if possible.
15
15
REPLACEMENT PARTS
16
For replacement parts, phone our Customer Service Department on 0161 621
6900. They will give you up to date prices, inclusive of VAT and Postage &
Packaging.
You may then: Send a cheque or postal order from the correct amount,
payable to Pulse Home Products Ltd, with one of the order forms printed
below (or a copy) to our Customer Service Department.
PLEASE COMPLETE THIS FORM IN BLOCK CAPITALS
Your name:
Your address:
Postcode:
Product:
Part No:
Description
VIN067/IR70/72
91208
Cartridge
I enclose a cheque for £
in full payment.
16
Quantity
IMPORTANT INSTRUCTIONS
Please read these instructions before operating this appliance and retain for future use.
This product is not suitable for use by children, and may not be suitable for persons requiring
supervision unless they receive instruction by a competent person on how to safely use the
product.
ALWAYS
✔ Always ensure hands are dry before
handling the plug or switching on the
appliance.
✔ Always ensure base unit is placed on
a secure dry level surface.
✔ Always iron only on an ironing board.
✔ Always turn off the power and unplug
from the socket when not in use, before
filling the water tank and before cleaning.
✔ Always empty the water tank after use.
✔ Always allow to cool before cleaning
and storing.
✔ Always remove the water tank to fill.
✔ Always carry out regular checks of the
supply cord and hot water pipe to ensure
no damage is evident. Should there be
any signs that they are damaged in the
slightest degree, the entire appliance
should be returned to the Customer
Service Department.
✔ Always return the appliance after a
malfunction, or if it has been damaged
in any manner to the Customer Service
Department for examination, repair or
adjustment as special purpose tools
are required.
✔ Always take care, this product
generates high temperature steam and
hot water.
CAUTION: THIS APPLIANCE
GENERATES HEAT DURING USE.
PROPER PRECAUTIONS MUST BE
TAKEN TO PREVENT THE RISK OF
SCALDS, BURNS, FIRES OR OTHER
DAMAGE TO PROPERTY.
NEVER
✘ Never use this appliance outdoors.
✘ Never use this appliance for other than
intended use. This appliance is for
household use only.
✘ Never immerse the iron, base console or
cordset and plug in water or any other
liquid to protect against electrical hazards.
✘ Never use harsh, abrasive or caustic
cleaners to clean any part of this appliance.
✘ Never add perfumes, vinegar or liquids
other than water into the water tank
✘ Never fill the water tank above the ‘Max’
mark.
✘ Never use without the anti-calc cartridge
in place.
✘ Never allow children to use this appliance.
✘ Never leave a hot iron within reach of
children. Close supervision is necessary
when the appliance is used near children.
✘ Never allow children to handle the anticalc cartridge, keep away from children at
all times.
✘ Never leave the appliance unattended
when in use or whilst plugged into the
socket.
✘ Never let cordset or hot water pipe hang
over the edge of a table or counter, touch
hot surfaces or become knotted or kinked.
✘ Never place this appliance on or near a hot
gas or electric burner or where it could
touch a heated oven or microwave oven.
Do not place on top of any other appliance
✘ Never touch hot surfaces, use the handle.
✘ Never iron over sharp objects such as
buttons, studs, and zippers as these could
scratch the soleplate
✘ Never operate the appliance with a
damaged cord, plug or hot water pipe,
after an appliance malfunction or if it has
been damaged in any manner
✘ Never touch the soleplate of the iron – it
may still be hot.
✘ Never touch the iron rest during or just
after ironing, heat is generated during use.
✘ Never wind the cord around the soleplate
or base console.
✘ Never attempt to open the appliance or
dismantle, there are no user-serviceable
parts inside.
17
17
18
CONNECTING TO THE POWER
When using electrical appliances, basic safety precautions should always
be followed.
WARNING: THIS APPLIANCE MUST BE EARTHED
If this appliance is fitted with a rewirable BS1363, 13 amp plug, the fuse should
be rated at 13 amps and be ASTA approved to BS1362. However if the plug is
unsuitable, it should be dismantled and removed from the supply cord and an
appropriate plug fitted as detailed below.
If this appliance is fitted with a moulded BS1363 13 amp plug, the fuse should
be rated at 13 amps and be ASTA approved to BS1362. If the fuse in a nonrewirable plug needs to be changed, the fuse cover must be refitted. The
appliance must not be used without the fuse cover fitted.
In the event of the plug being unsuitable, it should be changed and an
appropriate plug fitted as detailed below. If you remove the plug it must not be
connected to a 13 amp socket and the plug must be disposed of immediately.
As the colours of the wires in the mains lead of this appliance may not
correspond with the coloured markings identifying the terminals in your plug,
proceed as follows:
The wires of the mains lead are coloured in accordance with the following code:
GREEN & YELLOW = EARTH
BLUE = NEUTRAL BROWN = LIVE
The wire which is coloured GREEN & YELLOW must be connected to the
terminal in your plug which is marked with an E or by the EARTH SYMBOL
coloured GREEN or GREEN & YELLOW.
or
The wire which is coloured BLUE must be connected to the terminal in your plug
which is marked with the letter N or coloured BLACK.
The wire which is coloured BROWN must be connected to the terminal in your
plug which is marked with the letter L or coloured RED.
If any other plug is used, a 13 amp fuse must be fitted either in the plug or
adaptor or at the distributor board.
GREEN & YELLOW
(earth)
E
L
13 AMP FUSE
BLUE
(neutral)
N
BROWN
(live)
Make sure that the outer sheath of the cable
is firmly held by the cable clamp.
18
AFTER SALES SERVICE
These appliances are built to the very highest of standards. There are no userserviceable parts. Follow these steps if the unit fails to operate:
1
Check instructions have been followed correctly.
2
Check fuse has not blown.
3
Check mains supply is functional.
If the appliance will not operate, return the appliance to the place it was
purchased for a replacement. To return the appliance to the Customer Service
Department, follow the steps below:
1
Pack it carefully (preferably in the original carton). Ensure unit is clean.
2
Enclose your name and address and quote the model number on all
correspondence.
3
Give the reason why you are returning it.
4
If within the guarantee period, state when and where it was purchased and
include proof of purchase (e.g. till receipt).
5
Send it to our Customer Service Department at the address below:
Customer Service Department
Pulse Home Products Limited
Middleton Road
Royton
Oldham
OL2 5LN, UK.
Telephone: 0161 621 6900 Fax: 0161 626 0391
e-mail: [email protected]
19
19
GUARANTEE
This product is guaranteed for a period of 1 year from the date of purchase
against mechanical and electrical defects.
This guarantee is only valid if the appliance is used solely for domestic
purposes in accordance with the instructions provided, that it is not connected to
an unsuitable electricity supply, dismantled or interfered with in any way or
damaged through misuse. Under this guarantee we undertake to repair or
replace free of charge any parts found to be defective.
Nothing in this guarantee or the instructions relating to the product excludes,
restricts or otherwise affects your statutory rights.
In line with our policy of continuous development, we reserve the right to change
this product, packaging and documentation without notice.
This product is manufactured to comply with the radio interference requirements
of EEC directive 93/68 EEC.
Vine Mill, Middleton Road, Royton, Oldham, OL2 5LN, UK.
www.breville.co.uk
Breville is a registered trademark of Pulse Home Products Limited
© Pulse Home Products Limited
92532-3
VIN067/IR70/IR72_Rev4_07/08