1
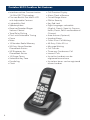
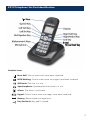
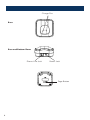
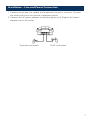
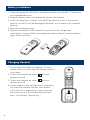
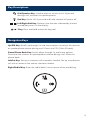
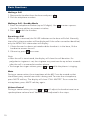
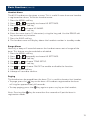
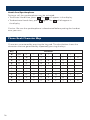
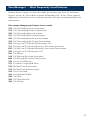
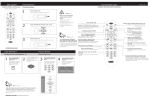
1
Instruction Manual
CORTELCO 8012 Cordless Telephone Set / DECT 6
Table of Contents
Why VoiceManagerSM with Cortelco Phones?......................................................... 2
Cortelco 8012 Cordless Set Features....................................................................... 3
Telephone Set Part Identification.............................................................................. 4
Installation — Line and Power Connection............................................................... 6
DSL Interference......................................................................................................... 6
Battery Installation...................................................................................................... 7
Charging Handset...................................................................................................... 7
Key Descriptions......................................................................................................... 8
Navigation Key............................................................................................................ 8
Basic Functions............................................................................................................ 9
Phone Book Characters........................................................................................... 15
Format/Setting Date and Time................................................................................ 16
Three-way Conference Call..................................................................................... 16
VoiceManager — Feature Descriptions................................................................... 17
VoiceManager — Most Frequently Used Features................................................. 18
Voice Portal................................................................................................................ 19
Voice Mail.................................................................................................................. 19
Troubleshooting Guide............................................................................................ 20
2
Cortelco 8012 / Cordless Telephone Set / DECT 6
Why VoiceManagerSM with Cortelco Phones?
• Total cost of ownership savings with Cox
• Total flexibility to meet your business needs
• One vendor to call to support voice and equipment needs
• Cox Business VoiceManager has more features than most phone systems
• VoiceManager features are NETWORK-BASED
- Can be accessed from anywhere (Voice Portal and My Account control)
- Most features can be controlled from the sets with /# codes (see page 18)
- Customer benefits from feature upgrades on VoiceManager platform
- Our strongest feature solutions are:
- Business continuity
- Personal mobility
*
3
Cortelco 8012 Cordless Set Features
• Interference-free Communication
1.8 GHz DECT Technology
• Five-row Backlit Dot Matrix LCD
with Adjustable Contrast
• Lighted Key Pad
• Speakerphone
• Receiver/Speaker/Ringer
Volume Control
• Tone/Pulse Dialing
• Flash with Selectable Timing
• Pause
• Mute
• 10 Number Redial Memory
• 50 Entry Name/Number
Phonebook Entries
• VIP Ringtones for
Phonebook Entries
• 10 Ringer Tones
• Selectable Key Tone
• Pre-dialing
• Clock
4
• Call Duration Display
• Alarm Clock w/Snooze
• Out-of-Range Alarm
• PIN for Security
• Key Pad Lock
• Eight Languages selectable
(English, French, Spanish, German,
Italian, Dutch, Polish and traditional
Chinese)
• Auto Answer (Optional)
• Handset Name
• Caller ID on Call Waiting
• 40 Entry Caller ID List
• Message Waiting
• Call Transfer
• Three-way Conference Call
• Internal Calls
• Up to five handsets can be
registered to one base
• Up to four bases can be registered
to one handset
8012 Telephone Set Part Identification
Ear Piece
Down/
Phone Book Key
Handset Icons
New Call: One or more calls have been received.
MSG Waiting: One or more voice messages have been received.
Off Hook: The line is in use.
Speakerphone: Speakerphone function is in use.
Alarm: The alarm is activated.
Signal: One or more voice messages have been received.
Battery: Shows battery charge level.
Key Pad Lock: Key pad is locked.
5
Charge Pins
Base
Rear and Bottom Views
Phone Line Jack
Power Jack
Page Button
6
Installation — Line and Power Connection
1. Connect the phone line cord to the telephone line jack in the base. Connect
the other end of the line cord to a telephone outlet.
2. Connect the AC power adapter to the base power jack. Plug the AC power
adapter into an AC outlet.
To phone wall outlet
To AC wall outlet
7
Battery Installation
1. Two rechargeable Ni-MH AAA size batteries come with the 8012. These must
be installed before use.
2. Slide the battery cover in the direction shown and remove.
3. Install the batteries as shown. Care MUST be taken to install in the correct
polarity. The 8012 may be damaged if batteries are inserted in the incorrect
polarity.
4. Reinstall the battery cover.
5. Replace the batteries when they fail to return to a full charge after
recharging. Use only Ni-MH rechargeable batteries. Never use other battery
types such as alkaline.
Charging Handset
1. The handset should be charged for 15 hours
before initial use. To charge the handset, place it
in the base.
2. To turn the handset off, press
until the
display turns off.
3. To turn the handset on, press
until the
display turns off.
4. If the handset is able to find a base, the display
will show the handset number, the handset
name (if one is assigned), the signal icon and
the current time. If the handset cannot find a
base, it will display “Searching ...”
8
Key Descriptions
Dial/Speaker Key: Used to place or answer a call. If pressed
during a call, activates the speakerphone.
End Key: End a call. If pressed and held, handset will power off.
Left/Right Soft Key: Performs the function indicated by the text
immediately over it in the display.
*Key: Press and hold to lock the key pad.
Navigation Keys
Up/CID Key: Scrolls up through list and menu options. Increases the receiver
or speakerphone volume during a call. Enters the CID (Caller ID book).
Down/Phone Book Key: Scrolls down through list and menu options.
Decreases the receiver or speakerphone volume during a call. Enter the
phone book.
Left/Int Key: Set up an intercom call to another handset. Set up a conference
call with an external line and an intercom handset.
Right/Redial Key: Enter the redial book. Insert a pause when pre-dialing.
9
Basic Functions
Making a Call
1. Remove the handset from the base and press
2. Dial the telephone number.
Making a Call – Standby Mode
1. Enter the telephone number (up to 32 digits). Use
Use the Erase soft key to correct mistakes.
2. Press
to dial the number.
.
to enter a pause.
Receiving a Call
When a call is received, the IN USE indicator on the base will blink. Normally,
the caller’s phone number will be displayed. If the caller cannot be identified,
only the NEW CALL information will display.
1. If Auto Answer has been activated and the handset is in the base, lift the
handset to answer the call.
2. Otherwise, press
to answer.
Note:
• After the call is terminated, the display will show the call duration. If a
polyphonic ringtone is set, the ringtone may continue for up to four seconds
after the call is answered at another phone.
• To change the ringer volume, press
or
while the phone is ringing.
Mute
During a conversation, the microphone of the 8012 can be muted so that
the distant party cannot hear what is being said. To mute the microphone,
press MUTE soft key. The display will show “CALL MUTED”. To un-mute the
microphone, press MUTE soft key again.
Volume Control
During a conversation, pressing
or
will adjust the handset receiver or
speakerphone volume level. Volume can be adjusted in five steps.
10
Basic Functions (cont’d)
Message Waiting
• If a voice message is received, the display will show the
icon and
“MSG WGT ON”.
• To deactivate the
icon, press the
key in standby mode, then press and
hold the 4 key. Finally, press
to return to standby mode.
“MSG WGT ON”.
Ringer Settings
Perform the following steps to change the ringer tone or volume. These
settings can apply to either external calls (from the telephone company) or
internal calls (from other handsets registered to the same base).
1.Press the MENU soft key.
2.Press
or
to choose Handset Settings.
3. Press the SELECT soft key.
4.Press
or
to choose Ring Setup.
5.Press the SELECT soft key.
6.Press the SELECT soft key to choose INT RING, or press the
to choose
EXT RING.
7.Press the SELECT soft key.
8.Press
or
to choose MELODY or VOLUME.
9.Press the SELECT soft key.
10.Choose the desired ring tone (1 to 10) or desired volume (1 to 5 or off).
The 8012 will play the selected melody or volume level.
11.Press the SAVE soft key to confirm.
Last Number Redial
1. Press
or the REDIAL soft key in standby mode. The display will show the
last number dialed.
2. Press
to dial the number.
11
Redial Book
The 8012 can also retrieve the last 10 numbers dialed and redial them.
1. Press
or
to scroll through the list of numbers until the desired
number is displayed.
2. Press
to dial the number.
Redial Book Options
Redial Book Options allow a number to be added to the phone book or
deleted from the redial book.
1. Press the REDIAL soft key in standby mode.
2. Press
or
to scroll through the list of numbers until the desired
number is displayed.
3. Press the MOVE soft key to choose the desired option. ADD to PB allows
the number to be added to the phone book. DELETE removes the selected
number from the redial book. DELETE ALL removes all numbers from the
redial book. If DELETE or DELETE ALL are selected, the display will show
“Confirm?”. To confirm, press the DEL or DEL ALL soft key. To cancel, press
the CANCEL soft key.
Caller ID Functions
• When a call is received, the 8012 will normally display the name and number
of the caller. If the caller has chosen to prevent his information from being
transmitted, the display will show “PRIVATE”. If information cannot be
received for some other reason, the display will show “OUT OF AREA”.
• If call is missed, the
icon will show on the display. If the Caller ID memory
is full, the
icon will flash.
Review Call ID Records
1. Press the MENU soft key.
2. Using the SELECT soft key, choose the CID Book. CID numbers will be
displayed. The CID Book may also be accessed by pressing
in standby
mode.
3. Use
or
to review the numbers. Each number that has been reviewed
is marked with
. Calls that have not been reviewed are marked with
.
12
Basic Functions (cont’d)
Dial from CID
Follow the steps for reviewing Caller ID Records. When the desired number is
displayed, press
to dial.
Add CID Number to Phone Book (PB)
1.Press the MENU soft key.
2.Using the SELECT soft key, choose the CID Book.
3.Use
or
to review the numbers.
4.When the desired number is displayed, press the MENU soft key to enter
the ADD to PB menu.
5.Press the SELECT soft key. A prompt for the name will appear.
6.Enter the name and press the NEXT soft key.
7.Enter the number, if necessary.
8.Press the NEXT soft key.
9.Select the ring tone (1 to 10).
10.Press the SAVE soft key. A beep will sound to confirm.
Delete a CID Number
1. Press the MENU soft key.
2. Using the SELECT soft key, choose the CID Book.
3. Use
or
to review the numbers.
4. When the desired number is displayed, press the MORE soft key.
5. Use
or
to choose DELETE.
6. Press the SELECT soft key.
7. When the display shows “CONFIRM?”, press the DEL soft key.
8. A beep will sound to confirm and the next number will be displayed.
Delete All CID Numbers
1. Press the MENU soft key.
2. Using the SELECT soft key, choose the CID Book.
3. Press the MORE soft key.
4. Use
or
to choose DELETE ALL.
5. Press the SELECT soft key.
6. When the display shows “CONFIRM?”, press the DEL ALL soft key.
7. A beep will sound to confirm and the 8012 will return to standby mode.
13
Caller ID on Call Waiting
This service allows the number of a calling party to be displayed while on
another call. When the number of the second caller is displayed, press the
FLASH soft key to answer. To return to the first caller, press the FLASH soft key.
Key Lock
Activating this feature causes the key pad to be disabled, but allows calls to be
answered.
• To lock keys in the standby mode, press
until the display shows HS
LOCKED. The key icon will also appear.
• To unlock keys in the standby mode, press
until the key icon disappears.
Auto Answer
Activating Auto Answer allows calls to be answered by simply removing the
handset from the base. To activate Auto Answer:
1. Press the MENU soft key.
2. Press
or
repeatedly to choose HS SETTINGS.
3. Press the SELECT soft key.
4. Use
or
to choose AUTO ANSWER.
5. Press the SELECT soft key.
6. Press
or
to choose ON/OFF to enable or disable the function.
7. Press the SAVE soft key.
8. A beep will sound to confirm.
Language
The 8012 supports eight languages: English, Spanish, German, Italian, Dutch,
Polish and Traditional Chinese. To select a language:
1. Press the MENU soft key.
2. Press
or
repeatedly to choose HS SETTINGS.
3. Press the SELECT soft key.
4. Use
or
to choose LANGUAGE.
5. Press the SELECT soft key.
6. Press
or
to choose ON/OFF to enable or disable the function.
7. Press the SAVE soft key.
8. A beep will sound to confirm.
14
Basic Functions (cont’d)
Handset Name
The 8012 handset can be given a name. This is useful if more than one handset
is registered to a base. To set the handset name:
1. Press the MENU soft key.
2. Press
or
repeatedly to choose HS SETTINGS.
3. Press the SELECT soft key.
4. Use
or
to choose HS NAME.
5. Press the SELECT soft key.
6. Enter the name (up to 12 characters) using the key pad. Use the ERASE soft
key to correct any mistakes.
7. Press the SAVE soft key.
8. The handset name will display above the handset number in standby mode.
Range Alarm
Normally a beep will sound whenever the handset moves out of range of the
base. This feature may be enabled or disabled.
1. Press the MENU soft key.
2. Press
or
repeatedly to choose HS SETTINGS.
3. Press the SELECT soft key.
4. Use
or
to choose TONE SETUP.
5. Press the SELECT soft key.
6. Use
or
to choose ON/OFF to enable or disable the function.
7. Press the SAVE soft key.
8. A beep will sound to confirm.
Paging
The handset can be paged from the base. This is useful to locate a lost handset.
• To page, press the
key on the base. All handsets registered to the base
will ring for approximately 60 seconds.
• To stop paging, press the
key again or press any key on the handset.
Note: Pressing the
registration mode.
.
key for more than five seconds will put the base in
15
Hands-free/Speakerphone
During a call, the speakerphone may be activated:
• To activate Hands-free, press
. The
will appear in the display.
• To deactivate Hands-free, press
again. The
will disappear in
the display.
Caution: Be sure the speakerphone is deactivated before putting the handset
near your ears.
Phone Book Character Map
Characters are entered by pressing the key pad. The chart below shows the
characters that are generated by repeatedly pressing the keys.
Key
0
16
Character
spc
0
?
&
1
1
2
A
3
4
/
.
,
!
@
_
+
-
B
C
a
b
“
(
)
%
c
2
D
E
F
d
e
f
3
G
H
I
g
h
i
4
s
7
z
9
5
J
K
L
j
k
l
5
6
M
N
O
m
n
o
6
7
P
Q
R
S
p
q
r
8
T
U
V
t
u
v
8
9
W
X
Y
Z
w
x
y
Format/Setting Date and Time
1. Press the MENU soft key.
2. Press
or
repeatedly to choose HS SETTINGS.
3. Press the SELECT soft key.
4. Use
or
to choose Date and Time Menu.
5. Press the SELECT soft key.
6. Use
or
to choose Date Format or Time Format.
7. Press the SAVE soft key.
8. Press
or
to select Date Format (DD-MM/MM-DD) or the Time Format
(12 HOUR/24 HOUR). Enter the current Date/Time with the key pad. Time
must be entered in 24-hour format even if the display is set for 12-hour format.
7. Press the SAVE soft key to confirm and exit.
Three-way Conference Call
A conference call may be established between two handsets and one external
caller:
1. During the external call, press
.
2. Enter the number of the handset to add to the conference call.
3. Press
to answer the call.
4. Press
at the calling handset to establish the conference.
3. Press
at either of the internal handsets to leave the call. Note that the
other handset will remain connected to the call.
17
VoiceManager – Feature Descriptions
SM
Call Forward Activation
1. Lift telephone handset. Press the assigned code (ex. *72).
2. Enter phone number to which calls will be forwarded.
3. Replace telephone handset. The Call Forwarding Always service is on.
Call Forward Deactivation
1. Lift telephone handset. Press the assigned code (ex. *73).
2. Replace telephone handset. The Call Forwarding Always service is off.
For Call Forward Always, Busy and No Answer, use above.
Call Forwarding No Answer Activation (*92)
Route incoming calls to another number or voice mail whenever you are
unable to answer your extension.
Call Forwarding No Answer Deactivation (*93)
Call Pickup (*98)
Allows a user to answer any ringing extension within their group from their own
phone. The group administrator defines group member.
Call Park (*68)
Allows a user to hold a call and retrieve it from any extension within the group.
Call Park Retrieve (*88)
Allows a user to retrieve a call parked from any extension.
Do Not Disturb Activation (*78)
All incoming calls are referred to a message that says, “The number you have
dialed is not taking calls at this time.” Callers are provided an option to go to
voice mail.
Do Not Disturb Deactivation (*79)
18
VoiceManager — Most Frequently Used Features
SM
Feature Access Codes lists the star codes for services you have. To activate a
service, hit the “ ” key and the number followed by the “#” key. Some require
additional information such as a phone number, but you are prompted for that
information.
*
You cannot change your feature access code.
*72 Call Forwarding Always Activation
*73 Call Forwarding Always Deactivation
*90 Call Forwarding Busy Activation
*91 Call Forwarding Busy Deactivation
*92 Call Forwarding No Answer Activation
*93 Call Forwarding No Answer Deactivation
*67 Calling Line ID Delivery Blocking per Call
*31 Calling Line ID Delivery Blocking – Persistent Activation
#31 Calling Line ID Delivery Blocking – Persistent Deactivation
*65 Calling Line ID Delivery per Call
*69 Call Return
*43 Call Waiting Persistent Activation
#43 Call Waiting Persistent Deactivation
*70 Cancel Call Waiting
*57 Customer Originated Trace
*78 Do Not Disturb Activation
*79 Do Not Disturb Deactivation
*22 Flash Call Hold
*66 Last Number Redial
*68 Call Park
*88 Call Park Retrieve
*98 Call Pickup
19
Voice Portal
Access the VoiceManager Voice Portal from any phone. The Voice Portal allows
you to make changes to your call forwarding and initiate outbound calls that
appear to originate from your office.
First Time Setup
1. Initial setup must be done from your VoiceManagerSM telephone line.
2. Dial 9999# to reach the Voice Portal from your office.
3. When prompted, set up your pass code and record your name.
4. Follow the prompts to set up call forwarding, change your status manager or
initiate a call.
Voice Mail
Your initial setup must be done from your Cox Telephone line. If you have
Caller ID block on your line, you will need to press * 6 7 prior to dialing
the number to disable this feature for the initial setup call.
Initial Setup
1. From your office phone associated with voice mail, dial the voice mail access number for your area (see below).
2. Follow the prompts. When prompted for your password, enter your
temporary password, which is “269266” or “COXCOM”.
3. After entering your temporary password, you will hear a greeting “Welcome
to your mailbox...”. Follow the prompts for a step-by-step tutorial to
personalize your voice mail box and create a new password.
Creating Your Password
Once you begin the tutorial, you will be prompted to create your own
password. Your password can be between four to seven digits in length.
Try to create a new password that is easy to remember, but not easily guessed
by others.
Take these steps to avoid unauthorized users from entering your mailbox.
1. Avoid using repetitive numbers (4444, 99999) or sequential numbers (12345, 2468).
2. Avoid using the last four digits of your phone number.
3. Change your password regularly.
20
Voice Mail Access Numbers
480-699-6245602-795-6245
623-322-6245928-252-6245
Tucson – 520-702-7000
Benson – 520-720-6245
Casa Grande – 520-235-6245
Sierra Vista – 520-335-6245
Troubleshooting Guide
Phone Does Not Operate
1. Power adapter is disconnected.
2. Line cord is disconnected at telephone outlet or at telephone. Test the
telephone in a different wall jack. If it works, the first jack may be defective.
3. Batteries are discharged.
4. Batteries are improperly installed.
Blank Screen
1. Batteries are discharged.
2. Batteries are improperly installed.
3. Handset is turned off.
Short Battery Life
1. Base charging contacts are dirty or damaged.
2. Wrong type of batteries used.
3. Batteries may need to be replaced.
Callers Are Not Displayed on Screen
1. Verify that you have subscribed to the appropriate service (Caller ID and
Call Waiting Caller ID) from Cox Business. If you only subscribed to Caller ID
service, the unit will not display call waiting caller ID information.
2. Check if your answering machine is set to answer before two rings.
No Caller Information Is Displayed with the Call Waiting Beep
Verify that you have subscribed to Call Waiting Caller ID service from
Cox Business.
We encourage you to disconnect all the telephone cords and adapter; then
reinstall the unit step by step per the instruction manual before you ask for
service.
Reporting Trouble
For help, please contact Cox Business Customer Care at 623-322-2000.
21
coxbusiness.com
Customer Care – 623-322-2000
Please refer to the Cortelco Owner’s Instruction Manual that came with your
phone for Important Safety Instructions, FCC Information, Telephone Repair
and Limited Warranty Information.
22
Service and features not available in all areas. Some features may incur local usage charges in certain markets.
Long distance rates will vary. Telephone modem equipment required. Modem uses electrical power to operate
and has backup battery power provided by Cox if electricity is interrupted. Telephone service including access
to e911 services will not be available during an extended power outage or if modem is moved or inoperable.
Telephone services are provided by Cox Arizona Telcom, LLC. ©2011 CoxCom Inc., d/b/a Cox Communications
Phoenix, Inc. All rights reserved.