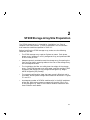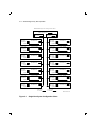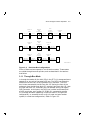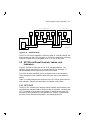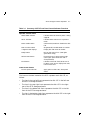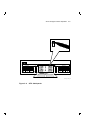
1
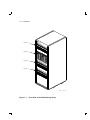
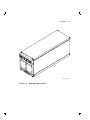
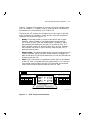
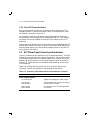
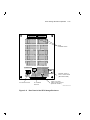
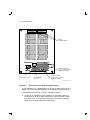
SF72 Storage Enclosure
and SF200 Storage Array
Owner’s Manual
Order Number EK–SF72S–OM–001
Digital Equipment Corporation
First Edition, January 1991
The information in this document is subject to change without notice and should not
be construed as a commitment by Digital Equipment Corporation. Digital Equipment
Corporation assumes no responsibility for any errors that may appear in this document.
Restricted Rights: Use, duplication, or disclosure by the U. S. Government is subject to
restrictions as set forth in subparagraph ( c ) ( 1 ) ( ii ) of the Rights in Technical Data and
Computer Software clause at DFARS 252.227–7013.
Copyright © Digital Equipment Corporation 1991
All Rights Reserved.
Printed in U.S.A.
The postpaid Reader’s Comment Card included in this document requests the user’s
critical evaluation to assist in preparing future documentation.
FCC NOTICE: The equipment described in this manual generates, uses, and may emit
radio frequency energy. The equipment has been type tested and found to comply with
the limits for a Class A computing device pursuant to Subpart J of Part 15 of FCC
Rules, which are designed to provide reasonable protection against such radio frequency
interference when operated in a commercial environment. Operation of this equipment in
a residential area may cause interference, in which case the user at his own expense may
be required to take measures to correct the interference.
dt
The following are trademarks of Digital Equipment Corporation:
DEC
DECUS
DSSI
KFMSA
MSCP
PDP
TMSCP
UNIBUS
VAX
VAX 6000
VMS
XMI
This document was prepared and published by Educational Services Development and
Publishing, Digital Equipment Corporation.
Contents
About This Manual
1
v
Introduction
1.1
1.2
1.3
SF200 Storage Array Overview . . . . . . . . . . . . . . . . . . . . . . .
SF72 Storage Enclosure Overview . . . . . . . . . . . . . . . . . . . . .
Related Documentation . . . . . . . . . . . . . . . . . . . . . . . . . . . . .
2
SF200 Storage Array Site Preparation
3
SF72 Storage Enclosure Operation
3.1
3.1.1
3.1.2
3.2
3.2.1
3.2.2
3.3
3.4
3.5
3.6
SF72 Configurations . . . . . . . . . . . . . . . . . . . . . . .
Through-Bus Mode . . . . . . . . . . . . . . . . . . . . . . .
Split-Bus Mode . . . . . . . . . . . . . . . . . . . . . . . . .
SF72 Front Panel Controls, Labels, and Indicators
SF72 OCP . . . . . . . . . . . . . . . . . . . . . . . . . . . . .
Drive DC Power Switches . . . . . . . . . . . . . . . . .
SF72 Rear Panel Controls and Indicators . . . . . . .
Applying Power to the Enclosure . . . . . . . . . . . . . .
Placing a Disk ISE On-Line . . . . . . . . . . . . . . . . . .
Taking a Disk ISE Off-Line . . . . . . . . . . . . . . . . . .
.
.
.
.
.
.
.
.
.
.
.
.
.
.
.
.
.
.
.
.
.
.
.
.
.
.
.
.
.
.
.
.
.
.
.
.
.
.
.
.
.
.
.
.
.
.
.
.
.
.
.
.
.
.
.
.
.
.
.
.
.
.
.
.
.
.
.
.
.
.
.
.
.
.
.
.
.
.
.
.
1–1
1–4
1–8
3–1
3–3
3–4
3–5
3–5
3–12
3–12
3–15
3–16
3–16
iii
iv Contents
4
4.1
4.2
Troubleshooting
Verifying a Hardware Problem . . . . . . . . . . . . . . . . . . . . . . . .
Recovering from a Disk ISE Fault Condition . . . . . . . . . . . . .
4–1
4–5
Glossary
Index
Figures
1–1
1–2
2–1
2–2
3–1
3–2
3–3
3–4
3–5
3–6
3–7
3–8
4–1
4–2
Front View of the SF200 Storage Array . . .
SF72 Storage Enclosure . . . . . . . . . . . . . . .
Single-Host System Configuration Sheet . .
Dual-Host System Configuration Sheet . . .
Single-Host Bus Configurations . . . . . . . . .
Dual-Host Bus Configurations . . . . . . . . . .
Through-Bus Mode . . . . . . . . . . . . . . . . . . .
Split-Bus Mode . . . . . . . . . . . . . . . . . . . . .
Front View of the SF72 Storage Enclosure .
SF72 Switchpacks . . . . . . . . . . . . . . . . . . .
SF72 Controls and Indicators . . . . . . . . . . .
Rear Panel of the SF72 Storage Enclosure .
Rear Panel of the SF72 Storage Enclosure .
Front Panel of the SF72 Storage Enclosure
.
.
.
.
.
.
.
.
.
.
.
.
.
.
.
.
.
.
.
.
.
.
.
.
.
.
.
.
.
.
.
.
.
.
.
.
.
.
.
.
.
.
.
.
.
.
.
.
.
.
.
.
.
.
.
.
.
.
.
.
.
.
.
.
.
.
.
.
.
.
.
.
.
.
.
.
.
.
.
.
.
.
.
.
.
.
.
.
.
.
.
.
.
.
.
.
.
.
.
.
.
.
.
.
.
.
.
.
.
.
.
.
.
.
.
.
.
.
.
.
.
.
.
.
.
.
.
.
.
.
.
.
.
.
.
.
.
.
.
.
.
.
.
.
.
.
.
.
.
.
.
.
.
.
.
.
.
.
.
.
.
.
.
.
.
.
.
.
.
.
.
.
.
.
.
.
.
.
.
.
.
.
. 1–2
. 1–5
. 2–2
. 2–3
. 3–2
. 3–3
. 3–4
. 3–5
. 3–6
. 3–9
. 3–11
. 3–13
. 4–2
. 4–3
SF200 Storage Array Specifications . . . . . . . . . . . . . . . . . . .
SF72 Storage Enclosure Specifications . . . . . . . . . . . . . . . . .
Related Documentation . . . . . . . . . . . . . . . . . . . . . . . . . . . .
Summary of SF72 Front Panel Control/Indicator Functions
DSSI ID Switch Settings (Single-Host) . . . . . . . . . . . . . . . .
DSSI ID Switch Settings (Dual-Host) . . . . . . . . . . . . . . . . .
Summary of SF72 Rear Panel Control/Indicator Functions .
. 1–3
. 1–7
. 1–8
. 3–7
. 3–10
. 3–10
. 3–12
Tables
1–1
1–2
1–3
3–1
3–2
3–3
3–4
About This Manual
This manual is intended for users of the SF200 storage array and SF72
storage enclosure. This manual will provide users with all the information
they need to operate these devices in a safe and effective manner. The
information in this manual is organized as follows:
•
Chapter 1, Introduction, contains a product description and
specifications for the SF200 storage array and SF72 storage enclosure.
•
Chapter 2, Storage Array Site Preparation, contains site
preparation information for the SF200 storage array.
•
Chapter 3, Storage Enclosure Operation, describes how to start
up the SF72 storage enclosure and how to bring the disk ISE on line
for normal operation.
•
Chapter 4, Troubleshooting, contains simple instructions for
troubleshooting the installation of the SF200 storage array and SF72
storage enclosure.
v
1
Introduction
1.1 SF200 Storage Array Overview
The SF200 storage array is a storage rack cabinet designed to hold SF72
storage enclosures and magazine tape subsystems.
The SF200 storage array is intended to be installed in one or both sides
of a host system. All operator control panels (OCPs) project through the
front door of the storage array to allow easy access. The DSSI (Digital
Storage System Interconnect) cables from the host cabinet input/output
(I/O) panel connect to the DSSI I/O panel at the bottom rear of the storage
array. The DSSI I/O panel supports as many as 16 individual DSSI buses.
A fully configured single-host SF200 storage array uses four DSSI buses.
A fully configured dual-host SF200 storage array uses six DSSI buses.
The remaining unused DSSI buses are for future use.
Viewing the SF200 storage array from the front, note that the SF72
storage enclosures and magazine tape subsystems are arranged in the
storage array as follows (Figure 1–1):
NOTE
The position numbers are visible on the right and left chassis side
rails when the front and rear doors of the storage array are open.
•
Levels 1, 2, and 4 are reserved for SF72 storage enclosures only.
SF72 storage enclosure upgrades are installed into these levels in the
following order: position 1, 2, 3, 4, 7, and 8.
•
Level 3 is reserved for magazine tape subsystems. Magazine tape
subsystem upgrades are installed into this level in the following order:
position 5 then 6.
Specifications for the SF200 storage array are shown in Table 1–1.
1–1
1–2 Introduction
SF
LEVEL 4
20
0
LEVEL 3
0
1
2
3
0
4
1
5
2
6
3
LEVEL 2
4
5
6
LEVEL 1
SHR_X1101_89
Figure 1–1
Front View of the SF200 Storage Array
Introduction 1–3
Table 1–1 SF200 Storage Array Specifications
Characteristic
Specification
Number of disk ISEs
Minimum: 2, maximum: 24
Formatted storage capacity
Minimum: 2, maximum: 24 (in 2 GByte
increments)
Dimensions (nominal)
152.4 cm (60.5 inches) H, 60.96 cm (24.0
inches) W, 76.2 cm (34.0 inches) D
Weight
Minimum configuration1
Maximum configuration2
179.62 kg (396 lb)
442.25 kg (975 lb)
Agency compliance
FCC, UL, IEC, CSA, and VDE
Temperature
+10°C to +40°C (+50°F to +104°F).
Derate 1.8°C for each 1000 meters altitude
(1.0°F for each 1000 feet altitude)
Humidity
10% to 85% @ maximum wet bulb
temperature of +32°C (+90°F) and
minimum dew point of +2°C (+36°F)
Recommended Environmental Limits3
Operating environment
Temperature
18°C to 24°C (64.4°F to 75.2°F) with
an average rate of change of 3°C/hour
maximum and a step change of 3°C or less
Relative humidity
40% to 60% (noncondensing) with a step
change of 10% or less (noncondensing)
Altitude
Up to 2400 meters (8000 feet)
Air quality (maximum
particle count)
Not to exceed 500,000 particles per cubic
foot of air at a size of 0.5 micron or larger
Air volume (at inlet)
50 cubic feet per minute (0.026 cubic
meters per second)
1 The
minimum configuration is an SF200–Bx with one SF72–HK.
2 The
maximum configuration is an SF200–Jx that consists of six SF72–JK enclosures and
two magazine tape subsystems.
3 These
limits are for optimum equipment performance and reliability.
1–4 Introduction
Table 1–1 (Cont.) SF200 Storage Array Specifications
Characteristic
Specification
Recommended Environmental Limits3
Nonoperating environment
Temperature
-40°C to +66°C (-40°F to +151°F)
Relative humidity
10% to 80%, noncondensing
Altitude
4900 meters (16,000 feet)
SF200 acoustic noise
6.8 bells
Nominal airflow through enclosure
360 to 520 cubic feet/minute
Input power requirements (47 to 63
Hz normal operation)
6.00 A (per phase) @ 100 to 120 Vac (60
Hz), 3.00 A (per phase) @ 220 to 240 Vac
(50 Hz)
Power requirements during disk
ISE spinup
21.0 A @ 100 to 120 Vac (60 Hz),
10.5 A @ 220 to 240 Vac (50 Hz)
3 These
limits are for optimum equipment performance and reliability.
1.2 SF72 Storage Enclosure Overview
The SF72 is a storage enclosure designed to be installed into an SF200
storage array or certain system cabinets (Figure 1–2). A single enclosure
holds two or four RF72 disk integrated storage elements (ISEs). Each
disk ISE is independently controlled by the SF72 OCP. The power supply
in the enclosure provides the dc power and cooling for the disk ISEs.
Introduction 1–5
SHR_X1123C_89
Figure 1–2
SF72 Storage Enclosure
1–6 Introduction
The SF72 storage enclosure has the following features:
•
The SF72 storage enclosure can operate in one of two modes:
through-bus (described in Section 3.1.1) or split-bus (described in
Section 3.1.2).
–
When in through-bus mode, all of the disk ISEs connect to a
single common DSSI bus inside the SF72 enclosure. The DSSI
bus is terminated by connecting to one of the following: a DSSI
terminator (part number 12–31281–01), another SF72 storage
enclosure operating in the split-bus mode (while in singlehost configuration), or another host system (while in dual-host
configuration).
Host configurations are explained later in this manual. Refer to
the KFMSA Module Installation and User Manual for a more
detailed explanation.
–
When in split-bus mode, the disk ISEs on the left side of the
enclosure connect to a different DSSI bus than the disk ISEs on
the right side. Also, both DSSI buses terminate inside the SF72
on the transition termination module (TTM) located behind the
OCP. By connecting one SF72 enclosure (operating in through-bus
mode) to an SF72 storage enclosure (operating in split-bus mode),
two DSSI buses with six disk ISEs each are obtained. This mode
of operation is used in single-host configurations only.
•
Each RF72 disk ISE has its own set of switches and indicators on the
OCP.
•
The enclosure power supply provides operating power to the
subassemblies of the enclosure. The rear panel of the power supply
contains the ac power switch for the SF72.
•
Two DSSI connectors are at the top rear of the enclosure. The DSSI
bus runs to each disk ISE in the enclosure.
•
The drive dc power switches for the disk ISEs are on the front panel
of the SF72 enclosure. Each switch contains a symbol to indicate its
associated disk ISE and an LED that lights when power is applied to
that disk ISE.
Specifications for the SF72 storage enclosure are shown in Table 1–2.
Introduction 1–7
Table 1–2 SF72 Storage Enclosure Specifications
Characteristic
Specification
Number of disk ISE positions
4 (RF72 disk ISEs)
Formatted storage capacity
SF72–HK1
2 GBytes
2
SF72–JK
4 GBytes
Dimensions (nominal)
26.7 cm (10.5 inches) H, 22.2 cm (8.75
inches) W, 71.1 cm (28.0 inches) D
Weight (nominal)
SF72–HK1
34.93 kg (72 lb)
2
SF72–JK
41.28 kg (91 lb)
Agency compliance
FCC, UL, IEC, CSA, and VDE
Temperature
+10°C to +40°C (+50°F to +104°F).
Derate 1.8°C for each 1000 meters altitude
(1.0°F for each 1000 feet altitude)
Humidity
10% to 85% @ maximum wet bulb
temperature of +32°C (+90°F) and
minimum dew point of +2°C (+36°F)
Recommended Environmental Limits3
Operating environment
Temperature
18°C to 24°C (64.4°F to 75.2°F) with
an average rate of change of 3°C/hour
maximum and a step change of 3°C or less
Relative humidity
40% to 60% (noncondensing) with a step
change of 10% or less (noncondensing)
Altitude
Up to 2400 meters (8000 feet)
Air quality (maximum
particle count)
Not to exceed 500,000 particles per cubic
foot of air at a size of 0.5 micron or larger
Air volume (at inlet)
50 cubic feet per minute (0.026 cubic
meters per second)
1 The
SF72–HK contains two RF72 disk ISEs.
2 The
SF72–JK contains four RF72 disk ISEs.
3 These
limits are for optimum equipment performance and reliability.
1–8 Introduction
Table 1–2 (Cont.) SF72 Storage Enclosure Specifications
Characteristic
Specification
Recommended Environmental Limits3
Nonoperating environment
Temperature
-40°C to +66°C (-40°F to +151°F)
Relative humidity
10% to 80%, noncondensing
Altitude
4900 meters (16,000 feet)
SF72 enclosure acoustic noise
6.2 bells
Nominal airflow through enclosure
45 to 65 cubic feet/minute
Input power requirements (47 to 63
Hz normal operation)
2.70 A @ 100 to 120 Vac (60 Hz),
1.20 A @ 220 to 240 Vac (50 Hz)
Power requirements during disk
ISE spinup
3.50 A @ 100 to 120 Vac (60 Hz),
3.25 A @ 220 to 240 Vac (50 Hz)
3 These
limits are for optimum equipment performance and reliability.
1.3 Related Documentation
Table 1–3 lists reference documentation that supplement this manual.
Table 1–3 Related Documentation
Title
Order Number
KFMSA Module Installation and User Manual
EK–KFMSA–IM
RF31/RF72 Integrated Storage Element User Guide
EK–RF72D–UG
TF837 Magazine Tape Subsystem Service Manual
EK–TF837–SM
2
SF200 Storage Array Site Preparation
The SF200 storage array is intended for installation in a Class A
computer room environment. It must be operated in an environment
that meets the conditions specified in Table 1–1.
Before installing the SF200 storage array, make sure the following
conditions are met:
•
The SF200 storage array requires 3-phase ac power. Each phase
draws up to 6 amperes in a fully configured array, and produces 6400
BTUs of heat per hour.
•
Adequate space is provided around the storage array for opening the
front and rear doors, accessing cables at the rear of the storage array,
and for adequate airflow.
•
The installation site floor can safely bear the weight of the storage
array. (The SF200 storage array with power controller weighs 179.63
kilograms [396 pounds]; a fully configured storage array weighs
442.26 kilograms [975 pounds].)
•
The system’s configuration sheet has been correctly filled out and is
up-to-date. Blank system configuration sheets can be found in Figures
2–1 and 2–2.
•
An adequate number of KFMSA modules exist in the XMI backplane
of the VAX 6000 series system to support all the disk ISEs in the
SF200 storage array. Refer to the KFMSA Module Installation and
User Guide for more details.
2–1
2–2 SF200 Storage Array Site Preparation
KFMSA/DSSI Single-host Configuration Sheet
KFMSA XMI Node #
Bus 1
DSSI ID #
Device Type
DSSI ID #
Node Name
ALLO_CLASS
SF200 Box #
System ID
Device Type
DSSI ID #
Node Name
ALLO_CLASS
SF200 Box #
ALLO_CLASS
SF200 Box #
ALLO_CLASS
SF200 Box #
ALLO_CLASS
SF200 Box #
Device Type
DSSI ID #
Node Name
ALLO_CLASS
SF200 Box #
Device Type
DSSI ID #
Node Name
ALLO_CLASS
SF200 Box #
Device Type
DSSI ID #
Node Name
ALLO_CLASS
SF200 Box #
System ID
ALLO_CLASS
SF200 Box #
System ID
Device Type
DSSI ID #
Node Name
ALLO_CLASS
SF200 Box #
System ID
System ID
Device Type
DSSI ID #
Node Name
Device Type
DSSI ID #
Node Name
System ID
System ID
Device Type
DSSI ID #
Node Name
ALLO_CLASS
SF200 Box #
System ID
System ID
Device Type
DSSI ID #
Node Name
Device Type
DSSI ID #
Node Name
System ID
System ID
Device Type
DSSI ID #
Node Name
Bus 2
DSSI ID #
Device Type
DSSI ID #
Node Name
ALLO_CLASS
SF200 Box #
System ID
ALLO_CLASS
SF200 Box #
System ID
Device Type
DSSI ID #
Node Name
ALLO_CLASS
SF200 Box #
System ID
Color Code
on Cables
Color Code
on Cables
SHR-X0109-90
Figure 2–1
Single-Host System Configuration Sheet
SF200 Storage Array Site Preparation 2–3
KFMSA/DSSI Dual-host Configuration Sheet
KFMSA XMI Node #
Bus 1
DSSI ID #
Device Type
DSSI ID #
Node Name
Bus 2
DSSI ID #
ALLO_CLASS
SF200 Box #
Device Type
DSSI ID #
Node Name
System ID
Device Type
DSSI ID #
Node Name
System ID
ALLO_CLASS
SF200 Box #
Device Type
DSSI ID #
Node Name
System ID
Device Type
DSSI ID #
Node Name
ALLO_CLASS
SF200 Box #
Device Type
DSSI ID #
Node Name
ALLO_CLASS
SF200 Box #
System ID
ALLO_CLASS
SF200 Box #
Device Type
DSSI ID #
Node Name
System ID
Device Type
DSSI ID #
Node Name
ALLO_CLASS
SF200 Box #
System ID
System ID
Device Type
DSSI ID #
Node Name
ALLO_CLASS
SF200 Box #
ALLO_CLASS
SF200 Box #
System ID
ALLO_CLASS
SF200 Box #
Device Type
DSSI ID #
Node Name
System ID
ALLO_CLASS
SF200 Box #
System ID
Bus 1
DSSI ID #
Bus 2
DSSI ID #
KFMSA XMI Node #
Color Code
on Cables
Color Code
on Cables
SHR-X0133-90
Figure 2–2
Dual-Host System Configuration Sheet
3
SF72 Storage Enclosure Operation
This chapter contains the following information:
•
A description of the various bus modes and system configurations in
which the SF72 storage enclosure functions
•
A description of all front and rear panel controls and indicators
•
Instructions on how to power up the SF72 storage enclosure
•
Instructions on how to bring the SF72 storage enclosure on- and
off-line
3.1 SF72 Configurations
The SF72 storage enclosure is available with either two or four RF72
disk integrated storage elements (ISEs) installed. The two-ISE variant is
referred to as an SF72–HK, and the four-ISE variant is referred to as an
SF72–JK.
SF72 storage enclosures residing in the SF200 storage array can be
connected to a single host (or system) or to two hosts. When connected
to one system, the configuration is called single-host. When connected to
two or more systems, the configuration is called dual-host. Single-host
configurations support up to 48 GBytes of formatted storage with two
SF200 storage arrays. Dual-host configurations support up to 24 GBytes
of formatted storage in an SF200 storage array with two host systems.
Figures 3–1 and 3–2 show the eight possible bus configurations in an
SF200 storage array cabinet.
3–1
3–2 SF72 Storage Enclosure Operation
Magazine
SF72
SF200 I/O
Tape
PORT
Subsystem
Storage
Enclosure
SYS
108-inch
70-inch
A
BC21Q-09
BC21R-5L
D
T
Magazine
Tape
Subsystem
T
D
42-inch
BC21Q-3F
PORT
D
D
42-inch
SF200 I/O
SF72
Storage
Enclosure
D
D
BC21Q-3F
SplitBus
SF72
Storage
Enclosure
SYS
108-inch
70-inch
42-inch
A
BC21Q-09
BC21R-5L
BC21Q-3F
D
D
D
D
DSSI TERMINATOR
12-31281-01
Magazine
SF200 I/O
Tape
PORT
Subsystem
T
SYS
108-inch
70-inch
A
BC21Q-09
BC21R-5L
DSSI TERMINATOR
12-31281-01
SF72
Storage
Enclosure
SF200 I/O
PORT
D
D
70-inch
SYS
108-inch
A
BC21Q-09
BC21R-5L
SF72
Storage
Enclosure
D
D
42-inch
D
D
BC21Q-3F
SplitBus
SF72
Storage
Enclosure
SF200 I/O
PORT
D
SYS
108-inch
70-inch
A
BC21Q-09
BC21R-5L
D
DSSI TERMINATOR
12-31281-01
D
D
SHR-X0167-90
Figure 3–1
Single-Host Bus Configurations
SF72 Storage Enclosure Operation 3–3
SF200 I/O
Magazine
Tape
PORT
Subsystem
SYS
108-inch
70-inch
A
BC21Q-09
BC21R-5L
T
SF72
SF200 I/O
Storage
Enclosure
D
D
D
D
42-inch
BC21Q-3F
SF200 I/O
Magazine
Tape
SF200 I/O
PORT
Subsystem
PORT
PORT
70-inch
108-inch
SYS
BC21R-5L
BC21Q-09
B
T
SYS
108-inch
70-inch
70-inch
108-inch
SYS
A
BC21Q-09
BC21R-5L
BC21R-5L
BC21Q-09
B
SF72
SF200 I/O
SF200 I/O
Storage
Enclosure
PORT
SYS
108-inch
70-inch
A
BC21Q-09
BC21R-5L
D
D
D
D
PORT
70-inch
108-inch
SYS
BC21R-5L
BC21Q-09
B
SHR-X0168-90
Figure 3–2
Dual-Host Bus Configurations
Either of these variants operate in one of two bus modes. These modes
are called through-bus and split-bus, and are described in the sections
that follow.
3.1.1 Through-Bus Mode
In through-bus mode, all four disk ISEs in the SF72–JK storage enclosure
operate on or are part of the same DSSI bus. The DSSI bus enters the
enclosure from the rear, at the rightmost DSSI connector. The DSSI
bus is then connected to the left rear disk ISE (facing the front of the
enclosure), then the left front disk ISE, onto the right front disk ISE, then
the right rear disk ISE, and finally out the leftmost (facing rear again)
DSSI connector. At this point, the DSSI bus is either terminated (with
a DSSI terminator, part number 12–31281–01), connected to another
SF72 storage enclosure (operating in split-bus mode in a single-host
configuration), or connected to the array I/O panel and onto another
system (in a dual-host configuration). Refer to Figure 3–3.
3–4 SF72 Storage Enclosure Operation
SF72-JK (THROUGH-BUS)
TAPE
ISE
0
DISK
ISE
1
DISK
ISE
2
HOST
SYSTEM 1
DISK
ISE
3
DISK
ISE
4
TTM
KFMSA
7
DSSI BUS 0
DSSI
TERMINATOR
SHR-X0110-90
Figure 3–3
Through-Bus Mode
The SF72–HK variant operates in through-bus mode, in a similar fashion,
but only the rear two disk ISEs are used. An SF72–UK upgrade kit
consisting of two RF72 disk ISEs can be added to an SF72–HK at any
time.
3.1.2 Split-Bus Mode
In split-bus mode, two disk ISEs in the SF72–JK storage enclosure
operate on or are part of two separate DSSI buses. The DSSI bus enters
the enclosure from the rear, at the leftmost or rightmost DSSI connector.
The DSSI bus for the left half of the enclosure is connected to the left rear
disk ISE (facing the front of the enclosure), then the left front disk ISE,
and finally terminated at the transition termination module (TTM) for the
left half of the enclosure.
The DSSI bus for the right half of the enclosure is connected to the right
rear disk ISE (facing the front of the enclosure), then the right front disk
ISE, and finally terminated at the TTM for the right half of the enclosure.
Refer to Figure 3–4. Split-bus mode is not supported in dual-host
configurations.
SF72 Storage Enclosure Operation 3–5
SF72-JK (THROUGH-BUS)
TAPE
ISE
0
DISK
ISE
1
HOST
SYSTEM 1
DISK
ISE
2
DISK
ISE
3
SF72-JK (SPLIT-BUS)
DISK
ISE
4
DISK
ISE
5
DISK
ISE
6
TTM
TTM
KFMSA
7
DSSI BUS 0
SHR-X0111-90
Figure 3–4
Split-Bus Mode
The SF72–HK variant operates in split-bus mode, in a similar fashion, but
only the rear two disk ISEs are used. An SF72–UK upgrade kit consisting
of two RF72 disk ISEs can be added to an SF72–HK at any time.
3.2 SF72 Front Panel Controls, Labels, and
Indicators
Figure 3–5 shows a front view of the SF72 storage enclosure. The
operator control panel (OCP) is on the top front of the enclosure. It
can be accessed without opening the cabinet front door.
The drive dc power switches are on the bottom front of the enclosure.
These switches are not accessible when the front door of the cabinet is
closed.
Table 3–1 briefly describes the functions of the SF72 front panel controls
and indicators. Details are contained in the sections that follow.
3.2.1 SF72 OCP
The SF72 OCP contains four identical sets of controls and indicators, and
two additional indicators behind the front door of the panel. Unless a disk
ISE is installed in the enclosure and power is applied to that disk ISE,
the controls and indicators are non-operational. Table 3–1 summarizes
the controls and indicators discussed in the following sections.
3–6 SF72 Storage Enclosure Operation
OPERATOR CONTROL PANEL (OCP)
digi tal
Write
Ready Protect Fault
DSSI
ID
DSSI
ID
Write
Ready Protect Fault
FRONT COVER
CAPTIVE SCREWS
FRONT COVER
DOOR
ENCLOSURE
CAPTIVE SCREWS
DRIVE DC POWER SWITCHES
Figure 3–5
Front View of the SF72 Storage Enclosure
SHR-X0126A-90
SF72 Storage Enclosure Operation 3–7
Table 3–1 Summary of SF72 Front Panel Control/Indicator Functions
Control/Indicator
Function
Operator Control Panel
TERM PWR indicator
Indicates when termination power is being
supplied.
SPLIT indicator
Indicates when enclosure is in split-bus
mode.
MSCP enable switch
(Leftmost bit) Enables or disables the disk
ISE.
DSSI ID select switch
(Rightmost bit) Enables DSSI ID number.
7-segment LED displays
Display disk ISE DSSI ID number.
Ready button
Brings disk ISE on-line. (LED lights
green when ready.)
Write Protect button
Places disk ISE in write-protect mode.
(LED lights yellow when disk ISE is
write-protected.)
Fault button
Indicates a disk ISE fault (when LED is
lit RED). Press once to display fault code,
twice to clear fault.
Lower Front of SF72
Drive dc power switches
Apply power to disk ISEs; show power
status.
The icons on the door located on the OCP represent each disk ISE, as
follows:
•
The icon in the top left front represents the disk ISE in the left rear
of the SF72 storage enclosure.
•
The icon in the top right front represents the disk ISE in the right
rear of the SF72 storage enclosure.
•
The icon in the bottom left front represents the disk ISE in the left
front of the SF72 storage enclosure.
•
The icon in the bottom right front represents the disk ISE in the right
front of the SF72 storage enclosure.
3–8 SF72 Storage Enclosure Operation
Colored labels on the inside of the door on the OCP help identify each
of the DSSI buses. In a single-host configuration, colors represent the
following:
•
Blue represents DSSI bus 1.
•
Red represents DSSI bus 2.
•
Yellow represents DSSI bus 3.
•
Green represents DSSI bus 4.
In a dual-host configuration, colors represent the following:
•
Blue represents DSSI bus 1.
•
Red represents DSSI bus 2.
•
Yellow represents DSSI bus 3.
•
Green represents DSSI bus 4.
•
Blue/white represents DSSI bus 5.
•
Red/white represents DSSI bus 6.
Refer to the inside cover of the SF Family Label Booklet for further
details.
The two indicators behind the OCP door are TERM PWR (termination
power, top) and SPLIT (bus mode, bottom). The TERM PWR indicator
lights green whenever the SF72 storage enclosure is connected to a
DSSI bus. The SPLIT indicator lights green only when the enclosure is
operating in split-bus mode, as described in Section 3.1.2.
Four switchpacks (Figure 3–6), one for each of the four disk ISEs, are
located to the right and left of the two indicators behind the OCP door.
The switch to the left is the MSCP enable switch and is in the down
position when MSCP is enabled. The other switches are used to set the
DSSI ID number, where the rightmost switch is the least significant.
Switch settings are shown in Tables 3–2 and 3–3.
SF72 Storage Enclosure Operation 3–9
digi tal
Write
Ready Protect Fault
DSSI
ID
1
DSSI
ID
Write
Ready Protect Fault
2
SHR_X1128B_89
Figure 3–6
SF72 Switchpacks
3–10 SF72 Storage Enclosure Operation
Table 3–2 DSSI ID Switch Settings (Single-Host)
Disk ISE
Positions 1, 2, 4, and 7
Setting
1
Left Rear (LR)
Left Front (LF)
Right Front (RF)
Right Rear (RR)
001
010
011
100
Positions 3 and 8
Left Rear (LR)
Left Front (LF)
Right Front (RF)
Right Rear (RR)
1 ‘‘0’’
101
110
110
101
= down, ‘‘1’’ = up.
Table 3–3 DSSI ID Switch Settings (Dual-Host)
Disk ISE
Setting
Positions 1, 2, 3, 4, 7 and 81
Left Rear (LR)
Left Front (LF)
Right Front (RF)
Right Rear (RR)
1 ‘‘0’’
= down, ‘‘1’’ = up.
001
010
011
100
SF72 Storage Enclosure Operation 3–11
The four 7-segment LED displays on the front of the OCP display these
DSSI ID numbers. If a display is not lit, then that disk ISE position in
the enclosure is not occupied by an RF72 disk ISE.
The three disk ISE controls and indicators are to the right or left side
of the 7-segment LED displays. These controls, with their associated
indicators, are as follows (Figure 3–7):
•
Ready—The Ready button is a push-to-set switch with a green
indicator. When pressed in, the Ready button causes the disk
ISE to come on-line. After the Ready button is pressed, it takes
approximately 60 seconds for the disk ISE to come on-line. The
green indicator remains lit while the disk ISE is on-line. However,
this indicator may blink or go out entirely when the disk ISE is
performing heavy seeks.
•
Write Protect—The Write Protect button is a push-to-set switch with
a yellow indicator. When the Write Protect button is engaged, the
data on that disk ISE cannot be overwritten, nor can any new data be
written to that disk ISE.
•
Fault—The Fault button is a momentary switch with a red indicator.
A disk ISE fault is indicated when the red indicator is lit. Press the
Fault button once to display the disk ISE fault code, and a second
time to clear the fault code and clear the disk ISE fault.
digi tal
Write
Ready Protect Fault
DSSI
ID
1
DSSI
ID
Write
Ready Protect Fault
2
SHR_X1128_89
Figure 3–7
SF72 Controls and Indicators
3–12 SF72 Storage Enclosure Operation
3.2.2 Drive DC Power Switches
Four drive dc power switches are on the lower front side of the SF72
storage enclosure. Each drive dc power switch is associated with a disk
ISE position, as shown in Figure 3–5.
An indicator in each drive dc power switch illuminates to show that
nominal power is being applied to the associated disk ISE. The switches
are shown on the icon located on the front of the chassis of the SF72
enclosure.
Setting a drive dc power switch connects power to the associated disk ISE
and causes the disk ISE to spin up and run a self-test. After setting the
drive dc power switch, you must press the Ready button on the OCP to
bring the disk ISE on-line.
3.3 SF72 Rear Panel Controls and Indicators
Figure 3–8 shows the rear panel of the SF72 storage enclosure. The DSSI
connectors are on the top rear side of the enclosure. The ac power switch,
line voltage selector switch, and power supply fault indicator are on the
bottom rear of the enclosure, on the power supply chassis, as shown in
Figure 3–8. These controls and indicators affect operation of the entire
SF72 enclosure.
Table 3–4 summarizes the functions of the rear panel controls and
indicators. Details are provided in the paragraphs that follow.
Table 3–4 Summary of SF72 Rear Panel Control/Indicator Functions
Control/Indicator
Function
Power Supply Chassis
AC power switch
Applies line voltage to dc power supply.
Line voltage
selector switch
Selects between 120 Vac (60 Hz) and 240
Vac (50 Hz) line voltage.
Power supply
fault indicator
Illuminates for fault or overtemperature
in enclosure.
SF72 Storage Enclosure Operation 3–13
DSSI
CONNECTORS
1 0
AC RECEPTACLE
AC POWER
SWITCH
230
115
FAULT
POWER SUPPLY
FAULT INDICATOR
(BEHIND PANEL)
LINE VOLTAGE
SELECTOR SWITCH
(BEHIND PANEL)
SHR-X0127A-90
Figure 3–8
Rear Panel of the SF72 Storage Enclosure
3–14 SF72 Storage Enclosure Operation
WARNING
Hazardous voltages are present inside the equipment cabinet and
the SF72 enclosure. Installation and service must be performed
only by qualified Digital Customer Services engineers.
When performing any operation involving the source power,
verify that the enclosure ac power switch, located on the power
supply at the rear of the enclosure, is turned off. Disconnect the
line cord from the enclosure rear panel and from the cabinet
power controller, if possible. Perform the operation, then
reconnect the cord.
The ac power switch for the SF72 enclosure is in the center of the rear
panel. Setting the ac power switch in the position labeled ‘‘1’’ applies
power to the SF72. Setting the switch in the position labeled ‘‘0’’ removes
power from the enclosure.
As you face the rear panel, the line voltage selector switch is located to
the right of the ac power switch. It is visible through a hole in the rear
panel. The Digital Customer Services engineer sets this switch to the
available line voltage during installation. The number ‘‘120’’ represents
120 Vac at 60 Hz, and the number ‘‘240’’ represents 240 Vac at 50 Hz.
CAUTION
The SF72 enclosure power supply is universal for both 120 Vac
and 240 Vac. The supply is factory-set to 240 Vac and must be
reset to 120 Vac for some installations. Selecting 120 Vac and
using 240 Vac will damage the power supply.
The power supply fault indicator is behind the panel, in the lower right
corner of the SF72 storage enclosure. When the fault indicator is lit,
a green light is visible through the holes in the rear panel. The SF72
enclosure automatically shuts down when the dc power supply detects a
fault or overtemperature condition.
SF72 Storage Enclosure Operation 3–15
3.4 Applying Power to the Enclosure
This section describes the correct procedure for powering up an SF72
storage enclosure. Perform all steps in the order in which they are
presented.
NOTE
Do not change the DSSI ID setting while the power is on.
Apply power to the enclosure as follows:
1. Verify that the drive dc power switches and all disk ISE control
buttons on the front of the enclosure are in the off (0) position.
2. Set the ac power switch to the on (1) position to apply ac power to the
dc power supply.
3. Verify that the power is on by checking that the fan starts and there
is normal airflow through the enclosure.
NOTE
It is possible to have airflow through the enclosure and not
have output voltage. This indicates that the line voltage
selector switch, located behind the rear panel of the enclosure,
is in the wrong position.
Set the ac power switch to off (0) and reset the line voltage
selector switch.
4. Verify that the termination power indicator is on.
5. Verify that the bus mode indicator is on, only if that SF72 is in the
split-bus mode.
6. Turn the drive dc power switch on. Verify that the green indicator
lights.
3–16 SF72 Storage Enclosure Operation
3.5 Placing a Disk ISE On-Line
After power is applied to the SF72 enclosure, use the following procedure
to place a disk ISE on-line. Perform all steps in the order in which they
are presented.
1. Press the Ready button on the OCP to bring the ISE on-line.
a. The Ready indicator flickers while the disk ISE is spinning up. If
you power up a disk ISE with the Ready button for that disk ISE
in the on (in) position, you must press the Ready button to put it
in its off (out) position momentarily, then press the button in to
bring the disk ISE on-line correctly.
b. All other indicators remain off.
c.
When the disk ISE has completed spinup, the Ready indicator
illuminates, indicating that the disk ISE is ready for read/write
operation.
d. The Fault indicator illuminates if the disk ISE detects a fault.
Refer to Chapter 4 of this manual for recovery procedures.
2. Press the Write Protect button on the OCP, as required, to turn on
write-protect mode. To deselect write-protect mode, press this button
a second time.
Repeat this entire procedure for each disk ISE being placed on-line.
NOTE
The Ready indicator remains lit during normal operation, though
it may flicker during heavy seeks.
The Write Protect indicator is lit when the disk ISE is writeprotected, and off when the disk ISE is write-enabled.
3.6 Taking a Disk ISE Off-Line
To take a disk ISE off-line, press the Ready button (out position) and wait
until the LED goes out.
4
Troubleshooting
This chapter contains procedures a user can perform, before calling
Digital Customer Services, to verify that a problem exists in the SF72
storage enclosure.
Procedures to attempt recovery from a fault condition are also included
here. Before attempting recovery from a fault condition, record the fault
code shown on the SF72 storage enclosure operator control panel (OCP),
as described in Section 4.2.
4.1 Verifying a Hardware Problem
If your SF72 storage enclosure or an installed disk ISE is not operating
correctly, check the following items before calling Digital Customer
Services:
WARNING
Hazardous voltages are inside the equipment cabinet and
the SF72 storage enclosure. Installation and service must be
performed only by qualified Digital Customer Services engineers.
When performing any operation involving the source power,
verify that the enclosure ac power switch, located on the power
supply at the rear of the enclosure, is turned off. Disconnect the
line cord from the enclosure rear panel and from the cabinet
power controller, if possible. Perform the operation, then
reconnect the cord.
1. If the entire SF72 storage enclosure is not operating, check the power
supply fault indicator. This indicator is visible, when lit, through
holes in the lower right corner of the SF72 storage enclosure. (Refer
to Figure 4–1).
4–1
4–2 Troubleshooting
DSSI
CONNECTORS
1 0
AC RECEPTACLE
AC POWER
SWITCH
230
115
FAULT
POWER SUPPLY
FAULT INDICATOR
(BEHIND PANEL)
LINE VOLTAGE
SELECTOR SWITCH
(BEHIND PANEL)
SHR-X0127A-90
Figure 4–1
Rear Panel of the SF72 Storage Enclosure
If this indicator is lit, immediately turn off the ac power switch on the
bottom rear of the storage enclosure. Call Digital Customer Services.
If the green fault indicator is not on, proceed as follows:
a. Check for an overload current condition in the power supply by
turning off all drive dc power switches on the front panel. (Refer
to Figure 4–2). If the enclosure fan starts, go to step 2 (recovery
when drive dc power switches are blinking).
Troubleshooting 4–3
OPERATOR CONTROL PANEL (OCP)
digi tal
Write
Ready Protect Fault
DSSI
ID
DSSI
ID
Write
Ready Protect Fault
FRONT COVER
CAPTIVE SCREWS
FRONT COVER
DOOR
ENCLOSURE
CAPTIVE SCREWS
DRIVE DC POWER SWITCHES
Figure 4–2
SHR-X0126A-90
Front Panel of the SF72 Storage Enclosure
b. Verify site power by checking other equipment on the same line
and the circuit breakers to the cabinet.
c.
Verify that the enclosure power plug is connected to the line outlet
in the cabinet.
d. Verify that the power plug of the cabinet is connected to the line
voltage outlet.
4–4 Troubleshooting
e.
Verify that the line voltage selector switch on the rear panel of the
power supply is set to the correct line voltage. Refer to Figure 4–1
for the location of the line voltage selector switch.
f.
Attempt to restart the enclosure.
2. If the drive dc power switches on the front panel of the enclosure are
blinking, an overload at the output of the power supply is the likely
cause.
a. Place all OCP buttons for each disk ISE in the out (off) position.
Refer to Figure 4–2.
b. Turn off all drive dc power switches.
c.
Turn on the drive dc power switches one at a time. If the indicator
on a drive dc power switch illuminates steadily when you turn it
on, that disk ISE is not causing the overload. When you turn on
a switch and the indicator blinks, you have found the overload.
Turn that switch off and resume operation on the remaining disk
ISEs.
d. Call Digital Customer Services.
3. If a single disk ISE is not communicating with the system controller
or does not respond to control panel commands (all other disk ISEs
are normal):
a. Make sure the Ready button for that disk ISE is asserted.
b. Record any fault code displayed on the OCP, as described in
Section 4.2.
c.
Reset all OCP switches for that disk ISE. If the disk ISE was online previously, dismount it from the system and take it off-line.
Spin the disk ISE down by pressing the Ready button. When the
Ready indicator goes out, set the front panel drive dc power switch
to off (Figure 4–2). Removing power to the disk ISE for 10 seconds
resets the disk ISE’s circuits.
d. Verify that the DSSI cable connectors from the host system are
securely tightened at the cabinet I/O bulkhead of the enclosure.
e.
Bring the disk ISE back on-line and attempt to restore normal
operation.
Troubleshooting 4–5
4.2 Recovering from a Disk ISE Fault Condition
The RF72 disk ISE contains sophisticated circuits to detect and report
fault conditions. These faults are reported through a fault code display on
the SF72 storage enclosure OCP. The Digital Customer Services engineer
uses these codes and other error reporting mechanisms in the disk ISE to
pinpoint the source of a fault and return your RF72 to service in the least
amount of time.
If the Fault indicator illuminates to signal that the disk ISE has detected
a fault, perform the following steps to obtain an error code and clear the
fault:
1. Press the Fault button once. This causes the disk ISE to display an
error code at the disk ISE’s indicator set on the SF72 OCP.
The error code is displayed as a binary number in flashing lights
across the indicator set. A flashing indicator signifies a 1; a dark
indicator signifies a 0. The most significant bit of the binary number
is displayed on the Ready indicator. The Fault indicator counts as the
fifth most significant bit in this display.
2. Record this binary number for later reference by your Digital
Customer Services engineer.
3. Press the Fault indicator again. This commands the disk ISE to clear
the fault and return to normal operation. If the fault clears, you may
resume operation. Record the occurrence of the fault in the system log
as it may become relevant in future system fault analysis. If the fault
recurs, call Digital Customer Services.
Glossary
ADAPTER
A module that connects one or more device controllers to the host bus and
hides many of the host bus requirements from the controller. The KFMSA
module is an XMI to DSSI bus adapter.
ALLOCATION CLASS
A numerical value assigned to the ISE to indicate which host(s) on a
cluster it will be served by.
BAD BLOCK
An address on a disk or tape that is determined by the device controller
to be bad and, therefore, in need of replacement.
BAD BLOCK REPLACEMENT
The procedure used to locate a replacement block, mark the bad block as
replaced, and move the data from the bad block to the replacement block.
BLOCK
The smallest data unit addressable on a disk. Also called a sector. In
DSSI ISEs, a block contains 512 bytes of customer data, EDC, ECC, flags,
and the block’s address header.
DEVICE NAME
A unique name given to each device by the VMS operating system. The
device name generally includes either the allocation class and MSCP unit
number assigned to the device (if the allocation class is not zero), or the
node name and MSCP unit number (if the allocation class is zero).
DMA
Direct memory access.
DRVTST
A local program resident on the ISE. It is a comprehensive hardware test
used to verify ISE operation.
Glossary–1
Glossary–2
DSSI
Digital Storage System Interconnect. A DSA-based storage interconnect
used by the KFMSA adapter and the RF- and TF-series integrated storage
elements to transfer data and to communicate with each other.
DUAL-HOST
Storage configuration where DSSI ISEs are shared between two DSSI
adapters and host systems.
DUP
Diagnostic and utility protocol. A SYSAP-level protocol by which a host
computer directs a storage device controller to run internal diagnostics or
utility functions. DUP is implemented as a class driver on the host side,
and a corresponding class server on the storage controller side.
EEPROM
Electrically erasable programmable read only memory. Used by the
KFMSA adapter to store configuration, manufacturing, and error
information in a nonvolatile location.
FCT
Factory control tables. Where factory found bad blocks are recorded.
ISE
Integrated storage element. All DSSI storage devices are ISEs.
KFMSA
XMI bus to DSSI bus adapter.
LBN
Logical block number. A logical block number is a volume-relative address
of a block on a mass storage device. A block is a physical sector on the
storage media that can contain customer data.
LTN
Logical track number. The actual data track in the customer data area.
MAGAZINE TAPE SUBSYSTEM
A DSSI tape ISE with tape loader.
MSCP
Mass Storage Control Protocol. An application layer protocol used by the
host to perform disk I/O operations and I/O control functions.
Glossary–3
NODE NAME
A 6-character (maximum) value that is assigned to each DSSI ISE. The
node name of each ISE must be unique across the system topology.
OCP
Operator control panel. An enclosure interface that allows remote control
of DSSI node ID selection and ISE operating status.
PARAMS
A local program resident on the ISE. PARAMS is used to view and modify
current device parameter settings on an ISE.
PATH
A channel from the host to a device.
RBN
Replacement block number. The last sector on each track of the host
accessible area reserved for bad block replacement.
RCT
Replacement and caching table. Used to store pointers to replaced blocks
in the RBN area.
RF72
A 1-gigabyte capacity DSSI disk ISE.
RLL
Run length limited. The format used in the DSSI ISE to record data.
SF72
A DSSI storage enclosure that houses either two or four RF72 disk ISEs.
SF200
DSSI storage array that houses up to six SF72 enclosures and up to two
DSSI magazine tape subsystems.
SINGLE-HOST
Storage configuration where DSSI ISEs are connected to only one DSSI
adapter and host system.
SPLIT-BUS
A mode of operation where the ISEs in the right side of an SF72 enclosure
are connected to a different DSSI bus than those on the left side. In this
mode, the DSSI buses are terminated by the TTM.
Glossary–4
THROUGH-BUS
A mode of operation where all the ISEs in an SF72 enclosure are
connected to the same DSSI bus. In this mode, the DSSI bus is
terminated using an external terminator.
TMSCP
Tape Mass Storage Control Protocol. Application layer protocol that is
used by the host to perform tape I/O operations and I/O control functions.
TTM
Transition termination module. A PC board that provides connection
between the SF72 OCP and RF72 disk ISE, and also provides DSSI bus
termination when in split-bus mode.
UNIT NUMBER
Also called the MSCP/TMSCP unit number. Default value is the ISE’s
DSSI node ID. A unique value can be selected using PARAMS.
VAX DIAGNOSTIC SUPERVISOR
A diagnostic environment that allows access to DSSI tests and programs
in VAX 6000 series systems.
VIRTUAL CIRCUIT
A logical point-to-point link between nodes.
XBN
External block number. The blocks located in the external block area
contain the FCT. They are not visible to the host operating system.
XMI
Extended Memory Interconnect. The system bus for the VAX 6000 series
systems.
Index
A
E
AC power switch, 3–14
Error codes, 4–5
B
F
Bus mode indicator, 3–8
Fault button, 3–11
Fault codes, 4–5
Fault condition
recovering from, 4–5
Fault indicator
OCP, 4–4
power supply, 3–14
Front panel
controls and indicators, 3–5
C
Clearing a fault, 4–5
Colored labels
dual-host, 3–8
single-host, 3–8
Configurations
See SF72 storage enclosure
Controls, labels, and indicators
rear panel, 3–12
Controls and indicators
front panel, 3–5
H
Hardware problem, verifying, 4–1
I
D
Disk ISE
not responding to commands, 4–4
Drive dc power switches, 3–12
blinking, 4–4
DSSI switchpacks, 3–8
Icons, 3–7, 3–12
Indicators
See Controls and indicators
Installation, SF200, 2–1
L
Labels
See Colored labels
Line voltage selector switch, 3–14
Index 1
2 Index
O
OCP
controls and indicators, 3–5
7-segment displays, 3–11
P
Powering up, enclosure, 3–15
Power supply
fault indicator, 3–14
Power switches
drive dc, 3–12
enclosure ac, 3–12
R
Ready button, 3–11
Rear panel
controls and indicators, 3–12
RF72 disk ISE
fault code, 4–5
not responding to commands, 4–4
S
Safety precaution, 4–1
SF200 storage array
overview, 1–1 to 1–4
recommended environmental
limits, 1–3
SF72 storage enclosure
applying power, 3–15
configurations, 3–1
not operating, 4–1
overview, 1–4 to 1–8
placing on-line, 3–16
positions, 1–1
recommended environmental
limits, 1–7
recovering from fault condition,
4–5
SF72 storage enclosure (Cont.)
taking off-line, 3–16
Site preparation, SF200, 2–1
Split-bus mode, 1–6, 3–4
T
Termination power indicator, 3–8
Through-bus mode, 1–6, 3–3
Troubleshooting, 4–1
W
Write Protect button, 3–11