1
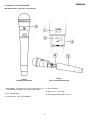
Operating Instructions
UHF WIRELESS
MICROPHONE SYSTEM
User Guide
ENGLISH
Table of Contents
Section 1 - Quick Set-Up . . . . . . . . . . . . . . . . . . . . . . . . . . . . . . . . . . . . . . . . . . . . . . . . . . . . . . . . . . . . . . . . . . . . . . . 1
Section 2 - System Description . . . . . . . . . . . . . . . . . . . . . . . . . . . . . . . . . . . . . . . . . . . . . . . . . . . . . . . . . . . . . . . . . . 2
Section 3 - Detailed Component Description . . . . . . . . . . . . . . . . . . . . . . . . . . . . . . . . . . . . . . . . . . . . . . . . . . . . . . . 3
Receiver Setup and Operation . . . . . . . . . . . . . . . . . . . . . . . . . . . . . . . . . . . . . . . . . . . . . . . . . . . . . . . . . . . . . . . . .4
Headphone Operation . . . . . . . . . . . . . . . . . . . . . . . . . . . . . . . . . . . . . . . . . . . . . . . . . . . . . . . . . . . . . . . . . . . . . . .6
Antenna Connections . . . . . . . . . . . . . . . . . . . . . . . . . . . . . . . . . . . . . . . . . . . . . . . . . . . . . . . . . . . . . . . . . . . . . . . .6
Handheld Transmitter, REV-H . . . . . . . . . . . . . . . . . . . . . . . . . . . . . . . . . . . . . . . . . . . . . . . . . . . . . . . . . . . . . . . . .8
Handheld Transmitter Setup and Operation . . . . . . . . . . . . . . . . . . . . . . . . . . . . . . . . . . . . . . . . . . . . . . . . . . . . . . .9
Handheld Transmitter, REV-PH . . . . . . . . . . . . . . . . . . . . . . . . . . . . . . . . . . . . . . . . . . . . . . . . . . . . . . . . . . . . . . .10
Handheld Transmitter Setup and Operation . . . . . . . . . . . . . . . . . . . . . . . . . . . . . . . . . . . . . . . . . . . . . . . . . . . . . .11
Bodypack Transmitter, REV-BP . . . . . . . . . . . . . . . . . . . . . . . . . . . . . . . . . . . . . . . . . . . . . . . . . . . . . . . . . . . . . . .12
Bodypack Transmitter Setup and Operation . . . . . . . . . . . . . . . . . . . . . . . . . . . . . . . . . . . . . . . . . . . . . . . . . . . . . .13
Bodypack Transmitter, REV-WT . . . . . . . . . . . . . . . . . . . . . . . . . . . . . . . . . . . . . . . . . . . . . . . . . . . . . . . . . . . . . . .14
Bodypack Transmitter Setup and Operation . . . . . . . . . . . . . . . . . . . . . . . . . . . . . . . . . . . . . . . . . . . . . . . . . . . . . .15
Section 4 - Receiver Display Screens and Functions . . . . . . . . . . . . . . . . . . . . . . . . . . . . . . . . . . . . . . . . . . . . . . . 17
Main Operating Screen . . . . . . . . . . . . . . . . . . . . . . . . . . . . . . . . . . . . . . . . . . . . . . . . . . . . . . . . . . . . . . . . . . . . . .17
Group/Channel Edit Screen . . . . . . . . . . . . . . . . . . . . . . . . . . . . . . . . . . . . . . . . . . . . . . . . . . . . . . . . . . . . . . . . . .18
Functions Screen . . . . . . . . . . . . . . . . . . . . . . . . . . . . . . . . . . . . . . . . . . . . . . . . . . . . . . . . . . . . . . . . . . . . . . . . . .19
ClearScan All groups . . . . . . . . . . . . . . . . . . . . . . . . . . . . . . . . . . . . . . . . . . . . . . . . . . . . . . . . . . . . . . . . . . . .19
ClearScan Group . . . . . . . . . . . . . . . . . . . . . . . . . . . . . . . . . . . . . . . . . . . . . . . . . . . . . . . . . . . . . . . . . . . . . . .20
ClearScan Band . . . . . . . . . . . . . . . . . . . . . . . . . . . . . . . . . . . . . . . . . . . . . . . . . . . . . . . . . . . . . . . . . . . . . . . .20
Audio Edit . . . . . . . . . . . . . . . . . . . . . . . . . . . . . . . . . . . . . . . . . . . . . . . . . . . . . . . . . . . . . . . . . . . . . . . . . . . . .21
Guitar Mode . . . . . . . . . . . . . . . . . . . . . . . . . . . . . . . . . . . . . . . . . . . . . . . . . . . . . . . . . . . . . . . . . . . . . . . . . . .21
Set Squelch Threshold . . . . . . . . . . . . . . . . . . . . . . . . . . . . . . . . . . . . . . . . . . . . . . . . . . . . . . . . . . . . . . . . . . .21
Sound Check Screen . . . . . . . . . . . . . . . . . . . . . . . . . . . . . . . . . . . . . . . . . . . . . . . . . . . . . . . . . . . . . . . . . . . .22
Copy Group . . . . . . . . . . . . . . . . . . . . . . . . . . . . . . . . . . . . . . . . . . . . . . . . . . . . . . . . . . . . . . . . . . . . . . . . . . .22
Clear Group . . . . . . . . . . . . . . . . . . . . . . . . . . . . . . . . . . . . . . . . . . . . . . . . . . . . . . . . . . . . . . . . . . . . . . . . . . .23
Name Edit Screen . . . . . . . . . . . . . . . . . . . . . . . . . . . . . . . . . . . . . . . . . . . . . . . . . . . . . . . . . . . . . . . . . . . . . .23
CAN Bus Address . . . . . . . . . . . . . . . . . . . . . . . . . . . . . . . . . . . . . . . . . . . . . . . . . . . . . . . . . . . . . . . . . . . . . .24
Section 5 - Transmitter Screens and Detail Functions . . . . . . . . . . . . . . . . . . . . . . . . . . . . . . . . . . . . . . . . . . . . . . 25
Transmitter Display and Controls . . . . . . . . . . . . . . . . . . . . . . . . . . . . . . . . . . . . . . . . . . . . . . . . . . . . . . . . . . . . . .25
Lockout . . . . . . . . . . . . . . . . . . . . . . . . . . . . . . . . . . . . . . . . . . . . . . . . . . . . . . . . . . . . . . . . . . . . . . . . . . . . . . . . . .25
Transmitter On/Off Lockout . . . . . . . . . . . . . . . . . . . . . . . . . . . . . . . . . . . . . . . . . . . . . . . . . . . . . . . . . . . . . . . . . .25
Section
Section
Section
Section
Section
Section
6 - Guidelines for Best Performance. . . . . . . . . . . . . . . . . . . . . . . . . . . . . . . . . . . . . . . . . . . . . . . . . . . . . . 26
7 - Trouble Shooting Guide . . . . . . . . . . . . . . . . . . . . . . . . . . . . . . . . . . . . . . . . . . . . . . . . . . . . . . . . . . . . . 27
8 - Technical Specifications . . . . . . . . . . . . . . . . . . . . . . . . . . . . . . . . . . . . . . . . . . . . . . . . . . . . . . . . . . . . . 29
9 - Approval Information . . . . . . . . . . . . . . . . . . . . . . . . . . . . . . . . . . . . . . . . . . . . . . . . . . . . . . . . . . . . . . . 30
10 - Factory Service . . . . . . . . . . . . . . . . . . . . . . . . . . . . . . . . . . . . . . . . . . . . . . . . . . . . . . . . . . . . . . . . . . . 31
11 - Accessories and Parts . . . . . . . . . . . . . . . . . . . . . . . . . . . . . . . . . . . . . . . . . . . . . . . . . . . . . . . . . . . . . 32
-i-
ENGLISH
Section 1 - Quick Set-Up
Quick Set-up: Receiver
Quick set-up: System Operation
1.
Do not connect the receiver to any other equipment yet!
1.
2.
Connect the two Antennas to the receiver.
3.
Plug the power cord into the back of the receiver and into
an outlet.
With the transmitter and receiver on, monitor the REV
Receiver main display screen. Note that the RF (1-100) Bar
graph should indicate near the 100 mark. The AF Bar
should show very little if any, indication until you talk or sing
into the microphone.
4.
Press the Power switch. Display will light up, show EV
name and software revision numbers for about 3 seconds
and then display the main operating screen.
2.
On the transmitter, press Set and Down buttons at the
same time twice to access the gain adjustment mode.
3.
5.
Press the MENU button twice to display the MENU option
screen and then press set.
Press set and use the Up and Down buttons to adjust the
transmitter gain to cause the AF Bar Graph to peak
between 50 and 100 for best performance.
6.
With the CLEARSCAN ALL line highlighted, press SET.
4.
Set the mixer/amp gain.
7.
ClearScanTM returns the clearest group. Press SET again.
8.
ClearScan returns the clearest channel in that group.
Press SET again.
5.
Talk or sing into the microphone or play the guitar at a normal volume. You should hear audio coming out of the system.
9.
The display will return to the main operating screen with the
clearest channel in the clearest group assigned.
6.
If you are not getting enough level at the input of the mixer,
see the audio output gain adjustment section on page 5.
10. Turn the receiver off and connect the mixer or other audio
system to the receiver XLR Mic/Line Level Connector or the
1/4 inch Line Level Jack.
11. Set the audio mixer or other system input level to minimum.
12. Turn receiver back on.
Receiver “Quick Set-up” is complete.
Quick set-up: Transmitter
1.
With the Power switch on the transmitter OFF, install a fresh
Battery (9V or two AA) into the transmitter.
2.
Place the transmitter Power Switch to the ON position.
3.
The LCD display backlight will come on and display Group
and Channel and battery level.
4.
Press the SET button once and the Group number will
flash.
5.
Use the up and down arrows to change the Group number
to match the channel number displayed on the receiver.
Press SET and the Channel Number will flash.
6.
Use the up and down arrow buttons to change the Channel
to match the receiver. Press Set and nothing will be flashing, the channel is now set.
7.
If you are using a bodypack transmitter, plug the microphone into the transmitter connector. If using a quitar, put
the bodypack and receiver into instrument mode (see page
5, Part K and page 13, Part G).
Transmitter “Quick Set-up” is complete.
-1-
“Quick Set-up” is now complete. Please enjoy your
REV system.
ENGLISH
Section 2 - System Description
System Description
The high quality audio circuitry and advanced Radio
Frequency (RF) signal processing offer broadcast quality signal-to-noise and audio clarity.
The REV Wireless Microphone system combines frequency
agility and ease of use like no other. The REV transmitters
and receivers operate over a 24 MHz bandwidth in the UHF
portion of the spectrum.
System Features Include:
. Advanced ClearScan technology for selecting clear channels and inter-modulation free groups
. 960 Radio Channels, user programmable or factory installed
. LCD Displays for ease of viewing
. Patented DSP Phase Diversity System
. CAN Bus Port for computer monitor, control, and updating
. Adjustable Unbalanced Line Level 1/4 inch output jack
. Adjustable Balanced Microphone Line Level XLR output jack
. Front Panel Power ON/OFF Switch
. Permanent Flash Memory for frequency/system storage
. Front Panel Software Control of Squelch and Audio Output settings
. Combination Squelch (Amplitude and Tone) system prevents false squelch
. Lockout feature to prevent accidental channel changes
. Sound Check mode to speed walk testing and provide tangible results
. Backlit LCD displays on transmitters for easy adjustment on dark stages
. “Smart” battery feature in the 9V transmitters means there is no wrong orientation
. Interchangeable heads on the handheld transmitters
. Cast magnesium case on the bodypack transmitter
. Optimized Guitar settings on transmitter and receiver
-2-
ENGLISH
Section 3 - Detailed Component Descriptions
REV-S or REV-D Receiver
REV Receiver Controls, Connectors, and Indicators
Figure 1
Front Panel
Figure 2
Back Panel
1.
Power ON/OFF
5.
IEC Power Cord Connector
2.
1/4” headphone jack with adjustable volume
(channel selection on REV-D)
6.
XLR Balanced Audio Output Connector (two on REV-D)
3.
Graphical Display
7.
Unbalanced 1/4” Line Level Audio Output Connector
(two on REV-D)
8.
TNC Antenna Input Connectors
c. Diversity Indicator
9.
REV-D TNC Antenna Output connectors
d. RF Strength of Signal Indicator
10. CAN Bus RJ45 connectors (two in parallel)
a. Channel Display
b. Battery Strength Indicator
e. Audio Level Indicator
4.
Display Control Buttons (Menu/Set/Up/Down)
-3-
ENGLISH
3.1 Receiver Setup and Operation
A. Receiver Setup
1. Place the receiver and antennas where there is a clear
line of sight to the area where the transmitter will be used.
Rotate the antennas to separate them by 90 degrees.
See Part 15 for more information.
E. ClearScan All: This function scans all of the groups (factory
and user) and returns a list of groups ranked by the number
of free channels.
1. Once ClearScan All has run, the screen will display the
clearest group with the open channels in that group. You
can scroll through the other ranked groups using
UP/DOWN.
2. Connect the power cord to the receiver. Turn the receiver on and confirm that it is ON by checking the main display screen. The display will show the company logo,
software revision level and then display the main screen
with the last channel set.
2. When you have the group you want, press SET to run
ClearScan on that group. The display will now show the
group with the Channels ranked by clearness and the
clearest channel will be flashing.
3. Press SET to select and the clearest channel will be
installed, display will return to the main display.
B. Manual Channel Change
1. From the main display screen press the MENU button
once to display the edit screen.
2. Press SET and the group number will flash. The UP and
DOWN buttons allow you to scroll through the 18 factory
groups and 2 user definable groups.
3. When the group you desire is displayed, press SET to select
that group and the Channel Number will start flashing.
4. Scroll to the desired channel, press SET to select.
NOTE: Groups 17 and 18 have 16 channels and are marked with
an N (17n). These groups require the transmitters to be in
the LOW transmit power setting to work together. After
ClearScan All runs, the N groups will always be displayed
after groups 1-18 and any user defined groups no matter
how many channels are free. If you need to use more than
12 systems at one time, scroll down to the N groups and
use the clearest group with Normal transmit power.
F. ClearScan Group: this function will scan the group currently
selected, which is useful for multi-system setup.
5. Pressing MENU anytime before pressing SET negates
any changes made since the last SET.
1. Use ClearScan All on the first unit of a multi-system installation to select the clearest group.
6. Once the desired group and channel are displayed (but
not flashing) press MENU twice to return to the main display screen.
2. For each system added, leave all previously selected
channel transmitters on, using Step 3 select the current
group, select ClearScan Group and press SET.
3. The display will show the remaining clear channels in the
group with the clearest flashing.
C. Frequency Assignment (User Defined Groups Only)
4. Select the desired channel with UP/DOWN or simply press
SET for the clearest channel.
1. With a User Group (19u or 20u) and channel selected in
step three, press SET until the Frequency Number flashes.
2. Use UP/DOWN to scroll in 25 kHz steps to the desired
frequency. With the desired frequency displayed press
SET. Hint: holding in the arrow key will increase the
speed of the scroll. Just release and press again for fine
control.
5. The channel will be selected and return to the main display.
6. Repeat until all systems are set up.
G. ClearScan Band: selects and ranks the clearest 16 frequencies in the 24 MHz bandwidth regardless of groups, channels
or previous coordination. This feature is useful for selecting
one clear channel in a very busy RF environment.
3. Repeat until all desired Channels in the user group are
assigned a frequency.
1. From the Options screen, select ClearScan Band and
press SET.
4. Press MENU twice to return to the main display screen.
2. This scan will run until SET is pressed again so it can be
used to evaluate a site over an hour, day or even a week.
D. Advanced ClearScan: This feature automates the process
of finding a clear group of inter-modulation free channels
and the clearest channels within those groups. From the
main display screen push Menu twice to go to the MENU
Screen and press SET to select ClearScan.
3. To end scan, press SET, the program displays Group 21S
with the clearest open frequencies in the band assigned
channels (up to 16).
4. These frequencies will remain assigned to this group until
ClearScan Band is run again.
Caution: Unlike the factory assigned groups, the channels in
21S are not coordinated. If more than two channels from group
21S are used, the combination must be walk tested with all
transmitters on before use.
-4-
ENGLISH
H. Change Lock-Out: Protects settings by disabling the SET
button.
M. Sound Check Screen: can be used to walk test the performance area.
1. To engage lock-out press and hold the UP and DOWN
arrow keys together for 5 seconds, until the padlock symbol appears.
1. From the main display screen, press MENU twice to display the options screen, scroll down to Sound Check and
press set. The sound check screen will be displayed and
it includes the following elements.
2. The MENU button still allows different screens to be displayed but no settings can be changed and ClearScan
will not run.
2. Peak Hold Audio Meter - allows you to set the transmitter gain as high as possible for the application which
maximizes the signal to noise ratio. Sing, yell or play the
guitar at the loudest desired volume and adjust the gain
so the meter peaks between 50 and 100.
3. To reactivate the SET key, press and hold the UP and
DOWN keys again for 5 seconds until the padlock symbol disappears.
I. Continue Set Up: make certain the mixer or amplifier input
used for the REV is muted or turned down to a minimum level.
3. Low Hold RF Meter will tell you if you have adequate
coverage in the performance area. If the RF level drops
below 10 on the meter during a walk of the desired area,
reposition the antennas, or change the channel and
retest.
J. Plug an audio cable (not supplied) into the 3 pin XLR or 1/4
inch output of the receiver.
NOTE: The XLR connector is the preferred connection since the
output is balanced and will be more immune to noise for
longer runs of cable, although either can be used with good
results.
4. Drop Counter - will tell you if you are exceeding the
range or may have some interference problems to contend with. Ideally this count would be zero for the desired
performance area. If there are several squelch breaks
while walking the area, adjust and check the antennas
and re-walk.
K. Voice or Guitar: The REV system guitar optimization mode
requires both the transmitter and receiver be placed into guitar mode.
5. Dropout Tone - Press the UP button and the speaker
symbol will change. Now when the receiver increments
the dropout counter, it will also send a 1 kHz audio tone
out the output so you can hear where on the stage the
drop occurs. Press DOWN to turn off the tone. The tone
will also deactivate when you return to the main display.
1. Press Menu twice to display the options screen, scroll
down to Audio Edit and press SET.
2. With the Audio Edit Screen displayed press SET until
Audio setting flashes.
3. Use UP/DOWN to select Voice or Guitar mode. The
default setting is Voice.
6. Left and Right Antenna Check - Press and hold the
SET button until the screen changes to two large meters
marked L and R. This screen is used to check the continuity of the left and right antennas. If the RF levels are
not approximately the same, check connections. Press
SET to return to Sound Check Screen.
4. Make certain the bodypack transmitter is in the same
mode.
5. Now refer ahead to transmitter setup and return to step
10 when that is completed.
6. With the transmitter on, speak into the microphone or
play the guitar. Turn up the level on the mixer or
amplifier until you are able to hear the desired signal.
If no audio is present, repeat setup and refer to the
troubleshooting section.
N. Squelch Adjustment - The squelch setting can be used to
maximize range or immunity to noise.
1. Turn the transmitter off and from the receiver Options
screen select Squelch and press SET.
L. Audio Output Level Adjustment: It may be necessary to
adjust the receiver output until the volume level from the
wireless system approximates the level of an equivalent
wired mic/instrument.
2. The current squelch setting will be displayed, the setting
will flash and (the tone coded portion of the squelch is
turned off in set mode to allow you to notice any changes
in the amplitude squelch setting).
1. From the main display screen, press MENU twice to display the menu screen, scroll down to Audio Edit and
press SET.
3. Adjust the squelch using the UP/DOWN keys and walk
test the unit. Maximum squelch (15) maximizes noise
immunity but limits the range. Minimum squelch (1) will
maximize the range but may allow noise at the end of
range.
2. Press SET to step through Mic/Line, Balanced (XLR Lvl)
and Unbalanced Audio (HiZ Lvl).
3. Use the UP and DOWN to adjust output levels when
flashing. The default settings are Mic and -18dB on the
outputs.
4
4. Repeat until desired range coverage is acceptable with
the maximum possible squelch.
Press SET a final time so nothing is flashing to save the
setting.
5. Press MENU to return to main screen.
-5-
ENGLISH
Headphone Operation
1.
With the transmitters and receivers setup and operating,
plug stereo headphones into the 1/4 inch jack on the front
panel.
2.
The Selected Receiver LED will indicate receiver 1 is being
monitored. Press the Receiver Select button once to
change from Receiver 1 to 2.
3.
Press the Receiver Select button once more and both indicator LEDs will light. You can now listen to both receivers.
NOTE: if both receivers are set to the same channel, the
volume will double.
4.
Pressing the Select button once more cycles back to
Receiver 1.
Antenna Connections
1.
Install the two 1/2 wave antennas to the “antenna in” jacks
on the rear panel.
NOTE: The two 1/2 wave antennas included with the REV can
be remote mounted. For an additional 5dB gain use the LPA500
log periodic directional antenna.
2.
The REV-DUAL is equipped with a left and right antenna
output jack. These jacks can be used to connect up to 3
REV-DUAL (6 receivers) to two antennas without any additional equipment. DO NOT remove “dummy” loads unless
connecting to another receiver.
3.
Figure 3 shows the connection diagram for 3 REV-DUAL
units.
4. UP to 12 REV-DUAL units can be operated with just two
antennas with the optional APD4+ antenna distribution unit
(see Figure 4).
Figure 4
Antenna Chain with APD4-B
Figure 3
Antenna Chaining
-6-
12 Volt Power On “Antenna In” Jacks
REV-LINK PC Software
To power in line antenna amplifiers, 12 volt power is available on
the center pin of the antenna in jacks. This power is disabled
when the REV leaves the factory but may be turned on by the
installer.
To turn on the 12 volts, first take off the cover of the radio by
removing 14 screws. There is a 2 pin “header” and a “jumper”
behind the “XLR” audio connector on each of the two large printed circuit boards. See Figure 5. The jumper is installed on one
pin of the header at the factory. To turn on power, unplug the
jumper and install it on both pins of the header.
1.
Software to monitor and control the REV receivers from a
PC through the USB port and a UCC-1 is available at
www.electrovoice.com. Minimum system requirements
are:
Windows 2000
512 Mbytes of RAM
One USB port
UCC-1 or N8000
CD-ROM Drive
2 Mbytes of hard drive memory
CAUTION: Do not attach antennas and splitters with a DC short
circuit to the antenna in jacks when the power is turned on.
Damage could result to the splitter or receiver.
The following antennas and accessories may be used with
power on:
FA-1, CLA-X, APD4+, APD4-1+, UAA-50
The following antennas and accessories may be used with the
power off:
FA-1, CLA-X, LPA-500, APD4, APD4-1
Power Enabled
Power Disabled
Figure 5
Moving Jumper
(Be sure to move Jumper on Both
Receiver printed circuit boards.)
-7-
ENGLISH
ENGLISH
3.2 Handheld Transmitter REV-HXX
REV-HXX Controls, Connectors, and Indicators
Figure 7
View of Transmitter Controls
Figure 6
Handheld Transmitter
1. Main Display - LCD (Channel, Frequency and Battery Level
Gauge) Display backlight - flashes when battery is low
4. Two AA Batteries
5. Battery Cover - Screw Type
2. Power On/Off Switch
6. Interchangeable Microphone Element
3. Control buttons - SET, UP, and DOWN
-8-
ENGLISH
Handheld Transmitter REV-HXX
A. Insert Batteries. Lower the battery cover by unscrewing it
completely. Slide down the inner cover and insert two AA batteries, positive ends toward the display.
B. Turning the transmitter On - With battery compartment still
open, hold the unit so you can see the display and the control panel. Turn the unit on by sliding the power switch forward to the ON position. The display backlight will light for a
second and the display will show the battery level, Group
and Channel numbers.
G. RF Transmit Level
1. With the RF Transmit Level displayed, press SET and the
Level (on the right) will flash.
2. Use UP and DOWN to set it at Hi (50mW) or Lo (5mW).
3. Press SET and DOWN at the same time once to return to
the Group and Channel mode.
H. Power Lock Out - Disables the power switch
1. To engage power lock press and hold SET, UP and
DOWN at the same time until ON-LOCK appears in the
display.
C. Change the group and channel numbers
1. Press SET, the Group number will flash and can be
changed with the UP/DOWN keys.
2. To turn the unit off while in ON-LOCK, place the power
switch in the OFF position and push any one of the SET,
UP or DOWN buttons.
2. Once the desired Group number is showing, press SET
to select and the Channel number will flash.
3. To remove the lock, press and hold SET, UP and DOWN
again at the same time until ON-OFF appears in the display.
3. Select the Channel and press SET again, the flashing will
stop and the channel is now set.
D. To See Other Screens
4. The ON-LOCK mode can also be entered by quickly
cycling the power switch three times. But using this
method the unit will not be in ON-LOCK the next time it is
powered up.
1. Press SET and DOWN at the same time to display the
exact transmit frequency.
2. Press SET and DOWN at the same time to display the
battery level in percent.
3. Press SET and DOWN again to display the gain setting
screen.
I. Change Lock-Out - Disables the SET button to
protect settings.
1. To engage Change Lock press and hold the UP and
DOWN arrow keys together until SECURE appears in the
display.
4. Press SET and DOWN again to show the RF Transmit
Level.
2. To remove the Change Lock, press and hold the UP and
DOWN keys until ACCESS appears in the display.
5. SET and DOWN one more time returns you to the Group
and Channel screen.
J. Verify reception.
E. Frequency Edit Mode - (User Group Only)
1. With the frequency screen displayed, press SET and use
UP and DOWN to adjust frequency.
2. Press SET and DOWN at the same time four times to
return to Group and Channel mode.
F. Gain Setting Mode
1. With the Gain Screen displayed, press SET and the level
numbers will flash.
2. Use UP and DOWN to adjust the transmitter gain. Watch
the Audio meter on the receiver and set the gain to peak
between 50 and 100 when singing/speaking into the
microphone as loud as it will be used during the performance.
3. Press SET and DOWN at the same time two times to
return to Group and Channel mode.
NOTE: Operating with the transmitter audio gain set as high as
possible (without distortion or peaks all the way to the right end
of the meter) will result in the best performance and highest signal to noise ratio.
-9-
1. With the transmitter and receiver on and matching Group
and Channel, the main receiver display should be indicating an RF signal on the bar graph.
2. Speak into the microphone and the Audio Meter bar
graph should indicate audio signal presence.
3. If the level meters do not show reception, make certain
the group and channel are matching and refer to the trouble shooting section.
4. Go back to Section 3.1 - Receiver Setup and Operation,
Step 1, to complete system set up and test.
ENGLISH
3.3 Handheld Transmitter REV-PHXX
REV-PHXX Controls, Connectors, and Indicators
Figure 8
Handheld Transmitter
1. Main Display - LCD (Channel, Frequency and Battery
Level Gauge)
2. Red Low battery LED indicator
3. Power On/Off Switch
4. SET control button
Figure 9
View of Transmitter Controls
6. Channel/Frequency Down Switch
7. Interchangeable Microphone Element
8. 9V Battery Compartment
9. Battery Cover - Screw type
5. Channel/Frequency Up Switch
-10-
ENGLISH
Handheld Transmitter REV-PHXX
A. Insert Batteries. Remove the battery cover by unscrewing it
completely. Insert a 9V battery terminal end first into the battery compartment. NOTE: The HTU-2 unique design allows
the battery to be inserted and used reqardless of the positive
and negative terminal position.
B. Turning the transmitter On - With battery compartment still
open, hold the unit so you can see the display and the control panel. Turn the unit on by sliding the power switch forward to the ON position. The low battery LED will light for a
second and the display will show the Group and Channel
numbers.
G. RF Transmit Level
1. With the RF Transmit Level displayed, press SET and the
level (on the right) will flash.
2. Use UP and DOWN to set it at Hi (50mW) or Lo (5mW).
3. Press SET and DOWN at the same time once to return to
the Group and Channel mode.
H. Power Lock Out - Disables the power switch
1. To engage power lock press and hold SET, UP and
DOWN at the same time until ON-LOCK appears in the
display.
C. Change the group and channel numbers
1. Press SET, the Group number will flash and can be
changed with the UP/DOWN keys.
2. To turn the unit off while in ON-LOCK, place the power
switch in the OFF position and push any one of the SET,
UP or DOWN buttons.
2. Once the desired Group number is showing, press SET
to select and the Channel number will flash.
3. To remove the lock, press and hold SET, UP and DOWN
again at the same time until ON-OFF appears in the display.
3. Select the Channel and press SET again, the flashing will
stop and the channel is now set.
D. To see Other Screens
4. The ON-LOCK mode can also be entered by quickly
cycling the power switch three times. But using this
method the unit will not be in ON-LOCK the next time it is
powered up.
1. Press SET and DOWN at the same time to display the
exact transmit frequency.
2. Press SET and DOWN at the same time to display the
battery level in percent.
3. Press SET and DOWN again to display the gain setting
screen.
I. Change Lock-Out- Disables the SET button to
protect settings.
1. To engage Change Lock press and hold the UP and
DOWN arrow keys together until SECURE appears in the
display.
4. Press SET and DOWN again to show the RF Transmit
Level.
2. To remove the Change Lock, press and hold the UP and
DOWN keys until ACCESS appears in the display.
5. SET and DOWN one more time returns you to the Group
and Channel screen.
J. Verify reception
E. Frequency Edit Mode - (User Group Only)
1. With the frequency screen displayed, press SET and use
UP and DOWN to adjust frequency.
1. With the transmitter and receiver on and matching Group
and Channel, the main receiver display should be indicating an RF signal on the bar graph.
2. Press SET and DOWN at the same time four times to
return to Group and Channel mode.
2. Speak into the microphone and the Audio Meter bar
graph should indicate audio signal presence.
F. Gain Setting Mode
1. With the Gain Screen displayed, press SET and the level
numbers will flash.
2. Use UP and DOWN to adjust the transmitter gain. Watch
the Audio meter on the receiver and set the gain to peak
between 50 and 100 when singing/speaking into the microphone as loud as it will be used during the performance.
3. Press SET and DOWN at the same time two times to
return to Group and Channel mode.
NOTE: Operating with the transmitter audio gain set as high as
possible (without distortion or peaks all the way to the right end
of the meter) will result in the best performance and highest signal to noise ratio.
-11-
3. If the level meters do not show reception, make certain
the group and channel are matching and refer to the trouble shooting section.
4. Go back to Section 3.1 - Receiver Setup & Operation
Step 10 to complete system set up and test.
ENGLISH
3.4 Bodypack Transmitter
REV-BP
Figure 11
Control View
Figure 10
Bodypack Transmitter
Figure 12
Top View
7
OR
Figure 13
Belt Clip Attachment
Rev-BP Controls, Connectors, and Indicators
1.
Antenna - Flexible 1/4 wave antenna removable (replacement part - see Section 10)
5.
LCD Display (Channel or Frequency, Battery Level Indication)
6.
Display Control Buttons (SET/Up/Down)
2.
Power On/Off Switch
7.
3.
Low Battery LED Indicator
Belt Clip (Removable and Detachable, Flat or Cell Phone
Style Clip)
4.
TA4 Audio Connector
8.
9V Battery Compartment
-12-
ENGLISH
Bodypack Transmitter REV-BP
A. Install Antenna. The REV-BP is equipped with a detachable
antenna. Screw in the antenna included with the system.
See the accessories section at the end of this manual for
optional antennas.
H. Gain Setting Mode
1. With the Gain Setting displayed, press SET and the level
numbers will flash.
2. Use UP and DOWN to adjust the transmitter gain. Watch
the Audio meter on the receiver and set the gain to peak
between 50 and 100 when singing/speaking into the
microphone as loud as it will be used during the performance.
B. Insert Batteries. Pinch the battery door tabs inward and pull
the door open. Insert a 9V battery as indicated by +/- in the
holder. (Note: the REV-BP unique design allows the battery to
be inserted and used regardless of the positive and negative
terminal position, the indicators are there for reference only).
C. Turning the transmitter On - With battery compartment still
open, turn the unit on with Power switch on the top panel.
The battery low LED and display back light will light for a second and the display will show the battery level, the Group
and Channel numbers.
D. Change the group and channel numbers
1. Press SET, the Group number will flash and can be
changed with the UP/DOWN keys.
3. Press SET and DOWN at the same time two times to
return to Group and Channel mode.
NOTE: Operating with the transmitter audio gain set as high as
possible (without distortion or peaks all the way to the right end
of the meter) will result in the best performance and highest signal to noise ratio.
I. RF Transmit Level
1. With the RF Transmit Level displayed, press SET and the
Level (on the right) will flash.
2. Once the desired Group number is showing, press SET
to select and the Channel number will flash.
2. Use UP and DOWN to set it at Hi (50mW) or Lo (5mW).
3. Select the Channel and press SET again, the flashing will
stop and the channel is now set.
E. To See Other Screens
3. Press SET and DOWN at the same time once to return to
the Group and Channel mode.
J. Power Lock Out - Disables the power switch
1. Press SET and DOWN at the same time to display the
exact transmit frequency.
1. To engage power lock press and hold SET, UP and
DOWN at the same time until ON-LOCK appears in the
display.
2. Press SET and DOWN at the same time to display the
battery level in percent.
3. Press SET and DOWN again to display the gain setting
screen.
2. To turn the unit off while in ON-LOCK, place the power
switch in the OFF position and push any one of the SET,
UP or DOWN buttons.
4. Press SET and DOWN again to show the RF Transmit
Level.
3. To remove the lock, press and hold SET, UP and DOWN
again at the same time until ON-OFF appears in the display.
5. Press SET and DOWN again for Voice/Guitar.
4. The ON-LOCK mode can also be entered by quickly
cycling the power switch three times. But using this
method the unit will not be in ON-LOCK the next time it is
powered up.
6. Set and Down one more time returns you to the Group
and Channel screen.
F. Frequency Edit Mode - (User Group Only)
1. With the frequency screen displayed, press SET and use
UP and DOWN to adjust frequency.
K. Change Lock-Out - Disables the SET button to
protect settings.
1. To engage Change Lock press and hold the UP and
DOWN arrow keys together until SECURE appears in the
display.
2. Press SET and DOWN at the same time four times to
return to Group and Channel mode.
2. To remove the Change Lock, press and hold the UP and
DOWN keys until ACCESS appears in the display.
G. Attach Microphone or Guitar/Instrument
Microphone - plug the TA4 end of the microphone cable into
the top panel of the REV-BP. Speak into the microphone and
the Audio Meter bar graph should indicate audio signal presence.
L. Verify reception
Guitar - Press SET-DOWN until voice is displayed. Press
SET, display will flash, press UP and display will change to
Guitar, press set and return to main display. NOTE: The REV
receiver must also be put into Instrument mode to optimize
the system for guitar. Plug in the guitar TA4 cable. Strum the
guitar and the Audio Meter bar graph on the receiver should
indicate audio signal presence.
1. With the transmitter and receiver on and matching Group
and Channel, the main receiver display should be indicating an RF signal on the bar graph.
2. Speak into the microphone and the Audio Meter bar
graph should indicate audio signal presence.
3. If the level meters do not show reception, make certain
the group and channel are matching and refer to the
trouble shooting section.
4. Go back to Section 3.1 - Receiver Setup & Operation
Step 1) to complete system set up and test.
-13-
ENGLISH
3.5 Bodypack Transmitter
REV-WT
Control View
Bodypack Transmitter
Top View
Belt Clip Attachment
REV-WT Controls, Connectors,and Indicators
1. Antenna - Flexible 1/4 wave
(replacement part see Section 10)
antenna
removable
2. Power On/Off Switch
3. Low Battery LED Indicator
4. TA4 Audio Connector
5. LCD Display (Channel or Frequency, Battery Level
Indication)
-14-
6. Display Control Buttons (Menu/Set/Up/Down)
7. Belt Clip (Removable and Detachable, Flat or Cell Phone
Style Clip)
8. Battery Compartment - Two AA
9. Battery Recharge contacts (for use optional BH-200
charging Station)
ENGLISH
Bodypack Transmitter REV-WT
A. Install antenna. The REV-WT is equipped with a detachable
antenna. Screw in the antenna included with the system. See
the accessories section at the end of this manual for optional antennas.
H. Gain Setting Mode
1. With the Gain Screen displayed, press SET and the level
numbers will flash.
2. Use UP and DOWN to adjust the transmitter gain. Watch
the Audio meter on the receiver and set the gain to peak
between 50 and 100 when singing/speaking into the
microphone as loud as it will be used during the performance.
B. Insert Batteries. Pinch the battery door tabs inward and pull
the door open. Insert two AA batteries as indicated by +/- in
the holder.
C. Turning the transmitter On - With battery compartment still
open, turn the unit on with Power switch on the top panel.
The battery low LED and display back light will light for a second and the display will show the battery level, the Group
and Channel numbers.
D. Change the group and channel numbers
1. Press SET, the Group number will flash and can be
changed with the UP/DOWN keys.
2. Once the desired Group number is showing, press SET
to select and the Channel number will flash.
3. Press MENU four times to return to Group and Channel
mode.
NOTE: Operating with the transmitter audio gain set as high
as possible (without distortion or peaks all the way to the
right end of the meter) will result in the best performance
and highest signal to noise ratio.
I. RF Transmit Level
1. With the RF Transmit Level displayed, press SET and the
Level (on the right) will flash.
3. Select the Channel and press SET again, the flashing will
stop and the channel is now set.
2. Use UP and DOWN to set it at Hi (50 MW) or Lo (5mW).
E. To See Other Screens
1. Press MENU to display the exact transmit frequency.
3. Press MENU three times to return to the Group and
Channel mode.
2. Press MENU again to display the gain setting screen.
3. Press MENU again to show the RF Transmit Level.
J. Power Switch Settings - Power Lock-Out
4. Press MENU again for Voice/Guitar.
1. With the Power Switch Settings screen display press Set
and use UP and DOWN to select one of the options:
5. Press MENU again for Power Switch Setting
. On off Mode - Switch turns power on and off
normally
. Mute Mode - Switch turns off audio but leaves RF sig-
6. MENU one more time returns you to the Group and
Channel screen.
F. Frequency Edit Mode - (User Group Only)
nal live. To turn the unit off, put switch in off position
and press MENU, SET, UP or DOWN.
1. With the frequency screen displayed, press SET and use
UP and DOWN to adjust frequency.
. tOnLock(k) Mode - Switch is disabled one time. To
2. Press MENU five times to return to Group and Channel
mode.
turn the unit off, put switch in off position and press
MENU, SET, UP or DOWN. The next time the unit is
powered on the on/off will work normally
G. Attach Microphone or Guitar/Instrument Microphone-
. On-Loc(k) Mode - Switch is disabled. To turn the unit
plug the TA4 end of the microphone cable into the top panel
of the REV-WT. Speak into the microphone and the Audio
Meter bar graph on the receiver should indicate audio signal
presence.
off, put switch in off position and press MENU, SET,
UP or DOWN
2. To change the power switch mode return to this screen
and select a different mode.
Guitar - Press MENU until voice is displayed. Press SET, display will flash, press UP and display will change to Guitar,
press SET and return to main display. NOTE: The REV
receiver must also be put into Guitar mode to optimize the
system for guitar. Plug in the guitar TA4 cable. Strum the guitar and the Audio Meter bar graph on the receiver should
indicate audio signal presence.
3. Press Menu once to return to Group and Channel mode.
4. The tON-LOCK mode can also be entered by quickly
cycling the power switch three times. By using this
method the unit will not be in ON-LOCK the next time it is
powered up.
-15-
ENGLISH
K. Change Lock-Out - Disables the SET button
to protect settings
N. Verify reception
1. To engage change Lock press and hold the UP arrow key
about four seconds until SECURE appears in the display.
2. To remove the Change Lock, press and hold the UP key
until ACCESS appears in the display.
1. With the transmitter and receiver on and matching Group
and Channel, the main receiver display should be indicating an RF signal on the bar graph.
2. Speak into the microphone and the Audio Meter bar
graph should indicate audio signal presence
L. No RF Operation
During a show or setup it is sometimes desired to turn on a
transmitter without the RF carrier to check the channel, assign
a new channel or check battery levels.
3. If the level meters do not show reception, make certain
the group and channel are matching and refer to the trouble shooting section.
1. Press and hold the DOWN button when you turn the
power switch on and tr OFF will be displayed.
4. Go back to Section 3.1 - (Receiver Setup & Operation
Step 1) to complete system set up and test
2. All setup functions will work but there will be no RF carrier or audio
The tr OFF mode is a one time operation, the next time the unit
is turned on it will be in normal operation mode.
M. Master Reset
To return the transmitter to factory default settings and erase all
user defined frequencies press and hold the MENU and DOWN
keys at the same time for 8 seconds.
-16-
Section 4 - Receiver Display Screens and Functions
Main Operating Screen
Figure 14
Main Operating Screen
Display:
1.
Group Number
18 factory + 2u user defined
2.
Channel Number
01 - 16
3.
Microphone Label or Name
8 characters
4.
Battery Status
100 to 0 Pct in 20 Pct steps / Flash if low
5.
Audio Meter
0 to 100% Deviation
6.
RF Signal Strength
1 to 100
7.
Antenna Diversity Status
left or right antenna
8.
Edit Lockout Status
Padlock next to GP indicates Locked
Controls:
1.
[MENU] goes to next screen
2.
[UP] + [DOWN] for 3 seconds Sets / Resets Edit Lockout
3.
[SET] for 3 seconds to change to the alternate operating screen
4.
[SET] + [MENU] + [UP] + [DOWN] for 3 seconds for master reset
5.
[UP] or [DOWN] adjust LCD display contrast up and down
Alternate Main Operating Screen
-17-
ENGLISH
ENGLISH
Group / Channel Edit Screen
Figure 15
Group / Channel Edit Screen
Display:
1.
Frequency Band Designation
A or B
2.
Group Number
18 factory + 2u user defined
3.
Channel Number
01 - 16
4.
TV Channel
US TV channel the current frequency is in
5.
Transmit / Receive Frequency
24 MHz operating band in 25 kHz steps
Controls:
1.
[MENU] goes to next screen
2.
[UP] + [DOWN] for 3 seconds Sets / Resets Edit Lockout
If Edit Mode is not locked out:
3.
[SET]
A. Starts Edit mode; Group Number begins flashing
B. Steps between Group Number and Channel Number, frequency (in user groups only), label.
Selected field flashes to indicate it can be changed.
C. Effects change after [UP] or [DOWN] have been pressed, then returns you to Display Mode.
4.
[MENU] stops Edit mode without effecting changes since [SET] was last pressed.
5.
[UP] or [DOWN] (in Edit Mode)
A. Increments or decrements selected field when flashing.
B. [UP] and [DOWN] auto-repeat when the button is held. Auto-repeat starts after the button has been held
for 1 second. Group and Channel have a slow auto-repeat.
Anytime Group or Channel is changed, the Frequency field is updated to show the correct frequency for that
Group and Channel.
-18-
ENGLISH
Functions Screen
Controls:
Use [UP] [DOWN] to select and view other functions
Use [SET] to start the function
Figure 16
Functions Screen
ClearScan All: searches all defined frequency groups for the
ones with the greatest number of receiver channels clear of
interference. Once a group is selected an additional scan is
made to determine the best frequencies in the group:
After pressing [SET]
Press [MENU] to abort
Figure 17
ClearScan All Groups Screen
After scanning, ClearScan will display the group that has the
most interference free receive channels. These clear channels
are displayed on the right half of the screen. Busy channels are
represented by an X. Press [SET] to place the receiver on this
group. ClearScan then scans to select the clearest channels
within the group (see ClearScan Group). Press [SET] to accept
this channel and return to the operating screen.
The [UP] and [DOWN] buttons may be used to select the next
best group/channel and so forth.
Press [MENU] to return to the Operating Screen with the receiver set to the Group, Channel and Frequency it was on prior to
executing ClearScan.
-19-
Figure 18
Clear Channel Screen
ENGLISH
ClearScan Group: scans channels within the currently selected
frequency group and displays the channels that are clear of interference.
After pressing [SET]
Press [MENU] to abort
After scanning the currently selected group, ClearScan will display the channels that are free of interference. These clear channels are displayed on the right half of the screen. The channels
are ranked according to noise; the channel with the least amount
of interference is presented first.
Figure 19
ClearScan Group Screen
The [UP] and [DOWN] buttons may be used to select a different
clear channel within the currently selected group.
Press [SET] to place the receiver on the currently selected channel and return to the Operating Screen.
Press [MENU] to return to the Operating Screen with the receiver set to the Group, Channel and Frequency it was on prior to
executing ClearScan.
Figure 20
Clear Channel Screen
ClearScan Band: continuously scans all frequencies within the
bandwidth of the receiver. The scan is started at the frequency
the receiver is on and proceeds in 200 kHz increments on either
side until the whole band is scanned. The scan is repeated until
ended by the user.
After pressing [SET]
After pressing [SET]
Each frequency is scanned continuously within the band; the
highest reading on each frequency is stored to give a worst-case
reading as long as the scan is being done.
Figure 21
ClearScan Band Screen
Pressing [SET] ends the scan. After scanning, ClearScan places
the 16 best frequencies in the band into ‘scanned’ group 21s.
This group is stored to prevent accidental erasure. The best frequency is placed at channel one and displayed.
The [UP] and [DOWN] buttons may be used to select the next
clear channel.
Press [SET] to accept currently selected frequency and return to
the Operating Screen.
Press [MENU] to return to the Operating Screen with the receiver set to the Group, Channel and Frequency it was on prior to
executing ClearScan.
-20-
Figure 22
Clear Channel Screen
ENGLISH
Audio Edit
Display:
1.
Audio
2.
Character Set
Controls:
1.
[MENU] returns to main screen
2.
[SET] (First time) enters Audio Edit Mode:
Figure 23
Audio Edit Screen
A. Starts flashing Audio Setting
B. Selects setting and steps to next field
3.
[UP] and [DOWN] change setting that is flashing.
Guitar Mode:
When using the REV-BP as a wireless guitar system, the
Bodypack transmitter and the receiver need to be set in Guitar
mode for optimal performance.
Figure 24
Audio Edit Guitar Screen
In Audio Edit Screen press [UP/DOWN] to change between
Voice and Guitar.
Press [SET] to save setting.
Press [MENU] to return radio to the previous state.
Set Squelch Threshold:
Display Mode:
Press [SET]
Controls:
1.
[SET] disables tone squelch and enables edit mode
(allows squelch level adjustment). Squelch level will flash
in edit mode. Tone Squelch is disabled.
Figure 25
Squelch Screen
2.
[UP] raises the squelch threshold.
3.
[DOWN] lowers the squelch threshold.
4.
[SET] saves the new threshold.
5.
[MENU] (From edit mode) restores threshold to the setting
just after the last time [SET] was pressed.
Figure 26
Squelch Edit Screen
-21-
ENGLISH
Sound Check Screen:
Display:
1.
Battery Status
2.
Peak Audio level held while screen is displayed
3.
Range of RF Signal Strength
4.
Count Tone on or off indicator
5.
Squelch Break Counter
Figure 27
Sound Check Screen
Controls
1.
[MENU] goes to next screen
2.
[SET] clears screen display variables and restarts Sound
Check
3.
[UP] turns on the Count Beep (
the beep off (
).
4.
Press and hold [SET] shows Antenna Test
), [DOWN] turns
Figure 28
Sound Check Screen
Antenna Test Screen
Copy Group
Selecting the Copy Group will copy the currently selected group
to the first unused User Group.
Press [SET] to accept the group and places the unit into the
Frequency Edit Screen (User Defined groups only) for editing.
Figure 29
Copy Group Screen
Press [UP/DOWN] to select a different user group.
Press [MENU] to return radio to its previous state.
Figure 30
Copy Group Edit Screen
-22-
ENGLISH
Clear Group:
Clear Group will delete all channels within the selected user
group.
Press [SET] to clear the group, and place the unit in the
Group/Channel edit screen with Group=1, Channel=1.
Group will be flashing to enable the selection of a new group.
Figure 31
Clear Group Screen
Press [MENU] to return radio the operating screen.
Figure 32
Clear Group Edit Screen
Name Edit Screen
Display
1.
Microphone Name (8 characters)
Controls:
1.
[MENU] cancels any unsaved changes and returns to
main operating screen
2.
[SET] (First time) enters Edit Mode: Starts flashing first
character in Name
3.
[UP] scrolls up through the available Character Set for the
flashing character
4.
[DOWN] scrolls down through the available Character Set
for the flashing character
5.
[SET] saves the currently selected character into the
curent character position of the Name field and advances
to the next character position of the Name field
6.
[SET] after the eighth character saves all changes and
stops Edit Mode
Figure 33
Name Edit Screen
-23-
ENGLISH
CAN BUS Address
Selecting the CAN BUS Address function will allow you to assign
a unique address for use with the REVLink and IRIS NET computer software.
Press [SET] to edit address (address will flash).
Press [UP/DOWN] to change address.
REV-Dual has two addresses tied together. The Channel 1 is
always even and Channel 2 is odd.
Figure 34
Can Bus Screen
Press [MENU] to return radio to its previous state.
Figure 35
Can Bus Edit Screen
-24-
Section 5 - Transmitter Screens and Detail Functions
ENGLISH
Transmitter Display and Controls:
Display Mode:
1.
Group and Channel
2.
Frequency
3.
Transmitter Gain
4.
RF Transmit Power
5.
Bodypack only Voice/Guitar Mode
Controls:
Bodypack
Only
1.
Press SET once, GP will flash, use UP and DOWN to adjust
2.
Press SET again to accept GP, CH will flash, adjust with UP/DOWN
3.
Press SET again to accept CH and channel will be installed.
4.
Press SET and DOWN at the same time to change to frequency mode
5.
Press SET and use UP/DOWN to set frequency (only when the Group
is set to 19u - 20u)
6.
Press SET and DOWN at the same time to change to the Gain mode
7.
Press SET and UP/DOWN to adjust the transmitter gain setting
8.
Press SET and DOWN at the same time to change to the RF mode
9.
Press SET and UP/DOWN to adjust the RF transmit power (HI or Lo)
10. Bodypack Only press SET and DOWN at the same time to change Voice/Guitar mode
11. Press SET and UP/DOWN to switch between Voice and Guitar Mode.
Note: Always place receiver in Guitar mode as well to maximize performance, see Section 3.1.9
12. Press SET and DOWN at the same time to return to Group mode
13. Press and hold UP and DOWN for 3 seconds to lock out SET
14. Press and hold UP and DOWN again to activate SET
15. Press and hold UP, DOWN and SET to lock power (see below)
16. Press and hold UP, DOWN and SET to unlock power
Lockout:
Transmitter On/Off Lock Out:
Press and hold [UP]+[DOWN] for 3 seconds, the unit will not
allow editing of any of the user variables: Group, Channel, frequencies, Squelch, Name, and ClearScan.
There are two On/Off lock out modes available, One Time and
Every time.
One Time: Cycling the power switch 3 times in under 3 seconds
and On-Loc will be displayed for a second and then return to
normal operation. The power switch alone will no longer turn the
unit off. To turn the unit off, put the power switch in the off position (On-Loc will be displayed) open the battery door and press
[Menu], [Set], [Up] or [Down] and the unit will power down. The
next time the unit is powered on the power switch will operate
normally.
-25-
ENGLISH
Section 6 - Guidelines for Best Performance
Compatibility
Potential Sources of Interference
The transmitter and receiver must be of the same frequency
band and set to the same group and channel in order to work
together. The REV is available in four US frequency bands, C1,
C2, C3, C5. The band information is available in the
Group/Channel edit screen on the receiver, the bottom label on
the handheld transmitter, and on the back panel label on the
bodypack.
There are many potential sources of interference for your wireless system. Any electronic product that contains digital circuitry
including digital signal processors (reverb/multi-effects units),
electronic keyboards, digital lighting controllers, CD and DVD
players, and computers, all emit RF energy that can adversely
affect the performance of your wireless system. It is always best
to place the receiver as far away as possible from these devices
to minimize potential problems.
Using Multiple Wireless Systems
If two or more REV systems and/or other UHF/VHF wireless
systems are being used in the same location, proper frequency
coordination is necessary to avoid interference. All channels in
the REV factory set groups are designed to work together, so if
channels from just one group are used, no further coordination
is required.
Contact your dealer or Telex for assistance if you are planning
more than 12 systems or using the REV with other wireless
equipment.
ALWAYS REMEMBER: SAME GROUP, DIFFERENT CHANNEL.
IMPORTANT NOTE: Always use the smallest preset group
that meets your needs. For instance, if you want to set up 6
units, use one of the groups of 12 frequencies. The smaller
the preset group, the more compatible the frequencies are.
IMPORTANT NOTE: Lo transmit power must be used for
factory preset groups of 16 units working simultaneously.
Analog and Digital Television stations can also interfere with
your wireless system. The REV is designed to operate over
24MHz of RF bandwidth, which covers four TV channels. The
factory presets on the REV are optimized for conditions where
one, two, or possibly three of the four stations are covered in
your area. If three of the four stations are used in your area, it
will severely limit the number of systems that will operate together and you should be using a different band.
Battery Recommendations
Fresh 9-volt or AA Lithium-Iron batteries from a quality manufacturer will yield the best performance from your transmitters.
Rechargeable 8.4-volt Ni-Cad batteries can be used but will
result in much shorter operational time.
When the REV-BP or REV-PH transmitters are turned on, the
red battery LED will flash once if the battery is good. If the light
does not light or stays lit continuously, the battery is weak or
dead. If the light comes on during use, the battery is weakening
and should be replaced as soon as possible. If sound quality
degrades during use, it may be the result of a weakening battery.
Multiple Systems and Advanced ClearScan
Because all of the channels in the factory set groups are compatible, Advanced ClearScan can be used to set up multiple systems quickly and with confidence. When setting up more than
one system, set up the first system using the ClearScan All function. Once the working Group has been established, leave the
first transmitter on, set the next receiver Group to the working
Group and run ClearScan Group.
Caution: The battery level indicators, on the transmitters
and receiver displays, are based on the use of alkaline batteries. Use of other battery types will result in false readings on these indicators although the battery low LED on
the transmitters will operate normally.
Receiver and Antenna Placement
Do not place the receiver near a large metal object or surface.
This will provide the next clearest channel in that group. Set the
transmitter to match, leave it on and repeat until all the systems
are set up. If you run out of clear Channels in one group but
need to set up more systems, contact your dealer or Telex for
assistance in choosing additional frequencies.
Locate the receiver as close as possible to the area where the
transmitter will be used. Ideally, the position of the
receiver/antennas are within sight of the transmitter. When using
multiple systems, do not allow antennas to cross or touch each
other. For best results with multiple receivers, use an APD4+
antenna splitter (see Antenna Connections, page 6).
-26-
ENGLISH
Section 7 - Trouble Shooting Guide
Problem
Possible Causes
Solutions
No audio and no display on the
receiver
Receiver is off
Make sure that the power supply is
properly connected and the on/off
button is in the on positon
No audio and no RF signal indicator on the receiver display
Transmitter is off
Turn on transmitter power switch
Transmitter is on a different channel
Match the transmitter group and
channel to the one displayed on the
receiver.
No (or dead) battery in transmitter
Insert fresh battery in transmitter
Faulty battery contacts
Clean and or bend contact
Microphone not connected
Check the TA4F connector on the
bodypack or the detachable microphone element connection on the
handheld
Low gain setting on the transmitter
Increase the transmitter gain
Receiver audio output cable is
damaged or disconnected
Connect, repair or replace cable
Gain not sufficient on mixer/preamp/amp input or it is muted
Increase gain on mixer or un-mute
the input
Receiver output too low
Increase the audio output setting
Transmitter audio gain too high
Decrease the transmitter gain setting
Receiver output too high
Decrease the receiver output setting
Loud instrument or audio source
Change the bodypack audio mode
switch to Instrument setting
Battery level low in transmitter
Insert fresh battery in transmitter
Another REV system in the installation is on the same channel or the
signals are mixing
Make sure all the channels in use
are from the same group. Use
ClearScan to select the clearest
group. If more channels are needed
call Tech Support at 800-392-3497
for coordination help.
Another wireless product in the
area is on the same frequency or
the signals are mixing
Use ClearScan to change the operating frequency. If problems persist,
call Tech Support at 800-392-3497
for coordination help.
No Audio with good RF signal indicator but no (or low) Audio indicator
on the receiver display
No (or low) Audio with good RF signal and Audio indicators on receiver display.
Distorted audio signal
Interference
-27-
ENGLISH
Trouble Shooting Guide (Continued)
Problem
Possible Causes
Solutions
Receiver is too close to digital
signal processor or similar device
Move the receiver to a different
location
Strong electromagnetic field from
stage lighting or other source near
the transmitter or receiver, which
may be producing RF noise at or
near the operating frequency.
Use ClearScan to change the operating frequency. Repair or remove
the source of interference. Move
the receiver to a different location.
RF reflective metal obstacles
between the transmitter and receiver
Move the obstacles, or reposition
the receiver/antennas.
Poorly oriented beltpack antenna
Check the antenna connection and
reorient the bodypack so the antenna is vertical (up and down) and
facing the receiver, if possible.
Faulty receiving antenna system
Check all antenna connections and
reposition to be in line-of-sight with
the transmitter
Application requires high transmitter output
Switch the transmitter to the high
power setting (see page 9 or 11)
Can’t change settings on receiver
or transmitter
Lockout feature is enabled
Disable lockout (see page 4, 9, or 11)
Can’t change frequency setting for
a channel
Channel not in a user definable
group
Change to a user definable group
(see page 9 or 11))
Bodypack or Handheld transmitter
will not turn off, display says On-Loc
On/Off lockout is engaged
Put the on/off switch in the off position and press one of the programming buttons. See Section 4, 9, or
11 for more.
Interference (continued)
Short range or drop-outs
-28-
ENGLISH
Section 8 - REV Technical Specifications
REV Receiver Specifications
Overall
Receiver Type . . . . . . . . . . . . . . . . . . . . . . . . . . . . . . . . . . . . . . . . . . . . . . . . . . . . . . . . . . . .Synthesized PLL
Frequency Range (RF) . . . . . . . . . . . . . . . . . . . . . . . . . . . . . . . . . . . . . . . . . . . . . . .C1 Band 614 - 638 MHz
C2 Band 650 - 674 MHz
C3 Band 674 - 698 MHz
C5 Band 722 - 746 MHz
D Band 798 - 822 MHz
E Band 841 - 865 MHz
Number of Channels . . . . . . . . . . . . . . . . . . . . . . . . . . . . . . . . . . . . . . . . . . . . . . . . .> 900 possible channels
programmable in 25 kHz steps
Modulation . . . . . . . . . . . . . . . . . . . . . . . . . . . . . . . . . . . . . . . . . . . . . . . . . . . . . . . . .FM +/- 40 kHz Deviation
Diversity . . . . . . . . . . . . . . . . . . . . . . . . . . . . . . . . . . . . . . . . . . . . . . . . . . . .DSP Posi-PhaseTM True Diversity
RF Sensitivity . . . . . . . . . . . . . . . . . . . . . . . . . . . . . . . . . . . . . . . . . . . . . . . . . . . . . .<0.8 μV for 12 dB SINAD
Image Rejection . . . . . . . . . . . . . . . . . . . . . . . . . . . . . . . . . . . . . . . . . . . . . . . . . . . . . . . . . . . . . . . . . .> 60 dB
Squelch . . . . . . . . . . . . . . . . . . . . . . . . . . . . . . . . . . . . . . . . . . . . . . . . . . . . . . . . . .Tone Code plus Amplitude
Ultimate Quieting . . . . . . . . . . . . . . . . . . . . . . . . . . . . . . . . . . . . . . . . . . . . . . . . . . . . . . . . . . . . . . . .> 100 dB
Power Requirements . . . . . . . . . . . . . . . . . . . . . . . . . . . . . . . . . . . . . . . . . . . . . . . .90 - 240 VAC, 50 - 60 Hz
Operating Temperature . . . . . . . . . . . . . . . . . . . . . . . . . . . . . . . . . . . . . . . . . . . . .-7o to 49o C (20o to 120o F)
Dimensions . . . . . . . . . . . . . . . . . . . . . . . . . . . . . . . . . . . . . . . . . . . . . . . . . . .1.72 in. H x 19 in. W x 10 in. D
43.7 mm H x 482.6 mm W x 254 mm D
Audio Parameters
Frequency Response . . . . . . . . . . . . . . . . . . . . . . . . . . . . . . . . . . . . . . . . . .Microphone: 80 - 15kHz +/- 2 dB
Instrument: 30 - 15kHz +/- 2 dB
Balanced Out Line Level . . . . . . . . . . . . . . . . . . . . . . . . . . . . . . . . . . . . . . . . . . . . . .(XLR) 20 mV-2.5 V RMS
Unbalanced Output . . . . . . . . . . . . . . . . . . . . . . . . . . . . . . . . . . . . .(HiZ) 10 mV-1.25V RMS (100k ohm load)
Distortion . . . . . . . . . . . . . . . . . . . . . . . . . . . . . . . . . . . . . . . . . . . . . . . . . .<0.5% (ref 1kHz, 40kHz deviation)
Signal-to-Noise Ratio . . . . . . . . . . . . . . . . . . . . . . . . . . . . . . . . . . . . . . . . . . . . . . . . . . . . . . . . . . .>110dB (A)
Dynamic Range . . . . . . . . . . . . . . . . . . . . . . . . . . . . . . . . . . . . . . . . . . . . . . . . . . . . . . . . . . . . . . . . . .>100dB
Transmitters REV-BP, REV-WT, REV-H, and REV-PH
Radiated Output . . . . . . . . . . . . . . . . . . . . . . . . . . . . . . . . . . . . . . . . . . . . . . . . . . .5mW or 50mW Selectable
Microphone Head ElectroVoice 767A . . . . . . . . . . . . . . . . . . . . . . . . . . . . . .N/D 767a supercardioid dynamic
ElectroVoice 967 . . . . . . . . . . . . . . . . . . . . . . . . .N/D 967 supercardioid concert dynamic
ElectroVoice RE410 . . . . . . . . . . . . . . . . . . . . . . . . . . . . . . . . .RE410 cardioid condenser
ElectroVoice RE510 . . . . . . . . . . . . . . . . . . . . . . . . . . . . .RE510 supercardioid condenser
TA4F Connector Wiring . . . . . . . . . . . . . . . . . . . . . . . . . . . . . . . . . . . . . . . . .Pin 1: Ground; Pin 2: Mic Input;
Pin 3: +5V bias; Pin 4: +5V bias
through a 3000 Ohm resistor
Audio Gain Adjustment . . . . . . . . . . . . . . . . . . . . . . . . . . . . . . . . . . . . . . . . . . .Handheld 27 dB in 3dB steps
Bodypack 42 dB in 3dB steps
Power Requirements . . . . . . . . . . . . . . . . . . . . . . . . . . . . . . . . . . . . . . .9 Volt Alkaline Battery or Two (2) AA
Battery Life (Typical) . . . . . . . . . . . . . . . . . . . . . . . . . . . . . . . . . . . . . . . . . . . . . .8 hours with Alkaline Typical
Bodypack Antenna . . . . . . . . . . . . . . . . . . . . . . . . . . . . . . . . . . . . . . . . . . . . . . . . . . . . .Detachable 1/4 wave
Handheld Antenna . . . . . . . . . . . . . . . . . . . . . . . . . . . . . . . . . . . . . . . . . . . . . . . . . . . . . . . . . . . . . . . .Internal
Dimensions (REV-H with RE510 head) . . . . . . . . . . . . . . . . . . . . . . . . . . . . . . . . . . . . . . . . .9.8 in. (249 mm)
(REV-PH with RE510 head) . . . . . . . . . . . . . . . . . . . . . . . . . . . . . . . . . . . . . . . .9.9 in. (252 mm)
Dimensions (REV-BP Bodypack) . . . . . . . . . . . . . . . . . . . . . . . . . . . . . . . .3.8 in. H x 2.38 in. W x 0.92 in. D
96.5 mm H x 60.5 mm W x 23.4 mm D
Dimensions (REV-WT Bodypack) . . . . . . . . . . . . . . . . . . . . . . . . . . . . . . .3.42 in. H x 2.36 in. W x 0.80 in. D
87 mm H x 60 mm W x 20.4 mm D
-29-
ENGLISH
Section 9 - Approval Information
FCC AND INDUSTRY CANADA APPROVAL INFORMATION
The Electro-Voice/Telex Transmitters are Type Accepted under United States Federal Communications
Commission CFR 47, Part 74 and Industry Canada RSS123.
The Electro-Voice/Telex Receivers are approved under United States Federal Communications Commission
CFR 47, Part 15 and Industry Canada RSS210. Operation is subject to the condition that this device does
not cause harmful interference.
Licensing of Electro-Voice/Telex equipment is the users responsibility and Licensability depends
upon the users classification, users application and frequency selected. Electro-Voice/Telex strongly urges the user to contact the appropriate telecommunications authority for any desired clarification.
CAUTION: Any changes or modifications made to the above equipment could void the users authority to
operate the equipment.
OTHER APPROVAL INFORMATION
Intended use: All models are intended to be used in a system as Professional Radio Microphones.
All products are suitable for indoor/outdoor use with suitable protection. (Products are not water-proof).
Approvals: All models are in compliance with the essential requirements and other relevant provisions of Directive
1999/5/EC. See below for other Declaration of Conformity information.
Licensing: Licensing of all models is the users responsibility. Licensing is different from country to country. ElectroVoice/Telex strongly urges the user to contact the appropriate licensing authority for any desired clarification.
Modifications: The user is cautioned that any unauthorized modifications to the equipment may void the users
authority to operate the equipment.
DECLARATION OF CONFORMITY
Telex Communications, Inc.
Declares, under our sole responsibility, that the following products:
Model:
REV-D
REV-S
REV-PH
REV-H
REV-WT
REV-BP
Description
Dual Receiver
Single Receiver
Handheld Transmitter
Handheld Transmitter
Beltpack Transmitter
Beltpack Transmitter
Is in compliance with the essential requirements and other relevant provisions of Directive 1999/5/EC.
Certified to:
ETSI EN 300 422-2 v1.1.1
ETSI EN 301 489-9 v1.3.1
Further guidance or information can be obtained by contacting:
Telex Communications, Inc.
ATTN: Compliance Engineer
8601 Cornhusker Highway,
Lincoln, NE 68507 U.S.A.
Telephone: 1-402-467-5321
FAX: 1-402-467-3279
Europe: Telex/EVI Audio GmbH
Hirshberger Ring 45
94315 Straubing
Germany
Phone +49 (0) 9421 706 206
Fax +49 (0) 9421 706 378
Signed: Charles E. Conner
Title: Senior Project Engineer
Date: April 23, 2008
-30-
ENGLISH
Section 10 - Factory Service
Factory Service (North America)
If factory service is required, ship the unit prepaid in its original carton to:
EV Audio Service
c/o Telex Communications, Inc.
8601 East Cornhusker Highway
Lincoln, NE 68507-9702 U.S.A.
Tel: 402/467-5321 or 800-553-5992
Fax: 402/467-3279
Enclose a note describing the problem along with any other pertinent information and how to contact you.
Factory Service (Excluding North America)
If factory service is required, ship the unit prepaid in its original carton to:
EVI Audio GmbH
Hirschberger Ring 45
D-94315 Straubing
Telephone: +49 (0) 9421 7060
Fax: +49 (0) 9421 706 265
Enclose a note describing the problem along with any other pertinent information and how to contact you.
Warranty (Limited)
Electro-Voice products are guaranteed against malfunction due to defects in materials or workmanship for a
specified period, as noted in the individual product-line statement(s) below, or in the individual product data
sheet or owner’s manual, beginning with the date of original purchase. If such malfunction occurs during the
specified period, the product will be repaired or replaced (at our option) without charge. The product will be
returned to the customer prepaid via UPS Ground.
Exclusions and Limitations: The Limited Warranty does not apply to: (a) exterior finish or appearance; (b)
certain specific described in the individual product-line statement(s) below, or in the individual product data
sheet or owner’s manual; (c) malfunction resulting from use or operation of the product other than as specified
in the product data sheet or owner’s manual; (d) malfunction resulting from misuse or abuse of the product; or
(e) malfunction occurring at any time after repairs have been made to the product by anyone other than ElectroVoice or any of its authorized service representatives.
Obtaining Warranty Service: To obtain warranty service, the customer must deliver the product, prepaid, to
Electro-Voice or any of its authorized service representatives together with proof of purchase of the product in
the form of a bill of sale or receipted invoice. A list of authorized service representatives is available from
Electro-Voice.
Incidental and Consequential Damages Excluded: Product repair or replacement and return to the customer
are the only remedies provided to the customer. Electro-Voice shall not be liable for any incidental or consequential damages including, without limitation, injury to persons or property or loss of use.
Other Rights (United States Only): This warranty gives you specific legal rights and you may also have other
rights which vary from state to state.
Electro-Voice Wireless Systems are guaranteed against malfunction due to defects in materials or workmanship for a period of three (3) years from the date of original purchase. The Limited Warranty does not extend
to cables or cable connectors. Additional details are included in the Uniform Limited Warranty Statement.
Technical Assistance: 800-392-3497 (U.S. and Canada only).
-31-
ENGLISH
Section 11 - REV ACCESSORIES AND PARTS
MODEL#
ORDER #
1/2 Wave Colinear Rx Antenna
C1, C2
(614-674 MHz)
CLA-3
870658-3
C3
(674-725 MHz)
CLA-5
870658-5
C5
(722-760 MHz)
CLA-6
870658-6
D, E
(798-865 MHz)
CLA-8
870658-8
(680-870 MHz)
FA-500
860031
AB-2
71138000
1/2 Wave Flexible Rx Antenna
C3, C5, D, E
1/2 Wave Antenna Bracket w/10 ft. Coax
1/4 Wave Rx Antenna
C1, C2, C3, C5
(600-746 MHz)
ANU-14
879010
D, E
(730-890 MHz)
ANU-14H
879010-1
Directional Rx Antenna
(450-900 MHz)
LPA500
LPA500
UHF Antenna Amplifier
(520-806 MHz)
UAA-500
7186400
Low Loss Coaxial Antenna Cable
25 ft. (7.6 M)
CXU-25
71151025
with TNC Connectors
50 ft. (15.2 M)
CXU-50
71151050
75 ft. (22.9 M)
CXU-75
71151075
100 ft. (30.5 M)
CXU-100
71151100
Antenna/Pwr Distribution System
C1, C2, C3, C5
(600-780 MHz)
APD4+
301614000
D, E
(780-900 MHz)
APD4-1+
301614011
TP-2
650095
Termination Plug for APD4+ and REV-D
1/4 Wave Bodypack Tx Antenna
C1
(Yellow, 556-638 MHz)
AN-Flex YEL
879220-3
C2, C3
(Green, 636-726 MHz)
AN-Flex GRN
879220-4
C5, D
(Red, 722-826 MHz)
AN-Flex RED
879220-5
E
(Blue, 826-930 MHz)
AN-Flex BLUE
879220-6
C1
(Yellow, 556-638 MHz)
AN-SFlex YEL
879538-3
C2, C3
(Green, 636-726 MHz)
AN-SFlex GRN
879538-4
C5, D
(Red, 722-826 MHz)
AN-SFlex RED
879538-5
E
(Blue, 826-930 MHz)
AN-SFlex BLUE
879538-6
1/4 Wave Super-Flex Tx Antenna
-32-
ENGLISH
REV ACCESSORIES AND PARTS (continued)
MODEL#
ORDER#
Bodypack Pouch
WP-1000
879553
Guitar Cord
MAC-G2
879526
767a Dynamic Head
RC2-767A
ACC000008D7
976 Dynamic Head
RC2-967
ACC00000D9
RE410 Condenser Head
RC2-410
ACC00000C4
RE510 Condenser Head
RC2-510
ACC000008C5
MSA-REV
880308
MSSA
870343-Y
Omnidirectional MicroMiniTM Lapel Mic
RE90TX
71753318
Unidirectional MicroMiniTM Lapel Mic
RE92TX
301456000
Lightweight omni headworn Mic
RE97TX
301XXX000
HM7
HM7
Mic Stand Adapter for REV-H
Mic Stand Adapter for REV-PH
Headworn Cardioid Condenser Mic
-33-
Made in U.S.A.
MAY 2008
LIT000004TX Rev D