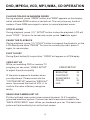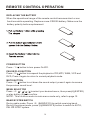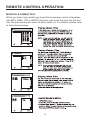
1
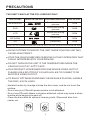
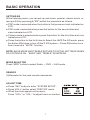
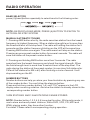
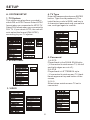
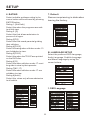
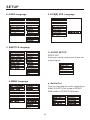
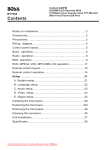
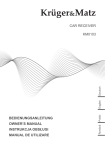
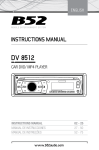
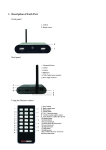
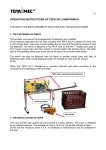
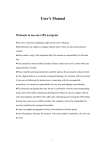
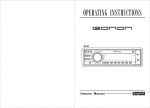
BV7965
3.6
Notes on installation.........................................................2
Accessories.....................................................................2
Precautions.....................................................................3
Wiring diagram................................................................4
Control panel layout.........................................................5
Basic operation...............................................................6
Radio operation...............................................................8
RDS operation.................................................................9
DVD, MPEG4, VCD, MP3,WMA, CD operation...................11
Remote control layout.....................................................13
Remote control operation................................................14
Setup............................................................................21
A. System setup............................................................21
B. Language setup........................................................22
C. Audio setup..............................................................23
D. Video setup.............................................................24
E. Digital setup.............................................................25
Installing the front panel..................................................26
Detaching the front pane.................................................26l
Removing the front panel.................................................26
Cleaning the connector....................................................26
Unit installation...............................................................27
Specificaton...................................................................28
1
NOTES ON INSTALLATION
NOTES ON INSTALLATION
● The unit is designed for 12V DC, negative ground operation system only.
Before installing the unit, make sure your vechicle is connected to 12V DC
negative grounded electrical system.
● The negative battery terminal must be disconnected before making
connections, Incorrect can reduce damaging to the unit due to short circuit.
● Be sure to connect the color coded leads correctly according to the
diagram. Incorrect connections may cause the unit malfunction or damage
the vehicle's electrical system.
● Be sure to connect the speaker(-) leads to the speaker(-)terminal. Never
connect the lef tand right channel speaker cables each other or to the
vehicle body. Do not block vents or radiator panels. Blocking them will
cause heat to build up inside and may result in fire.
● After the completion of the installation and begin to operate the unit
(including replacing the battery), please press the RESET button on the
front panel with pointed objects(such as ball pen)bo set the unit to initial
status.
ACCESSORIES
■ WIRELESS REMOTE CONTROL
■ OWNER'S MANUAL
■ A/V INPUT CABLE
■ NUT (5MM)
■ SCREW (5 X 25MM)
■ STRAP
■ RADIO REMOVAL KEYS
■ MOUNTING SLEEVE
■ USB CABLE
■ SPEAKER CABLE
■ SPRING WASHER
■ SCREW
■ LEVER
■ WIRING HARNESS
2
PRECAUTIONS
THIS UNIT CAN PLAY THE FOLLOW DISC ONLY
TYPE OF DISC
LABEL ON THE DISC
RECORDED MATERIAL
SIZE OF DISC
MPEG4/DIVX
Sound and moving
pictures
12CM
DVD
Sound and moving
pictures
12CM
VCD
Sound and moving
pictures
12CM
MP3/WMA
Sound only
12CM
CD
Sound only
12CM
NOTE: Th e uni t is com pact ibl e with DVD, DVD+/-R,VCD 1. 0/ 2. 0/ 3. 0, SVCD,CD,CD-R,CD-RW and JP EG
● DO NOT ATTEMP TO MODIFY THE UNIT, MODIFYING THE UNIT MAY
CAUSE AN ACCIDENT.
● STOP THE VEHICLE BEFORE CARRYING OUT ANY OPERATION THAT
COULD INTERFERE WITH YOUR DRIVING.
● DO NOT TURN ON THE UNIT IF THE TEMPERATURE INSIDE THE
VEHICLE IS OUT OF -20 C TO 60 C.
● THIS PRODUCT IS DESIGNED FOR ONE SINGLE VIDEO OUTPUT,
PLEASE USE A SPLITTER IF YOU WOULD LIKE TO CONNECT FOR
MULTIPLE VIDEO OUTPUT.
● TO ENJOY OPTIMUM SOUND AND VISION WHILE PLAYING, HANDLE
THE DISC. AS FOLLOWS:
- Handle the disc by its edge to keep the disc clean, and do not touch the
surface.
- Do not use your CDs with paste residue or ink attached.
- Do not use CDs with labels or stickers attached, which may leave a sticky
residue while begining to peel off.
- Clean the discs with an optional cleaning cloth. Wipe each disc from
center out.
3
WIRING DIAGRAM
WIRE CONNECTION
!
WARNNING
BRAKE WIRE MUST BE CONNECTED TO THE (-) SIDE OF THE PARKING
BRAKE SYSTEM. IF YOU DO NOT HOOK THIS WIRE UP, YOU WILL GET
A WARNING ON THE SCREEN THAT YOU WILL NOT BE ABLE TO WATCH
THE VIDEO WHILE THE CAR IS MOVING. YOU WILL BE ABLE TO HEAR
THE MOVIE BUT YOU WILL NOT BE ABLE TO WATCH IT UNLESS YOU
HOOK UP THE BRAKE WIRE. THEN YOU HAVE TO ENGAGE THE PARKING
BRAKE SYSTEM TO WATCH IT.
4
CONTROL PANEL LAYOUT
FRONT PANEL LAYOUT
5
BASIC OPERATION
INITIAL SYSTEM STARTS-UP
Operating the unit for the first time or after replacing the car battery, you
should press (14) to detach the front panel, and LED (15) will be blinking.
Press(1) Reset button with a pointed object(such as a ballpoint)to set the
unit to initial procedure.
NOTE: WHEN SOME ERRORS OCCUR IN THE LCD DISPLAY, YOU CAN
ALSO PRESS RESET BUTTON TO RESUME TO NORMAL. AND IT WILL
ERASE THE CLOCK SETTING AND SOME MEMORIZED FUNCTIONS.
TURNING THE UNIT ON/OFF
Press the POWER button will turn the radio on. Pressing for shortly will
shut it off.
VOLUME SELECTOR
For Volume button(3),press “VOL+” to increase the sound level and press
“VOL-” to decrease the sound level.
BASS/TREBLE/BAL(L-R)/FADE SELECTOR
Press “SEL” button once to enter “AUDIO
SETUP” menu.
Press “ ”or “ ” button to select you
desired mode. You can adjust the current
level by press “VOL+” or “VOL-” knob.
NOTE: IF YOU DON'T ADJUST THE KNOB WITHIN 5 SECONDS AFTER
SELECTING THE DESIRED, THE UNIT WILL AUTOMATICALLY RETURN
TO THE CURRENT MODE BEING DISPLAYED.
MUTE FUNCTION
Press EQ button more than 1 second is mute function.Press this button to
cut down the sound output and “MUTE” appear on the LCD.Press it again to
revert the previouse volume level.
6
BASIC OPERATION
SETTING EQ
While listening music, you can set up rock music, popular, classic music or
jazz pre-EQ by pressing(4)"EQ" button the procedure as follows:
● POP mode is selected when the button is first press and rock indicated on
LCD.
● POP mode is selected when press the button for the second time and
class indicated on LCD.
● Classic mode is selected when press the button for the third time and rock
indicated on LCD.
● Press the button for the forth time to Select the JAZZ Pre-EQ mode, press
the button fifth times to turn off the P-EQ system→ Press EQ button more
than I second is "MUTE" function.
NOTE: BASS MODE AND TREBLE RETURN TO INITIAL SETTINGS WHEN
EQ SYSTEM IS ON, “BASS” AND “TREBLE” DISAPPEAR.
MODE SELECTOR
Press “MOD” button to select Radio → DVD → AUX mode.
SENSOR
(5)Receptor for the card remote commander.
ADJUST TIME
● Press “SEL” button to enter “SYSTEM SETUP”.
● Press VOL+/- button select “DISP ON” mode.
● When the clock appear on the menu,
Press “VOL+” or “VOL-” to adjust hours or minutes.
7
RADIO OPERATION
BAND SELECTOR
press (6)(band)button repeatedly to select band in the following order:
NOTE: ON DVD PLAYING MODE, PRESS (6) BUTTON TO SWITCH TO
AUTO PAL OR NTSC SYSTEM
MANUAL/AUTOMATIC TUNING
1. Pressing AMS button shortly, the radio searches station from the lowest
frequency to highest frequency. When a station strength level is more than
the threshold level of the stop level. The radio will holding the station for 5
seconds and the station frequency blinking on the LCD at the same time.
Pressing AMS button once again. The radio search will stop on the station.
Pressing anyone preset number button for several seconds. The radio will
save the station at the preset number button.
2. Pressing and holding AMS button more then 3 seconds. The radio
searches from the lowest frequency and check the signal strength. When
the field strength level is more than threshold level of the stop level. The
radio storing the station at the preset number (is can store 3x6 stations for
FM and 2x6 stations for AM in all) after finishing a circle of search. It will
stop searching on the M1.
NUMBER BUTTONS
Number buttons can help you store your favorite station by pressing any one
of the number button. You can follow the steps as bellow:
Press and hold any number button(1~6) until "CH" appears in the LCD
display when receiving a station. And now the station is already stored in the
corresponding number button.
18FM STATIONS AND 12 AM STATIONS CAN BE STORED
NOTE: Number button 1,2,3,4,5,6 have dual function, While radio mode, it
use to store and recall preset stations, While DVD, VCD, CD, MP3 and
WMA playing mode, they have other function.
For detail. Please refer to corresponding playing operation.
8
RDS OPERATION
RDS(RADIO DATA SYSTEM)OPERATION
TA:
Operated as follows:
-TA is turned ON/OFF and TA indicator is displayed.
When traffic announcement is transmitted, regardless of the mode, traffic
announcement is received.
If VOLUME LEVEL is below 24, VOLUME LEVEL is raised to 24, and returns
to its previous mode and volume level when the traffic announcement is over.
If volume is adjusted during traffic announcement, only the previous volume
is valid.
-When TA is on, SEEK, SCAN, AUTO MEMORY function can be received or
saved only when traffic program identification code has been received.
-When TA is ON, traffic program identification code is not received during
specified time.
TA SEEK: TA SEEK is activated.
PTY RADIO MODE
Press “SEL”Button more than 1 second is PTY function.
-Previous PTY is displayed when PTY key(19) is pressed. If there are no
keys entered for
2seconds, previously selected PTY is searched. During 1LOOP, if desired
PTY is not found, NO PTY is displayed.
-2 program types are SPEECH and MUSIC.
Rotate VOL knob clockwise or anti-clockwise to select the desired program
type.
AF: Alternative Frequencies
- Setting RDS Mode Press AF button(9) and release immediately to switch
on or off RDS mode. Whenever RDS is switched on, symbol “AF” appears on
the display.
NOTE: TURN ON/OFF TA OR PTY MODE MUST PRESS THE BUTTON "TA"
OR BUTTON "PTY" ON THE REMOTE CONTROLLER.
9
RDS OPERATION
AF/REG
AF
- AF/REG key directs the activation of AF SEARCH.
- AF indicator is displayed when AF is ON, AF search is activated when
reception is had.
- During FM MODE, when AF is ON, SEEK, SCAN, AUTO, MEMORY function
can only receive and save RDS program. However, when italy option is in
use, regardless of RDS, programs that satisfy SD LEVEL Can be received
and saved.
INDICATOR
CONDITIONS
AF ON
AF ON MODE, RDS information is received.
AF OFF
AF OFF MODE
AF FLASHING
AF ON MODE, RDS information is not received.
REGION
- AF MOD E is converted to REGION ON/OFF MODE when AF ON MODE is
pressed for longer 1sec.
- ON: P1 CODE is checked when AF CHECK in progress
- OFF: P1 CODE and COVERAGEARE A is not checked when AF CHECK in
progress.
10
DVD, MPEG4, VCD, MP3,WMA, CD OPERATION
DVD, MPEG4, VCD, MP3,WMA, CD OPERATION
While listening to (or watching) DVD, MPEG4, DIVX, VCD, MP3, WMA and
CD, just insert a Disc (with labeled side up) into the disc slot(12), the
mechanism will automatically switch on. While it is Radio /AUX mode and a
Disc was loaded, press(9) MOD button to play the Disc.
If a ID3 disc is playing. The songs name, artist name and file name will
shufft show on LCD.
SELECTING TRACKS/ FW./RW
Press (7) to choose your favorite track upward or downward respectively.
Press and hold(7) button to fast forward or rewind the track upward or
downward respectively.
PLAYING TRACKS REPEATLY
Press (11)"3RPT"button to perform repeat playing function when you need
to repeat playing the track you like.
Press "3RPT" button for the first time, it will repeat playing the same track
for CD,VCD,MP3 and WMA, same chapter for DVD mode."RPT" appears.
Press "3RPT" button for the second time, entire Disc will be playing repeatly
for VCD and CD playing. entire TiTle will be playing repeatly for DVD playing,
the entire directory for MP3 and WMA playing " RPT" appears on the LCD
display.
Press "3RPT" button for the third time to stop repeat mode for CD, VCD and
DVD playing mode, repeat entire disc for MP3and WMA playing mode.
Press "3RPT" button for the forth, time to stop repeat mode for MP3 and
WMA playing mode.
SCANNING TRACK AUTOMATICALLY
During CD playback, press "2INT" button, to play the first 10 seconds of
each track on the disc,
the display will show " INT", track number and elapsed time.
Which indicates INT function is already activated.
Press "2INT"button once again to return to normal playback.
NOTE: INT DOESN'T WORK DURING PLAYING DVD/MP3/WMA
11
DVD, MPEG4, VCD, MP3,WMA, CD OPERATION
PLAYING TRACKS IN RANDOM ORDER
During playback, press "4RDM" button,and "RDM" appears on the display,
which indicates RDM function si carried out. The unit plays any track at
random. Press RDM once again to return to normal playback mode.
STOP PLAYING
During playback, press (11) " 5STOP" button to stop the playback, LCD will
show "STOP". To return to normal play mode, press 1 button again.
PAUSE THE PLAYBACK
During playback, press (11) "1PLAY" button to suspend the playback, on the
LCD display and show "PAUSE" To return to normal play node, press it
again, to resume play.
EJECT A DISC
During Eject button(8) to eject disc, "OPEN" will appear on LCD display.
VIDEO SET UP
While you watching DVD or receiver TV
program you can enter “VIDEO SETUP”
to adjust the picture quality.
IF the picture appear to disorder when
you adjustment. Please come into the
“SYSTEM SETUP”select the “DEFAULT”
menu, then press the knob of VOL +/- to
confirm the value of factory recognize
tacitly.
VIDEO SETUP
BRIGHTNE
CONTRAST
SHARPNESS
COLOR
HUE
33
33
2
30
30
REAR VIEW CAMERA SET UP
Put the unit back view control view connect to power 14.4 V negative
grounded electrical system. Connect car back view camra output to the
“BACK VIEW VIDEO” input. When you backward your car. The back view
picture will automatically turn to the front screen.
12
REMOTE CONTROL LAYOUT
26
13
REMOTE CONTROL OPERATION
REPLACING THE BATTERY
When the operational range of the remote control becomes short or non
functions while operating. Replace a new CR2025 battery. Make sure the
battery polarity before replacement.
POWER BUTTON
Press(1) button to turn power On/Off.
PAUSE/PLAY BUTTON
Press(2) button to suspend the playback of CD,MP3, WMA, VCD and
DVD, Press it again to return to normal palyback mode.
MUTE BUTTON
Press(3) button to cut down the sound output, press it again to resume
the previous sound level.
MENU SELECTOR
Press(4) / / / to select your desired menu, then press(6)(ENTER)
or play button (2) to confirm.
NOTE: This function works in main menu mode only, refer to page 12.
BAND/SYSTEM SWITCH
During radio mode, Press(5)(BAND/SYS) to switch receiving band.
During the player mode, press (5)(BAND/SYS) button to switch to AUTO,
PAL OR NTSC system.
14
REMOTE CONTROL OPERATION
VOLUME INCREASING/DECREASING
Press(7) (VOL+ or VOL-) button to increase or decrease the volume level
respectively.
TUNING/SELECTING TRACKS/FAST FORWARD/REWIND
During radio mode, continuously press(8) button to manual search a station
downward or upward respectively; if press and hold the button for more than
3seconds. The radio will automatically search a station downward of upward
respectively until it finds a station.
During the playing mode, press the (8) button to rewind or forward for you to
reach your desired track quickly. When discontinuously press (8) button,
you can select your desired portion downward or upward or upward
respectively.
if press and hold the button for more than 3seconds, you can select you
desired portion fast forward/rewind.
PROGRAM PLAYING/ST
During Disc playing mode, press(9) PROG button to enter programming
page.
Press(4) button and (14) numbers button to program the tracks to be played.
NOTE: ST WILL ONLY WORK ON RADIO MODE.
ON-SCREEN DISPLAY
During DVD, VCD, and CD mode, press(10) (OSD) button. The displayer
shows Track/Chapter, Current Time.
NOTE: DURING MP3/WMA MODE, ONLY SHOW DIRECTORY AND
TRACKS.
15
REMOTE CONTROL OPERATION
VOL/BAS/TRE/BAL/FAD SELECTOR
During DVD, VCD, and CD mode, Repeat press(11)(SEL) button to select
the desired mode in the following order:
NOTE: AFTER SELECTING YOUR DESIRED MODE, YOUR CAN ADJUST
THE CURRENT MODE BEING DISPLAYED BY(VOL) BUTTON. WHEN
P-EQ MODE ISACTIVATED, PRESS SEL BUTTON TO SELECT THE
MODES, AND BASS/TREBLE MODE ARE INVALID.(SHOW AS BELOW)
REPEAT PLAYING/ AMS
1.press AMS button(12),
In CD/MP3/VCD mode, repeat function is: RPT1 , RPT DIR, RPT ALL,
RPT OFF.
In DVD mode, repeat function is: PRT CHAPTER, PRT TITLE.
2.Radio mode is AMS function.
RANDOM PLAYING
During the Disc playing mode, press(13)(RDM) button to play any track at
random.
During the RADIO mode, press the button is LOCAL function.
NOTE: IN VCD PCB MODE AND SOME DVD DISCS, RANDOM PLAYING
WILL BE WORK.
16
REMOTE CONTROL OPERATION
NUMBER BUTTONS
During radio mode, you can select one of the 6 stored stations on each band
by pressing any one of the number button(14). During the playing mode, you
can select any track directly by using number button(14)(0~10+). For
example, if you need the fifteenth track, you can first press button 10+ and
press button 5, the corresponding track(15) will be played.
NOTE: WHEN BUTTON 10+ IS FIRST PRESSED. IT WORK AS 10+, IT
WORK AS 20+ WHEN PRESSED AT THE SECOND TIME, THE THIRD
TIME...30+...AND SO ON.
LEFT/RIGHT/STEREO SELECTOR
During the playing mode ,continuously press(15) (Audio) can change the
sound to left/right speaker or stereo mode.
PBC(MENU)
-During VCD/2.0 mode, when press(16)(PBC) button at the first time, PBC
playback starts and the menu of entire disc appears on the TV. And then you
can select your favorite track by using number button (14~10+). To cancel
PBC playing, press (16)(PBC) button again.
-During DVD mode, when press (16)(PCB) button, to show all tracks'title on
TV screen.
SUBTITLE SELECTOR
During DVD mode, press(SUB-T)(17) button to switch the subtitle
language.
SETTING DISC PLAYBACK TIME
During Disc playing mode, press(18)GOTO button can set the specific time
to play. Using(4) and (14)number button to set track/Chapter or time, and
press ENTER button to play.
MODE SWITCH
Press (19) button to switch Radio, Disc Playing USB/SD/MMC or AUX mode.
17
REMOTE CONTROL OPERATION
STOP THE PLAYBACK
In Disc playing mode, press (20)button to suspend the playback, press it
again to stop the playback.
MULTI-ANGLE KEY
In DVD playing mode, press(21) key, you can watch the DVDcontent from
different angle. If the disc supports.
SLOW REVERSE/SLOW ADVANCE PLAY
During DVD/VCD playing mode, press(22) key once for ½ slow advance,
twice for 1/3, third for 1/4, fourth 1/5,fifth for 1/6, sixth 1/7,seventh return to
normal playback speed.
Title Key
In DVD playing mode, press(24) key to show all tracks'title on TV screen.
Then press (14)(0~10+)key or press (4) key to choose your desired track
number and press (18) (ENTER)key or (2) key to start.
NOTE: NO TITLE DISPLAY IN MP3, WMA, CD MODE.
ZOOM KEY
In DVD/VCD playing mode, press(25) key once for 2 x zoom, twice for 3 x
zoom, third time for 4 x zoom, fourth time for ½ zoom, fifth time for 1/3 x
zoom, sixth time for 1/4 x zoom, seventh time to cancel the zoom mode. And
you can pan the picture by pressing the cursor keys.
NOTE: NO ZOOM FUNCTION FOR MP3, WMA, CD PLAYING MODE.
18
REMOTE CONTROL OPERATION
SETUP
1.Press SETUP (23) key of remote control in the stop mode.(Press the
STOP button twice to ensure the player is under STOP mode.
2.The main page of setup menu is displayed.
3.Select the preferred item by using the (4)button
4.Press (6) ENTER button
A. System Setup
This setup page includes all the items of TV system, Screen saver ,TV type,
Password, Rating & Default features. The detail please refer to SYSTEM
SETUP MENU.
B. Language Setup
This setup page includes all the items of OSD Language, Audio Language,
Subtitle Language and Menu Language features. The detail please refer to
LANGUAGE SETUP MENU.
C. Audio Setup
This setup page includes all the items for AUDIO. Please to AUDIO SETUP
MENU.
D. Video Setup
This setup page includes all the items for VIDEO. The details please refer to
VIDEO SETUP MENU.
E. Digital setup
EQ BUTTON
Press (26) button to select PRE-EQ:
ROCK → POP → JAZZ → FLATE mode
19
REMOTE CONTROL OPERATION
MIXED FILE FORMAT DISC
While you listen to(or watching) mixed file format disc, which is together
with MP3, WMA, JPG or MPEG4 formats, just insert the disc into the disc
slot, the mechanism will auton-atically switch on. For details, please refer
to the following steps:
20
SETUP
4. TV Type
A. SYSTEM SETUP
Enter the password and press ENTER
button. Type the old password ( The
instal factory code is 0000 ) and key in
4 characters password now you want to
use, and type again to confirm.
1. TV System
This player can play discs recorded in
either PAL or NTSC format. Select NTSC
format when you connected to NTSC TV.
Select PAL format when you connected to
PAL TV. If you select AUTO, the unit will
auto select the format (PAL/NTSC)
according to your TV system.
5. Password
1) 4:3 PS
Played back in the PAN & SCAN style
( If connected to wide sceen TV, the left
and right edges are cut off ).
2) 4:3 LB
Played back in LETTERBOX style.
( If connected to wide screen TV, black
bands appear at top and button of the
screen.
3) 16:9
Select when a wide screen TV set is
connected.
2. Screen Saver
3. VIDEO
21
SETUP
6. RATING
7. Default
Recover acquiescing in state when
leaving the factory.
Select suitable guidance rating by he
cursor button and confirmed by pressing
ENTER button.
Rating 1: [Kid Safe]
Select this when the programs are safe
to all kid view.
Rating 2: [G]
Select this that allows admission to
person of all ages.
Rating 3[PG]
Select this that needs parental guiding
their children.
Rating 4[PG13]
Select following when children under 13
are forbidden to view.
Rating 5[PG-R]
Select this when the"PG-R"was printed
on the DVD disc.
Rating 6 [R]
Select this when children under 17 must
be guide to view by their parents.
Rating 7[NC-17]
Select this when children under 17 are
orbidden to view
Rating 8[Adult]
Select this, when only allows admission
to all adults.
B. LANGUAGE SETUP
Select the preferred OSD Language,
Audio Language, Subtitle Language
and Menu Language by using the
cursor buttons.
1. OSD Language
22
SETUP
2. AUDIO Language
5. DIVX[R] VOD Language
3. SUBTITLE Language
C. AUDIO SETUP
SPDIF/OFF
Analog or optical output port all has not
output signal.
4. MENU Language
a. Audio Out
This is to activate the audio output from
ANAL OG/OPTICAL mode to SPDIF/
RAW mode or SPDIF/PCM mode.
23
SETUP
SPDIF/RAW:
b. key
When the player is connected with the
power amplifier by the analog or optical
port, please select this item; when the
playing disc which is recorded by Dolby
Digital, DTS or MPEG recoding system,
the analog or optical output signal of the
unit will be the same as the digital signal
(RAW format ) of the playing disc. At the same time, the power amplifier you
connected must have the decode function of Dolby Digital, DTS or MPEG.
SPDIF/ PCM:
When the player is connected with the 2 channel, digital stereo amplifier, please
select this item; when the playing disc which is recorded by Dolby Digital or MPEG
recording system, the analog or optical output will be modulated to 2 channel
output by PCM.
D. VIDEO SETUP
This is for the user to set Brightness
Contrast, Hue and Saturation of the
picture by pressing the arrow left/right
button.
Press Enter button to confirm the change.
NOTE: ONLY ON TV/AV MODE, THE
VIDEO SETUP IS AVAILABLE.
24
SETUP
This is for the user to set operation
mode, dynamic range compression
and stereo mode.
To set the operating modes for Dobly
Digital decoder.
25
INSTALLING THE FRONT PANEL
To install the front panel, insert the panel into the housing and make sure
the panel Is properly installed, otherwise, abnormalities occurs on the
display or some keys will not function properly.
DETACHING THE FRONT PANEL
Press REL button in the upper left
corner, and hen front panel will not
function properly.
REMOVING THE FRONT PANEL
When the front panel was turned down
to a position of 90°, hold and slide the
front panel to left, and then pull it out.
CLEANING THE CONNECTOR
If the connector between the main unit and the front panel is dirty, it may
result the unit in abnormal working condition. To avoid such problem
happening, please detach the front panel, and clean the connector with an
alcohol swab. Gently clean and avoid damaging the connector.
NOTE: ALWAYS SHUT THE CAR OFF WHEN YOU WANT TO CLEAN
THESE TABS.
26
UNIT INSTALLATION
1. Dashboard
2. Nut (5mm)
3. Spring Washer
4. Screw (5 x 25mm)
5. Screw
6. Strap
Be sure to use the strap to
secure the back of the unit in
place. The strap can be bent by
hand to the desired angle.
7. Plain Washer
Fastening the unit to the factory
radio mounting bracket:
1. Select a position where the screw
holes of the bracket and the
screw holes of the main unit
become aligned (are fitted), and
tighten the screws at 2 places on
each side. Use either truss screws
(5 x 5mm) or flush surface screws
(4 x 5mm)
2. Screw
3. Dashboard or Console
DIN REAR-MOUNT (Method B)
Installation using the screw holes
on the sides of the unit.
NOTE: The mounting box, outer
trim ring, and half-sleeve are not
used for method B installation.
1.Frame
2.Insert fingers into the groove in the
front of frame and pull out to remove
the frame. (When reattaching the
frame, point the side with a groove
downwards and attach it.)
3.Lever
Insert the levers supplied with the
unit into the grooves at both sides of
the unit ad shown in figure until they
click. Pulling the levers makes possible
to remove the unit from the
dashboard.
INPUT THE SD CARD
The SD angle should be on top to
slide into this unit. Push it inside
the slot to make it work and then
press it again to have it eject.
27
SPECIFICATON
GENERAL
Power Supply Requirements:
Load lmpedance:
Maximum Output Power:
Chassis Dimensions:
DVD DECK SECTION
Discs Played:
DC 14.4V, Negative Ground
4 ohms
80W x 4(CH)
178x163x50mm(WxDxH)
Video system:
Mounting Angle:
DVD, MPEG4,DIVX,VCD 1.0/2.0/3.0,MP3
WMA, CD, CD-R, CD-RW, Picture-CD
AUTO/PAL/NTSC
0° ~ 30°
VIDEO SECTION
Video System:
Video Output Level:
4:3 Letter Box, 4:3 Pan Scan,16:9
1.0V p-p 75 ohms
TFT SIZE:
3.6”
AUDIO SECTION
Maximium Output LEVEL:
Frequency Response:
Signal-to-noise Ratio:
Separation:
2Vrms (+ 3 dB)
20~20KHz
65dB
65dB
FM TUNER SECTION
Tuning Range:
IF:
Usable Sensitity (-30dB):
Signal-to-noise Ratio:
Stereo Separation:
Frequency Response:
AM TUNER SECTION
Tuning Range:
IF:
Usable Sensitivity(-20dB) :
87.5-108MHz(Europe)
87.5-107.9MHz(U.S.A.)
10.7MHz
15dB
60dB
30dB(1KHz)
30~15000 Hz
522-1620KHz(Europe)
530-1710KHz(U.S.A.)
450KHz
28dB
NOTE: Design and specifications are subject to change without notice for
improvements.
28