1
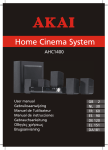
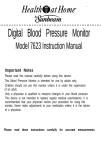
OPERATING INSTRUCTIONS
E646
Owners Manual
English
English
Simple Troubleshooting Guide
English
Welcome!
Problem
Thank you for purchasing our company multimedia player!
Cause/Solutlon
No power
Check and make sure whether the fuse is blown,
replace with the proper value if necessary.
carefully before using the unit. Keep these instructions and
Some errors occur in the LCD or no function
when pressing the button.
Press the RESET button.
retain this booklet for future reference.
Unable to receive stations.
Check and make sure whether the antenna is
inserted or the antenna is properly connected.
If so. Insert the antenna or connect it properly.
Poor effect on receiving a station.
Antenna may not be the proper length . Make
sure the antenna is fully extended or broken.
If broken. Replace the antenna with a new one.
The broadcasting signal is too weak.
The antenna is poorly grounded, check and
make sure the antenna is properly grounded
at its mounting location.
ACDs cannot be loaded.
A Cds is loaded in the mechanism.
To operate the unit correctly, please read the owner's manual
The stereo Indicator "
" is flashing.
Tune in the frequency accurately.
The broadcasting signal is too weak.
(Set to the MONO mode) (page 12)
No picture.
The Video line from main unit to the TV is
not connected properly.
The picture noise appcars.
Improper setting of the color system. Set the
color system to" PAL"or" NTSC". According
to the connected television.
The CDs is dirty or damaged.
Note: If any of the problem persist after check list had been made, consult your nearest service dealer.
Never attempt to disassemble your unit by yourself.
1
30
English
CONTENTS
Notes on Installation
3
English
Notes on installation
The unit is designed for 12V DC,
After the completion of the
negative ground operation system
installation and begin to play
only. Before installing the unit,
the unit(including replacing
make sure your vehicle is connected
the battery),please press the
to DC 12V negative ground electrical
RESET
button on the front panel
Precautions
4
system.
with pointed objects (such as
Wiring Diagram
5
The negative battery terminal
ball-point pen)to set the unit to
Location of the control
6
must be disconnected before
making connections, which can
initial status.
Basic Operation
7
reduce damaging the un it due
Radio Operation
9
to short circuit.
Be sure to connect the color coded
Bluetooth Operation
10
DVD
11
VCD
MP3
CD Operation
leads correctly according to th e
diagram. Incorrect connections
may cause the unit malfunction or
Location of the Remote Control
13
damage the vehicle's electrical
Remote Control Operation
14
system.
Playing WMA,MP3 and JPEG discs
26
Installation
27
Specification
29
Be sure to connect the speaker (-)
leads to the speaker (-) terminal.
Never connect the left and right
channel speaker cables each other
or to the vehicle body.
Simple Troubleshooting Guide
30
Do not block vents or radiator
panels. Blocking them will cause
heat to build up inside and may
result in fire.
2
3
English
Precautions
This unit can play the following discs only.
Type of disc
MP4
DVD
Wiring Diagram
STANDARD CONNECT
Label on the disc Recorded material
Sound and moving
MP4
Pictures
Sound and moving
Pictures
Sound and moving
Pictures
VIDEO CD
VIDEO
Size of disc
12cm/8cm
12cm/8cm
AUX IN/R
SUBWOOFER OUT
12cm/8cm
AUX IN/L
FRONT-L
RCAOUTPUT
COMPACT
VCD
DIGITAL AUDIO
MP3
MP3
Sound only
12cm/8cm
Sound only
12cm/8cm
COMPACT
CD
Note:
REAR-R
RCAOUTPUT
REAR-L
RCAOUTPUT
FRONT-R
RCAOUTPUT
AV-OUTPUT
DIGITAL AUDIO
The unit is compatible with. DVD. VCD 1.0 / 2.0 / 3.0 VCD, CD-R, PICTURE-CD version Disc.
The manual conforms to DVD. VCD. MP3 and CD. If no VCD or MP3 on some models you should
ignore them. White enjoying DVD, VCD, Mp3 and CD. The Display will automatically identify the
discs and indicate the corresponding words.
Do not attempt to modify the unit,
modifying the unit may cause an
accident.
Stop the vehicle before carrying out
any operation that could interfere
with your driving.
ANTENNA
Do not use your Cds with paste residue
or ink attached.
Do not use CDs with labels or stickers
attached, which may leave a sticky
residue while beginning to peel off.
(Shown as picture)
Do not work in extreme high or low
temperature inside the vehicle is
between +60 and-20 before
turning your unit on.
P.CONT
To enjoy optimum sound and images
while playing, handle the discs as
follows:
Clean the discs with an optional cleaning
cloth. Wipe each disc from the center out.
(Shown as picture)
Handle the disc by its edge to keep the disc
clean, and do not touch the surface.
4
To ignition
key
To Auto
Antenna
ORANGE
RED
YELLOW Memory back-up 12V
BLACK
BLUE
Negative Ground
Batting
Front Lch
Speaker
WHITE/BLACK
Rear Lch
Speaker
GREEN/BLACK
GRAY/BLACK
GRAY
WHITE
GREEN
PURPLE/BLACK
PURPLE
5
Front Rch
Speaker
Rear Rch
Speaker
English
Location of the Control
7 13 8 11 4
19
14
English
Basic Operation
4. Repeatedly press 4 (SE L) button
to select the desired mode in the
following order:
Initlal System Start-up
1.Operating the unit for the first time
or after replacing the car battery,you
must reset the unit. Press 1 (RESET)
Button with a pointed object (such
as a ball point pen) to set the unit
to initial procedure.
VOL
FAD
3
15 5
1 17 18
16
10
VOL
4
5
6
7
8
9
10
FAD
Setting EQ
5. While listening to the popular music,
classic music and rock music, you
Can adjust the sound quality to make
it perfect by pressing 13 (EQ) button.
The procedure is as follows:
CLASS mode is selected when 13
(P-EQ)button is first pressed and
"CLASS"appears in the display.
(Shown as picture)
Note: After the unit is off, if the volume level
is higher than it is in initial setting, it
will resume to initial status; if it is lower
than that in initial status, it still store
in the status which you set.
3
BAL
Turning The Unit ON/OFF
6
RESET
2
BAL
Note: If you don t adjust 3 (VOL) knob within
5 seconds after selecting the desired mode.
The unit will automatically return to the
current mode being displayed.
2. Press 2 (PWR) button to turn on the
unit, and press it again to turn off
the unit.
1
TRE
Note: After selecting the desired mode, you can
adjust the current level by rotating the
3 (VOL) knob.
Note: When some errors occur in the LCD display,
Display, you can also press RESET button
to resume to normal. And it will erase the
clock setting and some memorized functions.
9 12 2
BAS
Reset Button
Power Button
Volume Control
Setting the sound
Characteristics
Loud button
LED Indicator
Mute Button
Clock Button
Mode Button
Remote Control Receptor
11
12
13
14
15
16
17
18
19
6
Band Selector
Tuning/Selecting
Tacks
P-EQ Button
Release Button
AMS Button
Number Buttons
Eject Button
Disk Slot
LCD Panel
Vol/Bass/Tre/Bal(L-R)
/Fad(F-R) Selector
3. For Volume Control 3 , rotate VOL
knob clockwise to increase the sound
level, and rotate it anticlock wise to
decrease the sound level.
7
English
Basic Operation
Note: This windows is used for the unit with
POP mode is selected when
pressing 13
6 (P-EQ) button at the
second time, and "POP" appears on
the LCD. (Shown as picture)
remote control function. Without this
English
Radio Operation
Manual/Automatlc Tuning
Mode Selector
function you should ignore the operation
contents about remote control function.
Rock mode is selected when pressing
(P-EQ) button at the third time,
and "ROCK" appears in the display.
(Shown as picture)
(
or
) button continuously
to select a station upward or downward
respectively.
Band Selector
/Pause the playback
6
13
4. Press
2. Automatic Tuning: Press 12
Manual Tuning: press and hold
(
or
) button for more
than 3 seconds, the radio automatically
searches a station
12
1. Press 11 (BAND) button repeatedly
to select bands i n t he f ollowing
order:
Rress 136 (P-EQ) button at the fourth
time to turn off the P-EQ system.
Note: Bass mode and Treble mode rerurn to
BAND
initial settings when P-EQ system is on,
FM1
MW2
"BASS" and "TREBLE" disappear.
FM2
upward or down ward respectively
and plays when it finds a staion.
FM3
MW1
Scanning/Memorizing
Stations Automatically
During CD mode,press 1 PLAY
button to suspend the playback.
Mute Function
6.Press 97 (MUTE) button to cut
down the sound output, (Press it
3. Press 15 (AMS) button to listen each
stored station wh ic h st or ed i n
16 (1-6)number buttons.
Press and hold (AMS) button for
more than 3 seconds to activate
automatically memory storing
function. The radio automatically
selects a station and has it stored
in any one of the number buttons
16 (1-6).
againto revert to previous volume
level).
Sensor
Note: The unit can be stored up to 6 stations
7.Receptor for the card remote
commander.(for remote control
version only)
for details band. Regarding the function of
unmber buttons, refer to 16 number buttons
8
9
9 (MODE) button
to select
playback mode. If USB/SD card
exist, Mode button can switch
from each other. Press and hold
9
(Mode) button to select
AUX IN mode
English
Radio Operation
Number Buttons
Bluetooth function.
1.PAIR function
5.Number buttons can help you store
Power on the unit. You can used
your favorite station by pressing
your mobile phone to search and
any one of the number buttons. You
fine the Bluetooth module in our
can follow the steps as below:
unit named ONTOPPCB. Press
Press and hold any number button
16
and hold key EQ for about 2s,it
(1~6) until Number appears
DVD VCD MP3
CD Operation
1. While listening to (or watching)
DVD VCD CD MP3 ,just insertaCds
(with labeled side up)into the disk
S L O T 18
the mechanism will
automatically switch on.If a Cds is
l oaded press 9 (MOD) button to
start the playing.
Labeled side up
18
or
) to choose
2. Press 12 (
your favorite track upward or
downward respectively.Press and
or
) button to
hold 12 (
fast forward or rewing the track
upward or downward respectively.
will display PAIR on the LCD
i n t he L C D d i s p l a y w h e n r e c e i v i n g
Playing Tracks Repeatedly
screen. Then you can use your
a station. And now the station is
phone to bonding our Bluetooth
already stored in the corresponding
3. Press 16 RPT 3 button to perform
repeat playing function when you need
to repeat playing the track you like.
During DVD VCD CD version.
Press RPT 3 button at the first time
to repeat playing the same track.
Press RPT 3
button-agai n to stop
repeat.
RESET
module with your mobile phone.
number button.
The entrance code of our
(See the picture)
Bluetooth module is 8888.
You can store up to 18 FM stations,
up to 12 AM stations.
2.ANSWER function and HANGUP
function
After our Bluetooth module
bonded with your mobile phone.
Bluetooth Operation
When you have an incoming phone
call, the unit will ring and mute
the previous sound to indicate
that you have an incoming call,
There are there keys to operate
Bluetooth module:
1. EQ key for PAIR function
2. SEL key for ANSWER function
3. LOUD key for HANGUP
function
at the same time, incoming phone
number will displayed on the LCD
screen.When you have anincoming
phone call, you canpress key SEL
While listening to (or watching)
MP3,just insert a Cds into the
d i s k S L O T 18 , t h e m e c h a n i s m
will automatically switch on.
And the menu on the disc will
display to select playing pictures
or music.
Selecting Tracks/F.F/REW
to answer the callor press key LOUD
to HANGUP your phone call.
10
English
11
DVD VCD MP3
CD Operation
English
Location of the Remote Control
Scanning Tracks
Automatically
4. During play back, Press 5SCAN
button, one of the number button
16 to play the first 15 seconds of
each track on the disc,
19
18
1
11
24
20
5
3
10
12
English
2
7
8
6
4
Press 5SCAN
button once more
to revert to normal play back.
13
9
23
16
Note: INT doesn t work d uring p laying
21
14
15
Playing Tracks in
Random Order
25
22
5. During playback, press 16 RDM
button, The unit plays any track
at random. Press RDM once more
t o return to normal playback mode.
4
17
1
2
3
4
5
6
7
8
Eject a Cds
1 17 15
8
RESET
9
6. Press
17
Eject button(
10
11
12
13
) to eject the
disc.
12
Power Switch
Pause/Play Button
Mute Button
Selecting Menu Button
Local
Enter Button
Volume Control
Tuning/Selecting
Tracks/F.F/REW
Program Playing
Band Select
Loudness
Repeat Playing
Audio Effect
14
15
16
17
18
19
20
21
22
23
24
25
13
Number Button
Audio-Setting
PBC Menu
Subtitle-Setting
EQ Effect
Mode Switch
Stop/Reverse Button
Angle-Setting
Slow-motion play
Setup Menu
Title Display
Zoom-seting
Remote Control Operation
Replacing the Batt ery
When the range o f the o peration of
the card r emote contro l become s
short or no functions while operating.
Replace the b attery with a new button
cell.Make sure the battery polayity
before replace.
1. Pull out the Battery Ho lder whil e
pressin g the Stoppe r
English
Power Button
__
Press 1 ( ) button to turn
On/Off the power.
Pause/Play Button
__
Press 2 ( ) button to suspend
the playback of CD MP3 VCD.
Press it again to return to
normal playback mode.
DVD.
Mute Button
__
Press 3 ( )button to cut down
the sound output,press it once
more to resume the previous
sound level.
1
2. Put the button-type battery(+)mark
upward into the Battery Holder.
Menu selector
__
3. Insert the Battery Holder into the
Remote Control.
) to select
Press 4 (
your desired menu,then press
6 (ENTER) or press the play
button 2 ( )to confirm.
Note: This function works in main menu
mode only. refer to page 13.
Note: Some models are not equipped with
remote control,you should ignore
the contents about remote control.
Volume Increasing/Decreasing Band Selector
1. Press 10 (BAND) button repeatedly
__
Press. 7 ( VOL + or VO L - ) button
to select bands i n t he f ollowing
to increase or decrease the volume
order:
l evel re spec ti v ely.
BAND
FM1
MW2
Tuning/Selecting Tracks
/FastRewind/Forward
_ _ During radio mode, continuously
press 8 (
or
) button to
manual sea rch a station downward
or upwa rd res pectively; if press and
or
) bu tton for
hold 8 (
more than 3 seconds, the radio will
automatically search a station downward
or upward respectively until it finds
a stat ion
FM2
FM3
MW1
Repeat Playing/AMS
During DVD mode, firstly
Press 12 (RPT) to repeat
the current track being played;
press it again to repeat playing all
the tracks. The third press it to
cancel the repeating functional.
During CD MP3 VCD DVD mode,
firstly press 12 (RPT) to repeat
the current track being played;
press it again to cancel the repeating
functional.
__
During the playing mode, press
or
)button to fast
and hold 8 (
rewind or fast forward for you to
reach your desired track quickly.
When discon tinu ously press 8
(
or
) button, you can select your
desired portion downward or upward
respectively
Note: In DVD VCD MP3 CD mode. The initial
procedure is repeat playing all the tracks
Note: In radio mode. press 12 (RPT) to scan
each stored station 10seconds respectively
which stored in Number Buttons.
__
During CD VCD DVD mode,you
can set the program order to play,
you can follow the steps as below:
Firstly press 16 (PBC) button, and
then press 9 (PROG) b utton, and the
television displays prog ra mming
P00:00. You can set the program
order to play them by using 14 (0
~ 10+) button, and then press 2
(
) to play.
Note:Program doesn't function in playing Mp3.
14
English
Remote Control Operation
15
English
Remote Control Operation
Number Buttons
Playing PBC (menu)
During DVD mode only, when
During radio mode , you can
select one of the 6 stored stations on
each hand by pressing any one of the
number but ton 14
During
the playing
pressing 16 (PBC) button at the
Mode Switch
Press 19 (MODE) button to
switch to playback mode
first time, PBC play back starts and
the menu of entire disc appears on
mode,
the television. And then you can
you can select any track directly by
select your favorite track by using
using 14 number button (0~10+).
number button 14 (0~10+) When
For example, if you need the fifteenth
a track is playing , you can press
track, you can first press button
20 (STOP/RETURN) button to return
10+ and then press button 5 , the
to the menu if you want to stop to
(15)th. Will be
select other tracks. To cancel PBC
corresponding track
Remote Control Operation
played.
playing, press 16
Note: When button 10+ is first pressed, it works
as 10+ . It works as 20+ when pressed
at the second time, the third time 30+
and the like.
again.
(PBC) button
Subtitle Selector
In PBC playback mode, Number Button is
not functional.
During DVD mode, press 17
(SUB-T) button to switch the menu
to Chinese or English.
Left/Right/Stereo Selector
During the playing mode,
continuously press 15 (Audio)
can change the sound to left / right
speaker or stereo mode.
Note: There are S grades surrounding effect
in surround mode During VCD mode
you can see the different pictures indicating
different effects on the television.
Stop the playback
In DVD mode, press 20 ( )
button to suspend the playback
and press play to continue shown
on TV.Press it again to sto p the
playback.
Note: in VCD M P3and C D Press th is ke y
once to stop.
MULT-ANGLE KEY
In DVD playing mode, press
21 (ANGLE) key, you can watch
the DVD content from diferent
angle.
Nate: In DVD. MP3 and CD. It is not the function
SLOW REVERSE/
SLOW ADVANCE KEY
Press Slow button when pictures moving,
you can enter Slow Motion Playback mode.
Press the Slow button on the remote during
playback. Press the button again on the remote
to play at the next speed. Slow. Motion Playback
has six speeds:1/2,1/3,1/4,1/5,1/6,1/7.With
each consecutive press of the button, the play
speed decreases. If you press the button seven
times, Slow Motion Playback cycles back to
Normal playback.
Press Play button to resume normal playback.
=
2 (
) key to, cancel slow reverse
/Slow advance function.
Nate: in Mp3 and CD. Tt ts not the function,
16
17
English
Remote Control Operation
English
Chapter 4 Th e Setup Menu System
1. General Steps of Setup Menu
1) Press the Setup button, the main setup menu appears. A
When the main menu displayed, the DVD system will auto pause.
2) Press the Left and Right arrow buttons to highlight the icon of the desired page,
the press the Down or Right arrow button to activate that page; For example,if
you want to setup the video page, press Right to highlight the video icon, the video
page will be displayed on the screen.
3) Press the Down arrow button to highlight the desired option. Press Enter or press
Right to select, the choices of that option appear on the right; For example, press
the Down arrow button to highlight the BRIGHTNESS option, then press Enter
to select, the brightness choices choices appear on the right.
Remote Control Operation
Preview, Goto, Program, Repeat, A-B, Angle, language, Soundtrack, 3D, Record,
Display, Mute, Setup.
2. Setup Items lntroduction
SYSTEM SETUP
The system setup options are illustrated below:
TV SYSTEM
According to the Color System of the TV, you can choose the TV System.
AUTO: Choose this settin gs if your DVD player is connected to a multi-system TV.
NTSC: Choose this settings if your DVD player is connected to a NTSC TV.
PAL: Choose this settings if your DVD player is connected to a Pal TV.
PAL60: Choose this settings if your DVD player is connected to a PAL60 TV.
The default setting is NTSC.
SCREEN SAVER
If the screen saver is on, when your DVD player is in Stop, Open, or No Disc state,
or there is a frame frozen for more than 60sec, the screen saver will be displayed.
This feature can protect the screen from damage.
ON: Choose this setting to act to activate the screen saver.
OFF: Choose this setting to cancel the screen saver
The default setting is ON.
4) Press the Arrow buttons to highlight the Exit Setup option, then press Enter or
Setup again to exit Setup Menu.
Notes:
When setup, the pressing of the following buttons will turn off the setup menu, while
the choices that have been changed will be saved : P/N,Subtitle,F.F,F.R. Vol+/-.PBC,
PBC, Title, Return, Play, Stop, Resume. Pause / Step, Next, Prev, S.F, S.R, Zoom,
18
English
19
Remote Control Operation
English
VIDEO
Interlace-YUV: Choose this setting if your DVD player is connected to a TV with
Y, Cb, Cr video cables.
TV-RGB:Choose this setting if your DVD player is connected to a TV with an SP-SCAN:Choose this setting if your DVD player is connected to a progressive scan
TV with Y, Cb, Cr video cables.
PC-VGA:Choose this setting if your DVD player is connected to a progressive scan
TV or a monitor with a VGA video cable.
Notes:
When your DVD player output composite video, you can choose the setting randomly.
Choose TV-RGB/P-SCAN if your DVD player is connected to a progressive scan TV.
The default setting is TV-RGB.
TV TYPE
16:9 (Wide Screen):Choose this setting if your DVD player is connected to a wide
screen TV. If you Choose this setting and you don t have a wide screen TV, the
images on the screen may appear distorted due to vertical compression.
4:3LB (Letter Box): Choose this setting if your DVD player is connected to a
normal ratio TV. connector You ll see the movies in their original aspect ratio
(height- to-width ra tio). You ll see the entire frame of the movie, but it will take
up a smaller portion of the screen vertically. The movie might appear with black
bars at the top and bottom of the screen.
4:3 PS (Pan & Scan):Choose this setting if your DVD player is connected to a
normal ratio TV. You can fill the movie to the entire screen of your TV. This
might mean that
parts of the picture (the left and right edges) won t be seen.
Notes:
The image display ratio is related to the recorded disc format. Some disc can not
display images in the aspect ratio you choose.
If you play a disc recorded in 4:3 format on a wide screen TV, black bars will appear
on the left and right side of the screen.
You must adjust the screen setting depending on the type of the television you have.
20
Remote Control Operation
English
PA S S W O R D
The password option is initialized locked, and you cannot sct the ratings limit or
change the password. In order for the Ratings feature work, the password mode
must be turned on. If you want to set the ratings limit, you will need to enter the
default password, which is 0000, then press Enter to confirm. To change the password
you will be prompted for the old password, then be prompted for a new. Enter a 4-digit
number (this is your password).
R AT I N G
The Rating feature is a rating limit system, like movie ratings. It works with DVD
discs that have been assigned a rating. This helps you control the types of DVD s
that your family watches. There are two rating options: NO ADULT and KID SAFE
Select the VIEW ALL option to cancel the rating limit.
The default setting is VIEW ALL.
Notes:
If the password option is locked, you cannot set the ratings limit; the rating
limit doe not work when the password option unlocked.
DEFAULT
Choose this option to resume all the setup options to default settings.
LANGUAGE SETUP
The language setup options are illustrated below:
Highlight the OSD LANGUAGE option, and press the Arrow buttons to choose the
OSD language you prefer. Press Enter to confirm, and it will display OSD in that
21
Remote Control Operation
English
Ianguage;There are 8 iptional OSD languages: Chinese, English, Japan, French,
Spanish, Portuguese, German and Latin.
Highlight the AUDIO LANG option,and press the Arrow buttons to choose the aud io
language you prefer. Press Enter to confirm. If the disc you are playing has that
language available, it will output audio in that language; There are 8 optional audio
languages: Chinese, English, Japan, French, Spanish, Portuguese, German and Lat in.
Highlight the SUBTITLE LANG option, and press the Arrow buttons to choose the
subtitle language you prefer. Press Enter to confirm. If the disc you are playing has
that language availa ble, it will displa ys subtitles in that language; There are 8
optional audio languages: Chi8nese, English, Japan, French, Spanish, Portuguese,
German, and Off
Highlight the MENU LANG option, and press the Arrow buttons to choose the menu
language you prefer. Press Enter to confirm. If the disc you are playing has that
language av ailable, it w ill display s menu in the language; There are 8 optional menu
language: Chinese, English, Japan, French, Spanish, Portuguese, German, and Off.
Notes:
If your preferred language isn t available, the disc s default lan guage will be pl ayed.
The default language of your DVD player is Chinese.
AUDIO SETUP
The audio setup options are illustrated below:
Remote Control Operation
English
VIDEO SETUP
The video setup options are illustrated below:
BRIGHTNESS
Use the Up and Down arrow button to move the scroll and adjust the
brightness.
CON TRAST
Use the Up and Down arrow button to move the scroll and adjust the
contrast.
HUE
Use the Up and Down arrow button to move the scroll and adjust the hue.
.
S AT U R AT I O N
Use the Up and Down arrow button to move the scroll and adjust the
saturation.
22
23
Remote Control Operation
No using for a period of time, please
pul l ou t the plug from the electronic outlet.
The play er should be operated only on
condition that the type of power supply
corresponds to the marking label. Otherwise,
it doesn t work or even be damaged.
If the player stops playback by accident, please
power it on again.
TITLE KEY
In DVD
VCD playing mode,
press 24 (TILE)
tracks
key to show all
title on TV screen. Then
press 14 ( 0~ 10 +) key or press
(
4
) key to choose your
=
(
) key to
English
Remote Control Operation
Chapter 3 Playing WMA, MP3 and JPEG discs
Place a MP3/ JPEG disc into the tray, and the player will auto search the
directories saved MP3/JPEG files. After searching, it will auto go to the first
directory saved MP3 files (to the disc containing both mp3 and jpeg files; To the
disc containing single type of files,it will auto go to the first directory) and play
the first song in the directory ( 01: is highlighted).The screen displays as the
picture below:
Current
Directory
name
desired track number and press 7
(ENTER) key or 2
English
Current MP3/JPEG file
name. If a JPEG file
playing, the name should be
*.jpg.
start.
Note:1. No title display in Mp3 CD mode
2. For choose a desired language
to press title key.
ZOOM K EY
The 25 Function allows you to enlarge
or zoom out the video image and to pan
though the image. Press Zoom repeatedly
to activate the function and choose the
required zoom factor: Zoom 1, Zoom 2,
Zoom 3, Zoom 1/2, Zoom 1/3, Zoom,
Zoom Off.
Notes: This feature does not work when the
Disc Menu appears.
Use the Arrow buttons to pan across the
screen when the zoom factor is 1,2 or 3 .
REFERENCE:
To protect your DVD player, the interval
between two consecutive power
button operations must be above 30 seconds.
24
The playing file is
A JPEG picture.
The playing file
Is a MP3 music.
File Switch Region: Displays
the file type of the playing and
The switching.
Use the Arrow buttons to enter the Directory Region and highlight the desired
directory, then the first track under it starts playback; Also you can use the
Arrow buttons to enter the File Region and select the file you want to play.
Notes:
Press the Left and Right arrow buttons, you can activate Directory Region,
File Region and File Switch Region separately.
The highlight in Directory Region and File Region is shown as the picture
25
Playing WMA,MP3and JPEG discs
English
above; While it appears a transparent rectangle in File Switch Region.
. In File S w itch Region , you can press the Left and Right arrow buttons to
switch the highlight, then press Enter, the M , P ,and G button is
illustrated in the above picture. For example, if a disc with Mp3 and Jpeg
files but without any NES files is loaded, the color of the letter M and
P will appear to white and
turns darker.
G
English
Installation
Parts List (The number in the list are keyed to those in the instructions)
1
2
X2
black. If a Mp3 file playing, M
To the disc with WMA, MP3 and JPEG files, whcn playing a JPEG picture,
press the Return button to return to JPEG list.
3
6
5
4
7
You can press the Numeric buttons to select the file you want to play. For
example, if you desire the 15th track in current list, press the 10+ button
once, then poress 5 ,the 15th starts playback.
Notes: When playing a disc with Mp3files, video cannot be output while only
digital audio can.
When playing JPEG pictures, press the Program button to choose the pictures
Switched mode. There are 17 switch modes; Press Program repeatedly to activate
the function and choose the required switch mode: Spread from Up to Down,
Spread from Down to Left, Spread from Left to Right ,Up to Left Down, Spread
Spread from Left Up to Right Down, Spread from Right Up to Left Down, Spread
Left Down to Right Up, Spread from Right Down to Left Up, Spread from Center
to Up / Down, Fold from Up / Down to Center, Fold from Left/ Right to Center,
Horizontal Shutter, Vertical Shutter, Fold from the Corners to the Center,
Random Play, Off
When a picture playing or pausing, press the Arrow buttons to change the
display angle:
Up: flip vertical
Down: flip horizontal
Left: rotate 908 counter-clockwise
Right:rotate 908 clockwise
Mounting Example
1
182
1
2
mm
53mm
1
Put in the mounting sleeve.
Bend these clown outward
for a tight fit, if necessary.
3
8
Fasten the rear bracket serows
and back side harness, and fix
the unit well.
6
7
5
When a picture playing or pausing, press the Menu button, the screen disp
lays small pictures. Up to 12 small pictures are displayed per screen. To view the
next 12 pictures, press the Next button to go forward and the prev button to go to
the previous page. You can also select and play a picture in full screen by press
that number on the remote.
26
Remooac, insert key into
the set then pull the set
out trow dash board.
9
27
English
Installation
DETACHING THE FRONT PANEL
Before detaching the front panel. Be sure to
press
. Press
, then ture the front panel
to the level, slide it to the left, and pull it off
to wards you.
REPLACING THE FRONT PANEL
Bulgn
Dulge
Hollow
Hollow
First, insert the left side of the front panel
into the main unit. Push the right side of the
front panel until it looks firmly into the main
unit, at one time, insert the right side of the
front panel into the main unit.
PRECAUTIONS
Do not touch the contacts on the ront panel or
on the unit body, since this may result in poor
electrical contact, If dirt or dust get on the
contacts, wipe them with s clean, dry cloth.
Specification
English
General
Power Requirements
Load Impedance
Max. Power Output
Tone Controls
Dimensions
Mounting Dimensions
Weight
12V DC
4
45W x 4/65W x 4/100W x 4
8dB(Bass 100Hz, Treble 10KHz)
Approx.192x178x50mm(dxwxh)
Approx.169x182x53mm(dxwxh)
Approx. 1.75kg
DVD Deck Section
Discs Played
Video System
Mounting Angle
DVD,VCD1.0/1.1/2.0/3.0/MP3,CD,CD-R,CD-RW,PICTURE-CD
AUTO/PAL/NTSC
0TO+/-30
Video Section
Video System
Video Output level
Horizontal Resolution
Audio Section
Maximum Output level
Frequency Response
Signal-to-noise Ratio
Separation
AM Tuner Section
Frequency Range
IF Range
Usable Sensitivity(-20dB)
FM Tuner Section
Tuning Range
IF Range
Usable sensitivity (-30dB)
Signal-to-noise Ratio
Stereo Separation
Frequency Response
4:3 Letter Box and 4:3 Pan Scan
1.0Vp-p 75 ohms
500
2Vrms(+/-3dB)
20 to 20Khz
85dB
80dB
522-1620(Europe/China/Japan),530-1710(U.S.A)
(Optional)
450KHz
25dB
76-90(Japan)
87.5-108(Europe/china),87.5-107.9(U.S.A)(Optional)
10.7MHz
15dB
60dB
30dB(1KHz)
30~15000Hz
Note: Due to continuous product improvement, specifications and design are subject to change
without notice.
28
29