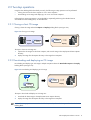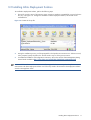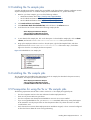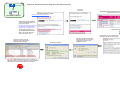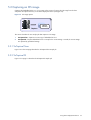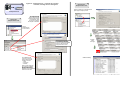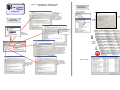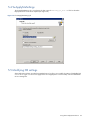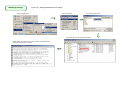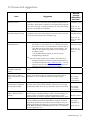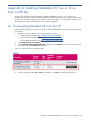
1
Altiris Deployment Solution Guide for Blade
Workstation Clients using Embedded OS 9.xx
or 10.xx
Part number: 467809-002
Second edition: June 2008
© Copyright 2008 Hewlett-Packard Development Company, L.P.
The information contained herein is subject to change without notice. The only warranties for HP products and services are set forth in the
express warranty statements accompanying such products and services. Nothing herein should be construed as constituting an additional
warranty. HP shall not be liable for technical or editorial errors or omissions contained herein.
Microsoft and Windows are U.S. registered trademarks of Microsoft Corporation.
Altiris eXpress is a trademark of Altiris, Inc. in the United States and other countries.
Part number: 467809-002
Second edition: June 2008
Audience Assumptions
This guide is for the person who administers blade workstation client computers for the HP Blade Workstation
Solution. HP assumes you are familiar with installing, configuring, and using the Altiris Deployment Solution.
2
Contents
1 Introduction
1-1
1-2
1-3
Client documentation...................................................................................................................... 5
Altiris Deployment Solution.............................................................................................................. 5
Tabloid-size pages ......................................................................................................................... 5
2 Altiris Deployment Solution overview
2-1
Deployment Solution building blocks ................................................................................................ 6
2-1-1
Download to eXpress............................................................................................................ 6
2-1-2
Capture .............................................................................................................................. 7
2-1-3
Deploy................................................................................................................................ 7
2-2
Two-step operations ....................................................................................................................... 8
2-2-1
Cloning a client OS image .................................................................................................... 8
2-2-2
Downloading and deploying an OS image ............................................................................. 8
3 Installing Altiris Deployment Solution
3-1
3-2
3-3
3-4
3-5
Downloading Altiris Deployment Solution.......................................................................................... 9
Installing Altiris Deployment Solution .............................................................................................. 11
Installing the 9x sample jobs ......................................................................................................... 12
Prerequisites for using the 9x sample jobs ....................................................................................... 12
Client computer boot order ........................................................................................................... 13
4 Preparing the PXE boot file for the HP dc73 Blade Workstation Client
5 Using Altiris Deployment Solution
5-1
5-2
Downloading an OS image to the eXpress directory......................................................................... 16
Capturing an OS image ............................................................................................................... 18
5-2-1
9xCaptureClone ................................................................................................................ 18
5-2-2
9xCaptureOS .................................................................................................................... 18
5-3
Deploying an OS image ............................................................................................................... 21
5-3-1
9xDeploy .......................................................................................................................... 21
5-3-2
9xDeployKeepSettings ........................................................................................................ 21
5-4
9xApplySiteSettings ..................................................................................................................... 24
5-5
Modifying OS settings .................................................................................................................. 24
6 Troubleshooting tips
6-1
Log files ...................................................................................................................................... 26
6-1-1
Turn the logging level up to 5 on the Altiris server .................................................................. 26
6-1-2
Client log files for capture operations.................................................................................... 26
6-1-3
Log files for deploy operations ............................................................................................. 26
6-2
Issues and suggestions.................................................................................................................. 27
Appendix A: Installing Embedded OS 9.xx from a USB key
A-1 Downloading Embedded OS 9.45 from HP........................................................................................ 29
A-2 Example installation from the USB key ............................................................................................... 33
Contents 3
Figures
Figure
Figure
Figure
Figure
Figure
Figure
Figure
Figure
Figure
Figure
Figure
Figure
Figure
Figure
Figure
Figure
Figure
Figure
Figure
Figure
Figure
Figure
Figure
Figure
Figure
Figure
Figure
Figure
Figure
Figure
Figure
Figure
Figure
Figure
Figure
Figure
Figure
2-1 Download of Altiris image to the eXpress directory ........................................................................... 6
2-2 Image capture............................................................................................................................. 7
2-3 Image deployment ....................................................................................................................... 7
2-4 Cloning an OS image ................................................................................................................... 8
2-5 Downloading and deploying an OS image...................................................................................... 8
3-1 File Download dialog for Altiris Deployment Solution 6.8 SP2 ............................................................ 9
3-2 Download menu ......................................................................................................................... 10
3-3 Downloading of the .frm file........................................................................................................ 10
3-4 Contents of the zip file ................................................................................................................ 11
3-5 Embedded OS 9.xx sample jobs .................................................................................................. 12
3-6 Client computer boot order ......................................................................................................... 13
4-1 Process to create the PXE automate boot image for the HP dc73 Blade Workstation Client................... 15
5-1 Download to eXpress directory..................................................................................................... 16
5-2 Downloading the Altiris image file to the eXpress directory .............................................................. 17
5-3 OS image capture ..................................................................................................................... 18
5-4 Capturing Embedded OS version 9.xx using 9xCaptureClone.......................................................... 19
5-5 Capturing Embedded OS version 9.xx using 9xCaptureOS ............................................................. 20
5-6 Image deployment ..................................................................................................................... 21
5-7 The 9xDeploy sample job ............................................................................................................ 22
5-8 The 9xDeployKeepSettings sample job .......................................................................................... 23
5-9 The 9xApplySiteSettings job......................................................................................................... 24
5-10 Modifying Embedded OS 9.xx settings ....................................................................................... 25
A-1 Selection of the 9.45 USB key image............................................................................................ 29
A-2 Downloading of softpaq sp38209.exe is complete—click Run to continue ......................................... 30
A-3 Softpaq screen for the 9.45 USB key image .................................................................................. 30
A-4 Contents of the softpaq folder ...................................................................................................... 31
A-5 Determining the ID of the USB key ................................................................................................ 31
A-6 Copying of the 9.45 image file to the USB key .............................................................................. 32
A-7 Keyboard language selection ...................................................................................................... 33
A-8 Select Install Cleanly ................................................................................................................... 33
A-9 Select No for site-wide default settings .......................................................................................... 34
A-10 Select Yes to set local, system-specific settings .............................................................................. 34
A-11 Local Settings screen................................................................................................................. 34
A-12 Selection of networking protocol ................................................................................................ 35
A-13 Setting local client network parameters ....................................................................................... 35
A-14 Installation of the Embedded OS ................................................................................................ 36
A-15 Installation complete screen ....................................................................................................... 36
Figures 4
1 Introduction
This guide provides information that you will need to download, capture, and deploy Embedded OS 9.xx or
10.xx on the following blade workstation client computers using Altiris Deployment Solution:
•
HP Blade Workstation Client (formerly known as the HP Compaq Blade Workstation Client)
•
HP dc72 Blade Workstation Client
•
HP dc73 Blade Workstation Client
Information on downloading, capturing, and deploying the operating system for the HP Compaq t5720 and
t5730 Thin Clients` is not provided in this guide.
The reader is assumed to be knowledgeable about:
•
Installing, configuring, and using Altiris Deployment Solution
•
Configuring DHCP and PXE servers
1-1 Client documentation
For the latest client documentation, potentially including a later version of this document, visit the following
websites:
•
HP Blade Workstation Client: http://www.hp.com/support/bwclient_manuals
•
HP dc72 Blade Workstation Client: http://www.hp.com/support/dc72_manuals
•
HP dc73 Blade Workstation Client: http://www.hp.com/support/dc73_manuals
1-2 Altiris Deployment Solution
With your purchase of the HP Blade Workstation Client, the HP dc72 Blade Workstation Client, or the HP dc73
Blade Workstation Client, you are entitled to a version of Altiris Deployment Solution designed to manage your
client computers. Chapter 3 describes how to download and install Altiris Deployment Solution.
1-3 Tabloid-size pages
This document contains both letter size and tabloid size pages. Tabloid pages are included because they permit
complex, multi-step processes to be documented on a single page. Tabloid pages are best viewed either on your
computer monitor, or when printed on size B (11 inches by 17 inches) or ISO A3 (297 mm by 420 mm) paper.
If you print this document, it is recommended that you use a printer capable of handling letter and tabloid size
paper simultaneously. If your printer handles only letter size paper, you should specify, if available, scaling to
letter size or scale to fit paper in the print dialog. This will ensure that figures on the tabloid pages are scaled to
fit on letter size paper.
Tabloid pages may also be printed individually if you have access to a tabloid-capable printer. Select Current
Page in the print dialog, and select Properties to view the paper size and orientation options. Depending on your
printer, paper size may be listed as tabloid, size B, or A3. Orientation should be set to landscape.
Introduction 5
2 Altiris Deployment Solution overview
This chapter provides an overview of the Altiris Deployment Solution. Three basic capabilities (building blocks)
are described first, followed by a description of how these capabilities can be combined to perform more
advanced operations. Chapter 5, “Using Altiris Deployment Solution“, describes each of these operations in
detail.
2-1 Deployment Solution building blocks
This section describes the three Altiris Deployment Solution building blocks upon which more advance operations
are based:
1.
Download to eXpress—Downloads the Embedded OS 9.xx or 10.xx image to the Deployment Server
eXpress directory.
2.
Capture—Creates a disk image of a client computer on the network, and store the disk image in the
eXpress directory on the Altiris Deployment Server.
3.
Deploy—Installs an OS image over the network from the eXpress directory to a client computer.
2-1-1 Download to eXpress
With Download to eXpress, the Embedded OS 9.xx or 10.xx image (the Altiris Image) is downloaded from the
HP website directly to the Deployment Server eXpress directory (see Figure 2-1).
Figure 2-1 Download of Altiris image to the eXpress directory
Altiris Image
eXpress
directory
Download to eXpress
The Download to eXpress details are described in Section 5-1, “Downloading an OS image to the eXpress
directory.”
IMPORTANT: An Altiris image file will only be available for subsequent installations if it is saved under the
network share eXpress directory set up when Altiris Deployment Server is installed. The directory path is
typically:
C:\Program Files\Altiris\eXpress\Deployment Server\Images
Altiris Deployment Solution overview 6
2-1-2 Capture
Capturing an OS image is the process of transferring the OS image from the client computer to the Deployment
Server eXpress directory (see Figure 2-2).
Figure 2-2 Image capture
eXpress
directory
Capture
Capturing an image is described in Section 5-2, “Capturing an OS image.”
2-1-3 Deploy
Deploying an OS image is the process of installing the OS image from the eXpress directory to one or more
client computers (see Figure 2-3).
Figure 2-3 Image deployment
eXpress
directory
Deploy
Deploying an image is described in Section 5-3, “Deploying an OS image.
Altiris Deployment Solution overview 7
2-2 Two-step operations
Using the three building blocks described previously, the following two-step operations can be performed:
•
Cloning the OS from the client computer to one or more computers.
•
Downloading an OS image and deploying it to one or more client computers.
Performing these two-step operations is accomplished by sequentially performing the individual actions
associated with each building block, as described next.
2-2-1 Cloning a client OS image
Cloning a client OS image utilizes the Capture and Deploy building blocks (see Figure 2-4).
Figure 2-4 Cloning an OS image
eXpress
directory
eXpress
directory
Deploy
Capture
The steps to clone an OS image are:
1.
Capture the OS image from the client computer, and store the image in the Deployment Solution eXpress
directory.
2.
Deploy the image from the eXpress directory to the target client computers.
2-2-2 Downloading and deploying an OS image
Downloading and deploying an OS image to multiple computers utilizes the Download to eXpress and Deploy
building blocks (see Figure 2-5).
Figure 2-5 Downloading and deploying an OS image
Altiris Image
eXpress
directory
eXpress
directory
Deploy
Download to eXpress
The steps to download and deploy an OS image are:
1.
Download the Altiris Image to the Deployment Server eXpress directory.
2.
Deploy the image from the eXpress directory to the target client computers.
NOTE: The two-step operations are not described further; instead, refer to the description of each individual
building block.
Altiris Deployment Solution overview 8
3 Installing Altiris Deployment Solution
This chapter describes how to download and install the Microsoft Windows version of Altiris Deployment Solution
6.8 SP2.
NOTE: At the time of this writing, Deployment Solution 6.8 SP2 is the latest version available. HP recommends
that you install later versions of Deployment Solution when they become available.
NOTE: Your complimentary copy of the Altiris Deployment Solution is governed by the Altiris Software Licensee
Agreement, which you are deemed to have agreed to by installing the software. This complimentary copy of
the software is non-transferable, and may only be used to remotely manage the HP blade workstation client
computers or computers for which a client-side license has been purchased. Please review the terms of the
license agreement before installing the software, by visiting http://www.altiris.com/legal/EULA-general.asp.
3-1 Downloading Altiris Deployment Solution
To download Altiris Deployment Solution, perform the following steps:
1.
Go to the website http://www.altiris.com/hptc, and click Download Deployment Solution. If this is your first
visit to this website, you’ll be asked to provide demographics and business information. The product
Deployment Solution for HP Thin Clients (Free Download) should be displayed in the Select a product to
download menu. Enter your e-mail address and click Submit.
2.
The End User License Agreement is displayed next—click YES, I agree if you agree with the terms of the
license agreement.
3.
On the next page, click Deployment Solution for Clients 6.8 SP2 (Windows) listed in step 2. This brings up
the dialog in Figure 3-1. Save the Altiris Deployment Solution zip file on your disk for later use.
Figure 3-1 File Download dialog for Altiris Deployment Solution 6.8 SP2
Installing Altiris Deployment Solution 9
4.
The next step is to download the Linux and Free DOS Automation Environment for Deployment Solution 6.8
SP2. To do this, perform the following steps:
a. Click Check the Altiris Product Updates page for the latest Deployment Solution updates, which is listed
in step 4—this will display the Products Update page.
b. On the Products Update page, click download site to display the Download page. On the Download
page, use the Select a product to download menu to select Deployment solution for Clients 6.8 SP2 (see
Figure 3-2). Click Submit and respond to the End User License Agreement.
Figure 3-2 Download menu
c.
Next, the Deployment Solution for Clients page is displayed. Click Linux and FreeDOS Automation
Environment for Deployment Solution 6.8 SP1, which brings up the dialog in Figure 3-3. Save the .frm
file on your disk—this file is used during Deployment Solution installation.
Figure 3-3 Downloading of the .frm file
Installation of Deployment Solution is described in the next section.
Installing Altiris Deployment Solution 10
3-2 Installing Altiris Deployment Solution
To install Altiris Deployment Solution, perform the following steps:
1.
The zip file saved in step 3 of the previous section contains a Windows executable file (.exe) and a license
file (.lic)—see Figure 3-4. To begin the installation of Altiris Deployment Solution, extract and run the
executable file.
Figure 3-4 Contents of the zip file
2.
During the installation process, you’ll be prompted for which preboot environment to use. Select Linux and,
when prompted, specify the path to the .frm file saved in step 4-c of the previous section.
3.
For additional installation and configuration instructions, refer to the HP Thin Client Management Getting
Started Guide available at http://www.altiris.com/upload/altiris_hpthinclients_gettingstarted.pdf.
NOTE: HP blade workstation clients are automatically recognized as license exempt when they first
communicate with Altiris Deployment Solution. No license key needs to be activated in the Deployment Solution
console to manage these clients.
Installing Altiris Deployment Solution 11
3-3 Installing the 9x sample jobs
A number of Deployment Solution sample jobs are available on the client software website to implement common
capture and deployment tasks. To install the sample jobs for Embedded OS 9.xx, perform these steps:
1.
Based on your client computer, go to one of the following websites:
•
HP Blade Workstation Client: http://www.hp.com/support/bwclient
•
HP dc72 Blade Workstation Client: http://www.hp.com/support/dc72
•
HP dc73 Blade Workstation Client: http://www.hp.com/support/dc73
2.
Click Download drivers and software.
3.
Click Workstation Blade Client Embedded OS, and scroll down to the Software section.
4.
Scroll down the list of client software to the following sample jobs file:
Altiris Deployment Solution Sample
Jobs for Microsoft Windows Systems
(9xHPBladeWorkstationClientJobs.bin)
5.
To view details of the sample jobs, click on the description. To download the sample jobs, click on Obtain
software, and save the 9xHPBladeWorkstationClientJobs.bin file to your hard drive.
6.
Bring up the Deployment Solution console. In the Jobs pane, right click the Samples folder, and select
Import. Browse to the 9xHPBladeWorkstationClientJobs.bin file saved in step 5, and select it.
Figure 3-5 shows the 9.xx sample jobs that are imported.
Figure 3-5 Embedded OS 9.xx sample jobs
3-4 Installing the 10x sample jobs
The 10x sample jobs are installed in the same manner as the 9x sample jobs described in the previous section,
except that the 10x sample jobs are labeled as follows:
Altiris Deployment Solution Sample
Jobs for Microsoft Windows Systems
(10xHPBladeWorkstationClientJobs.bin)
3-5 Prerequisites for using the 9x or 10x sample jobs
The following requirements must be met in order to use the 9x or 10x sample jobs supplied by HP:
•
The client computers must be on the same subnet as the Altiris Deployment Server.
•
There can only be one PXE server per subnet.
•
The client computers must already have Embedded OS version 9.40 or newer installed.
•
If you are using Embedded OS 8.xx, you must run e2fsck immediately before every activity that happens
at the automation console prompt. Failure to clean the partition after every reboot will result in an Altiris
'Invalid Volume' error.
•
Each client must have a static Altiris Deployment Server IP address assigned, or be on a network configured
to allow the Client to detect the server IP using multicasting.
Installing Altiris Deployment Solution 12
3-6 Client computer boot order
For all imaging operations described in this guide, the client computer boot order should be as shown in Figure
3-6. The boot order is set by pressing the F10 key during boot, selecting [language] > Storage > Boot Order, and
following the instructions in the Boot Order screen.
Figure 3-6 Client computer boot order
Installing Altiris Deployment Solution 13
4 Preparing the PXE boot file for the HP dc73 Blade
Workstation Client
When the client computer performs a PXE boot, the computer obtains its minimal operating system from the Altiris
Deployment Server. For the HP dc73 Blade Workstation Client, the PXE boot file needs to be created to ensure
that the required network drivers are included. For the earlier client computers (the HP dc72 Blade Workstation
Client and the HP Blade Workstation Client), the default PXE boot operating system provided with Altiris
Deployment Solution 6.8 can be used as-is.
This chapter describes how to create the PXE boot file for the HP dc73 Blade Workstation Client. If you’re not
using this particular client computer, you can skip this chapter. The process to create the PXE boot file for the HP
dc73 Blade Workstation Client is shown in Figure 4-1.
NOTE: The process described in Figure 4-1 includes downloading several drivers from the Altiris website.
These drivers are used to create the PXE automation boot image, and are required when using Altiris
Deployment Solution 6.8. Altiris Deployment Solution 6.9, when it becomes available, will no longer require
the downloading and inclusion of drivers from the Altiris website.
Preparing the PXE boot file for the HP dc73 Blade Workstation Client
14
Figure 4-1: Process to create the PXE Automation Boot Image for the HP dc73 Blade Workstation Client
start
here
Provide the desired name for
the PXE boot option, select
the items shown below, and
click “Create Boot Image”.
Enter a detailed description
if desired, and click “Next”.
The next step is to fetch the required
boot drivers from the Altiris website.
Click “Internet” on the dialog below.
A browser window is
automatically brought up
pointing to the FTP site below:
Click on “New”
Start the PXE Configuration Utility
Ensure that the IP address
is obtained from a DHCP
server and click “Next”.
Select: Altiris_verified/DS 6.8 SP2 (2.6.18.8)/x86
Immediately upon selecting multiple custom
drivers, the number of steps is incremented to
12 (was 11) to account for this additional step
of changing the driver load order.
Shown below is highlighting of the e1000.ko driver.
Click “Next” after all custom drivers have been highlighted.
Enter the IP address of
the Altiris Deployment
Server, select Remote,
and click “Next”.
Enter the Workgroup
or Domain name, enter
the User name and
Password of the
Altiris file server, then
click “Next”.
Step 8 of 12:
Step 8 of 12:
Review the
Review the
configuration
configuration
summary,
summary,
click “Next”
click “Next”
if OK.
if OK.
For the 2nd and 3rd drivers, click the “Have Disk…”
button in the “Step 2 of 11” dialog shown above.
Specify the driver module path and click “OK” for
each of the two remaining drivers. After all three
drivers have been loaded, select (highlight) all drivers
that are noted as custom in the “Source” column below.
Click “Finish”
If needed, customize the configuration
by adding and editing files.
Click “Next”
Click “OK” when the above
dialog re-appears
Click “Next”
After closing the browser
window, this dialog is
brought up automatically.
Use the “Add Driver” button
to add the first of the three
required Linux drivers
Click “OK” after
specifying the
path/file name
of the 1st driver.
Step 3 of 12 allows the driver load order
to be changed. Set the following order:
1. SCSI
2. SATA
3. e1000
This is where
the PXE image
is created.
Provide the information
required by the client to
access the image files
on the server, then click
“Next”.
From these 3 folders, save
the ahci.ko, ata_piix.ko, and
e1000.ko files to a local folder.
Ensure that “Next Device (BIOS/EFI)”
is first in the list. Use the Up/Down
keys to position “dc73Linux” second
in the list, then click “OK”.
Select the “DS” (Deployment Server)
tab and select “dc73Linux (32-bit)”
from the pull-down menu. Click “OK”.
15
5 Using Altiris Deployment Solution
This chapter describes how to use Altiris Deployment Solution—specifically, each of the Deployment Solution
building blocks is described. As noted previously, the individual building blocks can be combined to perform
more complex operations.
NOTE: Embedded OS 9.xx and 9x sample jobs are referenced in this chapter; however, the discussion applies
to Embedded OS 10.xx and the 10x sample jobs as well.
5-1 Downloading an OS image to the eXpress directory
With the Download to eXpress process, Embedded OS 9.xx or 10.xx (the Altiris Image) is downloaded from the
HP website directly to the Deployment Server eXpress directory (see Figure 5-1).
Figure 5-1 Download to eXpress directory
Altiris Image
eXpress
directory
Download to eXpress
Figure 5-2 on the next page describes this process in detail.
Using Altiris Deployment Solution 16
Figure 5-2: Download the Altiris image file to the eXpress directory
Altiris Image
Click on the
link shown.
eXpress
directory
Download to eXpress
IMPORTANT: If multiple Altiris Images are available, always
download the most recent image.
http://www.hp.com/support/dc73
Find the Altiris Image by starting
at the HP website appropriate for
your client computer:
http://www.hp.com/support/bwclient
http://www.hp.com/support/dc72
http://www.hp.com/support/dc73
Click on “Obtain software” for the HP
Compaq Blade Workstation Altiris Image
The web page at right is for the
HP dc73 Blade Workstation Client.
Click on the circled “Download
drivers and software” link.
Read the End User License Agreement
and indicate whether or not you agree.
Click Close and then move the
image file to the following folder
under the eXpress directory.
Download is complete.
Click Save and specify a location to
save the image file to. In this case,
a temporary file location under
C:\SWSetup is used.
IMPORTANT: When Altiris Deployment Server is installed, an
eXpress directory is created. The .img files must be saved under
this directory in order to be deployable over the network.
17
5-2 Capturing an OS image
Capturing the Embedded OS 9.xx or 10.xx image is the process of copying the OS image from the client
computer to the eXpress directory on the Altiris Deployment Server (see Figure 5-3).
Figure 5-3 OS image capture
eXpress
directory
Capture
This section describes the two sample jobs that capture an OS image:
1.
9xCaptureClone—Captures an exact copy of Embedded OS 9.xx
2.
9xCaptureOS—Captures Embedded OS 9.xx except for the current settings—instead, the current settings
are replaced by pre-defined settings.
5-2-1 9xCaptureClone
Figure 5-4 on the next page describes the 9xCaptureClone sample job.
5-2-2 9xCaptureOS
Figure 5-5 on page 19 describes the 9xCaptureOS sample job.
Using Altiris Deployment Solution 18
Figure 5-4 9xCaptureClone — Captures the complete
client OS, including the local setting files
Executing the
9xCaptureClone Job
eXpress
directory
Drag the computer to the 9xCaptureClone
job to begin the capture process.
9xCaptureClone
Viewing the
9xCaptureClone Job
The netbooton script
runs on the client and
changes the boot order
to boot from the network
first (PXE boot). After
this script is complete,
the computer is rebooted.
Select the desired schedule
and click “OK”.
Click on
9xCaptureClone
to view its tasks.
The PXE-booted automation
OS interacts with the Altiris
server to capture the Embedded
OS as-is, and sends the OS
image to the Altiris server.
Example
status
messages
Status summary:
The netbootoff script
runs on the client and
changes the boot order
to boot in this order:
1. USB
2. Hard drive
3. Network
After the script completes,
the computer is rebooted.
Absent a USB drive key
plugged in, the client will
boot back into the Embedded
OS from the hard drive.
19
Figure 5-5 9xCaptureOS — Captures the OS
but without the current settings
Executing the
9xCaptureOS Job
eXpress
directory
Drag the computer to
the 9xCaptureOS job.
9xCaptureOS
This script runs
on the Embedded OS.
It saves the local
settings for later
restoration, and then
stores a set of “pristine”
settings in place of the
original settings files.
Viewing the
9xCaptureOS Job
Click on
9xCaptureOS
to view its tasks.
Select the desired schedule
and click “OK”.
This script transfers the
saved local settings
file to the deployment
server.
Example
status
messages
Specifies the partitions
to be saved and where
the OS image file is to
be saved. The image is
then captured and
transferred to the Altiris
deployment server.
Status summary:
This script restores
additional settings
and reboots the
computer.
This script runs
on the Embedded
OS, and restores
the original settings
files.
20
5-3 Deploying an OS image
Deploying an OS image is the process of installing the Embedded OS 9.xx image from the eXpress directory to
one or more client computers (see Figure 5-6).
Figure 5-6 Image deployment
eXpress
directory
Deploy
This section describes the two sample jobs that deploy an OS image:
1.
9xDeploy—Deploys the OS image while overwriting all current OS settings.
2.
9xDeployKeepSettings—Deploys the image while retaining the current OS settings stored in partition 5.
5-3-1 9xDeploy
Figure 5-7 on the next pages describe the 9xDeploy sample job.
5-3-2 9xDeployKeepSettings
Figure 5-8 on page 23 describes the 9xDeployKeepSettings sample job.
Using Altiris Deployment Solution 21
Figure 5-7 9xDeploy — Deploy the complete
OS from the Altiris server
eXpress
directory
Executing the
9xDeploy Job
Drag the computer
to the 9xDeploy job.
9xDeploy
Select the desired schedule
and click “OK”.
IMPORTANT: The 9xDeploy job performs a clean install,
and wipes out everything on the Disk on Module drive.
Boots from the network
into automation mode.
Viewing the
9xDeploy Job
Example
status
messages
Transfers the image
from the Altiris
server to the client
computer in
automation mode.
Status summary:
Changes the boot order to boot from
the computer’s hard drive.
After the script is complete, the
computer is rebooted.
22
Figure 5-8 9xDeployKeepSettings — Deploy the
Embedded OS but keep the current settings
Executing the
9xDeployKeepSettings Job
eXpress
directory
Drag the computer to the
9xDeployKeepSettings job.
9xDeployKeepingSettings
Viewing the
9xDeployKeepSettings Job
Select the desired schedule
and click “OK”
This script executes
from within the
Embedded OS
and captures the
current settings
in a file.
This script executes in
automation mode and
copies the saved settings
to the Altiris server.
Example
status
messages
The settings are saved in a folder based on
the computer MAC address.
Status summary:
In this step, the Altiris image
is downloaded to the client
computer, also in automation
mode.
While still in automation mode, the
settings are copied back to the client
from the Altiris server and restored.
23
5-4 9xApplySiteSettings
The 9xApplySiteSettings job is a single-step job that copies the settings_20_site.txt file from the Altiris
Deployment Server to the client computer (see Figure 5-9).
Figure 5-9 The 9xApplySiteSettings job
5-5 Modifying OS settings
Altiris Deployment Solution provides the ImageExplorer tool to allow you to modify the settings of Embedded OS
9.xx or 10.xx. Figure 5-10 on the next page shows how ImageExplorer is used to modify one of the Embedded
OS 9.xx settings files.
Using Altiris Deployment Solution 24
Modifying Settings
Figure 5-10
Modifying Embedded OS 9.xx settings
Bring up ImageExplorer
Select “Open Image”
Select the image file to open
Select a settings file to edit, and then select “Open”
Change settings, for example, monitor_blank_time=60. The modified setting
is applied automatically at the next boot.
25
6 Troubleshooting tips
This chapter provides tips to aid in troubleshooting issues with operation of the Altiris Deployment Solution. First,
several log files are described that contain information useful in the troubleshooting process. Secondly, a table is
presented of possible issues and suggestions.
6-1 Log files
This section describes log files useful to troubleshooting issues with operation of the Altiris Deployment Solution.
6-1-1 Turn the logging level up to 5 on the Altiris server
To aid in troubleshooting issues with operation of the Altiris Deployment Solution, it is recommended that the
logging level be set to 5 on the Altiris Deployment Server, as follows:
1.
Click Start > All Programs > Altiris > Deployment Solution > Configuration.
2.
Click Options and then the Debug tab.
3.
Change the logging level to 5.
4.
Change the log filename if desired. The default is:
C:\Program Files\Altiris\eXpress\Deployment Server\axengine.log
5.
Click OK twice to save your changes and exit the Configuration tool.
6-1-2 Client log files for capture operations
On the client computer, check the following log files:
/root/writable/sanitize.log
/root/writable/sanitizerestore.log
Also check *.capture files (using find / -name *.capture)
6-1-3 Log files for deploy operations
For Altiris deploy operations, log files can be found on the Altiris server and the client computer in the following
locations:
•
Altiris server—Check the following log file:
C:\Program Files\Altiris\eXpress\Deployment Server\settings\MACAddressOfClient\restore.log
A copy of all preserved settings files is also saved in the settings directory under the MAC address of the client
computer from which they were captured.
•
Client computer—Check the log file at: /root/writable/restore.log
Troubleshooting tips 26
6-2 Issues and suggestions
Issue
e1000 error message in
automation mode
Client keeps rebooting to
automation mode in a loop
Suggestion
Ignore. This happens every time the system reboots from automation
mode & is an error sent out by the network adapter by default when it
is shut down. When there is another error, the system pauses longer &
users see this message. Investigate the other error, the e1000 network
connection is probably not the problem.
Move ‘Boot to next device’ up to the top of the list in the PXE
Configuration menu. If another preboot environment is first in the list &
can’t be accessed, the PXE server will keep trying.
Client does not connect to
DHCP/PXE server
OR
DS 6.5 will not deploy to my
HP blade Workstation
Client
HP dc73 network issues
when trying to capture or
deploy using DS 6.8 or RDP
3.70
HW/SW
versions
affected by
this issue
•The client has attached to the first server it happened to detect on
the subnet & it’s not the Altiris server. Isolate the clients and
Altiris server on their own private subnet or enter the static ip
of the Altiris server into each Client’s network settings. This
setting can be applied using Webmin or by modifying the
ds_address value in
/root/writable/settings/settings_20_site.txt using the
9xApplySettings sample job.
•Use the Boot Disk Creator tool to rebuild a clean 32-bit Linux
automation preboot environment using the latest DOS/Linux
.frm file downloaded from http://altiris.com/hptc
This will
ensure that you have the latest network drivers and that your
automation pre-boot environment is not corrupted.
DS 6.5 is not supported. Upgrade to DS 6.8 or newer or RDP 3.70 or
newer.
Follow instructions in the Altiris 8x Guide to download the latest
network drivers from the Altiris ftp site and use Boot Disk Creator to
build them into a new 32-bit Linux automation preboot image.
All DS 6.8+ an
RDP 3.70+ Altiris
Versions
All HP blade
workstation clients
All DS 6.8+ an
RDP 3.70+ Altiris
Versions
All HP blade
workstation clients
All DS 6.8+ an
RDP 3.70+ Altiris
Versions
DS 6.5
dc73 client
HP dc73 DOM (disk on
module) drive not detected
during capture/deploy.
Dc73 uses ICH9 technology which requires updated drivers. Refer to
the same section of the manual referred to in the previous row to get
the latest SCSI/SATA drivers for your automation preboot environment.
DeployKeepSettings job
failed. Need to recover
settings.
Settings are still on the server under the express/Deployment
Server/settings/<ClientMACAddress> folder. Run the 9xDeploy job
to apply a clean OS and then modify the ApplySettings job with
paths/filenames as needed to apply the settings retained on the server.
HP dc7* systems are recognized as being license exempt only if they
have the HP Blade Workstation Embedded OS installed. All systems
shipped from the factories come with the OS pre-installed. If you are
replacing the DOM with a blank one, you must use a USB key to install
the HP Blade Workstation Embedded OS the first time. Download the
OS from support.hp.com/….
Altiris license not found error
All HP blade
workstation clients
DS 6.8, RDP
3.70; Will be
fixed in DS 6.9
dc73 client
DS 6.8, RDP
3.70; Will be
fixed in DS 6.9
All clients
All Altiris versions
Clients that do not
have an HP
Embedded OS
All DS versions
Troubleshooting tips 27
Invalid volume error during
capture/deploy
On HP Embedded OS versions previous to 9.40, e2fsck must be run
on partition 5 after every reboot to avoid a false ‘dirty’ flag. Either
modify job scripts to run e2fsck on /dev/hda5 in automation mode
before each task or update to 9.40 or newer HP Blade Workstation
Embedded OS.
Older versions of
Embedded OS
All Altiris versions
Troubleshooting tips 28
Appendix A: Installing Embedded OS 9.xx or 10.xx
from a USB key
This appendix describes an alternative method of installing Embedded OS 9.xx or 10.xx onto the client
computer. The OS image is downloaded and installed on a USB key, and then the client computer is booted from
the USB key to perform the installation. This method is useful if, for example, you’re temporarily unable to use the
Altiris Deployment Solution. Embedded OS 9.45 is used as an example.
A-1 Downloading Embedded OS 9.45 from HP
Perform the following steps on a Windows computer to download Embedded OS 9.45, and store the OS image
on a USB key:
1.
Based on your client computer, go to one of the following websites:
•
HP Blade Workstation Client: http://www.hp.com/support/bwclient
•
HP dc72 Blade Workstation Client: http://www.hp.com/support/dc72
•
HP dc73 Blade Workstation Client: http://www.hp.com/support/dc73
2.
Click Download drivers and software.
3.
Click Workstation Blade Client Embedded OS, scroll down to the Software section, select the desired “USB
Key” image, and click Download (see Figure A-1).
Figure A-1 Selection of the 9.45 USB key image
4.
You’ll be prompted to either Run or Save the softpaq file—click Save, and specify the file location.
Appendix A: Installing Embedded OS 9.xx or 10.xx from a USB key 29
5.
After downloading is complete, you’ll be prompted for one of the following: Run, Open Folder, or Close
(see Figure A-2). If you’re ready to store the image on a USB key, click Run. If prompted, click Run again.
Figure A-2 Downloading of softpaq sp38209.exe is complete—click Run to continue
6.
At this point, you’ll see the first softpaq screen (see Figure A-3).
Figure A-3 Softpaq screen for the 9.45 USB key image
Appendix A: Installing Embedded OS 9.xx or 10.xx from a USB key 30
7.
Click Next, follow the softpaq instructions, and click Finish on the last softpaq screen. When execution of
the softpaq is complete, the contents of the softpaq folder will be as shown in Figure A-4 (for the 9.45 USB
key image). The folder will contain the image file (the Embedded OS file), the dskimg32.exe program
(which copies the image file to the USB key), and a Readme.txt file.
Figure A-4 Contents of the softpaq folder
dskimg32.exe – copies
client-09.45.img to the USB key
‘
8.
Plug a USB key into the Windows computer, and run dskimg32.exe without parameters to determine the
ID of the USB key (see Figure A-5). In this case, the USB key ID is “HD2”.
Figure A-5 Determining the ID of the USB key
The USB key is mapped
into HD2 (hard drive 2)
Appendix A: Installing Embedded OS 9.xx or 10.xx from a USB key 31
9.
To copy the image file to the USB key, run dskimg32.exe, with the image file name and the USB key ID
(HD2 in this case; see Figure A-6).
Figure A-6 Copying of the 9.45 image file to the USB key
At this point, the bootable image file is on the USB key, and the USB key can be removed from the Windows
computer.
Appendix A: Installing Embedded OS 9.xx or 10.xx from a USB key 32
A-2 Example installation from the USB key
In this section, an example installation is performed that includes a clean installation (not an upgrade) plus setting
of network parameters. The installation steps are as follows:
1.
Plug the USB key containing the Embedded OS image into a USB port on the client computer. While either
the front or back USB ports will work, use of a back USB port is recommended to minimize the possibility of
damaging the extending USB key.
2.
Cycle power on the client computer, which will initiate a boot from the USB key. The first screen will prompt
you to select a keyboard language (see Figure A-7). Use the up and down arrow keys to select a keyboard
language, and press Enter.
Figure A-7 Keyboard language selection
3.
Next you’ll be prompted to select either Upgrade, Install, or Run (see Figure A-8). Upgrade allows the OS
to be installed while preserving client settings saved in the /settings directory. Install does a complete
installation of the operating system, overwriting previous settings. Run allows the operating system to run
directly from the USB key, and is primarily for troubleshooting. For this example, select Install Cleanly, and
press Enter.
Figure A-8 Select Install Cleanly
Appendix A: Installing Embedded OS 9.xx or 10.xx from a USB key 33
4.
The next screen will give you the option to set site-wide default settings that will be used on every client
installed from this USB key (see Figure A-9). If you select Yes, the settings that you set on this client will be
written to the USB key for use on subsequent installations. For this example, use the arrow keys to select No,
and press Enter.
Figure A-9 Select No for site-wide default settings
5.
The next screen will give you the option of setting local, system-specific settings for this particular client (see
Figure A-10). For illustration purposes and because Network Settings often need to be set, use the arrow
keys to select Yes, and press Enter.
Figure A-10 Select Yes to set local, system-specific settings
NOTE: Independent of whether or not you set local settings on the client at this time, you’ll have the
option of modifying the local settings subsequently using Webmin.
6.
The Local Settings screen is displayed next (see Figure A-11). Use the up and down arrow keys to select
Network Settings, and press Enter.
Figure A-11 Local Settings screen
Appendix A: Installing Embedded OS 9.xx or 10.xx from a USB key 34
7.
The next screen enables you to select the networking protocol (see Figure A-12). If you have a DHCP
server, select one of the two DHCP options. If you don’t have a DHCP server, select Static networking.
When done, press Enter.
Figure A-12 Selection of networking protocol
8.
The Local Client Network Parameters screen is shown next (see Figure A-13). Use the up and down arrow
keys to select the parameter to change, and then enter the new parameter. For example, if you’ll be using
Altiris Deployment Solution in the future to install new Embedded OS images, enter the IP address of the
Altiris server. In Figure A-13, the Altiris Server Address has been changed from its default value of
127.0.0.1 to 15.2.76.101. When done, press the Tab key to highlight either OK or Skip (if no changes
need to be made), and press Enter.
Figure A-13 Setting local client network parameters
9.
The next screen enables you to change the Local Client Active Directory Parameters. Make any desired
changes and use the Tab key to select OK, or just use the Tab key to select Skip to bypass making any
changes—press Enter when done. In either case, you’ll be returned to the Local Settings screen shown in
Figure A-11.
Appendix A: Installing Embedded OS 9.xx or 10.xx from a USB key 35
10.
Use the arrow keys to select Done on the Local Settings screen—this initiates the actual installation of the
Embedded OS (see Figure A-14).
Figure A-14 Installation of the Embedded OS
11.
After completion of the installation, you’ll be prompted to press OK to reboot (see Figure A-15). Remove the
USB key when the BIOS splash screen appears. The client will now boot the newly-installed Embedded OS.
Figure A-15 Installation complete screen
Appendix A: Installing Embedded OS 9.xx or 10.xx from a USB key 36