1
AWS SDK for .NET
Developer Guide
Version v2.0.0
AWS SDK for .NET Developer Guide
AWS SDK for .NET: Developer Guide
Copyright © 2014 Amazon Web Services, Inc. and/or its affiliates. All rights reserved.
All trademarks not owned by Amazon are the property of their respective owners, who may or may not be affiliated with, connected
to, or sponsored by Amazon.
AWS services or capabilities described in AWS Documentation may vary by region/location. Click Getting Started with Amazon AWS
to see specific differences applicable to the China (Beijing) Region.
AWS SDK for .NET Developer Guide
Table of Contents
AWS SDK for .NET Developer Guide ................................................................................................ 1
How to Use This Guide ........................................................................................................... 1
Supported Services and Revision History .................................................................................. 2
About Amazon Web Services .................................................................................................. 2
Getting Started ............................................................................................................................. 3
AWS Account and Credentials ................................................................................................. 3
.NET Development Environment .............................................................................................. 4
Installing the AWS SDK for .NET .............................................................................................. 4
Starting a New Project ............................................................................................................ 5
Programming with the AWS SDK for .NET ......................................................................................... 8
Configuring Your Application .................................................................................................... 8
Configuring AWS Credentials .......................................................................................... 9
Additional Application Parameters ................................................................................... 13
AWS Region Selection .......................................................................................................... 16
Asynchronous APIs .............................................................................................................. 16
Asynchronous API for .NET 4.5, Windows Store, and Windows Phone 8 ................................ 17
Asynchronous API for .NET 3.5 ...................................................................................... 17
Migrating Your Code to the Latest SDK .................................................................................... 24
Introduction ................................................................................................................ 24
What's New ................................................................................................................ 24
What's Different ........................................................................................................... 24
Platform Differences ............................................................................................................. 28
AWS SDK for .NET Framework 3.5 ................................................................................. 28
AWS SDK for .NET Framework 4.5 ................................................................................. 28
AWS SDK for Windows RT ............................................................................................ 28
AWS SDK for Windows Phone 8 ..................................................................................... 28
Install AWS Assemblies with NuGet ........................................................................................ 29
Installation .................................................................................................................. 29
NuGet from Solution Explorer ........................................................................................ 29
NuGet Package Manager Console .................................................................................. 30
Tutorials and Examples ................................................................................................................. 31
IAM Roles for Amazon EC2 Instances ..................................................................................... 31
Use IAM Roles for Amazon EC2 Instances to Manage Your Credentials ................................ 32
Walkthrough: Using IAM Roles to Retrieve an Amazon S3 Object from an Amazon EC2
Instance ..................................................................................................................... 33
Managing ASP.NET Session State with Amazon DynamoDB ....................................................... 39
Create the ASP.NET_SessionState Table ......................................................................... 40
Configure the Session State Provider .............................................................................. 41
Security Considerations ................................................................................................ 42
Tutorial: Creating Amazon EC2 Instances ................................................................................ 43
Create an Amazon EC2 Client ....................................................................................... 43
Specify an Amazon EC2 Security Group .......................................................................... 44
Authorize Security Group Ingress ................................................................................... 46
Specify an Amazon EC2 Key Pair ................................................................................... 47
Launch Amazon EC2 Instances ..................................................................................... 48
Terminate Amazon EC2 Instances .................................................................................. 51
Additional Amazon EC2 Resources ................................................................................. 51
Tutorial: Amazon EC2 Spot Instances ...................................................................................... 52
Overview .................................................................................................................... 52
Prerequisites .............................................................................................................. 53
Step 1: Setting Up Your Credentials ................................................................................. 53
Step 2: Setting Up a Security Group ................................................................................ 53
Step 3: Submitting Your Spot Request ............................................................................. 55
Step 4: Determining the State of Your Spot Request .......................................................... 57
Step 5: Cleaning up Your Spot Requests and Instances ...................................................... 59
Version v2.0.0
iii
AWS SDK for .NET Developer Guide
Conclusion .................................................................................................................
Creating and Using an Amazon SQS Queue ............................................................................
Create an Amazon SQS Client .......................................................................................
Create an Amazon SQS Queue .....................................................................................
Amazon SQS Queue URLs ...........................................................................................
Send an Amazon SQS Message ....................................................................................
Receive a Message from an Amazon SQS Queue .............................................................
Delete a Message from an Amazon SQS Queue ...............................................................
Related Resources ......................................................................................................
Additional Resources ...................................................................................................................
Document History ........................................................................................................................
Version v2.0.0
iv
60
60
61
61
62
62
63
64
65
66
67
AWS SDK for .NET Developer Guide
How to Use This Guide
AWS SDK for .NET Developer
Guide
The AWS SDK for .NET is a single downloadable package that includes Visual Studio project templates,
the AWS .NET library, C# code samples, and documentation. The AWS SDK for .NET makes it easier
for Windows developers to build .NET applications that tap into the cost-effective, scalable, and reliable
AWS infrastructure services such as Amazon Simple Storage Service (Amazon S3) and Amazon Elastic
Compute Cloud (Amazon EC2).
The SDK for .NET supports development on any platform that supports the .NET Framework 3.5 or later.
You can develop applications with the SDK using Visual Studio 2010 or later. To simplify the development
process, AWS provides the AWS Toolkit for Visual Studio, a Visual Studio plug-in that provides:
• C# project templates for console and web applications.
• Support for securely handling account credentials.
• AWS Explorer, which you can use to manage your AWS resources from Visual Studio.
We recommend installing the Toolkit for Visual Studio on Visual Studio Professional or higher. It is possible
to install the Toolkit for Visual Studio on Visual Studio Express, but it will have only a limited set of features.
For more information, see the Toolkit for Visual Studio.
Note
If you install the Toolkit for Visual Studio, it includes the AWS SDK for .NET. You don't need to
install the SDK separately.
How to Use This Guide
The AWS SDK for .NET Developer Guide describes how to implement applications for AWS using the
SDK for .NET, and includes the following:
Getting Started (p. 3)
How to install and configure the SDK for .NET. If you have not used the SDK for .NET before or are
having trouble with its configuration, you should start here.
Version v2.0.0
1
AWS SDK for .NET Developer Guide
Supported Services and Revision History
Programming with the AWS SDK for .NET (p. 8)
The basics of how to implement applications with the SDK for .NET that applies to all AWS services.
This chapter also includes information about how to migrate code to the latest version of the SDK
for .NET, and describes the differences between the last version and this one.
Tutorials and Examples (p. 31)
A set of tutorials, walkthroughs and examples of how to use the SDK for .NET to create applications
for particular AWS services.
Additional Resources (p. 66)
Additional resources outside of this guide that provide more information about AWS and the SDK for
.NET.
Note
A related document, AWS SDK for .NET API Reference, provides a detailed description of each
namespace and class.
Supported Services and Revision History
The AWS SDK for .NET supports most AWS infrastructure products, and more services are added
frequently. For a current, complete list, view Supported Services on the AWS SDK for .NET home page,
at:
• http://aws.amazon.com/sdkfornet/
We regularly release updates to the AWS SDK for .NET to support new services and new service features.
To see what changed with a given release, you can check the release notes history.
About Amazon Web Services
Amazon Web Services (AWS) is a collection of digital infrastructure services that developers can leverage
when developing their applications. The services include computing, storage, database, and application
synchronization (messaging and queuing).
AWS uses a pay-as-you-go service model. You are charged only for the services that you—or your
applications—use. Also, to make AWS useful as a platform for prototyping and experimentation, AWS
offers a free usage tier, in which services are free below a certain level of usage. For more information
about AWS costs and the free usage tier go to Test-Driving AWS in the Free Usage Tier.
To obtain an AWS account, go to the AWS home page and click Sign Up Now.
Version v2.0.0
2
AWS SDK for .NET Developer Guide
AWS Account and Credentials
Getting Started with the AWS SDK
for .NET
To get started with the AWS SDK for .NET, set up the following:
• AWS Account and Credentials
• .NET Development Environment
• SDK for .NET
AWS Account and Credentials
To access AWS, you need an AWS account.
To sign up for an AWS account
1.
2.
Go to http://amazonaws.cn, and then click Sign Up.
Follow the on-screen instructions.
Part of the sign-up procedure involves receiving a phone call and entering a PIN using the phone
keypad.
AWS sends you a confirmation email after the sign-up process is complete. At any time, you can view
your current account activity and manage your account by going to http://amazonaws.cn and clicking My
Account/Console.
To use the SDK for .NET, you must have a set of valid AWS credentials, which consist of an access key
and a secret key. These keys are used to sign programmatic web service requests and enable AWS to
verify that the request comes from an authorized source. You can obtain a set of account credentials
when you create your account. However, we recommend that you do not use these credentials with SDK
for .NET. Instead, create one or more IAM users, and use those credentials. For applications that run on
EC2 instances, you can use instance roles to provide temporary credentials.
The preferred approach for handling credentials is to create a profile for each set of credentials in the
SDK Store. You can create and manage profiles with the AWS Toolkit for Visual Studio, PowerShell
cmdlets, or programmatically with the SDK for .NET.These credentials are encrypted and stored separately
from any project. You then reference the profile by name in your application, and the credentials are
Version v2.0.0
3
AWS SDK for .NET Developer Guide
.NET Development Environment
inserted at build time. This approach ensures that your credentials are not unintentionally exposed with
your project on a public site. For more information, see Setting Up the AWS Toolkit for Visual Studio and
Configuring AWS Credentials (p. 9).
For more information on IAM, including how to create IAM users and groups, and how to use roles to
provide temporary credentials to applications running on EC2 instances, see What Is IAM?. For more
information on managing your credentials, see Best Practices for Managing AWS Access Keys.
.NET Development Environment
To use the AWS SDK for .NET, you'll need the following:
• (Required) Microsoft .NET Framework 3.5 or later
• (Required) Microsoft Visual Studio 2010 or later.
• (Optional but recommended) AWS Toolkit for Visual Studio. a Visual Studio plugin that simplifies
application development and includes a user interface (AWS Explorer) that helps you to manage your
AWS resources from Visual Studio.
The Toolkit for Visual Studio includes the SDK for .NET, so you won't need to install it separately.
Note
We recommend installing the AWS SDK for .NET on Visual Studio Professional or higher. It is
possible to install the Toolkit for Visual Studio on Visual Studio Express, but it will have only a
limited set of features. For more information, see Toolkit for Visual Studio.
To confirm installation
1.
2.
Start Visual Studio.
On the Help menu, click About. A dialog box opens that lists Microsoft Visual Studio and .NET
Framework versions.
Configuring the .NET CLR
For the best performance of your server-based applications with the AWS SDK for .NET, we recommend
that you use Server mode garbage collection (GC).
To enable Server mode GC, add the following to your app.config file:
<runtime>
<gcServer enabled="true"/>
<gcConcurrent enabled="true"/>
</runtime>
Note
Server mode GC works only on systems with multiple processors or processor cores. Enabling
Server mode GC has no effect otherwise.
Installing the AWS SDK for .NET
The following describes how to install AWS SDK for .NET. If you have installed the AWS Toolkit for Visual
Studio, you can skip this step; the Toolkit for Visual Studio includes SDK for .NET.
Version v2.0.0
4
AWS SDK for .NET Developer Guide
Starting a New Project
To install the SDK for .NET
1.
Go to http://amazonaws.cn/sdkfornet.
2.
Click the Download button in the upper right corner of the page. Your browser will prompt you to
save the install file.
To begin the install process, open the saved install file and follow the on-screen instructions.
You can optionally install extensions for the SDK for .NET, which include a session state provider
and a trace listener. For more information, see Install AWS Assemblies with NuGet (p. 29).
3.
4.
The AWS SDK for .NET is also available on GitHub.
Tip
By default, the AWS SDK for .NET is installed in the Program Files directory, which requires
administrator privileges. To install the AWS SDK for .NET as a non-administrator, specify a
different installation directory.
Starting a New Project
If you have installed the Toolkit for Visual Studio on Visual Studio Professional, it includes the following
basic C# project templates:
AWS Console Project
A console application that makes a basic request to Amazon Simple Storage Service (Amazon S3),
Amazon SimpleDB, and Amazon Elastic Compute Cloud (Amazon EC2).
AWS Empty Project
A console application that does not include any code.
AWS Web Project
An ASP.NET application that makes a basic request to Amazon S3, Amazon SimpleDB, and Amazon
EC2.
The Toolkit for Visual Studio also includes a collection of templates for a variety of AWS services, including:
• App Services – Amazon Elastic Transcoder, Amazon Simple Email Service (Amazon SES), Amazon
Simple Workflow Service (Amazon SWF), Amazon Simple Notification Service (Amazon SNS), Amazon
Simple Queue Service (Amazon SQS)
• Compute and Networking – Amazon EC2
• Database – Amazon DynamoDB, Amazon Relational Database Service, Amazon SimpleDB
• Deployment and Management – Amazon CloudWatch Logs, AWS Identity and Access Management,
• Storage and Content Delivery – Amazon Glacier, Amazon S3
Note
The Toolkit for Visual Studio does not install the AWS project templates on Visual Studio Express.
You can also base your application on one of the standard Visual Studio project templates. Just add a
reference to the AWS .NET library (AWSSDK.dll).
The following procedure gets you started by creating and running a new AWS Management Console
project for Visual Studio 2012; the process is similar for other project types and Visual Studio versions.
For more information on how to configure an AWS application, see Configuring Your AWS SDK for .NET
Application (p. 8).
Version v2.0.0
5
AWS SDK for .NET Developer Guide
Starting a New Project
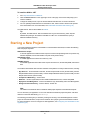
To create a new AWS Management Console project
1.
In Visual Studio, on the File menu, select New, and then click Project to open the New Project
dialog box.
2.
Select AWS from the list of installed templates, and then select the AWS project template you want
to use. Enter a project name, and then click OK.
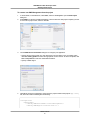
3.
Use the AWS Access Credentials dialog box to configure your application.
• Specify which account profile your code should use to access AWS. To use an existing profile,
click Use existing profile and select the appropriate one from the list. To add a new profile, click
Use a new profile and enter the credentials information.
• Specify a default region.
4.
Click OK to accept the configuration, which opens the project. Examine the project's App.config
file, which will contain something like the following:
<configuration>
<appSettings>
<add key="AWSProfileName" value="development"/>
<add key="AWSRegion" value="us-east-1" />
Version v2.0.0
6
AWS SDK for .NET Developer Guide
Starting a New Project
</appSettings>
</configuration>
The Toolkit for Visual Studio adds two key-value pairs to appSettings, based on the values you
specified in the AWS Access Credentials dialog box:
• AWSProfileName – specifies the profile name.
• AWSRegion – specifies the default region.
5.
Click F5 to compile and run the application, which prints the number of Amazon EC2 instances,
Amazon SimpleDB tables, and Amazon S3 buckets in your account.
For more information on how to configure an AWS application, see Configuring Your AWS SDK for .NET
Application (p. 8).
The Additional Resources section has pointers to other resources to assist you in programming AWS.
Version v2.0.0
7
AWS SDK for .NET Developer Guide
Configuring Your Application
Programming with the AWS SDK
for .NET
This section provides general programming techniques and information for developing software with the
AWS SDK for .NET.
Topics
• Configuring Your AWS SDK for .NET Application (p. 8)
• AWS Region Selection (p. 16)
• Amazon Web Services Asynchronous APIs for .NET (p. 16)
• Migrating Your Code to the Latest Version of the AWS SDK for .NET (p. 24)
• Platform Differences in the AWS SDK for .NET (p. 28)
• Install AWS Assemblies with NuGet (p. 29)
Configuring Your AWS SDK for .NET Application
You can configure your AWS SDK for .NET application to specify AWS credentials, logging options,
endpoints, or Signature Version 4 support with Amazon EC2 and Amazon S3.
One way to configure an application is to edit the appSettings element in the project's App.config
or Web.config file. The following example specifies the AWSRegion (p. 14) and AWSLogging (p. 13)
parameters.
<configuration>
<appSettings>
<add key="AWSRegion" value="us-west-1"/>
<add key="AWSLogging" value="log4net"/>
</appSettings>
</configuration>
These settings take affect only after the application has been rebuilt.
Version v2.0.0
8
AWS SDK for .NET Developer Guide
Configuring AWS Credentials
You can also configure an SDK for .NET application programmatically, by setting property values in the
AWSConfigs class. The following example specifies the AWSRegion (p. 14) and AWSLogging (p. 13)
parameters:
AWSConfigs.AWSRegion = "us-west-2";
AWSConfigs.Logging = LoggingOptions.Log4Net;
Programmatically defined parameters override any values that were specified in an App.config or
Web.config file. Some programmatically defined parameter values take effect immediately; others take
effect only after you create a new client object. For more information, see Configuring AWS
Credentials (p. 9).
Topics
• Configuring AWS Credentials (p. 9)
• Configuring Other Application Parameters (p. 13)
Configuring AWS Credentials
This topic describes how to configure your application's AWS credentials. It assumes that you have
created an AWS account and that you have access to your credentials, as described in AWS Account
and Credentials (p. 3). It is important to manage your credentials securely and avoid practices that could
unintentionally expose your credentials publicly. In particular:
• Don't use your account's root credentials to access your AWS resources.
These credentials provide unrestricted account access, and are difficult to revoke.
• Don't put literal access keys in your application, including the project's App.config or Web.config
file.
Doing so creates a risk of accidentally exposing your credentials if, for example, you upload the project
to a public repository.
Some general guidelines for securely managing credentials include:
• Create IAM users and use those credentials to provide account access instead of your account's root
credentials.
IAM credentials are easier to revoke if they are compromised and you can apply a policy to each user
that restricts them to a specified set of resources and actions.
• The preferred approach for managing credentials is to put a profile for each set of IAM user credentials
that you want to use in the SDK Store (preferred) or a credentials file.
You can then reference a particular profile programmatically or in your application's App.config or
Web.config file instead of having literal credentials in your project files. To limit the risk of unintentionally
exposing credentials, the SDK Store and credentials file are stored separately from any project. To
further reduce risk, the credentials in the SDK Store are encrypted.
• Use IAM roles for applications that are running on Amazon EC2 instances.
• Use temporary credentials for applications that are available to users outside your organization.
The following topics describe how to manage credentials for an SDK for .NET application. For a general
discussion of how to securely manage AWS credentials, see Best Practices for Managing AWS Access
Keys.
Version v2.0.0
9
AWS SDK for .NET Developer Guide
Configuring AWS Credentials
Topics
• Using the SDK Store (p. 10)
• Using a Credentials File (p. 10)
• Using Credentials in an Application (p. 11)
Using the SDK Store
The preferred way to manage credentials for SDK for .NET applications is to add a profile to the SDK
Store for each set of credentials that you want to use in your applications.
• The SDK Store can contain multiple profiles from any number of accounts.
• You reference the profile by name in your application and the associated credentials are incorporated
at build time.
Your source files never contain literal credentials.
• If you include a profile named default, the SDK for .NET will use that profile by default.
• The credentials in the SDK store are encrypted, and the SDK Store is in the user's home directory,
which limits the risk of accidentally exposing your credentials.
• The SDK Store also provides credentials to the AWS Tools for Windows PowerShell.
There are several ways to manage the profiles in the SDK Store.
• The Toolkit for Visual Studio includes a graphical user interface for managing profiles.
For more information, see Setting Up the AWS Toolkit for Visual Studio.
You can manage your profiles from the command line by using the AWS Tools for Windows PowerShell.
For more information, see Using AWS Credentials.
• You can manage your profiles programmatically by using the Amazon.Util.ProfileManager class.
The following example adds a new profile to the SDK Store.
Amazon.Util.ProfileManager.RegisterProfile(profileName,
accessKey, secretKey)
Using a Credentials File
You can also store profiles in a credentials file, which can also be used by the other AWS SDKS, the
AWS CLI, and AWS Tools for Windows PowerShell. To reduce the risk of accidentally exposing credentials,
the credentials file is stored separately from any projects, usually in the user's home folder. However, the
profiles are stored in plaintext, so a credentials file is not as secure as the SDK Store.
You can manage these profiles by using a text editor. The file is named credentials, and the default
location is under your user's home folder. For example, if your user name is awsuser, the credentials file
would be C:\users\awsuser\.aws\credentials.
Each profile has the following format:
Version v2.0.0
10
AWS SDK for .NET Developer Guide
Configuring AWS Credentials
[profile_name]
aws_access_key_id = accessKey
aws_secret_access_key = secretKey
A profile can optionally include a session token. For more information, see Best Practices for Managing
AWS Access Keys.
Tip
If you include a profile named default, the SDK for .NET will use that profile by default if it
cannot find the specified profile.
By default, the SDK for .NET searches for profiles only in the user's home directory. If, for example, your
application is running under Local System, the SDK for .NET will not be able to find those profiles. In that
case, the application cannot use profiles from the SDK Store. However, you can store profiles in a
credentials file that is stored in an arbitrary location, such as
C:\aws_service_credentials\credentials. You must then explicitly specify the file path in your
project's App.config or Web.config file. For more information, see Specifying a Profile (p. 11).
Using Credentials in an Application
The SDK for .NET searches for credentials in the following order and uses the first available set for the
current application.
1. Access key and secret key values that are stored in the application's App.config or Web.config
file.
We strongly recommend using profiles rather than putting literal credentials in your project files.
2. A specified profile in the SDK Store.
3. A specified profile in the credentials file.
4. A profile named default in the SDK Store.
5. A profile named default in the credentials file.
6. For applications running on an EC2 instance, credentials stored in an instance profile.
Tip
With the AWS CLI or other AWS SDKs, you can also store a set of credentials in the
AWS_ACCESS_KEY_ID and AWS_SECRET_KEY environment variables. The SDK for .NET does
not include these variables in its credentials search chain. However, you can obtain the keys by
calling Environment.GetEnvironmentVariable and then pass them to the client object
when you create it. Credentials specified in this way take precedence over the credentials in the
search chain.
Specifying a Profile
Profiles are the preferred way to use credentials in an application running locally. You can store profiles
in the SDK Store or in the credentials file. You don't have to specify where the profile is stored. Just
reference the profile by name, and the SDK for .NET retrieves the corresponding credentials, as described
in the previous section.
The simplest way to specify a profile is to define an AWSProfileName value in the appSettings section
of your application's App.config or Web.config file. The associated credentials are incorporated into
the application during the build process.
The following example specifies a profile named development.
Version v2.0.0
11
AWS SDK for .NET Developer Guide
Configuring AWS Credentials
<configuration>
<appSettings>
<add key="AWSProfileName" value="development"/>
</appSettings>
</configuration>
This example assumes that you are using the SDK Store or a credentials file in the default location, under
the current user's home directory. If your profiles are stored in a credentials file in an arbitrary location,
specify the location by adding an AWSProfilesLocation value to appSettings. The following example
specifies C:\aws_service_credentials\credentials as the credentials file.
<configuration>
<appSettings>
<add key="AWSProfileName" value="development"/>
<add key="AWSProfilesLocation" value="C:\aws_service_credentials\creden
tials"/>
</appSettings>
</configuration>
You can reference a profile programmatically by using
Amazon.Runtime.StoredProfileAWSCredentials. The following example references a profile
named development and uses it to create an AmazonS3Client object.
AWSCredentials credentials = new StoredProfileAWSCredentials("development");
IAmazonS3 s3Client = new AmazonS3Client(credentials, RegionEndpoint.USWest2);
Tip
If you want to use the default profile, omit the AWSCredentials object, and the SDK for .NET
will automatically use your default credentials to create the client object.
Specifying Roles or Temporary Credentials
For applications that run on Amazon EC2 instances, the most secure way to manage credentials is to
use IAM roles for EC2 Instances. See the following topic for more information.
• Using IAM Roles for EC2 Instances with the SDK for .NET (p. 31)
For application scenarios in which the software executable will be available to users outside your
organization, we recommend that you design the software to use temporary security credentials. In
addition to providing restricted access to AWS resources, these credentials have the benefit of expiring
after a specified period of time. For more information about temporary security credentials, go to:
• Using Security Tokens to Grant Temporary Access to Your AWS Resources
• Authenticating Users of AWS Mobile Applications with a Token Vending Machine.
Although the title of the second article above refers specifically to mobile applications, the article itself
contains information that is useful for any AWS application that is deployed outside of your organization.
Using Proxy Credentials
If your software communicates with AWS through a proxy, you should specify credentials for the proxy
using the ProxyCredentials property on the ClientConfig class for the service. For example, for Amazon
S3, you could use code similar to the following, where foo and bar are the proxy username and password
specified in a NetworkCredential object.
Version v2.0.0
12
AWS SDK for .NET Developer Guide
Additional Application Parameters
AmazonS3Config config = new AmazonS3Config();
config.ProxyCredentials = new NetworkCredential("foo", "bar");
Earlier versions of the SDK used ProxyUsername and ProxyPassword, but these properties have been
deprecated.
Configuring Other Application Parameters
In addition to configuring credentials (p. 9), you can configure a number of other application parameters:
• AWSEndpointDefinition (p. 13)
• AWSLogging (p. 13)
•
•
•
•
•
•
AWSLogMetrics (p. 14)
AWSRegion (p. 14)
AWSResponseLogging (p. 14)
AWS.DynamoDBContext.TableNamePrefix (p. 15)
AWS.EC2.UseSignatureVersion4 (p. 15)
AWS.S3.UseSignatureVersion4 (p. 15)
These parameters can be configured in either the application's .config file, with the SDK for .NET API,
or both.
Additional Application Parameters
AWSEndpointDefinition
Configures whether the SDK should use a custom configuration file that defines the regions and
endpoints.
To set the endpoint definition file in the .config file, set the AWSEndpointDefinition key in the
<appSettings> section:
<add key="AWSEndpointDefinition" value="c:\config\endpoints.xml"/>
To set the endpoint definition file with the SDK for .NET API, set the AWSConfigs.EndpointDefinition
property:
AWSConfigs.EndpointDefinition = @"c:\config\endpoints.xml";
If no filename is provided, then a custom configuration file will not be used. Changes to this setting
take effect only for new AWS client instances.
AWSLogging
Configures how the SDK should log events, if at all. For example:
<add key="AWSLogging" value="log4net"/>
The possible values are:
• None – Turn off event logging. This is the default.
• log4net – Log using log4net.
• SystemDiagnostics – Log using System.Diagnostics.
Version v2.0.0
13
AWS SDK for .NET Developer Guide
Additional Application Parameters
You can set multiple values at once, separated by commas. To set both log4net and
System.Diagnostics logging in the .config file, use:
<add key="AWSLogging" value="log4net, SystemDiagnostics"/>
Using the SDK for .NET API, combine the values of the LoggingOptions enumeration and set the
AWSConfigs.Logging property:
AWSConfigs.Logging = LoggingOptions.Log4Net | LoggingOptions.SystemDia
gnostics;
Changes to this setting take effect only for new AWS client instances.
AWSLogMetrics
Specifies whether or not the SDK should log performance metrics.
To set the metrics logging configuration in the .config file, set the AWSLogMetrics key in the
<appSettings> section:
<add key="AWSLogMetrics" value="true">
To set metrics logging with the SDK for .NET API, set the AWSConfigs.LogMetrics property:
AWSConfigs.LogMetrics = true;
This setting configures the default LogMetrics property for all clients/configs. Changes to this setting
take effect only for new AWS client instances.
AWSRegion
Configures the default AWS region for clients which have not explicitly specified a region.
To set the region in the .config file, set the AWSRegion key in the <appSettings> section:
<add key="AWSRegion" value="us-west-2"/>
To set the region with the SDK for .NET API, set the AWSConfigs.AWSRegion property:
AWSConfigs.AWSRegion = "us-west-2";
Changes to this setting take effect only for new AWS client instances.
AWSResponseLogging
Configures when the SDK should log service responses.
The possible values are:
• Never – Never log service responses. This is the default.
• Always – Always log service responses.
• OnError – Only log service responses when an error occurs.
To set the service logging configuration in the .config file, set the AWSResponseLogging key in
the <appSettings> section:
<add key="AWSResponseLogging" value="OnError"/>
Version v2.0.0
14
AWS SDK for .NET Developer Guide
Additional Application Parameters
To set service logging with the SDK for .NET API, set the AWSConfigs.ResponseLogging property
to one of the values of the ResponseLoggingOption enumeration:
AWSConfigs.ResponseLogging = ResponseLoggingOption.OnError;
Changes to this setting take effect immediately.
AWS.DynamoDBContext.TableNamePrefix
Configures the default TableNamePrefix that the DynamoDBContext will use if not manually
configured.
To set the table name prefix in the .config file, set the AWS.DynamoDBContext.TableNamePrefix
key in the <appSettings> section:
<add key="AWS.DynamoDBContext.TableNamePrefix" value="Test-"/>
To set the table name prefix with the SDK for .NET API, set the
AWSConfigs.DynamoDBContextTableNamePrefix property to the value you want to set:
AWSConfigs.DynamoDBContextTableNamePrefix = "Test-";
Changes to this setting will take effect only in newly-constructed instances of
DynamoDBContextConfig and DynamoDBContext.
AWS.EC2.UseSignatureVersion4
Configures whether or not the Amazon EC2 client should use Signature Version 4 signing with
requests.
To set Signature Version 4 signing for Amazon EC2 in the .config file, set the
AWS.EC2.UseSignatureVersion4 key to true in the <appSettings> section:
<add key="AWS.EC2.UseSignatureVersion4" value="true"/>
To set Signature Version 4 signing with the SDK for .NET API, set the
AWSConfigs.EC2UseSignatureVersion4 property to true:
AWSConfigs.EC2UseSignatureVersion4 = true;
By default, this setting is false, though Signature Version 4 may be used by default in some cases
or with some regions. When the setting is true, Signature Version 4 will be used for all requests.
Changes to this setting take effect only for new Amazon EC2 client instances.
AWS.S3.UseSignatureVersion4
Configures whether or not the Amazon S3 client should use Signature Version 4 signing with requests.
To set Signature Version 4 signing for Amazon S3 in the .config file, set the
AWS.S3.UseSignatureVersion4 key to true in the <appSettings> section:
<add key="AWS.S3.UseSignatureVersion4" value="true"/>
To set Signature Version 4 signing with the SDK for .NET API, set the
AWSConfigs.S3UseSignatureVersion4 property to true:
AWSConfigs.S3UseSignatureVersion4 = true;
Version v2.0.0
15
AWS SDK for .NET Developer Guide
AWS Region Selection
By default, this setting is false, though Signature Version 4 may be used by default in some cases
or with some regions. When the setting is true, Signature Version 4 will be used for all requests.
Changes to this setting take effect only for new Amazon EC2 client instances.
AWS Region Selection
AWS regions allow you to access AWS services that reside physically in a specific geographic region.
This can be useful both for redundancy and to keep your data and applications running close to where
you and your users will access them. To select a particular region, configure the AWS client object with
an endpoint that corresponds to that region.
For example:
AmazonEC2Config config = new AmazonEC2Config();
config.ServiceURL = "https://us-east-1.amazonaws.com";
Amazon.Runtime.AWSCredentials credentials = new Amazon.Runtime.StoredPro
fileAWSCredentials("profile_name");
AmazonEC2Client ec2 = new AmazonEC2Client(credentials, config);
You can also specify the region using the RegionEndpoint class. Here is an example that instantiates an
Amazon EC2 client using AWSClientFactory and specifies the region:
Amazon.Runtime.AWSCredentials credentials = new Amazon.Runtime.StoredPro
fileAWSCredentials("profile_name");
AmazonEC2Client ec2 = AWSClientFactory.CreateAmazonEC2Client(
credentials, RegionEndpoint.USEast1 );
Regions are isolated from each other. For example, you can't access US East resources when using the
EU West region. If your code needs access to multiple AWS regions, we recommend that you create a
client specific to each region.
Go to Regions and Endpoints in the AWS General Reference to view the current list of regions and
corresponding endpoints for each of the services offered by AWS.
Amazon Web Services Asynchronous APIs for
.NET
Topics
• Asynchronous API for .NET 4.5, Windows Store, and Windows Phone 8 (p. 17)
• Asynchronous API for .NET 3.5 (p. 17)
Version v2.0.0
16
AWS SDK for .NET Developer Guide
Asynchronous API for .NET 4.5, Windows Store, and
Windows Phone 8
Asynchronous API for .NET 4.5, Windows Store,
and Windows Phone 8
The AWS SDK for .NET uses the new task-based asynchronous pattern for .NET 4.5, Windows Store,
and Windows Phone 8.You can use the async and await keywords to perform and manage asynchronous
operations for all AWS products without blocking.
To learn more about the task-based asynchronous pattern, see Task-based Asynchronous Pattern (TAP)
on MSDN.
Asynchronous API for .NET 3.5
The AWS SDK for .NET supports asynchronous (async) versions of most of the method calls exposed
by the .NET client classes. The async methods enable you to call AWS services without having your code
block on the response from the service. For example, you could make a request to write data to Amazon
S3 or DynamoDB and then have your code continue to do other work while AWS processes the requests.
Syntax of Async Request Methods
There are two phases to making an asynchronous request to an AWS service. The first is to call the
Begin method for the request. This method initiates the asynchronous operation. Then, after some period
of time, you would call the corresponding End method. This method retrieves the response from the
service and also provides an opportunity to handle exceptions that might have occurred during the
operation.
Note
It is not required that you call the End method. Assuming that no errors are encountered, the
asynchronous operation will complete whether or not you call End.
Begin Method Syntax
In addition to taking a request object parameter, such as PutItemRequest, the async Begin methods
take two additional parameters: a callback function, and a state object. Instead of returning a service
response object, the Begin methods return a result of type IAsyncResult. For the definition of this
type, go to the MSDN documentation.
Synchronous Method
PutItemResponse PutItem(
PutItemRequest putItemRequest
)
Asynchronous Method
IAsyncResult BeginPutItem(
GetSessionTokenRequest getSessionTokenRequest,
AsyncCallback callback,
Object state
)
AsyncCallback callback
The callback function is called when the asynchronous operation completes. When the function is called,
it receives a single parameter of type IAsyncResult. The callback function has the following signature.
Version v2.0.0
17
AWS SDK for .NET Developer Guide
Asynchronous API for .NET 3.5
void Callback(IAsyncResult asyncResult)
Object state
The third parameter, state, is a user-defined object that is made available to the callback function as
the AsyncState property of the asyncResult parameter, that is, asyncResult.AsyncState.
Calling Patterns
• Passing a callback function and a state object.
• Passing a callback function, but passing null for the state object.
• Passing null for both the callback function and the state object.
This topic provides an example of each of these patterns.
Using IAsyncResult.AsyncWaitHandle
In some circumstances, the code that calls the Begin method might need to enable another method that
it calls to wait on the completion of the asynchronous operation. In these situations, it can pass the method
the WaitHandle returned by the IAsyncResult.AsyncWaitHandle property of the IAsyncResult
return value. The method can then wait for the asynchronous operation to complete by calling WaitOne
on this WaitHandle.
Examples
All of the following examples assume the following initialization code.
public static void TestPutObjectAsync()
{
// Create a client
AmazonS3Client client = new AmazonS3Client();
PutObjectResponse response;
IAsyncResult asyncResult;
//
// Create a PutObject request
//
// You will need to use your own bucket name below in order
// to run this sample code.
//
PutObjectRequest request = new PutObjectRequest
{
BucketName = "PUT YOUR OWN EXISTING BUCKET NAME HERE",
Key = "Item",
ContentBody = "This is sample content..."
};
//
// additional example code
//
}
Version v2.0.0
18
AWS SDK for .NET Developer Guide
Asynchronous API for .NET 3.5
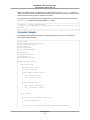
No Callback Specified
The following example code calls BeginPutObject, performs some work, then calls EndPutObject to
retrieve the service response.The call to EndPutObject is enclosed in a try block to catch any exceptions
that might have been thrown during the operation.
asyncResult = client.BeginPutObject(request, null, null);
while ( ! asyncResult.IsCompleted ) {
//
// Do some work here
//
}
try {
response = client.EndPutObject(asyncResult);
}
catch (AmazonS3Exception s3Exception) {
//
// Code to process exception
//
}
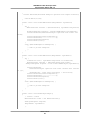
Simple Callback
This example assumes that the following callback function has been defined.
public static void SimpleCallback(IAsyncResult asyncResult)
{
Console.WriteLine("Finished PutObject operation with simple callback");
}
The following line of code calls BeginPutObject and specifies the above callback function. When the
PutObject operation completes, the callback function is called. The call to BeginPutObject specifies
null for the state parameter because the simple callback function does not access the AsyncState
property of the asyncResult parameter. Neither the calling code or the callback function call
EndPutObject. Therefore, the service response is effectively discarded and any exceptions that occur
during the operation are ignored.
asyncResult = client.BeginPutObject(request, SimpleCallback, null);
Callback with Client
This example assumes that the following callback function has been defined.
public static void CallbackWithClient(IAsyncResult asyncResult)
{
try {
AmazonS3Client s3Client = (AmazonS3Client) asyncResult.AsyncState;
PutObjectResponse response = s3Client.EndPutObject(asyncResult);
Console.WriteLine("Finished PutObject operation with client callback");
}
catch (AmazonS3Exception s3Exception) {
//
// Code to process exception
//
Version v2.0.0
19
AWS SDK for .NET Developer Guide
Asynchronous API for .NET 3.5
}
}
The following line of code calls BeginPutObject and specifies the preceding callback function. When
the PutObject operation completes, the callback function is called. In this example, the call to
BeginPutObject specifies the Amazon S3 client object for the state parameter. The callback function
uses the client to call the EndPutObject method to retrieve the server response. Because any exceptions
that occurred during the operation will be received when the callback calls EndPutObject, this call is
placed within a try block.
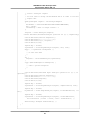
asyncResult = client.BeginPutObject(request, CallbackWithClient, client);
Callback with State Object
This example assumes that the following class and callback function have been defined.
class ClientState
{
AmazonS3Client client;
DateTime startTime;
public AmazonS3Client Client
{
get { return client; }
set { client = value; }
}
public DateTime Start
{
get { return startTime; }
set { startTime = value; }
}
}
public static void CallbackWithState(IAsyncResult asyncResult)
{
try {
ClientState state = asyncResult.AsyncState as ClientState;
AmazonS3Client s3Client = (AmazonS3Client)state.Client;
PutObjectResponse response = state.Client.EndPutObject(asyncResult);
Console.WriteLine("Finished PutObject. Elapsed time: {0}",
(DateTime.Now - state.Start).ToString());
}
catch (AmazonS3Exception s3Exception) {
//
// Code to process exception
//
}
}
The following line of code calls BeginPutObject and specifies the above callback function. When the
PutObject operation completes, the callback function is called. In this example, the call to
BeginPutObject specifies, for the state parameter, an instance of the ClientState class defined
previously. This class embeds the Amazon S3 client as well as the time at which BeginPutObject is
Version v2.0.0
20
AWS SDK for .NET Developer Guide
Asynchronous API for .NET 3.5
called. The callback function uses the Amazon S3 client object to call the EndPutObject method to
retrieve the server response. The callback also extracts the start time for the operation and uses it to print
the time it took for the asynchronous operation to complete.
As in the previous examples, because exceptions that occur during the operation are received when
EndPutObject is called, this call is placed within a try block.
asyncResult = client.BeginPutObject(
request, CallbackWithState, new ClientState { Client = client, Start = Date
Time.Now } );
Complete Sample
The following code sample demonstrates the various patterns that you can use when calling the
asynchronous request methods.
using
using
using
using
using
using
System;
System.Collections.Generic;
System.Diagnostics;
System.IO;
System.Text;
System.Threading;
using
using
using
using
Amazon;
Amazon.Runtime;
Amazon.S3;
Amazon.S3.Model;
namespace async_aws_net
{
class ClientState
{
AmazonS3Client client;
DateTime startTime;
public AmazonS3Client Client
{
get { return client; }
set { client = value; }
}
public DateTime Start
{
get { return startTime; }
set { startTime = value; }
}
}
class Program
{
public static void Main(string[] args)
{
TestPutObjectAsync();
}
public static void SimpleCallback(IAsyncResult asyncResult)
Version v2.0.0
21
AWS SDK for .NET Developer Guide
Asynchronous API for .NET 3.5
{
Console.WriteLine("Finished PutObject operation with simple callback");
Console.Write("\n\n");
}
public static void CallbackWithClient(IAsyncResult asyncResult)
{
try {
AmazonS3Client s3Client = (AmazonS3Client) asyncResult.AsyncState;
PutObjectResponse response = s3Client.EndPutObject(asyncResult);
Console.WriteLine("Finished PutObject operation with client call
back");
Console.WriteLine("Service Response:");
Console.WriteLine("-----------------");
Console.WriteLine(response);
Console.Write("\n\n");
}
catch (AmazonS3Exception s3Exception) {
//
// Code to process exception
//
}
}
public static void CallbackWithState(IAsyncResult asyncResult)
{
try {
ClientState state = asyncResult.AsyncState as ClientState;
AmazonS3Client s3Client = (AmazonS3Client)state.Client;
PutObjectResponse response = state.Client.EndPutObject(asyncResult);
Console.WriteLine(
"Finished PutObject operation with state callback that started
at {0}",
(DateTime.Now - state.Start).ToString() + state.Start);
Console.WriteLine("Service Response:");
Console.WriteLine("-----------------");
Console.WriteLine(response);
Console.Write("\n\n");
}
catch (AmazonS3Exception s3Exception) {
//
// Code to process exception
//
}
}
public static void TestPutObjectAsync()
{
// Create a client
AmazonS3Client client = new AmazonS3Client();
PutObjectResponse response;
IAsyncResult asyncResult;
//
Version v2.0.0
22
AWS SDK for .NET Developer Guide
Asynchronous API for .NET 3.5
// Create a PutObject request
//
// You will need to change the BucketName below in order to run this
// sample code.
//
PutObjectRequest request = new PutObjectRequest
{
BucketName = "PUT-YOUR-OWN-EXISTING-BUCKET-NAME-HERE",
Key = "Item",
ContentBody = "This is sample content..."
};
response = client.PutObject(request);
Console.WriteLine("Finished PutObject operation for {0}.", request.Key);
Console.WriteLine("Service Response:");
Console.WriteLine("-----------------");
Console.WriteLine("{0}", response);
Console.Write("\n\n");
request.Key = "Item1";
asyncResult = client.BeginPutObject(request, null, null);
while ( ! asyncResult.IsCompleted ) {
//
// Do some work here
//
}
try {
response = client.EndPutObject(asyncResult);
}
catch (AmazonS3Exception s3Exception) {
//
// Code to process exception
//
}
Console.WriteLine("Finished Async PutObject operation for {0}.", re
quest.Key );
Console.WriteLine("Service Response:");
Console.WriteLine("-----------------");
Console.WriteLine(response);
Console.Write("\n\n");
request.Key = "Item2";
asyncResult = client.BeginPutObject(request, SimpleCallback, null);
request.Key = "Item3";
asyncResult = client.BeginPutObject(request, CallbackWithClient, cli
ent);
request.Key = "Item4";
asyncResult = client.BeginPutObject(request, CallbackWithState,
new ClientState { Client = client, Start = DateTime.Now } );
Thread.Sleep( TimeSpan.FromSeconds(5) );
}
}
}
Version v2.0.0
23
AWS SDK for .NET Developer Guide
Migrating Your Code to the Latest SDK
See Also
• Getting Started (p. 3)
• Programming with the AWS SDK for .NET (p. 8)
Migrating Your Code to the Latest Version of the
AWS SDK for .NET
This guide describes changes in the latest version of the SDK, and how you can migrate your code to
the latest SDK.
Topics
• Introduction (p. 24)
• What's New (p. 24)
• What's Different (p. 24)
Introduction
The AWS SDK for .NET was released in November 2009 and was originally designed for .NET Framework
2.0. Since then, .NET has improved with .NET 4.0 and .NET 4.5. Since .NET 2.0, .NET has also added
new target platforms: WinRT and Windows Phone 8.
AWS SDK for .NET version 2 has been updated to take advantage of the new features of the .NET
platform and to target WinRT and Windows Phone 8.
What's New
• Support for Task-based asynchronous API
• Support for Windows Store apps
• Support for Windows Phone 8
• Ability to configure service region via App.config or Web.config
• Collapsed Response and Result classes
• Updated names for classes and properties to follow .NET conventions
What's Different
Architecture
The AWS SDK for .NET uses a common runtime library to make AWS service requests. In version 1 of
the SDK, this "common" runtime was added after the initial release, and several of the older AWS services
did not use it. As a result, there was a higher degree of variability among services in the functionality
provided by the AWS SDK for .NET version 1.
In version 2 of the SDK, all services now use the common runtime, so future changes to the core runtime
will propagate to all services, increasing their uniformity and easing demands on developers who want
to target multiple services.
However, separate runtimes are provided for .NET 3.5 and .NET 4.5:
Version v2.0.0
24
AWS SDK for .NET Developer Guide
What's Different
• The version 2 runtime for .NET 3.5 is similar to the existing version 1 runtime, which is based on the
System.Net.HttpWebRequest class and uses the Begin and End pattern for asynchronous methods.
• The version 2 runtime for .NET 4.5 is based on the new System.Net.Http.HttpClient class and uses
Tasks for asynchronous methods, which enables users to use the new async and await keywords
in C# 5.0.
The WinRT and Windows Phone 8 versions of the SDK reuse the runtime for .NET 4.5, with the exception
that they support asynchronous methods only. Windows Phone 8 doesn't natively support
System.Net.Http.HttpClient, so the SDK depends on Microsoft's portable class implementation of
HttpClient, which is hosted on NuGet at the following URL:
• http://nuget.org/packages/Microsoft.Net.Http/2.1.10
Removal of the "With" Methods
The "With" methods have been removed from version 2 of the SDK for the following reasons:
• In .NET 3.0, constructor initializers were added, making the "With" methods redundant.
• The "With" methods added significant overhead to the API design and worked poorly in cases of
inheritance.
For example, in version 1 of the SDK, you would use "With" methods to set up a
TransferUtilityUploadRequest:
TransferUtilityUploadRequest uploadRequest = new TransferUtilityUploadRequest()
.WithBucketName("my-bucket")
.WithKey("test")
.WithFilePath("c:\test.txt")
.WithServerSideEncryptionMethod(ServerSideEncryptionMethod.AES256);
In the current version of the SDK, use constructor initializers instead:
TransferUtilityUploadRequest uploadRequest = new TransferUtilityUploadRequest()
{
BucketName = "my-bucket", Key = "test", FilePath = "c:\test.txt",
ServerSideEncryptionMethod = ServerSideEncryptionMethod.AES256
};
Removal of SecureString
The use of System.Security.SecureString was removed in version 2 of the SDK because it is not
available on the WinRT and Windows Phone 8 platforms.
Breaking Changes
Many classes and properties were changed to either meet .NET naming conventions or more closely
follow service documentation. Amazon Simple Storage Service (Amazon S3) and Amazon Elastic Compute
Cloud (Amazon EC2) were the most affected by this because they are the oldest services in the SDK
and were moved to the new common runtime. Below are the most visible changes.
Version v2.0.0
25
AWS SDK for .NET Developer Guide
What's Different
• All client interfaces have been renamed to follow the .NET convention of starting with the letter "I". For
example, the AmazonEC2 class is now IAmazonEC2.
• Properties for collections have been properly pluralized.
• AWSClientFactory.CreateAmazonSNSClient has been renamed
CreateAmazonSimpleNotificationServiceClient.
• AWSClientFactory.CreateAmazonIdentityManagementClient has been renamed
CreateAmazonIdentityManagementServiceClient.
Amazon DynamoDB
• The amazon.dynamodb namespace has been removed; only the amazon.dynamodbv2 namespace
remains.
• Service-response collections that were set to null in version 1 are now set to an empty collection. For
example, QueryResult.LastEvaluatedKey and ScanResponse.LastEvaluatedKey will be set to empty
collections when there are no more items to query/scan. If your code depends on LastEvaluatedKey
to be null, it now has to check the collection's Count field to avoid a possible infinite loop.
Amazon EC2
• Amazon.EC2.Model.RunningInstance has been renamed Instance.
Additionally, the GroupName and GroupId properties of RunningInstance have been combined into
the SecurityGroups property, which takes a GroupIdentifier object, in Instance.
• Amazon.EC2.Model.IpPermissionSpecification has been renamed IpPermission.
• Amazon.EC2.Model.Volume.Status has been renamed State.
• AuthorizeSecurityGroupIngressRequest removed root properties for ToPort and FromPort in favor
of always using IpPermissions.
This was done because the root properties were silently ignored when set for an instance running in a
VPC.
• The AmazonEC2Exception class is now based on AmazonServiceException instead of
System.Exception.
As a result, many of the exception properties have changed; the XML property is no longer provided,
for example.
Amazon Redshift
• The ClusterVersion.Name property has been renamed ClusterVersion.Version.
Amazon S3
• AmazonS3Config.CommunicationProtocol was removed to be consistent with other services
where ServiceURL contains the protocol.
• The PutACLRequest.ACL property has been renamed AccessControlList to make it consistent with
GetACLResponse.
• GetNotificationConfigurationRequest/Response and
SetNotificationConfigurationRequest/Response have been renamed
GetBucketNotificationRequest/Response and PutBucketNotificationRequest/Response, respectively.
• EnableBucketLoggingRequest/Response and DisableBucketLoggingRequest/Response were
consolidated into PutBucketLoggingRequest/Response.
Version v2.0.0
26
AWS SDK for .NET Developer Guide
What's Different
• The GenerateMD5 property has been removed from PutObjectRequest and UploadPartRequest
because this is now automatically computed as the object is being written to Amazon S3 and compared
against the MD5 returned in the response from Amazon S3.
• The PutBucketTagging.TagSets collection is now PutBucketTagging.TagSet, and now takes a list
of Tag objects.
• The AmazonS3Util utility methods DoesS3BucketExist, SetObjectStorageClass,
SetServerSideEncryption, SetWebsiteRedirectLocation, and DeleteS3BucketWithObjects were changed
to take IAmazonS3 as the first parameter to be consistent with other high-level APIs in the SDK.
• Only responses that return a Stream like GetObjectResponse are IDisposable. In version 1, all
responses were IDisposable.
• The BucketName property has been removed from Amazon.S3.Model.S3Object.
Amazon Simple Workflow Service
• The DomainInfos.Name property has been renamed DomainInfos.Infos.
Configuring the AWS Region
Regions can be set in the App.config or Web.config files (depending on your project type). For
example, the following specification configures all clients that don't explicitly set the region to point to
us-east-1.
<configuration>
<appSettings>
<add key="AWSProfileName" value="profile_name"/>
<add key="AWSRegion" value="us-east-1"/>
</appSettings>
</configuration>
Response and Result Classes
To simplify your code, the Response and Result classes that are returned when creating a service
object have been collapsed. For example, the code to get an Amazon SQS queue URL previously looked
like this:
GetQueueUrlResponse response = SQSClient.GetQueueUrl(request);
Console.WriteLine(response.CreateQueueResult.QueueUrl);
You can now get the queue URL simply by referring to the QueueUrl member of the
CreateQueueResponse returned by the AmazonSQSClient.CreateQueue method:
Console.WriteLine(response.QueueUrl);
The CreateQueueResult property still exists, but has been marked as deprecated, and may be removed
in a future version of the SDK. Use the QueueUrl member instead.
Additionally, all of the service response values are based on a common response class,
AmazonWebServiceResponse, instead of individual response classes per service. For example, the
PutBucketResponse class in Amazon S3 is now based on this common class instead of S3Response in
version 1. As a result, the methods and properties available for PutBucketResponse have changed.
Version v2.0.0
27
AWS SDK for .NET Developer Guide
Platform Differences
Refer to the return value type of the Create* method for the service client that you're using to see what
values are returned. These are all listed in the AWS SDK for .NET API Reference.
Platform Differences in the AWS SDK for .NET
The AWS SDK for .NET provides four distinct assemblies for developers to target different platforms.
However, not all SDK functionality is available on each of these platforms. This topic describes the
differences in support for each platform.
AWS SDK for .NET Framework 3.5
This version of the SDK for .NET is the one most similar to version 1. This version, compiled against .NET
Framework 3.5, supports the same set of services as version 1. It also uses the same pattern for making
asynchronous calls (p. 16).
Note
This version contains a number of changes that may break code that was designed for version
1. For more information, see the Migration Guide (p. 24).
AWS SDK for .NET Framework 4.5
The version of the SDK for .NET compiled against .NET Framework 4.5 supports the same set of services
as version 1 of SDK for .NET. However, it uses a different pattern for asynchronous calls. Instead of the
Begin/End pattern it uses the task-based pattern, which allows developers to use the new async and
await keywords introduced in C# 5.0.
AWS SDK for Windows RT
The version of the SDK for .NET compiled for Windows RT supports only asynchronous method calls
using async and await.
This version does not provide all of the functionality for Amazon S3 and DynamoDB that was available
in version 1 of the SDK. The following Amazon S3 functionality is currently unavailable in the Windows
RT version of SDK.
• Transfer Utility
• IO Namespace
The Windows RT version of the SDK does not support decryption of the Windows password using the
GetDecryptedPassword method.
AWS SDK for Windows Phone 8
The version of the SDK for .NET compiled for Windows Phone 8 has a programming model similar to
Windows RT. As with the Windows RT version, it supports only asynchronous method calls using async
and await. Also, because Windows Phone 8 doesn't natively support System.Net.Http.HttpClient,
the SDK depends on Microsoft's portable class implementation of HttpClient, which is hosted on nuget
at the following URL:
• http://nuget.org/packages/Microsoft.Net.Http/2.1.10
Version v2.0.0
28
AWS SDK for .NET Developer Guide
Install AWS Assemblies with NuGet
This version of the SDK for .NET supports only the following services. This is the same set of services
as those supported in the AWS SDK for Android and the AWS SDK for iOS.
• Amazon EC2
• Elastic Load Balancing
• Auto Scaling
• Amazon S3
• Amazon SNS
• Amazon SQS
• Amazon SES
• DynamoDB
• Amazon SimpleDB
• CloudWatch
• AWS STS
This version does not provide all of the functionality for Amazon S3 and DynamoDB available in version
1 of the SDK. The following Amazon S3 functionality is currently unavailable in the Windows Phone 8
version of SDK.
• Transfer Utility
• IO Namespace
Also, the Windows Phone 8 version of the SDK does not support decryption of the Windows password
using the GetDecryptedPassword method.
Install AWS Assemblies with NuGet
NuGet is a package management system for the .NET platform. With NuGet, you can add the AWSSDK
assembly and the TraceListener and SessionProvider extensions to your application without first installing
the SDK.
NuGet always has the most recent versions of the AWS .NET assemblies, and also enables you to install
previous versions. NuGet is aware of dependencies between assemblies and installs required assemblies
automatically. Assemblies that are installed with NuGet are stored with your solution rather than in a
central location such as Program Files. This enables you to install assembly versions specific to a
given application without creating compatibility issues for other applications.
For more information about NuGet, go to the NuGet documentation.
Installation
To use NuGet, install it from the Visual Studio Gallery on MSDN. If you are using Visual Studio 2010 or
later, NuGet is installed automatically.
You can use NuGet either from Solution Explorer or from the Package Manager Console.
NuGet from Solution Explorer
To use NuGet from Solution Explorer, right-click on your project and select Manage NuGet Packages...
from the context menu.
Version v2.0.0
29
AWS SDK for .NET Developer Guide
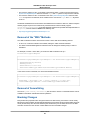
NuGet Package Manager Console
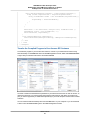
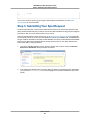
From the Manage NuGet Packages dialog box, select Online in the left pane. You can then search for
the package that you want to install using the search box in the upper right corner. The screenshot shows
the AWS.Extensions assembly package. Notice that NuGet is aware that this package has a dependency
on the AWSSDK assembly package; NuGet will therefore install the AWSSDK package if it is not already
installed.
NuGet Package Manager Console
To use NuGet from the Package Manager Console within Visual Studio, from the View menu, select
Other Windows, and click Package Manager Console. From the console, you can install the AWS
assemblies using the Install-Package command. For example, to install the AWS SDK for .NET
assembly, use the following command line:
Install-Package AWSSDK
To install an earlier version of a package, use the -Version option and specify the desired package
version. For example, to install version 1.5.1.0 of the AWS SDK for .NET assembly, use the following
command line:
Install-Package AWSSDK -Version 1.5.1.0
The NuGet website provides a page for every package that is available through NuGet such as the
AWSSDK and AWS.Extensions assemblies. The page for each package includes a sample command
line for installing the package using the console. Each page also includes a list of the previous versions
of the package that are available through NuGet.
Version v2.0.0
30
AWS SDK for .NET Developer Guide
IAM Roles for Amazon EC2 Instances
AWS SDK for .NET Tutorials and
Examples
This chapter provides tutorials, walkthroughs, and examples of programming Amazon Web Services with
the AWS SDK for .NET. Since these topics generally provide buildable and runnable examples of SDK
for .NET programming, it is expected that you have already set up the AWS SDK for .NET (p. 3) and
that you understand the material in the Programming with the AWS SDK for .NET (p. 8) chapter.
Topics
• Using IAM Roles for Amazon EC2 Instances with the AWS SDK for .NET (p. 31)
• Managing ASP.NET Session State with Amazon DynamoDB (p. 39)
• Tutorial: Creating Amazon EC2 Instances with the AWS SDK for .NET (p. 43)
• Tutorial: Amazon EC2 Spot Instances (p. 52)
• Creating and Using an Amazon SQS Queue with the AWS SDK for .NET (p. 60)
Using IAM Roles for Amazon EC2 Instances with
the AWS SDK for .NET
Note
For in-depth information about IAM roles for Amazon EC2 instances, go to Using Identity and
Access Management.
Securely managing authentication credentials is one of the challenges developers face when writing
software that accesses Amazon Web Services (AWS). All requests to AWS must be cryptographically
signed using credentials issued by AWS. For software that runs on Amazon Elastic Compute Cloud
(Amazon EC2) instances, developers must store these credentials in a way that keeps them secure but
also accessible to the software, which needs them in order to make requests.
IAM roles for Amazon EC2 instances provides an effective way to manage credentials for AWS software
running on EC2 instances. This section describes IAM roles for Amazon EC2 instances and shows how
it works with a sample .NET program. But first, let's examine some common strategies for managing
credentials and the issues that arise when using them.
One strategy is to first launch an Amazon EC2 instance and then securely transfer the credentials to the
instance using a utility such as scp (secure copy). However, this strategy doesn't scale well to large
Version v2.0.0
31
AWS SDK for .NET Developer Guide
Use IAM Roles for Amazon EC2 Instances to Manage
Your Credentials
numbers of instances. It also doesn't work well for instances that are created by AWS on behalf of the
customer, such as Spot Instances or instances in Auto Scaling groups.
Another strategy is to embed the credentials as literal strings in the software itself. However, this means
that anyone who comes into possession of the software can scan through the code and retrieve the
credentials.
Yet another strategy is to create a custom Amazon Machine Images (AMI) with the credentials, perhaps
stored in a file on the AMI. However, with this approach anyone with access to the AMI automatically has
access to the credentials—which again creates an unnecessary security risk.
All of the above strategies also make it cumbersome to rotate (update) the credentials. The new credentials
either have to be re-copied to the Amazon EC2 instance or compiled into a new build of the software or
incorporated into the creation of a new AMI.
Use IAM Roles for Amazon EC2 Instances to
Manage Your Credentials
IAM roles for Amazon EC2 instances provides a solution. With IAM roles, a developer can develop software
and deploy it to an Amazon EC2 instance without having to manage the credentials the software is using.
You use the IAM console to create the IAM role and configure it with all the permissions that the software
requires. Permissions for IAM roles are specified in a way that is similar to permissions for IAM users.
For more information about specifying permissions, go to Using Identity and Access Management.
Amazon EC2 instances support the concept of an instance profile, which is a logical container for the
IAM role. At the time that you launch an Amazon EC2 instance, you can associate the instance with an
instance profile, which in turn corresponds to the IAM role. Any software that runs on the Amazon EC2
instance is able to access AWS using the permissions associated with the IAM role.
If you are using the AWS Management Console, you don't need to worry about instance profiles. The
IAM console creates one for you in the background whenever you create an IAM role.
To use the permissions associated with the instance profile, the software constructs a client object for an
AWS service, say Amazon Simple Storage Service (Amazon S3), using an overload of the constructor
that does not take any parameters. When this parameterless constructor executes, it searches the
"credentials provider chain." The credentials provider chain is the set of places where the constructor will
attempt to find credentials if they are not specified explicitly as parameters. For .NET, the credentials
provider chain is:
• App.config file
• Instance Metadata Service that provides the credentials associated with the IAM role for the Amazon
EC2 instance
If the client does not find credentials in the App.config file, it retrieves temporary credentials that have
the same permissions as those associated with the IAM role. The credentials are retrieved from Instance
Metadata. The credentials are stored by the constructor on behalf of the customer software and are used
to make calls to AWS from that client object. Although the credentials are temporary and eventually expire,
the SDK client periodically refreshes them so that they continue to enable access. This periodic refresh
is completely transparent to the application software.
Version v2.0.0
32
AWS SDK for .NET Developer Guide
Walkthrough: Using IAM Roles to Retrieve an Amazon
S3 Object from an Amazon EC2 Instance
Walkthrough: Using IAM Roles to Retrieve an
Amazon S3 Object from an Amazon EC2 Instance
In this walkthrough, we consider a program that retrieves an object from Amazon S3 using regular
credentials. We then modify the program so that it uses IAM roles for Amazon EC2 Instances.
Sample Program with Credentials
Here is our starting program, which retrieves an object from an Amazon S3 bucket. The code as shown
here accesses your credentials by using the profile name stored in the project's App.config file.
using
using
using
using
System;
System.Configuration;
System.Collections.Specialized;
System.IO;
using Amazon.S3;
using Amazon.S3.Model;
namespace s3.amazon.com.docsamples.retrieveobject
{
class S3Sample
{
static string bucketName = "text-content";
static string keyName = "text-object.txt";
static IAmazonS3 client;
public static void Main(string[] args) {
NameValueCollection appConfig = ConfigurationManager.AppSettings;
Amazon.Runtime.AWSCredentials credentials = new Amazon.Runtime.StoredPro
fileAWSCredentials("appConfig.AWSProfileName");
string responseBody;
try {
using (client = Amazon.AWSClientFactory.CreateAmazonS3Client(
credentials, RegionEndpoint.USWest2)) {
Console.WriteLine("Retrieving (getting) an object");
GetObjectRequest request = new GetObjectRequest() {
BucketName = bucketName,
Key = keyName
};
using (GetObjectResponse response = client.GetObject(request)) {
using (Stream responseStream = response.ResponseStream) {
using (StreamReader reader = new StreamReader(responseStream)) {
responseBody = reader.ReadToEnd();
}
}
}
Version v2.0.0
33
AWS SDK for .NET Developer Guide
Walkthrough: Using IAM Roles to Retrieve an Amazon
S3 Object from an Amazon EC2 Instance
}
FileStream s = new FileStream( "s3Object.txt", FileMode.Create );
StreamWriter writer = new StreamWriter( s );
writer.WriteLine( responseBody );
}
catch (AmazonS3Exception s3Exception) {
Console.WriteLine(s3Exception.Message, s3Exception.InnerException);
}
} // main
} // class
} // namespace
You can test this program, by filling in your own credentials in an App.config. The following example
shows the lines you would need to edit.
<?xml version="1.0"?>
<configuration>
<appSettings>
<add key="AWSProfileName" value="profile_name"/>
</appSettings>
<startup>
<supportedRuntime version="v4.0" sku=".NETFramework,Version=v4.0"/>
</startup>
</configuration>
You should also specify the name of an Amazon S3 bucket and text object associated with your account.
static string bucketName = "text-content";
static string keyName
= "text-object.txt";
For instructions on how to create an Amazon S3 bucket and upload an object, go to the Amazon Simple
Storage Service Getting Started Guide.
After you have configured the program for your environment (credentials and target object to retrieve),
you can compile and run it.You can compile the program in Visual Studio or from a Visual Studio Command
Prompt. Here is a sample command line for compiling the program (here called get-object.cs). You
will need to adjust the path to the AWS assembly (AWSSDK.dll) to match the location of the assembly
on your computer. When you run the program, the assembly should be in the General Assembly Cache
(GAC) or in the same directory as the program.
csc get-object.cs /r:c:\aws-sdk-net\bin\AWSSDK.dll
Update the Sample Program for IAM Roles for Amazon EC2
Instances
Our next stage is to update this program to run from an Amazon EC2 instance using IAM roles for Amazon
EC2 instances. Here are the high-level steps.
1. Create the Role
2. Launch an Amazon EC2 Instance with the Corresponding Instance Profile
Version v2.0.0
34
AWS SDK for .NET Developer Guide
Walkthrough: Using IAM Roles to Retrieve an Amazon
S3 Object from an Amazon EC2 Instance
3. Edit the Source File to Remove the Credentials
4. Transfer the Compiled Program to Your Amazon EC2 Instance
5. Run the Program
Create the Role
The first step is to create an IAM role that has the appropriate permissions. To create the IAM role, follow
the procedure Creating an IAM Role in Using IAM. When you create the IAM role, specify that the trusted
entity is Amazon EC2 and that the role has read access to Amazon S3.
The IAM console provides ready-made policy templates for specific AWS services. When you create the
IAM role, specify the Amazon S3 Read Only Access policy template. The following screen shot from
the IAM role creation wizard shows this policy template.
Policies can also be represented in JSON format. The following JSON block describes the policy for
Amazon S3 Ready Only Access.
{
"Statement": [ {
"Effect": "Allow",
"Action": [
"s3:Get*",
"s3:List*" ],
"Resource": "*"
} ]
}
Note down the name of the role that you create so that you can specify it when you create your Amazon
EC2 Instance in the next step.
Launch an Amazon EC2 Instance with the Corresponding Instance Profile
To create an Amazon EC2 instance, follow the procedure Running an Instance in the Amazon Elastic
Compute Cloud User Guide. We recommend that you specify a recent Windows Server 2008 R2 for
Version v2.0.0
35
AWS SDK for .NET Developer Guide
Walkthrough: Using IAM Roles to Retrieve an Amazon
S3 Object from an Amazon EC2 Instance
your Amazon EC2 instance. When you create the Amazon EC2 instance, specify the IAM role that you
created previously in the IAM console.
When you create your Amazon EC2 instance, you will also need to specify a key pair and a security
group. Specify a key pair for which you have the private key (PEM file) stored on your local computer.
Specify a security group that will enable you to connect to your Amazon EC2 instance using RDP (port
3389). Information about key pairs and security groups is provided in the Amazon Elastic Compute Cloud
User Guide.
For information about how to programmatically launch an Amazon EC2 instance with an IAM role, see
Launch Amazon EC2 Instances (p. 48).
Edit the Source File to Remove the Credentials
Edit the source for the program so that it does not specify any credentials in the call that creates the
Amazon S3 client. In this new version of the program, the call to CreateAmazonS3Client no longer
takes any parameters.
using ( client = Amazon.AWSClientFactory.CreateAmazonS3Client() ) {
Build the modified program. You might actually run the program on your local computer to verify that it
does not work without credentials; you will get an Amazon Service Exception.
using
using
using
using
System;
System.Configuration;
System.Collections.Specialized;
System.IO;
using Amazon.S3;
using Amazon.S3.Model;
namespace s3.amazon.com.docsamples.retrieveobject
{
class S3Sample
{
static string bucketName = "text-content";
static string keyName = "text-object.txt";
static IAmazonS3 client;
public static void Main(string[] args) {
NameValueCollection appConfig = ConfigurationManager.AppSettings;
string responseBody;
try {
using (client = Amazon.AWSClientFactory.CreateAmazonS3Client(RegionEnd
point.USWest2)) {
Console.WriteLine("Retrieving (getting) an object");
GetObjectRequest request = new GetObjectRequest() {
BucketName = bucketName,
Key = keyName
};
Version v2.0.0
36
AWS SDK for .NET Developer Guide
Walkthrough: Using IAM Roles to Retrieve an Amazon
S3 Object from an Amazon EC2 Instance
using (GetObjectResponse response = client.GetObject(request)) {
using (Stream responseStream = response.ResponseStream) {
using (StreamReader reader = new StreamReader(responseStream)) {
responseBody = reader.ReadToEnd();
}
}
}
}
FileStream s = new FileStream( "s3Object.txt", FileMode.Create );
StreamWriter writer = new StreamWriter( s );
writer.WriteLine( responseBody );
}
catch (AmazonS3Exception s3Exception) {
Console.WriteLine(s3Exception.Message, s3Exception.InnerException);
}
} // main
} // class
} // namespace
Transfer the Compiled Program to Your Amazon EC2 Instance
To transfer the program to your Amazon EC2 instance, connect to your Amazon EC2 instance using
Remote Desktop. In the Instances view in the AWS Management Console, either click Instance Actions
or right-click your Amazon EC2 instance and select Connect.
You need to retrieve the administrator's password for your Amazon EC2 instance in order to connect. To
retrieve the password, you need to specify the private key file for the key pair. When you create a key
pair, you have an opportunity to download the private key to your local computer. This file ends in a PEM
extension.
You can invoke the Remote Desktop client from the Start menu on your computer or you can download
a shortcut from the Connect dialog box in the AWS Management Console.
Version v2.0.0
37
AWS SDK for .NET Developer Guide
Walkthrough: Using IAM Roles to Retrieve an Amazon
S3 Object from an Amazon EC2 Instance
You should configure your Remote Desktop session so that you can access your local drives from the
Amazon EC2 instance. If you use the shortcut provided by the AWS Management Console, right-click
the shortcut and select Edit. On the Local Resources tab, in the Local devices and resources section,
click the More button. In the following dialog box, select the Drives check box to make your local drives
available.
You can also bring up a Remote Desktop session to your Amazon EC2 instance from the AWS Toolkit
for Visual Studio. If you connect from the Toolkit, the Remote Desktop session is already configured so
that your local drives are available.
Connect to your Amazon EC2 instance as Administrator using the password that you retrieved from the
AWS Management Console. Once you are connected, copy both the program and the AWS assembly
(AWSSDK.dll) to the instance.
Version v2.0.0
38
AWS SDK for .NET Developer Guide
Managing ASP.NET Session State with Amazon
DynamoDB
Run the Program
Run the program. Ensure that the AWS assembly is either in the same directory as the program or that
you have installed it in the General Assembly Cache.
get-object.exe
The program downloads the object and writes its contents to a file called s3Object.txt.
Managing ASP.NET Session State with Amazon
DynamoDB
ASP.NET applications often store session-state data in memory. However, this approach doesn't scale
well. Once the application grows beyond a single web server, the session state must be shared between
servers. A common solution is to set up a dedicated session-state server with Microsoft SQL Server. But
this approach also has drawbacks: you must administer another machine, the session-state server is a
single point of failure, and the session-state server itself can become a performance bottleneck.
Amazon DynamoDB, a NoSQL database store from Amazon Web Services (AWS), provides an effective
solution for sharing session-state across web servers without incurring any of these drawbacks.
Note
Regardless of the solution you choose, be aware that Amazon DynamoDB enforces an item
size limit of 64 KB. None of the records that you store in DynamoDB can exceed this limit.
The AWS SDK for .NET includes AWS.SessionProvider.dll, which contains an ASP.NET session
state provider. Also included is the AmazonDynamoDBSessionProviderSample sample, which demonstrates
how to use Amazon DynamoDB as a session-state provider.
For more information about using Session State with ASP.NET applications, go to the MSDN
documentation.
Version v2.0.0
39
AWS SDK for .NET Developer Guide
Create the ASP.NET_SessionState Table
Create the ASP.NET_SessionState Table
When your application starts, it looks for an Amazon DynamoDB table named, by default,
ASP.NET_SessionState. We recommend that you create this table before you run your application for
the first time.
To create the ASP.NET_SessionState table
1.
Sign in to the AWS Management Console and open the Amazon DynamoDB console at
https://console.amazonaws.cn/dynamodb/.
2.
Click Create Table.The Create Table wizard opens.
3.
4.
a.
In the Table Name text box, enter this text: ASP.NET_SessionState
b.
c.
In the Primary Key Type field, click Hash.
In the Hash Attribute Name text box, enter this text: SessionId
When all your options are entered as you want them, click Continue.
On the Add Indexes page, click Continue.
On the Provisioned Throughput Capacity page, enter the number of Read Capacity Units and
Write Capacity Units you want for the table.
Note
For now, you can leave the provisioned throughput settings at their minimum values of 1
read capacity unit and 1 write capacity unit. This will allow applications to read or write
session data at the rate of once per second. If you expect higher rates of usage, you can
come back to the DynamoDB console and increase these settings.
For more information, go to Provisioned Throughput in the Amazon DynamoDB Developer
Guide.
5.
When all your options are entered as you want them, click Continue.
On the Throughput Alarms page, select the Use Basic Alarms check box. This automatically
configures Amazon CloudWatch alarms to notify you if read and write consumption reaches 80% of
the table's provisioned throughput.
In the Send notification to text box, enter your email address. This is the address to which
CloudWatch will send notification emails.
6.
When all your options are entered as you want them, click Continue.
Review the options for your table:
• If you need to correct any options, click Back to return to previous panels and make corrections.
• When all your options are entered as you want them, click Create.
The ASP.NET_SessionState table is ready for use when its status changes from CREATING to ACTIVE.
Note
If you decide not to create the table beforehand, the session state provider will create the table
for you during its initialization. See the web.config options below for a list of attributes that act
as configuration parameters for the session-state table. If the provider creates the table, it will
use these parameters.
Version v2.0.0
40
AWS SDK for .NET Developer Guide
Configure the Session State Provider
Configure the Session State Provider
To configure an ASP.NET application to use DynamoDB as the session state server
1.
Add references to both AWSSDK.dll and AWS.SessionProvider.dll to your Visual Studio
ASP.NET project. These assemblies are available by installing the AWS SDK for .NET (p. 4) or
you can install them using NuGet (p. 29).
In earlier versions of the SDK, the functionality for the session state provider was contained in
AWS.Extension.dll. To improve developer usability the functionality was moved to
AWS.SessionProvider.dll. For more information, see the blog post AWS.Extension Renaming.
2.
Edit your application's Web.config file: in the system.web element, replace the existing
sessionState element with the following XML fragment:
<sessionState
timeout="20"
mode="Custom"
customProvider="DynamoDBSessionStoreProvider">
<providers>
<add name="DynamoDBSessionStoreProvider"
type="Amazon.SessionProvider.DynamoDBSessionStateStore"
AWSProfileName="profile_name"
Region="us-west-2"
/>
</providers>
</sessionState>
The profile represents the AWS credentials that are used to communicate with DynamoDB to store
and retrieve the session state. If you are using the AWS SDK for .NET and are specifying a profile
in the appSettings section of your application's Web.config file, you do not need to specify a
profile in the providers section; the AWS .NET client code will discover it at run time. For more
information, see Configuring Your AWS SDK for .NET Application (p. 8).
If the web server is running on an Amazon EC2 instance that is configured to use IAM roles for EC2
instances, then you do not need to specify any credentials in the web.config file. In this case, the
AWS .NET client will use the IAM roles credentials. For more information, see IAM Roles for Amazon
EC2 Instances (p. 31) and Security Considerations (p. 42).
Web.config Options
You can use the following configuration attributes in the providers section of your web.config file:
AWSAccessKey
Access key ID to use. This can be set either in the providers section or in the appSettings
section. We recommend not using this setting. Instead, specify credentials by using AWSProfileName
to specify a profile.
AWSSecretKey
Secret key to use. This can be set either in the providers section or in the appSettings section.
We recommend not using this setting. Instead, specify credentials by using AWSProfileName to
specify a profile.
AWSProfileName
The profile name that is associated with the credentials that you want to use. For more information,
see Configuring Your AWS SDK for .NET Application (p. 8).
Version v2.0.0
41
AWS SDK for .NET Developer Guide
Security Considerations
Region
Required string attribute.The AWS region in which to use Amazon DynamoDB. For a list of available
AWS regions, go to the Regions and Endpoints documentation.
Application
Optional string attribute. The value of the Application attribute is used to partition the session
data in the table so that the same table can be used for more than one application.
Table
Optional string attribute. The name of the table used to store session data. The default is
ASP.NET_SessionState.
ReadCapacityUnits
Optional int attribute. The read capacity units to use if the provider creates the table. The default
is 10.
WriteCapacityUnits
Optional int attribute. The write capacity units to use if the provider creates the table. The default
is 5.
CreateIfNotExist
Optional boolean attribute. The CreateIfNotExist attribute controls whether the provider will
auto-create the table if it doesn't exist. The default is true. If this flag is set to false and the table
doesn't exist, an exception will be thrown.
Security Considerations
Once the DynamoDB table is created and the application is configured, sessions can be used as with
any other session provider.
As a security best practice, we recommend that you run your applications with the credentials of an AWS
Identity and Access Management (IAM) user. You can use either the AWS Management Console or the
AWS Toolkit for Visual Studio to create IAM users and define access policies.
The session state provider needs to be able to call the DeleteItem, DescribeTable, GetItem, PutItem
and UpdateItem operations for the table that stores the session data. The sample policy below can be
used to restrict the IAM user to only the operations needed by the provider for an instance of DynamoDB
running in us-east-1:
{
"Version" : "2008-10-17",
"Statement" : [
{
"Sid" : "1",
"Effect" : "Allow",
"Action" : [
"dynamodb:DeleteItem",
"dynamodb:DescribeTable",
"dynamodb:GetItem",
"dynamodb:PutItem",
"dynamodb:UpdateItem"
],
"Resource" : "arn:aws:dynamodb:us-east-1:<YOUR-AWS-ACCOUNTID>:table/ASP.NET_SessionState"
}
]
}
Version v2.0.0
42
AWS SDK for .NET Developer Guide
Tutorial: Creating Amazon EC2 Instances
Tutorial: Creating Amazon EC2 Instances with
the AWS SDK for .NET
This topic demonstrates how to use the AWS SDK for .NET to create, start, and terminate Amazon Elastic
Compute Cloud (Amazon EC2) instances.
The sample code in this topic is written in C#, but you can use the AWS SDK for .NET with any language
that is compatible with the Microsoft .NET Framework. The AWS SDK for .NET installs a set of C# project
templates, so the simplest way to start this project is to click the Visual Studio File menu's New Project
command and create a new AWS Empty Project.
Your project must include an App.Config file, which serves as a container for your AWS credentials
and has the following content:
<?xml version="1.0"?>
<configuration>
<appSettings>
<add key="AWSProfileName" value="profile_name"/>
</appSettings>
<startup>
<supportedRuntime version="v4.0" sku=".NETFramework,Version=v4.0"/>
</startup>
</configuration>
Note
If create your project by using an AWS SDK for .NET template, Visual Studio creates this file for
you.
To add your credentials to App.Config, replace profile_name with your AWS credentials' profile
name. For more information on credentials and profiles, see Configuring Your AWS SDK for .NET
Application (p. 8). The IAM policy that is attached to this profile must grant permissions for all of the
Amazon EC2 actions that you plan to use in your application. If you plan to launch an instance with an
IAM role, the policy must also grant permissions for IAM. For more information, see Permissions and
Policies and Roles.
The following sections walk you through the basic procedure for creating, launching, and terminating an
Amazon EC2 instance by using the AWS SDK for .NET.
Topics
• Create an Amazon EC2 Client (p. 43)
• Specify an Amazon EC2 Security Group (p. 44)
• Authorize Security Group Ingress (p. 46)
• Specify an Amazon EC2 Key Pair (p. 47)
• Launch Amazon EC2 Instances (p. 48)
• Terminate Amazon EC2 Instances (p. 51)
• Additional Amazon EC2 Resources (p. 51)
Create an Amazon EC2 Client
The first step in setting up an Amazon EC2 instance is to create an Amazon EC2 client, which represents
a set of Amazon EC2 instances and is used to configure, start, and terminate them. The client is
represented by an AmazonEC2Client object, which you create as follows:
Version v2.0.0
43
AWS SDK for .NET Developer Guide
Specify an Amazon EC2 Security Group
var ec2Client = new AmazonEC2Client(RegionEndpoint.USEast1);
The client object's permissions are determined by the policy that is attached to the profile that you specified
in App.config. To specify the service endpoint, pass the appropriate RegionEndpoint value to the
constructor. For a list of Amazon EC2 service endpoints, see Regions and Endpoints.
Specify an Amazon EC2 Security Group
An Amazon EC2 security group controls which network traffic can flow to and from your Amazon EC2
instances, much like a firewall. For example, you can configure a security group to authorize inbound
traffic from only a specified range of IP addresses, or perhaps only a single address. An AWS account
can have up to 500 security groups, each of which is represented by a user-defined name.
By default, Amazon EC2 associates your instances with a security group that allows no inbound traffic,
which means that you cannot communicate with them.To authorize your Amazon EC2 instances to accept
inbound traffic you must explicitly associate them with a security group that authorizes ingress. For more
information about security groups, go to Security Group Concepts.
If your account already has an appropriately configured security group, you can associate it with your
instances, as follows:
To select an existing security group
1.
Create and initialize a DescribeSecurityGroupsRequest object.
var secGroupRequest = new DescribeSecurityGroupsRequest()
{
GroupNames = new List<String> {"GroupName"}
};
2.
The DescribeSecurityGroupsRequest object characterizes the request.This example adds the desired
group to the object's GroupNames property.
Pass the request object to the Amazon EC2 client's DescribeSecurityGroups method, which returns
a DescribeSecurityGroupsResponse object.
DescribeSecurityGroupsResponse secGroupResponse =
ec2Client.DescribeSecurityGroups(secGroupRequest);
SecurityGroup secGroup = secGroupResponse.SecurityGroups[0];
The object's SecurityGroups property contains a list of the requested security groups, each of which
is represented by a SecurityGroup object. This example requests a particular group, so the list has
only one member.
Important
If the specified group name does not correspond to one of your account's security groups,
DescribeSecurityGroups throws an exception.
A more robust approach is to enumerate your account's security groups, as follows
Version v2.0.0
44
AWS SDK for .NET Developer Guide
Specify an Amazon EC2 Security Group
To enumerate existing security groups
1.
Obtain a list of your account's security groups.
DescribeSecurityGroupsRequest secGroupRequest =
new DescribeSecurityGroupsRequest();
DescribeSecurityGroupsResponse secGroupResponse =
ec2Client.DescribeSecurityGroups(secGroupRequest);
List<SecurityGroup> secGroups = secGroupResponse.SecurityGroups;
2.
This example but does not specify a group name, which directs DescribeSecurityGroups to return a
list containing all of the account's security groups.
Enumerate the requested security groups and select the desired group by name.
SecurityGroup secGroup = null;
foreach(SecurityGroup item in secGroups)
{
if (item.GroupName == "GroupName")
{
secGroup = item;
break;
}
}
If your account does not have a suitable security group, you can create a new one, as follows:
Important
Use this procedure only for new security groups. If you attempt to create a new security group
with the same name as one of your account's existing groups, CreateSecurityGroup throws
an exception.
To create a new Amazon EC2 security group
1.
Create and initialize a CreateSecurityGroupRequest object.
var newGroupRequest = new CreateSecurityGroupRequest()
{
GroupName = "YourSecurityGroupName",
Description = "YourSecurityGroupDescription"
};
Assign the group's name and description to the object's GroupName and Description properties,
respectively. The two strings must contain only US-ASCII characters and the group name must be
unique within the AWS region in which you initialized your Amazon EC2 client.
2.
Create the new security group.
Version v2.0.0
45
AWS SDK for .NET Developer Guide
Authorize Security Group Ingress
CreateSecurityGroupResponse newGroupResponse =
ec2Client.CreateSecurityGroup(newGroupRequest);
Pass the request object to the Amazon EC2 client's CreateSecurityGroup method, which returns a
CreateSecurityGroupResponse object.
3.
Optionally, you can obtain the SecurityGroup object for the group that you just created by using
the To select an existing security group (p. 44) procedure described earlier.
Authorize Security Group Ingress
By default, Amazon EC2 instances have no constraints on their outbound traffic but accept no inbound
traffic. To receive inbound traffic, an instance must be associated with a security group that explicitly
authorizes ingress. You can configure the ingress authorization to limit inbound traffic to individual IP
addresses, ranges of IP addresses, specific protocols, and specific TCP/UDP ports.
You authorize ingress for a new security group, as follows.
To authorize security group ingress for a new security group
1.
Create and initialize an IpPermission object.
var ipPermission = new IpPermission()
{
IpProtocol = "tcp",
FromPort = 3389,
ToPort = 3389
};
ipPermission.IpRanges.Add("0.0.0.0/0");
To initialize the object:
• Specify the IP protocol by assigning it to the IpProtocol property.
• For the TCP or UDP protocol, authorize ingress for specified ports by assigning appropriate values
to the FromPort and ToPort properties, which represent the beginning and end of the port range,
respectively. This example specifies a single port, 3389, which is the port that you use to
communicate with Windows in an Amazon EC2 instance by using the remote desktop protocol.
• Authorize ingress for particular IP addresses or address ranges by adding them to the IpRanges
collection. Use the CIDR notation to represent addresses or address ranges. For convenience,
this example uses 0.0.0.0/0, which authorizes all addresses. For production use, you typically
specify a more restricted range or even a single address.
2.
Incoming packets must meet all of these specifications.
Create and initialize an AuthorizeSecurityGroupIngressRequest object.
var ingressRequest = new AuthorizeSecurityGroupIngressRequest();
ingressRequest.GroupName = secGroupName;
ingressRequest.IpPermissions.Add(ipPermission);
To initialize the object:
Version v2.0.0
46
AWS SDK for .NET Developer Guide
Specify an Amazon EC2 Key Pair
• Set the GroupName property to the security group name of.
• Add the IpPermissionSpecification object from Step 1 to the group's IpPermissions collection.
3.
Authorize ingress.
AuthorizeSecurityGroupIngressResponse ingressResponse =
ec2Client.AuthorizeSecurityGroupIngress(ingressRequest);
Pass the request object to Amazon EC2 client's AuthorizeSecurityGroupIngress method, which
returns an AuthorizeSecurityGroupIngressResponse object.
To authorize ingress for additional IP address ranges, ports, or protocols, initialize a new
IpPermissionSpecification instance and add it to the IpPermissions collection before calling
AuthorizeSecurityGroupIngress.
You can also use this procedure to add IP address ranges, ports, and protocols to existing security group.
Each AuthorizeSecurityGroupIngress call adds a rule to the security group up to a maximum of
100 rules. For more information about security groups, see Security Group Concepts.
Important
If you attempt to authorize ingress for an IP address range that has already been authorized,
AuthorizeSecurityGroupIngress throws an exception. The following example shows how
to enumerate a security group's authorized IP address ranges to check for existing ranges, where
secGroup is the group's SecurityGroup object. For a description of how to obtain this object,
see Specify an Amazon EC2 Security Group (p. 44).
foreach (IpPermission ipPerm in secGroup.IpPermissions)
{
foreach (String ipAddress in ipPerm.IpRanges)
{
if (ipAddress == "Address Range")
{
//...
}
}
}
Specify an Amazon EC2 Key Pair
Public Amazon EC2 instances do not have a default password. Instead, you log into the instance by using
a public/private key pair. Amazon EC2 key pairs are distinct from your AWS account's public and private
keys. For more information, see Getting an SSH Key Pair.
Each of your account's Amazon EC2 key pairs is identified by a name. If you want to use an existing key
pair, you can launch your Amazon EC2 instances by using that name, as described later.
Important
Key pair names must be unique. If you attempt to create a key pair with the same name as an
existing key pair, CreateKeyPair returns an exception. You can enumerate your account's
existing key pairs to check for an existing key name as follows:
Version v2.0.0
47
AWS SDK for .NET Developer Guide
Launch Amazon EC2 Instances
DescribeKeyPairsRequest keyPairDescriptionRequest =
new DescribeKeyPairsRequest();
DescribeKeyPairsResponse keyPairDescriptionResponse =
ec2Client.DescribeKeyPairs(keyPairDescriptionRequest);
List<KeyPairInfo> keyPairs = keyPairDescriptionResponse.KeyPairs;
foreach (KeyPairInfo item in keyPairs)
{
if (item.KeyName == keyName)
{
keyPair = item;
break;
}
}
You can generate a new key pair, as follows:
To create a key pair and obtain the private key
1.
Create and initialize a CreateKeyPairRequest object.
var newKeyRequest = new CreateKeyPairRequest();
newKeyRequest.KeyName = "Key Name";
2.
Set the KeyName property to the key pair name.
Pass the request object to the Amazon EC2 client object's CreateKeyPair method, which returns a
CreateKeyPairResponse object.
CreateKeyPairResponse newKeyResponse =
ec2Client.CreateKeyPair(newKeyRequest);
privateKey = newKeyResponse.KeyPair.KeyMaterial;
The response object includes a CreateKeyPairResult property that contains the new key's KeyPair
object. The KeyPair object'sKeyMaterial property contains the unencrypted PEM-encoded private
key. You should store this value for later use, because this is the only time that you can retrieve the
private key from KeyMaterial. You can obtain an existing key pair's KeyPair object, as described
earlier in this section, but KeyMaterial will be empty.
Launch Amazon EC2 Instances
You can now launch a set of one or more identically configured Amazon EC2 instances, as follows:
To launch EC2 instances
1.
Create and initialize a RunInstancesRequest object.
Version v2.0.0
48
AWS SDK for .NET Developer Guide
Launch Amazon EC2 Instances
var runInstancesRequest = new RunInstancesRequest()
{
ImageId = "ami-62c44d52",
InstanceType = "m1.small",
MinCount = 1,
MaxCount = 1,
KeyName = keyName
};
runInstancesRequest.SecurityGroups.Add(secGroupName);
To configure the request object:
• Specify which Amazon Machine Image (AMI) your instances will use by setting the ImageId property
to an appropriate public or privately-provided image ID. For a list of public AMIs provided by
Amazon, go to Amazon Machine Images.
• Specify the instance type by assigning it to the InstanceType property. It must be compatible with
the specified AMI. For more information about instance types, see Instance Families and Types.
• Set MinCount to the minimum number of EC2 instances to be launched. If MinCount is larger
than your authorized maximum, AWS does not launch any instances. The default maximum is 20.
• Set MaxCount to the number of EC2 instances that you want to launch, which cannot be larger
than your authorized maximum. If MaxCount exceeds the number of available instances, AWS
launches as many as possible.
• Set KeyName to the EC2 key name.
• Add one or more security group names to the list of authorized security groups.
Important
Make sure that the specified AMI, key name, and security group names exist in the region
that you specified when you created the client object.
To launch the Amazon EC2 instance with an IAM role
To launch the Amazon EC2 instance with an IAM role, you need to specify an IAM instance profile
in the RunInstancesRequest. The following snippet shows how to instantiate and configure an
IamInstanceProfileSpecification object for an IAM role named winapp-instance-role-1. This
example assumes that you have already created this role using the AWS Management Console or
some other means.
IamInstanceProfile instanceProfile = new IamInstanceProfile();
instanceProfile.Id = "winapp-instance-role-1";
instanceProfile.Arn = "arn:aws:iam::4444-5555-6666:instance-profile/winappinstance-role-1";
To specify this instance profile in the RunInstancesRequest object, add the following line.
InstanceProfile = instanceProfile
Note
To launch an instance with an IAM role, the profile that you used to create the client object
must grant permissions to use the IAM service in addition to Amazon EC2 permissions. For
more information, see Tutorial: Creating Amazon EC2 Instances (p. 43).
2.
Launch the instances by passing the request object to the RunInstances method, as follows:
Version v2.0.0
49
AWS SDK for .NET Developer Guide
Launch Amazon EC2 Instances
RunInstancesResponse runResponse = ec2Client.RunInstances(runInstances
Request);
3.
You can use the returned RunInstancesResponse object to get a list of instance IDs for the new
instances.
List<Instance> instances = runResponse.Reservation.Instances;
List<String> instanceIDs = new List<string>();
foreach (Instance item in instances)
{
instanceIDs.Add(item.InstanceId);
}
You need the instance IDs, in particular, to check status and terminate instances. This enumeration
also allows you to determine how many instances were actually launched. The response object's
runResponse.RunInstancesResult.Reservation.Instances property contains a list of Instance objects,
one for each EC2 instance that you successfully launched. You can retrieve the ID for each instance
from the Instance object's InstanceId property.
After you create your Amazon EC2 instances, you can check their status programmatically.
To check EC2 status
1.
Create and configure a DescribeInstancesRequest object.
var instancesRequest = new DescribeInstancesRequest();
instancesRequest.InstanceId = instanceIDs;
2.
To configure the object, assign a list of instance IDs to the InstanceId property. You can use the
object's Filter property to limit the request to certain instances, such as instances with a particular
user-specified tag.
Call the EC2 client's DescribeInstances method, and pass it the request object from Step 1.
DescribeInstancesResponse statusResponse = ec2Client.DescribeInstances(in
stancesRequest);
The method returns a DescribeInstancesResponse object with the descriptions.
3.
Enumerate the running instances and determine their status.
List<Instance> runningInstances = statusResponse.DescribeInstancesResult.Re
servation[0].Instance;
foreach (Instance instance in runningInstances)
{
Console.WriteLine("Instance Status: " + instance.InstanceState.Name);
}
Version v2.0.0
50
AWS SDK for .NET Developer Guide
Terminate Amazon EC2 Instances
The DescribeInstancesResponse object's DescribeInstancesResult.Reservations property
contains a list of reservations. In this case, there is only one. Each reservation contains a list of
Instance objects, each of which represents one of the reservation's EC2 instances. You can get the
instance's status from an Instance object's InstanceState.Name property, which can have one of
the following values: "pending", "running", "shutting-down", "terminated", "stopping", "stopped".
After an instance is running, you can remotely connect to it by using an SSH/RDP client on your computer.
Before connecting to your Amazon EC2 instance, you must ensure that the instance’s SSH/RDP port is
open to traffic. To connect, you will need the Amazon EC2 instance ID and the private key from instance's
key pair. For information about how to obtain the private key, see Create a Key Pair (p. 47). For more
information about how to connect to an EC2 instance, see Connecting to Instances.
Next: Terminate Amazon EC2 Instances (p. 51)
Terminate Amazon EC2 Instances
When you no longer need one or more of your Amazon EC2 instances, you can terminate them, as
follows:
To terminate EC2 instances
1.
Create and initialize a TerminateInstancesRequest object.
var termRequest = new TerminateInstancesRequest();
termRequest.InstanceId = instanceIDs;
2.
Set the object's InstanceIds property to a list of the instance IDs that you want to terminate.
Pass the request object to the Amazon EC2 client object's TerminateInstances method.
TerminateInstancesResponse termResponse = ec2Client.TerminateInstances(ter
mRequest);
You can use the response object to list the terminated instances, as follows:
List<InstanceStateChange> terminatedInstances = termResponse.TerminateInstances
Result.TerminatingInstance;
foreach(InstanceStateChange item in terminatedInstances)
{
Console.WriteLine("Terminated Instance: " + item.InstanceId);
}
Next: Additional Amazon EC2 Resources (p. 51)
Additional Amazon EC2 Resources
The following table lists related resources that you'll find useful when using Amazon EC2 with the AWS
SDK for .NET.
Version v2.0.0
51
AWS SDK for .NET Developer Guide
Tutorial: Amazon EC2 Spot Instances
Resource
Description
Windows & .NET Developer Center
Sample code, documentation, tools, and additional resources
to help you build applications on Amazon Web Services.
Amazon EC2 Documentation
Amazon EC2 service documentation.
Tutorial: Amazon EC2 Spot Instances
Overview
Spot Instances allow you to bid on unused Amazon Elastic Compute Cloud (Amazon EC2) capacity and
run the acquired instances for as long as your bid exceeds the current Spot Price. Amazon EC2 changes
the Spot Price periodically based on supply and demand, and customers whose bids meet or exceed it
gain access to the available Spot Instances. Like On-Demand Instances and Reserved Instances, Spot
Instances provide another option for obtaining more compute capacity.
Spot Instances can significantly lower your Amazon EC2 costs for applications such as batch processing,
scientific research, image processing, video encoding, data and web crawling, financial analysis, and
testing. Additionally, Spot Instances are an excellent option when you need large amounts of computing
capacity but the need for that capacity is not urgent.
To use Spot Instances, place a Spot Instance request specifying the maximum price you are willing to
pay per instance hour; this is your bid. If your bid exceeds the current Spot Price, your request is fulfilled
and your instances will run until either you choose to terminate them or the Spot Price increases above
your bid (whichever is sooner).You can terminate a Spot Instance programmatically as shown this tutorial
or by using the AWS Management Console or by using the AWS Toolkit for Visual Studio.
It's important to note two points:
1. You will often pay less per hour than your bid. Amazon EC2 adjusts the Spot Price periodically as
requests come in and available supply changes. Everyone pays the same Spot Price for that period
regardless of whether their bid was higher. Therefore, you might pay less than your bid, but you will
never pay more than your bid.
2. If you're running Spot Instances and your bid no longer meets or exceeds the current Spot Price, your
instances will be terminated. This means that you will want to make sure that your workloads and
applications are flexible enough to take advantage of this opportunistic—but potentially
transient—capacity.
Spot Instances perform exactly like other Amazon EC2 instances while running, and like other Amazon
EC2 instances, Spot Instances can be terminated when you no longer need them. If you terminate your
instance, you pay for any partial hour used (as you would for On-Demand or Reserved Instances).
However, if your instance is terminated by Amazon EC2 because the Spot Price goes above your bid,
you will not be charged for any partial hour of usage.
This tutorial provides an overview of how to use the .NET programming environment to do the following.
• Submit a Spot Request
• Determine when the Spot Request becomes fulfilled
• Cancel the Spot Request
• Terminate associated instances
Version v2.0.0
52
AWS SDK for .NET Developer Guide
Prerequisites
Prerequisites
This tutorial assumes that you have signed up for AWS, set up your .NET development environment, and
installed the AWS SDK for .NET. If you use the Microsoft Visual Studio development environment, we
recommend that you also install the AWS Toolkit for Visual Studio. For instructions on setting up your
environment, see Getting Started (p. 3).
Step 1: Setting Up Your Credentials
To begin using this code sample, you need to populate the App.config file with your AWS credentials,
which identify you to Amazon Web Services. You specify your credentials in the files appSettings
element. The preferred way to handle credentials is to create a profile in the SDK Store, which encrypts
your credentials and stores them separately from any project. You can then specify the profile by name
in the App.config file, and the credentials are automatically incorporated into the application. For more
information, see Configuring Your AWS SDK for .NET Application (p. 8).
The following appSettings example specifies a profile named development.
<appSettings>
<add key="ClientSettingsProvider.ServiceUri" value="" />
<add key="AWSProfileName" value="development"/>
</appSettings>
To learn more about setting up security credentials, see the Amazon Elastic Compute Cloud User Guide.
Now that you have configured your settings, you can get started using the code in the example.
Step 2: Setting Up a Security Group
A security group acts as a firewall that controls the traffic allowed in and out of a group of instances. By
default, an instance is started without any security group, which means that all incoming IP traffic, on any
TCP port will be denied. So, before submitting your Spot Request, you will set up a security group that
allows the necessary network traffic. For the purposes of this tutorial, we will create a new security group
called "GettingStarted" that allows connection using the Windows Remote Desktop Protocol (RDP) from
the IP address of the local computer, that is, the computer where you are running the application.
To set up a new security group, you need to include or run the following code sample that sets up the
security group programmatically. You only need to run this code once to create the new security group.
However, the code is designed so that it is safe to run even if the security group already exists. In this
case, the code catches and ignores the "InvalidGroup.Duplicate" exception.
In the code below, we first use AWSClientFactoryClass to create an AmazonEC2 client object. We
then create a CreateSecurityGroupRequest object with the name, "GettingStarted" and a description
for the security group. Finally, we call the ec2.createSecurityGroup API to create the group.
1 AmazonEC2 ec2 = AWSClientFactory.CreateAmazonEC2Client();
try
{
5
CreateSecurityGroupRequest securityGroupRequest = new CreateSecurity
GroupRequest();
securityGroupRequest.GroupName = "GettingStartedGroup";
securityGroupRequest.GroupDescription = "Getting Started Security Group";
ec2.CreateSecurityGroup(securityGroupRequest);
Version v2.0.0
53
AWS SDK for .NET Developer Guide
Step 2: Setting Up a Security Group
10 }
catch (AmazonEC2Exception ae)
{
if (string.Equals(ae.ErrorCode, "InvalidGroup.Duplicate", StringCompar
ison.InvariantCulture))
{
15
Console.WriteLine(ae.Message);
}
else
{
throw;
20
}
}
To enable access to the group, we create an ipPermission object with the IP address set to the CIDR
representation of the IP address of the local computer. The "/32" suffix on the IP address indicates that
the security group should accept traffic only from the local computer. We also configure the ipPermission
object with the TCP protocol and port 3389 (RDP). You will need to fill in the IP address of the local
computer. If your connection to the Internet is mediated by a firewall or some other type of proxy, you will
need to determine the external IP address that the proxy uses. One technique is to query a search engine
such as Google or Bing with the string: "what is my IP address".
1
// TODO - Change the code below to use your external IP address.
String ipSource = "XXX.XXX.XXX.XX/32";
5 List<String> ipRanges = new List<String>();
ipRanges.Add(ipSource);
List<IpPermissionSpecification> ipPermissions = new List<IpPermissionSpe
cification>();
IpPermissionSpecification ipPermission = new IpPermissionSpecification();
10 ipPermission.IpProtocol = "tcp";
ipPermission.FromPort = 3389;
ipPermission.ToPort = 3389;
ipPermission.IpRanges = ipRanges;
ipPermissions.Add(ipPermission);
The final step is to call ec2.authorizeSecurityGroupIngress with the name of our security group
and the ipPermission object.
1 try {
// Authorize the ports to be used.
AuthorizeSecurityGroupIngressRequest ingressRequest = new AuthorizeSe
curityGroupIngressRequest();
ingressRequest.IpPermissions = ipPermissions;
5
ingressRequest.GroupName = "GettingStartedGroup";
ec2.AuthorizeSecurityGroupIngress(ingressRequest);
} catch (AmazonEC2Exception ae) {
if (String.Equals(ae.ErrorCode, "InvalidPermission.Duplicate", String
Comparison.InvariantCulture))
{
10
Console.WriteLine(ae.Message);
}
else
{
Version v2.0.0
54
AWS SDK for .NET Developer Guide
Step 3: Submitting Your Spot Request
throw;
15
}
}
You can also create the security group using the AWS Toolkit for Visual Studio. Go to the toolkit
documentation for more information.
Step 3: Submitting Your Spot Request
To submit a Spot Request, you first need to determine the instance type, the Amazon Machine Image
(AMI), and the maximum bid price you want to use.You must also include the security group we configured
previously, so that you can log into the instance if you want to.
There are several instance types to choose from; go to Amazon EC2 Instance Types for a complete list.
For this tutorial, we will use t1.micro, the least expensive instance type available. Next, we will determine
the type of AMI we would like to use. We'll use ami-fbf93092, the most up-to-date Windows AMI available
when we wrote this tutorial. The latest AMI may change over time, but you can always determine the
latest version AMI by doing the following:
1.
Log into the AWS Management Console, open the Amazon EC2 console, and from the Amazon
EC2 Console Dashboard, attempt to launch an instance.
2.
In the window that displays AMIs, just use the AMI ID as shown in the following image. Alternatively,
you can use the DescribeImages API, but leveraging that command is outside the scope of this
tutorial.
Version v2.0.0
55
AWS SDK for .NET Developer Guide
Step 3: Submitting Your Spot Request
There are many ways to approach bidding for Spot instances. To get a broad overview of the various
approaches, you should view the Bidding for Spot Instances video. However, to get started, we'll describe
three common strategies: bid to ensure cost is less than on-demand pricing; bid based on the value of
the resulting computation; bid so as to acquire computing capacity as quickly as possible.
• Reduce Cost Below On-Demand You have a batch processing job that will take a number of hours
or days to run. However, you are flexible with respect to when it starts and when it completes. You
want to see if you can complete it for less cost than with On-Demand Instances. You examine the Spot
Price history for instance types using either the AWS Management Console or the Amazon EC2 API.
For more information, go to Viewing Spot Price History. After you've analyzed the price history for your
desired instance type in a given Availability Zone, you have two alternative approaches for your bid:
• You could bid at the upper end of the range of Spot Prices (which are still below the On-Demand
price), anticipating that your one-time Spot Rrequest would most likely be fulfilled and run for enough
consecutive compute time to complete the job.
• Or, you could bid at the lower end of the price range, and plan to combine many instances launched
over time through a persistent request. The instances would run long enough, in aggregate, to
complete the job at an even lower total cost. (We will explain how to automate this task later in this
tutorial.)
• Pay No More than the Value of the Result You have a data processing job to run. You understand
the value of the job's results well enough to know how much they are worth in terms of computing costs.
After you've analyzed the Spot Price history for your instance type, you choose a bid price at which the
cost of the computing time is no more than the value of the job's results. You create a persistent bid
and allow it to run intermittently as the Spot Price fluctuates at or below your bid.
• Acquire Computing Capacity Quickly You have an unanticipated, short-term need for additional
capacity that is not available through On-Demand Instances. After you've analyzed the Spot Price
history for your instance type, you bid above the highest historical price to provide a high likelihood that
your request will be fulfilled quickly and continue computing until it completes.
After you choose your bid price, you are ready to request a Spot Instance. For the purposes of this tutorial,
we will set our bid price equal to the On-Demand price ($0.03) to maximize the chances that the bid will
Version v2.0.0
56
AWS SDK for .NET Developer Guide
Step 4: Determining the State of Your Spot Request
be fulfilled. You can determine the types of available instances and the On-Demand prices for instances
by going to Amazon EC2 Pricing page.
To request a Spot Instance, you simply need to build your request with the parameters we have specified
so far. We start by creating a RequestSpotInstanceRequest object. The request object requires the
number of instances you want to start (2) and the bid price ($0.03). Additionally, you need to set the
LaunchSpecification for the request, which includes the instance type, AMI ID, and security group
you want to use. Once the request is populated, you call the requestSpotInstances method on the
AmazonEC2Client object. An example of how to request a Spot Instance is shown below.
1 RequestSpotInstancesRequest requestRequest = new RequestSpotInstances
Request();
requestRequest.SpotPrice = "0.03";
requestRequest.InstanceCount = 2;
5
LaunchSpecification launchSpecification = new LaunchSpecification();
launchSpecification.ImageId = "ami-fbf93092";
// latest Windows AMI as
of this writing
launchSpecification.InstanceType = "t1.micro";
10
launchSpecification.SecurityGroup.Add("GettingStartedGroup");
requestRequest.LaunchSpecification = launchSpecification;
RequestSpotInstancesResponse requestResult = ec2.RequestSpotInstances(re
questRequest);
There are other options you can use to configure your Spot Requests. To learn more, see
RequestSpotInstances in the AWS SDK for .NET.
Running this code will launch a new Spot Instance Request.
Note
You will be charged for any Spot Instances that are actually launched, so make sure that you
cancel any requests and terminate any instances you launch to reduce any associated fees.
Step 4: Determining the State of Your Spot Request
Next, we want to create code to wait until the Spot Request reaches the "active" state before proceeding
to the last step. To determine the state of our Spot Request, we poll the describeSpotInstanceRequests
method for the state of the Spot Request ID we want to monitor.
The request ID created in Step 2 is embedded in the result of our requestSpotInstances request.
The following example code gathers request IDs from the requestSpotInstances result and uses
them to populate the SpotInstanceRequestId member of a describeRequest object. We will use
this object in the next part of the sample.
1 // Call the RequestSpotInstance API.
RequestSpotInstancesResponse requestResult = ec2.RequestSpotInstances(re
questRequest);
// Create the describeRequest object with all of the request ids
5 // to monitor (e.g. that we started).
DescribeSpotInstanceRequestsRequest describeRequest = new DescribeSpotIn
stanceRequestsRequest();
foreach (SpotInstanceRequest spotInstanceRequest in requestResult.Request
Version v2.0.0
57
AWS SDK for .NET Developer Guide
Step 4: Determining the State of Your Spot Request
SpotInstancesResult.SpotInstanceRequest)
{
describeRequest.SpotInstanceRequestId.Add(spotInstanceRequest.SpotIn
stanceRequestId);
10 }
1
// Create a variable that will track whether there are any
// requests still in the open state.
bool anyOpen;
5
// Create a list to store any instances that were activated.
List<String> instanceIds = new List<String>();
do
{
10
// Initialize the anyOpen variable to false, which assumes there
// are no requests open unless we find one that is still open.
anyOpen = false;
instanceIds.Clear();
15
try
{
// Retrieve all of the requests we want to monitor.
DescribeSpotInstanceRequestsResponse describeResponse = ec2.De
scribeSpotInstanceRequests(describeRequest);
20
// Look through each request and determine if they are all in
// the active state.
foreach (SpotInstanceRequest spotInstanceRequest in de
scribeResponse.DescribeSpotInstanceRequestsResult.SpotInstanceRequest)
{
// If the state is open, it hasn't changed since we attempted
25
// to request it. There is the potential for it to transition
// almost immediately to closed or canceled, so we compare
// against open instead of active.
if (spotInstanceRequest.State.Equals("open", StringComparis
on.InvariantCulture))
{
30
anyOpen = true;
break;
}
else if (spotInstanceRequest.State.Equals("active", StringCom
parison.InvariantCulture))
{
35
// Add the instance id to the list we will
// eventually terminate.
instanceIds.Add(spotInstanceRequest.InstanceId);
}
}
40
}
catch (AmazonEC2Exception e)
{
// If we have an exception, ensure we don't break out of
// the loop. This prevents the scenario where there was
45
// blip on the wire.
anyOpen = true;
Version v2.0.0
58
AWS SDK for .NET Developer Guide
Step 5: Cleaning up Your Spot Requests and Instances
Console.WriteLine(e.Message);
}
50
if (anyOpen)
{
// Wait for the requests to go active.
Console.WriteLine("Requests still in open state, will retry in 60
seconds.");
55
Thread.Sleep((int)TimeSpan.FromMinutes(1).TotalMilliseconds);
}
} while (anyOpen);
If you just ran the code up to this point, your Spot Instance Request would complete—or possibly fail with
an error. For the purposes of this tutorial, we'll add some code that cleans up the requests after all of
them have transitioned out of the open state.
Step 5: Cleaning up Your Spot Requests and
Instances
The final step is to clean up our requests and instances. It is important to both cancel any outstanding
requests and terminate any instances. Just canceling your requests will not terminate your instances,
which means that you will continue to pay for them. If you terminate your instances, your Spot Requests
may be canceled, but there are some scenarios—such as if you use persistent bids—where terminating
your instances is not sufficient to stop your request from being re-fulfilled. Therefore, it is a best practice
to both cancel any active bids and terminate any running instances.
The following code demonstrates how to cancel your requests.
1 try
{
// Cancel requests.
CancelSpotInstanceRequestsRequest cancelRequest = new CancelSpotInstan
ceRequestsRequest();
5
foreach (SpotInstanceRequest spotInstanceRequest in requestResult.Re
questSpotInstancesResult.SpotInstanceRequest)
{
cancelRequest.SpotInstanceRequestId.Add(spotInstanceRequest.SpotIn
stanceRequestId);
}
10
ec2.CancelSpotInstanceRequests(cancelRequest);
}
catch (AmazonEC2Exception e)
{
15
// Write out any exceptions that may have occurred.
Console.WriteLine("Error cancelling instances");
Console.WriteLine("Caught Exception: " + e.Message);
Console.WriteLine("Reponse Status Code: " + e.StatusCode);
Console.WriteLine("Error Code: " + e.ErrorCode);
20
Console.WriteLine("Request ID: " + e.RequestId);
}
}
Version v2.0.0
59
AWS SDK for .NET Developer Guide
Conclusion
To terminate any outstanding instances, we use the instanceIds array, which we populated with the
instance IDs of those instances that transitioned to the active state. We terminate these instances by
assigning this array to the InstanceId member of a TerminateInstancesRequest object, then
passing that object to the ec2.TerminateInstances API.
1
if (instanceIds.Count > 0)
{
try
5
{
TerminateInstancesRequest terminateRequest = new TerminateInstances
Request();
terminateRequest.InstanceId = instanceIds;
ec2.TerminateInstances(terminateRequest);
}
catch (AmazonEC2Exception e)
{
Console.WriteLine("Error terminating instances");
Console.WriteLine("Caught Exception: " + e.Message);
Console.WriteLine("Reponse Status Code: " + e.StatusCode);
Console.WriteLine("Error Code: " + e.ErrorCode);
Console.WriteLine("Request ID: " + e.RequestId);
}
10
15
}
20
Conclusion
Congratulations! You have just completed the getting started tutorial for developing Spot Instance software
with the AWS SDK for .NET.
Creating and Using an Amazon SQS Queue with
the AWS SDK for .NET
This topic demonstrates how to use the AWS SDK for .NET to create and use an Amazon Simple Queue
Service (Amazon SQS) queue.
The sample code in this topic is written in C#, but you can use the AWS SDK for .NET with any language
that is compatible with the Microsoft .NET Framework.
Topics
• Create an Amazon SQS Client (p. 61)
• Create an Amazon SQS Queue (p. 61)
• Amazon SQS Queue URLs (p. 62)
• Send an Amazon SQS Message (p. 62)
• Receive a Message from an Amazon SQS Queue (p. 63)
• Delete a Message from an Amazon SQS Queue (p. 64)
• Related Resources (p. 65)
Version v2.0.0
60
AWS SDK for .NET Developer Guide
Create an Amazon SQS Client
Create an Amazon SQS Client
You will need an Amazon SQS client in order to create and use an Amazon SQS queue. Before configuring
your client, you should create an App.Config file to specify your AWS credentials.
You specify your credentials by referencing the appropriate profile in the appSettings section of the file.
The following example specifys a profile named my_profile. For more information on credentials and
profiles, see Configuring Your AWS SDK for .NET Application (p. 8).
<?xml version="1.0"?>
<configuration>
<appSettings>
<add key="AWSProfileName" value="my_profile"/>
</appSettings>
<startup>
<supportedRuntime version="v4.0" sku=".NETFramework,Version=v4.0"/>
</startup>
</configuration>
After you create this file, you are ready to create and initialize your Amazon SQS client.
To create and initialize an Amazon SQS client
1.
Create and initialize an AmazonSQSConfig instance, and set the ServiceURL property with the
protocol and service endpoint, as follows:
AmazonSQSConfig amazonSQSConfig =
new AmazonSQSConfig();
amazonSQSConfig.ServiceURL =
"http://sqs.us-west-2.amazonaws.com";
The AWS SDK for .NET uses US East (Northern Virginia) Region as the default region if you do not
specify a region in your code. However, the AWS Management Console uses US West (Oregon)
Region as its default. Therefore, when using the AWS Management Console in conjunction with your
development, be sure to specify the same region in both your code and the console.
2.
Go to Regions and Endpoints for the current list of regions and corresponding endpoints for each of
the services offered by AWS.
Use the AmazonSQSConfig instance to create and initialize an AmazonSQSClient instance, as
follows:
amazonSQSClient =
new AmazonSQSClient(amazonSQSConfig);
You can now use the client to create an Amazon SQS queue. For information about creating a queue,
see Create an Amazon SQS Queue (p. 61).
Create an Amazon SQS Queue
You can use the AWS SDK for .NET to programmatically create an Amazon SQS queue. Creating an
Amazon SQS Queue is an administrative task. You can create a queue by using the AWS Management
Console instead of creating a queue programmatically.
Version v2.0.0
61
AWS SDK for .NET Developer Guide
Amazon SQS Queue URLs
To create an Amazon SQS queue
1.
Create and initialize a CreateQueueRequest instance. Provide the name of your queue and specify
a visibility timeout for your queue messages, as follows:
CreateQueueRequest createQueueRequest =
new CreateQueueRequest();
createQueueRequest.QueueName = "MySQSQueue";
createQueueRequest.DefaultVisibilityTimeout = 10;
Your queue name must only be composed of alphanumeric characters, hyphens, and underscores.
Any message in the queue remains in the queue unless the specified visibility timeout is exceeded.
The default visibility timeout for a queue is 30 seconds. For more information about visibility timeouts,
go to Visibility Timeout. For more information about different queue attributes you can set, go to
SetQueueAttributes.
2.
After you create the request, pass it as a parameter to the CreateQueue method.The method returns
a CreateQueueResponse object, as follows:
CreateQueueResponse createQueueResponse =
amazonSQSClient.CreateQueue(createQueueRequest);
For information about how queues work in Amazon SQS, go to How SQS Queues Work.
For information about your queue URL, see Amazon SQS Queue URLs (p. 62).
Amazon SQS Queue URLs
You require the queue URL to send, receive, and delete queue messages. A queue URL is constructed
in the following format:
https://queue.amazonaws.com/YOUR_ACCOUNT_NUMBER/YOUR_QUEUE_NAME
To find your AWS account number, go to Security Credentials . Your account number is located under
Account Number in the upper right of the page.
For information on sending a message to a queue, see Send an Amazon SQS Message (p. 62).
For information about receiving messages from a queue, see Receive a Message from an Amazon SQS
Queue (p. 63).
For information about deleting messages from a queue, see Delete a Message from an Amazon SQS
Queue (p. 64).
Send an Amazon SQS Message
You can use the Amazon SDK for .NET to send a message to an Amazon SQS queue.
Version v2.0.0
62
AWS SDK for .NET Developer Guide
Receive a Message from an Amazon SQS Queue
Important
Due to the distributed nature of the queue, Amazon SQS cannot guarantee you will receive
messages in the exact order they are sent. If you require that message order be preserved,
place sequencing information in each message so you can reorder the messages upon receipt.
To send a message to an Amazon SQS queue
1.
Create and initialize a SendMessageRequest instance. Specify the queue name and the message
you want to send, as follows:
sendMessageRequest.QueueUrl = myQueueURL;
sendMessageRequest.MessageBody = "YOUR_QUEUE_MESSAGE";
For more information about your queue URL, see Amazon SQS Queue URLs (p. 62).
2.
Each queue message must be composed of only Unicode characters, and can be up to 64 kB in
size. For more information about queue messages, go to SendMessage in the Amazon SQS service
API reference.
After you create the request, pass it as a parameter to the SendMessage method. The method returns
a SendMessageResponse object, as follows:
SendMessageResponse sendMessageResponse =
amazonSQSClient.SendMessage(sendMessageRequest);
The sent message will stay in your queue until the visibility timeout is exceeded, or until it is deleted
from the queue. For more information about visibility timeouts, go to Visibility Timeout.
For information on deleting messages from your queue, see Delete a Message from an Amazon SQS
Queue (p. 64).
For information on receiving messages from your queue, see Receive a Message from an Amazon SQS
Queue (p. 63).
Receive a Message from an Amazon SQS Queue
You can use the Amazon SDK for .NET to receive messages from an Amazon SQS queue.
To receive a message from an Amazon SQS queue
1.
Create and initialize a ReceiveMessageRequest instance. Specify the queue URL to receive a
message from, as follows:
ReceiveMessageRequest recieveMessageRequest =
new ReceiveMessageRequest();
recieveMessageRequest.QueueUrl = myQueueURL;
2.
For more information about your queue URL, see Amazon SQS Queue URLs (p. 62).
Pass the request object as a parameter to the ReceiveMessage method, as follows:
Version v2.0.0
63
AWS SDK for .NET Developer Guide
Delete a Message from an Amazon SQS Queue
ReceiveMessageResponse receiveMessageResponse =
amazonSQSClient.ReceiveMessage(receiveMessageRequest);
The method returns a ReceiveMessageResponse instance, containing the list of messages the
queue contains.
3.
The response object contains a ReceiveMessageResult member. This member includes a Messages
list. Iterate through this list to find a specific message, and use the Body property to determine if the
list contains a specified message, as follows:
if (result.Message.Count != 0)
{
for (int i = 0; i < result.Message.Count; i++)
{
if (result.Message[i].Body == messageBody)
{
recieptHandle =
result.Message[i].ReceiptHandle;
}
}
}
Once the message is found in the list, use the ReceiptHandle property to obtain a receipt handle for
the message. You can use this receipt handle to change message visibility timeout or to delete the
message from the queue. For more information about how to change the visibility timeout for a
message, go to ChangeMessageVisibility.
For information about sending a message to your queue, see Send an Amazon SQS Message (p. 62).
For more information about deleting a message from the queue, see Delete a Message from an Amazon
SQS Queue (p. 64).
Delete a Message from an Amazon SQS Queue
You can use the Amazon SDK for .NET to receive messages from an Amazon SQS queue.
To delete a message from an Amazon SQS queue
1.
Create and initialize a DeleteMessageRequest instance. Specify the Amazon SQS queue to delete
a message from and the receipt handle of the message to delete, as follows:
DeleteMessageRequest deleteMessageRequest =
new DeleteMessageRequest();
deleteMessageRequest.QueueUrl = queueUrl;
deleteMessageRequest.ReceiptHandle = recieptHandle;
2.
Pass the request object as a parameter to the DeleteMessage method. The method returns a
DeleteMessageResponse object, as follows:
Version v2.0.0
64
AWS SDK for .NET Developer Guide
Related Resources
DeleteMessageResponse response =
amazonSQSClient.DeleteMessage(deleteMessageRequest);
Calling DeleteMessage unconditionally removes the message from the queue, regardless of the
visibility timeout setting. For more information about visibility timeouts, go to Visibility Timeout.
For information about sending a message to a queue, see Send an Amazon SQS Message (p. 62).
For information about receiving messages from a queue, see Receive a Message from an Amazon SQS
Queue (p. 63).
Related Resources
The following table lists related resources that you'll find useful when using Amazon SQS with the AWS
SDK for .NET.
Resource
Description
Windows & .NET Developer Center
Provides sample code, documentation, tools, and additional
resources to help you build applications on Amazon Web
Services.
AWS SDK for .NET Documentation
Provides documentation for the AWS SDK for .NET.
Amazon Simple Queue Service (SQS)
Documentation
Provides documentation for the Amazon SQS service.
Version v2.0.0
65
AWS SDK for .NET Developer Guide
Additional Resources
Home Page for AWS SDK for .NET
For more information about the AWS SDK for .NET, go to the home page for the SDK at
http://amazonaws.cn/sdkfornet.
SDK Reference Documentation
The SDK reference documentation includes the ability to browse and search across all code included
with the SDK. It provides thorough documentation, usage examples, and even the ability to browse method
source. For more information, see the AWS SDK for .NET API Reference.
AWS Forums
Visit the AWS forums to ask questions or provide feedback about AWS. Each documentation page has
a Go to the forums button at the top of the page that takes you to the associated forum. AWS engineers
monitor the forums and respond to questions, feedback, and issues.You can also subscribe to RSS feeds
for any of the forums.
AWS Toolkit for Visual Studio
If you use the Microsoft Visual Studio IDE, you should check out the AWS Toolkit for Visual Studio and
the accompanying User Guide.
Version v2.0.0
66
AWS SDK for .NET Developer Guide
Document History
The following table describes the important changes since the last release of the AWS SDK for .NET
Developer Guide.
Last documentation update: November 8, 2013
Change
Description
Release Date
Support for .NET
SDK version 2
This guide has been modified to support the latest version November 8, 2013
of the AWS SDK for .NET.
New topic
This topic tracks recent changes to the AWS SDK for .NET September 9, 2013
Developer Guide. It is intended as a companion to the
release notes.
Version v2.0.0
67