1
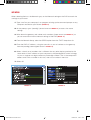
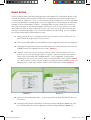
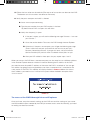
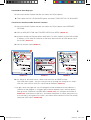
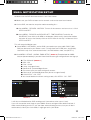
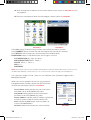
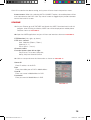
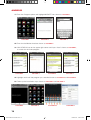
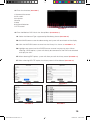
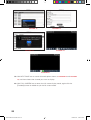
Remote Monitoring Setup Guide
DVR MODELS QR, QSDR & QSD9004
PC WITH WINDOWS
OPERATING SYSTEM
iPHONE
ANDROID
BLACKBERRY*
* Select Models
SETUP GUIDE FOR REMOTE INTERNET AND SMARTPHONE
MONITORING, MYQ-SEE DDNS, AND EMAIL NOTIFICATION
RemoteMonitorGuide.indd 1
1
10/20/2010 4:43:36 PM
Thank you
for purchasing this Q-See product.
Every effort has been made to make this DVR simple to assemble
and use. However, if you should run into any difficulties during its
installation or operation, we are here for you.
ADDRESS
CUSTOMER SERVICE
Q-See Products
Digital Peripheral Solutions, Inc.
8015 E. Crystal Drive
Anaheim, CA 92807
Phone: 877-998-3440 x 538 (M-F, 8-5 PST)
Email: [email protected]
Live Chat at www.q-see.com (M-F, 8-5 PST)
FAX
Phone: 877-998-3440 x 539 (M-F, 8-5 PST)
Email: [email protected]
Live Chat at www.q-see.com (M-F, 8-5 PST)
714-998-3509
WEBSITE
http://www.Q-See.com
GENERAL TECH SUPPORT
REMOTE MONITORING SUPPORT
Phone: 877-998-3440 x 540
Make sure you register your product.
Visit www.q-see.com, click “support”, then “online registration form”.
Complete the product registration form to receive warranty/technical
support benefits, and to be notified of product updates and free
downloadable firmware updates to your DVR.
© 2010 Q-See. Reproduction in whole or in part without written permission is prohibited. All rights
reserved. This manual and software and hardware described herein, in whole or in part, may not be
reproduced, translated, or reduces to any machine-readable form without prior written approval.
Q-See cannot warrant that the functions described in this guide will be uninterrupted or error-free.
Q-See is a registered trademark of Digital Peripheral Solutions, Inc.
All other trademarks are trademarks or registered trademarks of their respective owners.
2
RemoteMonitorGuide.indd 2
10/20/2010 4:43:37 PM
TABLE OF CONTENTS
TABLE OF CONTENTS
NETWORK SETUP
4
DHCP
4
PPPoE
4
Static
5
DDNS Setup
6
Port Forwarding
7
To access the DVR from a remote computer
7
To access the DVR through Internet Explorer
8
EMAIL NOTIFICATION SET-UP
11
Yahoo smtp setting
12
Hotmail smtp setting
12
SMARTPHONE SETUP
13
Windows
13
iPhone
15
Android 16
Blackberry
17
Supported Blackberry Models
17
Setup and operation on the Blackberry phone viewer
18
Q-SEE PRODUCT WARRANTY
22
3
RemoteMonitorGuide.indd 3
10/20/2010 4:43:37 PM
NETWORK SETUP
The Network Setup menu options need to be configured in order to access the DVR remotely
over a network or the internet. From the Network Setup menu, select the Network Type
(DHCP, PPPoE, or Static), Port and Web Port (80 and 9000 by default).
To configure the Network settings of the DVR, from the Main Menu, select the Network icon
and the Network Setup menu opens (IMAGE 12).
Type can be set to DHCP, PPPoE or Static. To have the router assign the IP address, use
DHCP. To select the address, use static. To attach directly to a modem instead of using a
router, use PPPoE. For more information, please see the remote access guide.
DHCP
When selecting DHCP as the Network type, the router automatically generates a DVR IP
address once the Network Setup menu is exited. Write down this IP address. Then switch the
Network Type to “Static” and re-enter the IP address to avoid any discrepancies that might
occur in the event the router auto generates a different IP address in the future.
IMAGE 12
IMAGE 13
PPPOE
When selecting PPPoE as the Network type, input the username and password provided by
your internet service provider. You would use this option if you are attaching the DVR directly
to DSL or cable modem instead of a router.
4
RemoteMonitorGuide.indd 4
10/20/2010 4:43:37 PM
STATIC
When selecting Static as the Network type, set the Network setting on the DVR to match the
settings on your router.
1. Type “cmd” on your computer’s run program to bring up the command prompt on any
computer attached to your Router (IMAGE 14)
2. At the prompt, type: “ipconfig” (see red arrow on IMAGE 14) to access the router
settings
3. Write down the gateway and subnet mask numbers (Green arrows on IMAGE 14) so
you can enter them into the network settings of the DVR (IMAGE 15)
4. From the Network Setup, select the STATIC option from the “TYPE” drop-down list
5. Enter the DVR’s IP address, using the same first 3 sets of numbers as the gateway
from the ipconfig (second green arrow in IMAGE 14)
6. Select a fourth set of numbers that is different than any other device attached to the
same router. If the IP address of your computer in the ipconfig (BLUE arrow in Image
14) was a single or two digit number any three digit number is OK. If the computer IP
address ends with a number in the 100s, then use a number in the 200s.
7. Select OK
IP ADDRESS
NETMASK
GATEWAY
IMAGE 14
IMAGE 15
5
RemoteMonitorGuide.indd 5
10/20/2010 4:43:37 PM
DDNS SETUP
Dynamic Domain Name Service (DDNS) provides the capability for a networked device using
the Internet Protocol Suite to notify a DDNS host to change the active DNS configuration of
its hostnames or addresses. This is a useful feature that your Q-See DVR system is equipped
with and can be helpful in avoiding any issues that might occur due to frequent or unplanned
changes to your Public/WAN IP address. Enabling DDNS on your Q-See DVR system will
allow you to connect to your device through a DDNS host such as myq-see.com. In order
to facilitate this ability on your Q-See DVR system, you must first set up Port Forwarding as
directed in the following pages. Once you have enabled Port Forwarding, you can configure
your DDNS information by following these steps:
1. Using a computer that is connected to the same network as your Q-See DVR, use
your IE Browser to go to http://myq-see.com.
2. Click on the NEW USER Link at the bottom of your page (http://myq-see.com/reg.asp).
3. Complete the registration process by following the on-screen directions and click the
SUBMIT button at the bottom of your screen. IMAGE 16
4. The next screen will ask you to create a domain name. Domain names must start
with an (a-z) or (0-9) and cannot contain a hyphen. Once you choose your domain
name, click on the REQUEST DOMAIN button. This will generate a confirmation
screen which tells you if your Domain name is available and list an IP address (IMAGE
17). Verify that this is your current IP Address by going to www.myipaddress.com and
checking that it is the same address listed in your confirmation screen (IMAGE 17).
IMAGE 16
IMAGE 17
5. Once you have completed steps 1-4, go to the DVR and select NETWORK from the
main menu.
6. Clicking on NETWORK will generate a Network settings dialog box (IMAGE 12). Click
on the DDNS SETUP button to generate a DDNS setting dialog box (IMAGE 18).
6
RemoteMonitorGuide.indd 6
10/20/2010 4:43:38 PM
IMAGE 12 IMAGE 18
NOTICE: You need to put your public DNS. This can be found in your Router Status tab.
Usually there are 2 DNS entries (DNS1 & DNS2). Use DNS 1 only. If you router does
not list the DNS address get it from your Internet Service Provider.
7. Enter the User Name, Password and Domain Name that you registered for through
http://myq-see.com. Click the APPLY button at the bottom of the screen and then the
EXIT button. This should return you to the Network Setup menu.
8. Click the APPLY button and then the EXIT button at the bottom of the Network Setup
Screen and your DDNS setup is complete.
PORT FORWARDING
To access the DVR from a remote computer
You need to forward ports 80 and 9000 from the router the DVR is attached to, to the IP
address of the DVR.
First connect your DVR to the Router and power on DVR, then follow these steps to configure
your DVR and Set up port forwarding on your router
1. Go to www.portforward.com/qsee
2. Choose your DVR or Series (QT, QSDT, QR, QS etc) from the list provided
3. Select the make and model of your router from the list
4. Click on the ‘Click here to skip this advertisement…’ link in the upper right corner
of the screen.
Note: When you go to the www.portforward.com website you will see an ad for a software
program that will setup port forwarding for you. You do not need to buy this software.
Above the ad there is a link to skip the ad, if you click on the link it will take you to the
instructions which are free. You can purchase the software if you want to, but you do not
need to pay to get the port forwarding instructions.
7
RemoteMonitorGuide.indd 7
10/20/2010 4:43:38 PM
5. Follow the instruction on the website (The top set of instructions are done on the DVR.
The bottom set of instructions are done on the router)
6. Verify the ports are open and traffic is allowed
A. Go to www.canyouseeme.org
B. Type the port number that your DVR requires in the box.
By default these DVRs use ports 80 and 9000.
C. Verify that the port(s) is open.
i. If the port is open, you will see the following message:”Success. I can see
your service…”
ii. Go to the section below: To access the DVR through Internet Explorer
iii.Otherwise, if the ports are not open, you will get the following message:
“Error: I could not see your service on 64.206.234.34 on port (80) Reason: Connection refused”. If you get this error, call your Internet
Service Provider (ISP) and ask them to unblock those ports for you.
iv.After your ISP unblocks those ports for you, repeat steps i and ii.
When you access the DVR from a remote computer you also need to use a different address
in the Internet Explorer browser window. Instead of entering the IP address of the DVR
you need to enter the public IP address of the router the DVR is attached to. You can get
this address by going to www.myipaddress.com from a computer that is attached to the
same router as the DVR. This website will display the box in IMAGE 19 below that shows
the IP address you need to use. It will be in the space where the below example shows
76.254.183.54.
IMAGE 19
To access the DVR through Internet Explorer
Once you have setup the network settings on the DVR to match the settings of your router
and forwarded the ports needed by the DVR (for remote access over the internet), you need
to modify your browser controls.
8
RemoteMonitorGuide.indd 8
10/20/2010 4:43:38 PM
You need to allow Pop-ups.
1. Go to the Internet Explorer tool bar and select the TOOLS option.
2. Then select the POP UP BLOCKER option and select TURN OFF POP-UP BLOCKER.
You will also need to enable Active X controls.
1. Go to the Internet Explorer tool bar and select the TOOLS option, then INTERNET
OPTIONS.
2. Click on SECURITY TAB, then TRUSTED SITES, then SITES. (IMAGE 20)
3. Uncheck the box for Require Server verification. Put the IP address of the DVR or WAN
IP address in the “Add this websites to the zone” box and click on ADD button. Click
on CLOSE. (IMAGE 21)
4. Click on Custom Level (IMAGE 22)
IMAGE 20
IMAGE 21
IMAGE 22
5. On “Reset to” pull down menu, select LOW then click on RESET button.
Click YES when asked: ‘Are you sure you want to change the setting for this zone?’
Click OK. Click APPLY. Click OK. Close Internet Explorer. (IMAGE 23)
If you get a error message that says the program cannot load because the publisher is
unknown or the program is unsigned, go to internet explorer, tools, internet options,
then go to the “Advanced” tab (RED box in IMAGE 24A), this will open the window in
IMAGE 24B, scroll down to “Security”, and select the options to “Allow software to run
or install even if the signature is invalid”, and “Allow Active Content to Run Files on My
Computer” (RED box in IMAGE 24B).
9
RemoteMonitorGuide.indd 9
10/20/2010 4:43:38 PM
X
Security Settings
Settings -- Trusted
Trusted Sites
Sites Zone
Security
Zone
Settings
Security
General
.NET Framework
? X
Internet Properties
Privacy
Content
Connections Programs
Advanced
Security Privacy
General Security
Privacy
To create home page tabs, type each address on its own line.
Disable
Check for publisher’s certificate revocation
Loose XAML
Use Current
Disable
Use Default
Delete temporary files, history, cookies, saved passwords,
and web form information.
XPS documents
Check for Use
server
certificate revocation*
Current
Use Default
Use Blank
Check for signatures on downloaded programs
Browsing history
Do not save encrypted pages to disk
DeleteTemporary
temporary Internet
files, history,
cookies,
saved
passwords,
Empy
Files folder
when
browser
is clos
and web form information.
Enable DOM Storage
Enable
Integrated
Winsows
Authentication*
Delete
browsing
history on
exit
Enable memory protection to help mitigare online attacks*
Settings
Enable native XMLHTTP supportDelete...
Delete browsing history on exit
Loose XAML
Delete...
Disable
Enable
Prompt
Settings
Search
Search
Change search defaults.
*Takes effect after you restart Internet Explorer
Settings
Tabs
Reset...
Medium-high (default)
Medium-high (default)
Settings
Languages
Fonts
Settings
Restore advanced settings
Change
howsettings
webpages are displayed in
Reset Internet
Explorer
tabs.
Settings
Resets Internet Explorer’s settings to their default
condition.
Appearance
Appearance
Colors
Medium-low
Enable SmartScreen Filter
Change search defaults.
*Takes effect after you restart Internet Explorer
Tabs
Change how webpages are displayed in
tabs.
Reset custom settings
Accessibility
Reset...
Reset...
You should only use this if your browser is in an unusable state.
Languages
Colors
Fonts
Accessibility
Some settings are managed by your system administrator.
OK
Cancel
OK
Use Blank
Browsing history
Enable
Prompt
Low
Advanced
Allow active content to run in files on My Computer*
Allow software to run or install even if the signature is invalid
XAML browser applications
Reset to:
Connections Programs
To create home page tabs, type each address on its own line.
Security
Allow
active content from CDs to run on My Computer*
http://www.q-see.com
http://www.q-see.com
Enable
Prompt
Content
Settings
Home
page
Home page
Loose XAML
? X
Internet Properties
IMAGE 23
Cancel
Apply
IMAGE 24A
OK
Cancel
Apply
IMAGE 24B
To connect to the DVR from the remote computer you would then open an Internet Explorer
browser window and enter the internet IP of your router that you got by going to www.
myipaddress.com (you have to do this from a PC that connect to same Router as your DVR).
Note: If you cannot use HTTP port 80 or 9000 because the port is being used by another program, or it
is being blocked by your service provider, you can use another port in the same range. If you do so then
you need to forward the IP address of the router to the other port, change the port in the DVR NETWORK
settings, and you need to add the port number after the IP address. For example, if you set the HTTP port
as 82, you need to enter the IP address as 192.168.0.25:82. After you have forwarded the ports you can
verify that the ports are open by going to canyouseeme.org from a computer that is attached to the same
router as the DVR.
Once you able to login, you will get the login screen, by default there is no password. Just push the Login
Button .
Note: If you still have problems connecting remotely: Anti-virus programs could also block the ActiveX
control, if you still have a problem try closing them. Other plug-ins could also block it. Close firewalls in
Windows and in the router if applicable. If you run Windows Vista or Windows 7, you will need to disable
User Account (UAC).Follow this link for instructions:
http://www.howtogeek.com/howto/windows-vistadisable-user-account-control-uac-the-easy-way-onwindows-vista/
If you have a router plugged into another router, for example, if you have the DVR attached to
a router which is attached to DSL or Cable router, you may need to forward port 80 and 9000
(or whatever ports you are using) on the DSL or Cable router to the IP address of the router
that the DVR is attached to, so that router can then forward the port to the DVR. Please refer
to the PORT FORWARDING section above on how to get instructions on how to forward the
port on the other router.
10
RemoteMonitorGuide.indd 10
10/20/2010 4:43:39 PM
EMAIL NOTIFICATION SET-UP
1. Make sure the DVR firmware version is 090716 or newer
2. Make sure your DVR has been set for network and can be seen from internet.
3. On the DVR, we need to setup the motion recording first :
A. Go to MENU - DEVICES - MOTION. Turn on all the cameras and set to 2 or 3. Click
APPLY and EXIT
B. Go to MENU - RECORD and RECORD SET - TIME SCHEDULE and click on
SCHEDULE, then click on ALARM at the bottom (check mark), then make the box
red color all across the Sunday. Click on COPY. Now all the “day” will be red. CLick
APPLY and EXIT.
This will record on Motion now.
4. Go to MENU - NETWORK, and on DNS, you need to put your public DNS. Public
DNS can be found in your Router status. Usually there are 2 DNS (dns1 and DNS2).
Use DNS 1 only. If for some reason there is no DNS address here, see (NOTE 1*)
5. Go to MENU - DEVICE - ALARM - EMAIL SETUP: (IMAGE 36) Example here for GMAIL
account (recommended), if you don’t have Gmail account, go www.gmail.com and sign up:
A. Turn ON email (IMAGE 37)
B. SSL : ON
C. Port : 00465
D. smtp: smtp.gmail.com
E. Send email: [email protected]
F. Password: your password with gmail account
G. Recv email: [email protected] (do not use gmail email)
H. Click APPLY - OK - EXIT
I. You should be back to Alarm setting screen, click APPLY - OK - EXIT.
IMAGE 36
IMAGE 37
It will take a while before the DVR sending email. (sometimes takes up to 1 hour)
If you still not receive email, login to your GMAIL account and go to Sent folder and look if
there are email being sent out. If you see there are email being sent out, but you still don’t
receive email, check your Junk folder, it might go to this junk folder.
11
RemoteMonitorGuide.indd 11
10/20/2010 4:43:39 PM
NOTE 1* Some of router does not giving out the Public DNS address, in this case call up the ISP and ask
them what is my public DNS address. Also you can try this step temporarily:
From a PC on the same Router as DVR, open up the Command DOS Prompt and: ping smtp.gmail.com
you should get a reply from an IP address. Write down this IP number and you will need to use this IP in the
email setting in DVR like below:
A. Turn ON email
B. SSL : ON
C. Port : 00465
D. smtp: PUT THAT IP ADDRESS YOU GET WHEN YOU PING SMTP.GMAIL.COM
E. Send email: [email protected]
F. Passwd: your password with gmail account
G. Recv email: [email protected] (do not use gmail email)
H. Click APPLY - OK - EXIT
I. You should be back to Alarm setting screen, click APPLY - OK - EXIT.
NOTE2 * If all above steps has been done properly and there is still no email being sent out, Find out these
1. What kind of Router this DVR connected to ? If you have 2WIRE router, there is might be
a problem with this router sending out email using third party SMTP server. You can try
different kind of router like Linksys or DLink or use your ISP SMTP server
2. If this DVR located in corporate office behind firewall, it might be not allow to use third party
SMTP server, Talk to your IT guy abut setting up corp office SMTP server.
Yahoo smtp setting
• Outgoing Mail (SMTP) Server: smtp.mail.yahoo.com (Use SSL, port: 465, use
authentication)
• Account Name/Login Name: Your Yahoo! Mail ID (your email address
without the “@yahoo.com”)
• Email Address: Your Yahoo! Mail address (e.g., [email protected])
• Password: Your Yahoo! Mail password
Hotmail smtp setting
• User name: Your Windows Live ID, for example [email protected]
• Password: The password you usually use to sign in to Hotmail or Windows Live
• SMTP server: smtp.live.com (Port 25)
{Note: If port 25 has been blocked in your network or by your ISP, you can set SMTP
port to 587 with TLS or SSL Encryption depending on the client in use}
• Authentication required? Yes (this matches your POP username and password)
• TLS/SSL required? Yes
NOTE: We do not recommend using Yahoo or Hotmail due to the limitation in allowed emails.
Using these accounts you can only receive up to 100 emails a day then your account is closed for
the day and you would not be able to get ANY emails.
12
RemoteMonitorGuide.indd 12
10/20/2010 4:43:39 PM
SMARTPHONE SETUP
This surveillance system can be configured to be viewed remotely from a 3G Smartphone.
This DVR is compatible with mobile phones running Windows Mobile Pro, Symbian operating
systems, iPhone, iPad, Android and some Blackberry models.
On the DVR, go to Menu – Device – Mobile and put the User name, Password and Port
number. By default : User name: admin / Password: admin / Port 18004. This port 18004
needs to be forwarded in your router to the IP address of the DVR. Look in the Remote
Monitoring quick start guide above for instructions on how to forward the port. (IMAGE 41)
IMAGE 41
WINDOWS
1. First you need to copy a program named as “Aseesetup.CAB” that is included on the
CD provided with the DVR to the phone.
2. Click the program “Aseesetup” shown as PICTURE 1 and choose an installation
location shown as PICTURE 3 after the initialization.
3. Click [Install] button to start the installation processing shown as PICTURE 2.
PICTURE 1
PICTURE 2
PICTURE 3
13
RemoteMonitorGuide.indd 13
10/20/2010 4:43:39 PM
4. After finishing the installation, click the icon named “Asee” shown as PICTURE 4 to run
the program.
5. Now you are allowed to enter into the program screen shown as PICTURE 5.
PICTURE 4
PICTURE 5
Click CH button [Pull-down menu] to select the channel you need to monitor
Click CONNECT button to enter into the live image of the channel you selected
Click SETUP button to allow you set parameter of the mobile viewer
FUNCTIONS buttons in the bottom from Left to right in turn are:
PTZ DIRECTION (left, right, up, down)
AREA SELECTION (Zoom+, Zoom-)
FOCUS (Focus +, Focus-)
IRIS (I+, I-)
SNAPSHOT
Note: Please make sure you have the right PTZ parameter setting (for details please refer to PTZ section of
the DVR User’s Manual) on DVR, then you can control the PTZ camera through your mobile phone.
The captured images will be saved to the defaulted path (Explorer/ Program/Files/
Moveeye/Photo file).
When you use this program for the first time or need to
change parameter settings, please click SETUP button
to enter into the window shown as PICTURE 6.
User’s Name: herein indicate the user name which
have been set on DVR-[Mobile Set] menu.
Password: herein indicate the password which
has been set on DVR-[Mobile set] menu.
Server address: indicate public IP address connected
to DVR or dynamic domain name used by DVR
Port: indicate the Mobile port which has been set
in your DVR Mobile Menu
Channel: Select one channel you want to monitor PICTURE 6
14
RemoteMonitorGuide.indd 14
10/20/2010 4:43:39 PM
Click OK to confirm the above setting, and system will return back the previous menu.
Auto-connect: When tick-selecting AUTO-CONNECT option, the mobile phone will be
auto-connected to the DVR. Click any area of screen to toggle display modes between
normal view and full screen.
IPHONE
1: On your iPhone, go to APPSTORE and Search for ASEE. Download and install this
program. After finishing installation, ASEE icon will be displayed on mobile phone
interface shown as PICTURE 15.
2: Open the ASEE application and you will then see interface shown on PICTURE 16.
PTZ Direction ( left, right, up, down)
PTZ Lens control
Area Selection (Zoom+, Zoom-)
Aperture (I+, I-)
Focus (focus +, focus-)
Channels select
Function buttons from left to right:
Play/Pause, Full-screen, Snapshot,
Setup, Help and Channel Switch
3. Click on setup and enter the information as shown on PICTURE 17
Server IP
Enter IP address of the DVR
Port
Enter the mobile port of DVR in Mobile Menu
User ID
Enter user name in Mobile Menu in DVR
Password
Enter password in Mobile Menu in DVR
PICTURE 17
15
RemoteMonitorGuide.indd 15
10/20/2010 4:43:39 PM
ANDROID
1. Enter into Program option and highlight MARKET icon shown as PICTURE 1.
PICTURE 1
PICTURE 2
PICTURE 3
2. Enter into the Market interface shown as PICTURE 2.
3. Click SEARCH icon on the upper right corner and input “Asee” shown as PICTURE 3,
to search for the Asee program.
PICTURE 4
PICTURE 5
PICTURE 6
PICTURE 7
4. Highlight and install the program you searched shown as PICTURE 4 and PICTURE 5
5. Follow up the installation steps shown as PICTURE 6 and PICTURE 7
PICTURE 8
PICTURE 9
PICTURE 10
PICTURE 11
16
RemoteMonitorGuide.indd 16
10/20/2010 4:43:40 PM
6. Clicking on the Asee icon in PICTURE 7 will display the screen in PICTURE 8, where
you can click on the Open button on the bottom of the screen to display the screen in
PICTURE 10 to view the cameras
7. To return to this screen you would go to the program list on the phone and click on the
Asee icon shown in PICTURE 9.
The functions of the buttons in PICTURE 10 are shown below:
1 PTZ Direction
3 Aperture
5 Channel Select
7 Full/Normal Screen
9 Setup
11 Help
2 Zoom+ 4 Focus+ 6 Play & Pause
8 Snapshot (save to phone)
10 Change Channel Group
8. Click on the Setup button (number 9) to bring up the screen shown in PICTURE 11 to
enter the network information needed to access your DVR from the phone.
9. Setting Menu: Enter the device info.
Address: Enter the IP address of the DVR
Port: Enter the Mobile Port No. of the DVR
Device Name: Enter DVR name (Customize)
User ID: Enter the User’s Name
Password: Enter the User’s Password
You can push the History button in the upper right corner to view the IP addresses you
have been to.
BLACKBERRY
SUPPORTED BLACKBERRY MODELS
CURVE 8900, BOLD 9000 & 9700, PEARL 9100 & 9105, TOUR 9630, TOUR 2 9650, ONYX 9020
1. Blackberry Desktop Manager needs to be installed on your PC. If you do not have
this you can download it from the Blackberry website. Then download the Blackberry
application file from the DVR product page on the Q-See website and extract it. You
will get a Asee.alx file.
2. Connect your phone to your PC via USB cable
3. Open the Desktop Manager
4. Choose APPLICATION LOADER from the Main Menu shown as PICTURE 1
5. Click START Button on the “Add/Remove” application menu shown as PICTURE 2
17
RemoteMonitorGuide.indd 17
10/20/2010 4:43:40 PM
6. Click BROWSER button and tick-select ASee.alx file shown as PICTURE 3
7. Click FINISH button to finish the installation shown as PICTURE 4
PICTURE 1
PICTURE 3
PICTURE 2
PICTURE 4
Setup and operation on the Blackberry phone viewer
1. The Blackberry viewer will be installed to the Downloads directory shown as PICTURE 5
2. Enter into the Downloads directory, and then click the ASee icon shown as PICTURE 6
PICTURE 5
PICTURE 6
18
RemoteMonitorGuide.indd 18
10/20/2010 4:43:40 PM
3. Enter into interface (PICTURE 7)
1 Connect/disconnect
2 full screen
3 snapshot
4 setup
5 help
6 Channel Selection
7 PTZ Control
PICTURE 7
4. Enter the Monitor DVR info in the Setup Menu (PICTURE 8, 9)
A. Select the Network Type supported by Blackberry phone (PICTURE 10)
B. Click SAVE button to save the above setting, and system will return back to Live display
C. Click the HISTORY button to enter into the History List shown as PICTURE 11, 12
D. Highlight one record and click ENTER button to enter into pop up menu. When
selecting OPEN option, system will directly be connected to the DVR and defaulted
to display the CH1.
E. When selecting EDIT option, system will allow you edit the history record (PICTURE 13)
F. When selecting DELETE option, the history record will be deleted (PICTURE 14)
PICTURE 8
PICTURE 10
PICTURE 9
PICTURE 11
19
RemoteMonitorGuide.indd 19
10/20/2010 4:43:40 PM
PICTURE 12
PICTURE 13
PICTURE 14
PICTURE 15
PICTURE 16
5. Click NEXT PAGE icon to search Channel option shown as PICTURE 15 and PICTURE
16, and then choose the channel you want to display.
6. Click FULL SCREEN icon to enter into full screen display mode, again click the
[Trackball] button of mobile to quit the full screen mode.
20
RemoteMonitorGuide.indd 20
10/20/2010 4:43:40 PM
7. Click NEXT PAGE button to find the PTZ Control icon and enter into the mode. Now
you could freely control your PTZ camera through your Mobile phone. (PICTURE 17)
8. Click HELP button to view the software’s Help instruction.
9. Click CLOSE button to exit the program shown as PICTURE 18.
PICTURE 17
PICTURE 18
21
RemoteMonitorGuide.indd 21
10/20/2010 4:43:40 PM
Q-SEE PRODUCT WARRANTY
Thank You for Choosing a Q-See Product!
All of our products are backed by a conditional service warranty covering all hardware for 12
months from the date of purchase. Additionally, our products also come with a free exchange
policy that covers all manufacturing defects for one month from the date of purchase.
Permanent upgrading service is provided for the software.
Liability Exclusions:
Any product malfunction or abnormalities in operation or damage caused by the following
reasons are not within the free service scope of our company:
1. Equipment damage caused by improper operation.
2. Improper equipment operation environment and conditions (e.g., improper power,
extreme environmental temperatures, humidity, lightning and sudden surges of
electricity).
3. Damage caused by acts of nature (e.g., earthquake, fire, etc).
4. Equipment damage caused by the maintenance of personnel not authorized by Q-See.
5. Product sold over 12 months ago.
In order to fulfill the terms of your warranty, you must complete the registration process after
purchasing our product. To do this, simply fill out the User’s Information Card below and fax
or mail it in to us at the information listed on the following page. You can also register the
product by going to the www.q-see.com website and clicking on the Register link.
22
RemoteMonitorGuide.indd 22
10/20/2010 4:43:40 PM
Questions or Comments? Contact Us
MAILING ADDRESS
Q-See Products
Digital Peripheral Solutions, Inc.
8015 E. Crystal Drive
Anaheim, CA 92807
CUSTOMER SERVICE
Phone: 877-998-3440 x 538 (M-F, 8-5 PST)
Email: [email protected]
Live Chat at www.q-see.com (M-F, 8-5 PST)
GENERAL TECH SUPPORT
FAX
714-998-3509
WEBSITE
http://www.Q-See.com
Phone: 877-998-3440 x 539 (M-F, 8-5 PST)
Email: [email protected]
Live Chat at www.q-see.com (M-F, 8-5 PST)
REMOTE MONITORING SUPPORT
Phone: 877-998-3440 x 540
23
RemoteMonitorGuide.indd 23
10/20/2010 4:43:40 PM
Digital Peripheral Solutions, Inc.
8015 E. Crystal Drive
Anaheim, CA 92807
24
RemoteMonitorGuide.indd 24
10/20/2010 4:43:42 PM