1
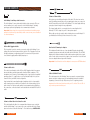
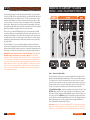
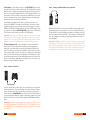
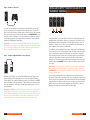
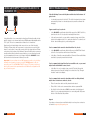
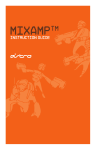
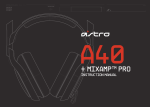
Contents
04
05
06
08
10
11
14
17
18
20
21
22
Introduction
about the a40 MixAmp™
controls
package contents
setup
Console setup - tv
Console setup - home theater
Console setup - lan
pc setup
PC setup lan
Troubleshooting
Warranty
Contents
P3
Introduction
Congratulations on your purchase of the ASTRO Gaming A40 MixAmp™!
Whether you are a professional video gamer, a casual player, or a hardcore
hobbyist, we’d like to welcome you into the ASTRO family of performance
gaming accessories.
The A40 MixAmp™ is the result of countless hours of research and development by the foremost experts in the audio industry, extremely talented
industrial designers, and an elite cadre of professional video gamers.
Despite its small size, the A40 MixAmp™ contains a complex electronics
package, and we’d like to ask that you to continue to read this instruction
guide. Please also keep it for later reference: it contains important warranty
information, and a handy troubleshooting guide.
For all of you Han Solos out there, the Quick Start Guide should be enough
to get you started, but come back later for deeper advice and better tips
than the Quick Start Guide can give you.
About the A40 MixAmp™
The A40 MixAmp™ is your own personal audio mixer and headphone amplifier. We developed it specifically for enhancing the audio and communications experience of video gaming. With Dolby® Pro Logic II and Dolby®
Digital decoding feeding into Dolby® Headphone, the A40 MixAmp™ is a
home theater in the palm of your hand.
Whether you’re gaming at home alone, socially on a LAN, on a console or a
PC, the A40 MixAmp™ has something to offer.
For Xbox and Xbox 360 users at home, the A40 MixAmp™ enables you to
combine voice communication and game sound in one headset - ideal for
discrete “midnight gaming” sessions. You can also add your own soundtrack
to any game as you play. Simply connect your music player to the mp3 input
and you’re good to go.
For PC gamers, the A40 MixAmp™ enables you to offload surround sound
decoding and voice communication duties. Don’t <Alt - Tab> yourself to an
untimely death trying to manage a software-based music player - just connect your mp3 player to the A40 and keep your gaming rig focused on the
task at hand.
In a LAN environment, your A40 MixAmp™ can be daisy-chained with any
number of other A40 MixAmps™ - creating a private, hands-free, full-duplex
voice communication channel - much higher-quality than VoIP systems, with
zero network lag.
ABOUT DOLBY® SURROUND TECHNOLOGY
Unlike many other generic “5.1” audio products on the market today, the
A40 MixAmp™ is a genuine Dolby® product - containing Dolby® Pro Logic
II, Dolby® Digital, and Dolby® Headphone surround technologies. Dolby®
is the only surround format used to encode current games, and authentic
Dolby® products should be your only choice when you want a superior
audio experience.
While you might be aware of what Dolby® Pro Logic II and Dolby® Digital do in a multi-channel environment, you may not be aware that Dolby®
Headphone offers the same benefits to users of two-channel headphones.
Using advanced patented audio processing technology, Dolby® Headphone
simulates a multi-channel speaker array using any standard pair of stereo
headphones.
Dolby®, Pro Logic and the double-D symbol are registered trademarks of
Dolby® Laboratories, Inc.
P4
INTRODUCTION
About the a40
P5
Controls
A40 MixAmp™
While the ASTRO Gaming A40 MixAmp™ contains a complex electronic
package, controlling it is quite simple.
The MASTER VOLUME knob raises and lowers volume of all incoming audio
feeds together. It will not raise or lower the volume of your outgoing voice
communication. (The distance between your microphone and your mouth is
the best way to adjust this).
The BALANCE control enables you to dial in the perfect mix of game-tovoice communication.
Important: It is possible to bring either the GAME or the VOICE volume
down to 0% volume, at either end of the BALANCE control dial spectrum.
Most people find that the ideal mix is somewhere between 11 and one
o’clock.
The DOLBY® on/off button turns on Dolby® Digital (when connected with
a digital cable), or Dolby® Pro Logic II (when connected with an analog
cable). Dolby® is active when the surrounding RED light is illuminated.
When the DOLBY® button is not illuminated, the A40 MixAmp™ is operating in 2-Channel stereo mode, and no Dolby® processing is applied to the
incoming audio signal.
The MASTER POWER button does exactly what you might expect, and is a
convenient way to mute the audio to your headset or headphones.
Important: When the headset is disconnected, the A40 will automatically
shut down. This feature is to prevent accidental power loss when you are
traveling with your A40. If you reconnect your headset within a short period
of time, your A40 will automatically return to the state you had it in before
it was disconnected. If you reconnect after this short time, you’ll need to
restart the A40 manually.
When your A40’s batteries are low, the RED ring around the MASTER
POWER button will flash ON and OFF intermittently. A SOLID RED button
indicates adequate power.
If you are using the optional A40 rechargeable battery pack, an AMBER ring
around the MASTER POWER button with flash ON and OFF when the battery is recharging (plugged into USB power). When the charge is complete,
a SOLID AMBER ring will illuminate.
You can check the power state of the A40 at any time, whether or not a
headset is connected. The MASTER POWER button will illuminate for a short
time, indicating how much charge the battery contains (FLASHING - low, or
SOLID - OK), and then the A40 will shut back down automatically.
P6
Controls
controls
P7
Package Contents
3.5mm-to-3.5mm Cables
A40 MixAmp™ and Daisy-chain Connector
The A40 MixAmp™ comes docked with a Daisy-chain connector. This connector enables you to easily connect to other A40 MixAmps™, instantly
opening up a private, high-quality voice communication channel.
Important: Always keep the connector fully inserted and seated for proper
operation. An incorrectly seated Daisy-chain connector may cause feedback
or other interference.
We’ve given you two different lengths of this cable. The short one can be
used for adding your mp3 player to your gaming mix, when you connect to
the MP3 input on the back of the A40 MixAmp™. The short length will keep
your player at arm’s length for easy adjustment.
The longer length cable is a convenient size for connecting the A40
MixAmp’s™ PC MIC output to your PC’s microphone input.
Either cable can also be used for daisy-chaining two or more MixAmps™ if
you find that the A40 Daisy-Chain connector is too short.
RCA-to-RCA Piggyback Cable
Dual Jack-to-3.5mm 4-pole Adapter
This long cable is used to connect your console to the A40 MixAmp™, providing a line-level feed of game audio to the A40. The “Piggyback” end can
fit right in-between your gaming system RCA connectors and your television, without hogging another input/output spot.
This adapter will enable the use of any standard 3rd party headset with
separate microphone and audio jacks with the A40 MixAmp™. The ASTRO
Gaming A40 Headset combines audio and microphone signals into a single
cable - and a single connector for a simple, clean connection. You don’t need
to use an adapter when using an A40 Headset.
Important: You will need to use this adapter to use any non-ASTRO headset.
3.5mm-to-RCA cable
This cable is an alternative to the RCA-to-RCA Piggyback cable for gamers
who would rather get their game audio feed from their computer or TV’s
headphone jack. Connect to the headphone jack of any television, handheld
gaming system, PC, or mp3 player - you’ll get instant Dolby Pro Logic Surround for all of your DVD’s, music, and games.
Keep in mind that connecting through a headphone jack is a lower quality
audio signal, and your volume level is subject to the volume setting of your
audio source. For the best audio quality, we recommend using a digital audio connection, or line-level audio connected with the included RCA-to-RCA
cable.
USB-to-USB Mini ‘B’ cable
This cable powers the A40 MixAmp™ when you want to conserve battery
power or need to recharge your A40 rechargeable battery kit (available
separately). Connect it to any USB port on your PC or gaming console.
Important: the A40 doesn’t interface with your PC or Xbox 360 via USB - it
only receives power from this port.
2.5mm-to-2.5mm Xbox Live Controller cable
This cable handles the Xbox Live communication between your controller
and the A40 MixAmp™. Just connect it to your controller and to the 2.5mm
input on the front of the A40 MixAmp™ — the side that says CONTROLLER.
P8
Package contents
Package contents
P9
Setup
Connecting the A40 MixAmp™ to a Gaming
Console - Using a Television as your A/V Hub
The preceding package contents descriptions should give you a good idea
of how each cable fits into your system before you get started. Go back and
read through those if you skipped Section 2. There are a great deal of ways
to use the A40 MixAmp™, and we’ve packed in virtually every type of cable
you’ll ever need to connect to a variety of equipment. That is, except digital
audio cables - digital cables can be quite expensive depending on the type
and length, and we didn’t want to make the overall price of the A40 package
higher by including an expensive item not every user needs.
That is not to say that ASTRO Gaming doesn’t recommend using a digital
connection. Optical and coaxial digital audio cables carry much more accurate surround information, and contain discrete data for each speaker/channel, unlike analog cables. In other words, you’ll be able to hear your enemies
attempting to sneak up behind you with much greater accuracy and clarity
by going digital.
The A40 MixAmp™ is also a powerful headphone amplifier, and will naturally increase background noise and hum inherently present on nearly every
analog audio path. With a digital connection, however, the background noise
floor drops to virtually zero and will give you a far better audio experience.
WARNING: Always adjust the volume of the A40 MixAmp™ to a safe level
BEFORE putting on headphones or inserting earbuds! The headphone
amplifier of the A40 MixAmp™ will increase the volume of the product that
it is connected to considerably. The A40’s high-performance amplification is
welcome in noisy situations like professional gaming tournaments - but permanent hearing loss may occur if your headphones or earbuds are used at a
high volume for an extended period of time. Reduce the volume or discontinue use of the A40 MixAmp™ immediately if you experience any discomfort or ringing in your ears.
Step 1 - Connect the Main Audio
The A40 MixAmp™ will give any connected equipment the benefits of Dolby® Surround and high-quality amplification. There are many different ways
to connect the A40 - in this section we’ll tell you how to connect it using
your television as the hub of your A/V system. In other words, you don’t use
a home theater receiver - if you do, then skip to the next section. We’ll also
list the connections you should use, in the preferred order of quality.
1) Toslink Optical Digital - (cable not included) Connecting to the A40’s rear
OPTICAL input: the Xbox 360, Sony Playstation 3, and Playstation 2 come
with optical Toslink outputs for Dolby® Digital audio, and can be simply connected to your A40’s OPTICAL input. The original Xbox requires an add-on
box like the Microsoft Xbox High Definition A/V Pack. The Nintendo Wii and
GameCube output only via analog signals, but both support Dolby® Pro
Logic II through the included analog cables.
Important: make sure to select ‘Dolby® Digital 5.1’ in your audio preferences
inside your console setup/options section. If you have PCM 2.0 selected, for
example, you will NOT get the benefit of Dolby® Digital 5.1 surround sound.
P10
Setup
console setup - tv
P11
2) RCA Analog - Connecting to the A40’s rear LEFT/RIGHT inputs: use this
connection if you don’t yet have a digital cable. The A40 MixAmp™ supports
Dolby Pro Logic II, giving you full surround sound even with an analog connection. You can use the supplied 4m RCA-to-RCA Piggyback Cable to connect directly to the RCA output of your television. Alternatively, if you don’t
have a free output, you may use the ‘Piggyback’ feature to intercept audio
from between your console and your television.
As described in the digital sections above, it is best to connect to your
television’s AUDIO OUT - this way the A40 MixAmp™ will receive an audio
signal from whatever source you have selected. If your television has both
FIXED and a VARIABLE outputs, make sure to use the FIXED output so that
you only have to adjust the MASTER VOLUME control on the A40 MixAmp™.
(The television’s own volume doesn’t affect a FIXED output).
Important: If you don’t have FIXED audio outputs on your television, simply
connect the RCA-to-RCA Piggyback cable between your console and your
television. This is a “line-level” signal (full volume) and you will only need to
adjust the volume of the A40 MixAmp™ to achieve full volume control.
3) 3.5mm Headphone Jack - If you are unable to connect your A40 MixAmp™ using one of the methods described above, use the headphone
output jack on your television by connecting the supplied 3.5mm-to-RCA
cable. The volume of your television’s headphone jack is tied to the volume
of the television itself, so set the TV volume to a suitable level (usually about
halfway to 3/4 of full volume) before adjusting the A40 MixAmp™. You may
get an unacceptable amount of hum and background noise if the television
is at or near full volume, depending on the quality of your TV’s audio, so try
different settings to find the best quality.
Step 3 - Connect an External Audio Source (optional)
With the A40 MixAmp™, you can mix an additional external audio source
(like an mp3 player) into your games. Use one of the supplied 3.5mm-to3.5mm cables to go from the headphone output of your player to the MP3
input on the back of the A40 MixAmp™. This enables you to instantly inject
your own soundtrack - and keeps your mp3 player within arm’s reach for
easy adjustment.
Important: The MP3 input is NOT connected to the balance function on the
A40 MixAmp™. You’ll need to use the volume control on the player itself in
order to find the right balance of music to game sound. Also, if you are connected to other A40 MixAmps™ in Daisy-chain configuration, don’t worry
about bothering your teammates with your music - they can’t hear it.
Step 2 - Connect to Xbox Live
If you are using an Xbox or Xbox 360 you can easily mix in voice communication from Xbox Live. For Xbox 360 users, connect the 2.5mm-to-2.5mm
cable to the back of the 360 controller. Then connect the free end of the
2.5mm cable to the CONTROLLER port on the front of the A40 MixAmp™. If
you are using the A40 MixAmp™ with the original Xbox, simply use the original Microsoft Volume Pod along with the supplied ASTRO Gaming 2.5mm
cable.
Important: Note that the A40 MixAmp™ will not improve the quality of Xbox
Live voice communication while using the Xbox 360. The quality of the signal is limited by the low-bandwidth connection between the Xbox 360 and
the controller.
P12
Console SEtup - tv
console setup - tv
P13
Connecting the A40 MixAmp™ to a Gaming
Console - Using a Home Theater Receiver as
your A/V Hub
2) Toslink Optical Digital - (cable not included) Connecting to the A40’s
rear OPTICAL input: the Xbox 360, Sony Playstation 3, and Playstation 2
come with optical Toslink outputs for Dolby® Digital audio. The original
Xbox requires an add-on box like the Microsoft Xbox High Definition A/V
Pack. The Nintendo Wii and GameCube output only via analog signals, but
both support Dolby® Pro Logic II through the included analog cables.
The best method is to connect the A40 to your home receiver’s RECORD
OUTPUT with an optical cable. This is the way to go if you have multiple
consoles connected to your system - your receiver will automatically send
audio from the selected source out to the A40 MixAmp™.
Important: make sure to select ‘Dolby® Digital 5.1’ in your audio preferences
inside your console setup/options section. If you have PCM 2.0 selected, for
example, you will NOT get the benefit of Dolby® Digital 5.1 surround sound.
3) RCA Analog - Connecting to the A40’s rear LEFT/RIGHT inputs: use this
connection if you don’t yet have a digital cable. The A40 MixAmp™ supports
Dolby® Pro Logic II, giving you full surround sound even with an analog
connection.Use the supplied 4m RCA-to-RCA Piggyback Cable to connect
directly to the RCA output on your home theater receiver. Alternatively, you
may also use the ‘Piggyback’ feature to intercept audio from between your
console and your receiver if you don’t have an open output.
As described in the digital sections above, it is best to connect to your home
theater receiver’s RECORD OUT - this way the A40 MixAmp™ will receive an
audio signal from whatever source you have selected.
Important: If you don’t have a RECORD OUT on your home theater receiver,
simply connect the RCA-to-RCA Piggyback cable in-between your console
and where it is plugged in to the receiver. This is a “line-level” signal (full
volume) and you will only need to adjust the volume of the A40 MixAmp™ to
achieve full volume control.
Step 1 - Connect the Main Audio
The A40 MixAmp™ will give any connected audio source the benefits of
Dolby® Surround and high-quality amplification. There are many different
ways to connect the A40 - in this section we’ll tell you how to connect it
using your home theater as the hub of your A/V system. In other words,
you only use your television as a “monitor” - if you don’t, then skip back to
the previous section. We’ll also list the connections you should use, in the
preferred order of quality.
4) 3.5mm Headphone Jack - If you are unable to connect your A40 MixAmp™ using one of the methods described above, you may also use the
headphone output jack on your receiver by connecting the supplied 3.5mmto-RCA cable. The volume of your receiver’s headphone jack is tied to the
volume of the receiver itself, so be sure to increase the volume to a suitable
level (usually about halfway to 3/4 of full volume) before adjusting the A40
MixAmp™. You may get an unacceptable amount of hum and background
noise if the receiver is at or near full volume, depending on the quality of
your receiver’s audio, so try different settings to find the best quality.
1) Coaxial Digital - (cable not included) Connecting to the A40’s rear COAX
input: this type of connector is very durable and long runs are reasonably
inexpensive. However, most gaming consoles use optical (Toslink) connection ports. If you wish to use a coaxial digital cable with your A40 MixAmp™,
you’ll first need to connect your console to a home theater receiver that has
an optical cable. From there, you can use a coaxial cable from the RECORD
OUTPUT of the receiver. Be sure to enable the record function of your receiver (read your receiver’s instruction manual to learn how to do this).
P14
CONSOLE setup - Home Theater
console setup - Home theater
P15
Step 2 - Connect to Xbox Live
If you are using a headset with a microphone, and an Xbox or Xbox 360,
you can easily mix in voice communication from Xbox Live. For Xbox 360
users, connect the 2.5mm-to-2.5mm cable to the back of the 360 controller.
Then connect the free end of the 2.5mm cable to the CONTROLLER port on
the front of the A40 MixAmp™. If you are using the A40 MixAmp™ with the
original Xbox, simply use the original Microsoft Volume Pod along with the
supplied ASTRO Gaming 2.5mm cable.
Important: If you are using a non-ASTRO headset, be sure to use the supplied Dual Jack-to-3.5mm 4-pole Adapter to integrate the microphone function of your headset with the A40 MixAmp™. Otherwise, your headset will
function normally, but without the microphone feature.
Step 3 - Connect an External Audio Source (optional)
Using A40 MixAmps™ together in LAN or in a
tournament (Console)
Using the built-in voice communication function of the A40 MixAmp™ will
instantly enable a high quality, ‘lag-free’ voice channel. You’ll find the voice
quality between Daisy-Chained A40s is MUCH higher than Xbox Live, for
example, so always use the A40’s voice communication feature when you
game together in the same place with friends.
To enable the voice communication channel, simply use the included daisychain connector (or one of the included 3.5mm-to-3.5mm cables for longer
runs) to connect two or more A40 MixAmps™ to each other. Connect the
A40’s by using the front 3.5mm connectors at the bottom of the MixAmp™
(where the Daisy-chain connector usually resides). Once both units are
powered on, you can now freely speak to your teammates in this new voice
channel. Adjust the BALANCE control to dial in the ideal amount of Game/
Voice ratio.
Important: You can continue to use Xbox Live communication at the same
time you use a local (daisy-chained) voice channel, as long as your A40’s
CONTROLLER port is connected to your Xbox controller with the included
2.5mm-to-2.5mm cable.
With the A40 MixAmp™, you can mix an additional external audio source
(like an mp3 player) into your games. Use one of the supplied 3.5mm-to3.5mm cables to go from the headphone output of your player to the MP3
input on the back of the A40 MixAmp™. This enables you to instantly inject
your own soundtrack - and keeps your mp3 player within arm’s reach for
easy adjustment.
You can mute outgoing Xbox Live communication at any time by disconnecting the 2.5mm cable - the Daisy-chain voice communication channel between you and your teammates will remain unaffected. While playing games
with proximity voice detection (like Halo, for example), your opponents will
NOT be able to hear you and your teammates speaking. That is, until you
plug the cable back in and smack talk in the game lobby.
Important: The MP3 input is NOT connected to the balance function on the
A40 MixAmp™. You’ll need to use the volume control on the player itself in
order to find the right balance of music to game sound. Also, if you are connected to other A40 MixAmps™ in Daisy-chain configuration, don’t worry
about bothering your teammates with your music - they can’t hear it.
P16
CONSOLE setup - Home Theater
console setup - Lan
P17
Connecting the A40 MixAmp™ to a PC at Home
Important: If you connect to an analog 2-channel output on your PC motherboard or soundcard, you will need to adjust the PC’s volume control in addition to the A40’s MASTER VOLUME control. Start out with the PC’s volume
control at least halfway up.
You may get an unacceptable amount of hum and background noise if your
PC is at or near full volume, depending on the quality of your PC’s audio. Try
out several different settings to find the best sound quality.
Step 2 - Connect the Microphone input
On the rear of the A40 you’ll find a PC MIC output, used to pass your microphone signal to your computer. Plug one of the included 3.5mm-to-3.5mm
cables from this output to your PC’s MICROPHONE INPUT (usually indicated
with a microphone icon, or a pink 3.5mm jack).
Important: If you are using a non-ASTRO headset, be sure to use the supplied Dual Jack-to-3.5mm 4-pole Adapter to integrate the microphone function of your headset with the A40 MixAmp™. Otherwise, your headset will
function normally, but without the microphone feature.
If you are using Voice Over IP (VOIP) software, you will not be able to adjust
the voice/game balance using the BALANCE dial. Voice communication
software and game sounds are mixed together at your PC, and you should
make any adjustments within your software. The balance dial balances game
sound with voice communication coming into the Daisy-chain connector
only.
Step 1 - Connect the Main Audio
As it does for console games, the A40 MixAmp™ will give any connected
PC the benefits of Dolby® Surround and high-quality amplification without
using processor cycles or internal hardware. There are many different ways
to connect the A40 - we’ll list the connections you can use (in the preferred
order of quality).
1) Coaxial Digital - (cable not included) Connecting to the A40’s rear COAX
input: this type of connector is very durable and long runs are reasonably
inexpensive. Many PC motherboards and sound cards come standard with a
coaxial digital output, and we recommend using your A40 with this type of
input. You may need to adjust your PC’s Audio Properties, and enable Digital
I/O (usually a check box). Consult your motherboard’s user manual for further information.
2) Toslink Optical Digital - (cable not included) Connecting to the A40’s
rear OPTICAL input: Many PC motherboards and sound cards come standard with an optical (Toslink) digital output. You may need to adjust your
PC’s Audio Properties, and enable Digital I/O (usually a check box). Consult
your motherboard user’s manual for further information.
3) RCA Analog - Connecting to the A40’s rear LEFT/RIGHT inputs: use
this connection if you don’t have an available digital connection. The A40
MixAmp™ supports Dolby® Pro Logic II, giving you full surround sound even
with an analog connection. You can use the supplied 2m 3.5mm-to-RCA
cable to connect your A40 MixAmp™ to the AUDIO OUT on your PC.
P18
pc setup
Step 3 - Connect an External Audio Source (optional)
With the A40 MixAmp™, you can mix an additional external audio source
(like an mp3 player) into your games. Use one of the supplied 3.5mm-to3.5mm cables to go from the headphone output of your player to the MP3
input on the back of the A40 MixAmp™. This enables you to instantly inject
your own soundtrack - and keeps your mp3 player within arm’s reach for
easy adjustment.
Important: The MP3 input is NOT connected to the balance function on the
A40 MixAmp™. You’ll need to use the volume control on the player itself in
order to find the right balance of music to game sound. Also, if you are connected to other A40 MixAmps™ in Daisy-chain configuration, don’t worry
about bothering your teammates with your music - they won’t hear it.
pc setup
P19
Using A40 MixAmps™ together in LAN or at a
tournament (PC)
Basic Troubleshooting
If the A40 MixAmp™ turns on briefly when switched on, but then turns off
again, check…
•
Is a headset connected to the A40? (The A40 is designed to shut down
automatically if there is no headset present, to prevent accidental discharging).
If game sound is very low, check…
Using the built-in voice communication function will instantly enable a highquality, ‘lag-free’ voice channel while using ZERO network bandwidth and no
CPU cycles. This voice communication channel is also ‘hands free’.
Simply use the included daisy-chain connector (or one of the included
3.5mm-to-3.5mm cables for longer runs) to connect two or more A40 MixAmps™ to each other. Connect two or more A40’s by using the front 3.5mm
connectors at the bottom of the MixAmp™ (where the Daisy-chain connector
usually resides). Once both units are powered on, you can now freely speak
to your teammates in this new voice channel. Adjust the BALANCE control
dial to mix in the ideal amount of Game/Voice ratio.
Important: You can continue to use VOIP programs as well as a local (daisychained) voice channel, as long as your A40’s PC MIC output is still connected to your PC’s MICROPHONE INPUT. Using a PTT (push to talk) key is
best for this scenario, but experimentation with different configurations will
pay off in the long run.
•
Is the BALANCE control knob dialed all the way to the VOICE side? If so,
turn it back to the 12 o’clock position and adjust from there.
•
Is the unit connected to a source with a separate volume control (like a
television’s headphone jack)? If so, make sure that the TV volume is sufficient - about halfway up is a good starting point.
If voice communication cannot be heard from Xbox Live, check…
•
Is the BALANCE control knob shifted all the way to GAME? Dial it back
to the 12 o’clock position, and fine-tune it from there.
•
Is the Xbox Controller connected with the 2.5mm-to-2.5mm cable? Make
sure that it is properly inserted at both ends.
If voice communication from Xbox Live has an audible echo, or you cannot
adjust it with the BALANCE control, check...
•
Is the Xbox Live voice output set up correctly? Tap the Xbox guide
button, then enter Personal Settings/Voice and select “Play Through
Headset” under Voice Output.
If voice communication cannot be heard when A40’s are Daisy-chained,
and/or there is interference and noise, check…
•
That all connection cables are fully inserted and seated.
•
That all A40’s in the voice communication chain are powered ON.
•
Do all A40’s in the chain have ‘GOOD’ power status (no flashing red
lights)? If so, try replacing the batteries or connecting with USB power
and see if this alleviates the problem.
Support
If you have an issue and you need further help to resolve, please contact us
via email at: [email protected]
P20
pc setup - lan
troubleshooting
P21
Warranty
All ASTRO Gaming products carry a one year warranty on parts and labor
from date of purchase. There is no need to register to obtain this warranty.
What is covered
All defective parts or faulty workmanship.
What is not covered
The warranty does not cover damage caused by accident, misuse, abuse,
neglect, lightning, power surges, other acts of nature/god(s), unauthorized
product modification or repairs, or failure to follow the instructions outlined
in this Setup Guide.
What we will do
We will repair or replace any defective parts within a reasonable amount of
time and free of charge at any time within the warranty period. After service,
we will ship your product back to you at our expense.
What we ask from you
You will be responsible for shipping or transportation charges to us. We recommend that you keep the original shipping materials, as it is important that
the product will not be damaged during shipping. ASTRO Gaming cannot be
responsible for damages incurred during shipping due to poor packing.
How to obtain ASTRO Gaming warranty service
If you have any questions about your warranty coverage, need help, or you
think you may need service, email the ASTRO Gaming Authorized Service
Center at: [email protected]. We will do everything we can to answer your questions and resolve any issues within 24 hours.
Exclusive remedy
This Limited Warranty is fully transferable provided that the current owner
furnishes the original proof of purchase. THE MAXIMUM LIABILITY OF
ASTRO GAMING SHALL NOT EXCEED THE ACTUAL PURCHASE PRICE PAID
BY YOU FOR THE PRODUCT. IN NO EVENT SHALL ASTRO GAMING BE
LIABLE FOR SPECIAL, INCIDENTAL, CONSEQUENTIAL OR INDIRECT
DAMAGES.
P22
Warranty
www.astrogaming.com
www.astrogaming.com/service
© 2007 Astro Gaming, LLC. All rights reserved