1
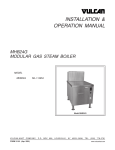
CB-G SERIES
GAS STEAM BOILER CABINETS
INSTALLATION – OPERATION – MAINTENANCE
BLODGETT OVEN COMPANY
www.blodgett.com
44 Lakeside Avenue, Burlington, Vermont 05401 USA Telephone (800) 331-5842, (802) 860-3700 Fax: (802) 864-0183
1 A (5/04)
S00043 Rev
IMPORTANT NOTES FOR INSTALLATION AND OPERATION
It is recommended that this manual be read thoroughly and that all instructions be
followed carefully. This manual should be retained for future reference.
This is the safety alert symbol. It is used to alert you to potential
personal injury hazards. Obey all safety messages that follow this
symbol to avoid possible injury or death.
FOR YOUR SAFETY: Do not store or use gasoline or other
flammable vapors or liquids in the vicinity of this or any other
appliance.
PURCHASER: Instructions to be followed in the event that the operator of this
appliance smells gas must be posted in a prominent location. This information
shall be obtained by consulting the local gas supplier.
Do not attempt to operate this unit in the event of a power failure.
Keep the appliance area free and clear from combustibles.
Do not obstruct the flow of combustion and ventilation air.
Adequate clearances must be maintained for servicing and proper operation.
WARNING: Improper installation, operation, adjustment, alteration,
service or maintenance can cause property damage, injury or death.
Read the installation, operating and maintenance instructions
thoroughly before installing, operating or servicing this equipment.
NOTICE: Contact the factory, the factory representative or local service
company to perform maintenance and repairs.
WARNING
DISCONNECT UNIT FROM POWER SUPPLY BEFORE CLEANING OR SERVICING APPLIANCE.
2
TABLE OF CONTENTS
DESCRIPTION
PAGE
Service Connections
4
1.0 Installation Instructions
5
2.0 Service Connections
8
3.0 Operation Instructions
10
4.0 Operation Instructions for CSD1 Equipped Units
13
5.0 Periodic Maintenance
16
6.0 Adjustments
19
7.0 Troubleshooting
20
3
SERVICE CONNECTIONS
Unless otherwise specified, Field Wire Electrical Connection to be 120 Volts, 60 Hertz single phase with grounding wire.
DRAIN: 2"IPS piped to open floor drain. No Solid Connection.
COLD WATER: 3/8" O.D. tubing at 25-50 PSI(170-345 kPa)
GAS CONNECTION: 3/4"IPS supply line required. Natural Gas : min.7" (178mm) Water Column. Propane : min.11" (279mm) Water Column.
S
STEAM TAKE-OFF: 3/4"IPS.
WATER QUALITY STATEMENT
Water quality is the major factor affecting the performance of your appliance. If you are unsure of water quality, consult a
local water treatment specialist and have the water analyzed. Your water supply must be within these general guidelines:
Total dissolved solids
Less than 60 PPM
Total alkalinity
Less than 20 PPM
Silica
Less than 13 PPM
Chlorine
Less than 1.5 PPM
7.0-8.5
pH Factor
Water which fails to meet these standards should be treated by installation of a water conditioner.
FAILURE OR MALFUNCTION OF THIS APPLIANCE DUE TO POOR WATER QUALITY IS NOT COVERED UNDER WARRANTY.
DIMENSIONS
MODEL
CB24-140G
CB24-200G
CB36-140G
CB36-200G
CB36-250G
CB36-300G
BTU/HR
140,000
200,000
200,000
250,000
300,000
UNITS
inches
mm
A
8.75
222
B
5.75
146
C
13.5
343
D
24
610
E
5.75
146
F
3.5
89
8
203
G
5
127
H
11
279
6
152
J
4.75
121
K
2.5
64
6.75
171
E
J
L
3
76
M
12.5
318
6
152
S
K
S
33 [838]
55 [1397]
H
G
L
6 [152]
D
B
A
C
M
28 [711]
F
CB24-140G AND CB24-200G
CB36-140G, CB36-200G,CB36-250 AND CB36-300G
DIMENSIONS ARE IN INCHES [MM]
4
24 [610]
36 [914]
GENERAL
The gas boiler is designed to ASME Code and approved as a steam heating boiler
restricted to operation at pressure not to exceed 15 psi. The gas boiler may be in a 24"
cabinet base rated at 140,000 or 200,000 BTU, 36" cabinet base rated at 200,000,
250,000 or 300,000 BTU, operational on Natural or Propane gas. Boilers may have
optional electronic ignition and CSD1 controls.
1.0 INSTALLATION INSTRUCTIONS
UNPACKING
Immediately after unpacking, check for possible shipping damage. If the appliance is
found to be damaged, save the packaging material and contact the carrier within 15
days of delivery.
Before installing, verify that the gas (natural or propane), the elevation from sea level
and the electrical supply agree with the specification on the data plate. NOTE: If this
appliance is being installed above 2000 feet altitude, contact your authorized service
office to assure that the proper orifice size for your elevation has been installed.
LOCATION
The installation location must be kept free and clear of combustibles. Do not obstruct
the flow of combustion and ventilation air. Clearance from combustible construction
must be a minimum of 3 inches from the sides and 6 inches from the back. The
appliance should be installed on a noncombustible floor. Provide adequate clearances
for cleaning, maintenance, service and proper operation.
Sufficient air should be allowed to enter the room to compensate for the amount of air
removed by any ventilating system and for combustion of the gas burners. Do not
obstruct the air flow into and around the appliance. Do not obstruct the flow of flue
gases from the flue duct located at the rear and above the cabinet. Position the
appliance in its final location. Check that there are sufficient clearances to service the
controls, for door swings, etc., so there will be no problem in making the required supply
and drain connections.
Allow enough space between any other piece of equipment or a wall for service access.
Service on the cabinet base may require access to the left and/or right side panels.
5
LEVELING AND ANCHORING THE CABINET
1. Place appliance in the installation position.
2. Place a carpenter’s level on top of the appliance and turn the adjustable feet to level
side-to-side and front-to-back.
3. Mark hole locations on the floor through the anchoring holes provided in the rear
flanged adjustable feet.
4. Remove appliance from installation position and drill holes in locations marked on
the floor. Insert proper anchoring devices (not supplied).
5. Place appliance back in the installation position.
6. Place carpenter’s level on top of appliance and re-level side-to-side and front-toback.
7. Bolt and anchor appliance securely to the floor.
8. Seal bolts and flanged feet with Silastic or equivalent compound.
INSTALLATION CODES AND STANDARDS
The boiler must be installed in accordance with:
Gas installation to conform to local codes, or in absence of local codes, with the National
Fuel Gas Code - ANSI Z223.1/NFPA 54. In Canada installation to be in accordance with
CSA B149.1 Natural Gas and Propane Installation Code.
1. The appliance and its individual shut off valve must be disconnected from the gas
supply piping system during any pressure testing of that system at pressures in
excess of ½ psig (3.5 kPa).
2. The appliance must be isolated from the gas supply piping system by closing its
individual manual shut off valve during any pressure testing of the gas supply piping
system at test pressures equal to or less than ½ psig (3.5 kPa).
Electrical grounding must be provided in accordance with local codes, or in the absence
of local codes, with the National Electrical Code ANSI/NFPA 70. In Canada, installation
must be in accordance with the Canadian Electrical Code CSA C22.2.
6
WARNING: ELECTRICAL GROUNDING INSTRUCTIONS
This appliance is equipped with a three-prong (grounding) plug for
your protection against shock hazard and should be plugged directly
into a properly grounded three-prong receptacle. Do not cut or
remove the grounding prong from this plug. (120V units only).
WIRING DIAGRAM FOR APPLIANCE IS LOCATED INSIDE CABINET DOOR.
EXHAUST FANS AND CANOPIES:
Canopies are set over ranges, ovens, kettles, etc., for ventilation purposes. It is
recommended that a canopy extend 6 inches past the appliance and be located 6 feet 6
inches from the floor. Filters should be installed at an angle of 45 degrees or more with
the horizontal. This position prevents dripping of grease and facilitates collecting the
run-off grease in a drip pan, usually installed with the filter. A strong exhaust fan tends
to create a vacuum in the room and may interfere with burner performance or may
extinguish pilot flames. Makeup air openings approximately equal to the fan area will
relieve such vacuum. In case of unsatisfactory performance on an appliance, check with
the exhaust fan in the “OFF” position.
7
2.0 SERVICE CONNECTIONS
PLUMBING CONNECTIONS
WARNING: Plumbing connections must comply with applicable
sanitary, safety, and plumbing codes.
WATER SUPPLY CONNECTION
The incoming cold water supply connection, at the rear of the steamer cabinet, requires
3/8" tubing and water pressure of 25-50 psi. A manual shut-off valve must be provided
convenient to the appliance; this valve should be open when the boiler is in operation.
FAILURE OR MALFUNCTION OF THIS APPLIANCE DUE TO POOR WATER
QUALITY IS NOT COVERED UNDER WARRANTY. SEE WATER QUALITY
STATEMENT, PAGE 4.
DRAIN CONNECTION
The steamer drain (2" IPS) should be piped to a floor drain near the steamer. There
should be no solid drain connection; an “open gap” between the steamer and the floor
drain is required.
GAS CONNECTION
1. The data plate on the cabinet door of the boiler indicates the type of gas your unit is
equipped to burn. DO NOT connect to any other gas type.
Keep the appliance area free and clear from combustible substances. Do not
obstruct the flow of combustion and ventilation air.
2. A 3/4" NPT line is provided at the rear for the connection. Each boiler is equipped
with an internal pressure regulator which is set at 3.5" W.C. manifold pressure for
natural gas or 10.5" W.C. for LP gas. Use the 1/8" pipe tap on the burner manifold
for checking pressure.
An adequate gas supply is necessary. Undersized or low pressure lines will restrict the
volume of gas required for satisfactory performance. A steady supply pressure, between
7" W.C. and 14" W.C. for natural gas and 11" W.C. and 14" W.C. for propane gas is
recommended. With all units operating simultaneously, the manifold pressure on all
units should not show any appreciable drop. Fluctuations of more than 25% on natural
gas, and 10% on propane gas, will create pilot problems and affect burner operating
characteristics.
8
Contact your gas company for correct supply line sizes.
Purge the supply line to clean out any dust, dirt, or foreign matter before connecting the
line to the unit.
CAUTION: The pipe thread compound used when installing pipes
must be a type that is resistant to the action of liquified petroleum or
propane gases.
Codes require that a gas shut-off valve be installed in the gas line prior to the steamer.
Make sure the pipes are clean and free of obstructions, dirt, and piping compound.
WARNING: Prior to start-up, check all joints in the gas supply line
for leaks. Use soap and water solution. Do not use an open flame.
Do not connect the appliance to the electrical supply until after the gas connection has
been made.
ELECTRICAL CONNECTIONS
WARNING: ELECTRICAL GROUNDING INSTRUCTIONS
This appliance is equipped with a three-prong (grounding) plug for
your protection against shock hazard and should be plugged directly
into a properly grounded three-prong receptacle. Do not cut or
remove the grounding prong from this plug. (120V units only).
120 VAC-60 Hz - Single Phase
Units with this electrical rating are factory supplied with a three-wire cord and threeprong plug which fits any standard 120V, three-prong grounded receptacle. A separate
15 amp supply is needed for each unit.
Refer to the electrical diagram located inside cabinet on door.
9
3.0 OPERATION INSTRUCTIONS
WARNING: Do not force the gas control knob. Use only your hand
to turn the gas control knob. Never use any tool. If the gas control
knob will not operate by hand the gas control should be replaced by
a qualified service technician.
WARNING: Do not disassemble the gas control; it contains no
replaceable components. Attempted disassembly or repair may
damage the gas control.
WARNING: In the event of main burner ignition failure, a 5 minute
purge period must be observed prior to re-establishing ignition
source.
For CSD-1 equipped boilers, see section 4.0 Operation Instructions for CSD-1 Equipped
Boiler.
BOILER CONTROLS (Inside Cabinet)
Main Power Switch
-
ON fills the boiler tank and turns the boiler controls on.
You should allow 20 minutes to fill the tank and
generate steam.
-
OFF shuts off the boiler controls and opens the
automatic blowdown valve, emptying the boiler tank
and releasing water and steam to the drain. This
should be done at least once daily to remove sediment,
lime or scale.
Pilot Light
-
Indicates main power is ON.
Boiler Pressure Gauge
-
Should read 9 - 11 psi during operation, 0 psi during
shutdown.
Water Level Sight Glass
-
Observe level of water and water quality in the boiler.
Murkiness in the water indicates inadequate water
quality; the owner must supply proper water to the
boiler (see page 4).
Water Level Control
-
While boiler is ON, briefly open the water level control
valve once a day to remove any sediment that might
accumulate. (See page 11 for detailed instructions.)
10
Safety Valve
-
This valve will release (pop off) if the boiler has too
much pressure. Once a week, this valve should be
tripped during operation to make sure it functions
properly.
START UP - BOILER OPERATION WITH STANDING PILOT IGNITION
1. Open manual gas shut off valve and if the appliance has a manual blowdown valve,
close it.
2. Open cabinet door and turn ON power switch located on left side. Green pilot light
will come on, water will begin to enter boiler and required water level will be reached
in about three minutes. Observe water gauge glass to verify.
3. The dial on the combination gas control valve has three positions (ON-PILOT-OFF)
for manual gas control of main burners and pilot. Turn DIAL to PILOT. Depress dial
and light pilot burner located on center main burner of boiler. Maintain dial in
depressed position for about 30 seconds and release. Observe that the pilot burner
flame stays on. If at any time the flame should become extinguished, a 5 minute
period of complete shut off of gas supply is required before relighting.
4. Turn dial to ON and burners should ignite. Steam generation will now commence and
be completed in approximately 15 minutes. Steam generation should reach
approximately 11 psi as indicated on the pressure gauge on the boiler.
START UP - BOILER OPERATION WITH ELECTRONIC IGNITION
1. Open manual gas shutoff valve.
2. Open cabinet door and turn main power switch ON. Green pilot light will come on,
water will begin to enter boiler and required water level will be reached in about 3
minutes. Observe water gauge sight glass to verify.
The dial on the gas combination control valve has 2 positions (ON and OFF).
ON - [Rotated counterclockwise] permits gas to flow to the pilot and main burner.
OFF - [Rotated clockwise] prevents gas flow to pilot and main burner.
NOTE: Units are shipped with the control in the ON position.
11
3. With the gas control valve, power switch and water supply all ON, water begins
entering the boiler and gas flows to the pilot: Spark will begin in 2 to 3 seconds. If
the pilot fails to light in 90 seconds, the control will provide 100% lockout. If this
occurs: Wait 5 minutes, then turn power switch off for one minute before turning
power switch back on.
4. Once the pilot is lit and the required water level has been reached, the main burners
will ignite. Burner will cycle to meet the steam pressure required. Steam pressure
should reach approximately 11 psi as indicated on the pressure gauge on the boiler.
DAILY SHUT DOWN
Turn power switch off.
Open blowdown valve if so equipped.
COMPLETE BOILER SHUT DOWN
If boiler is not intended to be operated for a lengthy period of time, shut off all power, gas
and water supplies to the appliance. Open blowdown valve if so equipped.
12
4.0 OPERATION INSTRUCTIONS FOR CSD1 EQUIPPED UNITS
Initial Start-Up Procedure
1. Open the manual gas shut-off valve.
2. Close the manual blowdown valve, if so equipped.
3. Light the pilot burner.
The dial on the combination gas valve has three positions (ON-OFF-PILOT) for
manual gas control of main burners and pilot burner. Turn the dial to PILOT.
Depress the dial and light the pilot burner on the center burner of boiler. Maintain the
dial in depressed position for about 30 seconds and release. Observe that the pilot
flame stays ON. Turn dial to “ON”.
4. Open cabinet door and turn “ON” the power switch. The green pilot light will come
“ON”. Water will begin to enter the boiler. When enough water has entered the boiler
the (amber) “STAND BY” pilot light will come on.
5. Press the “RESET” switch to begin boiler operation. The “STAND BY” pilot light will
go off and the boiler will begin operation.
If at anytime the flame should become extinguished, a five (5) minute purging is required
before relighting is attempted.
Daily Startup Procedure
1. Close the manual blowdown valve, if so equipped.
2. Examine that the pilot burner flame is burning. If the pilot burner is out, a five (5)
minute period of complete gas supply shut off is required before relighting. Follow
initial start up instructions above.
3. Open cabinet door and turn “ON” the power switch. The green pilot light will come
“ON”. Water will begin to enter the boiler. When enough water has entered the boiler
the (amber) “STAND BY” pilot light will come on.
4. Press the “RESET” switch to begin boiler operation. The “STAND BY” pilot light will
go off and the boiler will begin operation.
Daily Shutdown Procedure
1. Turn “OFF” the power switch. Observe that the burners go off.
2. Open the manual blowdown valve, if so equipped. If the appliance is equipped with
an automatic blowdown solenoid valve, the boiler’s contents, water and steam, will be
blown out and exhausted through the appliance drain. The cold water solenoid valve
will be activated.
13
Complete Shutdown Procedure
If the appliance is not intended to be operational for a lengthy period of time, shut it
down completely.
1. Open the manual blowdown valve, is so equipped.
2. Shut off all supplies of power, gas and water to the appliance.
Normal Boiler Operating Cycle
Water Fill Cycle
On the initial filling of the boiler, the reset switch must be activated to initialize the safety
lockout circuit. Once the water in the boiler has reached the proper level, the level
control will stop the flow of water to the boiler. As water is consumed in the production
of steam, the level control will replenish water to the boiler.
Firing Cycle
The gas valve is controlled by pressure sensing devices. On initial operation of the
boiler, steam generation should reach 11 psi in approximately 15 minutes. At this point
the “Operating Pressure” switch will close the gas valve. When pressure drops to 9 psi,
the pressure switch opens the gas valve and ignition should occur.
Should the pressure rise to more than 14.5 psi the “Overrride pressure switch” will open
the override solenoid valve, releasing the excess steam.
Condensing Drain
A thermostat is located in the drain assembly and is activated by the temperature of
steam. The thermostat opens the cooling solenoid valve, supplying water to the drain to
condense the steam.
Automatic Blowdown Valve
If the unit has an automatic blowdown valve, it is activated by the main power switch.
The boiler will drain should the main power switch be turned “OFF.”
14
Safety Lockout Conditions
High Temperature Condition
A high temperature safety device is installed on the boiler. Should the temperature
exceed the limit of this device, the boiler will be shut down and be put in a state of
lockout. The “Temperature” pilot light (Red), and the “Standby” pilot (amber), will come
on.
High Pressure Condition
A high pressure safety switch is installed on the boiler. Should the pressure exceed the
limit of this device, the boiler will be shut down and be put into a state of lockout. The
“Pressure” pilot light (Red), and the Stand By pilot (amber), will come on. Should this
device fail to operate, the safety relief valve will open.
Low Water Condition
A second low water safety cut off is supplied with the boiler. Should the water level fall
below normal operating levels, this device will activate and put the boiler in a state of
lockout. The “Low Water” pilot light (Red), and the “Stand By” pilot (amber) will come
on.
15
5.0 PERIODIC MAINTENANCE
Be sure to flush your boiler water level control daily. Failure to follow this procedure can
cause the control to malfunction resulting in serious boiler damage.
The Boiler Water Level Control installed on your boiler requires periodic maintenance.
As boiler water circulates into the float chamber, sand, scale and other sediment may be
deposited in the float chamber. While the chamber has been designed with a large
accumulation bowl, it is necessary to flush the sediment from the chamber by blowing
down the control so that the accumulation of sediment does not interfere with the
movement of the float in the control. Control must be flushed at least once a day.
CAUTION: Protect yourself. When flushing control, hot water
and steam will flow out of the drain.
When flushing control, note water level in gauge glass, allow the boiler to fill if necessary
and also to come up to temperature.
Before flushing control, note that water level in gauge glass is within operating range and
the boiler pressure is at least 6 psi. While the boiler is being fired, open blowdown valve
at bottom of control by rotating the handle counterclockwise about 1/4 turn to fully open
the valve. Opening the blowdown valve also checks the cut-off operation. Float should
drop shutting burner off, hot water and steam will flow out the drain flushing away
sediment.
16
CAUTION: If burner does not shut off during blowdown,
immediately discontinue use of appliance and call for service.
Continue draining water for about fifteen (15) seconds, from control until water is clean.
Manually close valve. Recheck gauge glass. If water level has dropped significantly,
wait for the boiler to restore water level and pressure and repeat if necessary.
WARNING: Disconnect the power supply to the appliance before
cleaning or servicing.
1. If water in sight glass is not clear and appears murky, this indicates poor water quality
and may cause control failure. SEE WATER QUALITY STATEMENT, page 4.
2. Safety valve should be tripped during operation once a week to ensure that it is
functioning properly.
3. Clean around burners and orifices if lint has accumulated.
4. Visually ensure carry over ports are unobstructed.
5. Visually check that the flue is not obstructed.
CLEANING
DO NOT allow water near the electrical components.
At the end of the day, turn the Main Power Switch OFF (automatic blowdown drains the
boiler tank) or if equipped with manual blowdown valve, open it. Wash exterior with mild
detergent and warm water, rinse, and wipe dry. Do not use steel wool on stainless steel
surfaces.
REMOVAL OF LIME SCALE DEPOSITS
The interior of the steam boiler should be inspected at least twice a year by your
authorized servicer to determine whether the boiler needs to be delimed. The servicer
should perform any necessary deliming procedure. See descaling instructions.
17
VENT HOOD
Twice a year check the venting system (hood); remove any obstructions; and clean as
necessary.
BOILER DESCALING INSTRUCTIONS
It is recommended that the boiler be checked every 90 to 120 days for scale build up.
Regular maintenance should be carried out at this time.
If the boiler is descaled, a new Anode should be installed in the boiler to help extend its
life.
1. With boiler empty, close manual blowdown valve. If appliance is equipped with
automatic blowdown, turn water supply OFF to appliance. Turn power switch ON.
This will energize and close blowdown valve.
2. Remove 3/4" pipe plug from fitting on left front of boiler.
3. Insert appropriate hose or tube through fitting and pour in (½) half gallon (U.S.) of
CLR Descaling solution. Or use the Optional Deliming assembly DPA-1 available
from your dealer. For appliances equipped with CSD-1, descaling solution must be
introduced through hand hole.
4. Replace 3/4" pipe plug securely.
5. Open water supply to appliance allowing water to fill boiler to required level.
6. Let appliance cycle, allowing two hours for descaling and cleaning. DO NOT TURN
STEAM ON TO CONNECTED APPLIANCES OR TO UPPER COMPARTMENTS.
7. Open both the blowdown and low water level control valves for complete drainage.
Then close both valves. For appliances equipped with automatic blowdown, turn
OFF power switch and open low water control valve. This will allow complete
drainage. Once drained close water level control valve.
8. Turn appliance switch ON. When boiler is completely filled, turn power switch OFF.
This will rinse and drain boiler. Appliance with manual blowdown valve must be
opened to drain.
9. Complete Step 8 twice to assure boiler is completely rinsed.
10. Appliance is now ready for use.
18
6.0 ADJUSTMENTS
WARNING: At least twice a year have an authorized service person clean and
adjust the unit for maximum performance.
TO CALIBRATE PRESSURE SWITCHES
NOTE: Pressure switches are factory set. Calibration is only required if pressure
switches are replaced or if adjustment is required.
Pressure switch range is from 1 to 15 psi.
Adjust all settings to maximum on high signal adjustment screw on pressure switches.
Adjust in the following sequence:
- High limit pressure switch.
- Override pressure switch.
- Operating pressure switch.
- Turning screw clockwise to increase, counterclockwise to decrease pressure.
- Use relief valve to release pressure from boiler for setting adjustments.
1. HIGH LIMIT PRESSURE SWITCHES
Allow pressure to build until unit shuts off. This should occur at 15 psi. Set the high
signal to switch at 14.5 psi on the gauge and the low signal to 13.0 psi.
2. OVERRIDE PRESSURE SWITCHES
Allow pressure to increase to 13 psi. Set the high signal to switch at 13 psi on the
gauge and the low signal to 11 psi.
3. OPERATING PRESSURE SWITCHES
Set the high signal to switch at 11 psi on the gauge and the low signal to 9 psi.
4
Release pressure in boiler to below 9 psi. Burner will come on. Once pressure has
reached 11 psi, burners will shut off. Repeat this process several times to make sure
burners come on at 9 psi and shut off at 11 psi.
Once completed, pressure switches have been calibrated.
Should your unit not have the High Limit pressure switch, start procedure at Override
pressure switch.
SERVICE
Contact your local authorized service office for any repairs or adjustments needed.
19
7.0 TROUBLESHOOTING
WARNING: The boiler and its parts are hot. Use care when operating, cleaning,
or servicing the boiler.
BURNERS PRODUCE CARBON DEPOSITS
1. Wrong size orifices.
2. Burner air not adjusted properly.
3. Wrong gas supply.
4. Incorrect pressure at supply.
PILOT DOES NOT LIGHT
1. Gas supply to unit is OFF.
2. Power supply is OFF.
3. Gas control knob is OFF.
4. Dirty or loose wire connection to module - clean and/or tighten.
5. Ignitor cable, shorting out - check that it is not in contact with metal or damaged; may
require replacement.
6. Defective control or module.
7. Unit has gone into 100% lockout - turn off and try again in five minutes.
8. Dirty flame sensor - clean with emery cloth.
9. Cracked ceramic insulator - replace pilot burner/ignitor sensor.
10. Too much draft.
20
BURNER DOES NOT COME ON
1. Gas supply to unit is “OFF”.
2. Manual shut off valve is “OFF”.
3. Power supply is “OFF”.
4. Faulty valve or ignition module.
5. Pilot out.
6. Pilot may require flame adjustment.
7. Water level has not been reached in boiler. Check water supply is on, check water
level control.
8. If water at proper level, check relay which energizes pressure switch and gas control.
9. Pressure switch may need to be replaced if relay is operating.
10. Gas control may also require replacement if energized but not operating.
SAFETY RELIEF VALVE BLOWS
1. Defective valve.
2. Pressure too high, pressure switch requires adjustment (lower) or may be defective.
WATER NOT BEING SUPPLIED TO BOILER
1. Water supply is “OFF”.
2. Defective water fill Solenoid Valve.
3. Water level control clogged or defective, unable to operate fill valve.
4. Check that drain valve is closed.
5. Supply water pressure too low.
BOILER SLOW TO HEAT UP
1. Lime build up - contact service.
2. Wrong size orifice(s) or gas supply.
21