1
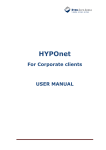
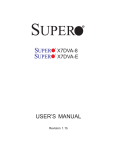
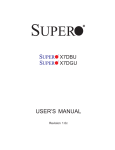
MIDLAND (TEAM MEMBER) RADIO-RELATED INFORMATION When your radio is to be stored for an extended period, you should remove the batteries so that they will not corrode and damage the radio. You may need to reset the channel and privacy code on the radio when the batteries are reinstalled. See the attached instructions for battery removal and installation. Also use those instructions (or the steps below) for resetting the channel and privacy code. LWR CERT uses CTCSS privacy codes. You should make certain that the VOX function is turned off . Turn the radio on. Set channel: Press MENU once, then press the or buttons until you see the correct channel. Then press the PTT (Push-To-Talk) button. Set CTCSS mode: Press MENU twice, then press the or buttons to select "ct" (instead of "oF" or "dc"). Then press PTT. Set CTCSS code #: Press MENU three times, then press the or buttons to select code #. Press PTT. If "VOX" is displayed on the screen, press the MENU key until "VOX blinks. Then press the or buttons to select "oF" and press PTT. During hurricane season, make sure that your radio has fresh batteries (for those radios using AA batteries) or that the battery is fully charged on a periodic basis (for those radios with rechargeable batteries). If your radio uses rechargeable Ni-Cd batteries, you should know how to use AA batteries if the Ni-Cd battery pack cannot be recharged. (LWR CERT will not replace defective Ni-Cd battery packs, i.e., those that will no longer hold a charge.) In general, try to keep all messages as short and concise as possible while still sending all of the required information. Since the first person to the assembly point becomes the Incident commander by default, each team member should know how to operate the IC radio to communicate with the CERT HUB radios. You should know where the IC radio is and how to access it. Operating instructions are given below. OPERATION OF THE WOUXAN UVA-1 OR DB16X IC RADIOS Turn on the radio by rotating the knob on the top right of the radio clockwise. Turning the knob further clockwise increases the volume. Turning the knob counterclockwise reduces the volume and turns the radio off. Select the channel you want to use by rotating the center knob on top. For LWR CERT use, the channel number will correspond to the number of the HUB you wish to contact. For example, Team 36 would turn to channel 3, as HUB3 is their primary contact. To send a message, first check that no one is using that channel currently. If it is clear, press the large PTT key on the top left side of the radio, hold for 2-3 seconds, then speak your message. Release the PTT key when done. The team coordinator is responsible for ensuring that the team's IC radio is charged and operational. Turn on your IC radio ASAP so that you can receive any messages from CERT. Please remember that initial communications from your team to the HUB should (1) report the team's readiness and appraise CERT of team strength, and (2) report any emergency life-threatening situations. Later communications can address less threatening issues. You will be notified when those secondary communications can begin. Model GXT760/795 Series LCD DISPLAY 1 6 2 7 8 3 9 4 10 11 5 CONTROLS 12 17 18 13 19 14 20 15 21 1. KEY LOCK ICON – Indicates KEY LOCK mode is on. 2. VOX ICON – Indicates when VOX mode is active. 3. NOAA WEATHER (WX) BAND ICON– Indicates when the radio is in Weather Band mode. 4. CHANNEL NUMBER – Changes from 1~42 on GMRS/FRS band (1~10 on WX band). 5. PRIVACY CODE – Indicates Privacy Code selected by user (oF~38/oF~ 104). It can only be used on Ch 1~22. 6. BATTERY METER – Indicates the battery level. 7. VIBRATE ALERT ICON – Indicates when the Vibrate Alert feature is on. 8. RECEIVE (RX) ICON – Indicates radio is receiving a transmission. 9. TRANSMIT (TX) ICON – Indicates radio is transmitting a signal. 10. TRANSMIT POWER LEVEL ICON – Indicates TX Power setting (H/M/L) 11. PRIVACY CODE ICON – Indicates Privacy Code setting (CTCSS/DCS). 12. POWER/VOLUME KNOB – Turn clockwise to turn the power on and increase the volume level. Turn counter-clockwise to decrease the volume level and turn the power off. 13. PTT Button – Press and hold to transmit voice communication. 14. CALL/LOCK Button – Press to send a CALL Alert signal. Press and hold to turn KEY LOCK on/off. 15. MIC – Built-in microphone. 16. SPEAKER – Built-in speaker. 17. ANTENNA 18. EXTERNAL SPEAKER/MIC JACK. 19. MENU/WX SCAN Button – Press to access Menu mode. Press and hold for 5 seconds to activate the NOAA Weather Scan function. 20. MONITOR/SCAN Button – Press to enter SCAN mode. Press and hold to enter MONITOR mode 21. UP and DOWN Button – Make adjustments in MENU mode. 16 Page 4 www.midlandradio.com Model GXT760/795 Series BATTERY INSTALLATION Your GXT760/795 Series radio operates with either 4 AA alkaline batteries or an optional NiMH battery pack. The belt clip should be removed (see below) to ease installation or removal of the batteries. To install the batteries: 1. With the back of the radio facing you, remove the belt clip (see diagram below) for easy access, then remove the Battery Cover by pressing down on the top center and sliding it down from the radio. 2. Insert 4 AA batteries observing the polarity as shown. Installing the batteries incorrectly will prevent the unit from operating or may damage the unit. 3. Return the Battery Cover by sliding it up on the radio. Replace the belt clip, making sure it locks into place. One Battery inserted in this slot BELT CLIP LOCK TAB BATTERY COMPARTMENT BATTERY COMPARTMENT COVER Press here and push down to open BELT CLIP LATCH INSTALLING THE BELT CLIP To install the BELT CLIP, slide the clip down into the slot on the back of the radio until the BELT CLIP LATCH clicks. To remove the BELT CLIP, press the LOCK TAB down, then gently pull the belt clip up toward the top of the radio. Page 5 www.midlandradio.com Model GXT760/795 Series KEYPAD LOCK To avoid accidentally changing the radio setting, press the LOCK button for 2 seconds. The KEY LOCK icon will appear on the display. PTT and CALL will still be active. Repeat the same procedure to unlock the keypad. DISPLAY ILLUMINATION During Power on, the display illumination will activate for approx. 5 seconds. The display illumination can also be activated when the MENU, MON/SCAN, and / button is pressed. CHANNEL SELECTION (GMRS/FRS BAND) Press the MENU button once, and then the / buttons to select one of the 42 GMRS/FRS channels. To confirm the selection, press the PTT button or press the MENU button again to move to the next feature setting. SETTING PRIVACY CODES Your GXT760/795 Series has 142 Privacy Codes available. The selected Privacy Code may be different for each channel. To select a Privacy Code for the current channel press the MENU button twice, and then the / buttons to select between Off/CTCSS/DCS. Press again the MENU button and the / button to select one of the 38 CTCSS Codes or one of the 104 DCS Codes. The Privacy Code icon on the display will indicate whether you set your Privacy Code in CTCSS or DCS mode. To confirm the selection, press the PTT button or press MENU button again to move to the next feature setting. Note : If you select any CTCSS Privacy Code, any pre-selected DCS Privacy Code will be cancelled and vice-versa. Selecting a Privacy Code of "oF" will disable the Privacy feature. To communicate between two GXT760/795 Series radios, all radios in your group must be set to the same channel and Privacy Code. The Privacy Code can only be set in channels 1~22. ! TRANSMIT (TX) POWER LEVEL SELECTION Your GXT760/795 Series has 3 power level settings. To select the power level on channels 1~7, 15~33 and 38~42, press the MENU button until a “Pr” icon will appear blinking on the display. Then press the / buttons to select TRANSMIT POWER LEVEL icon (H: Hi/ M: Mid/L: Lo). To confirm, press the PTT button or press MENU button again to move to the next feature setting. Page 9 www.midlandradio.com Model GXT760/795 Series When the Battery Meter drops to 1 bar , the TX Power will automatically switch from Hi(H) or Med(M) to Lo(L) level. ! Note : You cannot adjust the power setting on the FRS channels (8~14 and 34~37). They are set to Low power per FCC regulations. VOX (Hands-free Transmission) Your radio has 5 VOX level settings: (oF/1~5). To set VOX, press the MENU button until the display shows “VOX” blinking while on the right of the CHANNEL NUMBER display, an “oF” icon appears. Select “1~5” by pressing the / buttons and push the PTT key, or press MENU button again to move to the next feature setting. VOX will be more sensitive on the “1” setting than on the “5” setting. To turn VOX off, press the MENU button until the display shows “VOX” blinking while on the right of the CHANNEL NUMBER display, a “1~5” icon appears. Select “oF” by pressing the / buttons and push the PTT key, or press MENU button again to move to the next feature setting. SILENT OPERATION Your GXT760/795 Series has a SILENT OPERATION mode. In this mode, all “beeps” and “tones” are disabled. To turn the SILENT OPERATION mode on, press the MENU button until the display shows an “bP” icon while on the right of the “bP” display, an “on” icon appears. Select “of” by pressing the / buttons and push the PTT key or MENU button. To turn the SILENT OPERATION mode off, press the MENU button until the display shows an “bP” icon while on the right of the “bP” display, an “oF” icon appears. Select “on” by pressing the / buttons and push the PTT key or MENU button. ROGER BEEP (end of transmission) TONE When the PTT button is released, the radio will beep to confirm to other users that your transmission has finished. To turn the ROGER BEEP tone on, press the MENU button until the display shows an “rb” icon while on the right of the “rb” display, an “oF” icon appears. Select “on” by pressing the / buttons and push the PTT key, or press MENU button to move to the next feature setting. Page 10 www.midlandradio.com Additional)Midland)Radio)Settings) Midland'Models'GXT'710/735/750/760' (See$CERT$web$site,$www.lwrcert.org,$Radio$Communications$section,$for$complete$ instruction$manuals$for$each$radio.)$ Display( Symbol( VOX$ ( Description( ( Notes( Hands$free$operation$ To$disable,$use$Menu$until$VOX$ blinks.$Use$up/down$arrow$buttons$ to$select$“oF.”$$Press$PushJtoTalk.$ bP$ Silent:$Disables$the$beeps$ $ Rb$ Roger$Beep:$Beeps$at$the$end$ of$the$transmission$ $ CA$ Call$Alert:$Lets$you$know$ $ someone$is$trying$to$reach$you$ (((II)))$ Ub$ Vibrate$alert$ $ Wx$ NOAA$Radio$ Press$and$hold$Menu$for$3$seconds$ to$enable.$Press$PushJtoJTalk$to$ disable.$ Lock$icon$ Keypad$Lock$ Press$and$hold$lock/call$key$to$ enable/disable.$ Midland'Models'GXT'900/950' (See$CERT$web$site,$www.lwrcert.org,$Radio$Communications$section,$for$complete$ instruction$manuals$for$each$radio.)$ Display( Symbol( $ $ ( Description( ( Notes( Gr$ Group$Mode:$Setting$to$talk$to$ $ one$person$only$in$your$group.$ Sc$ Scrambler:$Scrambles$ messages$so$only$those$with$ Scrambler$on$can$hear.$ $