1
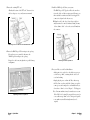
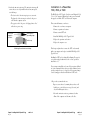
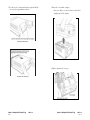
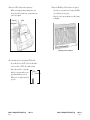
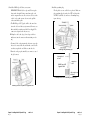
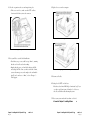
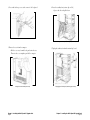
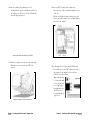
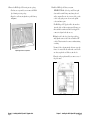
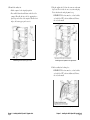
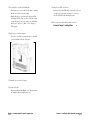
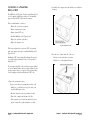
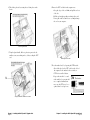
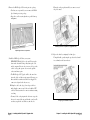
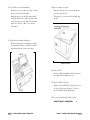
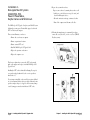
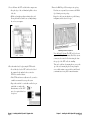
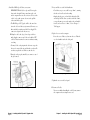
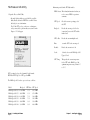
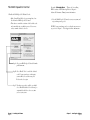
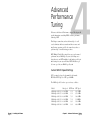
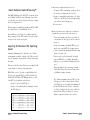
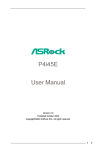
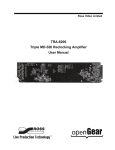
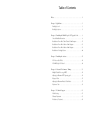
Table of Contents
Preface . . . . . . . . . . . . . . . . . . . . . . . . . . . . . . . . . . . . . . . . . . . . . .1
Chapter 1 - QuickStart . . . . . . . . . . . . . . . . . . . . . . . . . . . . . . . . . . 3
Installing the card . . . . . . . . . . . . . . . . . . . . . . . . . . . . . . . . . . . . . .3
Installing the software . . . . . . . . . . . . . . . . . . . . . . . . . . . . . . . . . . . .6
Chapter 2 - Installing the MACh Speed G3 Upgrade Card . . . . . . .9
General Installation Instructions . . . . . . . . . . . . . . . . . . . . . . . . . . . . .9
Installation in Power Mac 7300, 7500 or 7600 Computers . . . . . . . . 11
Installation in Power Mac 8500 or 9500 Computers . . . . . . . . . . . . . 21
Installation in Power Mac 8600 or 9600 Computers . . . . . . . . . . . . . 32
Installation in Non-Apple Systems . . . . . . . . . . . . . . . . . . . . . . . . . . 40
Chapter 3 - Installing the software . . . . . . . . . . . . . . . . . . . . . . . . .47
The Processor Info Utility . . . . . . . . . . . . . . . . . . . . . . . . . . . . . . . 48
The MACh Speed G3 Control . . . . . . . . . . . . . . . . . . . . . . . . . . . . .50
Chapter 4 - Advanced Performance Tuning . . . . . . . . . . . . . . . . . .53
Multiple Variable Processing (MVP) . . . . . . . . . . . . . . . . . . . . . . . . 54
Adjusting for Maximum CPU Operating speed . . . . . . . . . . . . . . . . . . 54
Frequency Chart . . . . . . . . . . . . . . . . . . . . . . . . . . . . . . . . . . . . . . 56
Adjusting the Maximum Backside Cache Ratios . . . . . . . . . . . . . . . . . 57
Performance Notes . . . . . . . . . . . . . . . . . . . . . . . . . . . . . . . . . . . . 59
Chapter 5 - Technical Support . . . . . . . . . . . . . . . . . . . . . . . . . . . 61
Troubleshooting . . . . . . . . . . . . . . . . . . . . . . . . . . . . . . . . . . . . . . . 61
Warranty Information . . . . . . . . . . . . . . . . . . . . . . . . . . . . . . . . . . 63
Decleration of Conformity . . . . . . . . . . . . . . . . . . . . . . . . . . . . . . . . 64
Thank you for choosing the MACh Speed G3 upgrade. You have
purchased an award wining product which will provide leading
edge performance gains, and is backed by a leader in the computing industry.
The MACh Speed G3 is fully compatible with PowerPC 7300,
7500, 7600, 8500, 8600, 9500 and 9600 Power Computing’s
PowerTower™, PowerCenter™, and PowerWave™ and Umax ®
S900 and J700.
This manual provides installation instructions for your new MACh
Speed G3 processor upgrade. We have divided this manual into 4
easy sections designed to get your system back in service as soon as
possible.
The QuickStart - Provides the information to get your
card installed and running immediately. The quickstart is designed
for persons familiar with installing add-in cards inside computers.
It will provide immediate CPU performance as rated by the manufacture.
Installing the Card - Provides information and
detailed instruction on installing the MACh Speed G3 Upgrade
Card in various computer systems.
Installing the Software -
Provides detailed information on the use of XLR8 exclusive software additions to the
MACh Speed G3 package.
Advanced Performance Tuning - Provides
information on implementing XLR8’s exclusive MVP performance technology, for tuning your system to run up to 20% faster
than the standard base upg rade settings.
Technical Support - This section includes support
information and a handy troubleshooting section, should you have
problems.
Preface
Page 1
Important:
Before installing your MACh Speed G3 CPU card, read the
instructions covering your machine model.
• Static electricity can cause damage to the CPU card and
other computer components including the motherboard.
• Please use the grounding wrist strap while installing or
removing the MACh Speed G3 card.
About Performance Tuning:
Your MACh Speed G3 CPU card was preset from the factory to
base BUS speed and BUS ratio settings. Depending upon the
hardware and software configuration of your particular computer,
you may choose to change the BUS speed and BUS ratio settings
to optimize performance. Refer to the Advance Performance
Tuning section of this manual to select your preferred settings
prior to installation.
Included with your package
The MACh Speed upgrade includes everything you need to install
your card with the exception of a couple of basic tools which are
usually available to any computer user, a phillips head screwdriver
and a ball point ink pen.
The Quickstart
Welcome to the QuickStart Section of this manual. This section
will provide the information that you need to quickly install your
G3 upgrade in the PCI based Mac OS system.
Installing the Card
1. Attach the anti-static wrist strap. The anti-static wrist strap will
ensure that you are well grounded and avoid any unexpected
static discharges.
• The elastic end of the wrist strap is put over your wrist.
The plug end of the wrist strap is attached to the power
cable.
• The opposite end of the power cable plugged into a “live”
wall socket or power strip.
power cord
plugged to
live socket
connection to
grounding strap
wrist strap
Your package includes:
• The MACh Speed G3 Processor Upgrade Card
• High-quality adjustable anti-static wrist strap
Attaching the anti-static wrist strap
• Software on diskette
• Warranty card
• Manual
Preface
Page 2
2. Open the Mac OS system chassis.
• Getting into the chassis varies from system to system. This
chapter assumes that you are familiar with the opening of
your system chassis.Please refer to later chapters if you
need assistance with this operation.
Chapter 1 - QuickStart
Page 3
3. Remove the existing CPU card.
• Identify the location of the CPU card. You can refer to
the later chapters, or to your Systems user manual.
5. Install the MACh Speed G3 into your system.
• The MACh Speed G3 Upgrade will face the same direction as the older card that you just removed. In most cases
this is with the heat sink towards the Power Supply. The
connector is designed to fit only one way.
•Holding the card by the edges (do not depress the heat
sink), insert into the connector without twisting. You may
feel two distinct “clicks” as the card seats itself firmly into
the connector.
Removing the CPU card from a PowerMacintosh 7300
4. Remove the MACh Speed G3 from its protective package.
• Be sure that you are grounded, and remove the
MACh Speed from its protective package.
• Inspect the card for any irregularities or possible damage
in shipment.
Installing the MACh Speed G3
6. Boot your Mac to test the Card/installation.
• At this point, it is a good idea to check that you get a successful boot up “chime”, ensuring that the card is well
seated and working.
• Simply plug the power cord into the Mac, and start up
the Mac. Once you have verified the “chime, you can disconnect power, and complete the card installation. If you
do not hear a “chime”, refer to Chapter 5 - Tech Support.
Inspecting the MACh Speed G3
Chapter 1 - QuickStart
Page 4
•Note: On some machines it may be mandatory to reassemble the Mac before booting. It is suggested that you test for
a successful start-up “chime” at the earliest period possible
to streamline any troubleshooting that may later be
required.
Chapter 1 - QuickStart
Page 5
7. Close up the System.
3. Enable the MACh Speed G3 Backside Cache.
• With a “chiming” G3 enabled Mac, complete the
installation by reversing the steps you followed for the
installation.
• Reconnect all power cables/video/ADB
• Reboot the system.
• In the Control Panels folder of your start-up drive, double-click on the MACh Speed G3 Control.
• This software controls the activation of the backside cache
and controls the ratio at which it operates. You are now
ready to turn the backside cache on.
Installing the Software
1. Copy the Software.
• After booting your Macintosh, insert the floppy disk.
• Review the readme file on the disk for any last minute
changes or updates.
• Copy the MACh Speed G3 Control file to the Control
Panels folder in the System of your start-up System drive.
• Copy the Prodcessor Info file into any Non-Systm folder.
Step A. Select your MACh Speed G3 model from the
pull-down menu.
2. Open the Processor Info file (more detail in Chapter 3).
• Double-click on the XLR8 Processor Info. Review the
dialog for correct information.
• If the CPU speed or cache size are reading incorrectly,
you may have a problem with your system. Consult
Chapter 5 - Tech Support for more information.
Step B. Select “Enable Now” to enable the backside
cache. If your system freezes at this point,
you most likely selected the wrong card.
Reboot and select again.
Step C. Now that your cache is enabled, you should
select “Enable Backside Cache at Startup” to
automatically enable the cache every time
you boot your system.
Step D. Advanced options. This area if for enabling
XLR8’s exclusive MVP technology. Refer to
Chapter 4 - Advanced Performance Tuning
for more information.
Check CPU Speed
Check Cache Size
Chapter 1 - QuickStart
Page 6
Chapter 1 - QuickStart
Page 7
4. Close the MACh Speed G3 Control, restart your system, and
enjoy working at new speeds!
NOTE: If your system hangs on boot, or displays any
error messages, refer to Chapter 5 - Tech Support for
more information.
Installing the
MACh Speed G3
Upgrade Card
This chapter provides information for installing the Mach speed
Card into individual systems. This information can also be found
in the user guides provided by each system manufacturer.
General Installation Instructions
Before installing your MACh Speed Card, you should review this
short section. It provides information specific to the Mach speed
G3 Upgrade Card.
NOTE: Some of the system pictures may differ slightly from the
exact chassis. When in doubt always refer to your Manufacturer's
User Guide.
Chapter 1 - QuickStart
Page 8
Chapter 2 - Installing the MACh Speed G3 Upg
r ade Car d
Page 9
1. Attach the anti-static wrist strap. The anti-static wrist strap will
ensure that you are well grounded and avoid any unexpected
static discharges.
Installation in a PowerMac
7300, 7500, or 7600
• The elastic end of the wrist strap is put over your wrist.
The plug end of the wrist strap is attached to the power
cable from the computer system.
The MACh Speed G3 Upgrade Card gives your Macintosh 7300,
7500 or 7600 computer additional processing power. You install
the upgrade card in the CPU card slot in your computer.
• The opposite end of the power cable plugged into a “live”
wall socket or power strip.
This section will instruct yo on how to:
• Remove the cover from you computer
• Remove expansion card retainer
power cord
plugged to
live socket
connection to
grounding strap
wrist strap
• Remove current CPU card
• Install the MACh Speed G3 Upgrade Card
• Replace the expansion card retainer
• Replace the computer cover
Attaching the anti-static wrist strap
This chapter explains how to remove the CPU card currently
inside your computer and replace it with the MACh Speed G3
Upgrade Card.
Installing the CPU card is technically challenging. If you prefer,
you can ask an Apple-authorized dealer or service provider to
install it for a fee.
If you attempt to install the card yourself but experience difficulties, it is recommended that you have an Apple-authorized service
provider complete the process. Apple does not warranty damage
caused by improper removal or installation of CPU cards.
1. Prepare the system and work area.
•Prepare your work area by ensuring that you have a well
lighted space, preferably not on carpet (less static), and
away from all magnetic devices.
• Put on the anti-static wrist strap, as instructed earlier.
• Turn off the computer and disconnect all cables.
Chapter 2 - Installing the MACh Speed G3 Upg
Page 10
rade Car d
Chapter 2 - Installing the MACh Speed G3 Upg
r ade Car d
Page 11
2. Press the two release buttons under the front panel and slide the
cover toward you approximately two inches.
3. Remove the cover from the computer.
• After you’ve slid the cover forward about two inches, lift it
straight up and off the computer.
Pressing the release buttons
Lifting the cover off.
4. Flip the expansion card cover open
Sliding the cover towards you
Flopping the cover open
Chapter 2 - Installing the MACh Speed G3 Upg
Page 12
r ade Car d
Chapter 2 - Installing the MACh Speed G3 Upg
r ade Car d
Page 13
5. Remove the CPU card that’s in the computer now.
7. Remove the MACh Speed G3 from its protective package.
• Pull the card straight up without rocking it side-to-side.
Do not pull on the heat sink because you may damage the
card or your computer.
• Now that you are grounded, you can remove the MACh
Speed from its protective package.
• Inspect the card for any irregularities or possible damage
in shipment.
Inspecting the MACh Speed G3
Removing the CPU card
6. Reset the motherboard, by depressing the CUDA switch.
• Located directly below the CPU card slot lies the motherboard reset switch, or CUDA. it is a small red button.
• Depress this switch for 5 seconds with a
small tool or pen point. failure to complete this instruction may cause the
CPU not to be recognized when booted
up for use.
Chapter 2 - Installing the MACh Speed G3 Upg
Page 14
r ade Car d
reset button
Chapter 2 - Installing the MACh Speed G3 Upg
r ade Car d
Page 15
8. Install the MACh Speed G3 into your system.
IMPORTANT: Handle by the edges only! Do not push
down on the heat sink. Doing so may damage the card
and/or computer. Excessive force is not needed to seat the
card. if steady, gentle pressure does not work, pull the
card out and insert again.
9. Install the grounding clip.
• The clip slides over one wall of the top chassis. Make sure
the grounding clip also touches the CPU card heat sink.
NOTE: If your Mac does not have a Grounding Strap,
ignore this step.
• The MACh Speed G3 Upgrade will face the same direction as the older card that you just removed. In most cases
this is with the heat sink towards the Power Supply. The
connector is designed to fit only one way.
•Holding the card by the edges (do not depress the heat
sink), insert, into the connector without twisting or rocking.
• You may feel the card going into the slot in two stages: the
first row of contacts slides in, and then the second row. Be
sure that you push the card all the way into the slot.
Installing the grounding clip
• When the card is properly installed, you cannot see any of
the gold contacts.
clip attached
to wall
MACh Speed G3
Upgrade Card
expansion
wall
clip contacts card
and wall
Cutaway view of the installed grounding clip
Installing the MACh Speed G3 Upgrade Card
Chapter 2 - Installing the MACh Speed G3 Upg
Page 16
r ade Car d
Chapter 2 - Installing the MACh Speed G3 Upg
r ade Car d
Page 17
10. Close the expansion card cover and snap it into place
12. Replace the cover on the computer
• If the cover won’t close, make sure the CPU card has
been inserted all the way into the connector.
Closing the cover
Closing the expansion card cover
11. Boot your Mac to test the Card/installation.
• Check that you get a successful boot up “chime”, ensuring
that the card is well seated and working.
• Simply plug the power cord and keyboard into the Mac,
and start up the Mac. Once you have verified the “chime,
you can disconnect power, and complete the card installation. If you do not hear a “chime”, refer to Chapter 5 Tech Support.
Snapping the cover into place
13. Reconnect all cables.
14. Package the old CPU card for later.
• Put the used card into MACh Speed anti-static bag. If you
ever have a problem, it may be handy to be able to use
the old card while troubleshooting the system.
15 Reboot your system and work faster than ever before!
• Proceed to Chapter 3 - Installing Softwar
Chapter 2 - Installing the MACh Speed G3 Upg
Page 18
r ade Car d
Chapter 2 - Installing the MACh Speed G3 Upg
e
r ade Car d
Page 19
Installation in a PowerMac
8500or 9500
The MACh Speed G3 Upgrade Card gives your Macintosh 8500
or 9500 computer additional processing power. You install the
upgrade card in the CPU card slot in your computer.
This section will instruct yo on how to:
• Remove the cover from you computer
• Remove expansion card retainer
• Remove current CPU card
• Install the MACh Speed G3 Upg rade Card
• Replace the expansion card retainer
• Replace the computer cover
This chapter explains how to remove the CPU card currently
inside your computer and replace it with the MACh Speed G3
Upgrade Card.
Installing the CPU card is technically challenging. If you prefer,
you can ask an Apple-authorized dealer or service provider to
install it for a fee.
If you attempt to install the card yourself but experience difficulties, it is recommended that you have an Apple-authorized service
provider complete the process. Apple does not warranty damage
caused by improper removal or installation of CPU cards.
1. Prepare the system and work area.
•Prepare your work area by ensuring that you have a well
lighted space, preferably not on carpet (less static), and
away from all magnetic devices.
• Put on the anti-static wrist strap, as instructed earlier.
• Turn off the computer and disconnect all cables.
Chapter 2 - Installing the MACh Speed G3 Upgrade Card
Page 21
2. Loosen the four large screws at the corners of the back panel.
4. Lower the auxiliary fan (retainer clip on 8500)
• Squeeze the sides and pull it down
Loosen the screws
Lowering the auxiliary fan (retaining clip on 8500)
3. Remove the cover from the computer.
5. Unplug the auxiliary fan form the mains logic board.
• Slide the cover away from the back panel an inch or two.
Then raise the cover straight up and off the computer.
Sliding the cover towards you and up
Chapter 2 - Installing the MACh Speed G3 Upgrade Card
Page 22
Unplugging the auxiliary fan (retaining clip on 8500)
Chapter 2 - Installing the MACh Speed G3 Upgrade Card
Page 23
6. Remove the auxiliary fan (retaining clip on 8500).
• To unlatch the fan, press the small button on the floor of
the computer, near the left leg of the fan. Then slide the
fan to the right and remove it.
8. Remove the CPU card that’s in the computer now.
• Grasp the edges of the card firmly and pull the card out
of the slot.
• Pull the card straight up without rocking it side-to-side.
Do not pull on the heat sink because you might damage
the card or your computer.
Removing the auxiliary fan (retaining clip on 8500)
Removing the CPU card
7. Gently lay the computer on its side on a clean stable surface.
• This makes it easier to insert the new CPU card
correctly.
9. Reset the motherboard, by depressing the CUDA switch.
• Located directly above the CPU card slot at the back of
the computer, lies the motherboard reset switch, or
CUDA. it is a small red button.
• Depress this switch for
5 seconds with a small
tool or pen point. failure to complete this
instruction may cause
the CPU not to be
recognized when booted up for use.
reset button
Laying the computer on its side for easy access
Chapter 2 - Installing the MACh Speed G3 Upgrade Card
Page 24
Chapter 2 - Installing the MACh Speed G3 Upgrade Card
Page 25
10.Remove the MACh Speed G3 from its protective package.
• Now that you are grounded, you can remove the MACh
Speed from its protective package.
• Inspect the card for any irregularities or possible damage
in shipment.
11.Install the MACh Speed G3 into your system.
IMPORTANT: Handle by the edges only! Do not push
down on the heat sink. Doing so may damage the card
and/or computer. Excessive force is not needed to seat the
card. if steady, gentle pressure does not work, pull the
card out and insert again.
• The MACh Speed G3 Upgrade will face the same direction as the older card that you just removed. In most cases
this is with the heat sink towards the Power Supply. The
connector is designed to fit only one way.
•Holding the card by the edges (do not depress the heat
sink), align the connector end of the card with the CPU
card slot. Then, insert into the connector without twisting
or rocking.
Inspecting the MACh Speed G3
• You may feel the card going into the slot in two stages: the
first row of contacts slides in, and then the second row. Be
sure that you push the card all the way into the slot.
• When the card is properly installed, you cannot see any of
the gold contacts.
Installing the MACh Speed G3 Upgrade Card
Chapter 2 - Installing the MACh Speed G3 Upgrade Card
Page 26
Chapter 2 - Installing the MACh Speed G3 Upgrade Card
Page 27
12.Reinstall the auxiliary fan
• Lift the computer back to its upright position.
• Press and hold down the small button on the floor of the
computer. Then slide the fan to the left, engaging the two
plastic loops on the floor of the computer. When the fan is
in place, the button pops up and secures it.
Reinstalling the fan (retaining clip on 8500)
13. Plug the auxiliary fan (9500) into the connector on the main
logic board. There is only one correct way to insert the plug.
Notice that the notch on the plug must face up
• IMPORTANT: If the fan cannot close, so that both sides
are latched, the CPU card is not fully inserted. Remove
the card, and reinstall.
Attaching the fan power to the logic board
14. Lift the auxiliary fan back into place.
• IMPORTANT: If the fan cannot close, so that both sides
are latched, the CPU card is not fully inserted. Remove
the card, and reinstall.
Lifting the auxiliary fan (retaining clip on 8500)
Chapter 2 - Installing the MACh Speed G3 Upgrade Card
Page 28
Chapter 2 - Installing the MACh Speed G3 Upgrade Card
Page 29
15. Boot your Mac to test the Card/installation.
• Check that you get a successful boot up “chime”, ensuring
that the card is well seated and working.
• Simply plug the power cord and keyboard into the Mac,
and start up the Mac. Once you have verified the “chime,
you can disconnect power, and complete the card installation. If you do not hear a “chime”, refer to Chapter 5 Tech Support.
19. Package the old CPU card for later.
• Put the used card into MACh Speed anti-static bag. If you
ever have a problem, it may be handy to be able to use
the old card while troubleshooting the system.
20. Reboot your system and work faster than ever before!
• Proceed to Chapter 3 - Installing Softwar
e
16. Replace the cover on the computer
• Lower the cover all the way down onto the case. Push the
cover back until it touches the back panel.
Replacing the cover
17.Tighten the screws on the back panel.
18. Reconnect all cables.
• You are now finished installing the card. You may turn on
the computer and start using the new card.
Chapter 2 - Installing the MACh Speed G3 Upgrade Card
Page 30
Chapter 2 - Installing the MACh Speed G3 Upgrade Card
Page 31
Installation in a PowerMac
8600, or 9600
2. Carefully lay the computer on its side with the cover and button
facing up
The MACh Speed G3 Upgrade Card gives your Macintosh 8600
or 9600 computer additional processing power. You install the
upgrade card in the CPU card slot in your computer.
This section will instruct yo on how to:
• Remove the cover from you computer
• Remove expansion card retainer
• Remove current CPU card
• Install the MACh Speed G3 Upg rade Card
• Replace the expansion card retainer
• Replace the computer cover
Lay the computer on its side
This chapter explains how to remove the CPU card currently
inside your computer and replace it with the MACh Speed G3
Upgrade Card.
Installing the CPU card is technically challenging. If you prefer,
you can ask an Apple-authorized dealer or service provider to
install it for a fee.
3. Press the release button on the side of the cover.
• Lift the cover near the button a few inches.
* Slide the cover to the right and lift it out.
If you attempt to install the card yourself but experience difficulties, it is recommended that you have an Apple-authorized service
provider complete the process. Apple does not warranty damage
caused by improper removal or installation of CPU cards.
1. Prepare the system and work area.
•Prepare your work area by ensuring that you have a well
lighted space, preferably not on carpet (less static), and
away from all magnetic devices.
• Put on the anti-static wrist strap, as instructed earlier.
Sliding the cover panel to the right and lifting it off
• Turn off the computer and disconnect all cables.
• If the computer cover is locked shut, unlock it by removing the security cable or padlock from the cover latch.
Chapter 2 - Installing the MACh Speed G3 Upgrade Card
Page 32
Chapter 2 - Installing the MACh Speed G3 Upgrade Card
Page 33
4. Unlock th top chassis by rotating the two locking levers on the
chassis
6. Remove the CPU card that’s in the computer now.
• Grasp the edges of the card firmly and pull the card out
of the slot.
• Pull the card straight up without rocking it side-to-side.
Do not pull on the heat sink because you might damage
the card or your computer.
Unlocking the chassis
5. Using the plastic handle, lift the top chassis up ant to the side
until it rests on your working surface, clearly revealing the CPU
card.
Removing the CPU card
7. Reset the motherboard, by depressing the CUDA switch.
• Located directly above the CPU card slot at the back of
the computer, lies the motherboard reset switch, or
CUDA. it is a small red button.
• Depress this switch for 5 seconds
with a small tool or pen point. failure to complete this instruction
may cause the CPU not to be recognized when booted up for use.
CPU
Card
reset button
Swing the chassis to reveal the CPU card
Chapter 2 - Installing the MACh Speed G3 Upgrade Card
Page 34
Chapter 2 - Installing the MACh Speed G3 Upgrade Card
Page 35
8. Remove the MACh Speed G3 from its protective package.
• Now that you are grounded, you can remove the MACh
Speed from its protective package.
• When the card is properly installed, you cannot see any of
the gold contacts.
• Inspect the card for any irregularities or possible damage
in shipment.
Installing the MACh Speed G3 Upgrade Card
Inspecting the MACh Speed G3
10.. Replace the chassis by swinging it back into place
9. Install the MACh Speed G3 into your system.
IMPORTANT: Handle by the edges only! Do not push
down on the heat sink. Doing so may damage the card
and/or computer. Excessive force is not needed to seat the
card. if steady, gentle pressure does not work, pull the
card out and insert again.
• Using the handle, gently swing the top chassis closed until
it rests firmly on the bottom chassis.
• The MACh Speed G3 Upgrade will face the same direction as the older card that you just removed. In most cases
this is with the heat sink towards the Power Supply. The
connector is designed to fit only one way.
•Holding the card by the edges (do not depress the heat
sink), align the connector end of the card with the CPU
card slot. Then, insert into the connector without twisting
or rocking.
• You may feel the card going into the slot in two stages: the
first row of contacts slides in, and then the second row. Be
sure that you push the card all the way into the slot.
Chapter 2 - Installing the MACh Speed G3 Upgrade Card
Page 36
Swinging the chassis into place
Chapter 2 - Installing the MACh Speed G3 Upgrade Card
Page 37
11. Boot your Mac to test the Card/installation.
13. Replace the computer cover panel.
• Check that you get a successful boot up “chime”, ensuring
that the card is well seated and working.
• Align the bottom edges of the cover panel with the computer chassis as shown below.
• Simply plug the power cord and keyboard into the Mac,
and start up the Mac. Once you have verified the “chime,
you can disconnect power, and complete the card installation. If you do not hear a “chime”, refer to Chapter 5 Tech Support.
• Then press the cover panel onto the chassis until it snaps
into place.
12. Lock the chassis by rotating the locking levers.
• Lock the top chassis in place by moving the two locking
levers inward and downward, as shown. Be sure that they
snap underneath the raised catches on the chassis.
Replacing the cover
14. Reconnect all cables.
• You are now finished installing the card. You may turn on
the computer and start using the new card.
15. Package the old CPU card for later.
• Put the used card into MACh Speed anti-static bag. If you
ever have a problem, it may be handy to be able to use
the old card while troubleshooting the system.
Rotating the locking levers
16 Reboot your system and work faster than ever before!
• Proceed to Chapter 3 - Installing Softwar
Chapter 2 - Installing the MACh Speed G3 Upgrade Card
Page 38
e
Chapter 2 - Installing the MACh Speed G3 Upgrade Card
Page 39
Installation in
Non-Apple Mac OS Systems
UMAX S900, J700,
PowerCC PowerWave,
DayStar Genesis and Millennium
1. Prepare the system and work area.
•Prepare your work area by ensuring that you have a well
lighted space, preferably not on carpet (less static), and
away from all magnetic devices.
• Put on the anti-static wrist strap, as instructed earlier.
• Turn off the computer and disconnect all cables.
The MACh Speed G3 Upgrade Card gives your MacOS System
additional processing power. You install the upg rade card in the
CPU card slot in your computer.
This section will instruct yo on how to:
• Remove the cover from you computer
2. Following the manufacturer’s recommended procedures,
remove the cover (PowerCC), or side access door (UMAX,
DayStar systems).
• Remove expansion card retainer
• Remove current CPU card
• Install the MACh Speed G3 Upgrade Card
• Replace the expansion card retainer
• Replace the computer cover
This chapter explains how to remove the CPU card currently
inside your computer and replace it with the MACh Speed G3
Upgrade Card.
Removing the cover of the PowerCC PowerWave desktop
Installing the CPU card is technically challenging. If you prefer,
you can ask an Apple-authorized dealer or service provider to
install it for a fee.
If you attempt to install the card yourself but experience difficulties, it is recommended that you have an Apple-authorized service
provider complete the process. Apple does not warranty damage
caused by improper removal or installation of CPU cards.
Removing the cover of the PowerCC PowerWave tower
Chapter 2 - Installing the MACh Speed G3 Upgrade Card
Page 40
Chapter 2 - Installing the MACh Speed G3 Upgrade Card
Page 41
3. Locate & Remove the CPU card that’s in the computer now.
5. Remove the MACh Speed G3 from its protective package.
• Grasp the edges of the card firmly and pull the card out
of the slot.
• Now that you are grounded, you can remove the MACh
Speed from its protective package.
• Pull the card straight up without rocking it side-to-side.
Do not pull on the heat sink because you might damage
the card or your computer.
• Inspect the card for any irregularities or possible damage
in shipment, and check your cache type.
Inspecting the MACh Speed G3
Removing the CPU card from a tower system
4. Reset the motherboard, by depressing the CUDA switch.
• Located directly above the CPU card slot at the back of
the computer, lies the motherboard reset switch, or
CUDA. it is a small red button.
Note on PowerCC Systems: The CPU card bay does not
support the full height card on many PowerWave systems.
you may need to remove the black extension plate from
the top edge of the CPU card before installing.
This can be easily done by removing the two screws at the
top of the card, removing the plate, then replacing the
screws, which continue to support the heat sink. Consult
your manufacturer’s user guide for more information.
• If the CUDA switch is not readily noticeable, you need to
consult the user manual for your specific system.
• Depress this switch for 5 seconds with a small tool or pen
point. failure to complete this
instruction may cause the CPU
not to be recognized when booted up for use.
Chapter 2 - Installing the MACh Speed G3 Upgrade Card
Page 42
Chapter 2 - Installing the MACh Speed G3 Upgrade Card
Page 43
6. Install the MACh Speed G3 into your system.
IMPORTANT: Handle by the edges only! Do not push
down on the heat sink. Doing so may damage the card
and/or computer. Excessive force is not needed to seat the
card. if steady, gentle pressure does not work, pull the
card out and insert again.
• The MACh Speed G3 Upgrade will face the same direction as the older card that you just removed. In most cases
this is with the heat sink towards the Power Supply. The
connector is designed to fit only one way.
•Holding the card by the edges (do not depress the heat
sink), align the connector end of the card with the CPU
card slot. Then, insert into the connector without twisting
or rocking.
7. Boot your Mac to test the Card/installation.
• Check that you get a successful boot up “chime”, ensuring
that the card is well seated and working.
• Simply plug the power cord and keyboard into the Mac,
and start up the Mac. Once you have verified the “chime,
you can disconnect power, and complete the card installation. If you do not hear a “chime”, refer to Chapter 5 Tech Support.
8. Replace the cover on the computer
• Lower the cover all the way down onto the case. Push the
cover back until it touches the back panel.
• You may feel the card going into the slot in two stages: the
first row of contacts slides in, and then the second row. Be
sure that you push the card all the way into the slot.
• When the card is properly installed, you cannot see any of
the gold contacts.
Replacing the cover
9. Tighten the screws on the back panel.
Installing the MACh Speed G3 Upgrade Card
10. Reconnect all cables.
• You are now finished installing the card. You may turn on
the computer and start using the new card.
Chapter 2 - Installing the MACh Speed G3 Upgrade Card
Page 44
Chapter 2 - Installing the MACh Speed G3 Upgrade Card
Page 45
11. Package the old CPU card for later.
• Put the used card into MACh Speed anti-static bag. If you
ever have a problem, it may be handy to be able to use
the old card while troubleshooting the system.
12. Reboot your system and work faster than ever before!
• Proceed to Chapter 3 - Installing Softwar
e
Installing
the
Software
This chapter will provide the information you need to enable the
MACh Speeds incredible backside cache. It also provides information on XLR8’s Processor Info Utility, which gives excellent feedback on the CPU card’s current status.
This chapter will instruct you on how to:
• Install the XLR8 software
• Use the XLR8 Processor Info Utility
• Use the MACh Speed G3 Upgrade Control
Your package includes the XLR8 Software diskette. This diskette
includes everything needed to enable and periodically review the
G3 upgrade card.
The software controls the activation of the Backside Cache and
controls the ratios it operates at. When first installed, the MACh
Speed’s backside cache will not be enabled. Follow the instructions
below to complete the installation of the software and enable the
backside cache.
1. After you ha ve installed your MACh Speed G3
Upg r ade Car d … Copy the Software to your startup disk.
• After booting your Macintosh, insert the floppy disk.
• Review the readme file on the disk for any last minute
changes or updates.
• Copy the MACh Speed G3 Control file to the Control
Panels folder in the System of your start-up System drive.
• Copy the Prodcessor Info file into any Non-System folder.
Chapter 2 - Installing the MACh Speed G3 Upgrade Card
Page 46
Chapter 3 - Installing the Software
Page 47
The Processor Info Utility
1. Open the Processor Info Utility
• Open the folder in which you copied the Processor Info
utility. Double-click on the XLR8 Processor Info. Review
the dialog for correct information.
Note: If the CPU speed or cache size are reading incorrectly, you may have a problem with your system. Consult
Chapter 5 - Tech Support.
Information provided in the PI Utility includes:
XLR8 Contact: This is handy information for when you
need to contact XLR8 for question or
comments.
CPU Speed:
Checks the current operating speed of
the CPU.
Bus Speed:
Provides the current speed of the bus
(connection) between the CPU and the
motherboard.
CPU to Bus
Provides the current multiplier used
Ratio:
to run the CPU at the current speed.
Backside
Provides the current size of the
Cache:
backside cache on the MACh Speed G3
Upgrade Card.
CPU Temp:
This provides the current temperature
for the CPU on the MACh Speed. the
optimum temperature range is from 0˚ C
to 85˚ C.
CPU operating clock speed is determined by the formula:
BUS Ratio X BUS Speed = CPU speed in MHz.
The MACh Speed G3 cards are preset at factory as follows:
Model
MACh Speed G3 266
MACh Speed G3 275
MACh Speed G3 300
MACh Speed G3 333
MACh Speed G3 366
MACh Speed G3 400
Bus Speed CPU Ratio CPU Speed
41.00 MHz
6.5:1
266.5 MHz
42.60 MHz
6.5:1
276.9 MHz
40.00 MHz
7.5:1
300.0 MHz
41.60 MHz
7.5:1
334.5 MHz
46.00 MHz
8.0:1
368.0 MHz
50.00 MHz
8.0:1
400.0 MHz
Chapter 3 - Installing the Software
Page 48
Chapter 3 - Installing the Software
Page 49
The MACh Speed G3 Control
About the “Advanced options ”. This area if for enabling
XLR8’s exclusive MVP technology. Refer to Chapter 4 Advanced Performance Tuning for more information.
1. Enable the MACh Speed G3 Backside Cache.
• In the Control Panels folder of your start-up drive, double-click on the MACh Speed G3 Control.
• This software control the activation of the backside cache
and controls the ratio at which it operates. You are now
ready to turn the backside cache on.
2. Close the MACh Speed G3 Control, restart your system, and
enjoy working at new speeds!
NOTE: If your system hangs on boot, or displays any error messages, refer to Chapter 5 - Tech Support for more information.
Step A. Select your MACh Speed G3 model from the
pull-down menu.
Step B. Select “Enable Now” to enable the backside
cache. If your system freezes at this point,
you most likely selected the wrong card.
Reboot and select again.
Step C. Now that your cache is enabled, you should
select “Enable Backside Cache at Startup” to
automatically enable the cache every time
you boot your system.
Chapter 3 - Installing the Software
Page 50
Chapter 3 - Installing the Software
Page 51
Advanced
Performance
Tuning
Welcome to the Advanced Performance chapter. This chapter will
provide information on enabling XLR8’s exclusive performance
technology, MVP.
This Chapter assumes that you have the knowledge of a well
versed technician, and that you understand how to remove and
install various expansion cards. It also assumes that you have a
good knowledge of troubleshooting procedures.
MVP, Multiple Variable Processing allows you to tap the unused
performance in your MACh Speed system, by allowing you to
adjust bus ratios, and CPU multiplier for the highest possible optimized settings for your system. In short, MVP will deliver up to
20% more speed for your MACh Speed System!
Current MACh Speed Settings
CPU operating clock speed is determined by the formula:
BUS Ratio X BUS Speed = CPU speed in MHz.
The MACh Speed G3 cards are preset at factory as follows:
Model
MACh Speed G3 266
MACh Speed G3 275
MACh Speed G3 300
MACh Speed G3 333
MACh Speed G3 366
MACh Speed G3 400
Chapter 3 - Installing the Software
Page 52
Bus Speed CPU Ratio CPU Speed
41.00 MHz
6.5:1
266.5 MHz
42.60 MHz
6.5:1
276.9 MHz
40.00 MHz
7.5:1
300.0 MHz
41.60 MHz
7.5:1
334.5MHz
46.00 MHz
8.0:1
368.0 MHz
50.00 MHz
8.0:1
400.0 MHz
Chapter 4 - Advanced Performance Tuning
Page 53
1. Shut down your computer and remove the cover.
About Multiple Variable Processing™
Only XLR8’s MACh Speed G3 CPU CPU cards have the advantage of Multiple Variable Processing. This unique feature allows
you to fine tune your card to the hardware and software configuration of your computer model.
• To adjust the CPU to its maximum operating speed locate
the current speed settings in the table at the left
• Keeping a consistent Ratio setting (switches 9-12), adjust
switches 1-8 to the BUS Speed at the next highest setting,
(refer to the table on the following page).
• Boot your system
This fine tuning is accomplished by adjusting the CPU Card BUS
Speed with switches 1-7 on the MACh Speed card.
Once the BUS speed is set, Ratios are set which determine the
final operating speed of the CPU (switches 8-12 on the card) and
its dedicated cache (via the control panel).
Adjusting for Maximum CPU Operating
Speed
Adjusting for Maximum Speed is “hit & miss” at best. To find
your maximum, you will have to find the “wall”. This can only be
located by adjusting to the point that the card fails, then lowering
the settings.
This is not for the faint of heart. But it is very rewarding. You will
reap the benefits of extreme speed and productivity.
XLR8 Utilizes a series of 12 switches on the MACh Speed G3
Upgrade card to adjust the BUS Speed (CPU to motherboard)
and the CPU to BUS Ratio (CPU Multiplier) in order to set the
actual CPU speed at which the card will operate.
• Switches 1-8 set the Card’s BUS Speed.
• Switches 9-12 determine the Ratio (or multiplier) at which
the CPU will operate.
Base Settings
220
233
266
275
300
333
366
400
Switches in the “ON” position
Bus Speed
1,3,4,6 - 10, 11
1,6,8 - 10,11
6,8 - 10,12
1,6,8 - 10,12
1,3,4,6 - 10,11,12
3,4,6,8 - 9 ,10
1,4,6,7 - 9,10
1,2,4,6,7,8 - 9,10
Chapter 4 - Advanced Performance Tuning
Page 54
40.0
42.6
41.0
42.6
40.0
44.6
46.0
50.0
Bus ratio
5.5
5.5
6.5
6.5
7.5
7.5
8.0
8.0
to
to
to
to
to
to
to
to
1
1
1
1
1
1
1
1
2. Run your system at the new setting for at least 24 hours to
determine that your system is stable at the new speed.
• If your card is running well at the new speed, then you
can again follow the earlier steps to take your card to the
next speed.
• If your card is running well at multiple BUS Speed settings above the standard BUS Speed settings, then you
can also experiment with adjusting the Bus Ratio Settings
(switches 9-12) on the card.
• When you reach a speed that is unstable. You should
adjust your BUS Ratio to a .5x higher. This will allow
higher processor speeds without being limited by the bus
speed.
• Your system should be able to run memory tests such as
TechTool Pro, DayStar’s PowerControl Testing software,
or MacBench overnight, consistently.
Note: To find the maximum achievable CPU speed, the
following steps can also be followed with the cache disabled. This allows you to determine the maximum speed
that the CPU will run on the bus. Once a comfortable
speed has been achieved, the cache can be enabled. It is
normal, that the CPU speed will have to be lowered
slightly to compensate when the cache is enabled.
Chapter 4 - Advanced Performance Tuning
Page 55
MVP CPU Frequency Chart
12
Switches in
“ON” position
1,3,4,6
1,2,3,6
6,8
2,4,6,8
1,6,8
1,3,6,8
1,2,4,6,8
1,2,3,4,6,8
3,6,7
2,6,7
2,3,4,6,7
1,4,6,7
1,2,6,7
1,2,3,6,7
4,6,7,8
3,4,6,7,8
2,3,6,7,8
1,6,7,8
1,3,4,6,7,8
1,2,4,6,7,8
5
3,5
2,4,5
2,3,4,5
1,3,5
1,2,5
1,2,3,4,5
4,5,8
2,5,8
2,3,5,8
1,4,5,8
1,3,4,5,8
1,2,3,5,8
5,7
3,4,5,7
2,4,5,7
1,5,7
1,3,5,7
1,2,4,5,7
1,2,3,4,5,7
11
10,11
10
Adjusting the Maximum Backside Cache
Speed
10,12
9,11,12 10,11,12
9,10
Backside cache is the revolutionary new technology that places
Level 2 cache (high speed memory) directly on the CPU card, dedicated to the G3 CPU.
Bus Ratio
40.0
40.6
41.0
42.0
42.6
43.0
43.6
44.0
44.6
45.0
45.6
46.0
46.6
47.0
47.6
48.0
48.6
49.0
49.6
50.0
50.6
51.0
51.6
52.0
52.6
53.0
53.6
54.0
54.6
55.0
55.6
56.0
56.6
57.0
57.6
58.0
58.6
59.0
59.6
60.0
4.5
5
5.5
6
6.5
7
7.5
8
180.0
182.7
1487.2
189.0
191.7
193.5
196.2
198.0
200.7
202.5
205.2
207.0
209.7
211.5
214.2
216.0
218.7
220.5
223.2
225.0
227.7
229.5
232.2
234.0
236.7
238.5
241.2
243.0
245.7
247.5
250.2
252.0
254.7
256.5
259.2
261.0
263.7
265.5
268.2
270.0
200.0
203.0
208.0
210.0
213.0
215.0
218.0
220.0
223.0
225.0
228.0
230.0
233.0
235.0
238.0
240.0
243.0
245.0
248.0
250.0
253.0
255.0
258.0
260.0
263.0
265.0
268.0
270.0
273.0
275.0
278.0
280.0
283.0
285.0
288.0
290.0
293.0
295.0
298.0
300.0
220.0
223.3
228.8
231.0
234.3
236.5
239.8
242.0
245.3
247.5
250.8
253.0
256.3
258.5
261.8
264.0
267.3
269.5
272.8
275.0
278.3
280.5
283.8
286.0
289.3
291.5
294.8
297.0
300.3
302.5
305.8
308.0
311.3
313.5
316.8
319.0
322.3
342.5
327.8
330.0
240.0
243.6
249.6
252.0
255.6
258.0
261.6
264.0
267.6
270.0
273.6
276.0
279.6
282.0
285.6
288.0
291.6
294.0
297.6
300.0
303.6
306.0
309.6
312.0
315.6
318.0
321.6
324.0
327.6
330.0
333.6
336.0
339.6
342.0
345.6
348.0
351.6
354.0
357.6
360.0
260.0
263.9
270.4
273.0
276.9
279.5
283.4
286.0
289.9
292.5
296.4
299.0
302.9
305.5
309.4
312.0
315.9
318.5
322.4
325.0
328.9
331.5
335.4
338.0
341.9
344.5
348.4
351.0
354.9
357.5
361.4
364.0
367.9
370.5
374.4
377.0
380.9
383.5
387.4
390.0
280.0
284.2
291.2
294.0
298.2
301.0
305.2
308.0
312.2
315.0
319.2
322.0
326.2
329.0
332.2
336.0
340.2
343.0
347.2
350.0
354.2
357.0
361.2
364.0
368.2
371.0
375.2
378.0
382.2
385.0
389.2
392.0
396.2
399.0
403.2
406.0
410.2
413.0
417.2
420.0
300.0
304.5
312.0
315.0
319.5
322.5
327.0
330.0
334.5
337.5
342.0
345.0
349.5
352.5
357.0
360.0
364.5
367.5
372.0
375.0
379.5
382.5
387.0
390.0
394.5
397.5
402.0
405.0
409.5
412.5
417.0
420.0
424.5
427.5
432.0
435.0
439.5
442.5
447.0
450.0
320.0
324.8
332.8
336.0
340.8
344.0
348.8
352.0
356.8
360.0
364.8
368.0
372.8
376.0
380.8
384.0
388.8
392.0
396.8
400.0
404.8
408.0
412.8
416.0
420.8
424.0
428.8
432.0
436.8
440.0
444.8
448.0
452.8
456.0
460.8
464.0
468.8
472.0
476.8
480.0
Base Settings
220
233
266
275
300
333
366
400
Switches in the “ON” position
1,3,4,6 - 10,11
1,6,8 - 10,11
6, 8 - 1 0,12
1,6,8 - 10,12
1,3 ,4,6 - 10,11,12
3, 4,6,8 - 9,10
1,4,6,7 - 9,10
1,2,4,6,7,8 - 9, 10
Chapter 4 - Advanced Performance Tuning
Page 56
Bus Speed
40.0
42.6
41.0
42.6
40.0
44.6
46.0
50.0
Since this is a dedicated cache technology, on its own BUS, it is
not limited to the slower fixed speed (±50 MHz) of the main logic
board BUS. The backside cache can run at speeds up the speed of
the CPU itself.
Most often though, the backside cache operates at half the speed
of the CPU. Even this speed is nearly 4 times faster than earlier inline, and look-aside caching technologies.
The Speed of the Cache is derived from the Ratios of the set
operating speed of the CPU. For example, if the CPU runs at 400
MHz, and the backside cache Ratio is 2:1, then the backside cache
will run at 200 MHz
To adjust the Backside Cache Speed:
1. Open the MACh Speed G3 Control in your Control Panels
folder.
Bus ratio
5.5
5.5
6.5
6.5
7.5
7.5
8 .0
8.0
to
to
to
to
to
to
to
to
1
1
1
1
1
1
1
1
Opening the G3 Control
MACh Speed G3 Model:
220MHz / 110MHz
233MHz / 117MHz
266MHz / 177MHz
266MHz / 133MHz
275MHz / 183MHz
275MHz / 137MHz
300MHz / 120MHz
300MHz / 200MHz
333MHz / 166MHz
366MHz / 183MHz
400MHz / 200MHz
Default Setting
2:1
2:1
1.5:1
2:1
1.5:1
2:1
5:2
2:1
2:1
2:1
2:1
Chapter 4 - Advanced Performance Tuning
Page 57
2. Uncheck automatic startup of the cache.
• To avoid having problems with boot-up if you select “too
fast” of a setting, deselect the “Enable backside cache at
startup box”. You can enable automatic start-up later
once you have found the optimum setting.
3. Select “Advanced Options:
• Set the Cache control to the next highest Ratio. some settings are not available for some card as the setting would
result in speeds much too high for the cache.
• Select “OK”
Miscellaneous Performance Notes
• Many factors effect the performance of the CPU card.
using high quality expansion products, cables and RAM
will ensure that you have a system that can perform much
faster with a “tuned” MACh Speed upgrade.
• Any speed can be set for any CPU, but a CPU will generally only operate at 20% more than its manufacturer rated
speed.
• Most of the logic boards supported by the MACh Speed
have a maximum Bus Speed of around 50 MHz.
• The CPU operating speed and the cache operating speed
are linked by the BUS speed on the card. The final operating speed of each is determined by the its Ratio to the
card’s BUS speed.
• CPU operating clock speed is determined by:
BUS Ratio X BUS Speed = CPU speed in MHz.
• Once the MACh Speed G3 Upgrade Card is installed, the
Motherboard Level 2 cache becomes a Level 3 cache.
Since the Motherboard cache is smaller than the Level 2
cache, it will not add to the system performance. If possible (as in the 8500/7500), you should remove the motherboard cache.
Setting the Cache Ratio for Maximum speed
4. Restart the backside cache
• In the main window, select “Enable Now”
• If you freeze at this point, then you have selected too fast
of a setting for your backside cache. It is possible to adjust
the CPU settings on the card to a slower setting, then
using a higher ratio on the backside cache.
• Your system should be able to run memory tests such as
TechTool Pro or DayStar’s PowerControl Testing software
overnight consistently to operate at the higher speeds.
Chapter 4 - Advanced Performance Tuning
Page 58
Chapter 4 - Advanced Performance Tuning
Page 59
Technical
Support
Direct questions concerning proper installation and operation of
the
MACh Speed G3 Card to:
1.800.513.9744 ext. 333 (Technical Support Only)
(316) 636-5544
Technical Support E-mail Address: [email protected]
Web Address: www.xlr8.com
Troubleshooting the MACh Speed Card
1. Please view the readme file on the software disk for the la est
news on your new MACh Speed G3 card.
2. If your computer does not power up:
• Make sure the motherboard L2 Cache DIMM has been
removed (if possible)
a) Make sure the cables, video and/or other PCI cards are
properly seated.
b) Check the MACh Speed G3 card to see if it is properly
and fully seated.
c) Reset the motherboard button (CUDA) located under
the CPU card. This ensures that the CPU will be recognized on the next boot.
Chapter 5 - Technical Support
Page 61
d) If your computer still does not power up, try removing
and reinstalling the MACh Speed G3 card.
Limited Warranty
e) ZAP the P-Ram (Control, Command, P and R) or see
the computer installation manual for further information on zapping the P-Ram.
XLR8 by Interex warrants this product to be free from any defects
in materials or workmanship to the initial purchaser for two full
years from the date of purchase. If such a defect is discovered
within this warranty’s limitations, the manufacturer agrees to
repair or replace, at its sole discretion, this product free of charge,
subject to the following conditions:
3. If your computer powers up, but freezes during Startup:
a) Make sure the MACh Speed G3 is properly seated in
the processor slot.
b) Be sure your old motherboard L2 Cache Card has been
removed and try re-booting. (Many of the original and
third-party L2 Cache can not operate at your new
accelerated speeds.)
NOTE: 9500/9600s have the cache soldered t the
motherboard, these caches are compatible with the G3
upgrades.
c) If your computer still does not power up, try removing
the new MACh Speed G3 card and reinstalling it.
d) Verify that the G3 settings are at the factory defaults.
4. If your system is unstable:
1. The manufacturer must be notified in writing within 10 days
of discovery of defect.
2. The defective unit is returned to the manufacturer, freight
prepaid, within 30 days of discovery of defect. Proof of purchase must accompany return.
3. Manufacturer shall determine damage to product is not due
to misuse, negligence, improper installation, repair, alteration or
accident caused by parties other than manufacturer.
This warranty is in lieu of all other warranties express or implied.
In no event shall the manufacturer be liable for incidental or consequential damages including personal injury. This product is
intended for use in only those computer models listed in the operating instructions or on the package.
a) If you are having a problem with random errors (system freeze, Type 1 and Type 11, communications problems with the floppy drive), the BUS speed may be set
too high. Set CPU BUS Speed to 40 MHz using the dip
switch settings from the Frequency Chart on page 6.
b) Install the Power PC Interrupt Extension. (Obtain from
Apple’s web site, http://www.info.apple.com (required
w/system 7.5.5 only). Upgrade system to OS 8.x.
5. If your software freezes:
The clock and BUS speeds are recorded by some software
packages when installed. Subsequent changes in speed can
cause the software to freeze. Reinstall any software that
seems unstable after installing MACh Speed G3 card.
The OS should be installed with a “clean install”.
Chapter 5 - Technical Support
Page 62
Chapter 5 - Technical Support
Page 63
DECLARATION OF CONFORMITY
according to ISO/IEC Guide 22 and 45014
We, the Manufacturer:
XLR8 by INTEREX, Inc.
8447 E. 35th St. N.
Wichita, KS USA 67226
Declare under our sole responsibility that the Product:
Name: Apple Macintosh CPU Board Upgrade
Model: MACh Speed G3
Part No: MACh/G220/5, MACh/G233/5, MACh/G266/1,
MACh/G275/1, MACh/G300/1, MACh/333/1, MACh/366/1,
MACh/400/1
Conforms to FCC 47 CFR 15.107 & 15.109 , CLASS B
Emissions, using: Safety: EMC: EN55022: 1994, A1: 1995 Class B
and EN 50082-1: 1997 Level 2
Other: Method of Continuing Conformance: ISO9001 (4.9) registered manufacturing facility with production sampling program.
Test Report: LM-12087A
Report Date: 09 December, 1997
XLR8 By INTEREX, Inc.
8447 E. 35th St. N.
Wichita, KS USA 67226
Phone (316) 636-5544
Fax (316) 636-4616
Chapter 5 - Technical Support
Page 64