1
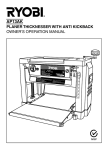
ESR2400A
1
ESR-2400A
240V
50Hz • 2400W
11
RYOBI AUSTRALIA.
10
9
8
2
-1-
-2-
English
Maintain tools with care.
Keep the blades sharp and the exit shoot clean for better
and safer performacnce. Follow instructions for changing
accessories. Do not use the shredder if it is damaged in
anyway.
GENERAL SAFETY RULES
CAUTION! Read and understand these instructions.
When using garden tools observe them to protect
against electric shock, risk of fire and serious injury.
Read these instructions before using the shredder
and keep them in a safe place for future reference.
Keep work area tidy
Cluttered work areas increase the risk of accident and
injury. Keep the work area that is to be used clear of
clutter.
Consider the work environment
Keep work area well lit. Do not expose tools to rain. Do
not use tools in damp or wet location. Do not use the
tools in the presence of flammable liquids or gases.
Gaurd against electric shock
Avoid body direct contact with earth or ground surfaces.
Keep away from children
Children under 16 years of age should not operate the
shredder. The operator shall be responsible for the safety
of person in the operating zone of the shredder.
Personal safety
Stay alert, watch what you are doing and use common
sense when operating a power tool. Do not use tools while
tired or under the influence of drugs, alcohol or medication.
Store tools in a secure place
When not in use, tools should be stored in a dry, high or
locked-up place, out of reach of children.
Inspect power leads and cords
Inspect the plug and cord each time when the shredder is
used. If damaged, have it repaired at an authorized service
centre. Inspect extension cables regularly for signs of
damage or aging. Replace if damaged. The shredder should
not be used if the condition of the connection cord is not
satisfactory.
Check damaged parts
Before further use of the tool, any part that is damaged
should be carefully checked to determine that it will operate
properly and perform its intended function. Check for
alignment of moving parts, breakages of parts, mounting
and any part that is damaged should be properly repaired
or replaced at an authorized service centre unless otherwise
indicated in the instruction manual. Have defective switches
replaced at an authorized service centre. Do not use the
tool if the switch does not turn it on and off.
Stay alert
Watch what you are doing. Use common sense. Do not
operate the shredder when tired.
Warning!
The use of any accessory or attachment, other than those
recommended in this instruction manual, may present a
risk of personal injury.
Have the shredder repaired by a qualified service centre.
This shredder is constructed inaccordance with the relevant
safety requirements.
Repairs should only be carried out by qualified service
centre using original spare parts, otherwise this may result
in considerable danger to the user.
Dress properly
Rubber gloves and non-skid footwear are recommended
when working outdoors.
Do not wear loose clothing or jewelry. Contain long hair.
Do not operate the shredder without the hopper.
When starting up or switching on the motor, the feeding
device and discharge chute shall be in the closed position.
Never reach into the shredder when it is running or plugging in.
Make sure the shredder is standing on a level and a firm
base and will not topple over.
Do not overreach
Keep proper footing and balance at all times.
Before leaving the shredder, it shall be switched off.
The shredder should be assembled in accordance with
the instruction manual before switching on.
-3-
English
SYMBOLS
Some of the following symbols may be used on your tool. Please study them and learn their meaning. Proper
interpretation of these symbols will allow you to operate the tool more safely and effectively.
SYMBOL
50' 15m
NAME
EXPLANATION
Safety Alert
Precautions that involve your safety.
Ricochet
Thrown objects can cause severe injury. Wear
protective clothing and boots.
Eye Protection
Always wear safety goggles or safety glasses with
side shields and a full face shield when operating
this product.
Keep Bystanders Away
Keep all bystanders at least 50 ft. (15 m) away.
No Blade
Do not install any type of blade on this product.
Class II Construction
Double-insulated construction.
Wet Conditions Alert
Do not expose to rain or use in damp locations.
Read Operator’s Manual
To reduce the risk of injury, user must read and
understand operator’s manual before using this
product.
The following signal words and meanings are intended to explain the levels of risk associated with this product.
SYMBOL
SIGNAL
MEANING
DANGER:
Indicates an imminently hazardous situation, which, if not avoided, will result in
death or serious injury.
WARNING:
Indicates a potentially hazardous situation, which, if not avoided, could result in
serious injury.
CAUTION:
Indicates a potentially hazardous situation, which, if not avoided, may result in
minor or moderate injury.
CAUTION:
(Without Safety Alert Symbol) Indicates a situation that may result in property
damage.
- 4-
English
SERVICE
Servicing requires extreme care and knowledge and should
be performed only by a qualified service technician. For
service we suggest you return the product to your nearest
AUTHORIZED SERVICE CENTRE for repair. When
servicing, use only identical replacement parts.
Disconnect tools, when not in use before servicing and changing
accessories.
Maintain tools with care.
STAY ALERT Keep cutting tools sharp and clean for better
and safer performance. Follow instructions for changing
accessories. Inspect tool cord periodically and if damaged
have it repaired by an authorized service certre. Inspect
extension cords periodically and replace, if damaged. Keep
handles dry, clean and free from oil and grease.
WARNING:
Observe all normal safety precautions related to
avoiding electrical shock.
WARNING:
STAY ALERT Have your tools repaired by a qualified service
centre. This electric tool is inaccordance with the relevant
safety rules. Repairs should only be carried out by qualified
service centre using original spare parts, otherwise this may
result inconsiderable danger to the user.
To avoid serious personal injury, do not attempt to
use this product until you read thoroughly and
understand completely the operator’s manual. Save
this operator’s manual and review frequently for
continuing safe operation and instructing others
who may use this product.
Warning! The use of any accessory or attachment other than
those recommended in this instruction manual, may present
a risk of personal injury.
WARNING:
The operation of any power tool can result in
foreign objects being thrown into your eyes,
which can result in severe eye damage. Before
beginning power tool operation, always wear
safety goggles or safety glasses with side shields
and a full face shield when needed. We
recommend Wide Vision Safety Mask for use
over eye glasses or standard safety glasses
with side shields. Always use eye protection.
PRECAUTIONS FOR USING SHREDDER
Machine should be operated on firm level surfaces only.
Before starting the machine, check that the cutting chamber
is empty.
Motor should be kept clean of debris and other
accumulations.
SAVE THESE INSTRUCTIONS
WARNING: If machine should become clogged; switch
off the motor, disconnect the power lead, make sure all
moving parts are completely stopped before cleaning
clogged debris.
Keep all guards and deflections in good working condition.
TOOLS USE AND CARE
Stand clear of discharge chute at all times.
Use the right tool. Do not force small tools or attachments
to do the job of a heavy duty tool. The correct tool will
do better and safer at the rate for which it is designed.
Do not over reach and keep face and body back from the
feed opening.
Ensure the switch is changed to off position if the power
is goes off suddenly during use. This may prevent you
from injury cause by sudden power recovery.
WARNING: Ensure the power cord is always in good
condition. A cord with broken insulation is extremely
dangerous and can result in fire, electric shock, or serious
personal injury.
Never carry a tool by the cord or pull it to disconnect it from
the socket. Keep the cord away from heat, oil and sharp edges.
In case of jamming during operation, please switch off
immediately and disconnect the plug from the AC-outlet.
Avoid unintentional starting. Do not carry a plug in tool with
your finger on the switch. Ensure the switch is off when plugging
in.
-5-
Never pull the machine by the power cord and keep cord
away from water and sharp edges.
Disconnect the power cord when the machine is not in use.
WARNING: The operation of any tools can result in foreign
objects being thrown into your eyes, which can result in
severe eye damage before operating power tool, always
wear safety goggles or safety glasses with side shields and
a full face shield when needed. We recommend wide vision
safety mask for use over eye glasses or standard safety
glasses with side shields.
English
GETTING STARTED
SPARE PARTS
Check that the shredder is properly assembled.
1. hopper
2. body
3. motor and blades
4. plunger
5. stand
6. complete wheel
7. axle
8. power plug
9. overload switch
10.switch on/off
11. securing knob
Place the shredder on a level and a firm surface to
prevent it topping over. If working on soft ground, rest the
shredder on a board.
Check that the extension lead is safe and the safety plug
is plugged into the MAINS SOCKET.
The safety switch which is located on the cutter base is
activated when the Top Hopper assembly is opened to
help prevent accidental starting. (See Fig. 10)
Plug the shredder in.
ACCESSORIES
Plunger, Allen key, Spanner.
When the shredder is used for the first time switch it ON
and then OFF to ensure the switch works and to
accustom yourself to the switch. (See Fig. 6)
TECHNICAL DATA
Make sure that you wear, safety glasses, gloves and ear
protection.
Voltage:
240V 50Hz
Power:
2400W
RPM:
2900 rpm
Ø branches:
max: Ø40mm
Acoustic pressure:
86 Db(A)
Acoustic capcity:
106 Db(A)
Weight:
21.5kg
Do not overload: after 4 or 5 min, work, take a break for
5-6 min. start again.
OPERATING INSTRUCTIONS
Start the shredder and feed the material to be shredded
into the plastic hopper. Do not feed the material in until
the shredder is running.
What can be shredded
Healthy hedge and tree pruning, dead flowers.
What cannot be shredded
Do not try to shred hard materials like glass, metal or
bones.
Do not try to shred plastic, polythene, rope, etc.
Do not try to shred food left-over, fish or meat.
Do not shred treated timber-the dust and compost it
makes will be toxic.
Do not shred pruning with fungus or decays-take these
to the dump.
ASSEMBLING THE UNIT
Connect the 2 parts of the motor-housing using the
washers and auto-securing bolts (3).
Place the axle in between the 2 parts of the stand (4).
Assemble the wheels using the washers and screws
with the spanner (5) press the plastic wheel covers into
place.
Take off the securing knob (6)
Place the housing (7) on the stand by fastening the hex
auto-securing screws.
Place the hopper (2) on the top and secure with 3 screws
(8).
-6-
Before you start shredding clippings or branches,
remove side shoots with a pair of secateurs to make it
easier to get the branches into the shredder.
Be careful, as injury to face or eyes may result.
English
Do not try to force branches in that are too large for the
machine.
The blades tend to pull the branches into the shredder
but finer material such as leaves may need to be pushed
through with the plunger.
If the machine is overloaded, an overload protection
switch will cut the shredder off-leave it for about 5
minutes and try again it should then start. (See Fig. 6)
Place the collecting bag, a bucket or small bin under the
chute to collect the shredding in.
Do not put your hand inside the hopper, when necessory
use the plunger.
CARE & MAINTENANCE
After use, unplug the shredder and clean it inside and out.
All un-painted metal parts should be greased to prevent
rusting.
When closing the shredder take care to remove all dirt and
debris from the thread of the hole of the securing knob for
the cover.
If the cover is not closed properly, the shredder will not start.
Take care not to cross-thread the bolt when the cover is
being bolted down.
If shredding is not coming out of the chute, stop and unplug
the shredder, remove the lid and clear the chute.
-7-
RYOBI TECHNOLOGIES AUSTRALIA PTY. LTD.
GUARANTEE
Subject to the guarantee condition below, this Ryobi tool
(hereinafter called “the product”) is guaranteed by Ryobi
(hereinafter called “the Company”) to be free from
defects in material or workmanship for a period of 24
months from the date of original purchase covering
both parts and labour. Under the terms of this
guarantee, the repair or replacement of any part shall
be the opinion of the Company or its authorised agent.
Should service become necessary during the warranty
period, the owner should contact the RYOBI HELPLINE
1300 361 505 or contact the retailer from whom the
product was purchased.
In order to obtain guarantee service, the owner must
present the sales docket and Guarantee Certificate
to confirm date of purchase. This product is sold by the
dealer or agent as principal and the dealer has no
authority from the Company to give any additional
guarantee on the Company’s behalf except as herein
contained or herein referred to.
Guarantee Conditions
This guarantee only applies provided that the Product
has been used in accordance with the manufacturer’s
recommendations under normal use and reasonable
care (in the opinion of the Company) and such
guarantee does not cover damage, malfunction or
failure resulting from misuse, neglect, abuse, or used
for a purpose for which it was not designed or is not
suited and no repairs, alterations or modifications
have been attempted by other than an Authorised
Service Agent. This guarantee will not apply if the tool is
damaged by accident or if repairs arise from normal
wear and tear.
The Company accepts no additional liability pursuant to
this guarantee for the costs of travelling or
transportation of the Product or parts to and from the
service dealer or agent - such costs are not included in
this guarantee.
Certain legislation, including the Trade Practices Act,
1974 (as amended) and other state and territorial laws
give rights to the buyer and impose liability on the seller in
certain circumstances. Nothing herein shall have the effect
of excluding, restricting or modifying any condition,
guarantee, right or liability imposed, to the extent only
that such exclusion, restriction or modification
would render any term herein void.
RYOBI TECHNOLOGIES AUSTRALIA PTY. LTD.
A.B.N. 98 002 277 509
359-361 Horsley Road, Milperra, N.S.W. 2214.
Contact during normal business hours.
Tel: (02) 9792 9800 - Fax: 1800 807 993 - www.ryobi.com.au
SYDNEY:
BRISBANE:
TOWNSVILLE:
MELBOURNE:
All enquiries Tel : 1300 361 505
All enquiries Tel : 1300 361 505
960 Stud Road, Rowville,Vic. 3178
Tel : (03) 9764 8656
HOBART:
ADELAIDE:
PERTH:
All enquiries Tel : 1300 361 505
All enquiries Tel : 1300 361 505
33-35 Sorbonne Cres. Canning Vale, W.A. 6155
Tel : (08) 9455 7775
RYOBI NEW ZEALAND PTY. LTD.
AUCKLAND:
27 Clemow Drive, Mt Wellington, N.Z.
Tel: (09) 573 0230 - Free Call: 0800 279 624 - Fax: (09) 573 0231 - www.ryobi.co.nz
Contact during normal business hours.
This Guarantee Form Should Be Retained By The Customer At All Times
For your record and to assist in establishing date of purchase (necessary for in-guarantee service)
please keep your purchase docket and this form completed with the following particulars.
Purchased From
Address Of Dealer
Date
Model No
Serial No
Present This Form With Your Purchase Docket When Guarantee Service Is Required.