1
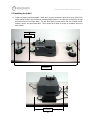
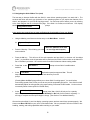
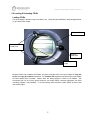
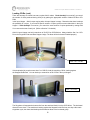
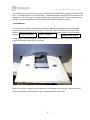
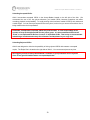
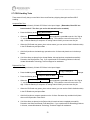
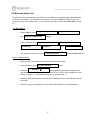
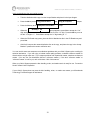
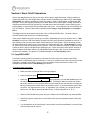
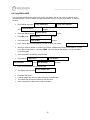
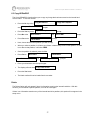
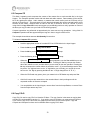
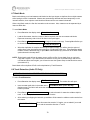
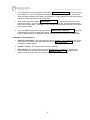
Orbit II Stand Alone
Disc Copier
Reference Manual
Revision K
Orbit II Disc Copier Reference Manual – Revision K
Orbit II Stand Alone 52X Disc Copier
Table of Contents
Section 1: Introduction
3
Section 2: Setting Up your CD-R Copying Area
4
Section 3: CD-R & CD-RW Media Recommendations
5
Section 4: CD, CD-R, and CD-RW Master Considerations
7
Section 5: Installation & Setup
5.1 Inspecting the shipment for Damage
5.2 Unpacking the Orbit II and verifying shipment contents
5.3 Installing the Orbit II
5.4 Initial Orbit II Copying System Checks
5.5 Navigating the Orbit II Menu Tree
5.6 Loading & Unloading CD-Rs
5.7 CD-R Handling Tests
5.8 Writer and Reader Test
Section 6: Basic Orbit II Operations
6.1 Copy DISCtoDISC
6.2 Copy DISCtoHDD
6.3 Copy HDDtoDISC
6.4 Copy and Compare
6.5 Compare CD
6.6 Copy CD+G
6.7 Batch Mode
6.8 Track Extraction
Section 7: Advanced Orbit II Operation
9
9
9
10
13
13
17
22
23
25
25
26
27
28
29
29
30
30
32
Section 8: Maintenance
33
Section 9: Troubleshooting
34
Section 10: Prior to Calling for Assistance
35
Section 11: References
11.1 Warranty
11.2 Technical Support Telephone #
11.3 Regulatory Agency Approvals
11.4 Specifications
Attachment A: Orbit II Menu Structure
36
36
36
36
37
38
Attachment B: Orbit II Error Messages
39
2
Orbit II Disc Copier Reference Manual – Revision K
Section 1: Introduction
Thank you for purchasing this Microboards Technology Orbit II Stand Alone Disc Copier. Your new Orbit II
System provides state of the art 52x duplication speed for both CD-Audio and CD-ROM discs. Orbit II also
incorporates “Burn Proof” technology to prevent wasting CD-R media due to buffer under runs. We are
confident you will be impressed with how easy it is to Setup and operate this unit. Your complete
satisfaction is our primary goal, so please contact our Technical Services Group if you have any questions,
comments, or suggestions.
The Microboards Technology Orbit II is a stand-alone Disc Copier designed to feed up to 50 CD-Rs or CDRWs into its CD-R/CD-RW Writer. With your Orbit II you can record all common CD-Audio or CD-ROM
formats, and accumulate accepted or rejected discs without operator attention. (See section 11.4
Specifications for a list of CD formats supported by your new Orbit II.) The Orbit II is designed for ease of
use in an office copier environment. The Orbit II is so easy to use its basic operating instructions are
contained on a single page. Your system includes a copy of the basic operating instructions that you can
hang on a wall near the unit.
The Orbit II has an internal hard drive that stores up to 10 different images.
The Orbit II Stand Alone Disc Copier is the ideal solution for users who require unattended copying of all
common CD formats.
Because it is a stand-alone system, Orbit II does not require the support of a
personal computer. Orbit II CD-to-CD Copier users do not need computer skills. If you can use a paper
document copier, you can use an Orbit II.
All Microboards Technology CD-R Systems share disc singulation components; and use industrial grade
CD-R/CD-RW Writers and Readers, control keypads, and LCD displays. Because it is based upon
Microboards Technology Professional Series Systems, your Orbit II will provide years of trouble-free
service, even if you use it continuously.
Your Orbit II can use CD, CD-R, or CD-RW discs as masters. It can copy your masters on to blank CD-R
or CD-RW discs. If you use CD-RW discs they must be blank. Orbit II cannot erase, or over-write, CD-RW
media. Pre-written CD-RW discs will be placed on the Reject side.
We at Microboards Technology strongly discourage the illegal copying of content in violation of
copyright laws. Our equipment will not defeat copy protection. Make sure the copies you produce
conform to copyright regulations, and function properly in target systems, before you distribute
them.
3
Orbit II Disc Copier Reference Manual – Revision K
Section 2: Setting Up your CD-R Copying Area
A clean and orderly work place is required to consistently produce high quality copies. We suggest you
locate your Orbit II Stand Alone Disc Copier in an office like environment free of dust and debris. Any
contamination that gets on the CDs, CD-Rs, or CD-RWs you use as masters or blanks can cause rejects
that will reduce your yield and increase your cost. Even worse than yield loss is the possibility that a CD-R
you duplicate will not work in your customer’s CD Drive. Dust and debris will also increase Orbit II system
maintenance, and possibly shorten the service life of your Orbit II Disc Copier
After you have selected a clean working environment for your Orbit II, you should allow enough tabletop
space around the unit to properly organize the flow of masters, blank media, duplicated discs, and process
rejects. In the example photograph below, workflow is from right to left. Blank discs waiting for copying are
on the right of the Orbit II, along with a clearly labeled container for rejects. Completed copy jobs and
masters are to the left of the Orbit II. Remember; it is sometimes difficult to tell if an unlabeled CD-R has
been duplicated. It is virtually impossible to identify the content of a duplicated CD-R until it is labeled or
printed. An organized workspace is the key to controlling the quality and consistency of your CD-R copy
process.
Temperature in your CD-R copy area should be between 65 and 85 degrees F. (18 – 29 degrees C.)
Humidity should be maintained between 30 and 80 % RH, if possible. CD-R copying can be performed
outside these recommended limits, but operator comfort and process yield may be affected.
In our sample CD-R copying Setup above we are keeping each completed copying job on a separate
spindle, with the master disc on top of the stack. This keeps the master available for quality control
“compare” tests. The master also clearly identifies the contents of each stack.
4
Orbit II Disc Copier Reference Manual – Revision K
Section 3: CD-R & CD-RW Media Recommendations
By selecting a Microboards Technology Orbit II Disc Copier, you have purchased the finest CD-R Copying
hardware and operating system available. The second most important choice you will make is selecting
the media to use in your copying process. This section provides a brief overview of media and presents
our recommendations for media selection.
When CD Recordable technology was introduced there were only two dye formulations, cyanine and
pthalocyanine, and all CD-Rs had gold reflecting layers. Your basic media color choices were “green” or
“gold”. Most of the discs sold were “branded”, which means they carried the name of their manufacturer or
distributor. These early CD-Rs were expensive, and there were durability and interchange concerns.
Today there is a third dye formulation called AZO, reflecting layers may be either gold or silver (sometimes
called “platinum”), shades of blue have been added to the spectrum of colors, and “bulk” packaging has
joined branded product on dealers shelves. The term “bulk packaging” refers to CD-Rs that are sold on a
shrink-wrapped spindle rather than in individual packages. Bulk packaged CD-Rs do not usually carry their
manufacturer’s name. Unidentified bulk packaged CD-Rs are usually cheaper than branded products. The
most expensive media is individually packed in jewel cases and labeled with the manufacturers name.
Recently, CD-RW (re-writeable) media has joined the CD product family. Re-writeable discs use a different
recording technology than write once CD-Rs. Because of this they are more expensive, record at lower
speeds, and may not function properly in older CD-Audio or CD-ROM Drives. Many CD-RW discs are
written in a format called “packet writing” which the Orbit II does not support. You may use CD-RW discs
that are not packet written as masters for your Orbit II Copying System, but make sure you understand
their limitations before you duplicate blank CD-RW discs. (Special note, Orbit II will detect CD-RW media
and automatically select the proper writing speed.)
The growth of CD-R and CD-RW usage has lured new vendors into the marketplace. Some of these
newer manufacturers may not have the manufacturing experience, or quality control procedures, required
to assure consistent recording and playback performance. The CD-R media recommendations that follow
will help you select CD-Rs that will maintain a consistent copying process and minimize your production
costs.
If your new Orbit II is your first Disc Copier, obtain a quantity of branded discs from a manufacturer you
know or is recommended to you. At this point, do not worry about the cost of the CD-Rs. You will be using
them to establish a performance reference for your copying process. We suggest you obtain at least 50 of
these branded CD-Rs. If you have previous CD-R copying experience select 50 CD-Rs from a
manufacturer you have had good results with in the past. If you need assistance in selecting a reliable
media source, contact the Microboards Technology Support Department.
Use this group of CD-Rs as you follow the sections of this manual that cover setting up and using your new
Orbit II Copying System. The sequence we provide will show you how to qualify the mechanical
performance, recording performance, and playback performance of this sample group. After samples from
this initial group of CD-Rs have completed the qualification procedure, you should set the remaining discs
aside as a media reference. If you encounter copying problems you can use a CD-R from your reference
group to determine if you have a media or an equipment problem. A known good reference CD-R will be
your basic troubleshooting tool.
Our recommended media qualification procedure includes copying, comparing, and testing on target
systems. After you have established your reference media you may continue to use that manufacturer’s
product, or you may qualify other sources using the same procedure.
5
Orbit II Disc Copier Reference Manual – Revision K
Section 3 — CD-R Media Recommendations: (cont.)
Although you cannot select CD-R media based upon color alone, there is a correlation between
“reflectivity” and media performance. The CD or CD-R drives that read the CD-Rs you duplicate project a
laser beam through the thickness of the plastic disc. The laser beam is reflected by the metallic coating on
the back of the CD-R and returns through the thickness of the plastic to the drive’s optical detector. For
CDs, the minimum reflectivity specification is 70%. CD-Rs are permitted to have slightly less reflectivity.
Their minimum specification is 65%. Hold a commercial CD up to a light. Place your fingers a few inches
behind the CD. You will typically not be able to see the shadow of your fingers looking through a CD. For
CD-Rs to work in a large number of CD or CD-R drives they should have similar reflectivity and opacity.
Reflectivity and opacity become increasingly important as read drive speeds increase. A modern 52x read
drive requires more reflectivity than an 8X read drive. It is best to avoid CD-Rs that are less reflective
and/or opaque than the CD-Rs you are using as your reference sample.
CD-RW media has about ½ of the signal strength of CD-R media, even though they may appear to be
highly reflective. The lower signal strength of CD-RW media is one of the reasons they may not work in
older CD-Audio, CD-ROM, or CD-R Drives. Recognizing the need for CD-RW compatibility, Compact Disc
media and drive manufacturers met and established a specification that is intended to assure CD-RW
interchange capability. Products compliant with this new specification carry a “MultiRead” qualified label on
their faceplate, or in their product manual. CD-RW media should only be used in CD-Audio, CD-ROM, CDR, or DVD Drives that have MultiRead certification.
6
Orbit II Disc Copier Reference Manual – Revision K
Section 4: CD, CD-R, and CD-RW Master Considerations
A “master” is the CD, CD-R, or CD-RW disc you are making a duplicate of. There are ethical as well as
functional considerations in the selection and use of masters. We at Microboards Technology discourage
the unauthorized copying of proprietary material. Our copying systems will not defeat copy protection
schemes. If you try to duplicate copy protected material, the Orbit II may either not read the master in, or
may read the master in but produce copies that are not readable in a “target” system. If you have problems
duplicating a CD or CD-R, one of the possibilities is the presence of copy protection. Try duplicating a
master that does not have copy protection before assuming there is something wrong with your Orbit II
Copy System.
There are a large number of formats included in the various “color books” that define CD technology. The
simplest and most common forms are CD-Audio discs, that contain only music, and CD-ROM discs which
contain only computer data. There are CD formats for specific games, Karaoke, video, graphics, and
photographs. It is also possible to combine different formats on one CD or CD-R. Examples include CDAudio albums with computer video, and CD-ROMs with audio and video tracks. Section 11.4 Reference
Information – Specifications lists the formats supported by the Orbit II Stand Alone Disc Copier.
You may be generating your own masters, or providing a copy service using masters supplied by your
customers. In either case you should be aware of the possibility that a master does not conform to all of
the requirements of the appropriate format specification. There are many pre-mastering software
packages that allow users to assemble their own CD-Rs. Most CD-R Writers sold as computer peripherals
include some form of pre-mastering software. The most common problem we have seen is creating a
master using the “back up” utility that comes with most CD-R Writers, instead of the “pre-mastering” utility.
Back Ups are intended for one purpose only, to be restored by the same utility that created it. Back up
utilities, and many file copy utilities, write small quantities of information called “packets” to the CD-R. This
makes the CD-R act like a floppy diskette or hard disk drive. Packet written discs are not suitable for
use as masters on your Orbit II Disc Copier. Your Orbit II will only duplicate masters that conform to all
of the appropriate Color Book format requirements. Properly written CD-RW discs may be used as
masters in Orbit II’s Reader or blanks in Orbit II’s Writer.
If you have problems reading in a master, the first thing you should do is read in a known good master. If
your known good reference master reads in, the new master may have copy protection or format problems
that the Orbit II will not tolerate. Try to redo, or ask your customer to redo, the master. Make sure all of the
pre-mastering software instructions are understood and followed. If this does not solve your problem
contact Microboards Technology Technical Services for assistance. We have equipment that can analyze
any CD format and identify deviations from appropriate Color Book specification. Please note that there
may be a charge for our CD analysis services.
Conscientious Disc Copier users implement a quality assurance program that typically includes the
following steps. They follow this procedure before duplicating a large lot from a master they have not used
previously.
1. Perform a virus scan on the master disc. (The Orbit II CD-to-CD Copier is virtually immune to
viruses, but it could pass a virus through to the duplicates.)
2. Test the master disc on a target system:
• Listen to an Audio Disc
• Watch a Video CD
• Test a CD-ROM on an appropriate PC
• Verify the master disc’s content and version number
3. Make one duplicate of the master on the Orbit II
4. Using the Orbit II, compare the duplicate to the master disc.
7
Orbit II Disc Copier Reference Manual – Revision K
5.
•
•
•
•
Test the duplicate on a target system:
Listen to an Audio Disc
Watch a Video CD
Test a CD-ROM on an appropriate PC
Verify the master disc’s content and version number
Steps 4 and 5 should be repeated, on a sample basis, during the production of each large lot of duplicates.
8
Orbit II Disc Copier Reference Manual – Revision K
Section 5: Installation & Setup
The installation and Setup of a Microboards Technology Orbit II Stand Alone Copying System is so simple
you may be tempted to proceed without referring to this manual. Unless you already use a Microboards
Technology Copying System we suggest that you take the few extra moments required to follow our
recommended unpacking, installation, and Setup procedure. During Orbit II CD-to-CD Copy System Setup
you will learn how to use our menu driven operating system. You will use the control keypad to configure
your Orbit II for basic copying and to determine if the unit has sustained any internal damage during
shipment.
5.1 Inspecting the shipment for Damage
Your Orbit II Disc Copier is supplied in one shipping carton. If the outer carton shows signs of shipping
damage, notify the shipping company immediately. They are responsible for the condition of the shipment.
Contact Microboards Technology Technical Services Group prior to unpacking any equipment that is
received in damaged shipping cartons.
If the shipping cartons do not show any signs of damage, unpack the Orbit II.
5.2 Unpacking the Orbit II and verifying shipment contents
The Orbit II shipping carton should contain the following items:
• Orbit II Disc Copier
• Orbit II external Power Supply
• An AC Power Cord
• Blank CD-R discs
• Starter Kit
• Surething Label Design Software
If any of these items are damaged or missing contact the Microboards Technology Technical Services
Group.
Save all of the Orbit II packaging material. You will need the packing material if you ever move your
Orbit II, or have to send it in for servicing. Returning an Orbit II for servicing without its original
shipping container will void your warranty!
9
Orbit II Disc Copier Reference Manual – Revision K
5.3 Installing the Orbit II
Prepare a properly sized workspace. Make sure you have cleared the area where your Orbit II Disc
Copier will be located. We recommend a desktop height surface, in an office-like environment, at least
36 inches wide and 18 inches deep. This will allow space on each side of the unit for blank media,
masters, rejects, and processed discs. There should be at least 24 inches of clearance above the
work surface.
24 inches
36 inches
15 inches
10
Orbit II Disc Copier Reference Manual – Revision K
5.3 Installing the Orbit II (cont)
Place the Orbit II Disc Copier on the work space with its back panel accessible to you:
Make sure the switch on the external Power Supply is OFF
Insert the DC output connector of the external Power Supply in the rear panel DC receptacle
Connect the external Power Supply to an AC Receptacle, but do not turn it on yet.
Rotate the assembled Orbit II Copy System so its control panel is facing you, and position the Power
Supply as shown in the photograph below.
11
Orbit II Disc Copier Reference Manual – Revision K
5.3 Installing the Orbit II (cont)
Slide out the Accept basket until it snaps into place.
Your Orbit II Copy System is now assembled and ready for its initial system checks.
12
Orbit II Disc Copier Reference Manual – Revision K
5.4 Initial Orbit II Copying System Checks
Turn Power On by operating the switch on the external Power Supply. The system’s power on
sequence will take a few seconds, but it should conclude with the display shown in the photograph
below. If the Copy CD-to-CD? prompt appears, your unit’s electronics are functioning properly.
Proceed with step 5.5 Navigating the Orbit II Menu Tree.
If you do not see anything on the display, check the external power supply connections. Make
sure the red light on the external power supply goes on when you turn on the power switch. If the
light does not go on, either the AC Receptacle you used does not have power, or the external
power supply may be defective. Contact Microboards Technology Technical Support.
If the display has any other message, or is unreadable, Contact Microboards Technology Technical
Support.
5.5 Navigating the Orbit II Menu Tree
This is the top level of the Orbit II operating system menu tree.
Copy Disc to Disc?
1 Line x 16 Character
Display
2 Key
Keyboard
Orbit II Display and 2 Key Control Panel
13
Orbit II Disc Copier Reference Manual – Revision K
5.5 Navigating the Orbit II Menu Tree (cont)
The two Orbit II control keys:
The two keys on the control panel provide access to all Orbit II functions.
Key #1: the Yes key
This key answers yes to the question displayed on Orbit II’s one line display. For example, pressing the
Yes key when Copy CD-to-CD? is displayed will initiate Orbit II’s disc copy operation.
Key #2: the No key
This key answers no to the question displayed on Orbit II’s one line display. For example, pressing the No
key when Copy CD-to-CD? is displayed will tell Orbit II you do not want to initiate a basic disc copy
operation. The display will change to the next question in Orbit II’s menu structure Copy and Compare?.
A diagram of the Obit II Menu Tree is presented on the next page.
14
Orbit II Disc Copier Reference Manual – Revision K
Orbit II’s menu structure:
Copy? DISCtoDISC
job starts
NO
Copy & Compare?
Load Master Disc
Analyzing Master
Extract? 01/12
YES or NO
NO
Compare? DISCtoDISC
YES
NO
NO
Extract? 08/12
YES or NO
Copy CD+G?
YES
End Extraction?
NO
YES B_Copy?
NO
Batch Mode?
YES
NO
Copy to HD OK?
NO B_Copy&Compare?
NO
Trk Extraction?
YES
Registration...
YES
Next Master?
NO
NO
YES
System Setup?
Copy? HDtoDISC
YES
NO
YES
DISCtoDISC?
NO
YES
DISCtoHD?
YES
HD1?
Burn Disc?
NO
YES/NO
HD2?
NO
job starts
Use Buzzer?
NO
YES/NO
NO
52x Write?
48x Write?
HD9?
NO
YES
YES
NO
HDtoDISC?
40x Write?
HD1? CD-DA 19:23
NO
NO
32x Write?
HD2? VIDEO CD 650MB
NO
NO
NO
24x Write?
NO
NO
HD9? Free
NO
YES
Delete?
16x Write?
YES
NO
HD1? CD-DA 19:23
12x Write?
NO
YES
NO
HD2? VIDEO CD 650MB
NO
YES
8x Write?
NO
NO
Ask Quantity?
YES
Quantity? 00
NO
The Burn CD?, Use Buzzer?, Write Speed?, and Ask Quantity? options are described in Section 7.0 of
this manual.
15
Orbit II Disc Copier Reference Manual – Revision K
5.5 Navigating the Orbit II Menu Tree (cont)
The best way to become familiar with the Orbit II’s menu driven operating system is to work with it. The
sections that follow will teach you the basics of our operating system as you explore the features of the
Orbit II, and prepare it for your CD-R Copying process. You can keep track of where you are by referring
to the menu diagram that is on the previous page. If the Orbit II is not On, turn it On now. Your display
should be
at the
prompt.
Copy
DISC-to-Disc?
Let’s use the two control keys to start confirming the functionality of your new Orbit II:
•
Using the No key, scroll down to the last entry on the Main Menu. It should
be
System Setup?
Burn CD? (Must be set to YES
to run Copy and Compare)
•
Press the Yes key. This will bring you to the
menu selection.
•
Press the No key . This will turn off the write operation and put Orbit II in what we call “simulation
mode”. In simulation mode all operations will be performed, but Orbit II will not write on the blank CDRs or CD-RWs it processes. We use this mode to test Orbit’s features without wasting media.
•
Press Yes at the
enabled.
•
At the
duplication speed prompt press Yes. This will
52x Write?
keep Orbit II in its normal 52x writing mode and advance you to the
prompt.
Use Buzzer?
prompt to leave Orbit II’s audible alarm
(Pressing No at the 52x? prompt allows you to lower Orbit II’s writing speed. You would select
lower writing speeds if the CD-Rs you use do not provide acceptable yield at 52x. Your Orbit II unit will
automatically adjust its writing speed to the proper setting if it detects CD-RW media. You do not have
to manually select a lower speed for CD-RW discs.)
•
Ask Quantity?
At the
prompt press Yes. Orbit II will ask you for a quantity
each time you start a new job. If you set Ask Quantity? to No Orbit II will not ask for a quantity. It
will copy or compare until the Input Hopper is empty. (See Section 7 for additional details.)
We now know that Orbit II’s one line display, operating system, and two control keys operate properly. We
Have turned Burn CD? Off, so your unit is in simulation mode. We can proceed to check out Orbit II’s disc
handling, reading, and writing capabilities without writing on your media.
16
Orbit II Disc Copier Reference Manual – Revision K
5.6 Loading & Unloading CD-Rs
Loading CD-Rs
The Input Hopper is located on top of the Orbit II unit. Locate the parts identified in the photograph below
on your Orbit II Disc Copier.
Singulator Plate
Small diameter
Guide Rods
Stepped
Guide Rod
CD-R Support
Ledge
Because Orbit II has a separate CD Reader, you place only blank discs in the Input Hopper for Copy CDto-CD? and Copy & Compare? operations. For Compare CD? operations the discs in the Input Hopper
will have already been recorded. Master discs are always placed in Orbit II’s CD Reader. We
recommend the use of lint free gloves whenever you handle CD-Rs, because fingerprints can affect
recording, playback, and printability. To avoid touching critical surfaces, handle CD-Rs by their inside
and outside edges.
17
Orbit II Disc Copier Reference Manual – Revision K
Loading CD-Rs (cont)
There are two ways to control how many copies Orbit II makes. If Ask Quantity? is turned off, you control
the number of discs produced during each job by placing the appropriate number of blank CD-Rs or CDRWs
in the Input Hopper. Orbit II stops copying when its Input Hopper is empty. Remember that there is always
the possibility of a reject. If you need a specific number of copies, place one extra blank disc in the Input
Hopper. If Ask Quantity? is turned on, you control the exact number of copies produced by setting Orbit
II’s counter at the start of each job. (Refer to Section 7 for details.)
Orbit II’s Input Hopper can hold a maximum of 50 CD-R or CD-RW discs. Always load the first 5 or 6 CDRs on the Singulator Plate and Rear Support Ledge. The discs will be horizontal if loaded properly.
First 5 or 6 CD-Rs
If the duplication job requires more than 5 or 6 CD-Rs, load the remaining CD-Rs, leaning against
the Stepped Guide Rod. You can load up to a maximum of 50 CD-Rs in the Input Hopper.
First 5-6 CD-Rs
The Singulator will separate the bottom disc from the stack and feed it into the CD-R Writer. The horizontal
discs will move down. The stack that is leaning against the Stepped Guide Rod may not drop a disc each
singulation cycle, but there should always be at least two discs in the horizontal group.
18
Orbit II Disc Copier Reference Manual – Revision K
The horizontal group should never become empty while there are discs leaning against the Stepped Guide
Rod. If this happens there is a media problem. Contact Microboards Technology Technical Support for
assistance. If you are running a very large duplication job (more than 50 copies of a single master) you can
add discs, remove accepted discs, or remove rejected discs while the system is running.
Loading Masters:
You may use CDs, CD-Rs, or CD-RW discs as Masters. Masters are always placed in the CD Reader
located in the lower right hand corner of Orbit II’s Front Panel. Because Orbit II is a CD-to-CD copier,
there must always be a master in the CD Reader during copy or compare operations. When you press
Yes at a
,
, or a Compare? Disc-to-Disc
Copy Disc-to-Disc?
Copy & Compare?
prompt; Orbit II’s controller will open the CD Reader for you. Load your master in the reader the same
way you would load an audio CD in a CD Player.
When you are sure the master is properly loaded in the CD Reader’s tray press Yes. Orbit II’s Controller
will close the Reader tray and begin the copy or compare operation you selected.
19
Orbit II Disc Copier Reference Manual – Revision K
Unloading Accepted CD-Rs:
Orbit II accumulates accepted CD-Rs in the Accept Basket located on the left side of the Unit. We
recommend the use of lint free gloves whenever you handle CD-Rs, because fingerprints can affect
recording, playback, and printability. To avoid touching critical surfaces, handle CD-Rs by their inside and
outside edges. You can remove accepted CD-Rs at any time, but do not try to remove them while a disc is
being transferred to the Accept Basket.
Remember; all duplicated, unprinted, CD-Rs may look the same. It is the responsibility of the
operator to keep each duplicated CD-R in the proper group. It is also sometimes difficult to tell
“blank” or un-duplicated CD-Rs from “burned” or duplicated CD-Rs. That is why we recommended
maintaining a consistent and orderly flow of masters and duplicates in your copy area.
Unloading Rejected CD-Rs:
Orbit II was designed to minimize the possibility of mixing rejected CD-Rs with masters or accepted
copies. The Reject Slot is located on the right side of Orbit II. You can access rejects at any time.
We suggest you keep a clearly labeled REJECT container in your production area so rejected
discs do not get mixed with masters or accepted duplicates.
20
Orbit II Disc Copier Reference Manual – Revision K
Unloading Masters:
When the Input Hopper is empty, Orbit II will alert you by sounding the Buzzer, and scrolling an Input
Hopper Empty message on the Display.
•
If your job is not completed, load the appropriate number of discs into the Input Hopper, and press
the Yes key to continue your job.
•
If your job is done, press the No key again. Orbit II will open the Reader Tray so you can unload
your master.
•
If you are not going to do another job, unload your master and gently push the Reader tray inward
until it powers itself closed.
•
If you are going to start a different job, replace the master in the Reader tray, insert the desired
quantity of discs in the Input Hopper, select the desired Orbit II operation, and press the Yes key
again to close the Reader tray and start the new job.
We suggest you keep the master disc on top of your stack of copies. This will identify the stack of
discs, and keep your master available for compare operations or quality assurance tests.
21
Orbit II Disc Copier Reference Manual – Revision K
5.7 CD-R Handling Tests
These tests will verify that your new Orbit II has not suffered any shipping damage that affects CD-R
handling.
Accepted Disc Test:
• Load approximately 10 blank CD-R discs in the Input Hopper. (Remember; Burn CD? has
been turned off. The discs you use for this test will not be recorded.)
•
Press the Yes key at the Copy Disc-to-Disc?
•
Quantity? 00
When the
prompt appears, press No to set the “10s” digit to
“1”, and press Yes to accept the “10s” digit setting. The underline cursor will move to the “1s”
digit. Press the Yes key to accept the “0” setting and tell Orbit II you want a ten disc job.
•
When the CD Reader tray opens, place a short master (you can use the Orbit II distribution disc)
in the CD Reader tray and press Yes .
•
Orbit II will perform a simulated copy operation on the 10 discs and place them in the Accept
Basket.
•
If all of the discs are placed in the Accept Basket, this test has been completed successfully.
Proceed to the Rejected Disc Test. If you experienced CD-R handling problems in this test,
contact Microboards Technology Technical Support for assistance.
prompt.
Rejected Disc Test:
• Load approximately 10 blank CD-R discs in the Input Hopper.
Copy & Compare?
•
Press the No key at the Copy Disc-to-Disc?
•
Press the Yes key at the
•
Quantity? 00
When the
prompt appears, press No to set the “10s” digit to
“1”, and press Yes to accept the “10s” digit setting. The underline cursor will move to the “1s”
digit. Press the Yes key to accept the “0” setting and tell Orbit II you want a ten disc job.
•
When the CD Reader tray opens, place a short master (you can use the Orbit II distribution disc)
in the CD Reader tray and press Yes.
•
Orbit II will perform a compare operation on the 10 discs. Because they are blank it will place
them on the Reject side of the Orbit 2.
•
If all of the discs are placed on the Reject side, this test has been completed successfully.
Proceed to the Writer and Reader Tests that follow. If you experienced CD-R handling problems
in this test, contact Microboards Technology Technical Support for assistance.
Compare? DISC-to-DISC
22
and
prompts.
prompt.
Orbit II Disc Copier Reference Manual – Revision K
5.8 Writer and Reader Test
This final trial run will verify that your new Orbit II has not suffered any shipping damage that affects either
the Writer or the Reader. You will make a back up copy of the Orbit II distribution CD-R, and you will
compare the copy to the master CD-R. You must first change Orbit II’s Setup so that Burn CD? is turned
on:
Turn Burn CD? on:
•
Press the No key at the Copy DISC-to-DISC?
and
•
Compare?
Copy & DISC-to-DISC
Press the Yes key at the
Use Buzzer?
Copy & Compare?
,
prompts.
System Setup?
,
,
,
Burn Disc?
52x Write?
, and
,
Ask Quantity?
prompts.
This sequence will return you to the
Copy Disc-to-Disc?
prompt with Burn CD? on.
Copy the distribution disc:
•
Make sure there is one blank (unrecorded) CD-R in the Input Hopper.
•
Press the Yes key at the Copy Disc-to-Disc?
•
Quantity? 00
When the
prompt appears, press Yes to accept the “10s”
digit setting of “0”. The underline cursor will move to the “1s” digit. Press the No key once to
set the “1s” digit to “1”. Press Yes to accept the “1s” digit setting of “1”.
•
When the CD Reader tray opens, place the Orbit II distribution disc in the CD Reader tray and
press Yes.
•
Orbit II will copy the distribution disc to the blank CD-R and place it in the Accept Basket.
23
prompt.
Orbit II Disc Copier Reference Manual – Revision K
Verify the distribution disc was copied properly:
•
Take the distribution disc copy from the Accept Basket and place it in the Input Hopper.
•
Press the No key at the Copy Disc-to-Disc?
•
Press the Yes key at the Compare? Disc-to-Disc
•
Quantity? 00
When the
prompt appears, press Yes to accept the “10s”
digit setting of “0”. The underline cursor will move to the “1s” digit. Press the No key once to
set the “1s” digit to “1”. Press Yes to accept the “1s” digit setting of “1”.
•
When the CD Reader tray opens, place the Orbit II distribution disc in the CD Reader tray and
press Yes.
•
Orbit II will compare the master distribution disc to the copy, and place the copy in the Accept
Basket if it passes the content verification test.
and
Copy & Compare?
prompts.
prompt.
You can use this same test sequence to troubleshoot problems with your Orbit II System prior to calling for
technical assistance. If you are trying to isolate media quality problems, substitute reference media for
discs that have a high reject rate. If you suspect problems with a particular master, substitute a reference
master. (You can use your distribution disc as a reference master.) If the term “reference media” or
“reference master” is new to you, refer to Sections 3 & 4 of this manual.
When your Orbit II System passes the disc handling, writer, and reader tests it is ready for use. Proceed to
Section 6 Basic Orbit II Operation.
If your Orbit II System does not pass the disc handling, writer, or reader test contact your Microboards
Technology Technical Support for assistance.
24
Orbit II Disc Copier Reference Manual – Revision K
Section 6: Basic Orbit II Operations
Orbit II was designed to be as easy to use as an office copier for paper documents. Making copies of a
master Disc takes only a few simple steps; load the number of blank discs you want to copy, select Copy
DISCtoDISC ? by pressing the Yes key, insert your master in Orbit II’s DVD Reader, and press the Yes
key again. Orbit II will copy the master disc on to blank discs until its Input Hopper is empty. Because all
operating mechanisms are fully enclosed; you can add discs to the Input Hopper, remove discs from the
Accept Basket, or remove Discs from the Reject side at any time. Your master disc can be a CDROM, CDR or CD-RW disc. There are three Orbit II operating modes, Copy?, Copy & Compare?, and Compare
Disc?.
The Copy mode has three options, Disc to Disc, Disc to HDD and HDD to Disc. The Orbit II has an
internal hard drive that stores up to 10 different images.
There are two different ways you can set up your Orbit II, depending upon how you intend to use it. If Ask
Quantity? is turned on, Orbit II will ask the operator how many discs should be processed for each job. In
this operating mode you can leave a stack of blank discs in the Input Hopper. Orbit II will always provide
the requested number of discs, even if some discs are rejected during the job. If Ask Quantity? is turned
off, Orbit II will not request a quantity from the operator. Orbit II will expect the operator to place the proper
number of discs in the Input Hopper before starting the job. If there are rejects, and a specific quantity of
discs is needed, the operator will have to add additional discs during the job, or set up another job when
the first job is complete. See Section 7 for additional details on the Ask Quantity? option.
6.1 Copy DISCtoDISC
This Orbit II operating mode is the easiest to use because it is the main menu selection that Orbit II
presents when it completes its power on self-test. A “copy only” operation is the most common form of disc
duplication. In Copy ? mode Orbit II does not verify the content of each data sector recorded. The
example shown below assumes Ask Quantity? is turned on.
To initiate a Copy ? operation:
•
Make sure there are enough discs in the Input Hopper.
•
Press the Yes key at the
•
Quantity? 00
When the
prompt appears, use the Yes and No keys to set
the required number of discs in Orbit II’s counter. Pressing the Yes key accepts the number
above the underline cursor, and tells Orbit II you are ready for the next operation. Pressing the
No key increments the number above the underline cursor. (If you accidentally press the Yes
key at the “10s” digit and move to the “1s” digit before you are ready, you can get the cursor
back to the “10s” digit by pressing the No until the “1s” digit changes from “9” to “0”.)
•
When the DVD Reader tray opens, place your master in the DVD Reader tray and press Yes.
•
Orbit II will copy the master disc on to the blank discs until the requested number of discs are
accepted.
•
You can add discs to the Input Hopper, remove discs from the Accept Basket, or remove Discs
from the Reject side at any time.
Copy ?
prompt.
25
Orbit II Disc Copier Reference Manual – Revision K
6.2 Copy DISCtoHDD
The Copy DISCtoHDD function allows you to copy your master disc to one of the 10 partitions of the
internal hard drive. Once the master is copied to the hard drive, your copies will be made. To use this
function:
•
Press the No key at the
Copy DisctoDisc?
Compare Disc?
prompts.
and
Copy and Compare?
,
System Setup?
,
•
Press the Yes key at the
•
Press No at the
Disc to Disc?
•
Press Yes at the
Disc to HD?
•
Next, choose the hard drive partition you wish to store your master.
•
When you select a partition, it will show you if there is data already stored on that partition. If there
is no data on that partition, it will show FREE. If there is data on the partition, you can overwrite it
by selecting Yes.
•
Once the partition is selected, press the Yes.
•
Press Yes to
52x CD Write?
prompt.
prompt.
Burn Disc?
and
, prompt.
Use Buzzer?
Ask Quantity?
prompts.
•
Place your blank discs into the input hopper.
•
The display will now show
•
•
•
•
Press the Yes button.
Load the master disc into the reader and press the Yes button.
The master disc will now be loaded into the hard drive.
Once completed, the blank discs will be recorded to.
Copy? DISCto HD1
26
HD1?
Orbit II Disc Copier Reference Manual – Revision K
6.3 Copy HDDtoDISC
The Copy HDDtoDISC function allows you to copy any image that has been stored on the internal hard
drive to a disc. To use this function:
•
Press the No key at the
Copy DisctoDisc?
Compare Disc?
prompts.
and
Copy and Compare?
,
System Setup?
,
•
Press the Yes key at the
•
Press No at the
Disc to Disc?
•
Press Yes at the
HD to DISC?
•
Next, choose the hard drive partition you wish to copy.
•
When you select a partition, it will show you if there is data already stored on that partition. If there
is no data on that partition, it will show FREE.
•
Once the partition is selected, press the Yes.
•
Press Yes to
52x CD Write?
and
and
Disc to HD?
prompts.
prompt.
HD1?
Use Buzzer?
Burn Disc?
and
, prompt.
Ask Quantity?
•
Place your blank discs into the input hopper.
•
The display will now show
•
Press the Yes button.
•
The blank media will now be loaded into the recorder.
prompts.
Copy? HD1 to Disc
Delete
The Delete Option will only appear if there is information stored on the internal hard drive. With this
function, you can delete a specific partition, so it can be used again.
If there is no information stored on any of the internal hard drive partitions, this option will not appear in the
setup menu.
27
Orbit II Disc Copier Reference Manual – Revision K
6.4 Copy and Compare
This Orbit II operating mode compares the content of the master disc to each disc you copy, before the
disc is placed in the Accept Basket. Following every copy operation with a compare operation gives you
the highest confidence in the discs you copy and distribute. The Compare operation works with both data
and audio masters. Data masters will be verified, bit for bit, against the master. Audio masters, or masters
that contain audio (such as CD Extra), will go through a “Read Check”. This read check will verify that the
duplicated disc can be read and has the same structure as the master. Because there is audio on the disc,
it cannot be “bit for bit” verified. We suggest you use Orbit II’s Copy and Compare? Mode:
•
When you want the highest level of confidence in the copies you produce.
•
Your Orbit II is new, has been moved to a new location, or has been returned from
servicing.
•
You are using a master from a new source.
•
You are qualifying a new source of blank discs.
Compare operations are performed at approximately the same rate as copy operations. Using Orbit II’s
Copy and Compare? Operation will reduce the number of discs you can produce in a given amount of
time by approximately 50%.
The example shown below assumes Ask Quantity? is turned on.
To initiate a Copy and Compare? operation:
• Make sure there are enough blank CD-R or CD-RW discs in the Input Hopper.
•
Press the No key at the
•
Press the Yes key at the Copy & Compare?
•
Quantity? 00
When the
prompt appears, use the Yes and No keys to set
the required number of discs in Orbit II’s counter. Pressing the Yes key accepts the number
above the underline cursor, and tells Orbit II you are ready for the next operation. Pressing the
No key increments the number above the underline cursor. (If you accidentally press the Yes
key at the “10s” digit and move to the “1s” digit before you are ready, you can get the cursor
back to the “10s” digit by pressing the No until the “1s” digit changes from “9” to “0”.)
•
When the CD Reader tray opens, place your master in the CD Reader tray and press Yes.
•
Orbit II will copy the master disc, and then compare the master disc to the recorded discs, until
the requested number of discs are accepted.
•
You can add discs to the Input Hopper, remove discs from the Accept Basket, or remove Discs
from the Reject area at any time.
Copy Disc-to-Disc?
28
prompt.
prompt.
Orbit II Disc Copier Reference Manual – Revision K
6.5 Compare CD
This Orbit II operating mode compares the content of the master disc to each recorded disc in the Input
Hopper. The Compare operation works with both data and audio masters. Data masters will be verified,
bit for bit, against the master. Audio masters, or masters that contain audio (such as CD Extra), will go
through a “Read Check”. This read check will verify that the duplicated disc can be read and has the same
structure as the master. Because there is audio on the disc, it cannot be “bit for bit” verified. If you are
using Orbit II’s Copy CD-to-CD? mode we suggest you periodically perform a verify operation on some of
the discs you copy to make sure your Orbit II is functioning properly.
Compare operations are performed at approximately the same rate as copy operations. Using Orbit II’s
Compare? Operation will take approximately as long as it does to copy the discs at 52x.
The example shown below assumes Ask Quantity? is turned on.
To initiate a Compare CD? operation:
•
Load the appropriate number of recorded CD-R or CD-RW discs in the Input Hopper
•
Press the No key at the
Copy Disc-to-Disc?
prompt.
•
Press the No key at the
Copy & Compare?
prompt.
•
Press the Yes key at the Compare? Disc-to-Disc
•
Quantity? 00
When the
prompt appears, use the Yes and No keys to set
the required number of discs in Orbit II’s counter. Pressing the Yes key accepts the number
above the underline cursor, and tells Orbit II you are ready for the next operation. Pressing the
No key increments the number above the underline cursor. (If you accidentally press the Yes
key at the “10s” digit and move to the “1s” digit before you are ready, you can get the cursor
back to the “10s” digit by pressing the No until the “1s” digit changes from “9” to “0”.)
•
When the CD Reader tray opens, place your master in the CD Reader tray and press Yes.
•
Orbit II will compare the master disc to the recorded discs in the Input Hopper until the
requested number of discs are accepted.
•
You can add discs to the Input Hopper, remove discs from the Accept Basket, or remove Discs
from the Reject area at any time.
prompt.
6.6 Copy CD+G
Copy CD+G is used to copy CD+G or Karaoke CD discs. The copy function is the same as copying data
or audio CD’s, as described in section 6.1. If you wish to copy CD+G discs, you must select this function.
If you use the Copy CD to CD function, the graphics portion of the CD will not be copied. Copy and
Compare and Compare functions are not available when copying CD+G discs.
29
Orbit II Disc Copier Reference Manual – Revision K
6.7 Batch Mode
Batch mode allows you to load masters and blanks into the input hopper to duplicate from multiple masters
while leaving the Orbit II unattended. Masters are automatically detected and stored temporarily on the
internal hard drive, then copied to each blank that follows until the next master is detected.
When using Batch mode, the first disc inserted must be a master. Also, masters must be separated by at
least one blank disc.
To enter Batch Mode:
Batch Mode?
•
Press Yes when the display reads
•
Load the first master, then the number of blanks required, then the next master and blanks.
Repeat as necessary, with a limit of 50 discs in the input hopper.
•
Press Yes at B_Copy?
to begin the batch mode copy. Pressing No will allow you
to choose the other batch copy option, B_Copy & Compare?
•
When the duplication is complete and the input hopper is empty, you will be given the option of
adding discs to the input hopper and continuing, or ending the batch copy. Press Yes after adding
media to continue the batch copy, or press No to halt the batch copy and return to the batch mode
option selected in the step above.
NOTE: Exiting batch mode will set the master source as Disc to Disc for non-batch Copy or non-batch
Copy and Compare. If you had selected a hard drive source prior to the batch copy and want to
use that hard drive source again, you will need to reset the System Setup to that hard drive source
(see section 6.3).
Batch Mode will not duplicate CD+G or allow duplication by Track Extraction.
6.8 Track Extraction (Audio CD Only)
NOTE: TRACKS CAN ONLY BE EXTRACTED FROM AUDIO CD MASTERS
To select Track Extraction:
Trk Extraction?
•
Press Yes when the display reads
•
Load Master Disc / press YES key..
Insert a master audio disc in the reader at the
display prompt. The Orbit II will retract the reader tray and analyze the master disc after the Yes
button is pressed.
•
Press Yes at Extract? 01/12
to select the track for extraction or No to skip this
track. In this example, the master has a total of 12 tracks.
•
After selecting or skipping the last track, press Yes to finish extraction or No to reselect tracks from
this master.
END EXTRACTION?
. The reader drive will open.
Since this master has a total of 12 tracks, you are asked if you would
like to end the extraction after the 12th track.
30
Orbit II Disc Copier Reference Manual – Revision K
•
If you selected any track for extraction, press Yes at Copy to HD OK?
to copy the tracks
to the hard drive. If you have specified a hard drive partition as the master source in the System
Setup, the track extraction will be written to that partition. Pressing No will eject the master without
writing any of the selected tracks to the hard drive.
•
After master ejects, press Yes at Next Master?
to extract more tracks from other
master audio discs. You will be prompted to load another master disc, and proceed through the
track selection steps again . Press No if you are finished extracting tracks and want to burn those
tracks to blank media.
•
If you press No in the previous step, press Yes at COPY START / HD(01) to
to copy the
extracted tracks in HD(01) to blank CD-R media. If you have specified a different hard drive
partition, that partition will be displayed and the track extraction will be written from that partition.
Limitations of Track Extraction:
•
Audio CD Tracks ONLY: Only CD audio tracks can be extracted. If the master does not contain
audio tracks, the drive will eject and the display will read Not Audio Track
. You will be
prompted for another master.
•
Number of Tracks: The number of tracks cannot exceed 99.
•
Disc Capacity: You cannot extract more capacity than will fit on a blank CD. If adding the
selected track would exceed the disc capacity, No More Select
will appear on the
display, which will shortly return to the same track. Press No to skip the track.
31
Orbit II Disc Copier Reference Manual – Revision K
Section 7: Advanced Orbit II Operation
There are four advanced Orbit II operation options within the System Setup menu: Burn Disc, Use
Buzzer, Speed Selection, and Ask Quantity.
Burn Disc allows you to run the Orbit II in simulate mode by pressing No when on that choice in the
System Setup menu. Burn Disc must be set to Yes for all copy operations.
The Use Buzzer Setup menu selection allows you to turn off Orbit II’s audible alarm. If Orbit II’s buzzer is
disabled, a flashing LED will be the only indication that the Input Hopper is empty, or there is a problem
with the current job. If the buzzer is enabled, you can silence the audible alarm by pressing the No key.
Set Write Speed to the copy speed you want to use. Normally you should leave the write speed at 52x to
maximize the number of CD-Rs you can write per hour. In order to run at 52x, it is important to make sure
you are using blank CD-R media that is rated for 52x. If you are experiencing a high reject rate (also called
“low yield”) with a particular batch of media, try lowering the copy speed to 16X.
Special Notes:
•
•
•
If you are copying to CD-RW discs, the maximum copy speed is 10X.
Orbit II will automatically adjust its copy speed if you load CD-RW discs instead of CD-R
discs. You do not have to manually change Write Speed to switch between CD-R and
CD-RW jobs.
CD-RW discs must be blank for use in Orbit II. Orbit II cannot erase or over-write CD-RW
media.
If Ask Quantity is turned on, Orbit II will ask the operator how many discs should be processed for each
job. In this operating mode you can leave a stack of blank discs in the Input Hopper. Orbit II will always
provide the requested number of discs, even if some discs are rejected during the job. If Ask Quantity is
turned off, Orbit II will not request a quantity from the operator. Orbit II will expect the operator to place the
proper number of discs in the Input Hopper before starting the job. If there are rejects, and a specific
quantity of discs is needed, the operator will have to add additional discs during the job, or set up another
job when the first job is complete. See Section 5 for additional details on the Ask Quantity option.
32
Orbit II Disc Copier Reference Manual – Revision K
Section 8: Maintenance
The Orbit II Stand Alone Disc Copier is designed to provide years of trouble free service without routine
maintenance. The key to long life and reliable operation is to keep the work area, and the Orbit II, free of
dust and debris.
To clean the outside cabinet and plastic panel:
•
•
•
Turn off Orbit II’s external power supply.
Use a clean lint free cloth moistened with a weak solution of dishwashing detergent in warm water.
Dry the unit immediately with a clean lint free cloth.
If debris accumulates within the Orbit II Loader you should gently wipe the affected surfaces with a lint free
cloth, use a small shop vacuum, and/or blow out the contamination with compressed air. Make sure all of
your blank media, masters, and copies are protected while you are cleaning your Orbit II System.
33
Orbit II Disc Copier Reference Manual – Revision K
Section 9: Troubleshooting
If you encounter operational problems with your Orbit II System please try to isolate the problem, for
example:
•
•
•
•
•
Singulating and feeding CD-Rs Reading in a particular master.
High CD-R/CD-RW disc reject rate.
Duplicates fail on target system.
Discs do not go all the way to the Accept Basket
Discs do not go all the way to the Reject side
There are no end user serviceable components in the Orbit II.
The Menu Tree, Functional Schematic, and Error Code List included as attachments may help you isolate
the source of a problem, and identify corrective action. If you cannot resolve the problem yourself, contact
Microboards Technology Technical Support.
34
Orbit II Disc Copier Reference Manual – Revision K
Section 10: Prior to Calling for Assistance
The Microboards Technology Technical Service Team wants to get your Orbit II unit back in operation as
quickly as possible. There are a few things you can do to make the assistance call as short and effective
as possible:
Call from a telephone near your Orbit II System.
Have this Orbit II Reference Manual available.
Have the following information available:
Date of purchase
________________
Who you purchased the system from
________________
Serial Number
________________
Problem description
________________
_______________________________________________________
_______________________________________________________
Have your system turned on and ready for use.
We want you to be completely satisfied with your Microboards Technology Orbit II Stand Alone Disc
Copier. Please the Microboards Technology Technical Services Group if you have any problems.
35
Orbit II Disc Copier Reference Manual – Revision K
Section 11: References
11.1 Warranty
Your Microboards Technology Orbit II Stand Alone Disc Copier has a one year parts and labor warranty.
All repairs will be made at Microboards Technology’s. The unit must be shipped in its original shipping
carton to maintain warranty coverage. Prior to shipping the unit back to Microboards Technology you must
contact the Technical Services Group for an RMA #. This number must appear on the shipping carton to
assure proper processing. You are responsible for the shipping and insurance charges on equipment
returned for analysis or repair. After repairs are complete the Microboards Technology Technical Services
Group will contact you to let you know the unit is ready to be returned. Microboards Technology will pay for
returning the unit to you by standard ground shipment. If you want to expedite return shipment, you can
authorize special charges when the TSG representative contacts you.
11.2 Technical Support Telephone #
To reach Microboards Technology Technical Support, please call 952-556-1639.
11.3 Regulatory Agency Approvals
This version of the Orbit II Reference Manual is intended for early production units. The Microboards
Technology Orbit II Stand Alone Disc Copier was designed to conform to applicable sections of UL, FCC,
CSA, TUV, and CE safety and EMC requirements. Formal agency approval is pending.
36
Orbit II Disc Copier Reference Manual – Revision K
11.4 Specifications
Capacity:
50 CD-Rs
Media:
CD-Rs or CD-RWs can be used as masters, or blanks. “Packet format”, which is
used on many CD-RW discs, is not supported by the Orbit II Controller. It should
also be noted that copying to blank CD-RW discs reduces throughput because the
recording operation is slower.
Formats:
CD ROM Mode 1
CD-XA Mode 2 form 1 & 2
ISO 9660
UFS
CD-DA (Red Book) Single Session
CD-Extra / CD Plus / CD-Enhanced
Multi Session
Mixed Mode
Hybrid
HFS
Photo CD
CD-I Bridge
Video CD
CD+G Karaoke
Note: Packet mode is not supported for CD-Rs or CD-RWs.
Masters:
Disc-At-Once
Session-At-Once
Track-At-Once
Notes:
Discs left open on masters will be left open on the duplicates.
Discs are always written disc at once.
Reliability:
Mean Disc Insertions Between Failure
MTBF
MTTR
Mechanical:
HxWxD
>200,000
>10,000 hours
<30 minutes
9“ x 18” x 12”
(23 cm x 46 cm x 30.5 cm)
Shipping 30 lb (13.6 kg)
Operating without CD-Rs 20 lb (9.1 kg)
Weight
Electrical:
External Power Supply 100 – 240 VAC, 50/60 Hz, 1.0/0.5 Amps 100 Watts
Environment:
Temp. – Operating
Temp. – non Op.
RH Operating
RH Storage
65 – 85 degrees F (18 – 29 degrees C)
-44–176 degrees F (-40– 80 degrees C)
20 – 80 % non-condensing
05 – 95 %
Vibration:
Operating
Non-Operating
> 0.3 G (5 – 30 Hz)
> 0.5 G (11 msec max.)
Shock:
Operating
Non-Operating
> 5 G (11 msec max)
> 50 G (11 msec max)
Altitude:
Operating
Non-Operating
10,000 ft (3,048 meters)
30,000 ft (9,144 meters)
37
Orbit II Disc Copier Reference Manual – Revision K
Attachment A: The Orbit II Menu Structure
Copy? DISCtoDISC
job starts
NO
Copy & Compare?
Load Master Disc
Analyzing Master
Extract? 01/12
YES or NO
NO
Compare? DISCtoDISC
YES
NO
NO
Extract? 08/12
YES or NO
Copy CD+G?
YES
End Extraction?
NO
YES B_Copy?
NO
Batch Mode?
YES
NO
Copy to HD OK?
NO B_Copy&Compare?
NO
Trk Extraction?
YES
Registration...
YES
Next Master?
NO
NO
YES
System Setup?
Copy? HDtoDISC
YES
NO
YES
DISCtoDISC?
NO
YES
DISCtoHD?
YES
HD1?
Burn Disc?
YES/NO
NO
HD2?
NO
job starts
Use Buzzer?
NO
YES/NO
NO
52x Write?
48x Write?
HD9?
NO
YES
YES
NO
HDtoDISC?
40x Write?
HD1? CD-DA 19:23
NO
NO
32x Write?
HD2? VIDEO CD 650MB
NO
NO
NO
NO
24x Write?
NO
HD9? Free
NO
YES
Delete?
16x Write?
YES
NO
HD1? CD-DA 19:23
12x Write?
NO
YES
NO
HD2? VIDEO CD 650MB
NO
8x Write?
NO
NO
Ask Quantity?
YES
Quantity? 00
NO
38
YES
Orbit II Disc Copier Reference Manual – Revision K
Attachment B: Orbit II Error Messages
Error Message:
Problem Description:
!! Bad Copy!!
The copy CD is bad and will be rejected. This message may briefly appear
during any of Orbit II’s operating modes.
!!ERROR!! No CD Reader!
This message would appear during a power on self-test if the copy controller did
not locate a compatible CD Reader. Contact Microboards Technology Technical
Support.
!!ERROR!! No CD-R Drives!
This message would appear during a power on self-test if the copy controller did
not locate a compatible CD-R/CD-RW Writer. Contact Microboards Technology
Technical Support.
!!ERROR!! Disc is Blank!
This message would appear at the start of a copy or compare job if the copy
controller could not read the disc that is in the CD Reader. Check your master
CD, CD-R, or CD-RW discs, and try again. If this message persists, contact
Microboards Technology Technical Support.
Setup Error
The user Setup file has been corrupted. Turn the external power supply OFF,
and leave it OFF for a few moments. When you turn your Orbit II System back
ON it will reset the user Setup file to the factory default values of Burn CD? Yes
and 52x Write? Yes. If you are not using these default settings, make the
appropriate System Setup? changes before you use your Orbit II System.
!!WARNING!! Copier
is in SIMULATE mode
Your Orbit II System Setup has been changed to Burn CD? No. If you want to
proceed with the operation you selected press the Yes key. If you do not want
to proceed in simulate mode, press the No key and change the System Setup?.
Master Drive Error
The Reader drive could not successfully read from the master. If you have been
able to successfully duplicate the master previously, use a copy as the master for
duplication purposes. If duplication is successful from the copy, the master may
contain burn errors from the original mastering or may be physically damaged;
continue using the copy as the master. If the copy returns the same error,
contact Microboards Technology Technical Support.
39