1
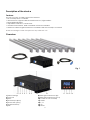
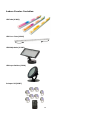
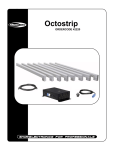
Octostrip ORDERCODE 42220 English……………………………………………………………………………….…… 1 Deutsch……………………………………………………………………………………………..… 15 Congratulations! You have bought a great, innovative product from Showtec. The Showtec LED Octostrip brings excitement to any venue. Whether you want simple plug-&-play action or a sophisticated DMX show, this product provides the effect you need. You can rely on Showtec, for more excellent lighting products. We design and manufacture professional light equipment for the entertainment industry. New products are being launched regularly. We work hard to keep you, our customer, satisfied. For more information: [email protected] You can get some of the best quality, best priced products on the market from Showtec. So next time, turn to Showtec for more great lighting equipment. Always get the best -- with Showtec ! Thank you! 1 Showtec Showtec LED Octostrip™ Product Guide Warning..…...................................................................................…………………………………………. 3 Safety-instructions………………………………………………………………………………………….…. 3 Operating Determinations…………………………………………………………………………………….4 Description..…..............................................................................……….………………………………… 5 Features…….……………………………………………………………………………………….……...…. 5 Overview……………………………………………………………………………………………………….. 5 Installation...............................................................................…...…………………………………….….. 6 Set Up and Operation.....................................................................……..…………………………….…… Panel Functions……..……………………………………………………………………………….……...… - Mode…...............................................………….........................……………………....………….. - F / S…..............................................................................….....………….........…………….…….. Stand-Alone…………………………..…………………………………………………………….……...….. Sound-Active……..…………………..…………………………………………………………….……...….. DMX Operation…………..…………..…………………………………………………………….……...….. - DMX Modes..…...............................………….........................……………………....……………. 6 6 6 7 7 7 8 9 Maintenance...................................................................................………..………….…….……………… 12 Changing the Fuse........................................................................…………………….………….………12 Troubleshooting............................................................................………………….………………….….. 12 Product Specifications.................................................................……………….…….………………….. 13 2 WARNING CAUTION! Keep this device away from rain and moisture! FOR YOUR OWN SAFETY, PLEASE READ THIS USER MANUAL CAREFULLY BEFORE YOUR INITIAL START-UP! SAFETY INSTRUCTIONS Every person involved with the installation, operation and maintenance of this device has to: be qualified follow the instructions of this manual CAUTION! Be careful with your operations. With a dangerous voltage you can suffer a dangerous electric shock when touching the wires! Before your initial start-up, please make sure that there is no damage caused by transportation. Should there be any, consult your dealer and do not use the device. To maintain perfect condition and to ensure a safe operation, it is absolutely necessary for the user to follow the safety instructions and warning notes written in this manual. Please consider that damages caused by manual modifications to the device are not subject to warranty. This device contains no user-serviceable parts. Refer servicing to qualified technicians only. IMPORTANT: The manufacturer will not accept liability for any resulting damages caused by the nonobservance of this manual or any unauthorized modification to the device. Never let the power-cord come into contact with other cables! Handle the power-cord and all connections with the mains with particular caution! Never remove warning or informative labels from the unit. Never leave any cables lying around. Do not insert objects into air vents. Do not open the device and do not modify the device. Do not connect this device to a dimmerpack. Do not shake the device. Avoid brute force when installing or operating the device. Do not switch the device on and off in short intervals, as this would reduce the system’s life. Do not use more cable between the controller and the Octostrip than 50 meters! Only use device indoor, avoid contact with water or other liquids. Only operate the fixture after having checked that the housing is firmly closed and all screws are tightly fastened. Only operate the device after having familiarized with its functions. Avoid flames and do not put close to flammable liquids or gases. Always keep case closed while operating. Always allow free air space of at least 50 cm around the unit for ventilation. Always disconnect power from the mains, when device is not used or before cleaning! Only handle the power-cord by the plug. Never pull out the plug by tugging the power-cord. 3 Make sure that the device is not exposed to extreme heat, moisture or dust. Make sure that the available voltage is not higher than stated on the rear panel. Make sure that the power-cord is never crimped or damaged. Check the device and the powercord from time to time. If device is dropped or struck, disconnect mains power supply immediately. Have a qualified engineer inspect for safety before operating. If the device has been exposed to drastic temperature fluctuation (e.g. after transportation), do not switch it on immediately. The arising condensation water might damage your device. Leave the device switched off until it has reached room temperature. If your Showtec device fails to work properly, discontinue use immediately. Pack the unit securely (preferably in the original packing material), and return it to your Showtec dealer for service. For adult use only. The device must be installed out of the reach of children. Never leave the unit running unattended. For replacement use fuses of same type and rating only. Repairs, servicing and electric connection must be carried out by a qualified technician. WARRANTY: Till one year after date of purchase. OPERATING DETERMINATIONS If this device is operated in any other way, than the one described in this manual, the product may suffer damages and the warranty becomes void. Any other operation may lead to dangers like short-circuit, burns, electric shock, lamp explosion, crash etc. You endanger your own safety and the safety of others! Improper installation can cause serious damage to people and property ! 4 Description of the device Features The LED Octostrip is a LED system from Showtec. • 8x Octostrip and 1x controller • 4x4 meter DC / Signal cable and 4x8 meter DC / Signal cable • 8x Installation Bracket • Adjustable Fade time / Chase time • 3 Modes: Stand-alone, DMX-controlled or Sound-controlled • Maximum cable length between the controller and the Octostrip: 50 meters! NOTE: Knowledge of DMX is required to fully utilize this unit. Overview Fig. 1 1) Menu Settings 2) ON/ OFF 3) Fuse 4) Power Input (Blue) 5) Power Thru (Grey) 6) Audio Sensitivity 7) Mic 8) DMX signal connector (IN) 9) DMX signal connector (OUT) 10) Power out for Octostrip 11) Mode 12) F / S 13) Up 14) Down 5 Installation Remove all packing materials from the LED Octostrip. Check that all foam and plastic padding is removed. Connect all cables. Always disconnect from electric mains power supply before cleaning or servicing. Damages caused by non-observance are not subject to warranty. Set Up and Operation Before plugging the unit in, always make sure that the power supply matches the product specification voltage. Do not attempt to operate a 120V specification product on 230V power, or vice versa. Connect the LED Octostrip fixtures using the supplied DC / Signal cables and set each fixture address as illustrated below. Fig. 3 Note : Link all cables before connecting electric power. Ensure that the power supply is off before unplugging the controller or before connecting / disconnecting fixtures. Panel Functions 1) Mode DMX Mode (1-255) Select DMX address for the controller. Stand-alone Mode 1-8 = auto-chase 9 = sound-chase Fixture Control Mode Select Mode 1, 2, 4 or 8 Manual RGB Color Mixing 6 2) F / S Adjust Chase Fade Time from 0-100%. Adjust Chase Speed from 1-500/min. Stand-alone Operation Refer to the four buttons on the front panel of the controller: Mode F/S Up Down Press the MODE button to view the Chase menu: Select Chases 1-9 using the UP and DOWN buttons. Chases 1-8 run according to the Fade and Speed values. Chase 9 is sound-active. Press the F/S button to set the Fade and Speed values: Adjust Chase Fade Time from 0-100%. Adjust Chase Speed from 1-500 steps per minute. Press the MODE button to view the Manual Color Mixing menu: Press F/S to select the color you want to adjust. Use UP and DOWN to mix the RGB colors and change their values. Indicates Red with value from Dark (0) to Bright (255). Indicates Green with value from Dark (0) to Bright (255). Indicates Blue with value from Dark (0) to Bright (255). Sound-active Operation In Stand-alone mode, select Chase 9 and adjust the audio input level using the sensitivity control dial on the side panel of the Controller. In DMX mode, use Channel 6 to select Sound-active operation and to adjust the audio sensitivity. 7 DMX Operation Press the MODE button to view the DMX address setting rnenu: Select the DMX starting address for the controller using the UP and DOWN buttons. The DMX Channel functions are: Channel 1: Channel 2: Channel 3: Channel 4: Channel 5: Channel 6: Rainbow Red (0-255) Green (0-255) Blue (0-255) Strobe (1-20HZ) Sound-active/ Audio sensitivity There are 8 modes of self-running programs (0-220) and 1 sound-active program (241-255) in Channel 6. Chase 1: Chase 2: Chase 3: Chase 4: Chase 5: Chase 6: Chase 7: Chase 8: Sound-Active: 1-30 31-60 61-90 91-120 121-150 151-180 181-210 211-240 241-255 The Controller will automatically detect the presence of a DMX signal. IF a DMX signal is present, the front panel LED display will blink. In order to receive a DMX signal, the controller must be attached to a DMX controller by a 3-pin DMX cable and the DMX controller must be turned on. To mix RGB color using DMX, Channel 1 (Rainbow) must be off (0). When programming your own DMX sequences, note that Channel 6 must be off (0) to avoid activating Sound-active mode during playback. The LED Octostrip system can operate as a 48-, 24-, 12- or 6- channel DMX fixture. Select DMX Mode 1, 2, 3 or 4 as described on the facing page. 8 DMX Modes Press the MODE button to view the DMX mode selection menu. Use the UP and DOWN buttons to select the DMX mode. DMX Mode 1 : 48-channel operation (Control each LED Octostrip fixture independently) DMX Mode 2 : 24-channel operation (Control 4 sets of 2 LED Octostrip fixtures) DMX Mode 4 : 12-channel operation (Control 2 sets of 4 LED Octostrip fixtures) DMX Mode 8 : 6-channel operation (Control 8 LED Octostrip fixtures simultaneously) 9 10 11 Maintenance The LED Octostrip requires almost no maintenance. However, you should keep the unit clean. Disconnect the mains power supply, and then wipe the cover with a damp cloth. Do not immerse in liquid. Keep connections clean. Disconnect electric power, and then wipe the audio connections with a damp cloth. Make sure connections are thoroughly dry before linking equipment or supplying electric power. Replacing a Fuse Power surges, short-circuit or inappropriate electrical power supply may cause a fuse to burn out. If the fuse burns out, the product will not function whatsoever. If this happens, follow the directions below to do so. 1. Unplug the unit from electric power source. 2. Insert a screwdriver into the slot in the fuse cover. Turn the screwdriver to the left, at the same time gently push a bit (Turn and Push). The fuse will come out. 3. Remove the broken fuse. If brown or unclear, it is burned out. 4. Insert the replacement fuse into the holder where the old fuse was. Reinsert the fuse cover. Be sure to use a fuse of the same type and specification. See the product specification label for details. Troubleshooting Showtec LED Octostrip This troubleshooting guide is meant to help solve simple problems. If a problem occurs, carry out the steps below in sequence until a solution is found. Once the unit operates properly, do not carry out following steps. If the amplifier does not operate properly, refer servicing to a technician. 1. If the device does not operate properly, unplug the device. 2. Check the fuse, power from the wall, all cables etc. 3. If all of the above appears to be O.K., plug the unit in again. 4. If you are unable to determine the cause of the problem, do not open the LED Octostrip, as this may damage the unit and the warranty will become void. 5. Return the device to your Showtec dealer. 12 Product Specification Model: Showtec Controller for LED Octostrip Voltage: AC 230V-50Hz (CE) Power: 200W 4 different DMX Modes (48 Channels, 24 channels, 12 channels, 6 channels) 8 built-in chases Adjustable Fade time / Chase time Sound active Mode Powerconnection: Powercon (IN and Out) Data connection: 5 Pole XLR connector Dimensions: 200 x 360 x 95 mm (LxWxH) Weight: 5,15 kg Model: Showtec LED Octostrip Power: 14W x 8 Data Connection: 5 Pole XLR connector 180 LEDs (60 Red, 60 Green, 60 Blue) M10 sliding profile for easy mounting of clamps and brackets Dimensions 1000 x 30 x 93,5 mm (LxWxH) 1000 x 30 x 47,5 mm (LxWxH) Octostrip only Weight: 1,9 kg x 8 Design and product specifications are subject to change without prior notice. Website: www.Highlite.nl Email: [email protected] 13 Other Showtec Products: LED Tube (41000) LED Cove Tube (41005) LED Wallpainter (41200) LED Aqua Painter (41220) Octopod 90 (30987) 14 Sehr geehrter Kunde, vielen Dank, dass Sie sich für ein Produkt von Showtec entschieden haben. Sie werden an dem Single 3 viel Freude haben. Sollten Sie sich noch für andere Showtec-Produkte interessieren, senden Sie uns eine eMail an: [email protected] oder besuchen Sie unsere Website www.showtec.info Beste Qualität, ausgereifte Produkte von Showtec, so erhalten Sie immer das beste -- mit Showtec! Danke! 15 Showtec Showtec LED Octostrip™ Produkt-Anleitung Warnung..…...................................................................................………………………………..…….….. 17 Sicherheitshinweise ……………………………………………………………………………………....…. 17 Bestimmungsgemäße Verwendung …………………………………………………………...…….….. 18 Gerätebeschreibung................…......................................................……….……………………………... 19 Features…….……………………………………………………………………………………….……….…. 19 Überblick ………………………………………………………………………………………………………..19 Installation...............................................................................…...…………………………………….…… 20 Aufstellung und Bedienung...........................................................……..……………………………...….. 20 Panel-Funktionen ……..……………………………………………………………………………….…….. 20 - Mode…...............................................………….........................………….…………....…………. 20 - F / S…..............................................................................….....…………..........………….………. 21 Stand-Alone…………………………..…………………………………………………………….……...….. 21 Musikgesteuert ……..…………………..…………………………………………………………….……..... 21 DMX-Bedienung …………..…………..…………………………………………………………….……….. 22 - DMX Modus..…...............................………….........................……………………....…….………. 23 Wartung.........................................................................................………..………….…….……………..... 26 Wechseln einer Sicherung.……........................................................…………………….……………. 26 Fehlersuche....................................................................................………………….…………………....... 26 Technische Spezifikationen................................................................…...…….…….……………….…... 27 16 WARNUNG ACHTUNG! Gerät vor Regen und Feuchtigkeit schützen! ZUR EIGENEN SICHERHEIT LESEN SIE VOR DER ERSTEN INBETRIEBNAHME DIESE BEDIENUNGSANLEITUNG SORGFÄLTIG DURCH! SICHERHEITSHINWEISE Alle Personen, die mit der Aufstellung, Inbetriebnahme, Bedienung, Wartung und Instandhaltung dieses Gerätes zu tun haben, müssen: entsprechend qualifiziert sein diese Bedienungsanleitung genau beachten ACHTUNG! Seien Sie besonders vorsichtig beim Umgang mit gefährlicher Netzspannung. Bei dieser Spannung können Sie einen lebensgefährlichen elektrischen Schlag erhalten! Vor der ersten Inbetriebnahme überprüfen Sie bitte, ob es keine Transportschäden gibt. Sollten Sie Beschädigungen feststellen, setzen Sie sich bitte mit Ihrem Händler in Verbindung und benutzen Sie das Gerät nicht. Um den einwandfreien Betrieb des Gerätes sicherzustellen ist es absolut notwendig für den Benutzer, die Sicherheitshinweise und die Warnvermerke in dieser Bedienungsanleitung zu beachten. Beachten Sie bitte das Beschädigungen, die durch Änderungen und unsachgemäße Behandlung am Gerät verursacht werden, nicht unter die Garantie fallen. Dieses Gerät enthält keine zu wartenden Teile. Das Instandhalten des Gerätes darf nur von qualifiziertem Personal durchgeführt werden. WICHTIG: Der Hersteller übernimmt keine Gewährleistung für Schäden, die durch die Nichtbeachtung dieser Bedienungsanleitung oder irgendeine nicht authorisierte Änderung am Gerät verursacht werden. Lassen Sie die Netzleitung nie mit anderen Kabeln in Kontakt kommen! Seien Sie vorsichtig beim Umgang mit Netzleitungen und -anschlüssen. Löschen Sie nie Warnhinweise oder informative Kennsätze von dem Gerät. Lassen Sie keine Kabel herumliegen. Stecken Sie nie Objekte in die Entlüftungsöffnungen. Schrauben Sie das Gerät nicht auseinander, und modifizieren Sie nie das Gerät. Schalten Sie nie dieses Gerät über ein Dimmerpack. Nie der Octostrip bei Gewitter verwenden. Das Gerät bei Gewitter sofort vom Netz trennen . Schütteln Sie das Gerät nicht und vermeiden Sie Erschütterungen, wenn Sie das Gerät installieren und bedienen. Nie das Gerät in kurzen Intervallen an- und ausschalten, da die Lebensdauer der Lampe erheblich reduziert wird. Benutzen Sie nicht mehr als 50m Kabel zwischen Controller und Octostrip! Das Gerät nur in Innenräumen benutzen, vermeiden Sie Kontakt mit Wasser oder anderen Flüssigkeiten. Setzen Sie das Gerät nur in Gang, wenn Sie sich mit den Funktionen vertraut gemacht haben. 17 Vermeiden Sie Flammen und setzen Sie das Gerät nicht nah an feuergefährliche Flüssigkeiten oder Gase. Um eine ausreichende Belüftung zu gewährleisten, halten Sie bitte einen Mindestabstand von 50 cm um das Gerät. Gerät bei Nichtbenutzung und vor jeder Reinigung vom Netz trennen! Fassen Sie dazu den Netzstecker an der Griffläche an und ziehen Sie niemals an der Netzleitung! Sorgen Sie dafür, dass das Gerät nicht extremer Hitze, Feuchtigkeit oder Staub ausgesetzt ist. Vergewissern Sie sich, daß die anzuschließende Netzspannung nicht höher ist als auf der Rückseite angegeben. Achten Sie darauf, daß die Netzleitung nie gequetscht oder beschädigt werden kann. Überprüfen Sie das Gerät und die Netzleitung von Zeit zu Zeit auf Beschädigungen. Wenn das Gerät herunter gefallen ist oder angeschlagen wird, trennen Sie die Hauptstromversorgung sofort. Lassen Sie das Gerät vor neuer Inbetriebnahme von einem qualifizierten Techniker kontrollieren. Das Gerät darf nicht in Betrieb genommen werden, wenn es starken Temperatur-Schwankungen (z.B. nach Transport) ausgesetzt worden ist. Das dabei entstehende Kondenswasser kann Ihr Gerät zerstören. Lassen Sie das Gerät solange ausgeschaltet, bis es Zimmertemperatur erreicht hat! Sollte Ihr Showtec Gerät einmal nicht mehr ordnungsgemäß arbeiten, schalten Sie es bitte sofort ab. Verpacken Sie das Gerät sorgfältig (am besten in der Originalverpackung) und schicken Sie es zu Ihrem Showtec-Händler . Nur für Erwachsene. Der Lichteffekt muß außerhalb der Reichweite von Kinder installiert werden. Betreiben Sie das Gerät niemals unbeaufsichtigt. Der Anwender ist verantwortlich für die korrekte Positionierung und Bedienung des Octostrip. Der Hersteller übernimmt keine Haftung für Schäden, die durch falsche Installation des Octostrips oder Mißbrauch des Produkts verursacht werden. Reparaturen, Instandhaltung und elektrischer Anschluß sollen von einem qualifizierten Techniker durchgeführt werden. Nur Sicherungen des gleichen Typen und Bewertung für Wiedereinbau verwenden. GARANTIE: Bis ein Jahr nach Erwerb. VORSICHT! AUGENVERLETZUNGEN! Blicken Sie nie direkt in die Lichtquelle (gilt besonders für Epileptiker)! ANMERKUNGEN: • Der Minimalabstand zwischen Lichtaustritt und der zu beleuchteten Fläche darf 0,5 Meter nicht unterschreiten! • Die maximale Umgebungstemperatur ta = 45°C darf nicht überschritten werden. • Die relative Luftfeuchte darf 50 % bei einer Umgebungstemperatur von 45° C nicht überschreiten. • Wird das Gerät anders verwendet als in dieser Bedienungsanleitung beschrieben, kann dies zu Schäden am Produkt führen und der Garantieanspruch erlischt. • Außerdem ist jede andere Verwendung mit Gefahren, wie z. B. Kurzschluß, Brand, elektrischem Schlag, Lampenexplosion, Abstürzen usw. verbunden. Sie gefährden Ihre eigene Sicherheit und die Sicherheit von anderen Unsachgemäße Installationen können Personen- oder Sachschäden verursachen! 18 GERÄTEBESCHREIBUNG Features Der LED Octostrip ist ein LED-System von Showtec. • 8x Octostrip und 1x Controller • 4x4m DC/Signalkabel und 4x8m DC/Signalkabel • 8x Installationsbügel • Regulierbare Fade-Time / Chase-Time • 3 Modi: Stand-alone, DMX-gesteuert oder musikgesteuert • Die maximale Kabellänge zwischen Controller und Octostrip beträgt 50m! Hinweis: Kenntnisse im Bereich DMX sind erforderlich, um alle Funktionen dieses Geräts voll auszunutzen. Überblick Abb. 1 1) Menü-Einstellungen 2) ON/ OFF 3) Sicherung 4) Power Input (Blau) 5) Power Thru (Grau) 6) Audio-Empfindlichkeit 7) Mikrofon 8) DMX signal connector (IN) 9) DMX signal connector (OUT) 10) Power-out für Octostrip 11) Modus 12) F / S 13) Up 14) Down 19 Installation Entfernen Sie das ganze Verpackungsmaterial vom LED-Octostrip und schließen Sie alle Kabel an. Trennen Sie immer das Gerät von der elektrischen Hauptstromversorgung, vor Reinigungs- und Wartungsarbeiten. Bei Beschädigungen, die durch Nichtbeachtung verursacht werden, erlischt der Garantieanspruch Aufstellung und Bedienung Bevor Sie das Gerät anschließen, überprüfen Sie immer die Netzspannung. Die Betriebsspannung ist auf der Rückseite des Gerätes angegeben. Versuchen Sie nie, ein 120V Produkt an 230V anzuschliessen oder umgekehrt. Schließen Sie alle LED-Octostrip Einheiten mit DC/Signalkabeln an und stellen Sie jede Geräte-Adresse ein wie unten beschrieben. Abb. 3 Hinweis: Schließen Sie alle Kabel an bevor Sie Strom einschalten. Stellen Sie sicher, dass die Stromversorgung ausgeschaltet ist bevor Sie den Controller vom Strom trennen und bevor Sie die Octostrip-Einheiten anschließen / trennen. Paneel-Funktionen 1) Modus DMX Modus (1-255) Wählen Sie die DMX-Adresse für den Controller. Stand-alone Modus 1-8 = Auto-Chase 9 = Sound-Chase Scanner-Steuermodus Wählen Sie Modus 1, 2, 4 oder 8 Manuelles RGB-Farbmischen 20 2) F / S Regulieren Sie die Chase-Fade-Time von 0-100%. Regulieren Sie die Chase-Geschwindigkeit von 1-500/min. Stand-alone Bedienung Schauen Sie auf die 4 Tasten auf der Fronteinheit des Controllers: Mode F/S Up Down Drücken Sie die MODE-Taste, um das Chase-Menü zu sehen: Wählen Sie die Lauflichter 1-9 mit den UP- und DOWN-Tasten. Die Lauflichter 1-8 laufen entsprechend zu Fade- und Speed-Werten. Lauflicht 9 ist musikgesteuert. Drücken Sie die F/S-Taste, um die Fade- und Speed-Werte einzustellen: Stellen Sie die Chase-Fade-Time von 0-100% ein. Stellen Sie die Chase-Geschwindigkeit von 1-500 Schritten pro Minute ein. Drücken Sie die MODE-Taste, um das Manual Colour-Mixing-Menü zu sehen: Drücken Sie F/S, um die Farbe auszuwählen, die Sie einstellen wollen. Benutzen Sie “ UP” und “DOWN”, um die RGB-Farben zu mischen und ihren Wert zu verändern. Zeigt Rot an mit einem Wert von dunkel (0) bis hell (255). Zeigt Grün an mit einem Wert von dunkel (0) bis hell (255). Zeigt Blau an mit einem Wert von dunkel (0) bis hell (255). Musikgesteuerte Bedienung Wählen Sie Lauflicht 9 und stellen Sie den Audio-Inputlevel im Stand-alone-Modus mit der Sensitivity-Control an der Seite des Controllers ein. Benutzen Sie Kanal 6 im DMX-Modus, um musikgesteuerte Bedienung zu wählen und die AudioEmpfindlichkeit einzustellen. 21 DMX-Bedienung Drücken Sie die MODE-Taste, um das DMX-Adreß-Einstellungsmenü zu sehen: Wählen Sie die DMX-Startadresse für den Controller, indem Sie die UP- und DOWNTasten benutzen. Die DMX-Kanalfunktionen sind wie folgt: Kanal 1: Kanal 2: Kanal 3: Kanal 4: Kanal 5: Kanal 6: Regenbogen Rot (0-255) Grün (0-255) Blau (0-255) Strobe (1-20HZ) musikgesteuert / Audio-Empfindlichkeit Es gibt 8 Modi selbständig ablaufender Programme (0-220) und 1 musik-gesteuertes Programm (241-255) in Kanal 6. Lauflicht 1: Lauflicht 2: Lauflicht 3: Lauflicht 4: Lauflicht 5: Lauflicht 6: Lauflicht 7: Lauflicht 8: Musikgesteuert: 1-30 31-60 61-90 91-120 121-150 151-180 181-210 211-240 241-255 Der Controller stellt automatisch fest, ob ein DMX-Signal vorhanden ist. Wenn ein DMX-Signal ankommt blinkt die LED-Anzeige auf der Vorderseite. Um ein DMX-Signal zu empfangen muss der Controller mit einem 3-pin DMX-Kabel einem DMX-Controller zugewiesen werden und der DMX-Controller muss an sein. Um RGB-Farben über DMX zu mischen, muss Kanal 1 (Regenbogen) aus sein (0). Wenn Sie Ihre eigenen DMXSequenzen programmieren denken Sie daran, dass Kanal 6 aus sein muss (0), um die Aktivierung des musikgesteuerten Modus während des Abspielens zu vermeiden. Das LED-Octostrip-System kann als 48-, 24-, 12- oder 6-Kanal DMX-Scanner fungieren. Wählen Sie den DMXModus 1, 2, 3 oder 4 wie auf den folgenden Seiten beschrieben. 22 DMX Modus Drücken Sie die MODE-Taste, um das DMX-Modus Auswahlmenü zu sehen. Wählen Sie den DMX-Modus mit den UP- und DOWN-Tasten. DMX Modus 1 : 48-Kanal Bedienung (Steuerung jedes LED-Octostrip Scanners unabhängig). DMX Modus 2 : 24-Kanal Bedienung (Steuerung 4 Sets von 2 LED-Octostrip Scannern). DMX Modus 4 : 12-Kanal Bedienung (Steuerung 2 Sets von 4 LED-Octostrip Scannern). DMX Modus 8 : 6-Kanal Bedienung (|Steuerung 8 LED-Octostrip Scanner gleichzeitig). 23 24 25 Wartung Der Showtec LED Octostrip benötigt fast keine Wartung. Sie sollten das Gerät jedoch sauber halten. Trennen Sie das Gerät vom Netz und wischen Sie dann das Gehäuse mit einem feuchten Tuch ab. Tauchen Sie das Gerät nicht in eine Flüssigkeit. Benutzen Sie nie Spiritus oder Lösungsmittel. Halten Sie Anschlüsse sauber. Trennen Sie das Gerät vom Netz und wischen Sie dann die Anschlüsse mit einem feuchten Tuch ab. Stellen Sie sicher, daß die Anschlüsse ganz trocken sind, bevor Sie das Gerät benutzen oder ans Netz anschliessen. Eine Sicherung auswechseln Elektrische Schwingungen, Kurzschlüsse oder ungeeignete Stromspannung können ein Durchbrennen der Sicherung verursachen. Wenn die Sicherung durchbrennt, funktioniert das Gerät gar nicht mehr. Wenn das passiert, führen Sie folgende Schritte durch: 1. Trennen Sie das Gerät vom Netz. 2. Setzen Sie einen Flachkopfschraubendreher in einen Schlitz der Sicherungsabdeckung. Drehen Sie ihn nach links und drücken gleichzeitig ein bißchen (vorsichtig drehen und drücken). Die Sicherung kommt heraus. 3. Entfernen Sie die kaputte Sicherung. Wenn Sie braun oder milchig ist, ist sie durchgebrannt. 4. Setzen Sie die Ersatzsicherung in den Halter, in dem die alte Sicherung war. Setzen Sie die Sicherungsabdeckung wieder ein. Vergewissern Sie sich, dass die neue Sicherung vom selben Typ ist und die gleichen technischen Spezifikationen hat. Informieren Sie sich anhand des Produktlabels über technische Einzelheiten. Fehlersuche Showtec LED Octostrip Diese Fehlersuchanleitung soll Ihnen helfen, einfache Probleme zu lösen. Wenn ein Problem auftritt, führen Sie die unten genannten Schritte in der Reihenfolge durch, bis eine Lösung gefunden ist. Sobald das Gerät richtig funktioniert, führen Sie keine weiteren Schritte durch. 1. Wenn das Gerät nicht richtig funktioniert, dann sollten Sie das Gerät vom Netz trennen. 2. Kontrollieren Sie die externe Sicherung, die Anschlüsse und die Stromversorgung. 3. Wenn alles richtig ist, schliessen Sie das Gerät wieder ans Netz an. 4. Wenn Sie die Ursache des Problems nicht feststellen können, öffnen Sie den LED Octostrip nicht. Dies könnte das Gerät beschädigen - in diesem Fall erlischt die Garantie. 5. Schicken Sie das Gerät zu Ihrem Showtec-Händler . 26 Produktbeschreibung Modell: Showtec Controller für LED Octostrip Voltage: AC 230V-50Hz (CE) Power: 200W 4 verschiedene DMX-Modi (48 Kanäle, 24 Kanäle, 12 Kanäle, 6 Kanäle) 8 eingebaute Lauflichter Regulierbare Fade-Time / Chase-Time Musikgesteuerter Modus Stromanschluss: Powercon (IN und Out) Datenverbindung: 5 Pole XLR connector Maße: 200 x 360 x 95 mm (LxBxH) Gewicht: 5,15 kg Modell: Showtec LED Octostrip Power: 14W x 8 Datenverbindung: 5 Pole XLR connector 180 LEDs (60 Rot, 60 Grün, 60 Blau) M10 Sliding-Profile zur leichten Montage von Schellen/Klemmen und Bügeln Maße: 1000 x 30 x 93,5 mm (LxBxH) 1000 x 30 x 47,5 mm (LxBxH) nur Octostrip Gewicht: 1,9 kg x 8 Design und Produktspezifikationen unterliegen Änderungen ohne vorherige Ankündigung. Website: www.Highlite.nl Email: [email protected] 27 Andere Showtec Produkten: LED Tube (41000) LED Cove Tube (41005) LED Wallpainter (41200) LED Aqua Painter (41220) Octopod 90 (30987) 28 2007 Showtec.