1
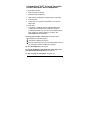
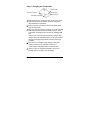
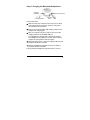
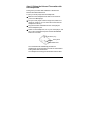
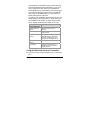
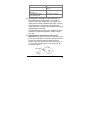
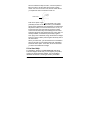
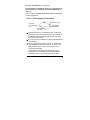
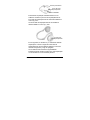
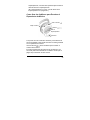
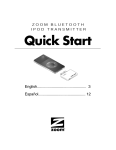
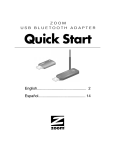
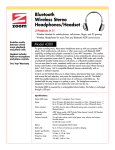
ZOOM UNIVERSAL
iHiFi TRANSMITTER and
iHiFi STEREO HEADPHONES
Quick Start
English............................................... 3
Español............................................. 18
2
Using the Zoom® iHiFi™ Universal Transmitter
and iHiFi Bluetooth® Stereo Headphones
Your package includes:
•
•
•
•
•
iHiFi Universal Transmitter
iHiFi Bluetooth Headphones
USB cable for charging the headset and the transmitter
Extender cable
Velcro tabs for securing the transmitter to your iPod or
MP3 player
You will need:
• A computer or USB hub with an available USB port for
charging the Transmitter and Headphones using the
included USB cable. (You can also use the optional Zoom
iHiFi charger for charging without a computer. See
www.zoom.com for information.)
To set up your wireless connection, follow these steps:
1 Charge the Transmitter (page 4)
2 Charge the Headphones (page 5).
3 Plug the Transmitter into your iPod or MP3 player and pair
the Transmitter with the Headphones (page 6).
To use the Headphones, see page 8.
To pair the Headphones with both your music player and
your Bluetooth mobile/cell phone, see page 10.
For tips on using the Transmitter, see page 12.
3
Step 1: Charging the Transmitter
Charging LED
On/Off (1/0) Switch
Removable
plastic jacket
Mini-USB Connector
a Make sure that your computer is NOT set to go into sleep
mode after a period of inactivity. Check the computer's
documentation for instructions.
b Unless you have an iPod Mini, remove the plastic jacket
from the Transmitter.
c With your computer turned on, plug one end of the included
USB charging cable into the mini-USB connector on the
Transmitter, and plug the other end into an available USB
port.
It takes up to 2 hours for the Transmitter to become fully
charged. The LED nearest the bottom of the Transmitter is
red during charging and becomes dim when charging is
complete.
d When the the Transmitter is fully charged, unplug the
charging cable from the Transmitter and the PC.
A fully charged Transmitter works for about 6 hours.
e When you are not using the Transmitter, turn the 1/0
(On/Off) switch to 0 (Off) to save the battery.
4
Step 2: Charging the Bluetooth Headphones
Charging
cable jack
Charging cable
On/Off (1/0) switch
Charging
LED
Follow these steps:
a Make sure that your computer is NOT set to go into sleep
mode after a period of inactivity. Check the computer's
documentation for instructions.
b Plug one end of the supplied USB charging cable into the
Headphones' charging jack.
c With your computer turned on, plug the other end of the
charging cable into an available USB port.
The Headphones' charging LED is red during charging.
The Headphones may take up to 2 hours to become fully
charged, at which point the LED turns green.
d When the LED is green, unplug the charging cable from the
Headphones and the computer.
e Keep the Headphones switched off until you're ready to
pair them with the Transmitter.
The fully charged Headphones typically work for 12 hours.
5
Step 3: Pairing the Universal Transmitter with
the Headphones
Pairing is the procedure that establishes a wireless link
between two Bluetooth devices.
To pair your music player with the Headphones:
a Make sure the Headphones are within a few meters of
your iPod or MP3 player.
b Set your music player volume at a high level, about ¾ of
maximum. (Later on you can control the volume with the
Headphone controls.)
c Plug the Universal Transmitter into the music player's
stereo headphone jack.
d Switch on the Headphones, turn on your music player, and
turn on the Transmitter and press and hold its Connect
button for 5 seconds.
Stereo plug
Pairing LEDs
Connect button
The Transmitter will automatically pair with the
Headphones. During the pairing process the Transmitter's
Pairing LEDs flash red and blue.
The Headphones' Pairing LED also flashes red and blue.
6
Pairing LED
Within 10 seconds, the Headphones and the Transmitter
should pair. When they do, the Headphones' Pairing LED
flashes blue for 10 seconds and then turns off.
The Transmitter's blue LED continues to flash intermittently
during the time it is paired with the Headphones. If the
Transmitter loses pairing, its LEDs become steady on
while it tries to re-initiate pairing.
(If pairing doesn't occur, see the Notes on Pairing on page
11.)
7
Using the Headphones to listen to your music
player
Volume Up
( )
Volume Down ( )
Phone
Pairing LED
Microphone
As soon as the Universal Transmitter and the Headphones
become paired, you can listen to the music stored on your
music player.
Use the and buttons on the Headphones to control the
music volume.
The chart on the next page lists button functions. The
functions for making calls on your cell phone (see page 10)
are shown in italics.
8
Button
Answer/end
phone call
Pairing LED
Microphone
Function
Lets you answer/terminate a phone call.
In Idle state, hold down 2 seconds to redial
the most-recently dialed number.
Flashes red and blue while pairing, flashes
blue when paired, and turns off after 10
seconds.
Flips down for phone conversations.
Mutes/unmutes the microphone.
Play/ Pause
Stop
To power off the headphones, hold for 4
seconds.
To power back on and re-initiate pairing,
hold again for 4 seconds.
Rejects an incoming call.
Volume up
Volume down
Increases sound volume. System beeps at
maximum.
Decreases volume. System beeps at
minimum.
9
Caution from The American Speech-Language-Hearing
Association (ASHA)
To avoid hearing damage, ASHA counsels headphone
users to turn down the volume, take frequent listening
breaks, and wear headphones like Zoom's that fit over the
ears to block background noise.
Pairing the Headphones simultaneously with
the Universal Transmitter and your Bluetooth
Mobile/Cell Phone
To switch back and forth between listening to music and
speaking on your Bluetooth mobile/cell phone, follow these
steps to pair the Headphones with your Universal Transmitter
and your phone at the same time:
a Make sure the Headphones are turned on, paired with the
Transmitter, and located within a few meters (30 feet or
less) of both the music player and the phone.
b Turn on your phone and access the Bluetooth settings
section of the phone's menu.
c Make the phone visible (discoverable) to other Bluetooth
devices. (Then, if you have previously paired with the
phone, skip to Step e. Otherwise continue with Step d.)
d Search for new devices.
e When the phone displays BT AV Headset, initiate pairing
with the Bluetooth Headphones.
f
10
At the prompt, enter a pairing PIN code of 0000 and make
the connection.
Note: Some phones also require you to tell them to
connect to the paired device.
That's all you need to do! You don't have to do anything on
the Headphones. The Pairing LED on the Headphones will
flash blue for 10 seconds, then turn off.
Note: Please consult the phone's documentation if you
need more information about pairing.
When you hear the phone ring through the
Headphones while you are listening to music, press
the Phone button on the Headphones and flip down the
microphone to answer the call.
To make a call while you are listening to music, just dial the
number on your phone – you don't need to press a button on
the Headphones.
When you finish speaking, flip up the micro-phone
and press the Phone button to end the call and
listen to your music player.
Notes on Pairing
• Pairing usually takes only about 10 seconds. However, it
can take up to three minutes if there are other Bluetoothenabled devices nearby that you don't want to pair with.
Move those devices out of range or switch them off.
• The Headphones lose the wireless connection if they get
too far away from your iPod/MP3 player or the cell phone –
for example, if you move outside the 10 meters/30 feet
range without taking the Headphones off.
11
If this happens, the Headphones go into Idle mode, and
the Pairing LED flashes blue intermittently. If you come
back in range within three minutes, the Headphones
automatically become paired with the music player again.
If you were simultaneously paired with your mobile/cell
phone and your iPod/MP3 player, you may have to reinitiate pairing with the cell phone.
If you don't come back within range within 3 minutes, the
Headphones go into Sleep mode. To restart pairing, turn
the Headphones off and then on again with the On/Off
button. Pairing should take place within 10 seconds.
Headphones
Pairing LED Status
Explanation
Red/blue alternate
flashing
Searching for a device or
pairing
Blue flashing
Paired. After 10 seconds, the
LED turns off.
Intermittent blue
flashing
Idle (not paired), looking for
last-paired device. After three
minutes, Headphones go into
Sleep mode and LED turns off.
Intermittent red
flashing
Low battery
No indication
Paired or in Sleep mode, or
headphones are turned off, or
battery is dead.
Using the Bluetooth Universal Transmitter
► The top two LEDs on the transmitter show you the mode
it’s in.
12
Both LEDs off
Both LEDs steady on
Red and blue LEDs
alternating
Blue LED flashing twice
every three seconds
Idle
Searching for last paired
device
Pairing
Paired and connected
► The Universal Transmitter can also work with your
MP3-enabled phone, stereo system, TV, CD player,
computer sound card, satellite radio, or any other audio
device that has a stereo headphone/output jack. Just plug
the transmitter into the device’s stereo headphone or
output jack directly, or use the short extension cable that is
shipped with the Transmitter.
The Transmitter plug is 3.5mm (1/8"). Adapters are widely
available to connect the transmitter to smaller or larger
jack sizes.
®
► Included with the Transmitter are some Velcro
fasteners that you can use to hold the Transmitter to your
iPod or other audio device. The Velcro works best if it is as
far away from the music player's headphone jack as
possible, but no part of the Velcro can be more than 3.75
cm (1.5 inches) from the jack or it won’t line up with the
Transmitter correctly.
Velcro Pad
13
We’ve included two strips of Velcro, one with 3 pieces of
light gray Velcro and the other with 3 pieces of white
Velcro. You use one of each color, and the extras will let
you replace the Velcro if it starts to wear out.
Velcro Pad
Peel off one piece of gray Velcro and stick it on a clear,
preferably flat area on the same side of your iPod/MP3
player as the headphone jack. Remember, the further from
the jack the better, but it can’t be more than 3.75 cm (1.5
inches) from the jack. Now peel off one piece of white
Velcro from the other strip, and carefully push the Velcro
side (NOT the sticky side) against the gray Velcro that you
already installed, so that the two pieces stay together.
Then plug in the Transmitter, being careful that it's straight.
Press it in place so that it pushes against the sticky side of
the white Velcro.
When you first do this, you should leave the Transmitter in
place for at least one hour before pulling the Transmitter
and audio device apart. To be safe, we recommend that
you leave them attached overnight.
If You Need Help
For assistance, please go to www.zoom.com and select
Technical Support. From here you can register your product,
contact our technical support experts, use our intelligent
database SmartFacts™, and/or get warranty information.
14
If you choose to call a Zoom technician, the appropriate
number depends on your country:
US: (561) 997-9686
Portugal: +35 1221451012
Switzerland: +41 435000369
UK: 0870 720 0090
Spain: +34 911516304
Other (US number):
(561) 997-9683
Some other Zoom iHiFi products
Zoom’s Model 4355 iHiFi Transmitter for iPods plugs into
the docking port of any iPod, and works with Zoom iHiFi
Headphones and the Zoom iHiFi Receiver.
Model 4360 iHiFi Receiver plugs into a stereo or powered
speakers. It wirelessly receives and plays audio from an iPod,
MP3 player, computer, or other device that has Bluetooth
A2DP capability. The Receiver works with iHiFi Transmitter
model 4355 for the iPod and with model 4353 for MP3 and
other audio players.
Model 4411F and 4321F Zoom USB Bluetooth Adapters
plug into a PC and communicate wirelessly with iHiFi Model
4380 Headphones, the iHiFi Model 4360 Receiver, and other
Bluetooth devices.
Regulatory Information
U.S. FCC Part 15 Emissions Statement
This equipment has been tested and found to comply with the limits for a Class
B digital device, pursuant to part 15 of the FCC Rules. These limits are
designed to provide reasonable protection against harmful interference in a
residential installation. This equipment generates, uses and can radiate radio
frequency and, if not installed and used in accordance with the instructions, may
cause harmful interference to radio communications.
However, there is no guarantee that interference will not occur in a particular
installation. If this equipment does cause harmful interference to radio or
television reception, which can be determined by turning the equipment off and
15
on, the user is encouraged to try to correct the interference by one or more of
the following measures:
• Reorient or relocate the receiving antenna.
• Increase the separation between the equipment and receiver.
• Connect the equipment into an outlet on a circuit different from that to which
the receiver is connected.
• Consult the dealer or an experienced radio/TV technician for help.
Declaration of Conformity
Déclaration de conformité
Δήλωση Συμμόρφωσης
Deklaracja zgodności
Declaración de conformidade
Uyum Beyanatı
Konformitätserklärung
Dichiarazione di conformità
Declaração de Conformidade
Konformitetsdeklaration
Cam kết về sự tuân thủ ở Châu Âu
Manufacturer/Producent/Fabrikant/Constructeur/
Hersteller/Κατασκευαστής/Fabbricante/Fabricante/
Tillverkare/Üretici/Nhà sản xuất
Zoom Technologies, Inc.,
207 South Street,
Boston, MA 02111, USA
617-423-1072 www.zoom.com
Brand/Varemærke/Merk/Marque/Marke/Μάρκα/
Marchio/Marka/Marca/Märke/Thương hiệu
Zoom Bluetooth iHiFi Stereo
Headphones/Headset
Type/Typ/Μάρκα/Tipo/Türü/Kiểu mẫu
Model 4380
Brand/Varemærke/Merk/Marque/Marke/Μάρκα/
Marchio/Marka/Marca/Märke/Thương hiệu
Zoom Bluetooth Wireless
Transmitter for MP3 player
Type/Typ/Μάρκα/Tipo/Türü/Kiểu mẫu
Model 4353
The manufacturer declares under sole responsibility that this equipment is compliant to
Directive 1999/5/EC via the following. The product is CE marked.
Producenten erklærer under eneansvar, at dette udstyr er i overensstemmelse med direktivet
1999/5/EC via følgende. Dette produkt er CE-mærket.
De fabrikant verklaart geheel onder eigen verantwoordelijkheid dat deze apparatuur voldoet
aan Richtlijn 1999/5/ EC op grond van het onderstaande. Dit product is voorzien van de CEmarkering.
Le constructeur déclare sous son entière responsabilité que ce matériel est conforme à la
Directive 1999/5/EC via les documents ci-dessous. Ce produit a reçu le marquage CE.
Hiermit erklärt Zoom die Übereinstimmung des Gerätes modem mit den grundlegenden
Anforderungen und den anderen relevanten Festlegungen der Richtlinie 1999/5/EC. Dieses
Produkt ist das gekennzeichnete CE.
Ο κατασκευαστής δηλώνει με αποκλειστική του ευθύνη ότι αυτό το προϊόν συμμορφώνεται με
την Οδηγία 1999/5/ΕC μέσω των παρακάτω. Αυτό το προϊόν φέρει τη Σήμανση CE..
Il fornitore dichiara sotto la sola responsabilità che questa apparecchiatura è compliant a
1999/5/EC direttivo via quanto segue. Questo prodotto è CE contrassegnato.
Producent stwierdza że to urządzenie zostało wyprodukowane zgodnie z Dyrektywą
1999/5/EC. Jest to potwierdzone poprzez umieszczenie znaku CE na urządzeniu.
16
O fabricante declara sob sua exclusiva responsabilidade que este equipamento está em
conformidade com a Directiva 1999/5/EC através do seguinte. Este produto possui Marcação
CE.
El fabricante declara bajo su exclusiva responsabilidad que este equipo satisface la Directiva
1999/5/EC por medio de lo siguiente. Este producto tiene marca CE.
Bu ürünün imalatçısı tüm sorumluluk kendisinde olmak kaydıyla bu cihazın aşağıdaki tabloda
gösterilen biçimde 1999/5/EC (R&TTE Yönetmeliği) no.lu Yönetmeliğe uygun olduğunu
beyan etmektedir. Bu ürün CE İşareti taşımaktadır.
Nhà sản xuất cam kết với trách nhiệm của mình là thiết bị này tuân theo Hướng dẫn
1999/5/EC thông qua các mục sau. Sản phẩm này được đánh dấu là CE.
73/23/EEC – LVD
EN 60950-1:2001
89/336/EEC – EMC
EN 55022: 1998/A1:2001/A2: 2003; EN 301
489-1, v1.4.1: 2002; EN 301 489-17, v1.2.1:
2002;EN 300 328, v1.6.1: 2004
Andy Pollock
24 May, 2007
4380/TF; 4353/TF
Boston, MA, USA
Director, Hardware Engineering /Direktør, Hardware Engineering
/Director, Sustaining Engineering /Directeur, ingénierie de soutien
/Direktør, Sustaining Engineering/Διευθυντής, Μηχανικής Διατήρησης
/Direttore, Hardware Engineering /Dyrektor, Inżynieria
ciągła/Director, Engenharia de Manutençã /Director, Ingeniería de
apoyo/Donanım Mühendisliği, Müdür/Giám Đốc Kỹ thuật Phần cứng
17
Como Usar el Transmisor Universal Zoom®
iHiFi™ y los Audífonos iHiFi Bluetooth® Estéreo
Su paquete incluye:
•
•
•
•
•
Un Transmisor Universal iHiFi
Audífonos iHiFi Bluetooth
Cable USB para cargar el headset y el transmisor
Cable de extensión
Cinta velcro para asegurar el transmisor a su iPod o MP3
Usted necesita:
• Un computador o USB hub con un puerto USB disponible
para cargar el Transmisor y los Audífonos usando el cable
USB aquí incluido. (También puede usar el Cargador iHiFi
opcional de Zoom para cargar sin necesidad de usar un
computador. Para más información vea www.zoom.com).
Para configurar su conexión inalámbrica, siga estos pasos:
1 Cargue el Transmisor (página 19).
2 Cargue los Audífonos (página 20).
3 Conecte el Transmisor a su iPod o MP3 y empareje el
Transmisor con los Audífonos (página 21).
18
Para usar los Audífonos, ver página 23.
Para emparejar los Audífonos tanto con su reproductor de
música como con su teléfono móvil/celular Bluetooth, ver
página 25.
Para ver algunos consejos sobre como usar el Transmisor,
consulte la página 28.
Paso 1: Como Cargar el Transmisor
Luz LED para cargar
Interruptor
encender/apagar
(1/0)
Tapa plástica
desprendible
Conector
Mini-USB
a Asegúrese de que su computador NO este configurado
para entrar en el modo inactivo después de un periodo de
inactividad. Verifique la documentación del computador
para ver las instrucciones.
b A menos que tenga un Mini iPod, retire la cubierta plástica
del Transmisor.
c Con su computador encendido, conecte un extremo del
cable USB para cargar aquí incluido en el conector miniUSB del Transmisor y conecte el otro extremo en un
puerto USB disponible.
Toma hasta 2 horas para que el Transmisor cargue
completamente. La luz LED más cercana al fondo del
Transmisor esta en rojo durante el tiempo que dura
19
cargando y se vuelve tenue cuando ya ha finalizado el
proceso de carga.
d Cuando el Transmisor este completamente cargado,
desconecte el cable de cargar del Transmisor y del PC.
Un Transmisor completamente cargado funciona cerca de 6
horas.
e Cuando el Transmisor no este en uso, cambie el
interruptor 1/0 (Encender/apagar) a 0 (Apagar) para
ahorrar la batería.
Paso 2: Como Cargar los Audífonos Bluetooth
Enchufe para
cargar la USB
Interruptor
Encender/Apagar
Cable para
Cargar
Luz LED para
Cargar
Siga estos pasos:
a Asegúrese de que su computador NO este configurado
para entrar en el modo inactivo después de un periodo de
inactividad. Verifique la documentación del computador
para ver las instrucciones.
b Conecte un extremo del cable USB para cargar aquí
incluido en el enchufe para cargar de los Audífonos.
c Con su computador encendido, conecte el otro extremo del
cable para cargar en un Puerto USB disponible.
20
La luz LED para cargar de los Audífonos estará roja
durante el proceso de carga. Puede que los Audífonos
tomen hasta 2 horas para cargar por completo, momento
en el cual la luz LED se volverá verde.
d Cuando la luz LED este verde, desconecte el cable para
cargar de los Audífonos y del computador.
e Deje los Audífonos apagados hasta que este listo para
emparejarlos con el Transmisor.
Por lo general los audífonos completamente cargados
funcionan por 12 horas.
Paso 3: Como Emparejar el Transmisor
Universal con los Audífonos
El emparejamiento es el procedimiento que establece un
enlace inalámbrico entre dos dispositivos Bluetooth.
Para emparejar su reproductor de música con los Audífonos:
a Asegúrese de que los Audífonos estén a pocos metros de
su iPod o MP3.
b Coloque el volumen de su reproductor de música a un
nivel alto, cerca del ¾ del máximo. (Más tarde puede
controlar el volumen con los controles de los Audífonos).
c Conecte el Transmisor Universal en el enchufe estéreo de
los audífonos de su reproductor de música.
d Encienda los Audífonos, su reproductor de música y el
Transmisor y presione y sostenga el botón Conectar
durante 5 segundos.
21
Enchufe para Estereo
Luces LED para
Emparejamiento
Botón Conectar
El transmisor emparejará automáticamente con los
Audífonos. Durante el proceso de emparejamiento las
luces LED de emparejamiento del Transmisor titilarán en
color rojo y azul.
Las luces LED de emparejamiento de los Audífonos
también titilarán en color rojo y azul.
Luz LED para
Emparejamiento
En 10 segundos, los Audífonos y el Transmisor deberán
emparejarse. Cuando lo hagan las luces LED de
emparejamiento de los Audífonos titilarán en color azul
durante 10 segundos y luego se apagarán.
La luz LED azul del Transmisor seguirá titilando
intermitentemente durante el tiempo que esté emparejado
con los audífonos. Si el Transmisor pierde el
22
emparejamiento, sus luces LED quedarán fijas mientras él
trata de reiniciar el emparejamiento.
(Si el emparejamiento no ocurre, vea las Notas sobre
Emparejamiento en la página 26.)
Como Usar los Audífonos para Escuchar el
Reproductor de Música
Subir Volumen ( )
Bajar Volumen ( )
Teléfono
LED de
Emparejamiento
Micrófono
Tan pronto como el Transmisor Universal y los Audífonos se
hayan emparejado, usted podrá escuchar la música guardada
en su reproductor de música.
Use los botones y de los Audífonos para controlar el
volumen de la música.
El cuadro siguiente lista las funciones de los botones. Las
funciones para hacer llamadas en su teléfono celular (ver la
página 25) se muestran en letra cursiva.
23
Botón
Responder/term
inar llamada
telefónica
LED para
Emparejar
Micrófono
Función
Le permite responder/terminar una llamada
telefónica.
En estado inactivo, sostenga por 2
segundos para marcar de nuevo el último
número marcado.
Titila en color rojo y azul durante el
emparejamiento, titila en color azul cuando
empareja y se apaga después de 10
segundos.
Se voltea hacia abajo durante las
conversaciones telefónicas.
Cierra/abre el micrófono.
Play/ Pausa
Parar
Para apagar los audífonos, sostener
durante 4 segundos.
Para encender de nuevo y reiniciar el
emparejamiento sostener nuevamente por
4 segundos.
Rechaza una llamada que entra.
Subir volumen
Bajar volumen
24
Aumenta el volumen del sonido. El sistema
suena al máximo.
Disminuye el volumen. El sistema suena al
mínimo.
Advertencia de la Asociación Americana del HablaLenguaje-Audio (ASHA)
Para evitar daño en la audición, ASHA aconseja a los
usuarios de los audífonos bajar el volumen, tomar
frecuentes descansos y usar audífonos como los de Zoom
que se colocan sobre las orejas para bloquear el ruido de
fondo.
Como Emparejar los Audífonos
Simultáneamente con el Transmisor Universal
y su Teléfono Móvil/Celular Bluetooth
Para cambiar entre escuchar música y hablar en su teléfono
móvil/celular Bluetooth, siga estos pasos para emparejar los
Audífonos con su Transmisor Universal y su teléfono al
mismo tiempo:
a Asegúrese de que los Audífonos estén encendidos, que
estén emparejados con el Transmisor y situados a pocos
metros (30 pies o menos) tanto del reproductor de música
como del teléfono.
b Conecte su teléfono y acceda a la sección de
configuraciones del Bluetooth en el menú del teléfono.
c Haga visible (fácil de ver) su teléfono a otros dispositivos
Bluetooth. (Luego, si ha emparejado previamente con el
teléfono, omita el Paso e. De lo contrario continúe con el
Paso d.)
d Busque nuevos dispositivos.
e Cuando el teléfono despliegue BT AV Headset, inicie el
emparejamiento con los Audífonos Bluetooth.
25
f
Cuando así se lo indique ingrese un código PIN de
emparejamiento de 0000 y haga la conexión.
Nota: Algunos teléfonos también requieren que se les
indique que se conecten al dispositivo emparejado.
Eso es todos lo que necesita hacer! No tiene que hacer nada
con los Audífonos. La luz LED de emparejamiento en los
Audífonos titilará en color azul durante 10 segundos y luego
se apagará.
Nota: Si necesita más información sobre el
emparejamiento por favor consulte la documentación del
teléfono.
Cuando escuche sonar el teléfono a través de los
Audífonos mientras que esta escuchando música,
presione el botón Teléfono en the los Audífonos y voltee el
micrófono hacia abajo y responda la llamada.
Para hacer una llamada mientras esta escuchando música,
simplemente marque el número en su teléfono – no es
necesario que presione un botón en los Audífonos.
Cuando termine de hablar, voltee el micrófono
hacia arriba y presione el botón Teléfono para
finalizar la llamada y escuchar su reproductor
de música.
Notas Sobre el Emparejamiento
• Por lo general, el emparejamiento toma solo cerca de 10
segundos. Sin embargo, puede tomar hasta tres minutos
si hay otros dispositivos Bluetooth-habilitados cercanos
26
con los que no desea emparejar. Retire estos dispositivos
fuera de rango o apáguelos.
• Los Audífonos pierden la conexión inalámbrica si están
muy lejos de su iPod/MP3 o del teléfono celular – por
ejemplo si usted se mueve fuera del rango de los 10
metros/30 pies sin quitarse los Audífonos.
Si esto pasa los Audífonos entrarán al modo inactivo y la
luz LED de Emparejamiento titilará intermitente en color
azul. Si regresa al rango dentro de los tres minutos
siguientes, los Audífonos se emparejarán de nuevo,
automáticamente, con el reproductor de música.
Si estaba simultáneamente emparejado con su teléfono
móvil/celular y su iPod/MP3, puede que tenga que reiniciar
el emparejamiento con el teléfono celular.
Si no regresa dentro del rango en 3 minutos, los Audífonos
entrarán en el modo inactivo. Para reiniciar el
emparejamiento, apague los Audífonos y luego
enciéndalos de nuevo con el botón Encender/Apagar. El
emparejamiento se efectuará en 10 segundos.
Estatus Luz LED de
emparejamiento
Explicación
Titileo rojo/azul
alternado
Buscando un dispositivo o
emparejando.
Titileo color azul
Emparejado. Después de 10
segundos la luz LED se apaga.
Titileo intermitente
color azul
Inactivo (no emparejado), buscando el
ultimo dispositivo emparejado.
Después de tres minutos, los
Audífonos entrarán en el modo
inactivo y la luz LED se apagará.
27
Titileo intermitente
color rojo
Batería baja.
Sin indicación
Emparejado o en modo Inactivo, o los
Audífonos están apagados o la
batería esta muerta.
Como Usar el Transmisor Universal Bluetooth
► Las dos luces LED superiores del transmisor le muestran
el modo en que se encuentra.
Ambas luces LED apagadas
Ambas luces LED fijas
Las luces LED roja y azul
alternando
La luz LED azul titilando dos
veces cada tres segundos
Inactivo
Buscando el ultimo dispositivo
emparejado
Emparejando
Emparejado y conectado
► El Transmisor Universal puede también funcionar con
su dispositivo MP3-habilitado, sistema estéreo, TV,
reproductor de CD, tarjeta de sonido del computadpor,
radio satelital, o con cualquier otro disposititvo de audio
que tenga audífonos/enchufe de salida estéreo.
Sımplemente conecte el transmisor directamente en el
audífono estéreo del dispositivo o enchufe de salida o use
el cable corto de extensión que le fue enviado con el
Transmisor.
El enchufe del Transmisor es de 3.5mm (1/8"). Los
adaptadores están ampliamente disponibles para conectar
el transmisor a tamaños de enchufe más pequeños o
grandes.
28
► Con el Transmisor se han incluido algunas cintas de
®
Velcro que puede usar para adherir el Transmisor a su
iPod u otro dispositivo de audio. El Velcro funciona mejor
si esta lo más lejos posible del enchufe de los audífonos
del reproductor de música, pero ninguna parte del Velcro
puede estar a más de 3.75 cm (1.5 pulgadas) del enchufe
o no alineará correctamente con el Transmisor.
Cinta
Velcro
Pieza de
Velcro
Hemos incluido dos cintas Velcro, una con 3 piezas de gris
claro y la otra con 3 piezas de Velcro blanco. Se usa una
de cada color y las piezas extras le permitirán reemplazar
el Velcro cuando se comience a desgastar.
Pieza de Velcro
Retire una pieza de Velcro gris y adhiérala en un área
clara preferiblemente lisa en el mismo lado de su
iPod/MP3 como el enchufe de los audífonos. Recuerde,
entre más lejos del enchufe mejor, pero no puede estar a
más de 3.75 cm (1.5 pulgadas) del enchufe. Ahora retire
una pieza de Velcro blanco de la otra cinta y
cuidadosamente empuje el lado del Velcro (NO el lado
29
pegajoso) contra el Velcro gris que ya instalo de manera
que las dos piezas se unan. Luego conecte el Transmisor,
teniendo cuidado de que este derecho. Presiónelo en su
lugar de manera que empuje contra el lado pegajoso del
Velcro blanco.
Cuando haga esto por primera vez debe dejar el
Transmisor en su lugar por lo menos una hora antes de
sacar el Transmisor y el dispositivo de audio aparte. Para
mayor seguridad, le recomendamos que los deje unidos
hasta el día siguiente.
Si Necesita Ayuda
Si necesita ayuda por favor vaya a www.zoom.com y
seleccione Soporte Técnico. Desde aquí podrá registrar su
producto, hacer contacto con nuestros expertos de soporte
técnico, usar nuestra base de datos inteligente SmartFacts™
y/o conseguir información sobre la garantía.
Si se decide a llamar a un técnico de Zoom, el número
adecuado depende de su país:
EU: (561) 997-9686
Portugal: +35 1221451012
Suiza: +41 435000369
30
RU: 0870 720 0090
España: +34 911516304
Otro (número en EU):
(561) 997-9683
Algunos otros productos iHiFi Zoom
El Transmisor iHiFi Modelo 4355 de Zoom para iPods
conecta en el puerto de cualquier iPod y funciona con los
Audífonos y el Receptor iHiFi de Zoom.
El Receptor iHiFi Modelo 4360 conecta con parlantes
estéreo o eléctricos. Recibe inalámbricamente y toca el audio
desde un iPod, MP3, computador, u otro dispositivo que
tenga capacidad Bluetooth A2DP. El Receptor funciona con el
Transmisor iHiFi modelo 4355 para el iPod y con el modelo
4353 para MP3 y otros reproductores de audio.
Los adaptadores Zoom USB Bluetooth Modelos 4411F y
4321F se conectan al PC y se comunican inalámbrica-mente
con los Audífonos iHiFi Modelo 4380, con el Receptor iHiFi
Modelo 4360 y con otros dispositivos Bluetooth.
31
3487-C
27456-2
©2007