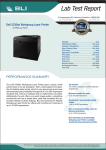
1
m
STAR
T
hank you for purchasingthe Labelwriter printer.
Your Labelwriter printer comes with 2 manuals and
2 disks. Please follow these steps to set up and use your
Labelwriter XL or XL Plus printer.
I. Follow the directions in the thin Labelwriter User
Manual. It explains:
How to set up your Labelwriter printer.
How t o load and change labels.
How to install Windows print drivers (see #2 below).
2. Next, to install the AddressMate software, open the
AddressMate manual and follow the directions covering
the installation and use of the software. AddressMate
will prompt you to install your Windows print drivers
near the end of its installation.You can refer to
Appendix E in your Labelwriter User Manual or
Appendix E in the AddressMate manual for step by
step instructions on installingWindows print drivers.
LABELWRlTER
User Manual for use with Labelwriter XL,
X L Plus, BC and BC Plus printers.
Includes:
Setting Up Your Printer
Loading Labels
Maintenance & Troubleshooting
Ordering More Labels
Printer Specifications
Development Tools
Installing Windows Print Drivers
Using Labelwriter With 3rd Party Software
Costar Corporation
599 West Putnam Avenue
Greenwich, CT 06830
FCC compliance
statement
This equipment has been tested and found t o comply with the limits
for a Class B digital device, pursuant to Part I 5 of the FCC (Federal
Communications Committee) rules. These limits are designed to provide
reasonable protection against harmful interference in a residential installation. This equipment generates, uses, and can radiate radio frequency
energy, and, if not installed and used in accordance with the instructions,
may cause harmful interference t o radio communications.
However, there is no guarantee that interference will not occur in a
particular installation. If this equipment does cause harmful interference
t o radio or television reception, which can be determined by turning the
equipment off and on, the user is encouraged to try correcting the interference by one or more of the following measures:
Reorient or relocate the receiving antenna.
Increase the separation between the equipment and the receiver.
Connect the equipment into an outlet on a circuit different from that to
which the receiver is connected.
Use shielded cables to connect this device to computers.
Consult the dealer or an experienced r a d i o m technician for help.
You may find helpful the following booklet, prepared by the FCC:
Interference Handbook This booklet is available from the U.S. Government
Printing Office, Superintendent of Documents, Washington, DC 204029325; (202) 783-3238.
Warning: Changes or modifications to this unit not expressly approved
by the party responsible for compliance could void the user's authority to
operate the equipment.
Copyright
0199 1-95 Costar Corporation. All rights reserved.
Trademarks
Labelwriter is a trademark of Costar Corporation. All other trademarks
are trademarks of their respective holders.
~
TABLEOF CONTENTS
Chapter I .
Labelwriter Printer Setup .............................................................................
i
Unpacking the printer ..................................................................................................................
i
Do you have what you need ...................................................................................................... i
Where t o put your printer ........................................................................................................ 2
Identifying printer components ................................................................................................. 3
4
Locating printer controls ............................................................................................................
5
Connecting the power ................................................................................................................
Connecting the serial cable ........................................................................................................
5
Installing the label guide ..............................................................................................................
6
Loading labels.................................................................................................................................
8
Removing an empty label roll ..................................................................................................
IO
Chapter 2 .
Maintenance and Troubleshooting...........................................................
Printer maintenance...................................................................................................................
Exterior maintenance ................................................................................................................
Interior maintenance .................................................................................................................
Clearing label jams .....................................................................................................................
Troubleshooting .........................................................................................................................
IRQ settings .................................................................................................................................
Printer isn’t getting power .......................................................................................................
Printer is on but doesn’t print.................................................................................................
Self-test works but printer still doesn’t
print from application ................................................................................................................
How t o correct poor print quality.........................................................................................
Chapter 3
.Ordering More Labels.....................................................................................
11
11
12
12
13
13
13
14
15
15
16
17
Appendix A .
Printer and Serial Interface Specifications.......................................
19
Appendix B .
Warranty and Service ................................................................................. 21
Appendix C .
Development Tools ...................................................................................... 23
Appendix D Battery Pack .................................................................................................... 25
Appendix E .
Installing Windows Print Drivers .............................................
:.............27
Appendix F .
Using Labelwriter with 3rd Party Software .................................... 35
.
~
~
~~
~~~~
~~~~
~~
~~~
~~~~~~~~~~~~~~~~~~~~~~~~~~~~~
~~~
CHAPTER1
SETUP
This chapter explains how to set up your new Labelwriter
printer for optimum performance.
Unpacking the
printer
The first step in setting up your printer is, naturally, unpacking
the pieces. Be sure t o save all the original packing materials.
They are specially designed t o protect the printer and will make
repacking easy if you ever need t o ship the printer. Now, let’s
take inventory.
Do you have
what you need?
Having unpacked your Labelwriter printer, it’s a good idea t o
check now to see that you have all the pieces. You should find the
following items (shown in Figure I- I):
Labelwriter XL, X L Plus, BC or BC Plus printer
Serial cable
Power transformer
Roll of labels
User manual
Check carefully to see if anything is missing o r damaged. If so,
contact Costar immediately.
Everything checked out? Let’s set up the Labelwriter printer
Figure 1-1. The Labelwriter printer comes with these items: printer, power
transformer, serial cable, roll of lab& user manual.
Where to put
your printer
Before setting up your Labelwriter, take a few moments t o
consider where you plan to put it. O f course, we can’t cover all
possible setups, but there are a few general guidelines you might
consider.
Be sure there’s enough room around the printer t o allow labels
t o flow out freely.
Avoid placing the printer in areas where sudden, severe changes
in temperature and humidity occur.
Avoid areas with direct sunlight, dust and grease.
Pick a clean area.
Select a steady source of electricity and check for other appliances which may be using the same circuit. Copiers, heaters, air
conditioners and other motorized equipment can cause power
fluctuations which may interfere with your printing.
Use a surge protector.
Identifying printer
components
Figure 1-2 highlights the main components of the LabelWriter
printer. Before setting up the printer, let’s see what these components do:
I
Label
-tear
bar
Power light
I
+z+
Form feed
button
Onloff button
Figure 1-2. LabelWriter components.
Cover - The cover protects the internal components of the
printer from dust, moisture and the outside world in general. The
cover is easily opened when changing label rolls.
-
Power light The power light glows green when the printer is
turned on. It flashes when there is something wrong with the
printer, such as when the printer runs out of labels.
Onloff button
- The on/off button turns the printer on and off.
-
Form feed button The form feed button advances the roll
of labels one label each time you press the button.
-
Label spindle The label spindle, located inside the printer,
holds the roll of labels.
-
Label tear bar The serrated tear bar on the label exit slot
allows quick, clean label removal.
-
Interface connector The interface connector, which looks
like a telephone jack, is a serial connector. One end of the special
serial cable that comes with the printer is plugged into this connector and the other end is attached t o your computer.
-
Power transformer The power transformer provides
electrical power t o the printer. Connect the transformer t o a
standard grounded outlet.
Locating printer
controls
The printer controls allow you to turn the printer on and off, and
advance the label roll. Refer t o Figure 1-3 to locate the following
printer controls on your Labelwriter printer.
The On/Off Button
The On/Off power button is the left button on the front panel of
the printer. Once you have the power cord plugged in, push the
on/off button t o turn the printer on; press it again t o turn the
printer off.
-
\\A-
Figure 1-3. Labelwriter onlofand form feed buttons.
-~
~
-~
~
~~~
Power Light
When the printer is on, the power light located on the front panel
of the printer will glow green. The light goes off when you turn
the printer off.
Form Feed button
The form feed button is the right button on the front panel of the
printer. Push this button once t o advance the label roll one label,
so the next set of three guide holes on the label roll aligns with
the label tear bar. The label roll advances one label each time you
press the form feed button.
Connecting the
power
The power cord is connected to the rear of the printer as
shown in Figure 1-4. Plug the power transformer into a standard
grounded outlet.
Connecting the
serial cable
Your printer and computer communicate through the special
serial cable that comes with your Labelwriter. The cable has a
telephone-like connector at one end that plugs into the back of
the Labelwriter, and two serial connectors at the other end - a
DB9 and DB25 connector. Your PC will use one or the other of
these two connectors, not both.
Follow the steps below while referring to Figure 1-4 to make the
proper connections:
I. Turn your computer and printer off.
I
Figure 1-4. Moking the right connections. Always connect the power cord to
a grounded outlet.
2. Connect the printer end of the serial cable t o the rear of the
printer. It fits only one way just like plugging in a telephone.
3. If you have a 9-pin serial port on your computer, attach the
9-pin connector; if you have a 25-pin serial port, attach the 25-pin
connector. Secure the connector with the two screws. The connector you do not use can simply hang loose. It doesn't need t o
be connected and will not cause any damage to your computer o r
printer. See Figure 1-4.
4. Turn the computer on.
Note: You can also connect your Labelwriter to a parallel (LPT)
port by using a parallel to serial port adapter cable. This cable is
available direct from Costar. Ask for part #60606.
Installingthe
label guide
The label guide should be installed if you are using a Labelwriter
with standard address labels or other narrow labels. The label
guide insures that narrow labels feed properly.
r
Note: The Labelwriter X L and BC have I I' wide print heads and
can only print on narrow labels up to I'I wide (address labels for
example) so the label guide should always be installed if you are
using one of these t w o models. The Labelwriter X L Plus and BC
Plus have 2.25" wide print heads so they can handle narrow and
wide labels. For the wider labels, the label guide should be
removed.
~~
~~
~
~
~~
~
~~~~
~~~~~
~
~~
~~~
~~~~~~~
I. Turn the printer off.
2. Remove the spindle from the printer. (Diagram #I)
3. Find the Label Guide (Diagram #2) nested in the well of the
printer.
4. Remove the Label Guide by placing your finger in the
recessed semicircle and gently lifting the Label Guide from i t s
compartment.
5. Hold the Label Guide as shown (Diagram #3).
6. Find the two small black vertical strips (Diagram #4) located
near the top center of the black well (closest to the label
tear bar).
7. Position the Label Guide aligning the opening between the black
strips and press down firmly. The small knob on the narrow end
of the opening should click into place.
8. Replace spindle.
9. Remember t o remove the Label Guide when using labels
larger than I ". You can store the Label Guide in the recessed
compartment.
Loading labels
Labels are quickly and easily loaded into the Labelwriter printer.
Follow the instructions below while referring t o Figures 1-5 and
1-6.
I. Open the cover so that you have access to the interior of the
printer. Remove any packing material.
2. Remove the label spindle by lifting it straight up from the label
spindle holder.
w/
)
1 GI;;
I
For wider label rolls
a straight
I
Figure 1-5. Looding labels onto the label spindle.
3. Locate your roll of labels and remove the tape from the end of
the roll. Cut the lead label in half t o create a nice straight edge.
The Labelwriter grabs a straight edge much easier.
4. Refer to Figure 1-5 while following these instructions: For narr o w labels, remove the right half of the label spindle and put the
labels on the label spindle so that the end feeds from the bottom
of the roll. Reconnect the right half of the spindle, with the label
roll snugly secured between the circular plates of the spindle.
If you're using wide labels, remove the right half of the label
spindle and turn it around, so that the long end of the spindle is
on the inside. An illustration indicating how to position the spindle
is molded into the black plastic base inside the printer. Put the
labels on the label spindle so that the end feeds from the bottom
of the roll. Reconnect the right half of the spindle, with the label
roll snugly secured between the circular plates of the spindle.
I
Figure 1-6. Insert labels into the feed slot before placing the label roll into
the printer.
5. Be certain that the power cord is connected. N o w turn on the
printer. The green power light will flash and you will hear the
printer’s motor turning as it looks for labels t o feed.
6. Holding the spindle of labels in one hand, use your other hand
to feed the free end of the roll into the feed slot on the inside of
the printer, as shown in Figure 1-6. (If it’s easier, you can rest the
label spindle on the top edge of the printer, freeing both hands to
help with getting the label feeding started.)
7. Push the end into the slot until you feel a slight resistance.
Continue pushing gently. The label feed motor will grab the end
and carry the labels through the printer and out the exit slot,
stopping automatically at the end of the first label.
If the motor stops turning while you’re still in the process of loading labels, just press the form feed button t o get it started again.
(To protect itself, the motor stops turning after a few seconds.)
8. Return the label roll spindle with the labels t o the spindle
holder. The spindle will settle into the raised shoulder slots in the
printer. See Figure 1-7.
Figure 1-7. After the labels have been properly fed past the label tear bar,
rest the label spindle holder and close the cover.
9. Tear off the labels coming out the front of the printer by grasping the very end and pulling downward and sideways across the
edge of the label tear bar.
IO. Close the cover and your Labelwriter printer is ready to go!
Removing an
empty label roll
When the printer runs out of labels, the power light will flash and
you will need t o remove the used roll. Follow these instructions
t o remove a used roll of label$.
I. Leave the printer turned on. Open the cover. Depending
on the label size you are using, the last label on the roll may be
connected to the corrugated core by a piece of tape. If it is, use
scissors to cut the label between the roll and the label feed slot.
2. Press the Form Feed button on the printer’s front panel and
hold it in as the printer ejects the remaining labels o r backing.
3. When the labels or backing stop, pull gently to remove the
material from the printer. Now you can load a new roll of labels.
See the Loading Labels section earlier in this chapter for instructions on how t o load labels.
CHAPTER2
MAINTENANCE
AND
TROUBLESHOOTING
The Labelwriter printer was designed t o give long and troublefree service, requiring very little maintenance. You’ll get the best
possible performance from your Labelwriter if you follow the
instructions in Chapter I Setup and the procedures described
here. This chapter also covers troubleshooting for printer errors
and other common problems.
Printer maintenance
Printer maintenance is quick and easy with the Labelwriter
printer. There’s no set schedule for maintenance; simply perform
the appropriate maintenance when you see that it’s needed.
The Labelwriter printer can be easily cleaned using just a few
simple items. Use these items as often as needed t o keep your
printer clean and in good working order. You’ll need these items:
0 lint-free cloth
0 isopropyl alcohol, diluted dishwashing detergent or diluted
(non-ammonia) glass cleaner
0 small, soft brush, such as a paint brush
0 Use these items as they are called for in the maintenance
procedures described in this chapter.
Exterior
maintenance
Cleaning the outside of your Labelwriter is as important as cleaning the inside. Dusting the outside of the printer occasionally will
reduce the incidence of foreign matter getting inside the printer.
Follow these steps t o perform exterior maintenance on your
printer:
I. Turn the printer off and disconnect the power cord.
2. Dirt, dust, ink and so on will more than likely be attracted to
the exterior of your printer. Use the lint-free cloth to wipe the
exterior of the printer. Remove dirt and ink smudges with either
isopropyl alcohol, diluted dishwashing detergent o r diluted glass
cleaner. Avoid products containing ammonia for cleaning the printer
or plastic cover.
3. Take a minute to clean the work area around the Labelwriter.
There are probably a few labels (new and used) laying around!
4. Reconnect the power cord and turn the printer on.
Interior
maintenance
The printer’s top cover will keep out most of the dust and dirt
which accumulates in operating areas. However, it is still a good
idea to periodically perform some basic interior maintenance:
I. Turn the printer off and disconnect the power cord.
2. Open the top cover.
3. Use a soft brush or a small, soft paint brush t o whisk paper
dust and other stray particles away from the inside of the printer.
Remove the roll of labels to clean under the roll, then replace the
labels.
4. Close the top cover.
5. Reconnect the power cord and turn the printer on.
~
~~
~
~~
~~~
~~~~
~~
~-
Troubleshooting
Since the Labelwriter is extremely reliable there’s an excellent
chance you’ll never have to look in this section. However, if you
do find yourself in need of some type of troubleshooting advice,
use this section to correct the problem.
Clearing label
jams
If you find labels jammed in the Labelwriter, follow these steps t o
remove them.
I. Open the printer’s cover and use scissors to cut the label
between the feed slot and the roll of labels.
2. Press the form feed button to advance the label through the
printer. Reload the labels as described in Chapter I Setup.
3. If the label will not come out with the form feed, remove the
label spindle from the printer. Pull the jammed label gently back
out of the printer through the feed slot.
IRQ settings
Computers send data to a device through the use of an address,
much in the same way a postman delivers a letter t o your home
using your street address. If you want to send mail from your
home, you put the mail in your mailbox and raise the red flag. The
postman sees the red flag and picks up your mail. The computer
does the same thing with a flag called IRQ (Interrupt Request).
When the computer sees an IRQ, it goes to the device that
sent the IRQ and retrieves the data. Below is a list of the addresses and IRQ’s used by IBM PC-compatible computers:
Bar codes printed on X L
or X L Plus are not scanning
consistently.
The Labelwriter X L and XL Plus can be set through their
Windows print drivers t o print crisp, readable bar codes that
match the bar code quality that comes standard in the BC and BC
Plus. In the Windows 3. I print driver, click on the “Setup” button
and then simply set the Darkness Control t o “Light”. In the
Windows 95 driver, select “Properties”, then “Print Density” and
then “Light.”
~
~~
~~
~~~~~~~~
~~~
PortName
COMI
COM2
COM3
COM4
LPT I
LPT2
IRQ
4
3
4
3
7
5
Address
03 F8
02F8
03E8
02E8
0378
0278
The Labelwriter X L sends status information back t o the
computer so that the computer knows the status of the printer at
all times. If your port settings are not correct, then the computer
may not be able to send data or receive status from the
Labelwriter XL printer. Your computer must be able to send and
receive data from the C O M port in which it is connected.
Each device requires i t s own address and IRQ -they C A N N O T
be shared. Notice that COM3 and COM4 share IRQs with C O M I
and COM2, respectively.
IMPORTANT: If you encounter print problems, especially when
you first set up your Labelwriter X L printer, most often conflicts
in the port settings are the cause of your problem. An installed
device such as a mouse, modem, network card o r sound card can
interfere with the Labelwriter X L printer. Check each of these
devices to ensure there is no conflict with IRQ and address. You
may need the assistance of your computer dealer or MIS Manager
to do this for you.
Printer isn't
getting power
The onloff light on the front of your printer should glow green
when the printer is switched on. If it doesn't check t o make sure
that the printer is plugged in properly at both the wall outlet and
along the back panel of the printer. Then t r y another machine in
the same wall outlet to make sure the outlet is good. If the outlet
is good, chances are that the power transformer that came with
your Labelwriter has become defective. There is no need to
return the printer. Just call Costar for a new power transformer.
Printer is on but
doesn’t print
To be certain that your Labelwriter is printing and feeding labels
properly, you can run a self-test.
I. Make sure a roll of labels is loaded.
2. Be sure the printer is OFF and that the serial cable is not
connected.
3. Locate the Form Feed button on the front of the printer.
4. Hold the Form Feed button down while you turn on the
Labelwriter with the power button.
5. The printer will begin printing a self-test pattern on the labels.
6. End the self-test by turning the printer off.
7. Reconnect the serial cable t o the back of the printer, turn the
printer on again, and you’re all set.
If the printer fails a self-test, check to see if the labels are loaded
improperly o r if the serial cable is plugged in (it shouldn’t be
during the self-test). Reload the labels and retry the self-test.
If the on/off LED is flashing and labels are loaded, this indicates
that the labels are jammed. You should remove the labels, look
for jammed o r crimped labels, and then reload the labels according to the instructions in chapter I.
The on/off light also flashes when you reach the end of a roll of
labels. Load a new roll and the light will stop flashing.
Self-test works
but printer still
doesn’t print from
application.
If the self-test works fine but the printer is still not printing from
your application, do the following:
Check to be sure that you have selected the correct serial port
in your software and that the serial port is set for 19,200baud no
parity, 8 data bits, I stop bit, and XON/OFF flow control. See
Appendix E for details on setting these parameters.
Check to see that the serial cable (or parallel t o serial adapter)
is properly connected. Make sure you are using a Costar serial
cable. Other ones that look the same will not work.
How to correct
poor print quality
Poor print quality can be caused by a misaligned o r dirty print
head. The first step is t o unload the labels, and then reload them
to see if the alignment improves. The second step is to clean the
print head. Costar sells IO-packs of cleaning cards for $9.95
(part # 6060 I).
Printer doesn't print
on right side of label
Remember that the Labelwriter XL and BC only have I 'I wide
print heads inside. Even though they will feed wider labels they
will only print on the left side of those labels. The XL Plus and BC
Plus contain wider 2.25" print heads so they print all the way
across large labels.
XL, BC
I " wide print head
X L Plus, BC Plus
2 '14" wide print head
~~
~
~
~~~
~~~~
CHAPTER3
ORDERING
MORE
LABELS
~
Costar manufactures a wide selection of labels for your
Labelwriter. This chapter provides you with a summary of the
sizes available at the time this manual was printed. For the most
up-to-date list, contact our Automated Fax Retrieval System at
800-350-6280,request Document 2 for a list of all marketing
documents, and then select the Label Sheet of your choice.
Or call our Customer Service Department at 800-426-7827or
203-661-9700.
If you need a special label size, material o r adhesive, a description
of our custom label program is also available on the Faxlnfo
system. Or you can call Costar Customer Service.
Costar labels are available from computer resellers, catalogs,
and direct from Costar. Standard sizes are available from many
sources, but more unusual sizes are often only available direct
from Costar.
See label list on following page.
~~
~~~-
~~~~~~~~
Labels: (Dimensions listed H x W)
Address:
X L and BC
X L Plus and BC Plus
d
d
White, clear, yellow, blue, peach, and lavender.
I. I3"x 3.5", I30 or 350 labels per roll.
Return Address:
White, .75"x 2",500 per roll.
File Folder:
All white, white w/red stripe and white wlblue stripe.
S6"x 3.4", 260 per roll.
d
Shipping:
White and clear.
2.25"~4". 300 labels per roll
d
Diskette:
White. Permanent or removable adhesive.
2. I 3"x 2.75", IO0 or 400 per roll.
Video Cassette:
Spine, White, .75"x 5.88', 200 per roll.
Top, White, I .88x 3.06", 300 per roll.
d
d
Audio Cassette:
d
White.
I .63"x 3.5", 350 per roll.
SyQuest Cartridge:
d
White, Removable adhesive.
I.97"x 4.5", 250 per roll.
8mm Video:
d
White, 2-up format.
.38"x2.83", 700 per roll.
DC2 I20 Tape Cartridge:
d
White, Removable adhesive.
2. I3"x 2.75", 400 per roll.
Name Badge (paper stock, not a label):
d
White, 2.25"~3.5", 300 per roll.
d
Small sizes:
White, I "x I ", 750 per roll.
White, .5"x I IO00 per roll.
White, 2.25" x I .25", 250 per roll.
d
Continuous Thermal Paper Roll:
d
'I,
White, 2.25"~300 feet per roll.
APPENDIXA
PRINTERSPECIFICATIONS
Hardware
specifications
Print method: Direct thermal.
Print resolution: 203 dots per inch.
Print speed, up to: I I' per second.
Maximum print width: .94" (24")
in XL and BC, 2.25"
(56mm) in Labelwriter X L Plus and BC Plus.
Maximum label width: I.22" (3 I mm) in X L and BC, 2.44"
(62mm) in Labelwriter X L Plus and BC Plus.
Maximum label length: User definable.
Maximum paper handling: 300 feet of thermal paper. 1200" of
labels.
Standard Interface: Bidirectional, serial RS232 using transmit,
receive and ground. Protocol is XON/XOFF o r CTS, I9.2K baud,
8 data bits, no parity. Can connect t o parallel (LPT) port with
parallel t o serial converter (PaW60606).
Dimensions: 4%" x 6%" x 7" (WHD) Weight: I '/4 pounds.
Print head life: Exceeds I 7 miles of paper.
Power requirements: Requires 24 volts AC, I amp.
Regulatory approvals: FCC, UL and CSA approved. USPS
approved for POSTNET and Delivery Point Bar Code.
Limited Warranty: One year
I.
6'
cable
DBSS
G
N
D
RJll
Pin N o . 6 5 4 3 2 1
DBSS
DB25S
Pin No.
Pin No.
CTS 8
DSR 6
GND 5
DTR 4
TX 3
RX 2
__e_
Yellow
RX
4
5
6
GND
DTR
DSR
Red
Black
White
Figure A-I. Serial cable pin specifications and wiring chart.
4
5
6
7
20
6
5
4
6
5 CTS
6 DSR
7 GND
20 DTR
2 TX
3 RX
APPENDIXB
WARRANTY
AND SERVICE
_
One (I) year
limited warranty
Costar warrants the Labelwriter against defects in materials
and workmanship for a period of one (I) year from the date of
original retail purchase. Printheads are warranted for 90 days.
If Costar receives notice of such defects during the warranty
period, Costar will either, at its option, repair or replace printers
which prove to be defective.
Exclusions
This warranty does not cover customer abuse o r accidental
damage. Costar's sole liability is limited t o supplying the parts and
labor required to restore the warranted product to i t s normal
operating conditions. This warranty is in lieu of all other warranties, express or implied, and in no event is Costar Corporation
liable for consequential o r incidental damage incurred by the user.
Service
In order to claim warranty coverage, dated proof of purchase for
the Labelwriter printer is required. Contact CoStars technical
support department at (203) 66 1-9700 between 9am and 5pm
Eastern time. A technical support specialist will ask you t o
describe the problem and provide the products serial number.
Upon confirmation of the defect, the service representative will
issue you an RA# (Return Authorization #). This number must be
clearly written on the side of the shipping container. W e will not
accept any return without an RA# marked on the outside of the
box. The product must be sent t o us freight prepaid. Send the
product t o Costar's repair center at:
Costar Service Center
RA#XXXXX (place your RA# here)
84 Commerce Street
Stamford, CT 06902
W e will repair the defects covered under warranty at no charge
in approximately three working days. The original warranty on the
printers stays in place - it does not restart from the repair date.
Printheads replaced under warranty come with a 90 day warranty.
Repairs not covered under warranty are billable and will only be
made as authorized by you.
On-site repair
option
Costar offers replacement parts (including printheads) for
resellers and end-users who want t o make their own repairs.
Please call Technical Support for details.
Out of warranty
repairs
Repairs made t o out-of-warranty printers are billable and will only
be made after your authorization.
~~~~~
~
APPENDIXC
LABELWRITER
DEVELOPMENT
TOOLS
Costar offers a variety of development tools t o simplify the integration of Labelwriter printers into custom applications.
Programming libraries provide a flexible API for Microsoft and
Borland C, FoxPro and Clipper. Features include:
NO TSRs. No shelling t o DOS.
Royalty free use in your applications.
Code 39, I28 and Interleaved 2 of 5 bar codes.
POSTNET bar code and .PCX graphics.
Serial port functions included.
Preview labels on monitor.
Lines, boxes and textured area fills.
Multiple fonts and bar codes on one label.
Mix portrait and landscape modes on the same label.
Costar also makes ASCII versions of the Labelwriter which bring
fast, high quality desktop label printing t o virtually all computing
environments. These new printers are called the Labelwriter
ASCII and Labelwriter SE200 and both are available with I" and
2.25" wide print heads. The ASCII models include 4 built-in fonts
in 20 sizes. The SE200 models include 4 built in fonts plus 2 I
bar code symbologies. All print a t a very fast speed of 2" per
second, with 203 dpi resolution. For detailed information on these
printers call our fax back service at 1-800-350-6280 and request
documents #6530 and #653 I.
Lobelwriter SE200 Plus and Lobelwriter ASCII Plus
APPENDIXD
LABELWRITER
BATTERYPACK
Costar offers a Battery Pack for the Labelwriter printers.
This Battery Pack turns any Labelwriter model into a portable
printer. For more information, call our Faxlnfo system at
800-350-6280 and request documnent #550 I o r call customer
service.
-
~
APPENDIXE
INSTALLING
WINDOWS
PRINTDRIVERS
This section explains how to install Windows 3. I, 95 and NT print
drivers. The drivers are supplied with your Labelwriter printer
on a disk marked Drivers. (Disk 2 if you are using AddressMate
Software.) PLEASE NOTE THAT THE LABELWRITER X L PRINT
DRIVER WORKS WITH THE LABELWRITER XL, X L PLUS, BC
A N D BC PLUS.
Follow these instructions for Windows 3. I
From the Main Program Group double click on the Control Panel
icon.
Then double click on the Printers icon.
I
Color
Fonts
Pork
Mouse
e
Rmters
Keyboards
ced
You will see a list of your installed printers. Click on the A D D
button.
DeFault Printer
HP LarerJet 414M PostScript on LPTl:
Since the Labelwriter X L print driver does not come with
Windows, you will have t o install it from the floppy disk that came
with your Labelwriter. (Disk 2 if you are using AddressMate
Software.) Click on the button called Install at the lower right
hand corner of the open window.
Insert your Labelwriter driver disk into Drive A o r Drive B and
make sure to type in either A\ o r B:\ in this screen. Then click
OK.
Insert unlisted, updated, or
vendor-provided printer driver dirk in:
Windows will search the disk and bring up a list of drivers. Select
the driver called Costar Labelwriter X L and click OK.
After a few seconds the driver will be installed and will appear on
the screen in the Installed Printers section. Click on the name
Costar Labelwriter X L under the Installed Printers section. Now
you must configure the driver so it knows which port the printer
is connected to.
r
Default Printer
HP LaserJet 4t4M PostScript on LPTl:
....
I
-
.
- . ...... ...
HP LaserJet 414M PostScript on LPTl:
HP LaserJet on LPT1:
m..
--...
I
~
~~
~~~
~~~
~
~~~~~
~~~~~~~~~
~~~~
~~~
Click on Connect.
In the Ports section of the screen click on C O M I, COM2, COM3
or COM4, depending on which port you are connected to. Also
click on the Fast Printing Direct to Port button in the lower left
hand corner of the screen.
Costar Labelwriter XL
Ports:
LPTZ.
LPT3.
:
1
Local Port Not Present
Local Port Not Present
Localport
Timeouts (seconds)
Device Not Sclected
Transmission Retry:
El
[XIEast Printing Direct to port
Then click on the Settings button. Make sure the settings are set
as follows:
Baud rate: 19200
Data Bits: 8
Parity: None
Stop Bits: I
Flow Control: XON/XOFF
I
Baud Rate:
1192001
D a t a Bits:
Parily:
Stop Bits:
Flow Control:
Xon f Xoff
Then Click on OK, OK, and CLOSE t o exit t o the control panel.
Your Labelwriter has been installed.
~
~~
~~
Follow these instructions for Windows 95
From the S t a r t menu in Windows 95, select Settings and then
Printers from the Settings submenu.
Double click on the Add Printer icon to bring up the Add Printer
Wizard.
Click on the Next button.
Select the Local Printer option and then click on the Next button.
You will see a list of manufacturer’s names and printer models.
Costar’s driver does not come with Windows 95 so click on the
Have Disk button.
Insert the Labelwriter Drivers disk that came with your
Labelwriter (Disk 2 if you have AddressMate Software) into your
floppy drive A or drive B and make sure you type in the right
drive letter in this screen.
Then click on the OK button and you will see the name
Labelwriter X L on the screen. This means that Windows 95 has
located the driver. This is the right driver for your XL, X L Plus,
BC and BC Plus.
Then simply click on the Next button.
Select C O M I or COM2 depending on which port your
Labelwriter is connected to. Then click on Configure Port.
Set Bits per second to 19200.
Set Data bits to 8.
Set Partity to None.
Set Stop Bits t o I
Set Flow Control to XON/XOFF.
Then click on the OK button.
You will see the name Labelwriter X L in this screen. This is correct whether you are using an XL, X L Plus, BC o r BC Plus. Leave
the NO button clicked on the lower part of your screen. Then
click on the Next button.
~
~
Click on the N o button in this final screen and then click on the
Finish button.
That's it. Your Windows 95 driver has been installed.
Follow these instructions for Windows NT
You will need these files t o install the Labelwriter XL print driver
which is used for the Labelwriter XL, XL Plus, BC and BC Plus.
LW.DLL
DISK I
Printer.inf
Step by Step Instructions:
I. In Program Manager, open the Main Group.
2. Double-click the Print Manager.
3. Select 'Create Printer
...I
from the Printer menu.
4. In the Printer Name window, create a name for the printer you
are installing.
5. Next t o the Driver window, click the down arrow. Select
'Other'.
6. This is the Install Driver window.
Type the drive o r directory where the Costar driver is located.
This will most likely be A o r 6
Click OK when finished.
7. This is the Select Driver window.
Select the correct print driver.
Click O K when finished.
8. "Enter path of Windows N T distribution disk"
You will need t o locate your original Windows NT installation
CD-ROM o r floppy disk.
Type the correct drive and add the i386 path. For example, if you
installed from a CD-ROM, the drive and path will probably
be:D:\i386\
Click OK when finished.
-~
~
9. In the Description window, type a description of the printer if
you wish.
IO. In the Print to: window, select the port where it is physically
attached. This will probably be a COM port.
I I. If you wish t o allow others on your network t o use the printer, check 'Share Printer on Network'
Type the name of the printer which will appear on the other computers.Type the location of the printer for extra information.
12. Click the Settings button.
If the port you selected was a COM port, click Settings: verify:
The setting should be set as follows:
I9200 baud
8 data bits
no parity
I stop bit
Xon/Xoff flow control. Note: you can also use Hardware flow
control.
13. Click the Advanced button.
Unless you are well-versed with the changes Windows N T will
make t o your system, we DO N O T RECOMMEND changing the
COM window, the BASE window, or the IRQ window. W e DO
recommend that you have FIFO disabled (unchecked). Click OK
when finished.
14. Click OK t o close the Port Settings window.
I5.Click Close t o close the Settings window.
I6.Click OK t o close the Create Printer window.
I-/.Click OK t o close the Printer Setup window.
After you have added the print driver, you can verify o r modify
settings by highlighting the printer in the Print Manager (in the
Main Group), and selecting 'Properties' from the Printer menu.
To create a custom form, follow instructions in the CUSTOMNT.TXT file.
~~
~~~
~~~~
~~~
~~
~~
APPENDIXF
USINGLABELWRITER
WITH
3RD PARTY SOFTWARE
A number of 3rd party programs now support direct printing t o
the Labelwriter printers. And Costar has developed templates
for several more. A t the time of this manual’s printing, supported
programs include Lotus Organizer, ECCO, ACT! for Windows,
Telemagic and GoldMine.
Depending on which Costar printer you purchase, you will
probably find the latest group of templates and instructions on
their use on the same disk that contains the Costar Printer
Drivers. For example, if you purchased a Labelwriter bundled
with AddressMate software, the templates can be found on
Disk 2 - Drivers and Utilities.
The newest templates and instructions are also available on our
BBS at 203-66 1-6292.
For Lotus Organizer, download costorg.exe
For ACT! for Windows, download costact.exe
For Telemagic, download costtele.exe
For ECCO, download costecco.txt
For GoldMine, download goldmine.exe
~
~~
~
~~~
~~~~
~-~~~
~~