1
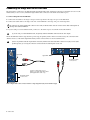
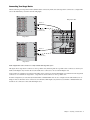
Snake Card
for VENUE Systems
PN 9321-62795-00 REV A 08/10
Legal Notices
This guide is copyrighted ©2010 by Avid Technology, Inc., (hereafter “Avid”), with
all rights reserved. Under copyright laws, this guide may not be duplicated in
whole or in part without the written consent of Avid.
003, 96 I/O, 96i I/O, 192 Digital I/O, 192 I/O, 888|24 I/O, 882|20 I/O,
1622 I/O, 24-Bit ADAT Bridge I/O, AudioSuite, Avid, Avid DNA, Avid Mojo,
Avid Unity, Avid Unity ISIS, Avid Xpress, AVoption, Axiom, Beat Detective,
Bomb Factory, Bruno, C|24, Command|8, Control|24, D-Command, D-Control,
D-Fi, D-fx, D-Show, D-Verb, DAE, Digi 002, DigiBase, DigiDelivery, Digidesign,
Digidesign Audio Engine, Digidesign Intelligent Noise Reduction, Digidesign
TDM Bus, DigiDrive, DigiRack, DigiTest, DigiTranslator, DINR, D-Show,
DV Toolkit, EditPack, Eleven, HD Core, HD Process, Hybrid, Impact, Interplay,
LoFi, M-Audio, MachineControl, Maxim, Mbox, MediaComposer, MIDI I/O, MIX,
MultiShell, Nitris, OMF, OMF Interchange, PRE, ProControl, Pro Tools M-Powered,
Pro Tools, Pro Tools|HD, Pro Tools LE, QuickPunch, Recti-Fi, Reel Tape, Reso,
Reverb One, ReVibe, RTAS, Sibelius, Smack!, SoundReplacer, Sound
Designer II, Strike, Structure, SYNC HD, SYNC I/O, Synchronic, TL Aggro,
TL AutoPan, TL Drum Rehab, TL Everyphase, TL Fauxlder, TL In Tune,
TL MasterMeter, TL Metro, TL Space, TL Utilities, Transfuser, Trillium Lane Labs,
Vari-Fi Velvet, X-Form, and XMON are trademarks or registered trademarks of Avid
Technology, Inc. Xpand! is Registered in the U.S. Patent and Trademark Office.
All other trademarks are the property of their respective owners.
Product features, specifications, system requirements, and availability are
subject to change without notice.
Guide Part Number 9321-62795-00 REV A 08/10
Contents
Chapter 1. Overview . . . . . . . . . . . . . . . . . . . . . . . . . . . . . . . . . . . . . . . . . . . . . . . . . . . . . . . . . . . . . . . . . . . . . . . . . . . . . . 1
Snake Card Components . . . . . . . . . . . . . . . . . . . . . . . . . . . . . . . . . . . . . . . . . . . . . . . . . . . . . . . . . . . . . . . . . . . . . . . . 1
Snake Card Features and Capabilities . . . . . . . . . . . . . . . . . . . . . . . . . . . . . . . . . . . . . . . . . . . . . . . . . . . . . . . . . . . . . . . 1
Conventions Used in This Guide . . . . . . . . . . . . . . . . . . . . . . . . . . . . . . . . . . . . . . . . . . . . . . . . . . . . . . . . . . . . . . . . . . . 2
Chapter 2. Installing a Snake Card . . . . . . . . . . . . . . . . . . . . . . . . . . . . . . . . . . . . . . . . . . . . . . . . . . . . . . . . . . . . . . . . . 3
Installing a Snake Card . . . . . . . . . . . . . . . . . . . . . . . . . . . . . . . . . . . . . . . . . . . . . . . . . . . . . . . . . . . . . . . . . . . . . . . . . 3
Confirming Snake Card Installation . . . . . . . . . . . . . . . . . . . . . . . . . . . . . . . . . . . . . . . . . . . . . . . . . . . . . . . . . . . . . . . . . 5
Connecting the Stage Rack to the FOH Rack . . . . . . . . . . . . . . . . . . . . . . . . . . . . . . . . . . . . . . . . . . . . . . . . . . . . . . . . . . 6
Chapter 3. Digital Snake Cables . . . . . . . . . . . . . . . . . . . . . . . . . . . . . . . . . . . . . . . . . . . . . . . . . . . . . . . . . . . . . . . . . . . 9
Environmental Compliance. . . . . . . . . . . . . . . . . . . . . . . . . . . . . . . . . . . . . . . . . . . . . . . . . . . . . . . . . . . . . . . . . . . . . . 11
EMC (Electromagnetic Compliance). . . . . . . . . . . . . . . . . . . . . . . . . . . . . . . . . . . . . . . . . . . . . . . . . . . . . . . . . . . . . . . . 11
Contents iii
iv Snake Card
Chapter 1: Overview
The Snake card allows you to connect a Stage Rack to your
FOH Rack via a Digital Snake cable, transmitting a maximum
of 48 inputs and outputs to and from your console. Adding a
second Snake card to your FOH Rack allows you to add a second Stage Rack, expanding your system’s I/O capacity to a
maximum of 96 inputs and outputs. Two Snake cards are also
required to enable redundant outputs for HDx and VENUE
MADI recording option cards.
For Snake card installation instructions, see “Installing a
Snake Card” on page 3.
For instructions on connecting Stage Racks to your FOH Rack
using the Snake card, see “Connecting the Stage Rack to the
FOH Rack” on page 6.
Snake Card Components
The Snake card package includes the following items:
• Snake card
• Ribbon cable
• Mounting screws
• Avid Registration Information Card
• BNC jumper cable
Snake Card Features and Capabilities
• Two pairs of Snake inputs and outputs (Snake 1 and
Snake 2) via BNC-style connector ports
• Optional redundant snake capability via Snake 2 ports
• Word Clock In and Out connectors for synchronizing external digital devices
• Active and Sig LEDs for all ports
Chapter 1: Overview 1
Conventions Used in This Guide
All Avid guides use the following conventions to indicate
menu choices and key commands in VENUE and Pro Tools:
:
Convention
Action
File > Save Session
In Pro Tools, choose
Save Session from the
File menu
Options > System Config
In the VENUE software
screen, click Options to
display the Options
page, then click the System Config tab.
Ctrl+N
Hold down the Control
key and press the N key
Ctrl-click
Hold down the Control
key and click the mouse
button
The following symbols are used to highlight important information:
User Tips are helpful hints for getting the
most from your VENUE system.
Important Notices include information that
could affect data or performance.
Shortcuts show you useful keyboard or
mouse shortcuts.
Cross References point to related sections in
the VENUE or Pro Tools Guides.
2 Snake Card
Chapter 2: Installing a Snake Card
Adding a second Snake card expands your VENUE system’s
I/O capacity by allowing you to connect a second Stage Rack
to your FOH Rack.
You also need a second Snake card in order to use a second
HDx or VENUE MADI card (for enabling redundant outputs,
for example), even if you are not using a second Stage Rack.
Installing a Snake Card
4 On the back panel of the FOH Rack, do one of the following:
• If you are adding a second Snake card, remove the Snake
card expansion slot cover by removing the four screws
holding it in place.
– or –
• If you are replacing the existing Snake card, remove the
four screws holding it in place, disconnect the ribbon
and power cables located inside the FOH Rack (accessible
from the open front panel of the FOH Rack), and remove
the existing card from the FOH Rack.
The Snake card is installed in the FOH Rack and is connected
with a ribbon cable to a Mix Engine Card inside the FOH Rack.
To install the Snake card:
1 Power down your system.
Snake card
expansion
slot
(remove cover)
2 Disconnect all audio and power cables attached to the FOH
Rack.
3 Remove the FOH Rack front panel faceplate by unscrewing
its mounting screws (#1 Phillips).
Mounting screws (remove all)
Back panel of the FOH Rack
Faceplate
Front panel of the FOH Rack
Chapter 2: Installing a Snake Card 3
5 Remove the Snake card from its packing material. Hold the
card by its edges.
Mounting bracket
Ribbon cable port
7 When the card is seated in its slot, secure both sides of the
Snake card to the inside of the FOH Rack chassis with the two
provided mounting screws (accessible from the open front
panel of the FOH Rack).
Power cable port
Securing the Snake card to the FOH Rack chassis
8 Secure the Snake card to the back panel of the FOH Rack us-
ing four of the provided mounting screws.
Snake card showing brackets and connectors
6 Gently slide the Snake card into a Snake card slot.
Securing the Snake card to the back panel of the FOH Rack
9 Do one of the following:
• If you are installing a second Snake card, attach the provided ribbon cable from the connector labeled “Snake”
on the second Mix Engine card (the card immediately adjacent to the innermost Mix Engine card) to the ribbon
connector on the second Snake card.
– or –
Installing the Snake card in the FOH Rack’s expansion slot
• If you are replacing the existing Snake card, attach the
provided ribbon cable from the connector labeled
“Snake” on the first Mix Engine card (the backmost card
when viewed from the open front panel) to the ribbon
connector on the Snake Card.
Make sure that any HDx or VENUE MADI cards are connected to the Mix Engine cards in the same manner. If the
top Snake card is connected to the first Mix Engine card,
then make sure the bottom HDx or MADI card is also connected to that same Mix Engine card.
4 Snake Card
Make sure the keyed connector is oriented correctly in each
socket. Secure each connection by moving the tabs on each
side of the connector inward. Check to make sure the cable is
connected securely.
Confirming Snake Card Installation
After installing the Snake card, you should confirm that you
have installed it properly. You can confirm installation by
checking your system hardware status.
To complete and confirm installation:
1 Reattach the FOH Rack faceplate.
2 Reconnect the power, FOH Link, and any audio and MIDI
cables to the FOH Rack.
3 Connect your snake to the Stage Rack and the FOH Rack. See
“Connecting the Stage Rack to the FOH Rack” on page 6.
4 Turn on your VENUE system.
5 Do one of the following to put your system into Config
Connecting the ribbon cable to the second Mix Engine card (second
Snake Card connection shown)
mode:
• Press the Console Config switch on the console
– or –
• Double-click the Mode box in the bottom-right corner of
the screen.
6 Go to the Options page and click the System tab.
7 Click Edit in the System Configuration page.
8 Select Enable Stage 2.
9 Click Apply. Console software restarts.
Connecting the ribbon cable to the Snake card (second Snake card
shown)
10 Plug an available power connector into the power socket
on the Snake card. Make sure it is connected securely.
Enabling the second Stage Rack
10 Go to the Options page and click the Devices tab to view
your system hardware status.
Detail of Devices page showing connection to second Stage Rack
Power connections to the Snake cards
11 If you have installed a second Snake card, connect the
Word Clock Out of the first Snake card to the Word Clock In of
the second Snake card using the provided BNC jumper.
Chapter 2: Installing a Snake Card 5
Connecting the Stage Rack to the FOH Rack
The Stage Rack is connected to the FOH Rack with the Digital Snake cable (purchased separately) via the Snake card. It is recommended that you use a second, redundant Digital Snake cable connected to the Snake card’s Snake 2 ports.
To connect a Stage Rack to the FOH Rack:
1 Connect the send snake to the Stage 1 Out port of the Stage Rack to the Stage 1 In port on the FOH Rack.
2 Connect the return snake to the Stage 1 Out Port of the FOH Rack to the Stage 1 In port on the Stage Rack.
The connectors on Avid’s Digital Snake cable are color coded, so that the white connector connects to the white-outlined ports on
the Stage Rack and the FOH Rack.
3 If you are using a second redundant snake, connect it to the Snake 2 ports on each unit in the same manner.
If you are using a second redundant snake, the primary and the redundant snake must be the same length.
When the FOH Rack and the Stage Rack are powered up, the primary snake connection is indicated by the solid Active LED
(marked “Active”). If the Snake Signal LEDs flash, a Snake connection has not been established. The
If there are problems with the Digital Snake connection, double check that all the BNC connectors are fully secured. If the
problem persists, try reversing the connectors connected to the In and Out ports on one end.
Signal LED
Signal LED
Redundant Snake
connects here
Connectors with white sleeves
attach to terminals with white labels
(Aviv Digital Snake cable only)
Redundant Snake
connects here
Detail of Digital Snake cable connection between a single Stage Rack (left) and an FOH Rack (right)
6 Snake Card
Connecting Two Stage Racks
When connecting two Stage Racks with redundant snake connections, make sure each Stage Rack is connected to a single Snake
card on the FOH Rack, as shown in the following figure.
BNC jumper cable
Snake 1
Snake 2
(redundant snake)
Stage Rack 1
Snake 1
Snake 2
FOH Rack
(redundant snake)
Stage Rack 2
Detail of Digital Snake cable connections for a fully redundant dual Stage Rack system
This figure shows Stage Rack 1 connected to the top Snake card, indicating that the top Snake card is connected to the first, innermost Mix Engine card, and that the bottom Snake card is connected to the second Mix Engine card.
Some systems are configured so that the bottom Snake card is connected to the first Mix Engine card, and therefore the Stage Rack
connected to it is identified as Stage Rack 1. Stage Rack 2 is then connected to the top Snake card.
In either configuration, be sure that any installed HDx or VENUE MADI cards are also configured in the same manner. For example, if the bottom Snake card is connected to the innermost Mix Engine card, then the bottom HDx or VENUE MADI card
should also be connected to that same Mix Engine card.
Chapter 2: Installing a Snake Card 7
8 Snake Card
Chapter 3: Digital Snake Cables
You can purchase 250-foot Digital Snake cables from Avid for
use with VENUE systems. For more information on purchasing a Digital Snake cable, visit the Avid website at
www.avid.com.
Alternatively, you can build your own snake cable assembly
using various brands of copper coaxial cable and BNC connectors. When building your own digital snakes for use with
VENUE systems, please adhere to the following connector, cable type and length requirements:
Snake Connector (x4)
BNC Male, 75 ohm
Snake Cable Type
Coaxial, 75 ohm
Max Cable Length 250 ft (76 m)
• Belden 1855A - single conductor
• Belden 7787A - three conductor
• Belden 7788A - four conductor
Max Cable Length 500 ft (152 m)
• Belden 1694A - single conductor
• Belden 7710A - three conductor
• Belden 7711A - four conductor
• Gepco VSD2001 – single conductor
• Gepco VS32001 – three conductor
• Gepco VS42001 – four conductor
• Gepco VS52001 – five conductor
• Van damme Cable (VDC) 278-175-00 - single conductor
Chapter 3: Digital Snake Cables 9
10 Snake Card
Appendix A: Compliance Information
Environmental Compliance
Disposal of Waste Equipment by Users in the
European Union
EMC (Electromagnetic Compliance)
This model Snake Card complies with the following standards regulating
interference and EMC:
• FCC Part 15 Class B
• EN 55103-1 E3
• EN 55103-2 E3
• AS/NZS CISPR 22 Class B
• CISPR 22 Class B
FCC Compliance for United States
Radio and Television Interference
This symbol on the product or its packaging indicates that this product must not
be disposed of with other waste. Instead, it is your responsibility to dispose of
your waste equipment by handing it over to a designated collection point for the
recycling of waste electrical and electronic equipment. The separate collection
and recycling of your waste equipment at the time of disposal will help conserve
natural resources and ensure that it is recycled in a manner that protects human
health and the environment. For more information about where you can drop off
your waste equipment for recycling, please contact your local city recycling office
or the dealer from whom you purchased the product.
Proposition 65 Warning
This product contains chemicals, including lead,
known to the State of California to cause cancer and
birth defects or other reproductive harm. Wash hands
after handling.
Perchlorate Notice
This product may contain a lithium coin battery. The State of California requires
the following disclosure statement: “Perchlorate Material – special handling may
apply, See www.dtsc.ca.gov/hazardouswaste/perchlorate.”
Recycling Notice
This equipment has been tested and found to comply with the limits for a Class B
digital device, pursuant to Part 15 of the FCC Rules.
DECLARATION OF CONFORMITY
We, Avid, 2001 Junipero Serra Boulevard
Daly City, CA 94014-3886, USA
650-731-6300
declare under our sole responsibility that the product
Snake Card
complies with Part 15 of FCC Rules.
Operation is subject to the following two conditions:
(1) this device may not cause harmful interference, and
(2) this device must accept any interference received,
including interference that may cause undesired operation.
Communication Statement
NOTE: This equipment has been tested and found to comply
with the limits for a Class B digital device, pursuant to Part
15 of the FCC Rules. These limits are designed to provide
reasonable protection against harmful interference in a
residential installation. This equipment generates, uses,
and can radiate radio frequency energy and, if not installed
and used in accordance with the instructions, may cause
harmful interference to radio communications. However,
there is no guarantee that interference will not occur in a
particular installation. If this equipment does cause harmful
interference to radio or television reception, which can be
determined by turning the equipment off and on, the user is
encouraged to try and correct the interference by one or
more of the following measures:
• Reorient or relocate the receiving antenna.
• Increase the separation between the equipment and
receiver.
• Connect the equipment into an outlet on a circuit
different from that to which the receiver is connected.
• Consult the dealer or an experienced radio/TV technician
for help.
Any modifications to the unit, unless expressly approved by
Avid, could void the user's authority to operate the
equipment.
Appendix A: Compliance Information 11
Australian Compliance
Important Safety Instructions
1) Read these instructions.
2) Keep these instructions.
Avid
3) Heed all warnings.
4) Follow all instructions.
Canadian Compliance
5) Do not use this equipment near water.
This Class B digital apparatus meets all requirements of the Canadian
Interference-Causing Equipment Regulations.
6) Clean only with dry cloth.
Cet appareil numérique de la classe B respecte toutes les exigences du
Règlement sur le matériel brouilleur du Canada.
CE Compliance
(EMC and Safety)
7) Do not block any ventilation openings. Install in accordance with the
manufacturer’s instructions.
8) Do not install near any heat sources such as radiators, heat registers, stoves,
or other equipment (including amplifiers) that produce heat.
9) Do not defeat the safety purpose of the polarized or grounding-type plug. A
polarized plug has two blades with one wider than the other. A grounding type
plug has two blades and a third grounding prong. The wide blade or the third
prong are provided for your safety. If the provided plug does not fit into your
outlet, consult an electrician for replacement of the obsolete outlet.
10) Protect power cords from being walked on or pinched particularly at plugs,
convenience receptacles, and the point where they exit from the equipment.
Avid is authorized to apply the CE (Conformité Europénne) mark on this compliant
equipment thereby declaring conformity to EMC Directive 2004/108/EC and Low
Voltage Directive 2006/95/EC.
12 Snake Card
11) Only use attachments/accessories specified by the manufacturer.
Avid
Technical Support (USA)
Product Information
2001 Junipero Serra Boulevard
Daly City, CA 94014-3886 USA
Visit the Online Support Center at
www.avid.com/support
For company and product information,
visit us on the web at www.avid.com