1
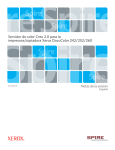
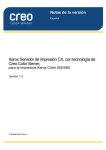
Quick Connect Guide
English
Xerox CX Print Server, Powered by Creo
for the Xerox 700 Digital Color Press
Version 1.0
653-01522A-EN
731-01334A-EN Internal
Copyright
© Creo, 2008. All rights reserved.
This document is also distributed in Adobe Systems Incorporated's PDF (Portable Document Format). You may
reproduce the document from the PDF file for internal use. Copies produced from the PDF file must be reproduced in
whole.
Trademarks
Creo is a trademark of Creo.
Kodak, Brisque, and InSite are trademarks of Kodak.
Adobe, Acrobat, Adobe Illustrator, Distiller, Photoshop, PostScript, and PageMaker are registered trademarks of Adobe
Systems Incorporated.
Apple, AppleShare, AppleTalk, iMac, ImageWriter, LaserWriter, Mac OS, Power Macintosh, and TrueType are registered
trademarks of Apple Inc. Macintosh is a trademark of Apple Inc., registered in the U.S.A. and other countries.
PANTONE, Hexachrome, PANTONE Hexachrome, PANTONE Goe, and PANTONE MATCHING SYSTEM are the property
of Pantone, Inc.
PEARL, PEARLsetter, PEARLhdp, PEARLdry, and PEARLgold are registered trademarks of Presstek, Inc.
XEROX is a trademark of XEROX CORPORATION.
FCC Compliance
Any Creo equipment referred to in this document complies with the requirements in part 15 of the FCC Rules for a Class
A digital device. Operation of the Creo equipment in a residential area may cause unacceptable interference to radio and
TV reception, requiring the operator to take whatever steps are necessary to correct the interference.
Product Recycling and Disposal
If you are managing the disposal of your Xerox product, please note that the product contains perchlorate, lead, mercury,
and other materials whose disposal may be regulated due to environmental considerations in certain countries or states.
The presence of perchlorate, lead and mercury is fully consistent with global regulations applicable at the time that the
product was placed on the market.
Application of this symbol on your equipment is confirmation that you must dispose of this equipment with agreed
national procedures.
In accordance with European legislation, end of life electrical and electronic equipment subject to disposal must be
managed within agreed procedures.
Xerox operates a worldwide equipment take back and reuse/recycle program. Contact your Xerox sales representative
(1-800-ASK-XEROX) to determine whether this Xerox product is part of the program. For more information about Xerox
environmental programs visit http://www.xerox.com/environment.
For perchlorate disposal information, contact your local authorities. In the United States, you may also refer to the
California Department of Toxic Substances Control (DTSC) or see
http://www.dtsc.ca.gov/hazardouswaste/perchlorate.
This electronic information product complies with Standard SJ/T 11363 - 2006 of the Electronics Industry of the People's
Republic of China.
Limitation of Liability
The product, software or services are being provided on an "as is" and "as available" basis. Except as may be stated
specifically in your contract, Creo and its parents, subsidiaries, and affiliates expressly disclaim all warranties of any kind,
whether express or implied, including, but not limited to, any implied warranties of merchantability, fitness for a
particular purpose and non-infringement.
You understand and agree that, except as may be stated specifically in your contract, Creo and its parents, subsidiaries,
and affiliates shall not be liable for any direct, indirect, incidental, special, consequential or exemplary damages, including
but not limited to, damages for loss of profits, goodwill, use, data or other intangible losses (even if Creo has been
advised of the possibility of such damages), resulting from: (i) the use or the inability to use the product or software; (ii)
the cost of procurement of substitute goods and services resulting from any products, goods, data, software, information
or services purchased; (iii) unauthorized access to or alteration of your products, software or data; (iv) statements or
conduct of any third party; (v) any other matter relating to the product, software, or services.
The text and drawings herein are for illustration and reference only. The specifications on which they are based are
subject to change. Creo may, at any time and without notice, make changes to this document. Creo, for itself and on
behalf of its parents, subsidiaries, and affiliates, assumes no liability for technical or editorial errors or omissions made
herein, and shall not be liable for incidental, consequential, indirect, or special damages, including, without limitation,
loss of use, loss or alteration of data, delays, or lost profits or savings arising from the use of this document.
www.pod-wf.com
Internal 731-01334A-EN
Revised April 2008
Contents
How to Use This Guide ...................................................................................................................................................................................1
Reference Information.....................................................................................................................................................................................1
Related Guides..........................................................................................................................................................................................1
Terminology ..............................................................................................................................................................................................1
Connections and Controls ....................................................................................................................................................................2
External Indicator Lights and Controls ..............................................................................................................................................4
System and Network Settings .............................................................................................................................................................4
Protocol and Service Settings ..............................................................................................................................................................5
Default Virtual Printers .........................................................................................................................................................................5
Step 1: Turning on the CX Print Server.......................................................................................................................................................6
Step 2: Viewing and Printing the System Configuration .......................................................................................................................6
Step 3: Configuring the CX Print Server ....................................................................................................................................................7
Configuring the CX Print Server Settings .........................................................................................................................................7
Configuring the Network Setup...........................................................................................................................................................7
Step 4: Setting Up Your Client Workstation ..........................................................................................................................................10
Windows Client Workstation............................................................................................................................................................10
Macintosh Client Workstation.......................................................................................................................................................... 13
vi
Xerox CX Print Server Quick Connect Guide
1
How to Use This Guide
This guide assists you with setting up the network and system configuration settings
for your Xerox® CX print server, Powered by Creo®, for the Xerox 700 digital color
press. In addition, this guide provides steps for setting up a network printer on the
Apple® Macintosh® and Microsoft® Windows® client workstations.
The CX print server was designed to connect to most networks with minimal
changes.
Step 1 describes the sequence for turning on the CX print server. Steps 2-4 provide
instructions on how to set up and configure the CX print server on the network.
Important: A network administrator is required in order to ensure that the
CX print server is configured properly on the network. The network
administrator must supply the appropriate network settings.
Reference Information
Related Guides
Part Number
Guide
653-01481A-EN
Xerox CX Print Server, Powered by Creo, for Xerox
700 Digital Color Press Easy Setup Guide
731-01331A-EN
Xerox CX Print Server, Powered by Creo, for Xerox
700 Digital Color Press Technical Manual
731-01341A-EN
Xerox CX Print Server, Powered by Creo, for Xerox
700 Digital Color Press User Guide
Terminology
The CX print server is available as a basic configuration, or can be configured with
one or more of the following optional packages:
• Advanced Color Tools package [098N02196]
• Advanced Productivity package [098N02197]
2
CX Print Server Quick Connect Guide
Depending on the which package you have, the CX print server provides four
possible configurations. The following table identifies and distinguishes among the
different configurations:
Configuration
Description
CX print server (“Basic
configuration”)
CX print server consists of Creo hardware,
including off-the-shelf hardware. It includes an
application and documentation CD.
Advanced Color Tools
package
This package consists of additional advanced
color tool features. It includes the X-Rite i1®
spectrophotometer and the Profile Wizard Digi
tool. A dongle is required for this configuration.
Advanced Productivity
package
This package consists of additional advanced
productivity features. A dongle is required for
this configuration.
Advanced Color Tools
package and Advanced
Productivity package
This option consists of additional advanced
color tool and productivity features. It includes
the Spectrophotometer and the Profile Wizard
Digi tool. Two dongles are required for this
configuration
Note: For more detailed information about the basic and advanced packages,
see User Guide (731-01341A-EN).
Connections and Controls
Figure 1 shows the network connections on the basic configuration of the CX print
server is configured with the following packages:
• Advanced Color Tools package
• Advanced Productivity package
Note: For a visual reference, see the Easy Setup Guide [653-01481A-EN]
3
1
12
2
3
4
11
5
700 digital color press
6
7
8
9
10
1
AC Adaptor
7
Network (Ethernet 10/100/1000)
cable
2
Mouse (USB with PS2 adaptor)
8
Scan cable
3
Keyboard
9
Spectrophotometer (included in
Advanced Color Tools package)
4
Advanced Color Tools package
(optional kit)
10
Interface cable
5
Advanced Productivity package
(optional kit)
11
Monitor connected to AC power
6
Monitor
12
Surge protector
Figure 1: CX print server connections
4
CX Print Server Quick Connect Guide
External Indicator Lights and Controls
Figure 2 identifies the external indicator lights and controls of your CX print server.
Power indicator light
Disk activity indicator light
(orange)
Power control button
Reset button
USB port
Ethernet link status
At rear
Ethernet transmit/
receive activity LED
Figure 2: External controls and indicators
The following list describes functions of the external indicator lights and controls:
• Power indicator light: Goes on when you turn on the CX print server and
remains a steady green as long as the printer server is on.
• Disk activity (hard disk) indicator light: Blinks in orange when a hard disk drive
is in use.
•
•
•
•
Power control button: Turns the CX print server on and off.
Reset button: Restarts the CX print server.
USB port: Connects any USB device to the server.
Ethernet link status indicator light: Indicates that there is an active connection
on the Ethernet port.
• Ethernet transmit/receive activity indicator light: Indicates that there is activity
between the server and the network.
System and Network Settings
The following table lists the default system and network settings. These are
automatically taken from the press settings:
Parameter
Default Setting
Server name
CX print server (the Server name is taken
from the Computer Name you typed
during the Windows installation. See the
Technical Manual (731-01331A-EN).
Workgroup or Domain
WORKGROUP
Languages
English
5
Units
Millimeters
Date & Time
US and Canada
IP address
Enable DHCP: Yes
AppleTalk zone
Enabled: Automatically detected
Protocol and Service Settings
The following table describes the default protocols and services installed on the
system:
Parameter
Default Setting
Client for Microsoft Networks
Enabled
File and Printer Sharing for Microsoft
Networks
Enabled
NetBEUI Protocol
Enabled
NWLink NetBIOS
Enabled
NWLink IPX/SPX/NetBIOS Compatible
Transport Protocol
Enabled
Network Monitor Driver
Enabled
Internet Protocol (TCP/IP)
Enabled: DHCP Yes
AppleTalk Protocol
Enabled
Default Virtual Printers
The default virtual printers that are available from the Macintosh and Windows
clients are as follows:
• <hostname>_ProcessPrint
• <hostname>_ProcessStore
• <hostname>_SpoolStore
6
CX Print Server Quick Connect Guide
Step 1: Turning on the CX Print Server
1.
Connect the monitor’s AC power cable to an AC power source, and turn on the
monitor.
2. Connect the server’s AC power cable to an AC power source.
3. Push the power control button on the CX print server. See Figure 2 on page 4.
The power indicator on the front panel lights up, and the Windows operating
system starts.
The CX print server splash screen appears followed by the workspace.
A test page is printed on the 700 digital color press.
If the workspace does not automatically appear, click Start and select CX700 >
CX700.
Note: If a power failure occurs while the server is turned on, the server will
restart automatically when power is restored.
Note: When the server is connected to an AC power source but is not
turned on, the operating system does not run, and all core logic is shut
down.
Step 2: Viewing and Printing the System Configuration
After the initial installation, you can view and print the default settings of the CX
print server to verify the initial settings.
1.
In the CX print server workspace, select Info > Configuration View.
The network and system configuration of your CX print server is displayed.
2. To print the configuration details, click Print.
The Page Setup dialog box appears.
7
3. Set the printing options as desired and click OK.
The Print dialog box appears.
4. From the Printer list, select the ProcessPrint printer and click OK.
The CX print server system configuration is printed.
5. Click Close.
Step 3: Configuring the CX Print Server
After the software is installed and the CX print server is turned on, you can change
the default configuration settings.
Configuring the CX Print Server Settings
1.
From the File menu, select Preferences.
The Preferences window appears.
2. Select the setting that you need to change, and configure the parameters
according to your site requirements.
Configuring the Network Setup
Configuring the IP Address
The following should only be performed if you need to change the default settings.
See Step 2: Viewing and Printing the System Configuration on page 6 .
1.
In the CX print server workspace, select File > Preferences.
2. Select the Network Setup parameter.
3. In the TCP/IP area, click Change.
8
CX Print Server Quick Connect Guide
4. Select Use the following IP Address.
5. Type the new IP address, Subnet mask and Default gateway (according to the
Network Administrator).
6. If required, enter the DNS server addresses (according to the Network
Administrator).
7.
Click OK.
8. Click OK in the Local Area Connections Properties window.
9. When prompted to restart your computer, click Yes.
10. In the Preferences window, click Save.
Configuring the IPv6 Address
The following should only be performed if you need to change the default settings
(see Step 2 for the default settings).
1.
In the CX print server workspace, select File > Preferences.
2. Select Network Setup.
3. In the IPv6 area, select IPv6 check box to enable IPv6 addressing.
The following message appears:
“You need to restart the application for the new settings to take effect”.
4. Click OK.
5. Type the new IPv6 address (according to the network administrator).
6. In the Preferences window, click Save.
Configuring the AppleTalk Zone
The following should only be performed if you need to change the default settings
(see Step 2 for the default settings).
1.
In the CX print server workspace, select File > Preferences.
2. Select Network Setup.
3. In the AppleTalk setup area, click Change.
The AppleTalk Protocol Properties window appears.
4. From the zone list, select the desired AppleTalk zone for your computer, and
click OK.
5. Click OK.
6. In the Preferences window, click Save.
Configuring IPX Printing
Note: For more detailed information, see the Xerox CX Print Server, Powered
by Creo, for Xerox 700 Digital Color Press Technical Manual (731-01331A-EN)
or the Xerox CX Print Server, Powered by Creo, for Xerox 700 Digital Color
Press User Guide (731-01341A-EN).
If you have a Novell network running the IPX protocol, install and configure the
Novell® client.
9
To install the Novell client and configure IPX printing on the CX Print Server:
1.
Close the CX print server software.
2. Close all other open applications.
3. On the Windows desktop, click Start and select CX700 > CX700 Tools >
Novell Client Installation.
4. Click Install; then click Reboot.
The system reboots and the Novell Setup window appears.
5. Type the Tree Name. If you do not know the name, click Browse and then
double-click the appropriate Tree Name.
6. Type the Context Name. If you do not know the name, click Browse and then
double-click the appropriate Context Name.
7.
Click OK.
The CX print server workspace appears.
10
CX Print Server Quick Connect Guide
Step 4: Setting Up Your Client Workstation
Note: For more detailed information, see the User Guide (731-01341A-EN).
Before you can print from a client workstation, you need to add a CX print server
virtual printer. Consult with your network administrator when choosing the set of
procedures that apply to your site.
Windows Client Workstation
Note: Some of the steps in these procedures may be different for the various
Windows versions. For example, to go to the Printers window from the Classic
view, select the path as follows:
• Start > Settings > Printers in Windows Vista®, Windows 2000,
Windows 2000 Pro, and Windows Server 2003
• Start > Settings > Printers and Faxes in Windows XP
To go to the Printers window from the Control Panel Home view, select the
path as follows:
• Start > Printers in Windows Vista®
• Start > Printers and Faxes in Windows XP
Setting Up a Hot Folder
1.
From your desktop, double-click the Network Neighborhood icon.
2. Locate the CX print server, and then double-click it.
3. Drag the hot folder to your desktop.
The hot folder is ready for use. When you drag files to the hot folder, all the files
with supported formats are processed and printed automatically to the printer,
according to the hot folder workflow.
Setting Up a Printer
1.
From the Start menu, select Run.
2. In the Open box, type \\ followed by the host name or IP address of the CX
print server—for example, \\CX700-1234.
3. Click OK.
The Server window appears.
4. Double-click the desired network printer icon.
The Queue window appears—for example, CX700-1234ProcessPrint on cx7001234
5. Verify that in the Printer window, the new printer appears on the lists.
11
Setting Up a TCP/IP Printer
The following items must be installed and configured on the Windows-based
computer before you begin:
• TCP/IP Protocol
• Latest Adobe® PostScript® printer driver (AdobePSDriver.exe located in the
shared D:\Utilities\PC Utilities folder on the CX print server or download from
the Adobe website at www.adobe.com)
• CX700_VI.PPD (the PPD is located in the shared D:\Utilities\PPD folder on the
CX print server)
To define the TCP/IP printer port:
1.
Go to the Printers window. See Windows Client Workstation on page 10.
2. From the File menu, select Server Properties.
3. Select the Port tab, and then click Add Port.
4. In the Printer Ports window, select Standard TCP/IP Port from Available Port
Types, and then click New Port.
The Add Standard TCP/IP Printer Port wizard appears.
5. Click Next.
6. Type the exact name of the CX print server (this box is case-sensitive) in the
Printer Name or IP Address box.
Note: The Port Name box automatically fills in while you are typing in the Printer
Name or IP Address box.
7.
Type a name of the printer so that you will be able to identify on your computer
in the Port Name box.
8. Click Next.
9. In the Device Type option, select Custom, and then click Settings.
10. Select the following options:
• Protocol: LPR
• LPR Settings:
• Queue Name: type the exact name of the network printer to which you
want to print—for example, CX7001_ProcessPrint.
• LPR Byte Counting Enabled: select this option.
11. Click OK, Next and then Finish.
12. Click Close in the Printer Ports window.
13. Verify that the new port is shown in the Print Server Properties window on the
Ports tab.
14. Click Close in the Printer Server Properties window.
12
CX Print Server Quick Connect Guide
Setting Up Line Printer Remote (LPR) Printing
Before you begin, make sure that you have the Windows installation CD for installing
LPR on your on the Windows computer.
To install an LPR printer in Windows XP:
1.
Select Start > Settings > Control Panel.
2. Select Add or Remove Programs.
3. Select Add/Remove Windows Components.
4. Locate the Other Network File and Print Services check box.
• If this check box is selected, proceed to To set up an LPR printer in Windows:
on page 12.
• If this check box is cleared, proceed to step 5.
5. Select the Other Network File and Print Services check box, and click Next.
6. Click Browse and locate the desired Windows installation files, on your hard
disk in the i386 folder, or on your Windows installation CD.
7.
Click Finish.
To install an LPR printer in Windows Vista:
1.
Select Start > Settings > Control Panel.
2. Select Programs and Features.
Note: The path to this option may vary depending on your Mac version.
3. Select Turn Windows Features On or Off.
4. Click Continue in the User Account Control window.
5. Click OK in the Windows Features window.
6. Locate the Print Services > LPR Printer check box.
• If this check box is selected, proceed to To set up an LPR printer in Windows:
on page 12.
• If this check box is not selected, proceed to step 7.
7.
Select the Print Services check box and LPR Port Monitor check box.
8. Click OK.
To set up an LPR printer in Windows:
1.
Go to the Printers window. See Windows Client Workstation on page 10.
2. Select Add a Printer.
The Add Printer wizard appears.
Note: You may have to select the Add a Local Printer option.
3. For WIndows XP and Windows 2000 do the following:
a.
Click Next.
b. Select Local printer attached to this computer, and click Next.
4. Select Create a new port.
13
5. From the Type of port list, select LPR Port, and click Next.
6. In the Name or address of server providing lpd box, type the IP address or
name of the CX print server.
7.
In the Name of printer or print queue on that server box, type the name of the
printer or print queue on that server.
8. Click OK.
Install the Printer Driver window appears.
9. Do one of the following:
• Click Window Update.
• If you have an installation disk, click Have a Disk.
10. In the Printer Name box, delete the default printer name (AdobePS
CX700_V2) and type the exact printer name from the CX print server Virtual
Printers list in the Resource Center—for example,
CX700-1234_ProcessPrint.
Note: You may have to select the Default Printer option.
11. Follow the instructions in the wizard to complete the LPR printer setup.
12. Go to the Printers window.
13. Right-click the new LPR printer and select Properties.
14. Click the Print Driver tab.
15. Click Server Hostname.
16. Type the CX print server IP address or host name, and then click OK.
Macintosh Client Workstation
Note: Some of the steps in this procedures may be different depending on
your Mac® OS® version.
Determine what procedures to use after consulting with your network administrator.
See the User Guide [731-01341A-EN] for more detailed explanation of the
procedures.
Setting Up a Hot Folder
1.
From the Finder menu bar, select Go > Connect to Server.
The Connect to Server window appears.
2. Locate your CX print server on the network, and click Connect.
3. Select Guest, and then click Connect.
4. From the list, select the desired hot folder—for example, HF_ProcessPrint —
and then click OK.
The hot folder icon appears on your desktop. You can now drag the desired files
to the hot folder icon. All the files are processed and printed automatically to the
printer, according to the hot folder workflow.
14
CX Print Server Quick Connect Guide
Setting Up the Print Driver Software (Mac OS X 10.4 or later)
To install the Print Driver software :
1.
From the Go menu, select Connect to Server.
2. In the Server Address box, type your server address, and click Connect.
3. In the Connect as area, select Guest.
4. Click Connect.
5. Select Utilities and click OK.
6. Select the Mac Utilities folder.
7.
Double-click CX700_V1_ColorServerPrintDriverInstaller.dmg.
8. Double-click the CX700_V1_ColorServerPrintDriverInstaller file.
9. Click Continue.
10. In the warning message window, click Continue.
11. In the Software License Agreement window, click Continue.
12. Click Agree to agree to the terms and continue with the installation procedure.
13. In the Select Destination window, select the hard disk, and click Continue.
14. Click Install.
15. Type your name (if necessary) and password, and click OK.
16. Click Close.
The Print Driver software is installed.
To define a printer with the Print Driver software:
Have the following information available before performing this procedure:
• Network address of your CX print server
• Name of the virtual printer that you want to use with the Print Driver software
1.
From the Go menu, select Utilities.
2. Do one of the following:
• In the Utilities folder, open System Preferences > Print & Fax, for Mac OS X
10.5.
• In the Utilities folder, double-click Printer Setup Utility, for Mac OS X 10.4.
3. Do one of the following:
• Click to add a printer, for Mac OS X 10.5
• In the Print Setup Utility window, click Add, for Mac OS X 10.4
15
4. In the Add Printer window, enter the following information.
• In the Protocol box, type the Line Print Daemon (LPD) protocol.
• In the Address box, type the address of your server.
• In the Queue box, type the full name of the virtual printer that you want to
use with the Print Driver software.
• In the Name box, type the full server name.
• In the Print Using list, select Other.
A validation message appears in the Address and the Name.
5. Go to Library > Printers > PPDS > Contents > Resources > en.lproj.
6. Select either Europe_A4 or US_Letter.
7.
Click Open.
8. Click Add.
9. Close the Print Setup Utility (or Print & Fax) window.
The virtual printer is now defined with the PPD file and can be seen in the Printer
list.
To enable the Print Driver software:
1.
In the Print & Fax window, double-click the virtual printer.
2. Click Utility.
3. In the Enable Enhanced User Interface list, make sure that On is selected.
4. In the Server Hostname box, type the server name.
5. Click Apply.
Copying the CX700 PPD File to the Macintosh Client Workstation
(Mac OS 9 and Mac OS X)
Before setting up one of the CX print server network printers, you must first copy the
CX700 PPD to your client server.
Note: If you have already installed the Print Driver software, the CX700 PPD is already
copied. See To install the Print Driver software : on page 14.
1.
From the Finder menu bar, select Go > Connect to Server.
The Connect to Server dialog box appears.
2. Locate the desired CX print server in the network and then double-click it.
3. In the Connect to Server dialog box, select Guest.
4. Click Connect.
5. Select the Utilities volume, and click OK.
6. If the folder does not automatically appear, double-click the Utilities volume
icon.
7.
Double-click the PPD folder.
8. Double-click the desired language folder.
16
CX Print Server Quick Connect Guide
9. Do one of the following:
• Double-click the MACOSX folder, for Mac OS X.
• Double-click the MACOS9 folder, for Mac OS 9.
10. Select one of the following folders:
• Europe_A4
• US_Letter
11. Locate the CX700_V1.PPD file.
Note: For best results, copy the PPD file by dragging it to the specified folder in
your local disk. To do this, open another Finder window.
12. From the Go menu, select Computer.
13. Click your disk icon, and locate the required folder—for example,
Library\Printers\PPDs\Contents\Resources.
14. Select the desired language folder—for example, en.lproj for English.
15. Drag the CX700_V1.PPD file to the language folder.
The CX700_V1.PPD is automatically set up on your Macintosh computer.
Setting Up a Printer (Mac OS 9)
1.
From the Apple menu, select Chooser.
2. Select LaserWriter and browse the network to your CX print server.
3. Select one of the CX print servernetwork printers, for example, ProcessPrint,
and then click Create. The CX700.PPD is automatically setup on your
Macintosh computer.
Setting Up a Printer (Mac OS X 10.4 or later)
Before setting up a printer, consult your network administrator. Depending on the
recommendations, do one of the following:
• Using the Default Browser option
• Using the IP Printer option
To set up a printer using the Default Browser option:
1.
From the Go menu, select Utilities.
2. Do one of the following:
• For Mac OS X 10.5, do the following:
• In the Utilities folder, open System Preferences > Print & Fax.
• In the Print Setup Utility window, click to add a printer.
• For Mac OS X 10.4, do the following:
• In the Utilities folder, double-click Printer Setup Utility.
• In the Print Setup Utility window, click Add.
3. Select Default Browser .
4. Select More Printers.
17
5. Below the AppleTalk network box, select the CX700 network printer (for
example, CX700_ProcessPrint).
Note: Locate the the network printer in Different Zones.
6. In the Printer Model list, select Other.
7.
Go to the location to which you have copied CX700_V1.PPD, and select
CX700_V1.PPD. See Copying the CX700 PPD File to the Macintosh Client
Workstation (Mac OS 9 and Mac OS X) on page 15.
Note: For example, Library > Printers > PPDS > Contents > Resources > en.lproj,
select either Europe_A4 or US_Letter.
8. Click Choose.
9. Click Add.
The printer (for example, CX700_ProcessPrint) is added to the Printer List.
To set up a printer using the IP Printer option:
1.
From the Go menu, select Utilities.
2. Do one of the following:
• In the Utilities folder, open System Preferences > Print & Fax, for Mac OS X
10.5.
• In the Utilities folder, double-click Printer Setup Utility, for Mac OS X 10.4.
3. Do one of the following:
• Click to add a printer, for Mac OS X 10.5
• In the Print Setup Utility window, click Add, for Mac OS X 10.4
4. In the Add Printer window, enter the following information.
• In the Protocol box, type the Line Print Daemon (LPD) protocol.
• In the Address box, type the address of your server.
• In the Queue box, type the full name of the virtual printer that you want to
use with the Print Driver software.
• In the Name box, type the full server name.
• In the Print Using list, select Other.
A validation message appears in the Address and the Name.
5. Go to the location to which you have copied CX700_V1.PPD, and select
CX700_V1.PPD. See Copying the CX700 PPD File to the Macintosh Client
Workstation (Mac OS 9 and Mac OS X) on page 15.
6. Click Choose.
7.
Click Add.
8. Close the Print Setup Utility window.
The virtual printer is now defined with the PPD file and can be seen in the Printer
list.
18
CX Print Server Quick Connect Guide
www.pod-wf.com