1
l.-L
Applellcs'"
Memory Expansion Card
ownert cu'ide
LIMITED WARRANTY ON MEDIA
ANDREPTACEMENA
If you discover physical defects in
the manuals distributed with an
Apple product or in the media on
which a software product is distributed, Apple will replace the media
or manuals at no charge to you,
provided you return the item to be
replaced with proof of purchase to
Apple or an authorized Apple dealer
during the 90-day period after you
purchased the software. In addition,
Apple will replace damaged software media and manuals for as long
as the software product is included
in Apple's Media Exchange
Program. \7'hile not an upgrade or
update method, this program offers
IN NO EVENTWILLAPPLE BE
LIABLE FOR DIRECT, INDIRECT,
SPECTAI" INCIDENIAT, OR CONSEQTIENTIAL DAMAGES RESULIING
FROM ANY DEFECT IN THE SOFT\VARE OR ITS DOCLIMENTATION,
even if advised of the possibiliry of
such damages. In particular, Apple
shall have no liability for any programs or data stored in or used with
Apple products, including the cosrs
of recovering such programs or
dalz.
TT{E WARRANTY AND REMEDIES
SET FORTH ABOVE ARE D(CLU.
SIVE AND IN IIEU OF ALL OTIIERS,
years or more from the date of your
oRAL ORWRITTEN, EXPRISS OR
IMPLIED. No Apple dealer, agent, or
employee is authorized to make any
modification, extension, or addition
to this warranty.
original purchase. See your authorized Apple dealer for program
Some states do not allow the exclusion or limitation of implied
additional protection for up to two
coverage and details. In some
countries the replacement period
may be different; check with your
authorized Apple dealer.
ALL IMPLIED VARRANTTES ON
THE MEDIAANDMANUAIS,
INCLL]DING IMPLIED WARRANTIFS
OF MERCTIANTABILITY AND FITNESS FOR
A PARTICUIAR Pt.]R-
warranties or liability for incidental
or consequential damages, so the
above limitation or exclusion may
not apply to you. This warranty
gives you specific legal rights, and
you may also have other rights
which vary from state to state.
I}OSE, ARE LIMITED IN DURATION
WARNING
TO NINETY(9o) DAYS FROMTIIE
DATE OF TIIE ORIGII{AL RETAIL
PURCTIASE OF TIIIS PRODUCT.
This equipment has been certified to
comply with the limits for a Class B
computing device, pursuant to
SubpartJ of Part 15 of FCC Rules.
See instructions if hterference to
radio or television reception is
suspected.
Even though Apple has tested the
software and reviewed the documentation, APPLE MAKES NO WARRANTY OR REPRESENTATION,
EITHER E)(PRESS OR IMPLIED,
VTIII RESPECT TO SOFnVARE, ITS
QUALITY, PERFORMANCE, MERCIIANTABTLITY, OR FITNESS FOR
A
PARTICUIAR PT]RPOSE. AS A
RESULT, THIS SOFIWARE IS SOLD
.AS IS,"ANDYOUTHE PURCIIASER ARE ASSUMING THE
ENTIRE RISK.AS TO ITS QUALITY
ANDPERFORMANCE.
3
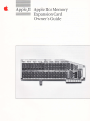
Apple,II Apple IlcsMemory
:
Expansion Card
Owner's Guide
J Apprp
CoMPUTER, INc.
@ Copyright 1986, Apple
Computer, Inc., for all
nontextual material, graphics,
figures, photographs, and all
computer program listings or
code in any form, including
object and source code. All
righ[s reserved.
Apple, the Apple logo, and
PToDOS are registered
trademarks of Apple Computer,
Inc.
Macintosh is a trademark of
Mclntosh Laboratories, Inc.,
and is being used with express
permission of its owner.
Microsoft is a registered trademark of Microsoft Corporation.
POSTSCRIPT is a trademark of
Adobe Systems Incorporated.
ITC Garamond, ITC Avant
Garde Gothic, andITC Zapf
Dingbats are registered
trademarks of International
Typeface Corporation.
Simultaneously published in the
USA and Canada.
Printed in Singapore.
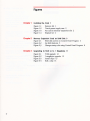
Contents
Figures iv
lntroduclion v
Rodio ond lelevision inlerference vi
Chopter I
lnstolling lhe Cord I
Chopter2
Memory Exponslon Cord os RAM Disk 3
Setting RAM disk size 4
Addressing the RAM disk 6
Using the RAM disk 7
Formauing the RAM disk 7
Copying an application to the RAM disk
Starting up from the RAM disk 8
Saving a document to the RAM disk 9
Chqpter3
Upgroding to 5t2K or lo
General instructions 13
I
Megobyte
ll
Figures
Chopter
I
lnslolling the Cord I
Figure
Figure
Figure
Figure
Chopler
2
1-1
1-2
1-l
1-4
Remove
lid
L
Touch power Supply cnse 2
Put card in memory expansion
Replace
lid
2
2
Memory Exponsion Cord os RAM Disk 3
Figure 2-1 RAM disk screen on Control Panel Program 4
Figore 2-2 Set RAM disk size 5
Figare 2-3 Change startup slot using Control Panel Program 8
Chopter3 Upgrodlng to 5l2K or to I Megobyte ll
Figure
Figure
Figure
Figarc
IV
slot
3-1
3-2
3-3
3-4
5lZKupgrade 12
l-megabyte upgrade 12
Install chips 13
Roll a chip 13
lntroduclion
The Apple@ IIcs Memory Expansion Card adds 256K, 512K, or
1 megabyte of memory to the Z56x of RAM built into the Apple IIGS.
The amount of memory it adds depends on whether you irutall the
card straight out of the box or upgrade itto 512K or 1 megabyte.
ce
Addtng nenory: You can upgrade the card yourself, by
gening one or more Apple 256K memory expansion kits, or you
can have your authorized Apple dealer upgrade the card for
you. Each kit adds 256K to the memory on the card. Chapter 3
explains how to insall the chips that come in the upgrade kit.
Many applications designed especially for the Apple IIGS will use
the extra memory on the card automatically-as an extension of the
memory that's built into the computer. You don't have to know
anything special to use the card in this way; just install it and leave
the rest up to the application.
You can also use the memory on the card as a RAM disk-memory
that you access like a disk. The advantage of using the card as a RAM
disk is that when you copy an application to the RAM disk and run it
from there, the computer can access different parts of the application much more quickly than it can when the application is on a
regular disk. And if you copy several applications to the RAM disk,
you can switch between those applications much more quickly than
if the computer had to get the next application from a regular disk.
The first chapter of this guide explains how to install the card in the
Apple IIGS. The second chapter explains how to use the memory on
the card as a RAM disk. The third chapter explains how to upgrade
the 256K card to 512K or to 1 megabyte.
Rodio ond lelevision interference
The equipment described in this manual generates and uses radiofrequenry energy. If it is not installed and used properly--+hat is, in strict
accordance with our instructions-it may cause interference with radio
and television reception.
This equipment has been tested and complies with the limits for a Class B
computing device in accordance with the specifications in Subpart J,
Part L5, of FCC rules. These rules are designed to provide reasonable
protection against zuch interference in a residential installation. However,
there is no guarantee that the interference will not occur in a patticulat
installation, especially if a "rabbit-ear" television antenna is used. (A
rabbit-ear antenna is the telescoping-rod type usually found on television
receivers.)
A shlelded coble uses o metollic
oround the wires to reduce the
wop
potentiol effecls of rodio-frequency
interference,
You can determine whether your computer is causing interference by
tuming it off. If the interference stoPs, it was probably caused by the
computer or its peripheral devices. To further isolate the problem,
disconnect the peripheral devices and their input/output (I/O) cables one
at a time. If the interference stoPs, it was caused by either the peripheral
device or the VO cable. These devices usually require shielded I,/O cables.
For Apple peripherd devices, you can obtain the ProPer shlelded cable
from your authorized Apple dealer. For non-Apple peripheral devices,
contact the manufacturer or dealer for assistance.
If your computer does cause interference to radio or television reception,
you can try to correct the interference by using one or more of the
following measures:
r
r
r
r
r
Tum the television or radio antenna until the interference stops'
Move the computer to one side or the other of the television or radio.
Move the computer farther away from the television or radio.
Plug the computer into an outlet that is on a different circuit than the
television or radio. Cfhat is, make certain the comPuter and the radio or
television set are on circuits controlled by different circuit breakers or
fuses.)
Consider installing a rooftop television antenna with a coaxial cable
lead-in between the antenna and television.
If necessary, consult your authorized Apple dealer or an experienced
radio,/television technician for additional suggestions.
lmporlonl
This product wos FCC-certilied under test conditions thot included use of
shielded cobles ond connectors between system components. lt is
importont thot you use shielded cobles ond connectors to reduce the
possibility of cousing interference to rodio. television, ond other electronic
devices.
VI
Chopter
I
lnslolling the Cqrd
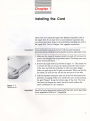
Here's how you install the Apple IIGS Memory Expansion card in
the Apple IIGS. If you have one or more memory expansion kits,
you should add those chips to the card before installing the card in
the Apple IIGS. Turn to Chapter 3 for upgrade instructions.
lmporlont
lf your computer's power is on, furn it off ond woit of leost 30
seconds before instolling or removing the memory exponsion cord.
1. Make sure the Apple IIGS power switch is tumed off, but leave the
power cord plugged into a grounded outlet. This keeps your com-
L/
puter system grounded.
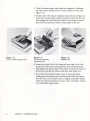
2. Remove the Apple IIGS lid as shown in Figure 1-1. The easiest way
to remove the lid is to wrap your hands around the rear corners
of the case and hold the lid latches in with your index fingers
while you push up on the lid with your thumbs. NThen you feel the
lid release, lift it all the way off ttre case and put it to one side.
3. Take the memory expansion card out of the box and remove the
protective wrapping. \flhen you handle the card, avoid touching
the gold ufingers" along the bottom edge of the card. The moisture from your fingers
an
dust that would weaken the
^ttact
card's connection to the computer.
Figure I - I
Remove lid
lmporlont
Sove the two jumper blocks pocked with the cord. You'll need them
if
you upgrode to 5'l2K or to I megobyte,
4. Touch the power supply case inside the computer to discharge
any static electricity that may be on your clothes or body. (See
Figure 1-2.)
5
Put the card in the memory expansion slot as shown in Figure 1-J.
You'll have to exert some pressure to get the card in the slot. But
don't wiggle the card from side to side in your efforts to insert it.
Rock it forward and back until it's firmly seated in the slot.
Eb..
.'zl
1r" a "t.-
Figure I -2
Touch power supply cose
Figure I -3
Putcord in memory
exponsion slot
Figure I -4
Reploce lid
6. Replace the Apple IIGS lid by Iaying the front edge of the lid in
the groove in the front of the Apple IIGS case and lowering the
back edge of the lid into place. Press down on the back corners of
the lid until you hear the latches click shut. (See Figure 1-4.)
7 . Go to the Control Panel Program (turn on the power while
holding down the Option key) and choose the RAM disk option
from the menu. The number next to "Largest selectable" should
match the amount of memory on your card. If it doesn't, consult
your authorized Apple dealer.
Chopter 1: lnstolling the Cord
Chopter
2
Memory Exponsion Cord
os RAM Disk
Many applications designed especially for the Apple IIGS take advantage of the extra memory on a memory expansion card automatically.
In some grses you can't use the application-or can't take advantzge
of all the application's features-without adding a memory expansion
card. If you got the card specifically to use those kinds of applications,
you can stop reading right here.
Another way you c:tn use the memory on the card is as a RAM disk.
This requires a litde more effort on your part, but it's worth the
effort if you want to speed up access to applications that aren't
designed to use the extra memory on the card automatically. Just
keep in mind that if you use memory on the card as a RAM disk, that
memory isn't available for use by applications designed to use the
memory automatically.
To use the memory on the memory expansion card as a RAM disk,
you need to know how to copy applications to the RAM disk and how
to start them up from there. You may also want to know how to save
documents to the RAM disk. This is not a substinrte for saving documents on a disk, because the memory on the card is temporary just
like the RAM that's built into your computer. But saving documents
to the RAM on the memory expansion card can be useful if you have
more than one application that uses the same data or if you refer to
certain data regularly.
Setting RAM disk size
Ihe Apple iles Ownels Guide
exploins how to chonge Control
Ponel settings.
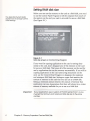
Before you can use the memory on the card as a RAM disk, you need
to use the Control Panel Program to tell the computer how much of
the memory on the card you want to set aside for use as a RAM disk.
(See Figure 2-1.)
Figure 2-l
RAM disk screen on Control Ponel Progrom
If you won't be copying applications to the card or saving documents to the card, don't designate any of the memory on the card
for use as a RAM disk. This leaves all of the memory on the card for
use by applications that use the memory automatically. If you will be
copying applications to the card and saving documents on the
card, use the Control Panel Program to designate the maximum
and minimum RAM disk size. Setting an upper limit restricts the
amount of memory on the card that you srn use as a RAM disk.
Setting a minimum amount restricts the amount of memory that
applications can use; it guarantees that there will alway's be a certain
amount of memory avarlable for you to use as a RAM disk.
lmporlonl
lf your opplicotion uses o version of PToDOS eorlier thon L2,you
must set the minimum ond moximum llAM disk size to the some
number.
Chopter 2: Memory Exponsion Cord os RAM Disk
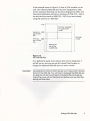
In the example shown in Figure 2-2, there is 512K available on the
card. The minimum RAM disk size has been designated as 255K,
and the maximum RAM disk size has been designated as 320K. That
means that applications will have a minimum of 192K (5tZ -320) to
use and can use as much as 256K (StZ - 255) tf you aren't akeady
using that memory as a RAM disk.
512K
I t"ro" ovoitobte
I for opplicotions
I to
Moximum
size
320K
+
of RAM
disk
I
Minimum
size
disk
use
of
RAM disk
= 5l2K
t_
256K
RAM
Memory for
you to use
os RAM disk
Figwe 2-2
Set RAM disk size
If an application needs more memory than you've designated, it
will tell you so, and you can use the Control Panel Program to
change the maximum RAM disk size to a lower number.
lmportonl
Decreosing the moximum RAM disk size won't erose whot's olreody
stored on the RAM disk. You willhove to decreose the RAM disk size
by tslng the Control Ponel Progrom ond restori lhe computer (by
furning the power off ond then bock on) before your new RAM disk
settings will toke effect.
Setting RAM disk slze
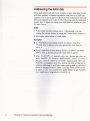
Addressing the RAM disk
Many applications will ask for the locarion of your RAM disk by slot
and drive number. A memory expansion card used as a RAM disk
appears to be in slot 5, just as a 3.5-inch drive connected to the disk
drive port appears to be in slot 5. The following rules and examples
explain how to figure out where your RAM disk is in relation to your
3.5-inch drives.
tules
1. Your startup device is always drive 1. @emember, you can
change the starttrp device by using the Control Panel program.)
2. RAM disks come before 3.5-inch disks.
E:ramples
r
r
*
If a RAM disk is your swtup device, it is drive L, your first
3.5-inch drive is ddve 2, and your second 3.5-inch drive is
drive 3.
If a 3.5-inch drive is your starhlp device, it is drive 1, the RAM
disk is drive 2, and the second 3.5-inch drive is drive 3.
Note: ProDOSo 1.1.1 supports only two devices per slot; so
PToDOS 1.1.l-based applications, "drive 3"-your
second 3.5-indr drive-is invisible. Applications that use
PToDOS 7.2 rcolgnizc up to four devices per slot, so this isn't a
problem (although it will take some getting used to: the third
device is assigned to slot 2, drive 1; and the fourth device to slot
2, drive 2). See. your authorized Apple dealer to get proDOS
1.1.1 applications upgraded to proDOS 1.2.
with
Chopter 2: Memory Exponsion Cord os RAM Disk
Using the RAM disk
To copy and run applications from the RAM disk, you need to:
1. (Optional) Format the RAM disk. This is necessary only if you
plan to use the RAM disk as your startup device. The RAM disk is
preformatted at startup for storing applications and documents.
2. Copy applications to the RAM disk.
3. (Optional) Make the RAM disk your startup device by using the
Control Panel Program.
4. Start up your application from the RAM disk.
* Startup deuice: Making the RAM disk your startup device means
that when you press d-Control-Reset (or type PR#5 from the
BASIC programming environment), the computer will start up
from the applicarion on your RAM disk instead of looking for a
program disk in one of your disk drives.
Keep in mind that if you make the RAM disk your startup device and
then turn off the power, you'll get the message Check Startup
Device the next time you try to start up. That's because you lose
what's on the RAM disk when you orm off the power. if this happens,
go into the Control Panel and change ttre starnrp slot to one of your
disk drives so you can start up.
Formolting the RAM disk
Format the RAM disk the same way you would format a regular disk,
using the formatting option on your utility disk. Choose PToDOS as
the format if the applications you want to copy to the RAM disk are
PToDOS-based. Choose Pascal if your applications are Pascalbased. You can name the RAM disk anything you like, but naming it
AAM5 is a good way to remind yourself that the RAM disk emulates
a drive connected to slot 5 inside the computer.
If the formatting program
asks for the slot and drive number of the
RAM disk, answer slot 5 and drive 2. (This assumes that you have at
least one 3.5-inch drive and that you're using a 3.5-inch drive as
your startup device. If you don't have a 3.5-inch drive, or if you've
used the Control Panel Program to designate the RAM disk as your
sarnrp drive, answer slot 5 and drive 1.)
Using the RAM disk
lmporlont
You con't put DOS 3,3 opplicotions ond documents on the RAM
don't try to formot the disk for DOS 3,3, DOS 3.3 wos
.l43K.
designed for 5,25-inch disks with o storoge copocity of
lt con't
use the spoce on lorger storoge devices like RAM disks,3.S-inch
drives, ond hord disks.
disk, so
Copying on qpplicotion to lhe RAM disk
Copy all the files from your application disk to the RAM disk using
the Copy Files program on your utility disk.
lmporlonl
lf you copy more thon one opplicotion's liles to the RAM disk, put oll
but one opplicolion's files in seporote subdirectories, This ovoids the
problem of duplicote filenomes in the moin directory.
Storting up from the RAM disk
If you want to start up directly from an application on the RAM
disk, use the Control Panel Program to change the startup slot to
RAM disk. (See Figure 2-3.) After that, any time you press
d-Control-Reset (or rype pR#5 from the BASIC programming
environment), the application on your RAM disk will start up.
Figure 2-3
Chonge storiup slot using Control Ponel Progrom
Chopter 2: Memory Exponsion Cord os RAM Disk
Most PToDOS opplicotlons put you
into BASIC ofter you choose the
Quii option fiom the Moin Menu,
If the RAM disk is not your startup device, or if you have more than
one application on the RAM disk, get into the BASIC programming
environment and type -/RAM5/f ile (where RAM5 is the name of
your RAM disk and f ile is the name of your application's system
file). The system file is the file with the name ending in . SYSTEM.
(For example, to start up Apple\(orks from the RAM disk, you'd
rype -/RAM5 /APLWoRKS . sYsrEM.)
Soving o documenl to the RAM disk
You can save documents on your RAM disk the same way you save
them on a regular disk. Just remember that a document saved on a
RAM disk is saved only temporarily.
lmportont
Sove the contents of the RAM disk to o regulor disk before you turn
off the power or your documents will be gone for good.
If your application asks for the slot and drive number, answer
slot 5 and drive 1 if the RAM disk is your startup device. Answer
slot 5 and drive 2 if a 3.5-inch drive is your startup device. (To
applications, the RAM disk looks just like a disk in a drive connected to slot 5.)
If the application
asks for a pathname, type a slash, the name of
your RAM disk, another slash, and the name of the document. (If
you didn't format ttre RAM disk, its name is /RAM5.)
Using the RAM disk
Chopter
3
Upgroding to 512K
or to I Megobyte
The Apple IIGS Memory Expansion Card comes with 255K. You can
upgrade itto 512K by gening an upgrade kit or to 1 megabyte by
getting three upgrade kits. (Each upgrade kit adds z56x of RAM to
ttre card.) It's not a good idea to upgrade the card to Z6gr because
some applications have trouble dealing with that memory configuration. The memory expansion kit comes with 8 RAM chips You'Il
also need the jumper blocks that came with the card.
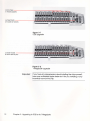
There are only two steps to upgrading the memory expansion card:
1. Put a plastic jumper block on the lower set of pins if you're upgradingto 512K. (See Figure 3-1.) Put plastic jumper blocks
on both see of pins if you're upgrading to 1 megabyte. (See
Figure 3-2.)
2. Put the RAM chips in the sockets according to the general instructions that follow. To upgrade to 512K, put the chips in the
locations shown in Figure 3-1.To upgrade to 1 megabyte, put a
chip in every socket. (See Figure 3-2.)
't't
lnsioll chips
in these sockets
Jumper block
on lower set of pins
Figure 3-l
512K upgrode
Jumper blocks
on both sets of pins
Figure 3-2
l-megobyte upgrode
lmportonl
12
lf you hove ony opprehension obout instolling the chipsyourself,
hove your outhorized Apple deoler do it for you. lnstolling o chip
inconectly con ruin the chip.
Chopter 3: Upgroding to 512K or to 'l Megobyte
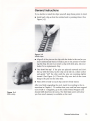
Generql instruclions
If you decide to install the chips yourself, keep these poins in mind:
r Install each chip so that the notched end is pointing down. (See
nigure 3-3.)
Figure 3-3
lnstollchips
Figure 3-4
Rollo chip
r
Align all of the pins on the chip with the holes in the card so you
don't inadvertently bend or break a pin in the process of installing the chip. Do not try to insert a chip with bent pins. Ask your
dealer for a replacement chip.
*
Pins don't line up? If the pins are splayed outward and don't
line up with the holes, lay the chip on its side on a clean surface
and gently "roll" the chip until the pins are pointing slightly
inward. (See Figure 3-4.) Turn the chip over and do the same
thing to the pins on the other side.
r
Press down evenly on each chip
until it's firmly seated.
After you finish upgrading the card, install it according to the instructions in Chapter 1. To confirm that your card has been upgraded to 512K or 1 megabyte, go to the Control Panel Program and
choose RAM disk from the menu. The RAM disk screen will show
you how much memory is available on the card.
Generol insiructions
t3
THE APPLE PUBLISHING SYSTEM
This Apple manual was written,
edited, and composed on a
desktop publishing system using
the Apple Macintoshru Plus and
Microsoft@ l$[ord. Proof and
final pages were created on the
Apple LaserlVriterrM Plus.
PoSTSCRIPT*, the Laser\Triter's
page-description language, was
developed by Adobe Systems
Incorporated.
Text type is ITC Garamond@
(a downloadable font distributed
by Adobe Systems). Display
type is ITC Avant Garde
Gothic@. Bullets are ITC Zapf
Dingbats@. Program listingi are
set in Apple Courier, a
monospaced font.
t
o
o
co
rt
o
a
6
\\
o
o
s
u,
o
rtrtl
I I tl
ttItl I I rl
[