1
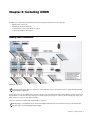
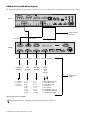
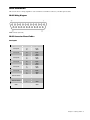
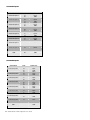
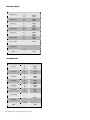
XMON EUCON™ Software Application User Guide Legal Notices This guide is copyrighted ©2011 by Avid Technology, Inc., with all rights reserved. Under copyright laws, this guide may not be duplicated in whole or in part without the written consent of Avid. 003, 96 I/O, 96i I/O, 192 Digital I/O, 192 I/O, 888|24 I/O, 882|20 I/O, 1622 I/O, 24-Bit ADAT Bridge I/O, AudioSuite, Avid, Avid DNA, Avid Mojo, Avid Unity, Avid Unity ISIS, Avid Xpress, AVoption, Axiom, Beat Detective, Bomb Factory, Bruno, C|24, Command|8, Control|24, D-Command, D-Control, D-Fi, D-fx, D-Show, D-Verb, DAE, Digi 002, DigiBase, DigiDelivery, Digidesign, Digidesign Audio Engine, Digidesign Intelligent Noise Reduction, Digidesign TDM Bus, DigiDrive, DigiRack, DigiTest, DigiTranslator, DINR, DV Toolkit, EditPack, Eleven, EUCON, HD Core, HD Process, Hybrid, Impact, Interplay, LoFi, M-Audio, MachineControl, Maxim, Mbox, MediaComposer, MIDI I/O, MIX, MultiShell, Nitris, OMF, OMF Interchange, PRE, ProControl, Pro Tools M-Powered, Pro Tools, Pro Tools|HD, Pro Tools LE, QuickPunch, Recti-Fi, Reel Tape, Reso, Reverb One, ReVibe, RTAS, Sibelius, Smack!, SoundReplacer, Sound Designer II, Strike, Structure, SYNC HD, SYNC I/O, Synchronic, TL Aggro, TL AutoPan, TL Drum Rehab, TL Everyphase, TL Fauxlder, TL In Tune, TL MasterMeter, TL Metro, TL Space, TL Utilities, Transfuser, Trillium Lane Labs, Vari-Fi, Velvet, X-Form, and XMON are trademarks or registered trademarks of Avid Technology, Inc. Xpand! is Registered in the U.S. Patent and Trademark Office. All other trademarks are the property of their respective owners. Product features, specifications, system requirements, and availability are subject to change without notice. Guide Part Number 9329-65212-00 REV A 12/11 Documentation Feedback We are always looking for ways to improve our documentation. If you have comments, corrections, or suggestions regarding our documentation, email us at [email protected]. Contents Chapter 1. Introduction to the XMON EUCON Software Application . . . . . . . . . . . . . . . . . . . . . . . . . . . . . . . . . . . . 5 System Requirements and Compatibility . . . . . . . . . . . . . . . . . . . . . . . . . . . . . . . . . . . . . . . . . . . . . . . . . . . . . . . . . . . . . 5 What’s Included . . . . . . . . . . . . . . . . . . . . . . . . . . . . . . . . . . . . . . . . . . . . . . . . . . . . . . . . . . . . . . . . . . . . . . . . . . . . . . 5 About This Guide. . . . . . . . . . . . . . . . . . . . . . . . . . . . . . . . . . . . . . . . . . . . . . . . . . . . . . . . . . . . . . . . . . . . . . . . . . . . . . 5 About www.avid.com . . . . . . . . . . . . . . . . . . . . . . . . . . . . . . . . . . . . . . . . . . . . . . . . . . . . . . . . . . . . . . . . . . . . . . . . . . . 6 Chapter 2. Installing XMON . . . . . . . . . . . . . . . . . . . . . . . . . . . . . . . . . . . . . . . . . . . . . . . . . . . . . . . . . . . . . . . . . . . . . . . . 7 Making Audio Connections . . . . . . . . . . . . . . . . . . . . . . . . . . . . . . . . . . . . . . . . . . . . . . . . . . . . . . . . . . . . . . . . . . . . . . . 7 DB-25 Connectors . . . . . . . . . . . . . . . . . . . . . . . . . . . . . . . . . . . . . . . . . . . . . . . . . . . . . . . . . . . . . . . . . . . . . . . . . . . . . 9 Installing the M-Audio MIDI Uno . . . . . . . . . . . . . . . . . . . . . . . . . . . . . . . . . . . . . . . . . . . . . . . . . . . . . . . . . . . . . . . . . . 14 Connecting the Control Cable Breakout Adapter . . . . . . . . . . . . . . . . . . . . . . . . . . . . . . . . . . . . . . . . . . . . . . . . . . . . . . . 15 Connecting a Talkback Microphone. . . . . . . . . . . . . . . . . . . . . . . . . . . . . . . . . . . . . . . . . . . . . . . . . . . . . . . . . . . . . . . . 15 Installing and Configuring the XMON EUCON Software Application . . . . . . . . . . . . . . . . . . . . . . . . . . . . . . . . . . . . . . . . . . 16 Chapter 3. Using XMON . . . . . . . . . . . . . . . . . . . . . . . . . . . . . . . . . . . . . . . . . . . . . . . . . . . . . . . . . . . . . . . . . . . . . . . . . . 19 XMON to EUCON Mapping . . . . . . . . . . . . . . . . . . . . . . . . . . . . . . . . . . . . . . . . . . . . . . . . . . . . . . . . . . . . . . . . . . . . . . 19 Selecting Sources from MC Pro . . . . . . . . . . . . . . . . . . . . . . . . . . . . . . . . . . . . . . . . . . . . . . . . . . . . . . . . . . . . . . . . . . 20 Setting Control Room, Monitor, and Dim Levels . . . . . . . . . . . . . . . . . . . . . . . . . . . . . . . . . . . . . . . . . . . . . . . . . . . . . . . 22 Speaker Management . . . . . . . . . . . . . . . . . . . . . . . . . . . . . . . . . . . . . . . . . . . . . . . . . . . . . . . . . . . . . . . . . . . . . . . . . 23 Additional Information . . . . . . . . . . . . . . . . . . . . . . . . . . . . . . . . . . . . . . . . . . . . . . . . . . . . . . . . . . . . . . . . . . . . . . . . . 23 Contents iii iv XMON EUCON Software Application User Guide Chapter 1: Introduction to the XMON EUCON Software Application The XMON EUCON™ Software Application is a simple EUCON-enabled utility that lets you control the XMON hardware from an Avid MC Pro or System 5-MC control surface. Once configured, the Control Room and Monitor section can be locked to XMON, letting you continue to control XMON monitoring from the control surface while switching to other software applications and workstations. System Requirements and Compatibility The XMON EUCON Software Application is compatible with Mac OSX and Windows 7. Avid can only assure compatibility and provide support for hardware and software it has tested and approved. For downloads and other Avid resources, visit: www.avid.com/compatibility To install and use XMON with Avid D-Control or D-Command work surfaces, see the guides that came with your system. What’s Included The following items are included with your XMON monitoring solution package: • XMON unit • XMON power connector • Control cable (for use with ICON series) • XMON EUCON Software installer disc (contains installers and this guide) • Control Cable Breakout Adapter (for use with XMON EUCON control) • M-Audio MIDI Uno (for use with XMON EUCON Software Application) About This Guide Conventions Used in This Guide All of our guides use the following conventions to indicate menu choices and key commands: : Convention Action File > Save Choose Save from the File menu Control+N Hold down the Control key and press the N key Control-click Hold down the Control key and click the mouse button Right-click Click with the right mouse button Chapter 1: Introduction to the XMON EUCON Software Application 5 The names of Commands, Options, and Settings that appear on-screen are in a different font. The names of keys on System 5-MC and MC Pro hardware are in bold (such as SEL). The following symbols are used to highlight important information: User Tips are helpful hints for getting the most from your system. Important Notices include information that could affect your data or the performance of your system. Shortcuts show you useful keyboard or mouse shortcuts. Cross References point to related sections in this guide and other Avid guides. About www.avid.com The Avid website (www.avid.com) is your best online source for information to help you get the most out of your system. The following are just a few of the services and features available. Product Registration Register your purchase online. Support and Downloads Contact Avid Customer Success (technical support); download software updates and the latest online manuals; browse the Compatibility documents for system requirements; search the online Knowledge Base or join the worldwide Pro Tools community on the User Conference. Training and Education Study on your own using courses available online or find out how you can learn in a classroom setting at a certified Pro Tools training center. Products and Developers Learn about Avid products; download demo software or learn about our Development Partners and their plug-ins, applications, and hardware. News and Events Get the latest news from Avid or sign up for a product demo. 6 XMON EUCON Software Application User Guide Chapter 2: Installing XMON Installing and configuring the XMON EUCON Software application includes the following steps: • Making audio connections • Installing the M-Audio MIDI Uno • Connecting the Control Cable Breakout Adaptor • Connecting a Talkback microphone Making Audio Connections XMON audio connections Audio connections shown above are examples for Avid ICON work surfaces. Not all connections are supported with the XMON EUCON Software Application. Monitoring is based on the XMON analog interface, which is remotely controlled from the XMON EUCON Software Application and the MC Pro Control Room section. All supported audio inputs and outputs for control room monitoring and studio communication are connected to the XMON interface. All audio connections are made with standard DB-25 connectors. XMON provides 18 V phantom power for the external Talkback Mic that connects via the DB-25 connector. The internal Talkback mic requires an external phantom power supply. Chapter 2: Installing XMON 7 XMON-to-Pro Tools|HD Wiring Diagram The following diagram shows basic XMON connections for a Pro Tools|HD system with an HD I/O that has 16 analog outputs. HD I/O Analog Outputs 1-8 Analog Outputs 9-16 DB-25 to DB-25 connectors Cue Inputs Main Inputs XMON Cue Outputs To Cue System Amplifiers Main Outputs To Main Speakers Alt Outputs Talkback/Listenback To Alternate Speakers To Various Inputs and Outputs DB-25 to XLR snakes 1-2: Studio 3-4: Cue 1 5-6: Cue 2 7-8: Cue 3 1=L 2 = Lc 3=C 4 = Rc 5=R 6 = Ls 7 = Rs 8 = LFE 1=L 2 = Lc 3=C 4 = Rc 5=R 6 = Ls 7 = Rs 8 = LFE 1 = Ext Talkback Mic Input 2 = Listen Mic 1 Input 3 = Listen Mic 2 Input 4 = AFL Input 1 5 = AFL Input 2 6 = Mini Speaker Out 1 (L) 7 = Mini Speaker Out 2 (R) 8 = Talkback/Slate (Out) Wiring diagram for HD I/O and XMON Not all channels shown are supported by the XMON EUCON Software Application. 8 XMON EUCON Software Application User Guide DB-25 Connectors This section shows a wiring diagram for each of XMON’s seven DB-25 connectors, and their pinout tables. DB-25 Wiring Diagram DB-25 connector (user view) DB-25 Connector Pinout Tables Cue Inputs Signal Name Cue Input1 Cue Input2 Cue Input3 Cue Input4 Cue Input5 Cue Input6 Not Connected Not Connected GND Pin# 24 12 25 10 23 11 21 9 22 7 20 8 18 6 19 4 17 5 15 3 16 1 14 2 13 26 27 Signal Type Input+ InputGND Input+ InputGND Input+ InputGND Input+ InputGND Input+ InputGND Input+ InputGND NC NC GND NC NC GND GND Chapter 2: Installing XMON 9 Surround1 Inputs Signal Name Surround Input1-1 Surround Input1-2 Surround Input1-3 Surround Input1-4 Surround Input1-5 Surround Input1-6 Surround Input1-7 Surround Input1-8 GND Pin# 24 12 25 10 23 11 21 9 22 7 20 8 18 6 19 4 17 5 15 3 16 1 14 2 13 26 27 Signal Type Input+ InputGND Input+ InputGND Input+ InputGND Input+ InputGND Input+ InputGND Input+ InputGND Input+ InputGND Input+ InputGND GND Surround2 Inputs Signal Name Surround Input2-1 Surround Input2-2 Surround Input2-3 Surround Input2-4 Surround Input2-5 Surround Input2-6 Surround Input2-7 Surround Input2-8 GND Pin# 24 12 25 10 23 11 21 9 22 7 20 8 18 6 19 4 17 5 15 3 16 1 14 2 13 26 27 Signal Type Input+ InputGND Input+ InputGND Input+ InputGND Input+ InputGND Input+ InputGND Input+ InputGND Input+ InputGND Input+ InputGND 10 XMON EUCON Software Application User Guide GND 2Track Inputs Signal Name 2Track Input1 2Track Input2 2Track Input3 2Track Input4 2Track Input5 2Track Input6 2Track Input7 2Track Input8 GND Pin# 24 12 25 10 23 11 21 9 22 7 20 8 18 6 19 4 17 5 15 3 16 1 14 2 13 26 27 Signal Type Input+ InputGND Input+ InputGND Input+ InputGND Input+ InputGND Input+ InputGND Input+ InputGND Input+ InputGND Input+ InputGND GND Cue Outputs Signal Name SLS Output L SLS Output R Cue Output1L Cue Output1R Cue Output2L Cue Output2R Cue Output3L Cue Output3R GND Pin# 24 12 25 10 23 11 21 9 22 7 20 8 18 6 19 4 17 5 15 3 16 1 14 2 13 26 27 Signal Type Output+ OutputGND Output+ OutputGND Output+ OutputGND Output+ OutputGND Output+ OutputGND Output+ OutputGND Output+ OutputGND Output+ OutputGND GND Chapter 2: Installing XMON 11 Main SPK Outputs Signal Name Main 1 (L) Main 2 (Lc) Main 3 (C) Main 4 (Rc) Main 5 (R) Main 6 (SurL) Main 7 (SurR) Main 8 (LF) GND Pin# 24 12 25 10 23 11 21 9 22 7 20 8 18 6 19 4 17 5 15 3 16 1 14 2 13 26 27 Signal Type Output+ OutputGND Output+ OutputGND Output+ OutputGND Output+ OutputGND Output+ OutputGND Output+ OutputGND Output+ OutputGND Output+ OutputGND GND Alt SPK Outputs Signal Name Alt 1 (L) Alt 2 (Lc) Alt 3 (C) Alt 4 (Rc) Alt 5 (R) Alt 6 (SurL) Alt 7 (SurR) Alt 8 (LF) GND Pin# 24 12 25 10 23 11 21 9 22 7 20 8 18 6 19 4 17 5 15 3 16 1 14 2 13 26 27 Signal Type Output+ OutputGND Output+ OutputGND Output+ OutputGND Output+ OutputGND Output+ OutputGND Output+ OutputGND Output+ OutputGND Output+ OutputGND 12 XMON EUCON Software Application User Guide GND TB/LB Signal Name TB Input2 LB Input1 LB Input2 AFL Input1 AFL Input2 Mini Spk L Mini Spk R TB OUT GND Pin# 24 12 25 10 23 11 21 9 22 7 20 8 18 6 19 4 17 5 15 3 16 1 14 2 13 26 27 Signal Type Input+ InputGND Input+ InputGND Input+ InputGND Input+ InputGND Input+ InputGND Output+ OutputGND Output+ OutputGND Output+ OutputGND GND Chapter 2: Installing XMON 13 Installing the M-Audio MIDI Uno Windows 7 and Mac OS X If you are using Windows 7 or Mac OS X, simply plug in your Uno to the computer’s USB port, the proceed to “Connecting the Control Cable Breakout Adapter” on page 15. Since the M-Audio MIDI Uno is class-compliant, it does not require additional drivers. Installation for Advanced Windows 7 Users Windows 7 users who fall into the following categories should install the special M-Audio drivers for optimal performance. • Use the M-Audio MIDI Uno interface with more than one application at the same time (i.e., multi-client operation) • Use long SysEx commands • Use other class-compliant USB audio devices simultaneously Do not connect the M-Audio MIDI Uno to your computer until the M-Audio driver files have been installed. The following instructions indicate when to connect the interface to your computer. To install the M-Audio drivers: 1 Insert the MIDISPORT Series disc into your computer’s CD drive. The interactive installation screen displays automatically. If the installer does not launch automatically, you can manually start it by clicking on Start > My Computer > MIDISPORT Series. 2 Select MIDISPORT Uno from the drop-down menu and click Install. 3 Follow the driver installer’s onscreen instructions. 4 During installation, you may be notified that the driver being installed has not passed Windows Logo Testing. Click Continue Anyway to proceed with the installation. 5 Click Finish once the installer has completed the installation. 6 Connect your M-Audio MIDI Uno to an open USB port on your computer. Windows identifies the interface and asks if you want to search the Internet for a driver. 7 Select No, not this time and press Next. Windows displays the Found New Hardware Wizard. 8 Choose Install software automatically and click Next. 9 Once the Wizard has completed, click Finish. When the installation is complete, Windows displays Your new hardware is installed and ready to use. 14 XMON EUCON Software Application User Guide Connecting the Control Cable Breakout Adapter The Control Cable Breakout Adapter lets the XMON EUCON Software Application communicate with and control the XMON hardware. To connect the Control Cable Breakout Adapter and M-Audio MIDI Uno: 1 Connect the 15-pin end of the Control Cable Breakout Adapter to the Control port on the back panel of the XMON hardware. 2 Connect the M-Audio Uno’s MIDI OUT cable (four feet, attached) to the MIDI IN port on the Control Cable Breakout Adapter. 3 Connect the M-Audio Uno’s MIDI IN cable (four feet, attached) to the MIDI OUT port on the Control Cable Breakout Adapter. If the devices are more than four feet apart, attach longer MIDI cables to the MIDI In and MIDI Out cables on the M-Audio Uno. 4 Use a 1/4-inch TRS cable (not included) to connect the Headphone Out on the Control Cable Breakout Adapter to the Headphone jack on the back of the MC Pro (or bottom of the System 5-MC frame). Connecting a Talkback Microphone The XMON EUCON Software Application supports both internal and external Talkback mic connections on XMON. To connect the internal Talkback microphone: 1 Use a mic cable (not included) to connect the internal Talkback Microphone output on the MC Pro or System 5-MC to the input of a phantom power supply (not included). Since this connector does not provide the 48 V required to power the console’s microphone, you must use an external phantom power supply. 2 Connect the output of the phantom power supply to the Talkback input on the Control Cable Breakout Adapter. To connect the external Talkback microphone: Connect a microphone to the External Talkback Microphone input on the back panel of the XMON hardware. This connection provides an 18 V power supply for a condenser microphone. Chapter 2: Installing XMON 15 Installing and Configuring the XMON EUCON Software Application The XMON EUCON Software Application installer includes Mac and Windows audio drivers that integrate with the applications you use with XMON. To install the XMON EUCON Software Application: 1 On the XMON EUCON Software Application disc, double-click the XMON Install.pkg file (Mac) or SetupXMON.exe (Windows). 2 Follow the on-screen instructions. Mac (left) and Windows (right) installer icons Selecting a MIDI Port The XMON EUCON Software Application uses a MIDI port to communicate with the XMON hardware. The Mac and Windows versions of XMON select this port differently. Pro Tools users must deselect the MIDI device that XMON uses in Setup>MIDI>Input Devices. Mac Right-click the XMON icon in the dock and select a MIDI port from the Select MIDI port menu. If you are using the included M-Audio MIDI Uno device, select USB Uno MIDI Interface. Otherwise, select another MIDI port. XMON icon XMON icon Mac (left) and Windows (right) MIDI Port selection Windows In Windows, click the XMON icon in the task tray and select a MIDI port from the Select MIDI port menu. If you are using the included M-Audio MIDI Uno device, select MIDISPORT Uno Out. Otherwise, select another MIDI port. 16 XMON EUCON Software Application User Guide Locking the Surface to XMON The Control Room and Monitor section of the MC Pro control surface must be locked to the XMON software application to retain control of the studio levels while other applications or another workstation is in focus. To lock the Control Room section to the XMON EUCON Software Application: 1 Make sure the MC Pro is attached to the workstation running the XMON EUCON Software Application. 2 Make sure the XMON EUCON Software Application is in focus (i.e., the front-most application). The MC Pro Touchscreen displays that application’s name in the top-left corner. 3 Press the SETUP button in the Control Room section of the MC Pro control surface. 4 On the Touchscreen, select the Locking tab. MC Pro Locking tab 5 Press the Lock Section button on the screen. A lock icon appears to the left of the button, which is now labeled Unlock Section. The software to which it is locked is listed to the right of the button. 6 To unlock the section, press the Unlock Section button. The locking action can be achieved using a keyboard and control surface shortcut: 1 Make sure the XMON EUCON Software Application is in focus. 2 Press and hold the computer keyboard Shift key, and then press the SETUP key in the MC Pro Control Room section. The SETUP keys in both the Control Room and Monitor sections light dimly to indicate they are locked to an application. Chapter 2: Installing XMON 17 18 XMON EUCON Software Application User Guide Chapter 3: Using XMON XMON to EUCON Mapping This section clarifies the terminology used for the XMON and MC Pro/System 5-MC hardware. Control Room The Control Room section of the MC Pro/System 5-MC can route input sources to three sets of outputs. Main Spkrs Routes selected source(s) to the Main 1–8 (7.1-channel) outputs on the XMON hardware. Alt 1 Spkrs Routes selected source(s) to the Alt 1–8 (7.1-channel) outputs on the XMON hardware. Alt 2 Spkrs Feeds selected source(s) to the Mini 1–2 (stereo) outputs on the XMON hardware located on the TB/LB/UTIL connector (XLR-M 6–7). Monitors A–D Monitor A Controls the output level of Headphones 1–2 located on the Control Cable Breakout Adapter. Monitor B Controls the output level of STLS Output 1–2 located on the CUE OUTPUTS connector (XLR-M 1–2) on the back of the XMON hardware. Monitor C Controls the output level of Cue Output 1–2 located on the CUE OUTPUTS connector (XLR-M 3–4) on the back of the XMON hardware. Monitor D Controls the output level of Cue Output 3–4 located on the CUE OUTPUTS connector (XLR-M 5–6) on the back of the XMON hardware. Chapter 3: Using XMON 19 Selecting Sources from MC Pro The MC Pro surface lets you assign XMON input sources to the Control Room and Monitor outputs. Control Room To select input sources for the Control Room: Press the SETUP key in the Control Room section of the MC Pro surface. The Touchscreen that appears displays the available sources across the top row in blue. MC Pro Control Room Setup Touchscreen 1 Press a gray button directly below a source to toggle the corresponding source on. 2 Press a yellow button directly below a source to toggle the corresponding source off. In the figure above, only the Main source is active. The yellow On button (below the surface graphic) is only active when at least one source is active. This button toggles all currently assigned sources off/on. 3 You can re-order the blue sources by clicking on one and re-selecting another source (see figure below). Re-ordering the sources The Monitor and Control Room source selector buttons are always in Sum mode. Selecting a new source does not turn off the previously selected source(s). 20 XMON EUCON Software Application User Guide Control Room Sources The following input sources are available for the Control Room: • Main • Surround • Stereo 1 • Stereo 2 • Stereo 3 • Stereo 4 • Listenback • AFL Monitors A–D To select input sources for the four Monitor feeds: 1 Press the SETUP key in the Control Room section of the MC Pro surface. The Setup: Monitor Touchscreen displays the available sources in the Monitor Source column. 2 Touch a source in the list to activate it for the Monitor feed. Active sources are dark blue, inactive sources are light blue. Choosing Monitor A sources Monitor A–D Sources The following input sources are available for Monitor A–D: • Control Room L/R • Talkback • Cue 1 (Monitor A, B, and C) • Cue 2 (Monitor A, B, and D) • Cue 3 (Monitor A and B) Chapter 3: Using XMON 21 Setting Control Room, Monitor, and Dim Levels Control Room Levels The MC Pro main Control Room knob adjusts the playback level for the three Control Room output feeds independently. To adjust the level of the Main Spkrs (7.1), Alt 1 Spkrs (7.1), or Alt 2 Spkrs (Stereo): 1 Select Main Spkrs, Alt 1 Spkrs, or Alt 2 Spkrs below the MC Pro Control Room knob. 2 Adjust the Control Room knob to the desired playback level for the selected speaker feed. Pressing the Control Room knobtop cuts (mutes) the selected Speaker feed. Monitor Levels The MC Pro Monitor section provides two knobs to adjust the Monitor A–D levels. Pressing the knobtop down cuts (mutes) the level, and pressing it again restores the previous Monitor level. The up/down arrow buttons to the right of the Monitor knobs toggle between adjusting Monitor A and B or Monitor C and D. The scribble strips and surface indicate which pair is currently selected. Dim Level The MC Pro Control Room DIM key attenuates the output to the Dim level you previously specified. The DIM key toggles on and off, and is lit when active. The DIM key can exhibit momentary or latch button behavior. To adjust the Dim level using latch behavior: 1 Press and quickly release the DIM key so it is lit. 2 Adjust the Control Room knob to the desired amount of attenuation. 3 Press and quickly release the DIM key so it is not lit. To adjust the Dim level using momentary behavior: 1 Press and hold the DIM key down. The Control Room level dims temporarily. 2 Adjust the Control Room knob to the desired amount of attenuation. 3 Release the DIM key and the Control Room level returns to normal illumination. 22 XMON EUCON Software Application User Guide Speaker Management Speaker Mapping The Speakers buttons at the bottom of the Control Room Setup screen correspond to the eight outputs for the currently selected Control Room feed: Main, Alt, Mini. When Alt 2 Spkrs is selected on the MC Pro, the Control Room Setup screen speaker selector array shows only the two speakers for the Mini output feed. Speakers On and Off The Speakers outputs are toggled on and off by clicking the eight buttons on the Control Room Setup screen. • A yellow button indicates the speaker output is on. • A gray button indicates the speaker is off. Turning Control Room Speakers on and off Master Speaker On and Off The far left Speakers button (labeled On in the figure above) is a master speaker on/off toggle switch. • Clicking the yellow On button turns all speakers off. • Clicking the gray Off button toggles speakers on that were previously active before the Off button was pressed. Additional Information The following XMON features are currently not supported in the XMON EUCON Software Application: • Linking Monitor Output levels • Output level trim mode • Calibration mode • Mono Switch • Individual Output Trim Mode • Broadcast Mode for AFL and PFL monitoring • Cue Outputs 5–6 are not accessible via EUCON • Headphone / Cue Talkback Dim • Auto Talkback Mode • Listen Mic level Control • Listen Mic Select Switches Chapter 3: Using XMON 23 24 XMON EUCON Software Application User Guide Avid Technical Support (USA) Product Information 2001 Junipero Serra Boulevard Daly City, CA 94014-3886 USA Visit the Online Support Center at www.avid.com/support For company and product information, visit us on the web at www.avid.com