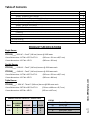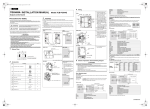
1
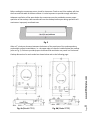
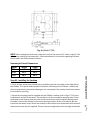
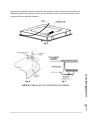
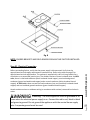
Installation and Operating Instructions for Ceramic Glass Radiant Electric Cooktop Models CTR1 CTR2 CTR3 Model # _______________ Serial # ________________ You can find them on a label under the cooktop. To prevent accidents and machine damage, read the Installation & Operating Manual before installation and use. www.DENALIplus.com Write the model and serial numbers here: 0 Page F-10002-R0 SAVE THIS MANUAL FOR FUTURE REFERENCE. Table of Contents Safety Instructions…………................................................................................................................... Installation Instructions for Ceramic Glass Cooktops Step #1: Unpacking the Cooktop…………….............................................................................. Step #2: Check the Electrical Supply Requirements …........................................................... Step #3: Countertop Preparation & Cutout Dimension…...................................................... Step #4: Installing the Cooktop ............................................................................................. Step #5: Electrical Connection ............................................................................................... Step #6: Final Preparations Prior to Use ................................................................................ Operating Instructions Cookware…….......................................................................................................................... Heating Elements…….............................................................................................................. Controls & Indicators............................................................................................................. Care and Cleaning.............................................................................................................................. Warranty ........................................................................................................................................... 2 5 6 6 7 9 11 12 12 12 12 13 13 14 PRODUCT SPECIFICATIONS Single Burner CTR1120___: 120V AC – One 6” (140 mm) burner @ 1200 watts Overall dimensions: 11⅞”W x 12⅝”D x 3⅜”H (302 mm x 321 mm x 85,7 mm) Cutout dimensions: 11⅛”W x 11⅞”D (282 mm x 302 mm) Double Burner CTR2120___: 120V AC – Two 6” (140 mm) burners @ 1200 watts each Cutout dimensions: 11⅛”W x 19⅛”D (282 mm x 486 mm) Triple Burner CTR3240___: 240V AC - Three 6” (140 mm) burners @1200 watts each Overall dimensions: 20⅝”W x 19⅛"D x 3⅜”H (524 mm x 486 mm x 85,7 mm) Cutout dimensions: 19⅞”W x 18⅜”D (505 mm x 467 mm) RADIANT ELECTRIC COOKTOP - DEVICE LOGIC GMO CTR # COOKING ZONES 1 2 3 VOLTAGE 120 240 220 EDGE COLOR W PE B BV Y LEGEND BV PE W B Y Beveled Edge Pencil Edge Glass Color, White Glass Color, Black Glass Color, White on Black 1 (302 mm x 502 mm x 85,7 mm) Page Overall dimensions: 11⅞”W x 19¾”D x 3⅜”h www.DENALIplus.com CTR2240___: 240V AC – Two 6” (140 mm) burners @ 1200 watts each IMPORTANT SAFETY INFORMATION READ ALL INSTRUCTIONS BEFORE USING. For your safety, the information in this manual must be followed to minimize the risk of fire or explosion, electric shock, or to prevent property damage, personal injury, or loss of life. SAFETY PRECAUTIONS When using electrical appliances, basic safety precautions should be followed, including the following: Items of interest to children should not be stored in cabinets above a cooktop— children climbing on the cooktop to reach items could be seriously injured. Always keep combustible wall coverings, curtains or drapes a safe distance from your cooktop. Never wear loose-fitting or hanging garments while using the appliance. Flammable material could be ignited if brought in contact with hot surface elements and may cause severe burns. Use only dry pot holders—moist or damp pot holders on hot surfaces may result in burns from steam. Do not let pot holders touch hot surface elements. Do not use a towel or other bulky cloth. Such cloths can catch fire on a hot surface element. For your safety, never use your appliance for warming or heating the room. Do not use water on grease fires. Never pick up a flaming pan. Turn the controls off. Smother a flaming pan on a surface element by covering the pan completely with a well-fitting lid, cookie sheet or flat tray. Use a multi-purpose dry chemical or foam-type extinguisher. Flaming grease outside a pan can be put out by covering with baking soda or, if available, by using a multi-purpose dry chemical or foam-type fire extinguisher. Do not flame foods on the cooktop. If you do flame foods under the hood, turn the fan on. Do not let cooking grease or other flammable materials accumulate on the cooktop. SAVE THESE INSTRUCTIONS www.DENALIplus.com 2 Have the installer show you the location of the circuit breaker or fuse. Mark it for easy reference. Do not leave children alone—children should not be left alone or unattended in an area where an appliance is in use. They should never be allowed to sit or stand on any part of the appliance. Teach children not to play with the controls or any other part of the cooktop. Do not allow anyone to climb, stand or hang on the cooktop. Always keep dishtowels, dish cloths, pot holders and other linens a safe distance away from your cooktop. Always keep wooden and plastic utensils and canned food a safe distance away from your cooktop. They may become hot and could cause burns. Page Use this appliance only for its intended use as described in this manual. Do not attempt to repair or replace any part of your cooktop unless it is specifically recommended in this manual. All other servicing should be referred to a qualified technician. Before performing any service, disconnect the cooktop power supply at the household distribution panel by removing the fuse or switching off the circuit breaker. Be sure your appliance is properly installed and grounded by a qualified technician in accordance with the provided installation instructions. This appliance must be supplied with the proper voltage and frequency, and connected to an individual, properly grounded branch circuit, protected by a circuit breaker or fuse acceptable for the indicated wattage on the name plate. IMPORTANT SAFETY INFORMATION READ ALL INSTRUCTIONS BEFORE USING. SAFETY PRECAUTIONS SAVE THESE INSTRUCTIONS 3 cause hot fat to bubble up and over the sides of the pan. Use little fat for effective shallow or deep-fat frying. Filling the pan too full of fat can cause spillovers when food is added. If a combination of oils or fats will be used in frying, stir together before heating, or as fats melt slowly. Always heat fat slowly, and watch as it heats. Use a deep fat thermometer whenever possible to prevent overheating fat beyond the smoking point. Never try to move a pan of hot fat, especially a deep fat fryer. Wait until the fat is cool. Do not store flammable materials near the cooktop. Keep the hood and grease filters clean to maintain good venting and to avoid grease fires. Do not store or use combustible materials, gasoline or other flammable vapors and liquids in the vicinity of this or any appliance. Clean only parts listed in this Owner’s Manual. Do not leave paper products, cooking utensils or food on the cooktop when not in use. Keep cooktop clean and free of accumulation of grease or spillovers which may ignite. Never heat unopened food containers. Pressure buildup may make container burst and cause injury. Never leave jars or cans of fat drippings on or near your cooktop. Never use your appliance for warming or heating the room. Page Do not touch surface elements. These surfaces may be hot enough to burn even though they are dark in color. During and after use, do not touch, or let clothing or other flammable materials contact the surface elements or areas nearby the surface elements; allow sufficient time for cooling first. Potentially hot surfaces include the cooktop and areas facing the cooktop. To minimize the possibility of burns, ignition of flammable materials and spillage, the handle of a container should be turned toward the center of the cooktop without extending over any nearby surface elements. Always turn the surface element control to off before removing the cookware. Use proper pan size—select cookware having flat bottoms large enough to cover the surface heating element. The use of undersized cookware will expose a portion of the surface element to direct contact and may result in ignition of clothing. Proper relationship of cookware to surface element will also improve efficiency. Never leave surface elements unattended at high heat settings. Boilovers cause smoking and greasy spillovers that may catch on fire. Only certain types of glass, glass/ceramic, earthenware or other glazed containers are suitable for cooktop cooking; others may break because of the sudden change in temperature. Keep an eye on foods being fried at high or medium-high heat settings. Foods for frying should be as dry as possible. Frost on frozen foods or moisture on fresh foods can www.DENALIplus.com When using electrical appliances, basic safety precautions should be followed, including the following: IMPORTANT SAFETY INFORMATION READ ALL INSTRUCTIONS BEFORE USING. RADIANT SURFACE ELEMENTS Clean the cooktop with caution. If a wet sponge or cloth is used to wipe spills on a hot surface element, be careful to avoid steam burns. Some cleansers can produce noxious fumes if applied to a hot surface. NOTE: We recommend that you avoid wiping any surface element areas until they have cooled and the indicator light has gone off. Sugar spills are the exception to this. Please see the Cleaning the Glass Cooktop section. To avoid possible damage to the cooking surface, do not apply the cleaning cream to the glass surface when it is hot. After cleaning, use a dry cloth or paper towel to remove all the cleaning cream residue. Read and follow all instructions and warnings on the cleaning cream labels. Use care when touching the cooktop. The glass surface of the cooktop will retain heat after the controls have been turned OFF. Do not stand on the glass cooktop. Large scratches or impacts to glass cooktops can lead to broken or shattered glass. Page 4 Avoid scratching the glass cooktop. The cooktop can be scratched with items such as sharp instruments, rings or other jewelry and rivets on clothing. Never use the glass cooktop surface as a cutting board. Do not place or store items on top of the glass cooktop surface when it is not in use. Be careful when placing spoons or other stirring utensils on glass cooktop surface when it is in use. They may become hot and could cause burns. Avoid heating an empty pan. Doing so may damage the cooktop and the pan. Do not allow water, other liquids or grease to remain on the cooktop. To minimize the possibility of burns, always be certain that the controls for all surface elements are at the off position and the entire glass surface is cool before attempting to clean the cooktop. Do not operate the glass surface elements if the glass is broken. Spillovers or cleaning solution may penetrate a broken cooktop and create a risk of electrical shock. Contact a qualified technician immediately should your glass cooktop become broken. www.DENALIplus.com Use care when touching the cooktop. The glass surface of the cooktop will retain heat after the controls have been turned off. SAVE THESE INSTRUCTIONS INSTALLATION INSTRUCTIONS BEFORE YOU BEGIN Read these instructions completely and carefully. IMPORTANT - Save these instructions for local inspector’s use. IMPORTANT - Observe all governing codes and ordinances. Note to Installer – Be sure to leave these instructions with the Consumer. Note to Consumer – Keep these instructions for future reference. Product failure due to improper installation is not covered under the Warranty. ATTENTION INSTALLER -ALL COOKTOPS MUST BE HARD WIRED (DIRECT WIRED) INTO AN APPROVED JUNCTION BOX. A “PLUG AND RECEPTACLE” IS NOT PERMITTED ON THESE PRODUCTS. Page 5 www.DENALIplus.com Proper installation is the responsibility of the installer and product failure due to improper installation is NOT covered under warranty. Step #1 - Unpacking the Cooktop Carefully unpack the cooktop from its shipping container. If possible, retain the original shipping carton and protective packaging in the event the unit ever has to be returned for service. Verify and identify the package contents. The following items should be included in the carton. If any components are missing or damaged, call DENALI+ customer service immediately. Radiant Electric Cooktop Mounting brackets (2 pcs. for Single and Double Burners, 4 pcs. for Triple Burners) Mounting screws (2 pcs. for Single and Double Burners, 4 pcs. for Triple Burners) Fig. 1 Step #2 - Check the Electrical Supply Requirements Power Supply Requirements Minimum Wire Size (AWG) CTR1120 _ _ _ 1,200 120V/ 10A/ 60Hz 16 Ga. CTR2120 _ _ _ 2,400 120V/ 20A/ 60Hz 16 Ga. CTR2240 _ _ _ 2,400 240V/ 10A/ 60Hz 16 Ga. CTR3240 _ _ _ 3,600 240V/ 15A/ 60Hz 16 Ga. The supply must be from an individual grounded circuit that is protected by a circuit breaker and rated per the specifications for the various models as shown in the table above. INSTALLATIONS MUST COMPLY WITH ALL LOCAL, STATE AND NATIONAL ELECTRICAL CODES. Failure to comply with the applicable codes may result in fire, property damage, personal injury or death. If the electric power supply does not meet the product specifications, consult with a licensed electrician before proceeding with installation. 6 Maximum Connected Load (Watts) Page DENALI + Model # www.DENALIplus.com This product must be installed in accordance with national, state and local electric codes. The following table provides the correct voltage, amperage and frequency that must be supplied to the cooktop. Step #3 - Countertop Preparation Please read this section prior to making cutout for the cooktop. It is important to plan ahead for installation of the cooktop, keeping the following dimensions in mind (please refer to Fig. 2). A. 36 inches is minimum height of countertop above floor B. 13 inches maximum depth of overhead C. 30 inches minimum clearance between the top of the cooking surface and the bottom of an unprotected wood or metal cabinet or 24 inch minimum clearance when the bottom of wood or metal cabinet is protected by not less than ¼-inch-thick flame retardant millboard covered with not less than No. 28 MSG sheet steel, 0.015-inch-thick stainless steel, 0.024-inchthick aluminum or 0.020-inch-thick copper. D. The minimum flat countertop surface that the cooktop will rest upon must be equal to or greater than the overall cooktop dimensions (refer to the following pages for overall cooktop dimensions). E. 2-inch minimum from backsplash of countertop to edge of glass (refer to the following pages for overall cooktop dimensions). Fig. 2 7 Page To eliminate the risk of burns by reaching over heated surface units, cabinet storage space located above surface units should be avoided. If cabinet storage is necessary, the risk can be reduced by installing a range hood that projects horizontally a minimum of 5” beyond the bottom of the cabinets. www.DENALIplus.com Do not install closer than ½ inch (12 mm) from any adjacent surface! Before making the countertop cutout, check for clearance. Check to see if the cooktop will clear the front and side walls of the base cabinet. It is also important to provide enough ventilation. Adequate ventilation of the space below the countertop must be provided to ensure proper operation of the cooktop. Heat transferred from the cooktop bottom pan during operation will overheat an improperly ventilated area. Fig. 3 Allow a 2” minimum clearance between the bottom of the metal pan of the cooktop and any combustible surface located below, i.e.: the upper edge of a drawer installed below the cooktop (refer to Fig. 3). Failure to provide proper clearances and ventilation may result in a fire hazard. Fig. 4b (Model CTR2) Page Fig. 4a (Model CTR1) 8 www.DENALIplus.com Cooktop dimensions for each model are shown below and on the following page: Fig. 4c (Model CTR3) NOTE: When making the countertop, radius the corner of the cutout (1/4” radius is typical). This will prevent cracking of the countertop. Follow manufacturer’s instructions regarding minimum corner radius and reinforcement of corners. Depth 11⅞" 19⅛" 18⅜" Step #4 - Installing the Cooktop 1. Strips of foam sealant have already been installed around the outer edge of the underside of the cooktop. This special sealant prevents liquid from infiltrating into the cabinet. Additionally, the mounted sealant helps prevent damage to the countertop if the cooktop should ever need to be removed for servicing. 2. Attach the mounting brackets supplied with the DENALI+ cooktop (refer to Figs. 6-7-8) to the inside bottom surface of the cutout. The brackets are to be mounted on opposing sides. Center the bracket in the opening, flush with the countertop and secure with long self-tapping screws (included). Position the cooktop in the cutout opening and press firmly on all sides to seal the frame into the sealant strips. Secure the cooktop to the brackets from underneath with the small sheet metal screws that are supplied. There are two mounting brackets for the single and double 9 Width 11⅛" 11⅛" 19⅞" Page Model CTR1 CTR2 CTR2 www.DENALIplus.com Summary of Cutout Dimensions: glass ceramic cooktops and four brackets for the triple glass ceramic cooktop. These brackets are designed to tighten the cooktop and then seal it onto the counter to avoid any movement of the cooktop and to provide good insulation. NOTE: BE CAREFUL NOT TO OVERTIGHTEN THE SCREWS. 10 Fig. 7 Page Fig. 6 www.DENALIplus.com Fig. 5 Fig. 8 NOTE: CARRIER BRACKETS AND SELF ADHESIVE SEALANT ARE FACTORY INSTALLED. Grounding: The entire appliance must be grounded at all times when the electrical power supply is on. Connect the red to red, black to black and green to ground. Do not ground the appliance with the neutral house supply wire. A separate ground must be used. 11 Attach conductor wires to residence wiring in accordance with national, state and local electric codes. Page Before proceeding further, verify that the power supply is disconnected. Verify that the appropriate electrical supply requirements have been met. Refer to the table on page 2 for appropriate electrical requirements. The cooktop is supplied with a 40-inch long conduit for a connection to an accessible junction box. The conduit consists of three insulated wires. In 120V units, there is a hot lead conductor (black insulated tinned copper), one insulated ground conductor (green insulated tinned copper) and a neutral conductor (white insulated tinned copper). In 240V units, there are two hot lead conductors (one red, one black insulated tinned copper) and one insulated ground conductor (green insulated tinned copper). www.DENALIplus.com Step #5 - Electrical Connection STEP #6 - Final Preparations Prior to Use Clean the cooktop before you use it for the first time. A thorough cleaning with a cooktop cleaner will provide a clean, shiny coating on the cooktop surface. The next sections of the manual cover cooktop safety, operation, maintenance and service information. Please keep these instructions with the DENALI + cooktop for future OPERATING INSTRUCTIONS READ SAFETY INSTRUCTIONS BEFORE OPERATING YOUR APPLIANCE. The cooking surface areas of your glass ceramic cooktop are identified by permanent patterns in the cooktop. The appliance is easy to maintain and easy to clean. Keeping the cooktop at top performance levels can be achieved by following the simple guidelines for use and cleaning below. Cookware Be certain that both the cooktop surface and the bottom of your pots and pans are clean and dry before use. By doing so, you will help prevent scratches and stains. Heating Elements This cooktop contains radiant heating elements. The radiant elements will “light up” about 4-5 seconds after being turned on. The special design of these elements directs the heat up through the ceramic glass, providing efficient cooking. Temperature limiters are included in each element to ensure that the safe operating temperature of the ceramic glass top is not exceeded. The 12 Use cookware of the correct diameter only. The base of the pot or pan should be about as wide as the cooking zone on which it is used – not much wider or much narrower. By using utensils with the correct diameter, you should achieve maximum heating efficiency in the shortest possible time. Page The cookware should have a flat bottom. Although glass and other types of cookware can be used, metal cookware with thick, smooth, flat bottoms will generally conduct the heat well. Aluminum and stainless steel cookware usually works best. Avoid cookware with shaped and rounded bottoms as well as utensils that warp when heated. www.DENALIplus.com Chances are that your existing cookware will work just fine with your glass ceramic cooktop. Cooking on a glass ceramic cooktop does not require special pots or pans. Since cookware plays an important role in cooking efficiency and convenience, keep in mind the following information when selecting your cookware. temperature limiter will cycle the radiant element on and off to prevent exceeding the maximum safe surface temperature. Controls & Indicators Each of the cooking area controls has an infinite selection of heat settings. The control settings begin at low and increase heat output by cycling the heating elements between OFF and full power as you turn the knob clockwise. The heating elements will stay at full power for longer periods and at zero power for shorter periods as you turn the knob clockwise, thus increasing the heat output. There are a series of lights located adjacent to the control knob(s) that provide an indication of heating element operation and hot surfaces. When a control is in the ON position, a red light is lit indicating which burner is on, and hot surface light glows indicating that some part of the glass cooktop surface is too warm too touch or place articles upon. Do not place articles other than cookware on the cooking surface while this light is glowing. CLEANING AND CARE To help ensure that your cooktop stays clean, follow these easy-care tips: • Clean the cooktop before you use it for the first time. A thorough cleaning with a recommended cooktop cleaner will provide a coating on the cooktop prior to its first use. • Avoid abrasive scouring cleaners of any kind. Also avoid using plastic, nylon or metal cleaning pads. They may scratch or melt onto the cooktop. • Avoid chemical cleaners such as chlorine bleach, ammonia, hydrofluoric acid or chemical oven cleaners. They can etch or discolor the surface. • Do not let anything that melts – plastic, aluminum foil, sugar, etc., come into contact with the cooktop surface when it is hot. Should something melt onto the surface, immediately move it to a cool area of the cooktop with a razor blade scraper and then remove it from the cooktop as soon as possible. 13 • Do not use a dish towel or sponge to wipe off the cooktop. A film may be left by the detergent and may cause discoloration of the cooktop surface. Page • Clean the cooktop with a paper towel or a clean, soft cloth and a recommended cleaner. After cleaning, always wipe the cooktop with a clean, damp cloth to avoid cooked-on cleaner residue. Wipe the cooktop dry. www.DENALIplus.com • Always remove food spills, grease spatters and metal rub-off from cookware. A razor blade scraper or the equivalent works well to remove spillovers. ONE-YEAR LIMITED WARRANTY Within the 48 contiguous United States, for one year from the date of purchase, when this appliance is operated and maintained according to instructions attached to or furnished with the product, warrantor will pay for factory-specified parts and repair labor to correct defects in materials or workmanship. Service must be provided by a designated service company. Outside the 48 states, all parts are warranted for one year from manufacturing defects. Glass and plastic parts are warranted to be manufactured to commercially acceptable standards, and are not covered from damage during handling or breakage. ITEMS WARRANTOR WILL NOT PAY FOR: • Service calls to correct the installation of your appliance, to instruct you how to use your** appliance, to replace or repair fuses or to correct wiring. • Damage resulting from accident, alteration, misuse, abuse, fire, flood, acts of God, improper installation, installation not in accordance with electrical or plumbing codes, or use of products not approved by warrantor. • Replacement parts or repair labor costs for units operated outside the United States. • Repairs to parts or systems resulting from unauthorized modifications made to the appliance. • Expenses for travel and transportation for product service in remote locations. • The removal and reinstallation of your appliance if it is installed in an inaccessible location or is not installed in accordance with published installation instructions. DISCLAIMER OF IMPLIED WARRANTIES – LIMITATION OF REMEDIES DENALI Plus Products, LLC. PO Box 39080 Charlotte, NC 28278 14 Call customer service @ 1-980-224-3437, Monday to Friday 9:00 AM - 5:00 PM (ET) or e-mail [email protected]. Page PARTICULAR PURPOSE, ARE LIMITED TO ONE YEAR. WARRANTOR SHALL NOT BE LIABLE FOR INCIDENTAL OR CONSEQUENTIAL DAMAGES. SOME STATES DO NOT ALLOW THE EXCLUSION OR LIMITATION OF INCIDENTAL OR CONSEQUENTIAL DAMAGES, OR LIMITATIONS ON THE DURATION OF IMPLIED WARRANTIES OF MERCHANTABILITY OR FITNESS, SO THESE EXCLUSIONS OR LIMITATIONS MAY NOT APPLY TO YOU. THIS WARRANTY GIVES YOU SPECIFIC LEGAL RIGHTS AND YOU MAY ALSO HAVE OTHER RIGHTS, WHICH VARY FROM STATE TO STATE. www.DENALIplus.com CUSTOMER’S SOLE AND EXCLUSIVE REMEDY UNDER THIS LIMITED WARRANTY SHALL BE PRODUCT REPAIR AS PROVIDED HEREIN. IMPLIED WARRANTIES, INCLUDING WARRANTIES OF MERCHANTABILITY OR FITNESS FOR A