Transcript
CH49961301.book Page 1 Tuesday, August 31, 2010 9:51 AM
English
1
4
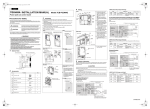
INSTALLATION MANUAL
1. Tie the output wiring using the
Model:TCB-PCIN4E
SMMS-i
1 or 2
Output control board
7 -b
8
3
• Read these “Precautions for Safety” carefully before installation work.
• The precautions described below include important items regarding safety. Observe them without
fail.Understand the following details (indications and symbols) before reading the body text, and follow
the instructions.
The meanings of indications
WARNING
Text set off in this manner indicates that failure to adhere to the
directions in the warning could result in serious bodily harm or loss of
life if the product is handled improperly.
CAUTION
Text set off in this manner indicates that failure to adhere to the
directions in the caution could result in serious bodily injury or
damage to property if the product is handled improperly.
• After completion of installation, perform trial operation to check for any problems. Explain method of
use and maintenance to the customer by following the descriptions in the manual. Ask customer to
keep this Manual at accessible place for future reference.
Installation
1. Before starting installation work, be sure to turn the power supply OFF.
2. Install the "Optional PCB" at the position on the electrical components box shown in the figure on
3.
4.
5.
6.
Optional
PCB
9
the right.
Install the "Optional PCB" at the specified location inside the electrical components box using the
fixing support.
There are four mounting holes for the fixing support at specified locations inside the electrical
components box.
Connect the connector (PJ20 (green)) on the "Optional PCB" to the connector (CN511 (green) or
CN514 (green)) on the "interface PCB" using the connector cable (provided). (See figure on right.)
The cable (provided) is long. Tie it using the binding band.
Output
wiring
8
3.
[PCB Installation Position]
SMMS-i
SMMS-i
Connector Positions
MMY-MAP080 to 120
MMY-MAP140, 160
7
2.
[A]
4 5
MiNi-SMMS
1. Tie the output wiring with the
wire clamp ( 4 ).
SMMS, SHRM
Connector Positions
Electric component
box
Optional PCB
CN511 (green)
5
C2
C4
D2
D3
79
69
C3
4 5
MCC-1613-02
PJ20
Outdoor unit interface PCB
2
3
4
OUTPUT2
5
6
MiNi-SMMS
Accessories
No.
1
Screw
Part Name
Q'ty
Connection cable 1 (for CN511)
1
Connection cable 2 (for CN514)
Hook part
1
(5 wires)
3
Support to fix the board
4
4
Wire clamp
1
5
Wire clamp fixing screw
1
6
Earth screws
2
Install this optional P.C. board to the
back side of the Interface P.C. board
on outdoor unit.
1. If the screw of the position
Screw
Interface P.C. board
(4 wires)
2
1
2
3
1
2
Locally procured
TB1
C2
SW16
PJ20
CN514
CTR1
1
OUTPUT1
2
3
OUTPUT2
4
5
OUTPUT3
6
K1
ON
OFF
(See “CAUTION”)
Optional PCB
Outdoor unit
interface PCB
K2
1 2 3 4
K3
CTR2
CTR3
L1
PS
L2
PS
L3
PS
Connector cable 2 ( 2 )
Connector on interface side (green)
Elapsed operation counter 1
Elapsed operation counter 2
Elapsed operation counter 3
Relays
Operation indication LEDs
Compressor 1 operation output terminal
Compressor 2 operation output terminal
Compressor 3 operation output terminal
Connector on optional PCB side
Power supply unit
Terminal block
CN514
CTR1
CTR2
CTR3
K1, K2, K3
L1, L2, L3
OUTPUT1
OUTPUT2
OUTPUT3
PJ20
PS
TB1
▼ Operation
TB1
OUTPUT3
(max. number installed: 1 pcs)
2
During compressor operation, the relay of the output terminal
corresponding to that compressor turns ON (closes) and turns OFF
(opens) when compressor operation stops.
As shown in the figure, the output terminals are "OUTPUT1", "OUTPUT2"
and "OUTPUT3" from the left compressor facing the front of the outdoor
unit.
Wiring example
The operation state can be remotely checked since the system operating rate signal can be output
externally.
Output wiring
1
▼ Operation
▼ Functions
K3
4-4 mm dia. mounting holes
OUTPUT1
This function can be applied, for example, to the elapsed operation time count of each compressor
mounted on an outdoor unit since the compressor in operation signal can be output externally.
Operating Rate Output (This function is supported only on the SMMS-i.)
Grounding ( 6 )
Outdoor unit
interface PCB
Terminal block (M3)
K2
▼ Functions
C2
Output wiring
73
63
Compressor Operation Output (This function is supported only on the
SMMS-i.)
Shield
wire
Optional PCB
SMMS, SHRM
* Connect optional boards to the center outdoor unit.
* [OUTPUT3] is normally output when power is turned on.
7 )
through securing hole [B] shown
in the figure on the left and tie
the output wiring together with
other wiring.
Fix the wire clamp ( 4 ) using
the screw ( 5 ) holes at location
[A] in the figure on the left.
Outdoor unit
interface PCB
(max. number installed: 2 pcs)
Error output
Operation output
Connector on optional PCB side
Power supply unit
Terminal block
1. Pass the binding band A (
[B]
External View
K1
binding band A ( 7 ) at the
position in the figure on the left.
( 7 -a):Tie the output wiring
togerther with other leads.
( 7 -b):Tie the output wiring
after passing the upper fixation
hole on of the bandling band.
Attach the clamp filter ( 8 ) to
the output wiring and connection
cable ( 1 or 2 ) as shown in
the figure. Use binding band B
( 9 ) to fix the clamp filter ( 8 )
to the wirings.
* When more than one optional
PC boards are installed, band
all the connection cables and
attach one clamp filter.
Fix the wire clamp ( 4 ) using
the screw holes at location [A] in
the figure on the left.
OUTPUT1
OUTPUT2
PJ20
PS
TB1
Outdoor unit
SMMS, SHRM
CN514 (green)
WARNING
D1
2.
4 5
[A]
CN511 (green)
• Only a qualified installer or qualified service person is allowed to do installation work.
If installation is carried out by an unqualified individual, fire or electric shock may result.
• Perform installation work reliably according to this installation manual.
Incomplete installation may cause electric shock, fire or abnormal operation.
• Electrical work must be performed by a qualified installer or qualified service person in
accordance with this installation manual. The work must satisfy all local, national and
international regulations.
Inappropriate work may result in electric shock or fire.
• Connect the specified wires firmly and clamp them securely so that external force applied to
the wires does not affect the connector pins.
Improper wire connection or clamping may result in fire or malfunction.
• Do not disassemble, modify, repair or move the product yourself.
Doing so may cause fire, electric shock, injury or water leaks.
• Ask a qualified installer or qualified service person to do any repairs or to move the product.
1
7 -b
9
7 -a
Precautions for Safety
1
Wiring
Optional P.C. board
• Up to total of two boards
Optional PCB (right side)
2.
shown in the figure is removed
and an upper right hook is
slipped, an interface board will
open.
Place this P.C. board by using
the support of the electric
component box. There are four
installation holes to place the
support of the electric
component box.
MiNi-SMMS
Connector Positions
4
8
Clamp filter
2
9
Binding band B
Outdoor unit
interface PCB
Output Relay (K1, K2, K3) Contact Specifications
• Output terminals (OUTPUT1, 2, 3) must satisfy the following electrical rating.
• When connecting a conductive load (e.g. relay coil) to loads K1, K2 and K3, insert a surge killer
CR (for an AC power supply) or a diode for preventing back electromotive force (for a DC power
supply) on the bypass circuit.
SW16
ON
OFF
1 2 3 4
System
operating
rate output
bit 1 : ON
bit 2 : OFF
<Electrical Rating>
220-240 VAC, 10 mA or more, 1A or less
24 VAC, 10 mA or more, 1 A or less (non-conductive load)
OUTPUT1
OFF
ON
OFF
ON
OFF
ON
OFF
ON
OUTPUT2
OFF
OFF
ON
ON
OFF
OFF
ON
ON
OUTPUT3
OFF
OFF
OFF
OFF
ON
ON
ON
ON
Operating rate FA
FA=0%
0%<FA<20%
20%≤FA<35%
35%≤FA<50%
50%≤FA<65%
65%≤FA<80%
80%≤FA<95%
95%≤FA
OFF=relay open ON=relay closed
Wiring example
Error / Operation output
Locally procured
▼ Functions
Header outdoor unit
The operation error indication PCB can output operation and error states by connecting to the interface
PCB of outdoor units.
Operation output:
The operation indication is output when even one of the indoor units in the system
is operating.
The error indication is output when an error has occurred on even one of the
indoor units or outdoor units in the system.
Outdoor unit
interface PCB
TB1
C2
K1
SW16
ON
OFF
CN514
PJ20
K2
1 2 3 4
Wiring example
1
OUTPUT1
2
3
OUTPUT2
4
5
OUTPUT3
6
SW16
ON
OFF
1 2 3 4
C1
CN511
K1, K2
L1
L2
CN511
Optional PCB
C1
K1
PJ20
K2
TB1
1
OUTPUT1
2
3
OUTPUT2
4
5
OUTPUT3
6
Shield
wire
Connector cable 1 ( 1 )
Connector on interface side (green)
Relays
Error indication Lamp
Operation indication Lamp
MONITOR
Shield
wire
Locally procured
Header outdoor unit
Outdoor unit
interface PCB
(See “CAUTION”)
Optional PCB
K3
(See “CAUTION”)
2
As shown in the table, each of the output terminals turns ON (relay closes) and OFF (relay opens)
according to the system operating rate.
Functions
CAUTION
Error output:
(max. number installed: 1 pc)
Binding band A
Details of Operation, Electrical Wiring Diagram
▼ Operation
CN511 (green)
7
5
L1
PS
L2
PS
C2
CN514
K1, K2, K3
MONITOR
OUTPUT1
OUTPUT2
OUTPUT3
PJ20
TB1
Connector cable 2 ( 2 )
Connector on interface side (green)
Relays
Monitoring device
Output terminal for each function
Output terminal for each function
Output terminal for each function
Connector on optional PCB side
Terminal block
* Connect optional boards to the center outdoor unit.
CH49961301
