1
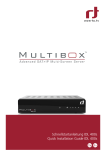
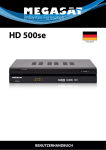
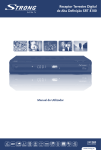
Bedienungsanleitung
User’s Manual
Digital HD Satellite Receiver
MEGASAT HD550
Stand:07.11.2010
DE
Inhaltsverzeichnis
Wichtige Sicherheitshinweise ...................................................................... 4
1 Vorder- und Rückseite ........................................................................................................ 6
1.1 Vorderseite ............................................................................................................... 6
1.2 Rückseite ................................................................................................................. 6
2 Fernbedienung.................................................................................................................... 7
2.1 Tastenbelegung........................................................................................................ 7
2.2 Batterien einlegen .................................................................................................... 8
2.3 Fernbedienung verwenden ...................................................................................... 8
3 Anschlüsse.......................................................................................................................... 9
4 Erstinstallation .................................................................................................................... 9
4.1 Einstellungen............................................................................................................ 10
4.1.1 Programmeinstellungen ................................................................................ 10
4.1.2 EPG (Elektronische Programmzeitschrift)..................................................... 11
4.1.3 Sortieren ........................................................................................................ 12
4.2 Videoeinstellungen(Picture Setting)......................................................................... 12
4.2.1 Bildverhältnis ................................................................................................. 12
4.2.2 Auflösung....................................................................................................... 12
4.2.3 TV-Format...................................................................................................... 12
4.2.4 Videoausgang................................................................................................ 12
4.3 Kanalsuche .............................................................................................................. 12
4.3.1 Satellit............................................................................................................ 13
4.3.2 Transponder .................................................................................................. 15
4.4 Zeiteinstellungen ...................................................................................................... 16
4.5 Optionen................................................................................................................... 17
4.6 System ..................................................................................................................... 17
4.6.1 Passwort einstellen ....................................................................................... 17
4.6.2 Auf Werkseinstellungen zurücksetzen........................................................... 18
4.6.3 Informationen................................................................................................. 18
4.6.4 Liste aufrufen................................................................................................. 18
4.6.5 Software update ............................................................................................ 18
4.7 USB .......................................................................................................................... 18
4.7.1 Multimedia ..................................................................................................... 18
4.7.2 Fotoeinstellungen .......................................................................................... 19
4.7.3 Filmeinstellungen .......................................................................................... 19
4.7.4 PVR-Einstellungen ........................................................................................ 20
4.7.5 Time Shift ....................................................................................................... 20
5.Problembehebung .............................................................................................................. 21
6.Technische Daten ............................................................................................................... 22
3
DE
Wichtige Sicherheitshinweise
1) Lesen Sie diese Hinweise.
2) Beachten Sie diese Hinweise.
3) Beachten Sie alle Warnhinweise.
4) Befolgen Sie alle Hinweise.
5) Benutzen Sie das Gerät nicht in unmittelbarer Nähe von Wasser.
6) Reinigen Sie das Gerät nur mit einem weichen Tuch.
7) Blockieren Sie nicht die Lüftungsöffnungen und installieren Sie das Gerät nur entsprechend der
Bedienungsanleitung.
8) Installieren Sie das Gerät nicht in unmittelbarer Nähe von Wärmequellen, wie Heizkörpern, Heizgeräten,
Herden oder sonstigen Geräten (einschließlich Verstärkern), die Wärme erzeugen.
9) Das Gerät muss an einer geerdeten Steckdose angeschlossen werden.
10) Schützen Sie das Netzkabel, damit nicht darauf getreten oder es eingeklemmt wird. Achten Sie
insbesondere auf den Stecker und den Bereich, in welchem das Netzkabel aus dem Gerät kommt.
11) Benutzen Sie ausschließlich von Hersteller empfohlene Zubehörteile.
12) Ziehen Sie während eines Gewitters und bei längerer Nichtbenutzung bitte den Netzstecker.
13) Wenden Sie sich mit Wartungsarbeiten nur an einen autorisierten Kundendienst. Wenden Sie sich an
einen Kundendienst, wenn das Gerät in irgendeiner Weise beschädigt wurde, wenn beispielsweise
Netzkabel oder -stecker beschädigt sind, Feuchtigkeit oder Fremdkörper in das Gerät eingedrungen sind,
das Gerät Regen oder Feuchtigkeit ausgesetzt war, wenn das Gerät nicht richtig funktioniert oder
heruntergefallen ist.
14) Das Gerät wird durch Ziehen des Netzsteckers vollständig vom Stromnetz getrennt. Die Steckdose
muss während des Betriebs jederzeit frei zugänglich sein.
15) Blockieren Sie nicht die Lüftungsöffnungen mit Zeitungen, Tischtüchern, Gardinen usw.
16) Stellen Sie keine nackten Flammen (wie Kerzen) auf dem Gerät ab.
17) Entsorgen Sie Batterien stets umweltgerecht.
18) Das Gerät ist zur Benutzung in moderatem Klima ausgelegt.
19) Setzen Sie das Gerät nicht Spritzwasser oder Tropfwasser aus und stellen Sie keine
mit Wasser gefüllten Gegenstände (wie Vasen) auf dem Gerät ab.
WARNHINWEIS: Zur Vermeidung von Feuer und Stromschlag setzen Sie das Gerät bitte weder Regen
noch Feuchtigkeit aus.
WARNHINWEIS: Setzen Sie die Batterien weder Hitze (direkte Sonneneinstrahlung) noch Feuer und
dergleichen aus.
Der Blitz im gleichseitigen Dreieck weist auf gefährliche Hochspannung im Gerät hin, die zu
Stromschlag führen kann.
Das Ausrufungszeichen im gleichseitigen Dreieck weist auf wichtige Bedienungs- und
Wartungsanleitungen hin.
Das Symbol zeigt an, dass dieses Gerät doppelt isoliert ist. Bitte benutzen Sie ausschließlich
Original-Ersatzteile.
4
DE
VORSICHT: Sollte das Gerät bedingt durch elektrostatische Entladung nicht
Funktionieren, muss es durch den Benutzer neu gestartet werden.
WARNUNG: Ein USB-Speicher sollte direkt mit dem Gerät verbunden werden.
Verwenden Sie keine USB-Verlängerungskabel, um fehlerhafte
Datenübertragungen zu vermeiden.
Recycling von Batterien
Um Batterien umweltfreundlich zu entsorgen, geben Sie diese NICHT in
den normalen Haushaltsmüll. Bringen Sie Batterien zu Ihrem Händler
oder zu entsprechenden Sammelstellen Ihrer Gemeinde.
Anzeichen einer entladenen Batterien sind: Das Gerät lässt sich nicht
einschalten. Das Gerät schaltet sich automatisch aus und “Batterie
verbraucht” erscheint auf dem Display. Das Gerät und/oder die Batterie
funktionieren nicht korrekt.
5
DE
1 Vorder- und Rückseite
1.1 Vorderseite
1 USB: Anschluss für USB-Speicher.
2 SENSOR FÜR FERNBEDIENUNG: Empfängt die Signale der Fernbedienung.
3.LED-DISPLAY: Zeigt die Zeit- und Kanalinformationen.
4&8 /: Lautstärke verringern /erhöhen
5&6 /: Wechseln Sie die Kanäle ohne Hilfe der Fernbedienung.
7 STANDBY: Dient der Settop-Box oder auf Standby-Schalter
1.2 Rückseite
1 LOOP OUT: Weiterleiten des RF-Signals an eine weitere Set Top Box (STB).
2 LNB IN: Für den Empfang des LNB-Signals.
3 CVBS: Komposit-Videoausgang.
4 COAXIAL: Koaxial-Ausgang für Ihr Surround Sound System.
5 AUDIO L/R: Analoger Audioausgang mit L/R-Signal.
6 TV SCART: Anschluss für den Fernseher.
7 VCR SCART: Anschluss für ein DVD-Spieler oder anderes Videosystem.
8 HDMI: HDMI-Ausgang.
9 NETZKABEL: Netzkabel für Anschluss an die Netzversorgung.
Falls möglich, schließen Sie USB-Speicher nur direkt and den
USB-Anschluss an.
Sollte dies nicht möglich sein, verwenden Sie nur USB-Verlängerungskabel, die
nicht länger als 25 cm sind.
6
28
DE
2 Fernbedienung
29
2.1 Tastenbelegung
1)
2)
3)
4)
5)
6)
7)
8)
9)
10)
11)
12)
13)
14)
15)
16)
17)
18)
19)
20)
21)
22)
23)
24)
25)
MUTE: Ton Stummschalten oder wieder
aktivieren.
INFO: Zeigt weitere Kanalinformationen.
TTX: Zeigt Teletext-Informationen.
DTV/VCR: Wechseln zwischen DTV- und
VCR-Modus.
SUBTITLE: Auswählen der Untertitelsprache.
EXIT: Schließt das aktuelle Menü oder geht zu
vorherigem Menü zurück.
OK: Bestätigen einer Eingabe oder Auswahl.
Zeigt die Kanalliste.
RECHTS / LINKS: Navigation in den Menüs.
Lautstärke erhöhen oder verringern.
TV/RADIO: Wechsel zwischen TV- und
Radio-Funktion.
RECALL: Zeigt den zuletzt angeschauten
Kanal.
GOTO: Auswahl der Wiedergabezeit eines
Mediums.
PREV: Springt zu vorherigem Titel bei
Wiedergabe eines Mediums.
NEXT: Springt zu nächstem Titel bei
Wiedergabe eines Mediums.
REPEAT: Auswahl der Wiederholfunktion oder Ausschalten der Wiederholfunktion.
STOP: Stoppt die Medienwiedergabe.
STANDBY: Schaltet das Gerät ein oder auf Standby.
EPG: (Elektronische Programmzeitschrift) Zeigt die Programmzeitschrift an.
AUDIO: Auswahl einer Audiosprache oder eines Audio-Modus.
HOCH / RUNTER: Navigation in Menüs. Nächsten oder vorherigen Kanal wählen.
MENU: Zurück zum Hauptmenü.
FAVOURITE: Zeigt das Favoritenmenü.
0-9 (numerische Tasten): Einen Kanal oder eine Einstellung wählen.
FWD: Suche vorwärts bei Medienwiedergabe.
REV: Suche rückwärts bei Medienwiedergabe.
PLAY: Start oder fortsetzen einer Medienwiedergabe.
7
DE
26) PAUSE: Medienwiedergabe unterbrechen.
27) FARBTASTEN:
c Rot: Funktionen;
d Grün: Auflösung ändern;
e Gelb: Seitenverhältnis anpassen;
f Blau: Schaltuhr einstellen;
28) REC: Aufnahme eines Programms.
29) LIST: Zeigt die aufgenommenen Programme auf der aktuellen Disk.
2.2 Batterien einlegen
Entfernen Sie die Batteriefachabdeckung von der Fernbedienung und legen Sie 2 x AAA
Batterien in das Batteriefach.
Die Aufdrucke im Batteriefach zeigen, wie die Batterien korrekt eingelegt werden müssen.
1. Abdeckung öffnen 2 Batterien einlegen
3. Abdeckung schließen
2.3 Fernbedienung verwenden
Um die Fernbedienung zu verwenden, richten Sie diese direkt auf die Vorderseite der Set
Top Box. Die Reichweite der Fernbedienung beträgt bis zu 7 Meter von der Set Top Box
bei einem Winkel von bis zu 60 Grad.
Die Fernbedienung funktioniert nicht, wenn keine Sichtverbindung besteht. Sonnenlicht
oder sehr helles Licht verringert die Empfindlichkeit der Fernbedienung.
8
DE
3 Anschlüsse
Vorsicht: Achten Sie darauf, dass die Spannung der Steckdose mit der des Empfängers
übereinstimmt. Um das Risiko eines elektrischen Schlags zu verhindern, öffnen Sie nicht
das Gehäuse oder die Rückseite des Empfängers.
Hinweis: Wenn Sie den Empfänger an andere Geräte anschließen, wie TV, Videorekorder
und Verstärker, lesen Sie auch die jeweiligen Bedienungsanleitungen dieser Geräte.
Achten Sie ebenfalls darauf, alle Geräte während des Anschließens von der
Netzversorgung zu trennen.
VIDEO AUDIO TV SCART HDMI
SATELLIT STB
Digitaler Verstärker
4 Erstinstallation
Nachdem alle Anschlüsse korrekt durchgeführt wurden, schalten Sie den Fernseher ein
9
DE
und stellen Sie sicher, dass der Empfänger an die Netzversorgung angeschossen ist.
Drücken Sie die Power-Taste, um den Empfänger einzuschalten. Verwenden Sie den
Empfänger das erste Mal oder er wurde auf Werkseinstellungen zurückgesetzt.
werden alle werkseitige Einstellungen geladen.
Die Senderliste und alle vorgenommenen Einstellungen werden auf die ab Werk
ei ngestellten Werte zurückgesetzt.
Der Receiver ist mit einer Senderliste Astra/Hotbird vorprogrammiert und sofort
Einsatzbereit.
Um die Voreinstellungen zu ändern folgen Sie dem Installations Guide.
(1) Wählen Sie die Anzeigesprache [OSD Language] und drücken Sie RECHTS/LINKS,
um die Sprache auszuwählen.
(2) Wählen Sie das Satelliten-Setup [Dish Setup] und drücken Sie RECHTS/LINKS/OK,
um in das Satellitenmenü zu gelangen.
(3) Nachdem die Kanalsuche beendet ist, können Sie Fernseh schauen.
4.1 Einstellungen
Um das Menü zu öffnen, drücken Sie MENU und
wählen Sie Programm [Program]. Das Menü bietet
die Möglichkeit Einstellungen vorzunehmen. Wählen
Sie eine Option und drücken Sie OK oder RECHTS,
um Einstellungen vorzunehmen. Drücken Sie EXIT,
um das Menü zu verlassen.
Dish Setup
4.1.1 Programmeinstellungen
Um die Einstellungen zu ändern (sperren (lock),
überspringen (skip), Favoriten (favourite), bewegen
(move) oder löschen (delete)), müssen Sie das
Programmeinstellungsmenü (Program Edit) aufrufen.
Dieses Menü ist durch ein Passwort geschützt. Das
Standardpasswort ist “000000”.
Default
Favoriten einstellen
Sie können eine kurze Liste mit Ihren Lieblingskanälen
für den schnellen Zugriff einstellen. Favoriten für TV oder
Radio einstellen:
1. Wählen Sie den gewünschten Kanal und drücken Sie dann FAVOURITE. Ein
herzförmiges Symbol erscheint und der Kanal wurde
zu den Favoriten hinzugefügt.
2. Wiederholen Sie diesen Schritt, um weitere
0009 CANAL+
Favoriten hinzuzufügen.
0010 TPS STAR
0011 CANAL J
3. Drücken Sie EXIT zum Bestätigen und verlassen
0012 PLANETE
des Menüs. Drücken Sie FAVOURITE mit dem
0013 CANAL+ SPORT
SAT: ASTRA 1H,1KR,1L
0014 CANAL+ CINE MA
TP: 4151/H/19636
herzförmigen Symbol auf der Fernbedienung, um
0015 CANAL J
PDI: A 96/V 164
0016 PLANETE
den Favoritenmodus zu verlassen.
FAV: Disable
Favoriten ansehen
10
Ein TV- oder Radiokanal überspringen
1. Wählen Sie den Kanal, den Sie überspringen wollen und drücken Sie die GRÜNE Taste.
Ein Symbol erscheint. Der Kanal wird als zu überspringen markiert.
2. Wiederholen Sie diesen Schritt, um weitere Kanäle zu überspringen.
3. Drücken Sie EXIT zum Bestätigen und verlassen des Menüs. Drücken Sie die GRÜNE
Taste mit dem Symbol zum Überspringen, um diesen Modus zu verlassen.
Einen TV- oder Radiokanal bewegen
1. Wählen Sie den gewünschten Kanal und drücken Sie die ROTE Taste. Ein Symbol zum
bewegen erscheint.
2. Drücken Sie HOCH/RUNTER, um den Kanal zu bewegen.
3. Drücken Sie OK zum Bestätigen.
4. Wiederholen Sie diese Schritte, um weitere Kanäle zu bewegen.
Kanal sperren
Sie können ausgewählte Kanäle blockieren. Ein TV- oder Radiokanal blockieren:
1. Wählen Sie das gewünschte Programm und drücken Sie die GELBE Taste. Ein
Schlosssymbol erscheint. Der Kanal ist nun als zu Sperren markiert.
2. Wiederholen Sie diesen Schritt, um weitere Kanäle zu sperren.
3. Drücken Sie EXIT zum Bestätigen und verlassen des Menüs.
4. Drücken Sie die GELBE Taste, um die Sperrung für einen Kanal aufzuheben.
5. Um einen gesperrten Kanal anzusehen, benötigen Sie entweder das Standardpasswort
“000000” oder das zuletzt von Ihnen eingestellte
Program Guide
Passwort.
003 3 / 24
4.1.2 EPG (Elektronische
Programmzeitschrift)
EPG ist eine Programmzeitschrift, die auf dem
Bildschirm angezeigt wird und
Sun. 26 jan 2008 11:26
26jan 11:10-11:30EI media ambient
26jan 11:30-12:00EI Noticies 3/24
26jan 12:00-12:22EI Noticies 3/24
26jan 12:22-12:30EI Canal Parlament
26jan 12:30-13:00EI Noticies 3/24
26jan 13:00-13:30EI Noticies 3/24
26jan 13:30-14:00EI Noticies 3/24
26jan 14:00-14:30EI Noticies 3/24
26jan 14:30-15:30EI Telenoticies migida
26jan 15:30-16:00EI Valor afegit
26jan 16:00-16:20EI Noticies 3/24
OK
Book
INFO
Book List
Page Down
Les conarcues de muntanya
viuen una clara represa
economica en eis ultims anys
Page:1/3
Page Up
11
DE
1. Drücken Sie FAVOURITE, um das Favoritenmenü aufzurufen.
2. Drücken Sie HOCH/RUNTER, um den gewünschten Kanal zu wählen.
3. Drücken Sie OK, um den Kanal anzusehen.
Ein TV- oder Radiokanal löschen
1. Wählen Sie den Kanal und drücken Sie die BLAUE Taste, ein Hinweis erscheint.
Drücken Sie OK, um den Kanal zu löschen.
2. Wiederholen Sie diesen Schritt, um weitere Kanäle zu löschen.
DE
Programminformationen der nächsten 7 Tage für jeden Kanal zeigt. Drücken Sie EPG auf
der Fernbedienung, um es aufzurufen. Sie können mit HOCH/RUNTER das gewünschte
Programm wählen. Ist mehr als eine Seite Informationen vorhanden, drücken Sie BLAU für
die vorherige Seite und GELB für die nächste Seite.
4.1.3 Sortieren
Sortieren Sie die Kanäle mit der folgenden Option:
[Default] – ursprüngliche Reihenfolge.
[Encrypt] – Kanäle verschlüsselt sortieren.
[Service Name] – Kanäle in alphabetischer
Reihenfolge sortieren.
[Service ID] – Kanäle nach der Service-ID sortieren.
Video Setting
4.2 Videoeinstellungen (Bildeinstellung)
Drücken Sie MENU und wählen Sie das Menü
[Video]. Das Menü bietet Optionen zur
Videoeinstellung. Drücken Sie HOCH/RUNTER, um
eine Option zu wählen und RECHTS/LINKS, um
Einstellungen vorzunehmen. Drücken Sie EXIT, um das Menü zu verlassen.
4.2.1 Bildverhältnis
Sie müssen das Bildverhältnis zwischen 4:3 Pans Scan, 4:3 Letter Box, 16:9 Wide Screen
oder Auto wählen, um den gesamten Bildschirm nutzen zu können.
4.2.2 Auflösung
Sollte das Bild nicht korrekt erscheinen, wechseln Sie die Auflösung. Es können die meist
gebräuchlichen Auflösungen für HDMI. [480i] eingestellt werden: für NTSC-Systeme TV.
[480P]: für NTSC-Systeme TV. [576i] für PA-Systeme TV. [576P]: für PAL-Systeme TV.
[720P]: für NTSC- oder PAL-Systeme TV. [1080I]: für NTSC- oder PAL-Systeme TV.
4.2.3 TV-Format
Sollte das Bild nicht korrekt erscheinen, ändern Sie das TV-Format. Es können die meist
gebräuchlichen TV-Formate eingestellt werden [NTSC]: für NTSC-Systeme TV. [PAL]: für
PAL-Systeme TV. [Auto]: Automatische Formateinstellung.
4.2.4 Videoausgang
[CVBS]: CVBS-Ausgang. [RGB]: RGB-Ausgang.
4.3 Kanalsuche
Drücken Sie MENU, um das Menü [Search Channel]
aufzurufen. Das Menü bietet Optionen die
12
4.3.1 Satellit
Konfigurieren Sie die Satelliteneinstellungen.
Satellitenliste: Drücken Sie HOCH/RUNTER, um einen Satelliten zu wählen, die
Einstellungen werden auf der rechten Seite angezeigt.
LNB-Typ: Drücken Sie LINKS/RECHTS/OK, um eine Liste von LNB-Typen zu zeigen, die
als Frequenzen des Lokaloszillators angezeigt werden. Sie können die Frequenz auch
unter User Single oder User Dual am Ende der Liste.
Satellite
001
002
003
004
005
006
007
008
013.0E Ku HOTBIRD6
019.2E Ku_ASTRA 1H
028.2E Ku_ASTRA 2A
023.5E Ku_ASTRA 1E
007.0W Ku_NILESAT 1
007.0E Ku_EUTELSAT
010.0E Ku_EUELSAT
026.0E Ku_badr-2,3.
Ku_ASTRA 1H,1KR,1L,1M
09750/10600
LNB Type
LNB Power
13/18V
22KHz
Auto
Toneburst
None
DiSEqC1.0
None
DiSEqC1.1
None
Motor
None
Satellite
001
002
003
004
005
006
007
008
013.0E Ku HOTBIRD6
019.2E Ku_ASTRA 1H
028.2E Ku_ASTRA 2A
023.5E Ku_ASTRA 1E
007.0W Ku_NILESAT 1
007.0E Ku_EUTELSAT
010.0E Ku_EUELSAT
026.0E Ku_badr-2,3.
Ku_ASTRA 1H,1KR,1L,1M
LNB Type
09750/10600
9750/10600
9750/10750
05150
05750
09750
10600
10750
Quality
GOTO
TransPonder
EXIT
EXIT
OK
Select
Edit
Add
Delete
Scan
LNB-Leistung: Drücken Sie LINKS/RECHTS zum Einstellen der LNB-Leistung.
22K: Drücken Sie LINKS/RECHTS, um 22K ein- oder auszuschalten, diese Funktion ist auf
auto geschaltet, wenn ein Dual-LNB als Lokaloszillator verwendet wird.
Toneburst: Ein- oder ausschalten des Toneburst-Schalters.
DiSEqC1.0: Wählen Sie den rechten Port bis zu 4 für den rechten LNB.
DiSEqC1.1: Wählen Sie den rechten Port bis zu 16 für den rechten LNB.
Motor: Drücken Sie LINKS/RECHTS, um DiSEqC1.2 oder DiSEqC1.3 zu wählen. Drücken
Sie dann OK, um das Menü für das Einstellen der Position zu zeigen.
DiSEqC1.2: Steuern Sie den Motor auf die korrekte Position, um das Signal zu Empfangen.
DiSEqC1.3: Steuern Sie den Motor gemäß der Örtlichkeit und der Satellitenposition.
Auto-Bewegung: Drücken Sie LINKS/RECHTS, um West/Ost zu steuern. Die Bewegung
stoppt automatisch, sobald das Signal empfangen wird.
Kontinuierliche Bewegung: Drücken Sie LINKS/RECHTS, um West/Ost zu steuern. Die
Bewegung wird so lange durchgeführt, bis Sie anhalten.
Schrittweise Bewegung[1]: Drücken Sie LINKS/RECHTS, um nur einen Schritt weit zu
bewegen.
Position speichern: Aktuelle Position des Motors speichern.
13
DE
Kanalsuche einzustellen. Drücken Sie HOCH/RUNTER, um eine Option zu wählen und
RECHTS/LINKS, um Einstellungen vorzunehmen. Drücken Sie EXIT, um das Menü zu
verlassen.
DE
Gehe zu Position: Drücken Sie LINKS/RECHTS, um zu der gespeicherten Position zu
gehen.
Gehe zu Referenz: Pausieren aller Positionen.
Gehe zu X: Zur berechneten Position, abhängig von der Örtlichkeit und der
Satellitenposition gehen.
Satellite
001
002
003
004
005
006
007
008
Set Position
Ku_ASTRA 1H,1KR,1L,1M
013.0E Ku
HOTBIRD6
Move
Auto
019.2E Ku_ASTRA
1H
Move Continue
028.2E Ku_ASTRA
Move Step(2A
1)
023.5E Ku_ASTRA
1E
Store Position
007.0W Goto
Ku_NILESAT
Position 1
007.0E Ku_EUTELSAT
Goto Reference
010.0E Ku_EUELSAT
026.0E Ku_badr-2,3.
09750/10600
LNB Type
STOP
STOP
LNB Power
13/18V
22KHzSTOP
Auto
Toneburst
None
DiSEqC1.0
None
DiSEqC1.1
None
Motor
None
001
002
003
004
005
006
007
008
Satellite
Set Ku_ASTRA
Position
1H,1KR,1L,1M
09750/10600
013.0E Ku HOTBIRD6
Move Auto LNB Type STOP
019.2E Ku_ASTRA
1H
Move Continue
STOP
13/18V
LNB Power
028.2E Ku_ASTRA
2A (1) 22KHz STOP
Move Step
Auto
023.5E Ku_ASTRA
1E
Store Position
None
Toneburst
007.0W Ku_NILESAT
1
Goto Position
DiSEqC1.0 None
007.0E Ku_EUTELSAT
Goto Reference
DiSEqC1.1 None
010.0E Ku_EUELSAT
GotoX
Satelliten hinzufügen: Drücken Sie ROT, um einen
Satelliten hinzuzufügen, Sie müssen
einen Längengrad eingeben und den
Satellitennamen mit dem Softkeyboard eingeben.
Quality
001
002
003
004
005
006
007
008
Satelliten editieren: Drücken Sie GRÜN, um den
fokussierten Satelliten zu editieren.
Satelliten löschen: Drücken Sie GELB, um den
fokussierten Satelliten zu löschen. Drücken Sie OK
zum Bestätigen.
Satellite
Edit
Ku_ASTRA
1H,1KR,1L,1M
09750/10600
LNB Type
013.0E Ku HOTBIRD6
002
No.
019.2E Ku_ASTRA 1H
LNB Power 13/18V
ASTRA 1H, 1
Satellite Name
028.2E Ku_ASTRA 2A
Auto
22KHz
East
Longitude
023.5E Ku_ASTRA
1E Direction
None
Toneburst
007.0W Ku_NILESAT 1
019.2
Longitude Angle
None
DiSEqC1.0
007.0E Ku_EUTELSAT
None
DiSEqC1.1
Ku
Band
010.0E Ku_EUELSAT
026.0E Ku_badr-2,3.
14
Motor
None
Quality
Satellite
Einzelnen Satelliten Scannen: Drücken Sie BLAU,
um das Scan-Menü aufzurufen.
Scan-Modus: Drücken Sie LINKS/RECHTS,
um Default zu wählen, damit die eingebauten
Standard Transponder gescannt werden. Blind Scan
und NetWork scannen mit aktivem NIT.
None
Motor
026.0E Ku_badr-2,3.
Quality
001
002
003
004
005
006
007
008
Channel
Search 1H,1KR,1L,1M
Ku_ASTRA
013.0E Ku HOTBIRD6
Scan Mode
019.2E Ku_ASTRA 1H
Crypted
028.2E Ku_ASTRA 2A
Service 1E
Type
023.5E Ku_ASTRA
007.0W Ku_NILESAT 1
007.0E Ku_EUTELSAT
010.0E Ku_EUELSAT
026.0E Ku_badr-2,3.
Quality
LNB Type
Default
09750/10600
LNB Power
13/18V
22KHz
Auto
All Channels
All
Toneburst
DiSEqC1.0
None
None
DiSEqC1.1
None
Motor
None
Multi-Satelliten Scan: Drücken Sie OK, um Satelliten mit " 9 “ zu markieren, drücken Sie
dann BLAU, um das Scan-Menü aufzurufen. Konfigurieren Sie wie unter Einzelnen
Satelliten scannen und drücken Sie OK, um das Scannen zu beginnen.
Kanalsuche
Scannen Sie die Satelliten oder Transponder gemäß den Einstellungen.
Channel Search
Satellite
001
002
003
004
005
006
007
008
013.0E Ku HOTBIRD6
019.2E Ku_ASTRA 1H
028.2E Ku_ASTRA 2A
023.5E Ku_ASTRA 1E
007.0W Ku_NILESAT 1
007.0E Ku_EUTELSAT
010.0E Ku_EUELSAT
026.0E Ku_badr-2,3.
Ku_ASTRA 1H,1KR,1L,1M
09750/10600
LNB Type
LNB Power
13/18V
22KHz
Auto
Toneburst
None
DiSEqC1.0
01/01 HOTBIRD 6,7A,8
10829MHz V 3333kbps
DTV:0000
Radio:0000
None
DiSEqC1.1
None
Motor
None
Quality
2%
Pro gre ss
GOTO
TransPonder
EXIT
EXIT
OK
Select
Edit
Add
Delete
Scan
Blinder Scan
Scannen Sie zuerst das Band, um verfügbare Transponder zu finden. Nachdem alle
Transponder gefunden wurden, scannen Sie die Transponder einen nach dem anderen,
um alle Kanäle zu finden.
Channel Search
Channel Search
01/01 ASTRA 1H,1KR,1L,1M
01/01 ASTRA 1H,1KR,1L,1M
H/L-LOF 12364MHz
10744MHz V 22000kbps
DTV:0000
TransPonder
Pro gre ss
4%
Pro gre ss
Radio:0000
2%
4.3.2 Transponder
Drücken Sie GOTO, um die Liste der Transponder der fokussierten Satelliten anzuzeigen.
15
DE
Verschlüsselt: Drücken Sie LINKS/RECHTS, um alle Kanäle oder FTA-Kanäle zu wählen.
Service Type: Drücken Sie LINKS/RECHTS, um ALL, DTV oder RADIO zu wählen.
Drücken Sie OK, um mit den obigen Einstellungen zu scannen.
DE
Drücken Sie GOTO nochmals, um zurück zur Satellitenliste zu gelangen.
Transponder hinzufügen: Drücken Sie ROT, um einen neuen Transponder hinzuzufügen.
Es kann ein bereits existierender Transponder nicht unter dem gleichen Satelliten
gespeichert werden.
Transponder editieren: Drücken Sie GRÜN, um den fokussierten Transponder zu editieren.
TransPonder
001
002
003
004
005
006
007
008
Ku_EUTELSAT W3A
09750/10600
LNB Type
10928 V 30000
11345 V 27500
11471 V 30000
11513 V 27500
11554 V 27500
11595 V 30000
011637 V 3000
11679 V 30000
LNB Power
13/18V
22KHz
Auto
Toneburst
None
DiSEqC1.0
None
DiSEqC1.1
None
Motor
None
TransPonder
001
002
003
004
005
006
007
008
Quality
GOTO
Satellite
EXIT
EXIT
10928 V 30000
11345 V TransPonder
27500
11471 V 30000
11513 V Frequency
27500 :
11554 V Symbol
27500
11595 V Polarity
30000
011637 V 3000
11679 V 30000
Ku_EUTELSAT W3A
Type
09750/10600
Add
LNB
LNB
019
Power
22KHz
11471
Toneburst
3000
DiSEqC1.0
V
13/18V
Auto
None
None
DiSEqC1.1
None
Motor
None
Quality
OK
Select
Edit
Add
Delete
Scan
Es kann ein bereits existierender Transponder nicht unter dem gleichen Satelliten
gespeichert werden.
Transponder löschen: Drücken Sie GELB, um
den fokussierten Transponder zu löschen.
Time
Drücken Sie OK zum Bestätigen.
Time Auto
Time Zone
Einzelnen Transponder Scannen: Drücken Sie
BLAU, um das Scan-Menü aufzurufen Nach
dem Einstellen drücken Sie OK, um zu
scannen.
On
GMT +5
Date
01/01/2000
Time
05:05
Sleep
Off
Multi-Transponder Scan: Drücken Sie OK, , um
Satelliten mit " 9 “ zu markieren, drücken Sie dann BLAU, um das Scan-Menü aufzurufen.
Konfigurieren Sie den Transponder und drücken Sie OK, um das Scannen zu beginnen.
4.4 Zeiteinstellungen
Drücken Sie MENU, um das Menü [Time] aufzurufen. Das Menu bietet Optionen zum
Einstellen der Zeit. Drücken Sie HOCH/RUNTER, um eine Option zu wählen und
RECHTS/LINKS, um Einstellungen vorzunehmen. Drücken Sie EXIT, um das Menü zu
verlassen.
(1)Time Auto: Zeit automatische einstellen.
(2)Time Zone: Wählen Sie die Zeitzone.
(3)Date: Zeigen und stellen Sie das Systemdatum ein.
(4)Time: Zeigen und stellen Sie die Systemzeit ein.
16
4.5 Optionen
Drücken Sie MENU, um das Menü [Option] aufzurufen. Das Menü bietet Optionen zur
Einstellung der Systemsprache,
Untertitelsprache und Audiosprache.
Wählen Sie eine Option und drücken Sie
RECHTS/LINKS, um Einstellungen
vorzunehmen. Drücken Sie EXIT, um das
Menü zu verlassen.
(1) OSD Language: Wählen Sie die
Systemsprache.
(2) Audio Language: Wählen Sie die
gewünschte Audiosprache, in der die Kanäle wiedergegeben werden sollen. Ist die
Sprache nicht verfügbar, wird die Standardsprache verwendet.
(3) Subtitle Language: Wählen Sie die Untertitelsprache.
4.6 System
Drücken Sie MENU, um das Menü [System]
aufzurufen. Das Menü bietet Optionen zur
Einstellung der Systemeinstellungen. Drücken
Sie HOCH/RUNTER, um eine Option zu
wählen und RECHTS/LINKS, um Einstellungen
vorzunehmen. Drücken Sie EXIT, um das Menü
zu verlassen.
Recall List
Off
Software Update
4.6.1 Passwort einstellen
Stellen Sie ein Passwort ein oder ändern Sie es für gesperrte Kanäle. Geben Sie das alte
oder das Standardpasswort “000000“ ein. Sie werden nun aufgefordert, ein neues
Passwort einzugeben. Nachdem es bestätigt wurde, drücken Sie EXIT, um das Menü zu
verlassen.
17
DE
(5)Sleep: Stellen Sie eine automatische Abschaltzeit ein. Es wird ein Hinweis gezeigt,
wenn sich das Gerät abschaltet. Dieser Hinweis erscheint in jeder Betriebssituation. Sie
können die automatische Abschaltzeit zwischen 0 und 12 Stunden einstellen. Drücken Sie
STANDBY, um den automatischen Abschaltmodus zu verlassen.
DE
4.6.2 Auf Werkseinstellungen zurücksetzen
Setzen Sie Ihre Set Top Box auf Werkseinstellungen zurück. Wählen Sie im Hauptmenü
[Restore Factory Default] und drücken Sie OK oder RECHTS zur Auswahl. Geben Sie Ihr
Passwort oder das Standardpasswort “000000” ein und drücken Sie OK zum Bestätigen.
Diese Option wird alle eingestellten Kanäle und Einstellungen löschen.
4.6.3 Informationen
Zeigen Si e Informationen zu Modell,
Hardware und Software an.
4.6.4 Liste aufrufen
Schalten Sie diese Funktion ein oder aus,
die mehrfach-Programmwahl ermöglicht.
4.6.5 Software update
Zum Starten des Updates wenn ein USB Wechseldatenträger mit einem entsprechenden
Update angeschlossen wurde.
4.7 USB
Drücken Sie MENU, um das Menü [USB] auszuwählen. Das Menü bietet Optionen für die
Wiedergabe von Musik- und Fotodateien, es werden MP3-, WMA-, JPEG- und
BMP-Dateien unterstützt. Das Gerät unterstützt nur USB-Speicher mit dem FAT und FAT32
Dateisystem. NTFS wird nicht unterstützt.
4.7.1 Multimedia
Ist kein USB-Speicher angeschlossen, wird ein Hinweis "No USB Device is Found"
angezeigt. Ist ein USB-Speicher angeschlossen, können Sie die Musik- oder Fotodateien
in diesem Menü wählen, drücken Sie OK, um den Dateimanager aufzurufen und wählen
Sie die Datei, die Sie öffnen wollen.
Multimedia
C / PV RREC ORD
Page 01/01
PVRRECORD
MTC _ MSD7828 _ DH2836 . AP
Music
Select
Photo
Movie
EXIT EXIT
PVR
Move
Select
18
Move
Recall
Up Folder
DE
Falls möglich, schließen Sie USB-Speicher nur direkt and den DYON
USB-Anschluss an.
Sollte dies nicht möglich sein, verwenden Sie nur USB-Verlängerungskabel, die
nicht länger als 25 cm sind.
4.7.2 Fotoeinstellungen
-Slide Time: Stellen Sie die Verweildauer im Bereich von 0 bis 8 Sekunden ein.
-Slide Mode: Stellen Sie den Übergangseffekt zwischen 0 und 59 oder zufällig “random”
ein.
-Aspect Ratio: Zeigt Bilder in ihrer
Photo Config ure
Originalgröße an, “Discard” zeigt die Bilder
85
Slid e Time
angepasst an.
15
Slid e Mode
Disc ard
Aspect Ratio
4.7.3 Filmeinstellungen
- Spezifischer Untertitel:
[Small]: Zeigt den Untertitel klein an.
[Normal]: Zeigt den Untertitel normal an.
[Big]: Zeigt den Untertitel groß an.
- Untertitel-Hintergrund:
[White]: Zeigt den Untertitel mit weißem Hintergrund.
[Transparent]: Zeigt den Untertitel mit transparentem Hintergrund.
[Grey]: Zeigt den Untertitel mit grauem Hintergrund.
[Yellow green]: Zeigt den Untertitel mit gelb-grünem Hintergrund.
EXIT
EXIT
- Untertitel-Schriftfarbe:
[Red]: Zeigt den Untertitel in roter Schriftfarbe.
[Blue]: Zeigt den Untertitel in blauer Schriftfarbe.
[Green]: Zeigt den Untertitel in grüner Schriftfarbe.
Hinweis:
- Wir übernehmen keine Garantie für die Kompatibilität (Bedienung und/oder Bus-Leistung)
aller USB-Speicher und übernehmen keine Haftung für Datenverlust, bedingt durch
Anschluss an dieses Gerät.
- Sind große Datenmengen gespeichert, kann dieses Gerät etwas länger brauchen, um
alle Inhalte auf dem USB-Speicher auszulesen.
- Einige USB-Geräte können eventuell nicht korrekt erkannt werden.
- Auch wenn die Dateien unterstützt werden, kann es dazu kommen, dass diese nicht
19
DE
wiedergegeben oder abgespielt werden können, abhängig von deren Inhalt.
4.7.4 PVR-Einstellungen
[Record Device]: Wählen Sie die Disk, auf der gespeichert werden soll.
[Format]: Formatieren Sie die ausgewählte Disk.
4.7. 5 Timeshift
Mit PAUSE starten Sie die Timeshift-Funktion, ein USB-Speichermedium mit
ausreichender Kapazität muss angeschlossen sein.
Mit WIEDERGABE/PAUSE setzen Sie das Programm fort.
Mit VORLAUF/RÜCKLAUF gehen Sie im Progamm vor und zurück. Beim Erreichen des
Anfangs der Aufzeichnung wird die Wiedergabe fortgesetzt, beim Erreichen des Endes
wird aufgezeichnet. Mit erneutem Tastendruck auf PAUSE starten Sie die
Timeshift-Funktion erneut.
Tipps für umweltfreundliche Entsorgung
Nach dem Ende seiner Lebenszeit, darf dieses Gerät nicht mit dem normalen
Haushaltsmüll entsorgt werden. Es muss zu einer Sammelstelle für das
Recycling von elektrischen und elektronischen Geräten gebracht werden. Das
Symbol auf dem Gerät, in der Bedienungsanleitung und auf der Verpackung
zeigt dies an.
Die Materialien, die für die Herstellung dieses Geräts verwendet wurden, sind
recyclebar, je nach den Identifikationsmarkierungen. Durch das Recyceln
dieses Geräts, das Recyceln seiner Komponenten oder durch andere Wege
des Weitergebrauchs alter Geräte tragen Sie zum Schutz unserer Umwelt bei.
Fragen Sie Ihre lokale Gemeindeverwaltung nach Recyclingstellen.
20
DE
5.Problembehebung
Bei Problemen mit diesem Receiver oder seiner Installation lesen Sie bitte zunächst die
entsprechenden Punkte in der Bedienungsanleitung und dann die Vorschläge in der
Störungserkennung.
Problem
Mögliche Ursache
Lösung
Kein Bild
Netzversorgung nicht
angeschlossen
Netzversorgung
anschließen
Gerät nicht eingeschaltet
Gerät einschalten
Bildschirm zeigt
No Signal
DVB-S-Kabel nicht
angeschlossen
DVB-S-Kabel
anschließen
Falsche Einstellung
Korrekte Einstellungen
vornehmen
Keine oder falsche
Verbindung mit Audiokabel
Schließen Sie das
Audiokabel korrekt an
Ton ist stummgeschaltet
Schalten Sie den Ton
wieder ein
Falscher Soundtrack
Stellen Sie einen anderen
Soundtrack ein
Keine oder falsche
Verbindung mit dem
AV-Kabel
Schließen Sie das
AV-Kabel korrekt an
Der Kanal ist ein Radiokanal
Drücken Sie
<TV/RADIO>, um in den
TV-Modus zu wechseln
Batterie verbraucht
Wechseln Sie die Batterie
aus
Die Fernbedienung ist nicht
auf das Gerät gerichtet oder
zu Weit entfernt
Halten Sie die
Fernbedienung auf das
Gerät, nicht zu Weit
entfernt
Empfang ist zu schwach
Verstärken Sie den
Empfang
Kein Ton aus den
Lautsprechern
Nur Ton, kein Bild auf
dem Bildschirm
Fernbedienung
funktioniert nicht
Das Bild bleibt stehen,
„Mosaik“-Effekt
21
DE
6.Technische Daten
Komponente
Spezifikation
Tuner
Frequenzbereich
Demodulation
Anschlüsse
Leistung
Anzeige
Dekodiereung
950 MHz bis 2150 MHz
Eingangs-Impedanz
75 Ohm unsymmetrisch
Eingangssignal
-65 ~ -25 dBm
Symbol-Rate
2-45 Mbps
LNB-Leistung
13/18 V, Max 500 mA
Demodulator
QPSK/8PSK
FEC
1/2,2/3,3/4,5/6,7/8,8/9,9/10
LNB IN
F-Anschluss
LOOP OUT
F-Anschluss
TV SCART
Komposit TV (CVBS), RGB,Audio L/R
VCR SCART
Komposit Video,Audio L/R
COAXIAL
RCA,für SPDIF Digital Audio Output
HDMI
Für Anschluss an HDMI-fähige Geräte
RCA
CVBS, Audio L/R
Eingang
100-240 V~, 50/60Hz
Verbrauch
Max 18 W
Dekoder-Modul
PAL, NTSC
Auflösung
720X576(PAL),720X480(NTSC),720P,1080i
Bildverhältnis
4:3(Letterbox, Pan&Scan)16:9
Video
MPEG2 Transport [email protected]
MPEG4 AVC/H.264 HP@L4
Weiteres
Audio
MPEG2 Audio Layer I&II
Standard
ETSI/EN 300421 DVB-S konform
Tonmodus
Rechts, Links, Stereo
* Änderung der Spezifikationen, auch ohne Vorankündigung, vorbehalten.
22
Content
EN
Important Safety Instructions............................................................................ 4
1 Front and Rear Panel ......................................................................................................... 6
1.1 Front Panel............................................................................................................... 6
1.2 Rear Panel ............................................................................................................... 6
2 Remote Control................................................................................................................... 7
2.1 Key introduce ........................................................................................................... 7
2.2 Installing the Batteries.............................................................................................. 8
2.3Using the Remote Control......................................................................................... 8
3 Connections........................................................................................................................ 9
4 First Time Installation.......................................................................................................... 9
4.1 Program Manage Settings .......................................................................................10
4.1.1 Program Edit..................................................................................................10
4.1.2 EPG (Electronic program guide) ..................................................................11
4.1.3 Sort ...............................................................................................................12
4.2 Picture Setting.........................................................................................................12
4.2.1 Aspect Ratio .................................................................................................12
4.2.2 Resolution.....................................................................................................12
4.2.3 TV format......................................................................................................12
4.2.4 Video output .................................................................................................12
4.3 Channel Search ......................................................................................................12
4.3.1 Satellite........................................................................................................ 13
4.3.2 Transponder ................................................................................................ 15
4.4 Time Setting ........................................................................................................... 16
4.5 Option..................................................................................................................... 17
4.6 System ................................................................................................................... 17
4.6.1 Set Password .............................................................................................. 17
4.6.2 Restore Factory Default .............................................................................. 17
4.6.3 Information................................................................................................... 18
4.6.4 Recall List .................................................................................................... 18
4.6.5 Software update ..........................................................................................18
4.7 USB ........................................................................................................................18
4.7.1 Multimedia ..................................................................................................18
4.7.2 Photo configure ..........................................................................................19
4.7.3 Movie Configure ..........................................................................................19
4.7.4 PVR Configure............................................................................................. 20
4.7.5 Time Shift .................................................................................................... 20
5.Troubleshooting ................................................................................................................ 21
6.Technical Specifications....................................................................................................22
3
Important Safety Instructions
1) Read these instructions.
EN
2) Keep these instructions.
3) Heed all warnings.
4) Follow all instructions.
5) Do not use this apparatus near water.
6) Clean only with dry cloth.
7) Do not block any ventilation openings, install in accordance with the instructions.
8) Do not install near any heat sources such as radiations, heat registers, stoves, or other apparatus
(including amplifiers) that produce heat.
9) Do not defeat the safety purpose of the polarized plug. If the
provided plug does not fit into your outlet, consult an electrician for replacement of the obsolete outlet.
10) Protected the power cord from being walked on or pinched particularly at plugs, convenience
receptacles, and the point where they exit from the apparatus.
11) Only use attachments/accessories specified by the manufacturer.
12) Unplug this apparatus during lighting storms or when unused for long periods of time.
13) Refer all servicing to qualified service personnel. Servicing is required when the apparatus has been
damaged in any way, such as power-supply cord or plug is damaged, liquid has been spilled or objects
have fallen into the apparatus, the apparatus
has been exposed to rain or moisture, does not operate normally, or has been dropped.
14) Mains plug is used as the disconnect device, the disconnect device shall remain readily operable.
15) The ventilation should not be impeded by covering the ventilation openings with items, such as
newspapers, table-cloth, curtains, etc.
16) No naked flame sources, such as lighted candles, should be placed on the apparatus.
17) Attention should be drawn to the environmental aspects of battery disposal.
18) The use of apparatus in moderate climate.
19) The apparatus shall not be exposed to dripping or splashing and that no objects filled with liquids, such as
vases, shall be placed on the apparatus.
WARNING: To reduce the risk of fire or electric shock, do not expose this apparatus to rain or moisture.
WARNING: The batteries shall not be exposed to excessive heat such as sunshine, fire or the like.
The symbol indicates that dangerous voltages constituting a risk of electric shock are present within
this unit.
The symbol indicates that there are important operating and maintenance instructions in the
literature accompanying this unit.
The symbol indicates that this product incorporates double insulation between hazardous mains
voltage and user accessible parts. When servicing use only identical replacement parts.
4
EN
CAUTION: When the apparatus was in electrostatic circumstance, it may be
malfunction and need to reset by user.
WARNING: The USB memory stick should be plugged in the unit directly.
USB extension cable should not be used to avoid failing of data transferring
and interference caused.
Battery Recycling
In order to ensure the environmently friendly disposal of batteries,
please do NOT dispose of used batteries through normal household
waste. Please take the batteries to your local retail or community
collection point for recycling.
The following may be an indication of a discharged battery: The device
cannot be switched on. The device switches off automatically
and "Battery Empty" is shown in the display. The device and or battery
do not function properly.
5
1 Front and Rear Panel Illustration
EN
1 Front and Rear Panel
1.1 Front Panel
1.USB JACK: Used to connect to an external USB 2.0 device.
2.REMOTE CONTROL SENSOR: Used to receive the signal from the remote control.
3.LED DISPLAY: Used to display the time or channel information.
4.VOLUME DOWN: Used to decrease the volume without using the remote control.
5 CHANNEL UP: Selects the previous Channel. without using the remote control.
6 CHANNEL DOWN: Selects the next Channel. without using the remote control.
7 STANDBY: Used to switch the set top box to on or standby.
8.VOLUME UP: Used to increase the volume without using the remote control.
1.2 Rear Panel
1 LOOP OUT: This socket will bypass the RF signal to another STB.
2 LNB IN: Used to connect the LNB to receive the signal.
3 CVBS: This socket outputs composite video signal.
4 COAXIAL: This socket connects to a coaxial socket on your surround sound system.
5 AUDIO L/R: This socket outputs analog audio L/R signal.
6 TV SCART: This socket connects to your TV.
7 VCR SCART: This socket connects to either a DVD or other video system.
8 HDMI: This socket connects to HDMI in device.
9 MAINS CABLE: This is used to connect to your main power supply.
If possible, please connect USB devices directly to the USB
interface.
If this is not possible, use only USB extension cables not exceeding 25 cm.
6
2.
Remote Key Function:
28
29
5)
6)
7)
8)
9)
10)
11)
12)
13)
14)
15)
16)
17)
18)
19)
20)
21)
22)
23)
24)
MUTE: Mute or Restore Audio Output.
INFO: Displays additional channel information.
TTX: Displays Teletext Information.
DTV/VCR: Switches the product to VCR input if
it is in DTV state. Switches the product to DTV if
it is in VCR state.
SUBTITLE: Selects Subtitles Language.
EXIT: Exits the current Menu or returns to the
previous Menu.
OK: Confirms an entry or selection. Displays
the list of channels.
RIGHT / LEFT: Navigates through the Menus.
Increases or decreases volume.
TV/RADIO: Switches from TV function to Radio
function and from Radio to TV.
RECALL: Used to switch between the last two
viewed channels.
GOTO: Selects the play time of media.
PREV: Skips to the previous track during
playing media.
NEXT: Skips to the next track during playing
media.
REPEAT: Selects Repeat or turn off Repeat mode.
STOP: Stops media play.
STANDBY: Switch the product to on or standby.
EPG: (Electronic Program Guide)Turns the program guide on.
AUDIO: Selects an Audio Language or Audio Mode.
UP / DOWN: Navigates through the Menus. Selects the next or previous Channel.
MENU: Turns on Main Menu.
FAVOURITE: Turns on Favourite Menu.
0-9 (Numeric Buttons): Selects a channel or setting.
FWD: Searches forwards during media play.
REV: Searches backwards during media play.
7
EN
2.1 Key introduce
1)
2)
3)
4)
EN
25) PLAY: Starts or resumes media play.
26) PAUSE: Pauses media play.
27) COLOUR BUTTONS:
c RED: Find function;
d Green: witch resolution;
e Yellow: Switch aspect ratio;
f Blue: Timer setting;
28) REC: Used to record the program.
29) LIST: Used to show the record program list on the current disk.
2.2 Installing the Batteries
Remove the battery cover from the Remote Control and put 2xAAA size batteries inside the
compartment.
The diagram inside the Battery Compartment shows the correct way to install the batteries.
1.Open the cover
2.Install batteries
3.Close the cover
2.3Using the Remote Control
To use the Remote Control, point it towards the front of the Digital Set Top Box. The
Remote Control has a range of up to 7 metres from the Set Top Box at an angle of up to 60
degrees.
The Remote Control will not operate if its path is blocked. Sunlight or very bright light will
decrease the sensitivity of the Remote Control.
8
Caution: Make sure to check the voltage specification of the wall outlet is the same rating
with the receiver. To prevent the risk of electric shock, do not open the cover or the back of
the receiver.
Note: When connecting the receiver to other equipment, e.g., TV, VCR and amplifier, make
sure to refer to relevant user manual for instruction. Also, make sure you disconnect all the
equipments from the mains supply before the connection.
VIDEO AUDIO TV SCART HDMI
SATELLIT STB
Digitaler Verstärker
4 First Time Installation
After all connections have been made properly, switch on TV and make sure the receiver is
connected to the Main Power. Press Power button to switch receiver on. If you are using
the receiver for the first time or restored to Factory Default, the Main Menu will appear on
y our TV screen.
9
EN
3 Connections
EN
(1) Select [OSD Language] and press RIGHT/LEFT key to select an language.
(2) Select [Dish Setup] and press RIGHT/LEFT/OK to Dish Setup menu.
(3) Once channel tuning is complete, you are now ready to watch TV.
4.1 Program Manage Settings
To access the Menu, press the MENU button and
select [Program].The Menu provides options to
adjust the Program Manage Settings. Select an
option and press OK or RIGHT to adjust that setting.
Press the EXIT button to exit the Menu.
Dish Setup
4.1.1 Program Edit
To edit your program preferences (lock, skip, favourite, move or delete), you will need to
enter the Program Edit Menu. This Menu requires a password to access. Enter the default
password '000000'
Set Favourite Program
You can create a short list of favourite programs that you
can easily access. Set Favourite TV or Radio program:
Default
1. Select the preferred program then press the
FAVOURITE button. A heart-shaped symbol will appear
and the program is marked as a favourite.
2. Repeat the previous step to select more Favourite
programs.
3. To confirm and exit the Menu, press the EXIT key Disable favourite TV or Radio
Program; Press the FAVOURITE button on the Remote Control with the heart-shaped
symbol.
View Favourite Program
1. Press the Favourite button and the Favourite
Menu will appear.
2. Press UP/ DOW N to select your Favourite
Programs.
3. Press OK to select your favourite program.
10
0009 CANAL+
0010 TPS STAR
0011 CANAL J
0012 PLANETE
0013 CANAL+ SPORT
0014 CANAL+ CINE MA
0015 CANAL J
0016 PLANETE
SAT: ASTRA 1H,1KR,1L
TP: 4151/H/19636
PDI: A 96/V 164
FAV: Disable
Skip TV or Radio Program
1. Select the program you would like to skip and press the GREEN button. A skip symbol is
displayed. The program is marked as a skip.
2. Repeat the previous step to select more programs.
3. To confirm and exit the menu, press EXIT key. Disable a skip TV or Radio program:
Press the GREEN button on the skip program with the skip symbol.
Move a TV or Radio Program
1. Select the preferred program then press the RED button. A move symbol will appear.
2. Press UP/DOWN to move the program.
3. Press OK to confirm.
4. Repeat the above steps to move more channels.
Lock Program
You can lock selected programs for restricted view. Lock a TV or Radio Program:
1.Select the preferred program then press the YELLOW button. A lock- shaped symbol is
displayed. The program is now marked as locked.
2. Repeat the previous step to select more programs.
3. To confirm and exit the menu, press the EXIT button.
4. Press the YELLOW button to disable the locked program.
5. To view the locked program, you will be require to
Program Guide
Sun. 26 jan 2008 11:26
/
enter either the default password '000000' or your last set
password.
003 3 24
4.1.2 EPG (Electronic program guide)
26jan 11:10-11:30EI media ambient
26jan 11:30-12:00EI Noticies 3/24
26jan 12:00-12:22EI Noticies 3/24
26jan 12:22-12:30EI Canal Parlament
26jan 12:30-13:00EI Noticies 3/24
26jan 13:00-13:30EI Noticies 3/24
26jan 13:30-14:00EI Noticies 3/24
26jan 14:00-14:30EI Noticies 3/24
26jan 14:30-15:30EI Telenoticies migida
26jan 15:30-16:00EI Valor afegit
26jan 16:00-16:20EI Noticies 3/24
Les conarcues de muntanya
viuen una clara represa
economica en eis ultims anys
The EPG is an on-screen TV guide that shows scheduled
programs seven days in advance for every tuned channel.
Press the EPG button on the Remote Control to access
guide. You can use the UP/DOWN key to select the
preferred program. If there is more than one page of information, use the BLUE button for
page up and the YELLOW button for page down .
OK
Book
INFO
Book List
Page Down
Page:1/3
Page Up
11
EN
Delete a TV or Radio Program
1. Select the Program and then press the BLUE button, A message will appear. Press OK
to delete the program.
2. Repeat the previous step to select more programs to delete.
4.1.3 Sort
EN
Sort your channels f rom the f ollowing o ptions:
[Default]- remain the original order.
[Encrypt]- Sort the channels in encrypt m ode.
[Service Name]- Sort the c hannels i n alphabetical order.
[Service ID]- Sort the channels according to the service id.
4.2 Video Setting
To access the Menu, press MENU then select
[Video]. The Menu provides options to adjust the
video settings. Press UP/DOWN to select an option
and press RIGHT/LEFT to adjust that setting. Press
EXIT to exit the menu.
4.2.1 Aspect Ratio
You must set the display format to either 4:3 Pan Scan,
4:3 Letter Box , 16:9 Wide Screen or Auto to get the maximum display when watching TV.
4.2.2 Resolution
If the video does not appear correctly, change the setting. This setting is to match the most
common setting for HDMI. [480i]: for NTSC system TV. [480P]: for NTSC system TV. [576i]
for PAL system TV. [576P]: for PAL system TV. [720P]: for NTSC or PAL system TV. [1080I]:
for NTSC or PAL system TV.
4.2.3 TV format
If the video does not appear correctly, you need to change the settings. This should match
the most common setting for TVs in your country.[NTSC]: for NTSC system TV. [PAL]: for
PAL system TV. [Auto] :set TV format according to the stream automatically.
4.2.4 Video output
[CVBS]: CVBS output. [RGB]: RGB output.
4.3 Channel Search
To access the menu, press MENU and select
[Search Channel]. The Menu provides options to
adjust the Search Channel settings. Select an option
12
and press RIGHT/LEFT to adjust the settings. Press EXIT to exit the Menu
EN
4.3.1 Satellite
Configure the settings of satellites.
Satellites' list: Press Up/Down to select a satellite, whose settings will be shown at right
side.
LNB Type: Press LEFT/RIGHT/OK to show the list of LNB Types which is shown as
frequencies of local oscillator. You also can enter frequency by User Single, User Dual at
bottom of the list.
Satellite
001
002
003
004
005
006
007
008
013.0E Ku HOTBIRD6
019.2E Ku_ASTRA 1H
028.2E Ku_ASTRA 2A
023.5E Ku_ASTRA 1E
007.0W Ku_NILESAT 1
007.0E Ku_EUTELSAT
010.0E Ku_EUELSAT
026.0E Ku_badr-2,3.
Ku_ASTRA 1H,1KR,1L,1M
09750/10600
LNB Type
LNB Power
13/18V
22KHz
Auto
Toneburst
None
DiSEqC1.0
None
DiSEqC1.1
None
Motor
None
Satellite
001
002
003
004
005
006
007
008
013.0E Ku HOTBIRD6
019.2E Ku_ASTRA 1H
028.2E Ku_ASTRA 2A
023.5E Ku_ASTRA 1E
007.0W Ku_NILESAT 1
007.0E Ku_EUTELSAT
010.0E Ku_EUELSAT
026.0E Ku_badr-2,3.
Ku_ASTRA 1H,1KR,1L,1M
LNB Type
09750/10600
9750/10600
9750/10750
05150
05750
09750
10600
10750
Quality
GOTO
TransPonder
EXIT
EXIT
OK
Select
Edit
Add
Delete
Scan
LNB Power: Press LEFT/RIGHT to set the LNB power.
22K: Press Left/Right to switch on or off the 22K,which is set with auto when LNB Type is
dual local oscillator.
Toneburst: Enable or Disable the toneburst switcher.
DiSEqC1.0: select the right port up to 4 for the right LNB.
DiSEqC1.1: select the right port up to 16 for the right LNB.
Motor: Press LEFT/RIGHT to select DiSEqC1.2 or DiSEqC1.3. Then Press OK to show the
menu to set position.
DiSEqC1.2: Move the motor to a right position to lock the signal.
DiSEqC1.3: Move the motor according to the local and satellite positions.
Move Auto: Press LEFT/RIGHT to start to move West/East. It will be stopped automatically
when the signal is locked.
Move Continue: Press LEFT/RIGHT to start to move West/East. It will keep moving until
you stop it.
Move Step[1]: Press LEFT/RIGHT to move just a step.
Store Position: store current position of motor.
13
Goto Position: Press LEFT/RIGHT to goto the position stored.
Goto Reference: Rest all the positions.
Goto X: goto the position calculated from the local and satellite positions.
EN
Satellite
001
002
003
004
005
006
007
008
Set Position
Ku_ASTRA 1H,1KR,1L,1M
013.0E Ku
HOTBIRD6
Move
Auto
019.2E Ku_ASTRA
1H
Move Continue
028.2E Ku_ASTRA
Move Step(2A
1)
023.5E Ku_ASTRA
1E
Store Position
007.0W Goto
Ku_NILESAT
Position 1
007.0E Ku_EUTELSAT
Goto Reference
010.0E Ku_EUELSAT
026.0E Ku_badr-2,3.
LNB Type
STOP
09750/10600
STOP
LNB Power
13/18V
22KHzSTOP
Auto
Toneburst
None
DiSEqC1.0
None
DiSEqC1.1
None
Motor
None
001
002
003
004
005
006
007
008
Satellite
Set Ku_ASTRA
Position
1H,1KR,1L,1M
09750/10600
013.0E Ku HOTBIRD6
Move Auto LNB Type STOP
019.2E Ku_ASTRA
1H
Move Continue
STOP
13/18V
LNB Power
028.2E Ku_ASTRA
2A
Move Step(1) 22KHz
STOP
Auto
023.5E Ku_ASTRA
1E
Store Position
None
Toneburst
007.0W Ku_NILESAT
1
Goto Position
DiSEqC1.0 None
007.0E Ku_EUTELSAT
Goto Reference
DiSEqC1.1 None
010.0E Ku_EUELSAT
GotoX
None
Motor
026.0E Ku_badr-2,3.
Quality
Add satellites: Press Red to add a new
satellite, in which you must input an unique
longitude, and edit the satellite's name with
soft keyboard.
Edit satellites: Press Green to edit the
focused satellite.
Delete satellite: Press Yellow to delete the
focused satellite. Press OK to confirm.
Single Satellite Scan: Press Blue to pop the
menu of scanning settings.
Scan Mode: Press Left/Right to select
default, which scan the default
transponders built in, Blind Scan and
NetWork, which scan with NIT on.
Crytped: Press Left/Right to select All
Channels or FTA Channels;
Service Type: Press Left/Right to select
ALL , DTV or Radio.
Press OK to start scanning with the above
settings.
14
Quality
001
002
003
004
005
006
007
008
Satellite
Edit
Ku_ASTRA
1H,1KR,1L,1M
09750/10600
LNB Type
013.0E Ku HOTBIRD6
002
No.
019.2E Ku_ASTRA 1H
LNB Power 13/18V
ASTRA 1H, 1
Satellite Name
028.2E Ku_ASTRA 2A
Auto
22KHz
East
Longitude
023.5E Ku_ASTRA
1E Direction
None
Toneburst
007.0W Ku_NILESAT 1
019.2
Longitude Angle
None
DiSEqC1.0
007.0E Ku_EUTELSAT
None
DiSEqC1.1
Ku
Band
010.0E Ku_EUELSAT
None
Motor
026.0E Ku_badr-2,3.
Quality
Satellite
001
002
003
004
005
006
007
008
Channel
Search 1H,1KR,1L,1M
Ku_ASTRA
013.0E Ku HOTBIRD6
Scan Mode
019.2E Ku_ASTRA 1H
Crypted
028.2E Ku_ASTRA 2A
Service 1E
Type
023.5E Ku_ASTRA
007.0W Ku_NILESAT 1
007.0E Ku_EUTELSAT
010.0E Ku_EUELSAT
026.0E Ku_badr-2,3.
Quality
LNB Type
Default
09750/10600
LNB Power
13/18V
22KHz
Auto
All Channels
All
Toneburst
DiSEqC1.0
None
None
DiSEqC1.1
None
Motor
None
EN
Multi-Satellites Scan: Press OK to select satellites with the mark" 9 “,then press
blue to pop the menu of scanning setting. After Configuring like single satellite scan,
press OK to start multi-satellites scan.
Channel Search
Scan the satellites or Transponders according the configurations.
Channel Search
Satellite
001
002
003
004
005
006
007
008
013.0E Ku HOTBIRD6
019.2E Ku_ASTRA 1H
028.2E Ku_ASTRA 2A
023.5E Ku_ASTRA 1E
007.0W Ku_NILESAT 1
007.0E Ku_EUTELSAT
010.0E Ku_EUELSAT
026.0E Ku_badr-2,3.
Ku_ASTRA 1H,1KR,1L,1M
09750/10600
LNB Type
LNB Power
13/18V
22KHz
Auto
Toneburst
None
DiSEqC1.0
01/01 HOTBIRD 6,7A,8
10829MHz V 3333kbps
DTV:0000
Radio:0000
None
DiSEqC1.1
None
Motor
None
Quality
2%
Pro gre ss
GOTO
TransPonder
EXIT
EXIT
OK
Select
Edit
Add
Delete
Scan
Blind Scan
First scan the band to get the transponders which can be locked. After gathering
all Transponders, Scan the transponders one by one to get the programs.
Channel Search
Channel Search
01/01 ASTRA 1H,1KR,1L,1M
01/01 ASTRA 1H,1KR,1L,1M
H/L-LOF 12364MHz
10744MHz V 22000kbps
DTV:0000
TransPonder
Pro gre ss
4%
Pro gre ss
Radio:0000
2%
4.3.2 Transponder
Press GOTO to switch the list to show transponders of the focused satellite. Also
you can press GOTO to switch back to satellites' list.
Add transponder: Press Red to add a new transponder. It can't save an existing
TP under the same satellite.
15
EN
Edit transponder: Press Green to edit the focused transponder. It can't save an
existing TP under the same satellite.
Delete transponder: Press Yellow to delete the focused transponder. Press OK
to confirm.
TransPonder
001
002
003
004
005
006
007
008
Ku_EUTELSAT W3A
09750/10600
LNB Type
10928 V 30000
11345 V 27500
11471 V 30000
11513 V 27500
11554 V 27500
11595 V 30000
011637 V 3000
11679 V 30000
LNB Power
13/18V
22KHz
Auto
Toneburst
None
DiSEqC1.0
None
DiSEqC1.1
None
Motor
None
Quality
GOTO
Satellite
EXIT
EXIT
TransPonder
001
002
003
004
005
006
007
008
10928 V 30000
11345 V TransPonder
27500
11471 V 30000
11513 V Frequency
27500 :
11554 V Symbol
27500
11595 V Polarity
30000
011637 V 3000
11679 V 30000
Ku_EUTELSAT W3A
Type
09750/10600
Add
LNB
LNB
019
Power
22KHz
11471
Toneburst
3000
DiSEqC1.0
V
13/18V
Auto
None
None
DiSEqC1.1
None
Motor
None
Quality
OK
Select
Edit
Add
Delete
Scan
Single Transponder Scan: Press Blue to pop the menu of scanning setting. After
configuring the settings, Press OK to start scanning.
Multi-Transponder Scan: Press OK to select transponders with the mark " 9 ",
then press blue to pop the menu of scanning setting. After Configuring
the settings, press OK to start multi-transponder scanning.
4.4 Time Setting
To access the Menu, press MENU then select [Time]. The Menu provides options to adjust
the time settings. Press UP/DOWN to select an option and press RIGHT/LEFT to adjust
the settings. Press EXIT to exit the menu.
(1)Time Auto: update time with the stream time,
or NOT.
(2)Time Zone: Select the Time Zone Offset.
Time
(3)Date: show and set the system date.
Time Auto
On
Time Zone
GMT +5
(4)Time: show and set the system time.
Date
01/01/2000
Time
05:05
(5)Sleep: If this setting is off, this function
Sleep
Off
does not work. If this setting is not off, a
message will pop up after your preferred
time to inform you, that the device will go in to
sleep mode. This message will appear
under no any operation. Auto-off function can be set in a time period at 0-12 hours.
16
EN
Standard setting is off. Press STANDBY button to exit sleep/auto-off mode.
4.5 Option
To access the Menu, press MENU and select [Option]. The menu provides options to
adjust the OSD Language, Subtitle Language and Audio Language. Select an option and
press RIGHT/LEFT to adjust the setting.
Press EXIT to exit the Menu.
(1) OSD Lan guage: Select an O SD language.
(2) Audio Language: Select the preferred
audio language for watching TV channels.
If the language is not available, the default
program language will be used.
(3) Subtitle Language: Select the preferred
subtitle language.
4.6 System
To access the Menu, press MENU and select
[System].The menu provides options to adjust
the system settings. Press the UP/DOWN key
to select an option and press RIGHT/LEFT to
adjust the setting. Press EXIT to exit the Menu .
Recall List
Off
Software Update
4.6.1 Set Password
Set or c hang e t h e p assw or d f or l ocked
programs. Enter your old password or the
default password '000000'. You will then be asked to enter your new password. To confirm
re-enter your new password. Once it is confirmed, press EXIT to exit the Menu.
4.6.2 Restore Factory Default
Reset your Set Top Box to the Default Factory Settings. In Main Menu select [Restore
Factory Default] and press OK or RIGHT to select. Enter your password or the default
17
password '000000' and press OK to confirm. This option will delete all preset channels and
settings.
EN
4.6.3 Information
View model, hardware and software information.
4.6.4 Recall List
enable or disable Recall list function, which support
multi-recall -program switching.
4.6.5 Software update
select to start software update if USB is connecting and there's a upgrading file.
4.7 USB
To access the Menu, press the MENU button and select [USB]. The menu provides options
to playback Music and Photo files, it can support MP3, WMA, JPEG, BMP files, The unit
will only support USB device with FAT and FAT32 file system. It will not support NTFS file
system.
4.7.1 Multimedia:
if no USB device plugged into it, a warning message "No USB Device is Found" displays,
otherwise you can select the Music or Photo type in this menu and press OK to enter the
file browser and select the file to playback
Multimedia
C / PV RREC ORD
Page 01/01
PVRRECORD
MTC _ MSD7828 _ DH2836 . AP
Music
Select
Photo
Movie
EXIT EXIT
PVR
Move
Select
18
Move
Recall
Up Folder
EN
If possible, please connect USB devices directly to the DYON Level's US
interface.
B
If this is not possible, use only USB extension cables not exceeding 25 cm.
4.7.2 Photo configure:
-Slide Time: adjust slide show interval to 1~8 seconds .
-Slide Mode: adjust slide show effect as mode 0~59 or random.
-Aspect Ratio: Keep displays the picture as its original aspect, Discard displays the picture
in full screen mode.
Photo Config ure
4.7.3 Movie Configure
- Subtitle Specific:
[Small]: Displays t he subtitle as small mode.
Slid e Time
85
Slid e Mode
15
Aspect Ratio
Disc ard
[Normal]: Displays the subtitle as normal mode.
[Big]: Displays the subtitle as big mode.
- Subtitle BG:
[W hite]: Displays the subtitle in white background.
[Transparent]: Displays the subtitle in transparent background.
[Grey]: Displays the subtitle in grey background.
[Yellow green]: Displays the subtitle in yellow green background.
- Subtitle Font Color:
[Red]: Displays Subtitle in red font.
[Blue]: Displays Subtitle in blue font.
[Green]: Displays Subtitle in green font.
Note:
- We cannot guarantee compatibility (operation and/or bus power) with all USB mass
storage devices and assumes no responsibility for any loss of data that may occur when
connected to this unit.
- With large amounts of data, it may take longer for the system to read the contents of a
USB device.
- Some USB devices may not be properly recognized.
- Even when they are in a supported format, some files may not play or display depending
on the content.
EXIT
EXIT
19
4.7.4 PVR Configure
EN
[Record Device]: Select the disk for the record.
[Format]: Format the selected disk.
4.7. 5 Timeshift
Press PAUSE to start timeshift with USB connected and enough free space.
Press PLAY/PAUSE to resume the service playing from the pause moment.
Press REW/FWD to review/forward the service playing. If reviewing
reaches the beginning, it will resume to play, and if forwarding reaches
the end, it will change to record mode. Press PAUSE to enter timeshift
again , Press STOP to stop timeshift function.
Tips regarding environmental protection
At the end of its operating life, this product may not be disposed of by way of
your normal household waste. Instead it must be delivered to a collection
point for recycling electrical and electronic equipment. The icon on the
product, in the operating instructions or on the packaging, indicates this.
The materials used in manufacturing this product are recyclable, depending
on their identifying markings. By recycling this equipment, by recycling its
components, or through other procedures of re-using outdated equipment,
you are making an important contribution to protection our environment.
Please ask you local municipal administration for the location of the
corresponding recycling point.
20
If you experience problems with this receiver or its installation, in the first instance
please read carefully the relevant sections of this User Manual and this Troubleshooting
section.
Problem
Potential Reasons
What to do
No picture
Power isn't connected
Connect the power
The power switch is not on
Switch on the power
Screen shows
No Signal
Not connect
Plug in the DVB-S cable
Incorrect setting
Set up correct parameter
No sound from
Speaker
No or incorrect connection
with audio cable
Connect the audio cable
correctly
Mute the sound
Switch on the correct
volume control
DVB-S cable
Incorrect sound track
Try another sound track
Only sound,
no image on the
screen
No or incorrect connection
with AV cable
Connect the audio cable
correctly
The program is a radio
program
Press <TV/RADIO> key
to shift into TV mode
Remote control
unit is not workable
The battery is exhausted
Change new battery
Remote control unit is not
in the right opposite of the
front panel or too far from it
Adjust the way of holding
remote control unit and
near from the panel
The image stop
suddenly or mosaic
The signal is too weak
Strengthen the signal
21
EN
5.Troubleshooting
6.Technical Specifications
EN
Item
Specification
Tuner
Frequency Range
950MHz to 2150MHz
Input Impedance
75Ohms unbalanced
Demodulation
Connections
Power
Display
Decoding
Signal Input Level
-65 ~ -25dBm
Symbol Rate
2-45Mbps
LNB Power
13/18V,Max 500mA
Demodulator
QPSK/8PSK
FEC
1/2,2/3,3/4,5/6,7/8,8/9,9/10
LNB IN
F connector
LOOP OUT
F connector
TV SCART
Composite TV(CVBS),RGB,Audio L/R
VCR SCART
Composite Video,Audio L/R
COAXIAL
RCA,for SPDIF digital audio output
HDMI
Connects to HDMI in device.
RCA
CVBS,Audio L/R
Input
100-240V~ 50/60Hz
Consumption
Max 18W
Decoder Module
PAL,NTSC
Resolution
720X576(PAL),720X480(NTSC),720P,1080i
Aspect Rate
4:3(Letterbox,Pan&Scan)16:9
Video
MPEG2 Transport [email protected]
MPEG4 AVC/H.264 HP@L4
Others
Audio
MPEG2 Audio Layer I&II
Compliance
ETSI/EN 300421 DVB-S compliant
Sound Mode
Right,Left,Stereo
* Specifications are subject to change without further notice.
This symbol on the product or in the instructions means that your electrical and electronic
equipment should be disposed at the end of life separately from your household waste. There are
separate collection systems for recycling in the EU. For more information, please contact the local
authority or your retailer where you purchased the product.
22