1
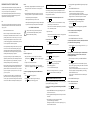
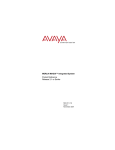
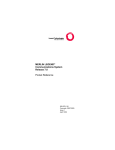
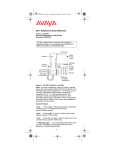
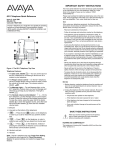
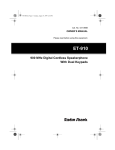
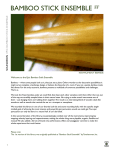
S
8101, 8101M, 8102M, 8103, 8104, 8110M and 8111
Telephones Quick Reference
Data jack
Labeling
designation
card
Handset
Flash
button
Adjunct
(equipment)
jack
Data jack
THIS NUMBER
Flash
Redial
Hold
Redial button
Hold light
Program
button
PROGRAM
Pause button
PAUSE
Programmable
Dialing buttons
Handset
Flash
button
Redial button
THIS NUMBER
Flash
Redial
Hold
Hold button
1
Handset
jack
ABC
2
DEF
3
GHI
JKL
MNO
PQRS
TUV
WXYZ
*
OPER
#
4
7
5
8
O
ABC
1
6
9
Message
Message light
Handset
jack
DEF
2
JKL
MNO
TUV
WXYZ
*
OPER
#
7
Positive
Disconnect
(on 8101 and
8103 only)
Pulse/Tone
Mode (on
8101/8103 only)
Routing
channels
Line jack
Ringer volume
Hold light
The Message Light — a red light which flashes when a message has
been left for you.
5
Message light
The Adjunct Equipment Jack (only on the 8102M and 8104) — for
connecting adjunct equipment such as a speakerphone or headset to
your telephone.
6
8
9
O
Message
Dial pad
The 8101 and 8103 Telephones, Top View
The 8101, 8101M, and 8103
Speaker volume
control (on
8110M/8111 only)
The Adjunct Power Jack (only on the 8102M and 8104) — for
connecting an auxiliary power source for using adjunct equipment
such as headsets or speakerphone.
Tone selector
(Fast/Slow)
The Data Jack — for connecting a device such as a modem to your
telephone.
The 8102M and 8104 Telephones, Top View
Tone selector (Lo/Hi)
Data jack
Data jack
Handset
Program
button
Handset
Labeling
designation
card
THIS NUMBER
Flash button
Flash
Handset
jack
1
ABC
2
DEF
GHI
JKL
MNO
TUV
WXYZ
*
OPER
#
7
5
8
O
6
9
Dial pad
Pause button
Message
Message light
Handset
jack
PAUSE
Programmable
Dialing buttons
THIS NUMBER
Flash
Redial
Speaker
Mute
1
3
PQRS
4
Flash
button
Speaker
button
The 8102M, 8104, 8110M, and 8111
PROGRAM
ABC
2
Hold
Auto
DEF
3
GHI
JKL
MNO
PQRS
7
TUV
8
WXYZ
*
OPER
#
4
5
O
The Speaker Button (only on the 8110M and 8111) — for accessing
the built-in speakerphone and microphone combination. To turn off
the microphone on the speakerphone, press Mute .
Hold button
Ringer
volume
Dial pad
The FLASH Button — press the FLASH button instead of pressing
the switchhook for features such as Conference with business
communications systems, and for custom calling features if you are
using your telephone at home.
3
GHI
PQRS
4
Special Features:
Adjunct power jack
(on 8102M and
8104 only)
6
9
Message
Dial pad
The 8101M Telephone, Top View
The 8110M and 8111Telephones, Top View
Hold button
Hold light
Redial button
Auto Answer
button
Mute button
Message light
Side and Bottom Views of the 8101, 8101M, 8102M, 8103, 8104,
8110M, and 8111
There are two Tone Selectors: The one marked HI and LO is used for
selecting one of two tone ringer frequencies. The one marked FAST
and SLOW is used for selecting one of two tone ringer modulation
rates.
On the 8101 and 8103, the Mode Selector selects dialing mode (Pulse
or Tone). The Positive Disconnect (On/Off) switch, also on the 8101
and 8103, can be turned on to engage the Timed Disconnect feature.
For information and procedures on the Auto Answer Button, see
“Auto Answer” later in this guide. For information and procedures on
the Programmable Dialing Buttons and the Pause Button, see
“Programmable Dialing Buttons” also later in this guide.
IMPORTANT SAFETY INSTRUCTIONS
The most careful attention has been devoted to quality standards in the
manufacture of your new telephone. Safety is a major factor in the design
of every set, but, safety is YOUR responsibility too.
Please read carefully the helpful tips listed below and on the next page.
These suggestions will enable you to take full advantage of your new
telephone. Then, retain these tips for later use.
Service
1 Before cleaning, unplug the telephone from the modular wall jack. Do
not use liquid cleaners or aerosol cleaners. Use a damp cloth for
cleaning.
2 Unplug the telephone from the modular wall jack. Be sure to refer
servicing to qualified service personnel when these conditions exist:
— If liquid has been spilled into the telephone.
— If the telephone has been exposed to rain or water.
Use
— If the telephone has been dropped or the housing has been damaged.
When using your telephone equipment, the following safety precautions
should always be followed to reduce the risk of fire, electric shock, and
injury to persons.
— If you note a distinct change in the performance of the telephone.
• Read and understand all instructions.
• Follow all warnings and instructions marked on the telephone.
SAVE THESE INSTRUCTIONS
!
When you see this warning symbol on the product, refer
to the instructions booklet packed with the product for
more information before proceeding.
• This telephone can be hazardous if immersed in water. To avoid the
possibility of electric shock, do not use it while you are wet., If you
accidentally drop the telephone into water, do not retrieve it until
you have first unplugged the line cord from the modular jack. Then,
call service personnel to ask about a replacement.
• Avoid using the telephone during electrical storms in your immediate area. There is a risk of electric shock from lightning. Urgent
calls should be brief. Even though protective measures may have
been installed to limit electrical surges from entering your business,
absolute protection from lightning is impossible.
To have your 8110M or 8111 automatically answer a call
1 Press
Auto
4 To program another programmable dialing button, repeat Steps 2
and 3.
5 Press the PROGRAM button to exit.
Note: You can use the PAUSE button to program a
1.5-second pause between a dialing access number
(such as 9) and the telephone number, and for certain banking and
long-distance services. More than one pause can be entered.
To dial a number with a programmable dialing button
.
• The Auto Answer feature is active when the button is in the “up”
position and green is visible on the sides.
• When a call comes in, the built-in speakerphone on your 8110M or
8111 is automatically activated.
1 Pick up the handset, or, if you are using an 8110M,
you can press Spkr .
2 When you hear dial tone, press the appropriate programmable
dialing button.
To erase a number stored on a dialing button
2 Speak to the caller.
• When the caller ends the call, the 8110M or 8111 hangs up automatto end the call.
1 Press the PROGRAM button.
2 Press the button to be cleared twice.
3 Press the PROGRAM button or lift the handset.
To turn off the Auto Answer feature
1 Press
Auto
.
• The button reverts to the “down” position.
ANSWERING AND PLACING A CALL
Important: If you are on a bridged call, your speakerphone may not
work.
To answer or place a call
1 Pick up the handset, or, if you are using the 8110M or 8111
speakerphone, press Spkr while on-hook. (The Spkr light goes
on.)
• Never push objects of any kind into the equipment through housing
slots since they may touch hazardous voltage points or short out
parts that could result in a risk of electric shock. Never spill liquid of
3 To end the call, hang up the handset, or, if you are using the
8110M or 8111 speakerphone, press Spkr . (The Spkr light goes
off.)
• To reduce the risk of electric shock, do not disassemble this telephone. There are no user serviceable parts. Opening or removing
covers may expose you to hazardous voltages. Incorrect reassembly
can cause electric shock when the telephone is subsequently used.
The Auto Answer Button, only on the 8110M and 8111, can be used
for automatically activating the built-in speakerphone when a call
comes in. (The phone beeps to tell you the call has been answered. It
hangs up when the caller does.)
ically, or you can press Spkr
• If you suspect a natural gas leak, report it immediately, but use a
telephone away from the area in question. The telephone’s electrical
contacts could generate a tiny spark. While unlikely, it is possible
that this spark could ignite heavy concentrations of gas.
any kind on the telephone. If liquid is spilled, however, refer servicing to
proper service personnel.
AUTO ANSWER (For 8110M and 8111 Users)
2 To place a call, dial the desired number.
To mute the speakerphone microphone (for 8110M and 8111
users)
1 Press
Mute
To put a call on hold
Hold
. (The red Hold light goes on.)
To return to the held call
1 Press Hold , or, if you have hung up the handset,
pick up the handset again from the cradle.
(The red Hold light goes off.)
• You are reconnected to the other party.
Note: If you are using an 8110M or 8111, you can press
Spkr and you are reconnected to the other party.
. (The Mute light goes on.)
2 When you want to resume talking to the other party,
press Mute again. (The Mute light goes off.)
1 Pick up the handset, or, if you are using an 8110M or 8111, you
can press Spkr .
2 Press
HOLD
1 Press
To automatically redial the last number you dialed (from the dial
pad). This feature redials up to 20 digits.
PROGRAMMABLE DIALING BUTTONS
There are 12 programmable dialing buttons on which you can program
frequently dialed or emergency numbers.
To program any of the 12 programmable dialing buttons (WHILE
ON-HOOK)
1 Press the PROGRAM button to enter programming mode. (You
will hear a continuous tone.)
2 Press the programmable dialing button on which you want to store
the number.
3 Dial the number you want to program on the button,
up to 20 elements (digits and characters,
including Pause and Flash). You will hear a rapid beep if you try
to enter more than 20 elements.
Redial
.
To program a 1.5-second automatic pause for redialed numbers
(usually inserted between a dial access code, such as 9, and a
redialed telephone number)
1 While the telephone is on-hook, press the PROGRAM button.
2 Press
Redial
.
3 Press the appropriate dial access code and number of pauses in
order to insert a long enough waiting time to obtain a second dial
tone. For example, if you need
2 pauses (3.0 seconds) inserted between the access code (such as
9) and the remainder of the telephone number you are dialing,
press the PAUSE button twice.
You can enter up to three different dial access codes and pause
combinations.
4 Press the PROGRAM button again.
To erase ALL stored access codes
1 Press the PROGRAM button.
2 Press
Redial
twice.
3 Press the PROGRAM button again.
INSTALLING YOUR TELEPHONE
Wall Installation
Note: The following installation procedures are applicable for all of
the 8100 Series telephones.
Use the following directions to mount the telephone on a standard
wallphone jack with mounting studs.
1 You must reverse the handset tab (which holds the handset when
you hang up).
Table/Desk Installation
Use the 7-foot straight line cord that came with your telephone to
connect the telephone to a modular jack, and, if you are using the
8103, 8104, or 8111, you must connect the telephone with the power
supply that comes in the box with the phone.
• Hold down the switchhook and slide the handset tab up and out of
its slot.
• Turn the tab so that the curved end is facing up.
• Insert the tab back into its slot.
Line jack
on telephone
2 Turn the telephone upside down so that you can see the bottom of
the telephone.
3 Remove the mounting base by pushing in on the triangle at the
center of the large end of the base and then lifting the base off the
telephone.
4 Turn the base so the larger end is down.
Power
supply
Wall
jack
LINE
PHONE
Line cord
Power supply cord
WARNING: Do not plug the handset cord into the line jack or the
adjunct jack on the bottom of your telephone since it could damage
your handset and the telephone.
1 Turn the telephone upside down so that you can see the bottom of
the telephone.
5 Place the base on the wall-jack mounting studs and pull down
until it is secure.
6 Plug one end of the line cord into the line jack on the bottom of the
telephone.
Note: You may prefer to use an 8-inch line cord rather than the 7foot cord provided with the telephone. If you use the 7-foot cord,
you will need to place it into the back of the telephone in its
original coiled position.
7 Plug the free end of the line cord into the modular wall jack.
8 Plug one end of the coiled handset cord into the handset jack on
the side of the telephone.
9 Place the telephone against the base and push down so that the
base locking tab slides into the slot at the top of the telephone.
2 Plug one end of the line cord into the line jack on the bottom of the
telephone.
10 Push in on the triangle at the bottom center of the base to lock the
bottom of the telephone into place.
3 Feed the line cord through the line cord routing channel.
11 Plug the free end of the coiled handset cord into the handset and
hang up the handset.
4 Turn the telephone right-side up and place it on your desk or table.
5 Plug one end of the coiled handset cord into the handset jack on
the side of the telephone.
6 Plug the other end of the handset cord into the handset.
7 Hang up the handset.
8 Do one of the following:
— If you are using an 8101, 8102M, or 8110M, plug the free end
of the line cord into a modular wall jack.
— If you are using an 8103, 8104, or 8111, plug the free end of
the line cord into the PHONE jack on the power supply. Then,
plug the power supply cord into the LINE jack on the power
supply and plug the other end of the power supply cord into
the modular wall jack.
9 Lift the handset and listen for dial tone.
10 Set the Ringer Volume Control switch and the Tone Selectors to
the settings you want.
12 Lift the handset and listen for dial tone.
13 Set the Ringer Volume Control switch and Tone Selectors to the
settings you want.
Labeling and Installing the Programmable Dialing Button
Designation Card
1 Remove the plastic cover, which fits over the designation card, by
placing your finger in the finger slot on the right side of the
telephone and lifting up.
2 Place the plastic cover aside, and remove the blank designation
card from the telephone.
3 In the blank space next to the appropriate Programmable Dialing
button, write or type the name, telephone number, or dialed
feature that you want to store there.
4 Place the designation card on the telephone. Replace the plastic
cover over the card by fitting the cover’s bottom tabs into the slots
on the telephone and pressing down, allowing the tabs on the top
to snap into place.
Removing and Covering the Auto Answer Button
If you have an 8110M or 8111 telephone, you may want to disable the
Auto Answer button ( Auto ) so that it cannot be activated
accidentally. Follow this procedure to remove the Auto Answer
button and then cover the resulting opening.
Note: To complete this procedure, you will need the slot cover which
is shipped in the box with the telephone.
1 Press
Auto
so that the button is in the “up” position
2 Lift the button from its slot on the face of the telephone. (You will
probably want to use a set of needlenose pliers for this task.)
3 Take the slot cover (provided with the telephone) and place it in a
horizontal position in the empty slot. Be sure that the cap is snug
with the face of the telephone.
Using Adjunct Equipment With The 8102M or 8104
Note: The installation of adjunct equipment (such as the S201A
Speakerphone or 500A Headset Adapter) with the 8102M or 8104
telephone is different from installation with other telephones.
To connect adjunct equipment to the 8102M or 8104 telephone
1 Plug one end of the adjunct cord into the adjunct equipment.
2 Plug the other end of the adjunct cord into the Adjunct jack on the
rear of the 8102M or 8104 telephone.
3 Plug one end of the adjunct power cord into the Adjunct Power
jack on the bottom of the 8102M or 8104 telephone.
4 Plug the free end of the adjunct power cord into the adjunct power
supply.
Using the 500A Headset Adapter with the 8102M or 8104
To answer calls using the 500A Headset Adapter
Note: If a 500A headset adapter is connected to your 8102M or
8104,you may use the handset or headset adapter to answer calls.
To answer a call with the headset adapter, press the
On/Quiet button. (The green light next to the button goes on.) To
mute the handset or headset adapter, you must hold down the
On/Quiet button. (The green light next to the button stays on for as
long as the button is held down.) When you want the other party to
hear you again, you can remove your finger from the On/Quiet
button. (The light goes off.)
To end a call, press the Off button on the headset adapter.
To place a call, using the 500A Headset Adapter
To go off-hook to place a call, press the On/Quiet button and dial the
number using the dial pad, press Redial , or use the appropriate
programmable dialing button. Flash works the same with the headset
adapter as it would with a handset.
To put a call hold, with an attached headset adapter
Press Hold on the 8102M or 8104. (Note that the green light next to
the On/Quiet button on the headset adapter remains on, even though
the call is on hold.) To retrieve the held call, you must press the Off
button, and then within 2 seconds, press the On/Quiet button. (The
red Hold light on the 8102M or 8104 goes off.) If you take more than 2
seconds for this sequence of button presses, the call will be dropped.
FCC REGISTRATION AND REPAIR INFORMATION
Your new Lucent Technologies telephones have been registered with the
Federal Communications Commission (FCC). This product complies with
standards in Part 68 of the FCC rules. The FCC requires us to provide you
with the following information:
CONNECTION AND USE WITH THE NATIONWIDE
TELEPHONE NETWORK
The FCC requires that you connect your telephone equipment to the
nationwide telephone network through a modular telephone outlet or jack.
The modular telephone outlet or jack to which the telephone must be
connected is a USOC RJ11C or RJ11W. The telephone may not be used on
coin service provided by the telephone company. Connection to party lines
is subject to state tariffs. (Contact your state public utility commission or
corporation commission for information.)
INFORMATION FOR THE TELEPHONE COMPANY
Upon request of your local telephone company, you are required to provide
them with the following information: A.) Your phone number. B.) The
telephone equipment's FCC registration number and ringer equivalence
number (REN). These numbers are on the back or bottom of your
telephone equipment. The REN is useful to determine how many devices
you may connect to your telephone line and still have them ring when your
telephone line is called. At most, but not all areas, the sum of all Rent
should be 5 or less. You may want to contact your local telephone
company.
REPAIR INSTRUCTIONS
If it is determined that your telephone is malfunctioning, the FCC requires
that it not be used and that it be unplugged from the modular outlet until the
problem is corrected. Repairs can only be made by the manufacturer or its
authorized agents or by others who may be authorized by the FCC.
RIGHT OF THE TELEPHONE COMPANY
If telephone equipment is causing harm to the telephone network, the telephone
company may temporarily discontinue your telephone service. If possible,
they'll notify you before they interrupt service. If advance notice isn't practical,
you'll be notified as soon as possible. You'll be given the opportunity to correct
the problem, and you'll be informed of your right to file a complaint with the
FCC. Your telephone company may make changes in its facilities, equipment,
operations or procedures that could affect the proper functioning of your Lucent
Technologies product. If such changes are planned, you'll be notified.
INTERFERENCE INFORMATION
WARNING: Some telephone equipment generates and uses radio
frequency energy and if not installed and used properly, that is, in strict
accordance with the manufacturer's instructions, may cause interference to
radio and television reception. These telephones have been type tested and
found to comply with the limits for a Class B computing device in
accordance with the specifications in Subpart J of Part 15 of FCC Rules,
which are designed to provide reasonable protection against such
interference in a residential installation.particular installation.
However, there is no guarantee that interference will not occur in a
particular installation. If this equipment does cause interference to radio or
television reception, which can be determined by turning the equipment on
and off, the user is encouraged to try to correct the interference by one or
more of the following measures:
• Reorient the receiving television or radio antennae where this may
be done safely.
• To the extent possible, relocate the receiver with respect to the telephone equipment.
• Where the telephone equipment requires ac power, plug the telephone into a different ac outlet so that the telephone equipment and
receiver are on different branch circuits.
LUCENT TECHNOLOGIES WARRANTY
INFORMATION
to be connected to a telephone loop which is used by
the device, to prevent overloading. The termination on
a loop may consist of any combination of devices
subject only to the requirement that the sum of the
Load Numbers of all the devices does not exceed 100.
TO GET WARRANTY SERVICE FOR YOUR
TELEPHONE: Call the Lucent Technologies Customer Service
Support Operations toll-free at 1 800 242-2121 or call the distributor from
whom the product was purchased. If you are directed to ship your
telephone to an authorized service location, you must prepay all shipping
costs. We suggest that you retain the original packing material in the event
you need to ship the unit. When sending your telephone to a service
location, include your name, address, phone number, proof of purchase (or
original shipping receipt), and description of the operating problem. After
replacing your telephone, Lucent Technologies will ship it to you at no cost
to you.
CANADIAN REGULATIONS
This digital apparatus does not exceed the Class B
limits for radio noise emissions from digital apparatus
set out in the interference-causing equipment
standard entitled “Digital Apparatus,” ICES-003 of
the Department of Communications.
NOTICE: The Canadian Department of Communications
label identifies certified equipment. This certification
means that the equipment meets certain
telecommunications network protective, operational
and safety requirements. The Department does not
guarantee the equipment will operate to the user’s
satisfaction.
Before installing this equipment, users should ensure
that it is permissible to be connected to the facilities of
the local telecommunications company. The
equipment must also be installed using an acceptable
method of connection. The customer should be aware
that compliance with the above conditions may not
prevent degradation of service in some situations.
Repairs to certified equipment should be made by an
authorized Canadian maintenance facility designated
by the supplier. Any repairs or alterations made by the
user to this equipment, or equipment malfunctions,
may give the telecommunications company cause to
request the user to disconnect the equipment.
Users should ensure for their own protection that the
electrical ground connections of the power utility,
telephone lines and internal metallic water pipe system,
if present, are connected together. This precaution
may be particularly important in rural areas.
CAUTION: Users should not attempt to make such
connections themselves, but should contact the
appropriate electrical inspection authority, or
electrician, as appropriate.
NOTICE: The Load Number (LN) assigned to each
terminal device denotes the percentage of the total load
1 Press the PROGRAM button; then press the FLASH button; then
press the HOLD button.
2 Press “797 (SYS)” on the dial pad.
WHAT IS COVERED: All terms and conditions specified in your
agreement with Lucent Technologies apply.
To program the HOLD button as an alternate feature such as Call
Park
APPARATUS
CODE
CANADIAN
LOAD
NUMBER
NETWORK
INTERFACES
8101A01B
20
CA11A, CA114A;
RJ11C, RJ14C
3 Press the FLASH button again; then press the PROGRAM button
again.
Note: Next, you must program the button with the feature access code
of the alternate feature (such as Call Park).
Note: As long as the HOLD button is not being used for the Hold
feature, the light next to the HOLD button will not go on.
8101A02B
20
CA11A, CA114A;
RJ11C, RJ14C
8102A01C
17
CA11A, CA114A;
RJ11C, RJ14C
The system manager can program a minimum of 1.2-second timed
disconnect. The default setting is timed disconnect disabled.
8103
CA11A, CA114A;
RJ11C, RJ14C
Note: If Timed Disconnect is enabled, there will be a
1.2-second delay in speakerphone response.
8104
CA11A, CA114A;
RJ11C, RJ14C
To program the (1.2-second minimum) Timed Disconnect option
8110A01D
10
8111
The Timed Disconnect Feature
1 Press the PROGRAM button; then press the FLASH button.
CA110A, CA114A;
RJ11C, RJ14C
2 Press “837 (TDS)” on the dial pad.
CA110A, CA114A;
RJ11C, RJ14C
3 Press the FLASH button again; then press the PROGRAM button
again.
To disable the Timed Disconnect option
1 Press the PROGRAM button; then press the FLASH button.
FOR THE SYSTEM MANAGER ONLY
(for the 8102M, 8104, 8110M, and 8111
telephones)
CAUTION: The following features for the
8102M, 8104, 8110M, and 8111 telephones
should be programmed only by the
system manager.
If necessary, detach this panel from the
quick reference guide and keep it separate.
2 Press “866 (TNO)” at the dial pad.
3 Press the FLASH button again; then press the PROGRAM button
again.
Locking the Programmable Dialing Buttons
The system manager can lock the 12 programmable dialing buttons so
the numbers or features assigned to these buttons CANNOT be
changed.
To lock the Programmable Dialing buttons
1 Press the PROGRAM button; then press the FLASH button.
2 Press “752 (RLC)” on the dial pad.
3 Press the FLASH button again; then press the PROGRAM button
again.
To unlock the Programmable Dialing buttons
The Hold Feature
The Hold button ( Hold ) can be programmed, at each individual set,
either as the normal Hold feature or as an alternate feature such as Call
Park. The default setting is for normal Hold.
To program Hold for normal Hold (that is, the feature which
allows the user to put a call on hold)
1 Press the PROGRAM button; then press the FLASH button; then
press Hold .
2 Press Hold again; then press the FLASH button again; finally,
press the PROGRAM button again.
4 Press the PROGRAM button; then press the FLASH button.
5 Press “766 (RNO)” on the dial pad.
6 Press the FLASH button again; then press the PROGRAM button
again.