1
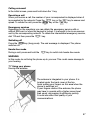
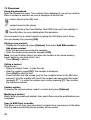
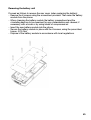
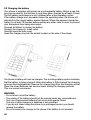
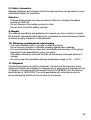
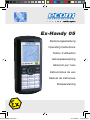
US EX-HANDY 05.indd 1
Ex-Handy 05
Bedienungsanleitung
Operating Instructions
Notice d‘utilisation
Gebruiksaanwijzing
Istruzioni per l‘uso
Instrucciones de uso
Manual de instruçoes
Bruksanvisning
01.10.2007 10:27:03 Uhr
US EX-HANDY 05.indd 2
Deutsch
Seite
1
English
Page
38
Français
Page
71
Nederlands Pagina 105
Italiano
Page
Español
Página 175
Português Página 209
Svenska Sida
140
243
01.10.2007 10:27:03 Uhr
Table of Contents
1.
Application
39
2.
Safety information
39
3.
Faults and damage
39
4.
Safety regulations
39
5.
Ex-Data
40
6.
Specifications
40
7.
Functional description / Operating instructions
40
8.
Battery
64
9.
Repair
67
10. Cleaning, maintenance and storage
67
11. Disposal
67
12 . Warranty and liability
68
13 . EC Declaration of Conformity
68
14 . EC-Type Examination Certificate
69
Note:
The current operating manual, the EC Declaration of Conformity and the EU
prototype testing certificate can be downloaded from the relevant product page
at www.ecom-ex.com, or alternatively they can be requested directly from the
manufacturer.
38
1. Application
The Ex-Handy 05 is an intrinsically safe, splash water-, dust- and impact-resistant mobile phone for industrial application in areas with an increased risk of
explosion in zones 1 and 2, in accordance with directive 1999/92/EC (ATEX 137).
2. Safety information
This operating manual contains information and safety regulations which are to
be observed without fail for safe operation in the described conditions. Non-observance of this information and these instructions can have serious consequences or may violate regulations. Please read these operating instructions
carefully before starting to use the phone!
In case of any doubt (in the form of translation or printing errors) the German
language operating instructions shall apply.
3. Faults and damage
If there is any reason to suspect that the safety of the unit has been impaired, it
must be withdrawn from use and removed immediately from the Ex-area.
Measures must be undertaken to prevent it from being restarted accidentally.
The safety of the unit may be compromised, if, for example:
- there is visible damage to the housing.
- the unit has been subjected to excessive loads.
- the unit has been improperly stored.
- the unit has been damaged in transit.
- unit markings or inscriptions are illegible.
- malfunctions occur.
- permitted limit values have been exceeded.
4. Safety regulations
Use of the explosion-proof mobile phone Ex-Handy 05 assumes that the operator
complies with conventional safety regulations and has read the certificate in
order to eliminate faulty operation of the unit.
The following points are to be observed:
- The device may not be opened inside the Ex-area.
- Only the original battery module Ex-AMH 05 (Li-ion 3.7V/850 mAh)
may be used!
- The battery module may not be changed inside the Ex-area!
- The battery module may only be charged outside the Ex-area and only then
using the following appropriate chargers: charger LGH 05, car charger ALH 05,
Car-Kit CKH 05 or USB data cable PCH 05.
- When changing the battery the battery compartment and the circulating seal
are to be examined for any contamination and cleaned, if necessary, with a
brush or by using blasts of compressed air.
39
- The covers for the SIM card and charging socket must be closed in the
Ex-area.
- When replacing the battery cover it must be ensured that the cover locks in
place properly and that the rear is secured using the six screws.
- It must be ensured that the phone is not taken into zone 0 or 20, 21 or 22!
- Only accessories approved by ecom instruments GmbH may be used.
- The mobile phone is not waterproof, therefore keep it dry!
- Observe the corresponding laws that are in force in the respective country
regarding the use of mobile phones while operating a vehicle!
- Use of the mobile phone in an airplane is not permitted!
- Switch off the mobile phone when in close proximity to medical instruments
and if you are requested to do so by corresponding regulations!
- Manufacturers of cardiac pacemakers recommend a minimum distance of
15 cm is maintained between a mobile phone and a pacemaker.
- Do not switch on the mobile phone when the use of such devices is prohibited,
as it may cause interference or result in danger.
5. Ex-Data
EC-Type Examination Certificate No.:
Ex-Designation:
ZELM 07 ATEX 0337
II 2 G Ex ib IIC T4
Approved for zone 1, device group II, explosion group IIC (explosive gases,
vapours or mist), temperature class T4.
6. Specifications
Networks:
Data transfer:
Display:
Power supply:
Talk time / standby:
Charging time:
Dimensions:
Weight:
CE-Designation
Ambient temperature Ta:
Storage temperature:
Protection rating:
Triband GSM 900 / 1800 / 1900 MHz
GPRS class 10 (up to 62.4 kbps)
Passive matrix display with 65,536 colours
(resolution 128 x 128 pixels)
Li-ion rechargeable battery with 850 mAh capacity
max. 4h / max. 350h
approx. 3h
117 x 52 x 24 mm
approx. 150g
0102
-10°C ... +50°C
0°C ... +40°C
IP54
0
7. Functional description / Operating instructions
Please read this instruction manual carefully before use so that you are familiar
with, and are able to use, all of the functions of your Ex-Handy 05. For your own
safety and information please read through the instructions on the following
pages.
40
7.1 Your phone package - Accessories
When you open the box, check that all items listed below are present:
1. Mobile phone Ex-Handy 05
2. Battery Ex-AMH 05
3. Charger LGH 05
4. Screwdriver
5. User guide
6. Software-CD
è
é
å
ê
ç
ë
Accessories
Only use accessories that are approved by ecom instruments GmbH in order to
guarantee optimal operating conditions and the safety of your phone and accessories. You can also find (as an option) or order the following accessories:
- Spare battery Ex-AMH 05
- Spare charger LGH 05
- Car charger ALH 05
- Hands free device, Car-Kit CKH 05
- PCH 05 USB cable (with associated drivers) to connect your phone to a PC
- Leather case in yellow
- Bluetooth hands free kit CK1
7.2 Description
General view
1. Belt clip
2. Charging socket
3. SIM-card
4. IrDA
5. Voice recording
å
ç
é
ê
è
41
Hold down: Switch on/off.
In a call context: Reject a call - hang up
In menus: Return to initial screen
Long press: Activate/Deactivate hands-free mode (Warning:
In this mode do not bring the phone up to your ear.) (This could
cause damage to your hearing). In a call context: Call - receiving a call
Right programmable key:
In initial screen: two short presses: access to Inbox;
long press: access to network settings
In menus: access to the selection shown on screen in the tab(*)
Left programmable key:
In initial screen: two short presses: access to Phonebook, access to Bluetooth,
long press: activate/deactivate the alarm
In menus: Access to the selection shown on screen in the tab(*)
The four-directional navigation stick allows you to:
- Move the cursor on the screen by pushing the stick toward the
corresponding direction
- Confirm your selection by pressing the stick
- In initial screen: Pressing and holding the button to the left
(depending on model):
access to tasks in the form of speech; pressing and holding the button to the
right: access to calendar.
(*) In this manual, when a function is chosen by pressing on this key, square
brackets are used (e.g.: [Save]).
Note: When the and icons appear on the screen, access to the corresponding
option is initiated via the navigation stick
Press briefly and [OK]: activate or deactivate keypad locking
When composing a message: Short press: switches from one input mode to
another (T9, ABC, 123); Long press: upper case/lower case
42
Hold down: In initial screen: Silent mode
In call reception mode: Short press stops ring tone In ring tone setting mode:
Activate/deactivate ring tone Zoom mode (see Multimedia and WAP menus)
2 to 9
A long press on the keys 2 to 9 directly displays the phonebook.
7.3 Navigation principles
These basic principles bring a great intuitiveness to your phone.
Validate by pressing the
key or the navigation stick.
will take you to the previous level.
Pressing
The thumbnails at the bottom of the screen refer to the
and
keys.
In the menus, a title bar reminds you of the previous level.
From the initial screen, pressing the navigation stick displays the icons of the
main menus
When pressing the navigation stick followed by a figure, you can display a menu
directly. For instance, pressing the navigation stick and then 5 displays the
Phonebook.
key is used to go from a menu to a sub-menu.
The
key is used to go a sub-menu to a menu.
The
key (press briefly) is used to go back to the initial screen (current
The
function is abandoned).
), which informs you on the various
In some menus there is a Help menu (
functions of the sub-menus.
43
7.4 Initial screen
The initial screen may contain the following information:
1 - The title bar icons:
Batterie
Calls forwarded
Call (establishing the call)
Call (hands free)
Message (reception of a message, message memory full)
FAX communication
DATA communication
Silent mode
Message in answering machine
WAP (@) communication
GPRS
Home zone
Roaming
Only emergency call is possible
Keypad locking
Protected WAP logon
Protected WAP logon icon with certificate
Signal strength level (5 bars)
2 - Date and time, in digital or analog mode
3 - Network provider
4 - Thumbnail centred on bottom line:
The main menu thumbnail shows that the menu can be accessed by pressing the
navigation stick. The following information may also be displayed: „1 message
key briefly.
received“ or „1 call“. It can be deleted by pressing the
7.5 Activating your phone
Information on the SIM card
To use your phone, you need a card called SIM card. It contains personal information that you can modify:
- Secret codes (PINs, Personal Identification Numbers):
these codes allow you to protect access to your SIM card and phone
- Phonebook
- Messages
- How special services work.
- Your phone is compatible with the SIM 3V-cards.
44
WARNING
This card must be handled and stored with care in order not to be damaged.
If you should lose your SIM-card, contact your network provider or your SMC
(Services Marketing Company) immediately.
Please keep your SIM-card out of reach of young children.
First use: Installing the SIM-card
1. Open the lower cover carefully on the Ex-Handy 05 to insert the SIM card.
2. Slide the SIM-card into the card holder until it locks in place. When doing
this make sure that the tapered side of the card is facing the same way as
illustrated in the diagram (or the type plate on the rear).
3. Replace the lower cover again carefully.
7.6 Getting started
You are now ready to use your phone for the first time.
key. A short display appears.
Switch on the phone by pressing the
When you switch on your phone for the first time, you must configure it with various settings that will remain by default until you choose to modify them.
After entering your PIN code and the date and time, make your choice for the
following settings: time zone, daylight savings, skin, wallpaper, screensaver, ring
tone, volume, vibrate and voicemail number.
If there are contacts saved in your SIM-card, you are invited, if you wish, to copy
them in the phone contacts memory.
PIN number
This is your SIM‘s secret code.
If access to the SIM card is protected, the device prompts you to enter the PIN
number.
Enter the code between 4 and 8 digits given to you when the SIM card was
issued. These digits do not appear on the screen for security reasons.
Press [OK] or the navigation stick to validate.
key, to switch off
If your phone indicates that the SIM is missing, press the
your phone and check that the SIM-card is correctly installed.
45
WARNING
If a wrong PIN number is entered three times in succession, your SIM-card is
blocked. You must then:
- Enter „**05*“.
- Enter the PUK (Personal Unblocking Key) code provided by your operator
and validate.
- Enter your PIN number and validate.
- Enter your PIN number again and validate.
After 5 or 10 failed attempts (depending on the type of SIM-card), the SIM-card
is definitely locked. You must then contact your operator or your SMC to obtain
a new card.
7.6.1 Setting time and date
When you use your phone for the first time, you need to set the date and time.
In due course, when the battery is completely discharged, or if it has been removed, you will be prompted systematically to confirm date and time.
Setting the date:
Set the date by entering it directly in numerical form or by using the navigation
stick to increase or decrease the default values.
Use the navigation stick to access the next (or last) data input field. Once the
key to validate.
date is correct, press the
(Setting the time: Same procedure as for setting the date.)
Network
From now on the phone hunts for a network on which it can make calls. If it finds
one, it displays the name of the network on the screen. You are then ready to
send or receive a call.
• If the network icon appears, calls are possible on your operator‘s network.
• If the letter R and a network name are displayed, calls are possible on the
network of a different operator. If the letter E is displayed without any network
name, only the emergency services are accessible (ambulance, police, fire
brigade).
• If the network icon flashes, the phone is in permanent search mode. There is
no network available. The signal strength indicator received allows you to
display the quality of reception. If it indicates less than three bars, search for
better reception in order to call in good conditions.
7.6.2 First call
key. During the call, the
Dial the number of your correspondent. Press the
call in progress icon flashes on screen and tones may indicate the establishment of the call. Once communication has been established, the call icon stops
flashing. You can adjust the sound level (volume) using the navigation stick. At
key to hang up.
the end of the conversation press the
46
Calling voicemail
In the initial screen, press and hold down the 1 key.
Receiving a call
When you receive a call, the number of your correspondent is displayed when it
key or the
key to answer and
is presented by the network. Press the
key or the
key.
speak. To refuse the call, press the
Emergency services
Depending on the operators you can obtain the emergency service with or
without SIM-card or when the keypad is locked. It is enough to be in an area served by the corresponding network. To obtain the international emergency service,
key.
dial 112 and then press the
Switching off
Press the
switches off.
key (long press). The end message is displayed. The phone
Hands-free mode
During a call, press and hold the
key to switch into hands-free mode.
WARNING
In this mode do not bring the phone up to your ear. This could cause damage to
your hearing.
7.7 Using your phone
Freeing the antenna
The antenna is integrated in your phone. It is
located under the back cover at the top.
Avoid putting your fingers on this area when the
phone is switched on.
If your fingers obstruct the antenna, the phone
may have to operate with a higher power level
than usual; decreasing its efficiency quickly.
It could also affect the quality of your
communications.
47
7.8 Phonebook
Using the phonebook
Enter the Phonebook menu. The contacts list is displayed if you set up contacts.
When a contact is selected, an icon is displayed in the title bar:
contact stored in the SIM card
contact stored in the phone
contact stored in the Fixed Dialling. See PIN2-Code and Fixed dialling in
Security Menu for more details about this activation.
You can search for a contact quickly by typing the first letters (up to three).
You can display it by pressing [OK].
Storing a new contact:
- Display the Phonebook, press [Options], then select Add SIM contact or
Add phone contact.
- Enter the last name and press the navigator.
- Enter the number and press the navigator [OK].
Note: you can fill other fields if you store the contact in the phone memory
(email, address, ring tone, photo, etc.).
- Press [Save] to store it.
Calling a contact
Several ways:
- Select a contact. Press to start the call.
- Select a contact, press [OK]. The number is displayed.
Press [Call] to start the call.
- Direct call from the idle screen (only for the contacts stored in the SIM card
memory): type the number with which the contact was saved and then enter *
(example: 21 *), or enter the number and confirm pressing [#]. Then confirm
the displayed number.
Contact options
To display the various options, select a contact and press [Options].
Modifying a contact
Modify what you want and validate; then select Save once the modifications are
completed.
Copy to SIM/Copy to mobile
This allows you to copy your phonebook contacts from one memory to the other.
Only the name and the first phone number will be copied.
48
My numbers
You can create the entries corresponding to your own numbers in order to consult them when necessary.
Select My numbers and validate. Enter the different details and validate.
Mailing lists
A mailing list allows you to send a same message to several recipients at the
same time.
- Select Mailing Lists and press the navigation stick. The phone asks you to
confirm the creation of a new list.
- Select the list type (SMS or MMS) and press the navigation stick.
- Enter a name and press the navigation stick.
- Then, on a list press [Options]. Select Add contact each time you want to add
a contact in the list.
Memory
Select SIM or Telephone and validate. Telephone: the screen displays the amount
of memory used. The memory capacity is shared between the phonebook and
various other features. If you lack memory, check if you can free some space.
SIM: available memory for contacts only.
Delete/Delete all
This allows you to delete the contact selected or all the contacts.
Set as my card/Business card
The details of a contact stored in the phone memory can be saved in a business
card.
- Select a contact, press [Options].
- Select Set as my card and [OK]. The details are saved as Business card.
Then you can read it, modify it or send it by SMS, MMS or IrDA.
List choice
This menu allows you to select the default phonebook (phone, SIM and Phone or
SIM) displayed when the phone switches on.
Contacts synchronisation with a computer
Install Wellphone, the software provided on CD, and click on DIRECTSYNC: you
can synchronise your contacts stored in the phone memory with those of your
Lotus Notes™ or Microsoft Outlook™ bases.
7.9 Messages
From this menu, you are able to send SMS and MMS. MMS is a Multimedia
Message Service, which allows you to enclose audio files, images and other rich
contents to your messages: these messages can even be composed of several
slides.
49
MMS are differently invoiced than SMS are. Please contact your network provider
to get more information on their cost.
Compose SMS
On the Messages menu select the Compose menu and validate. Choose the
SMS option. The language used is the one selected on the display of the phone.
If the language selected is not compatible with the Easy Message T9™, the
English language will be automatically selected.
When typing a text, a counter showing the number of characters deducted is displayed at the top of the screen. This counter is not displayed if an icon or sound
is inserted into the SMS. When the text has been entered [Options] is used to
access the functions offered.
Using T9 Mode
Press once the key corresponding to the letter chosen and compose the word by
continuing to press the keys corresponding to the various letters without paying
attention to the display: the word is highlighted.
If you agree on the word proposed on the screen, press the 0 key to validate it.
The 0 key inserts a space. Then you can go on writing the next word.
However, the same sequence of keys pressed can correspond to several words,
existing on the dictionary. If the word that appears is not the word you expected,
press the navigation stick to scroll through the words corresponding to this key
sequence.
If the word you are expected is not proposed, please add characters until you get
the message Add a word? Press Yes and validate if the word displayed suits you
or modify this word before adding it to the dictionary.
Input modes
key is used to access other input modes. The mode
In the input screen, the
in which you type the text is displayed at the right top of the screen. A short
key switches from one mode to another.
press of the
The „ABC“ mode is used to write words that do not exist in the dictionary. To
get a particular character, please press the corresponding key several times: the
characters will scroll down on your screen.
„123“ mode“ is used to add numbers.
Insert mode is used to add symbols, animations, call group icons and tunes.
Upper case
A long press of the
key will display the next letter in upper case (Ò).
Punctuation characters
Punctuation characters are obtained thanks to key 1 (except in the „123“ mode)
or with the help of the Insert mode (fast access by briefly pressing the
key).
50
When composing a message:
- key Deletes last letter
- key Message options
- key (long press): Zoom mode (changes size of characters)
- key (short press): Access to symbol table
- key (long press): Upper case
Compose MMS
On the Messages menu select the Compose menu and validate. Choose the
MMS option.
[Options] is used to
When the text has been entered in the Message field,
access the functions offered.
Saving the message
Select Save. It is saved in the Drafts menu. Select Save as Template. It is saved
in the Templates menu.
Sending the message
- Once the text entered, press the navigation stick or press [Options] and
select Send.
- Enter the receiver’s number (or take it from your phonebook pressing
Contacts) and press the navigation stick.
Note: It is possible that the voice message format (.amr) is not supported by
some PCs. Contact your PC provider to get additional information.
Warning:
Some message sendings may fail if the message content is too big.
Receiving messages
When you receive a message, the phone plays the ring tone that you selected,
will be displayed on the screen of your phone.
and the message icon
If you do not read the messages, this icon remains displayed on the screen.
When the icon flashes, the memory is full.
Receiving icons, backgrounds or tunes can take several seconds. An icon is
blinking when the download of your message is in progress.
Note that you have two different possibilities for receiving MMS: automatically or
manually. if „manual mode“ is activated, then you will receive only a notification in
your Inbox, meaning that a MMS is available on the MMS Server; select Retrieve,
when you want to retrieve the MMS from the server.
Inbox
On the Messages menu, choose the Inbox menu and [Select].
Each message shows the presence of any attachments, the time and date the
message was received and its size.
51
Messages are listed in chronological order, the latest one being displayed first.
The quantity of Not Read and Not Retrieved messages is shown. Not Retrieved
and Not Read messages are shown in bold.
Outbox
This menu displays the messages that have not been sent. You can send them
again from this menu.
Sentbox
If you activated the Store sent messages option in the Options menu, the
Sentbox menu is used to store all your sent messages.
Too many messages saved will quickly fill up the available memory. This means,
no further messages will be received.
For each message, its characteristics (shown with an icon) and the time (or date)
of sending are displayed on the screen.
Drafts
When you store a composed message, it is stored among the drafts.
On the Messages menu, choose the Drafts menu and [Select].
key. If you do not delete this message,
Select a message and press the
it will be stored in the draft folder and it can be accessed again after sending.
Options
Several sending options are available.
On the Messages menu, choose the Options menu and [Select].
Choose one of the options given: SMS or MMS.
The SMS sending options are: store sent message acknowledgment, period of
validity (during that period, the network provider will try to send the message),
message format, message centre number.
The following options are available:
- Store sent message: (it is highly recommended that you keep this function
deactivated, in order to avoid a full memory).
- Retrieval mode: if you are in a poor coverage area, it may be more convenient
to choose the manual retrieval mode which gives you the Retrieve later option.
- Priority: selection of a priority to send a message.
- Request delivery report: request of a delivery report when sending a
message.
- Period afte validity: during that period, the network provider will try to send
the message.
Advanced settings:
- Send delivery report: sending a delivery report when receiving a message.
- MMS ignore: if you want to deactivate the reception of any MMS in your
phone.
52
- MMS server: to select another MMS provider, or set the parameters of a new
MMS provider.
- Sender visibility: you choose to display or not your phone number on the
receiver’s phone screen, with that message.
Calling Voice Mail
This function allows you to call your voicemail.
On the Messages menu, choose the Call Voice Mail menu and [Select].
This number depends on the operator.
7.10 Multimedia
My Pictures
This menu gives you access to the pictures you have downloaded.
On the Multimedia menu, select the My Pictures sub menu and [Select].
PlanetSagem: to have access to the web site to download pictures. Selecting
[Options] allows you to delete all the pictures.
On a picture selected, you can press [Options] to have access to the following
options:
- Send By: makes it possible to transmit a picture (NB: you may not send any
copyrighted picture).
- Use as: allows you to use the picture as a wallpaper or screen saver.
- Rename: allows you to rename a picture.
- Properties: properties of the picture selected.
- Delete: allows you to delete a picture.
- Delete all: allows you to delete all pictures.
You can import or export pictures to or from a computer using My Pictures And
Sounds (MPAS). Visit www.planetsagem.com for downloading this tool.
My Sounds
This menu gives you access to the sounds you have downloaded or recorded.
On the Multimedia menu, select the My Sounds submenu and [Select].
PlanetSagem: to have access to the web site to download sounds. Selecting
[Options] allows you to delete all the sounds or to record a new sound.
To display the different options, press [Options]:
- New Sound: allows you to record a new sound.
- Send By: allows you to send a sound by MMS, IrDA or Bluetooth
(depending on model).
- Use as: allows you to add a sound to the ring tones list.
- Rename: allows you to rename a sound.
- Properties: properties of the sound selected.
- Delete: allows you to delete a sound.
- Delete all: to delete all sounds.
You can import or export sounds to or from a computer using My Pictures And
Sounds (MPAS). Visit www.planetsagem.com for downloading this tool.
53
7.11 WAP
The WAP Menu
The WAP navigator is under licence: The WAP navigator and the software included are the exclusive property of
Openwave. For this reason, it is forbidden to modify, translate, disassemble or
even decompile all or part of the software.
You can activate the magnifying glass to increase the size of the characters by
key.
holding down the
The Services menu, a dropdown menu, can be accessed at all times when navikey.
gating through WAP pages pressing the
It contains the following sub menus:
Previous: this menu allows you to go back to the previous screen.
Welcome: logs onto the initial screen (showing the name of your operator).
Bookmarks: is used to save in a phonebook the names and addresses of
Internet sites in order to make the access easy.
Go to URL: this menu allows you to input an Internet address directly.
Inbox: this menu allows you to check the messages sent by the Internet site.
Save objects: is used to save a WAP site item.
Snapshots: takes a snapshot of the currently displayed page.
Save Page: saves the currently displayed page.
History: backward and forward navigation of the pages displayed are kept in
memory.
Reload: refreshes the current page.
Reset cache: clears the stored information on previous connections.
Advanced…: choose one of the following advanced settings:
- Settings
- Show URL
- Disconnect
- Security (is used to access information on making WAP connections secure).
- Delete Cookies
- View Title Region
About…: information on the browser
Exit: returns to the phone‘s initial screen.
54
Configuring WAP parameters
Select the Advanced... menu and the Settings menu.
Profiles is used to select or modify your access provider‘s logon parameters or
configure the parameters of other access providers. (The active profile is preceded with a asterisk).
Configuration of GSM and GPRS parameters:
All information to be entered in the parameters are provided by your operator or
service provider.
On a profile in the list, press [Options] and select Modify. The different parameters are: Provider title, Home page, Preferred connections , GSM parameters and
GPRS parameters.
Preferred connections:
- GSM if not GPRS (by default): the logon to WAP services uses the GPRS as
a priority. However, in the event of unavailability of the GPRS network, the GSM
network is used to establish the link.
- GPRS: the logon to WAP services uses the GPRS network exclusively.
- GSM: the logon to WAP services uses the GSM network exclusively.
GSM parameters
- User
- Password
- IP address of WAP gateway
- Port type (secure or insecure)
- Dial-up number
- Mode (digital, analog or automatic)
GPRS parameter
- User
- Password
- IP address of WAP gateway
- Port type (secure or insecure)
- APN: if no APN has been defined, press [Options], then the APN menu.
Select or add an APN.
Once all the settings have been entered, you can activate the chosen service
provider. Select him from the list and validate your choice.
Linger timer: is used to choose the time after which the call is automatically
disconnected if you have forgotten to log off from a service.
WAP Logging on
The connection to a WAP service on the GPRS network is not cut if an incoming
call is received. You can answer the call normally.
55
Using the Welcome menu, you can log onto your service provider‘s WAP site
key. If you are logging onto the GSM or GPRS network, the
by pressing the
@ symbol flashes. The metering of the cost of the call starts as soon as it stops
flashing.
WAP Logging off
key. The logoff happens automatically after a few
To log off, press the
seconds of inactivity if you forget to log off. This period is defined by the Linger
time setting.
GPRS
A flashing icon indicates that the phone is logging onto a GPRS network. A nonflashing icon indicates that the GPRS network is available. If the icon is greyed
out, it indicates that the phone is logged onto the GPRS network. This icon is not
displayed if the GPRS network is not available or if the SIM-card inserted in your
phone does not support the GPRS service.
7.12 Applications
Services
This item may not be present on your phone’s menu, as it depends on the
inserted SIM-card.
Alarm
On the Applications menu, select the Alarm menu and [OK].
Select Activate or Deactivate and validate. Set the wake-up time by entering the
numbers directly or using the navigation stick and validate.
The alarm icon appears on the initial screen.
The alarm works even when the phone is switched off.
Timer
This menu is used to set and activate the timer.
On the Applications menu, select the Timer menu and [OK].
Select Activate or Deactivate and validate. Set the duration (hours/minutes) by
entering the numbers directly and validate.
The alarm icon appears on the initial screen.
ToDo
On the Applications menu, select ToDo and press [Options].
Select one of the actions in the list with the navigation stick and validate.
- Add Written ToDo/Add Vocal ToDo: allows you to add ToDo of the text or
voice type.
- Categories: allows you to see the different ToDo categories, assign a specific
ring tone to each individual ToDo, know the number of ToDo’s in each category
56
and see them.
- Delete all: Enables you to delete all tasks in the ToDo list in a single step.
- Memory: allows you to view the memory used by the different functions of
your ToDo.
- Synchronize: allows you to synchronise a ToDo with a computer.
Data exchange with a PC
Working from a PC, you can save/edit contacts, events and tasks stored in your
phone. To do this, you will need to connect your phone to the PC by means of a
suitable data cable. Next, you will have to install the Wellphone software supplied
with your phone.
Note: If a call comes in during an exchange of data with your PC, the link will be
interrupted and will have to be manually re- started.
Calculator
On the Applications menu, select the Calculator menu and [OK].
Use the navigation stick to make calculations:
- Upwards: Add
- Downwards: Subtract
- Rightwards: Multiply
- Leftwards: Divide
The following keys are used for:
Left programmable key: Equals or convert
- Right programmable key: Delete
- * key or #: Decimal point
- If no calculations are being run, pressing [Convert] allows you to use the value
in the converter directly.
Converter
On the Applications menu, select the Converter menu and [OK].
Enter a value and move the navigation stick upwards to convert from one currency to another, or downwards to convert back.
7.13 Organizer
This menu gives you access to your agenda and to a day, week, month or specific date. It lets you add events and access the global actions for all the events.
Also, you can manage events by event category.
Calendar menu
From the Organizer menu, select the Calendar menu.
- Categories: allows you to see the different event categories, assign a specific
ring tone to each individual category, check the number of events in each
category and display them.
- Add Written Event/Add Vocal Event: allows you to add events of the text or
voice type. Fill in the different items and save the event.
57
- Delete: allows you to schedule the deletion of events that took place more than
one day, week or month ago.
- Memory: allows you to view the memory capacity used by the different
functions of your agenda.
- Delete all: allows you to delete all events.
- Synchronize: allows you to synchronise an event with a computer.
The other menus are:
- See month: allows you to access events on a month-by-month basis.
- See week: allows you to access events on a week-by-week basis.
- See today: allows you to access the events for the current day and the
actions possible on any event (see, modify, delete and send).
- See date: allows you to access events at a specific date.
7.14 Settings
7.14.1 Sounds
Volume and ring tone
On the Sounds menu, select the Ring tones menu and [Select].
Select the function on which you want to choose a ring tone.
Select the ring tone from the proposed list and validate.
You can deactivate the sound by pressing the
key.
Vibrate
On the Sounds menu, select the Vibrate menu and [Select].
Select the vibrate mode from the proposed choices and validate.
Silent mode
On the Sounds menu, select the Silent mode and [Select].
Select Activate or Deactivate and validate. Silent mode can also be accessed
key.
via the initial screen by holding down the
When the phone is in silent mode, the relevant icon appears on the initial
screen. In this mode, the ring tone will not function, except for the alarm clock.
Note: If you have activated the silent mode, it does not remain after switching off
your phone.
Beeps
On the Sounds menu, select the Beeps menu and [OK].
Select the type of beep you want to allocate from the proposed choices and
validate. Activate or deactivate the beep and validate.
If you select keypad beeps, different options are available.
Recorder
On the Sounds menu, select the Recorder menu and [Select].
Press [Start] to record your melody or your voice by means of the microphone
58
then save it. Give it a name and validate. The new tone is saved in the list of ring
tones and in Multimedia/My Sounds.
7.14.2 Display
Skins
On the Display menu, select Skins.
Select the desired skin and validate.
Wallpaper
On the Display menu, select the Wallpaper menu and [OK].
Select the wallpaper and [View]. The picture appears in the background of the
screen. Press [OK] to validate this choice, or [Back] to go back to your choice.
Note: the Random option allows you to display a wallpaper scrolling different
pictures in a random way.
Screensaver
On the Display menu, choose the Screensaver menu and [Select].
Select one of the screensavers given and View.
Operator logo
On the Display menu, choose the Operator logo menu and [Select].
Select Activate or Deactivate and press OK.
Contrast
On the Display menu, choose the Contrast menu and [Select].
Adjust the contrast using the navigation stick.
Energy saving
On the Display menu, choose the Energy saving menu and [Select].
Screen only: only the screen is lit up.
Full backlight: both the screen and the keypad are lit up.
After a longer period of inactivity, the screen will enter an economy mode where
the time is displayed. To quit this sleep mode and resume backlight, press the key
7.14.3 Languages
On the Settings menu, choose the Languages menu and [Select].
Select the desired language and validate. If you select Automatic, the language
used will be the one relative to your SIM-card.
59
7.14.4 Contacts
On the Settings menu, choose the Contacts menu and [Select].
- Filter: this menu allows you to select the way to sort contacts in the
phonebook (by name or first name).
- Contacts list: This menu allows you to select the filter applied on the contacts
list display (SIM contacts, phone memory or both).
7.14.5 Calls
The Calls menu allows you to manage all the calls functions (call forward,
displaying numbers, call waiting, voicemail number, etc.).
Call forward
Depending on your subscription, this service allows you to forward incoming
calls to a different number or to the voice mailbox.
On the Calls menu, select the Call forward menu and [Select].
Choose the type of forwarding you want from the options available.
View last calls
This menu allows you to access the list of last numbers used.
On the Calls menu, select the View last calls menu and [Select].
The following information is displayed on the screen for every phone call: characteristics (shown with an icon), time (or date), duration.
Select a call from the list and validate.
Choose one of the options given: Call, Store in your phonebook, Send a message, Delete, Delete all.
You can also make the call by pressing the
key.
Fast access to the list of calls from the initial screen: Press the
key.
Counters
This menu allows you to consult the duration of the last calls. It can also be used
to check the volume of data exchanged via GPRS.
On the Calls menu, select the Counters menu and [Select].
Display number
On the Calls menu, select the Display number menu and [Select].
Choose one of the options given: Anonymous mode, My number, Callers’ number.
Call waiting (Operator-dependent service)
During a call, you may be informed that a caller is trying to reach you: you hear a
special tone. The caller‘s name or number is displayed on the screen.
On the Calls menu, select the Call waiting menu and [Select].
You can choose one of the following options: Activate, Deactivate. If you select
Consult status you can see the status of the call waiting service in order to
check if it is active or not.
60
Automatic redial
On the Calls menu, select Automatic redial and [Select].
You can set the redial function to inactive, on request or systematic.
If you choose On request , your phone will offer to redial your caller automatically if the number is busy.
Blacklist
The blacklist is used to limit failures on automatic calls (calls generated by the
automatic redial function or by applications: data, fax for example).
On the Calls menu, select the Blacklist menu and [Select].
When several automatic calls failed with a number (number busy or unknown),
this number is put in the blacklist. Automatic calls for this number will not be
resumed until you delete it from the blacklist.
Note: this function does not apply to the calls performed manually.
Voicemail
This function is used to record your answer phone number. This number will be
used during a call to the voice mailbox using the programmable keys.
On the Calls menu, select the Vociemail menu and [Select].
Enter your answer phone number and validate.
ALS
The ALS (Alternate Line Service) function allows you, depending on your subscription, to have two phone lines. The number of the line selected (1 or 2) for the
calls appears on the initial screen.
7.14.6 Security
Keypad locking
On the Security menu, choose the Keypad locking menu and [Select].
Select Activate or Deactivate and validate. Now select a time for the automatic
keypad lock to be activated. After expiration of the defined period the symbol for
the keypad lock will be displayed on the initial screen. You can also manually
and the
access this function from the initial screen by pressing the keys
navigation stick.
PIN number
On the Security menu, choose the Pin number menu and [Select].
To modify the PIN, select Modiy PIN and [Select].
Enter the old PIN number and validate. Enter the new PIN number twice and
validate.
To activate or deactivate the PIN, select the Control PIN menu and[Select]. Enter
your PIN number and validate. Select Activate or Deactivate and validate.
61
PIN2 number
You have a second PIN number to allow you to access certain functions*.
Proceed as above in order to activate, deactivate or modify PIN 2 number of your
phone.
* These functions may or may not be available depending on your SIM-card.
Phone code
The phone code is requested and checked whenever the phone is switched on,
even if a different SIM card is used.
To activate or deactivate the phone code, select the Phone code menu and
validate. Enter 0000 (the factory code, by default) and validate. Select Activate or
Deactivate and validate. To modify the phone code, select Modify and validate.
Enter the old phone code and validate. Enter the new phone code and validate.
Enter the phone code again to confirm it and validate.
Confidentiality
The Confidentiality function is used to delete last call numbers, messages or
organiser events when a new SIM card is inserted into the phone.
On the Security menu, choose the Confidentiality menu and [Select].
Select Activate or Deactivate and validate.
Operator (Operator-dependent service)
This menu allows you to modify the call barring.
On the Security menu, choose the Operator menu and [Select].
Call barring can be applied to ALL calls (incoming and outgoing), to all incoming
calls when you are away from your home country (if roaming available).
Call barring (Operator-dependent service)
This menu allows you to block the sending or reception of certain calls. Before
you can use this service, a password will be provided by your operator when you
take out your subscription.
On the Security menu, choose the Call barring menu and [Select].
Select Activate or Deactivate and validate.
Fixed dialling (Operator-dependent service)
This menu allows you to restrict the outgoing calls.
On the Security menu, choose the Fixed dialling menu and [Select].
Enter PIN2 number and validate.
Select Activate or Deactivate and validate. Proceed as for any other phonebook. When activating this function, only the numbers stored in the phonebook
can be called.
This phonebook is linked to the SIM card, and its size depends on the card‘s
capacity.
62
Cost (Operator-dependent service)
This menu allows you to control the cost of your calls.
On the Security menu select the Cost menu and validate. The Cost menu (*)
lets you check the cost of the last call you made and of all the calls you made
since you last deleted them. The Delete costs menu (*) lets you delete the cost
of your last call and reset the cost counter. Enter your PIN2 code first.
Note: Depending on how the networks and associated subscription cards are
configured, some functions may be unavailable (these are marked out with *).
7.14.7 Networks
On the Settings menu, choose the Networks menu and [Select].
Choose Selection to activate (automatically or manually) one of the networks
accessible in the area where your are located.
Choose Preferred to view all the pre-registered networks.
Choose Network type to select your network.
Choose GPRS to select the way you want to be attached on the GPRS network
always, or only when needed (when launching a data connection).
7.14.8 Shortcuts
This menu allows you to allocate functions to the programmable keys:
On the Settings menu, choose the Shortcuts menu and [Select].
Select the key that you wish to modify and validate.
Choose the function that you want to allocate to this key and validate.
.
7.14.9 Date / Time
Set Date/Time
On the Date / Time menu, select Set Date/Time and [Select].
Date: set the date by entering it directly in digital form or by using the navigation
stick. Once the date is correct, validate it.
Time: same procedure as for setting the date.
Automatic update (Operator-dependent service)
This menu allows you to choose manual or automatic updating of date and time
(after switch off of your phone or when going abroad for instance) (service depending on the operator). On the Date / Time menu, select Automatic upd. and
[Select]. Select Automatic, Manual or On demand and press [Select].
Display
On the Date / Time menu, select Display and [Select].
In the list that appears, select the desired display type from the following:
- Analog,
- Digital,
- None.
Use the navigation stick for selecting the desired option and validate.
63
Time zone
On the Date / Time menu, select Time zone and [Select].
Choose the time of the country desired by calculating the time from the GMT
time.
Daylight savings
On the Date / Time menu, select Daylight savings and [Select]. Select 1h, 2h
Summer time or Winter time depending on the season, and validate.
7.15 Connectivity
You can exchange with other devices (PC, mobile phones, personal assistants,
printers, etc.) various data: pictures, sounds, photos, To Do tasks, organiser
events, contacts, etc.
Data exchange can be done via:
- USB data cable,
- infrared connection,
- Bluetooth connection.
If you want to exchange objects between the phone memory and a PC, you must
install the Wellphone software provided on CD: select Multimedia from the PC to
open the phone files explorer.
Note: If a call comes in during an exchange of data with your PC, the link will be
interrupted and will have to be manually re- started.
Bluetooth
This menu allows you to set your phone Bluetooth connection in order to
communicate with other devices equipped with Bluetooth: for example, an audio
connection with a car kit or a data connection with a PC.
My Bluetooth name: allows you to assign a name to your phone for the
Bluetooth connection. This name is displayed on the devices connected.
Paired devices: allows you to search for devices which may connect with
Bluetooth link with your phone (for instance: headset).
Mode: allows you to activate the phone Bluetooth connection.
- Off: Establishing a Bluetooth connection is not possible.
- On and hidden: your phone is not detected by the other devices but the phone
detects the other devices.
- On and visible: your phone can be detected by another device.
8. Battery
8.1 Changing the battery
The battery module Ex-AMH 05 of the Ex-Handy 05 may only be changed outside
the Ex-area. Only those battery modules which are approved by the manufacturer
may be used. Other battery modules may not be taken into the Ex-area.
64
Removing the battery unit
Proceed as follows to remove the rear cover (when replacing the battery):
- Remove the 6 screws using the screwdriver provided. Then raise the battery
module from the phone.
- When changing the battery module the battery compartment and the
circulating seal are to be examined for any contamination and cleaned, if
necessary, with a brush or by using blasts of compressed air.
- Insert the new battery module into the phone.
- Secure the battery module in place with the 6 screws, using the prescribed
torque. (0,15 Nm)
- Dispose of the battery module in accordance with local regulations.
65
8.2 Charging the battery
Your phone is supplied with power via a rechargeable battery. Before a new battery can be used for the first time it must have been charged for at least 4 hours.
The full battery performance is only obtained after a few operating cycles.
If the battery charge level decreases below the operating value, the phone will
indicate this (the empty battery symbol flashes). When this appears charge the
battery for at least 15 minutes before making any other calls, in order to prevent
your discussion from being interrupted.
Proceed as follows to charge the battery:
Connect the charger to a wall outlet.
Carefully open the side cover.
Insert the charger plug into the socket located on the side of the phone.
The phone‘s battery will now be charged. The scrolling battery symbol indicates
that the battery is being charged. When the battery is fully charged the charging
process stops automatically. Remove the charger plug from the charging socket.
Close the cover. Batteries can become warm during the charging process.
This is a normal occurrence.
WARNING
- Do not short-circuit the battery.
- The casing of the battery should not be opened under any circumstances.
- Only use chargers and batteries from ecom instruments GmbH.
The use of other chargers or batteries is not permitted.
- If you do not intend using the phone for a prolonged period, you should
remove the battery.
- Do not connect your charger to the phone if the battery is not inserted.
66
8.3 Safety information
Damaged batteries and chargers should be removed from use and sent to ecom
instruments GmbH for inspection.
Attention:
- Extreme temperatures can have an adverse effect on charging the battery
module Ex-AMH 05.
- Do not dispose of the battery module in a fire!
- Do not short-circuit the battery module!
9. Repair
The national regulations and guidelines for repairs vary from country to country.
We therefore recommend that repairs are conducted by ecom instruments GmbH
to ensure a safety inspection is implemented.
10. Cleaning, maintenance and storage
- Only use a suitable cloth or sponge to clean the phone.
Do not use any solvents or abrasive cleaning agents when cleaning.
- It is recommended that you have the functionality and accuracy of the phone
inspected by the manufacturer every two years.
- The battery should be removed from the phone during prolonged periods of
storage.
- Do not exceed the permissible storage temperature range of -20 ... +50°C!
11. Disposal
Old electrical devices as well as „historical“ old electrical devices from ecom
instruments GmbH are supplied for disposal at our expense and disposed of free
of charge in accordance with European Directive 2002/96/EC and the German
electrical law of 16/03/2005. The costs associated with returning devices to
ecom instruments GmbH are to be borne by the sender.
67
12. Warranty and liability
In accordance with our general terms and conditions ecom instruments GmbH
provides a warranty for this product for a period of two years regarding its function and material under the specified and permitted operating and maintenance
conditions. This excludes all parts that are subject to wear and tear (e.g. batteries). We provide a 6-month manufacturer‘s warranty especially for the supplied
Ex-battery.
This warranty does not extend to products that are used improperly, have been
modified, neglected, damaged in accidents or exposed to abnormal operating
conditions and inappropriate handling.
Any claims under the warranty can be invoked by returning the defective equipment to the manufacturer. We reserve the right to repair, adjust or exchange the
device.
The aforementioned warranty conditions are the sole and only right of the
purchaser to compensation, are exclusively valid and replace all other contract
or legal warranty obligations. ecom instruments GmbH assumes no liability
for special, direct, indirect, accompanying or consequential damage as well
as losses including the loss of data, independent of whether it was caused by
violation of the warranty obligation, lawful or unlawful action, action in good faith
or any other action.
If the limitation of a legal warranty as well as the exclusion or limitation of accompanying or consequential damage is not permissible in certain countries, it
may be that the aforementioned limitations and exclusions are not valid for every
purchaser. Should any such clause of these warranty conditions be declared
ineffective or unenforceable by a competent court, then the effectiveness or
enforceability of any of the other conditions of these warranty conditions shall
remain unaffected by such a judgment.
13. EC Declaration of Conformity
Further details regarding the declaration of conformity can be found at the
following address:
http://www.ecom-ex.com in the download area.
68
14. EC-Type Examination Certificate
69
70
Kommunikation
Mobile Computing
Portable Handlampen
Mess- & Kalibriertechnik
Communication
Torches/Flashlights
Mobile Computing
Measuring & Calibration
Copyright© 2007 ecom instruments GmbH.
Der Inhalt dieses Dokuments darf ohne vorherige schriftliche Genehmigung durch die ecom instruments GmbH in keiner Form,
weder ganz noch teilweise vervielfältigt, weitergegeben, verbreitet oder gespeichert werden.
Der Inhalt dieses Dokuments wird so präsentiert, wie er aktuell vorliegt. Die ecom instruments GmbH übernimmt
weder ausdrücklich noch stillschweigend irgendeine Gewährleistung für die Richtigkeit oder Vollständigkeit des Inhalts dieses
Dokuments, einschließlich, aber nicht beschränkt auf die stillschweigende Garantie der Markttauglichkeit und der Eignung
für einen bestimmten Zweck, es sei denn, anwendbare Gesetze oder Rechtsprechungen schreiben zwingend
eine Haftung vor. Die ecom instruments GmbH behält sich das Recht vor, jederzeit ohne vorhergie Ankündigung
Änderungen an diesem Dokument vorzunehmen oder das Dokument zurückzuziehen.
Copyright© 2007 ecom instruments GmbH.
The contents of this document, either in part or in their entirety, may not be reproduced, forwarded, distributed or saved in any
way without ecom instruments GmbH prior written consent.
The contents of this document are presented as they currently exist. ecom instruments GmbH does not provide any express
or tacit guarantee for the correctness or completeness of the contents of this document, including, but not restricted to, the
tacit guarantee of market suitability or fitness for a specific purpose unless applicable laws or court decisions make liability
mandatory. ecom instruments GmbH reserves the right to make changes to this document or to withdraw it any time without
prior notice.
PA000277 / 10.000 / 10 / 07
WEEE-Reg.-Nr. DE 934 99306
0170AL02A00 10/07 Änderungen vorbehalten! Subject to change without notice!
ecom instruments GmbH · Industriestr. 2 · 97959 Assamstadt · Germany
Tel.: + 49 (0) 62 94 / 42 24 0 · Fax: + 49 (0) 62 94 / 42 24 100
E-Mail: [email protected] · www.ecom-ex.com
US EX-HANDY 05.indd 3
01.10.2007 10:27:03 Uhr