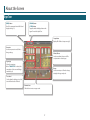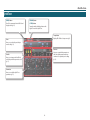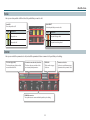
1
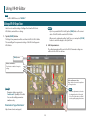
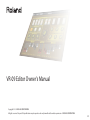
VR-09 Editor Owner’s Manual Copyright © 2013 ROLAND CORPORATION All rights reserved. No part of this publication may be reproduced in any form without the written permission of ROLAND CORPORATION 1PS What is VR-09 Editor? “VR-09 Editor” is an iPad app that allows you to edit the Organ Tones and Synth Tones of the Roland VR-09. You can use the large display of the iPad to control the Harmonic Bar of a Organ Tone and the parameters of a Synth Tone. This allows you to visually control the parameters in a graphical editing screen. IMPORTANT NOTES Trademarks • Company names and product names appearing in this document are registered trademarks or trademarks of their respective owners. Additional Precautions • Unfortunately, it may be impossible to restore the contents of data that was stored in the iPad once it has been lost. Roland Corporation assumes no liability concerning such loss of data. • In the interest of product improvement, the specifications and/or contents of this package are subject to change without prior notice. • The explanations in this manual include illustrations that depict what should typically be shown by the display. Note, however, that your unit may incorporate a newer, enhanced version of the system (e.g., includes newer sounds), so what you actually see in the display may not always match what appears in the manual. 2 Contents What is VR-09 Editor?. . . . . . . . . . . . . . . . . . . . . . . . . . . . . . . . . . . . . . . . . . . . . . . . 2 IMPORTANT NOTES . . . . . . . . . . . . . . . . . . . . . . . . . . . . . . . . . . . . . . . . . . . . . . . . . 2 Before You Use VR-09 Editor (Connecting Via Wireless LAN). . . . . . . . . . . . 4 What is Wireless LAN Function? . . . . . . . . . . . . . . . . . . . . . . . . . . . . . . . . . . . . . . . . . . . . . 4 Settings in VR-09 Editor . . . . . . . . . . . . . . . . . . . . . . . . . . . . . . . . . . . . . . . . . . . . . . . 4 Before You Use VR-09 Editor (Connecting Via a USB Cable). . . . . . . . . . . . . 6 Required Items. . . . . . . . . . . . . . . . . . . . . . . . . . . . . . . . . . . . . . . . . . . . . . . . . . . . . . . . . . . . . 6 Making Connections. . . . . . . . . . . . . . . . . . . . . . . . . . . . . . . . . . . . . . . . . . . . . . . . . . . . . . . . 6 Settings in VR-09 Editor . . . . . . . . . . . . . . . . . . . . . . . . . . . . . . . . . . . . . . . . . . . . . . . 6 About the Screen . . . . . . . . . . . . . . . . . . . . . . . . . . . . . . . . . . . . . . . . . . . . . . . . . . . 7 Organ Tone. . . . . . . . . . . . . . . . . . . . . . . . . . . . . . . . . . . . . . . . . . . . . . . . . . . . . . . . . . . . . . . . . 7 When “TRANSISTOR” Is Selected for Organ Type. . . . . . . . . . . . . . . . . . . . . . . . 8 Synth Tone . . . . . . . . . . . . . . . . . . . . . . . . . . . . . . . . . . . . . . . . . . . . . . . . . . . . . . . . . . . . . . . . . 9 Parts. . . . . . . . . . . . . . . . . . . . . . . . . . . . . . . . . . . . . . . . . . . . . . . . . . . . . . . . . . . . . . . . . 10 Partials . . . . . . . . . . . . . . . . . . . . . . . . . . . . . . . . . . . . . . . . . . . . . . . . . . . . . . . . . . . . . . 11 Common . . . . . . . . . . . . . . . . . . . . . . . . . . . . . . . . . . . . . . . . . . . . . . . . . . . . . . . . . . . . 11 Parameters . . . . . . . . . . . . . . . . . . . . . . . . . . . . . . . . . . . . . . . . . . . . . . . . . . . . . . . . . . 12 Using VR-09 Editor. . . . . . . . . . . . . . . . . . . . . . . . . . . . . . . . . . . . . . . . . . . . . . . . . 13 Editing a VR-09 Organ Tone . . . . . . . . . . . . . . . . . . . . . . . . . . . . . . . . . . . . . . . . . . . . . . . . 13 Editing a VR-09 Synth Tone. . . . . . . . . . . . . . . . . . . . . . . . . . . . . . . . . . . . . . . . . . . . . . . . . 14 Saving the Tone . . . . . . . . . . . . . . . . . . . . . . . . . . . . . . . . . . . . . . . . . . . . . . . . . . . . . . . . . . . 15 3 Before You Use VR-09 Editor (Connecting Via Wireless LAN) You’ll need to make the following preparations in order to use this app. Settings in VR-09 Editor If you connect using a USB cable, refer to p. 6. Make the following settings in VR-09 Editor. 1. In the upper right of the screen, tap the [ What is Wireless LAN Function? ] button. The setup screen will appear. By inserting the wireless USB Adapter (WNA1100-RL; sold separately) into the VR-09’s USB MEMORY port, you’ll be able to use this app via wireless LAN. iPad Wireless LAN access point (e.g., wireless LAN router) VR-09 Wireless USB Adapter (sold separately: WNA1100-RL) Wireless LAN Choose the instrument that you want to connect. If you have more than one instrument, choose the instrument that you want to connect. Wireless LAN What you’ll need in order to use the wireless LAN function Electronic Musical Instrument (Roland VR-09) Wireless USB Adapter (Roland WNA1100-RL) A Wireless LAN Access Point (such as a wireless LAN router) that supports WPS NOTE Connect by WPS may take longer time. 2. Tap any area other than the setup screen. The setup screen will disappear. 4 Before You Use VR-09 Editor (Connecting Via Wireless LAN) If the screen indicates “No instrument found,” check the following points Points to check Reference Is the instrument powered-on? Is the wireless USB adapter (WNA1100-RL) connected to the instrument? Are you using an instrument that supports wireless LAN functionality? Is the instrument connected to the wireless LAN? Are the instrument and the iPad connected to the same network (the same wireless LAN access point)? For details on models that support wireless LAN functionality, refer to http://roland.jp/link/RWC/e/ . For details on making settings for your instrument, refer to the VR-09 owner’s manual. Is the wireless LAN access point set to Refer to the owner’s manual of your wireless LAN allow communication between wireless access point for details on settings. LAN devices? This completes the necessary settings. Now you can proceed to p. 7! 5 Before You Use VR-09 Editor (Connecting Via a USB Cable) You’ll need to make the following preparations in order to use this app. Settings in VR-09 Editor Required Items Make the following settings in VR-09 Editor. You’ll need the following items in order to use this app. 1. In the upper right of the screen, tap the [ • VR-09 ] button. The setup screen will appear. • USB cable (type-A male – type-B male: commercially available) Choose the instrument that you want to connect. • Connector to use for connecting via USB If you have more than one instrument, choose the instrument that you want to connect. Apple iPad Camera Connection Kit (with third generation and earlier iPads) Lightning to USB Camera Adapter (with fourth generation and later iPads) Making Connections Here’s how to connect the iPad to the VR-09. 1. Connect the Apple iPad Camera Connection Kit or the Lightning to USB Camera Adapter to your iPad. 2. Tap any area other than the setup screen. 2. Connect a USB cable (a commercially available one) between the USB connector on the Apple iPad Camera Connection Kit or the Lightning to USB Camera Adapter and the USB COMPUTER connector on the VR-09. The setup screen will disappear. 3. Power-on the VR-09. This completes the necessary settings. Now you can proceed to p. 7! 6 About the Screen Organ Tone [READ] button [ORGAN] button Reads Tone parameters from the VR-09 and displays them (p. 13). [SYNTH] button Tapped to switch the display between the Organ Tone and the Synth Tone. Setup button Displays VR-09 Editor’s setup screen (p. 4). Percussion Used to turn percussion on/off and to change settings. Vibrato/Chorus Used to turn vibrato/chorus on/off for each part and to select the type. Organ type Selects the organ type. When “TRANSISTOR” is selected, the composition of the screen will change somewhat (p. 8). Rotary Used to turn rotary on/off and to change settings for the type and speed. Tone wheel Used to adjust the leakage noise of the tone wheel and set the click level. Harmonic bars Slide the bars to create an organ sound. 7 About the Screen When “TRANSISTOR” Is Selected for Organ Type When “TRANSISTOR” is selected for Organ Type, the composition of the screen will change somewhat. Vibrato/Chorus Used to make global on/off settings for the parts. Harmonic bars The number of bars and the effects will change. The pedal part will disappear. 8 About the Screen Synth Tone [READ] button [ORGAN] button Reads Tone parameters from the VR-09 and displays them (p. 14). [SYNTH] button Tapped to switch the display between the Organ Tone and the Synth Tone. Setup button Displays VR-09 Editor’s setup screen (p. 4). Parts Here you can select the part that you want to edit (p. 10). Common Here you can switch the parameters to edit, and edit the parameters that are common to the part that you’re editing (p. 11). Partials Here you can turn partials on/off and select the partial that you want to edit (p. 11). Parameters Here you can edit the Synth Tone parameters (p. 12). 9 About the Screen Parts Here you can select the part that you want to edit. Part Status Part SELECT Indicates the status of the UPPER part or LOWER part. Here you can select the part that you want to edit. Indicate (ON) (ON) (OFF) Tone assigned to the part Synth Tone Synth Tone that cannot be edited Button Explanation This part is being edited. This part cannot be edited. --- 10 About the Screen Partials Here you can turn partials on/off and select the partial that you want to edit. Partial SW Partial SELECT Turn each partial on/off. Button Select the partial that you want to edit. Explanation Button Explanation This partial is on. This partial is being edited. This partial is off. This partial is not being edited. Common Here you can switch the parameters to edit, and edit the parameters that are common to the part that you’re editing. Tone name (upper line) Parameter name and value (lower line) CATEGORY Parameter select tabs This shows the name of the tone that was read from the VR-09. This shows the name and value of the most recently edited parameter. This shows the category of the tone. Use these to switch between types of parameter that you want to edit. COMMON parameters These parameters are common within the part that you’re editing. 11 About the Screen Parameters Here you can edit the Synth Tone parameters. The screen that’s shown will depend on the parameter select tab you’ve chosen. OSC/FILTER/AMP LFO This will appear if the parameter select tab is set to “OSC/FILTER/AMP” (p. 11). This will appear if the parameter select tab is set to “LFO” (p. 11). 12 Using VR-09 Editor NOTE Set VR-09 MIDI IN mode to “MODE 2.” Editing a VR-09 Organ Tone MEMO • If you’ve operated the VR-09 itself, tap the [READ] button. The current state of the VR-09 will be read into VR-09 Editor. Here’s how to read the settings of a Organ Tone from the VR-09 into VR-09 Editor, and edit those settings. 1. Tap the [READ] button. • When used in combination with a Synth Tone, you can tap the [SYNTH] button to switch the display to the Synth Tone. The Organ Tone parameters will be sent from the VR-09 to VR-09 Editor. The current Organ Tone parameter settings of the VR-09 will appear in VR-09 Editor. 2. Edit the parameters. The edited parameters will be sent to the VR-09. Parameter settings are reflected on the VR-09 in real time. [READ] button Buttons and switches Tap a button or switch to change its setting. Knobs and harmonic bars Drag a knob or harmonic bar up/down to change its value. MEMO Parameter editing supports the “multi-touch” capability of the iPad. You can edit multiple parameters simultaneously. MEMO • Make fine adjustments to the value by dragging knobs to left or right. • You can reset the value to its initial state by rapidly tapping three times. Roland website “Support Information” http://www.roland.com/support/ 13 Using VR-09 Editor Editing a VR-09 Synth Tone MEMO • If you’ve operated the VR-09 itself, tap the [READ] button. The current state of the VR-09 will be read into VR-09 Editor. Here’s how to read the settings of a Synth Tone from the VR-09 into VR-09 Editor, and edit those settings. 1. Tap the [READ] button. • When used in combination with an Organ Tone, you can tap the [ORGAN] button to switch the display to the Organ Tone. The Synth Tone parameters will be sent from the VR-09 to VR-09 Editor. The current Synth Tone parameter settings of the VR-09 will appear in VR-09 Editor. 2. Edit the parameters. The edited parameters will be sent to the VR-09. Parameter settings are reflected on the VR-09 in real time. [READ] button Buttons and switches Tap a button or switch to change its setting. PCM number If tapped when PCM has been selected for WAVE, the WAVE NUMBER popup will appear. Knobs and sliders Drag a knob or slider up/down to change its value. MEMO • Make fine adjustments to the value by dragging to left or right. • You can reset the value to its initial state by rapidly tapping three times. MEMO Parameter editing supports the “multi-touch” capability of the iPad. You can edit multiple parameters simultaneously. Roland website “Support Information” http://www.roland.com/support/ 14 Using VR-09 Editor Saving the Tone A Tone you edit is temporary; it will be lost if you turn off the power or select another tone. If you want to keep a Tone you’ve edited, you must write the Registration. For details, refer to the VR-09 owner’s manual. MEMO You can’t save the Tone by operating VR-09 Editor. You’ll need to perform the save operation on the VR-09 itself. 15