1
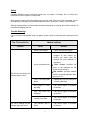
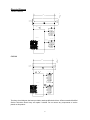
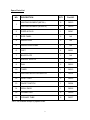
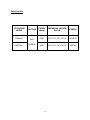
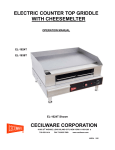
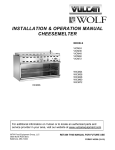
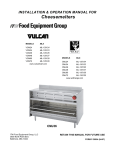
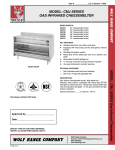
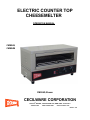
ELECTRIC COUNTER TOP
CHEESEMELTER
OPERATION MANUAL
CMS24Q
CMS24M
CMS24Q Shown
CECILWARE CORPORATION
43-05 20th AVENUE, LONG ISLAND CITY, NEW YORK 11105-1295 ■
718-932-1414
FAX 718-932-7860
www.cecilware.com
NN54A 5/05
TABLE OF CONTENTS
Introduction ....................................................... page 2
Packaging .......................................................... page 2
Installation ......................................................... page 2
Operation ........................................................... page 2
Cooking By Time ............................................... page 3
Continuous Cooking ......................................... page 3
Cleaning, Care and Maintenance ..................... page 3
Safety ................................................................. page 4
Trouble Shooting .............................................. page 4-5
Compliance ........................................................ page 5
Electrical Diagram ............................................. page 6
Explosion View .................................................. page 7-8
Spare Part List ................................................... page 9
Specifications .................................................... page 10
1
Introduction
Congratulations on the purchase of your Cecilware Cheesemelter. Please take time to carefully read
through this manual to ensure the machine is operated and maintained properly. This will enable the best
possible performance from this product for many years.
Cecilware will not accept liability for the following if:
*The instructions in this manual have not been followed correctly.
*Non-authorized personnel have tampered with the machine.
*Non-original spare parts are used.
*The machine has not been handled and cleaned correctly.
Packaging
Cecilware prides itself on quality and service, ensuring that at the time of packing all products are
supplied fully functioning and free of damage.
Provided in this package are the following:
* Cheesemelter
* Crumb Trays
* Grilling Rack
* Manual
Should you find any damage that has occurred in transit, please contact your Cecilware dealer
immediately.
Installation
Remove the Cecilware Cheesemelter from the packaging. Be certain that all protective plastics and
residues are thoroughly cleaned from its surface.
Place the Cecilware Cheesemelter on a firm level surface.
Local standards and regulations should be consulted in order to abide by standards set in relation to
positioning, spacing, and ventilation.
Caution:
Do not position and operate near combustible materials/flammable objects. Once the Cheesemelter has
been placed in position, ensure the upper and lower stainless steel trays are positioned correctly.
Supply the appropriate power and connect to source. The Cheesemelter is now ready to turn on and
operate. (For power supply, please see technical specification sheet, page 10).
Operation
The Cecilware Cheesemelter has upper and lower elements which can be used together or alternatively;
the top element can be used on its own. This can provide flexibility when toasting and grilling.
The toaster is also fitted with a timer and a thermostat which allows cooking continuously or by time.
Please see next page for further details.
2
Cooking By Time
Select the style of toasting/grilling by selecting both elements or alternatively select the upper element by
pressing the element control switch. Adjust the timer dial to the desired time of cooking. When the time is
selected, the elements will automatically be activated at full power; when the time has lapsed, the
elements will automatically switch off. For this cooking method ensure the thermostat is turned off.
*Note: If the elements are not required to turn off completely, adjust the thermostat dial to low; this will
keep the elements on after the time has lapsed. This will help to keep the product warm and will also
allow for faster reheat when required.
Continuous Cooking
Select the style of toasting/grilling by selecting both elements or alternatively select the upper element by
pressing the element control switch.
When cooking continuously, be sure the timer dial is turned off. Using the thermostat dial, select the
desired temperature. When selected, the elements will automatically switch on; when finished, turn the
thermostat dial off. The timer will over ride the energy regulator if it is not turned off.
*Summary: Time Control - provides full power to elements for the selected period of time.
The thermostat control provides the desired heat control setting for continuous operation when the timer
is off.
*Note: When in operation, the Cheesemelter will be hot; part of unit is the grilling rack which is handled
regularly. This rack is made from steel and will hold heat; therefore, protective gloves must be worn for
protection when handling.
Cleaning, Care and Maintenance
Switch off the power and disconnect from the power source.
The Cheesemelter should be cleaned after each day’s operation; however, the unit may require more
frequent cleaning, depending on the volume of production.
Allow the Cheesemelter to cool before cleaning. Remove upper and lower trays and wash them in
warm soapy water; be sure to dry before returning them to the unit.
The remainder of the Cheesemelter can be cleaned with a damp cloth using hot, soapy water.
Do not immerse completely in water or use hose to clean.
Warm soapy water is recommended for cleaning; prolonged use of cleaning agents may cause damage
to stainless steel.
3
Safety
Cecilware Qualified Service Technician should carry out repairs if necessary. Do not remove any
components or service panels on this product
When cleaning, switch power off and disconnect from the outlet. If the power cord is damaged, it must
be replaced by a Cecilware Recommended Qualified Service Technician in order to avoid a hazard.
Allow the Cheesemelter to cool down after use before dismantling for cleaning; the unit will still be too hot
to handle immediately after use.
Trouble Shooting
If your Cecilware Cheesemelter does not operate, please check the following before placing a service
call.
CMS24Q, CMS24M
Top Cheesemelter
Problem
Cause
Remedy
1. Mains power supply
1. Check mains power supply
2. Check that the unit is correctly
plugged in and turned on;
ensure you have read the
manual for both methods of
operation:
2. Unit is not switched on
¾ Dial Control: provides desired
heat for continued operation when
the timer is off
The unit is not working, the
indicator light is not on.
The unit is heating but the
indicator lights are not on.
¾ Timer Control: provides full
power to the elements for the
period of time selected
3. Fuse in the plug has
blown
3. Replace the fuse in the plug with
correctly rated fuse
4. Dial Control or Timer
are faulty
4. Call service agent or qualified
technician
5. Plug and
damaged
5. Call service agent or qualified
technician
lead
are
6. Internal wiring fault
6. Call service agent or qualified
technician
1. The indicator light is
faulty
1. Call service agent or qualified
technician
4
Trouble Shooting Cont…
Problem
Cause
Remedy
1. Incorrect operation
1. Ensure that you have clearly
read the manual, fully taking into
account whether the unit has
been selected for Timer Control
or for Dial Control and also
whether single or double
element heating has been
selected
2. Elements are faulty
2. Call service agent or qualified
technician
3. Power dial is faulty
3. Call service agent or qualified
technician
Slow heat up or no heat
up, power is on.
Please ensure:
* There is correct power supply.
* The machine is plugged in correctly and power is switched on.
* The timer and thermostat are in the correct position.
* The elements are clear of any food waste.
Note: All Cecilware products are tested prior to packing.
Compliance
Cecilware products have undergone strict product testing in order to comply with regulatory standards
and specifications set by international, independent, and federal authorities.
As testimony to such compliance, Cecilware products carry the following marks/symbols:
5
Electrical Diagram
Model: CMS24Q
L
E
N
240V
on/off
switch
pilot light
timer
top elements
thermostat
pilot light
L
PILOT
s
t
n
e
m
e
l
e
m
o
t
t
o
b
selector
switch
N
LOAD
CMS24M
N
240V
E
on/off
switch
pilot light
L
thermostat
pilot light
PILOT
LOAD
N
The above circuit diagram has been provided to assist qualified technicians. A Recommended Qualified
Service Technician should carry out repairs if needed. Do not remove any components or service
panels on this product.
6
Explosion View
CMS24M
16
15
14
2
1
13
3
12
11
4
10
9
8
5
7
7
6
CMS24Q
15
16
14
1
2
3
13
12
11
4
10
9
8
5
7
6
8
Spare Parts List
NO.
DESCRIPTION
QTY
Part NO.
HEATING ELEMENT (METAL)
8
08010
HEATING ELEMENT (QUARTZ)
6
08019
2
CORD & PLUG
1
08047
3
SIDE PANEL
2
NA
4
INSULATION
2
NA
5
INSULATION CLAMP
1
NA
6
FEET
4
08031
7
BASE PLATE
1
NA
8
ENERGY SWITCH
1
08011
9
DIAL
2
08012
10
TIMER
1
08013
11
HEATING SELECTION SWITCH
1
08014
12
PILOT LIGHT
2
08015
13
ON/OFF SWITCH
1
08054
14
GRILL RACK
1
08016
15
CRUMB TRAY
2
08039
16
CERAMIC TUBE
8
08077
1
*NA = not available except by special order.
9
Specifications
CECILWARE
MODEL
CMS24Q
CMS24M
VOLTAGE
240V
~
50/60HZ
POWER
(Watts)
DIMENSIONS (INCHES)
ELEMENT
W×D×H
2400
23 1/2”×13 1/4”×12 3/4”
QUARTZ
2400
23 1/2”×13 1/4”×12 3/4”
METAL
10
CECILWARE CORPORATION
43-05 20th AVENUE, LONG ISLAND CITY, NEW YORK 11105-1295
718-932-1414
FAX 718-932-7860
11
www.cecilware.com
■