1
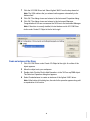
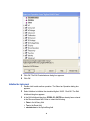
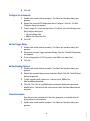
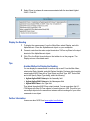
Getting Started with IVI Drivers Your Guide to Using IVI with Agilent VEE Pro Version 1.5 © Copyright IVI Foundation, 2011 All rights reserved The IVI Foundation has full copyright privileges of all versions of the IVI Getting Started Guide. For persons wishing to reference portions of the guide in their own written work, standard copyright protection and usage applies. This includes providing a reference to the guide within the written work. Likewise, it needs to be apparent what content was taken from the guide. A recommended method in which to do this is by using a different font in italics to signify the copyrighted material. Contents •••••• Chapter 1 Introduction. . . . . . . . . . . . . . . . . . . . . . . . . . . . . . . . . . . . . . . . . . . . . 4 Purpose . . . . . . . . . . . . . . . . . . . . . . . . . . . . . . . . . . . . . . . . . . . . . . . . . 4 Why Use an Instrument Driver? . . . . . . . . . . . . . . . . . . . . . . . . . . . . . . . 4 Why IVI?. . . . . . . . . . . . . . . . . . . . . . . . . . . . . . . . . . . . . . . . . . . . . . . . . 5 Why Use an IVI Driver? . . . . . . . . . . . . . . . . . . . . . . . . . . . . . . . . . . . . . 7 Flavors of IVI Drivers . . . . . . . . . . . . . . . . . . . . . . . . . . . . . . . . . . . . . . . 8 Shared Components . . . . . . . . . . . . . . . . . . . . . . . . . . . . . . . . . . . . . . . 8 Download and Install IVI Drivers . . . . . . . . . . . . . . . . . . . . . . . . . . . . . . 8 Familiarizing Yourself with the Driver . . . . . . . . . . . . . . . . . . . . . . . . . . . 9 Examples . . . . . . . . . . . . . . . . . . . . . . . . . . . . . . . . . . . . . . . . . . . . . . . . 9 Chapter 2 Using IVI with Agilent VEE Pro . . . . . . . . . . . . . . . . . . . . . . . . . . . . . 11 The Development Environment . . . . . . . . . . . . . . . . . . . . . . . . . . . . . . . 11 Example Requirements . . . . . . . . . . . . . . . . . . . . . . . . . . . . . . . . . . . . . 11 Download and Install the Driver . . . . . . . . . . . . . . . . . . . . . . . . . . . . . . . 11 Launch the Instrument Manager and Select the Driver . . . . . . . . . . . . . 11 Create an Instance of the Driver . . . . . . . . . . . . . . . . . . . . . . . . . . . . . . 13 Initialize the Instrument . . . . . . . . . . . . . . . . . . . . . . . . . . . . . . . . . . . . . 14 Configure the Instrument . . . . . . . . . . . . . . . . . . . . . . . . . . . . . . . . . . . . 15 Set the Trigger Delay . . . . . . . . . . . . . . . . . . . . . . . . . . . . . . . . . . . . . . . 15 Set the Reading Timeout . . . . . . . . . . . . . . . . . . . . . . . . . . . . . . . . . . . . 15 Close the Session . . . . . . . . . . . . . . . . . . . . . . . . . . . . . . . . . . . . . . . . . 15 Display the Reading . . . . . . . . . . . . . . . . . . . . . . . . . . . . . . . . . . . . . . . . 16 Tips. . . . . . . . . . . . . . . . . . . . . . . . . . . . . . . . . . . . . . . . . . . . . . . . . . . . . 16 Another Method to Display the Reading . . . . . . . . . . . . . . . . . . . . . 16 Further Information. . . . . . . . . . . . . . . . . . . . . . . . . . . . . . . . . . . . . . . . . 17 3 Chapter 1 Introduction •••••• Purpose Welcome to Getting Started with IVI Drivers: Your Guide to Using IVI with Agilent VEE Pro. This guide introduces key concepts about IVI drivers and shows you how to create a short program to perform a measurement. The guide is part of the IVI Foundation’s series of guides, Getting Started with IVI Drivers. Getting Started with IVI Drivers is intended for individuals who write and run programs to control test-and-measurement instruments. Each guide focuses on a different programming environment. As you develop test programs, you face decisions about how you communicate with the instruments. Some of your choices include Direct I/O, VXIplug&play drivers, or IVI drivers. If you are new to using IVI drivers or just want a quick refresher on the basics, Getting Started with IVI Drivers can help. Getting Started with IVI Drivers shows that IVI drivers can be straightforward, easy-to-use tools. IVI drivers provide a number of advantages that can save time and money during development, while improving performance as well. Whether you are starting a new program or making improvements to an existing one, you should consider the use of IVI drivers to develop your test programs. So consider this the “hello, instrument” guide for IVI drivers. If you recall, the “hello world” program, which originally appeared in Programming in C: A Tutorial, simply prints out “hello, world.” The “hello, instrument” program performs a simple measurement on a simulated instrument and returns the result. We think you’ll find that far more useful. Why Use an Instrument Driver? To understand the benefits of IVI drivers, we need to start by defining instrument drivers in general and describing why they are useful. An instrument driver is a set of software routines that controls a programmable instrument. Each routine corresponds to a programmatic operation, such as configuring, writing to, reading from, and triggering the instrument. Instrument drivers simplify instrument control and reduce test program development time by eliminating the need to learn the programming protocol for each instrument. Starting in the 1970s, programmers used device-dependent commands for computer control of instruments. But lack of standardization meant even two digital multimeters from the same manufacturer might not use the same commands. In the early 1990s a group of instrument manufacturers developed Standard 4 Commands for Programmable Instrumentation (SCPI). This defined set of commands for controlling instruments uses ASCII characters, providing some basic standardization and consistency to the commands used to control instruments. For example, when you want to measure a DC voltage, the standard SCPI command is “MEASURE:VOLTAGE:DC?”. In 1993, the VXIplug&play Systems Alliance created specifications for instrument drivers called VXIplug&play drivers. Unlike SCPI, VXIplug&play drivers do not specify how to control specific instruments; instead, they specify some common aspects of an instrument driver. By using a driver, you can access the instrument by calling a subroutine in your programming language instead of having to format and send an ASCII string as you do with SCPI. With ASCII, you have to create and send the instrument the syntax “MEASURE:VOLTAGE:DC?”, then read back a string, and build it into a variable. With a driver you can merely call a function called MeasureDCVoltage( ) and pass it a variable to return the measured voltage. Although you still need to be syntactically correct in your calls to the instrument driver, making calls to a subroutine in your programming language is less error prone. If you have been programming to instruments without a driver, then you are probably all too familiar with hunting around the programming guide to find the right SCPI command and exact syntax. You also have to deal with an I/O library to format and send the strings, and then build the response string into a variable. Why IVI? The VXIplug&play drivers do not provide a common programming interface. That means programming a Keithley DMM using VXIplug&play still differs from programming an Agilent DMM. For example, the instrument driver interface for one may be ke2000_read while another may be hp34401_get or something even farther afield. Without consistency across instruments manufactured by different vendors, many programmers still spent a lot of time learning each individual driver. To carry VXIplug&play drivers a step (or two) further, in 1998 a group of end users, instrument vendors, software vendors, system suppliers, and system integrators joined together to form a consortium called the Interchangeable Virtual Instruments (IVI) Foundation. If you look at the membership, it’s clear that many of the foundation members are competitors. But all agreed on the need to promote specifications for programming test instruments that provide better performance, reduce the cost of program development and maintenance, and simplify interchangeability. For example, for any IVI driver developed for a DMM, the measurement command is IviDmmMeasurement.Read, regardless of the vendor. Once you learn how to program the commands specified by IVI for the instrument class, you can use any vendor’s instrument and not need to relearn the commands. Also commands that are common to all drivers, such as Initialize and Close, are identical regardless of 5 the type of instrument. This commonality lets you spend less time browsing through the help files in order to program an instrument, leaving more time to get your job done. That was the motivation behind the development of IVI drivers.The IVI specifications enable drivers with a consistent and high standard of quality, usability, and completeness. The specifications define an open driver architecture, a set of instrument classes, and shared software components. Together these provide consistency and ease of use, as well as the crucial elements needed for the advanced features IVI drivers support: instrument simulation, automatic range checking, state caching, and interchangeability. The IVI Foundation has created IVI class specifications that define the capabilities for drivers for the following thirteen instrument classes: Class IVI Driver Digital multimeter (DMM) IviDmm Oscilloscope IviScope Arbitrary waveform/function generator IviFgen DC power supply IviDCPwr AC power supply IviACPwr Switch IviSwtch Power meter IviPwrMeter Spectrum analyzer IviSpecAn RF signal generator IviRFSigGen Upconverter IviUpconverter Downconverter IviDownconverter Digitizer IviDigitizer Counter/timer IviCounter IVI Class Compliant drivers usually also include capability that is not part of the IVI Class. It is common for instruments that are part of a class to have numerous functions that are beyond the scope of the class definition. This may be because the capability is not common to all instruments of the class or because the instrument offers some control that is more refined than what the class defines. 6 IVI also defines custom drivers. Custom drivers are used for instruments that are not members of a class. For example, there is not a class definition for network analyzers, so a network analyzer driver must be a custom driver. Custom drivers provide the same consistency and benefits described below for an IVI driver, except interchangeability. IVI drivers conform to and are documented according to the IVI specifications and usually display the standard IVI logo. Why Use an IVI Driver? Why choose IVI drivers over other possibilities? Because IVI drivers can increase performance and flexibility for more intricate test applications. Here are a few of the benefits: Consistency – IVI drivers all follow a common model of how to control the instrument. That saves you time when you need to use a new instrument. Ease of use – IVI drivers feature enhanced ease of use in popular Application Development Environments (ADEs). The APIs provide fast, intuitive access to functions. IVI drivers use technology that naturally integrates in many different software environments. Quality – IVI drivers focus on common commands, desirable options, and rigorous testing to ensure driver quality. Simulation – IVI drivers allow code development and testing even when an instrument is unavailable. That reduces the need for scarce hardware resources and simplifies test of measurement applications. The example programs in this document use this feature. Range checking – IVI drivers ensure the parameters you use are within appropriate ranges for an instrument. State caching – IVI drivers keep track of an instrument’s status so that I/O is only performed when necessary, preventing redundant configuration commands from being sent. This can significantly improve test system performance. Interchangeability – IVI drivers enable exchange of instruments with minimal code changes, reducing the time and effort needed to integrate measurement devices into new or existing systems. The IVI class specifications provide syntactic 7 interchangeability but may not provide behavioral interchangeability. In other words, the program may run on two different instruments but the results may not be the same due to differences in the way the instrument itself functions. Flavors of IVI Drivers To support all popular programming languages and development environments, IVI drivers provide either an IVI-C or IVI-COM (Component Object Model) API. Driver developers may provide either or both interfaces, as well as wrapper interfaces optimized for specific development environments. Although the functionality is the same, IVI-C drivers are optimized for use in ANSI C development environments; IVI-COM drivers are optimized for environments that support the Component Object Model (COM). IVI-C drivers extend the VXIplug&play driver specification and their usage is similar. IVI-COM drivers provide easy access to instrument functionality through methods and properties. All IVI drivers communicate to the instrument through an I/O Library. Our examples use the Virtual Instrument Software Architecture (VISA), a widely used standard library for communicating with instruments from a personal computer. Shared Components To make it easier for you to combine drivers and other software from various vendors, the IVI Foundation members have cooperated to provide common software components, called IVI Shared Components. These components provide services to drivers and driver clients that need to be common to all drivers. For instance, the IVI Configuration Server enables administration of system-wide configuration. Important! You must install the IVI Shared Components before an IVI driver can be installed. The IVI Shared Components can be downloaded from vendors’ web sites as well as from the IVI Foundation Web site. To download and install shared components from the IVI Foundation Web site: 1 2 3 Go to the IVI Foundation Web site at http://www.ivifoundation.org. Locate Shared Components. Choose the IVI Shared Components msi file for the Microsoft Windows Installer package or the IVI Shared Components exe for the executable installer. Download and Install IVI Drivers After you’ve installed Shared Components, you’re ready to download and install an IVI driver. For most ADEs, the steps to download and install an IVI driver are identical. For the few that require a different process, the relevant Getting Started with IVI Drivers guide provides the information you need. 8 IVI Drivers are available from your hardware or software vendor’s web site or by linking to them from the IVI Foundation web site. To see the list of drivers registered with the IVI Foundation, go to http://www.ivifoundation.org. Familiarizing Yourself with the Driver Although the examples in Getting Started with IVI Drivers use a DMM driver, you will likely employ a variety of IVI drivers to develop test programs. To jumpstart that task, you’ll want to familiarize yourself quickly with drivers you haven’t used before. Most ADEs provide a way to explore IVI drivers to learn their functionality. In each IVI guide, where applicable, we add a note explaining how to view the available functions. In addition, browsing an IVI driver’s help file often proves an excellent way to learn its functionality. Examples As we noted above, each guide in the Getting Started with IVI Drivers series shows you how to use an IVI driver to write and run a program that performs a simple measurement on a simulated instrument and returns the result. The examples demonstrate common steps using IVI drivers. Where practical, every example includes the steps listed below: • Download and Install the IVI driver– covered in the Download and Install IVI Drivers section above. • Determine the VISA address string – Examples in Getting Started with IVI Drivers use the simulate mode, so we chose the address string GPIB0::23::INSTR, often shown as GPIB::23. If you need to determine the VISA address string for your instrument and the ADE does not provide it automatically, use an IO application, such as National Instruments Measurement and Automation Explorer (MAX) or Agilent Connection Expert. • Reference the driver or load driver files – For the examples in this guide, the driver is the IVI-COM/IVI-C Version 1.2.2.0 for 34401A, October 2008 (from Agilent Technologies) … or the Agilent 34401A IVI-C driver, Version 4.4, July 2010 (from National Instruments). • Create an instance of the driver in ADEs that use COM – For the examples in the IVI guides, the driver is the Agilent 34401A (IVI-COM) or HP 34401 (IVI-C). • Write the program: • Initialize the instrument – Initialize is required when using any IVI driver. Initialize establishes a communication link with the instrument and must be called before the program can do anything with the instrument. We set reset to true, ID query to false, and simulate to true. Setting reset to true tells the driver to initially reset the instrument. 9 Setting the ID query to false prevents the driver from verifying that the connected instrument is the one the driver was written for. Finally, setting simulate to true tells the driver that it should not attempt to connect to a physical instrument, but use a simulation of the instrument. • Configure the instrument – We set a range of 1.5 volts and a resolution of 0.001 volts (1 millivolt). • Access an instrument property – We set the trigger delay to 0.01 seconds. • Set the reading timeout – We set the reading timeout to 1000 milliseconds (1 second). • • Take a reading Close the instrument – This step is required when using any IVI driver, unless the ADE explicitly does not require it. We close the session to free resources. Important! Close may be the most commonly missed step when using an IVI driver. Failing to do this could mean that system resources are not freed up and your program may behave unexpectedly on subsequent executions. • Check the driver for any errors. • Display the reading. Note: Examples that use a console application do not show the display. Now that you understand the logic behind IVI drivers, let’s see how to get started. 10 Chapter 2 Using IVI with Agilent VEE Pro •••••• The Development Environment Agilent Visual Engineering Environment Pro is a graphical programming environment designed to help you quickly create and automate measurements and tests. VEE Pro lets you program by creating an intuitive block diagram. You select and edit objects from pull-down menus and connect them to specify the program flow. VEE Pro also includes Instrument Manager, which facilitates control and management of your devices. Let’s see how VEE Pro works with IVI. Example Requirements • Agilent VEE Pro 9.2 • Agilent 34401A IVI-COM/IVI-C, Version 1.2.2.0, October 2008 (from Agilent • Technologies) Agilent IO Libraries Suite 16.0 or greater Download and Install the Driver If you have not already installed the driver, go to the vendor Web site and follow the instructions to download and install it. You can also refer to Chapter 1, Download and Install IVI Drivers, for instructions. This example uses the IVI-COM driver. VEE Pro does not support the use of IVI-C drivers through the Instrument Manager. Launch the Instrument Manager and Select the Driver If you have correctly installed the IVI driver, VEE Pro’s Instrument Manager will automatically find it for you. 1 2 Launch VEE Pro. From the Main Menu, select I/O, and click Instrument Manager. Note: If you were connected to a live instrument, you would click the Find Instruments button at the right in this screen and then skip to the next section. 3 Click Add under instrument in the list at the right to add a simulated instrument. The Instrument Properties dialog box appears. 4 In the Instrument Properties dialog box, enter or select the following: • myDMM in the Name field • GPIB in the Interface field 11 • 0 in the Board Number field • GPIB0::23::INSTR in the VISA Address field 5 6 Click Advanced. The Advanced Instrument Properties dialog box appears. Click the IVI-COM Driver tab. Select Agilent 34401 from the drop-down list. Note: The VISA address that you entered earlier appears automaticaly in the Address field. 12 7 Click the IVI-COM Driver tab. Select Agilent 34401 from the drop-down list. Note: The VISA address that you entered earlier appears automatically in the Address field. 8 9 Click OK. The dialog closes and returns to the Instrument Properties dialog. Click OK. The dialog closes and returns to the Instrument Manager. Congratulations! You can now access the IVI Driver in the Instrument Manager. Note: If the driver is correctly installed, the text darkens on the IVI-COM Driver button under Create I/O Object in the list at the right. Create an Instance of the Driver 1 Click IVI-COM Driver under Create I/O Object at the right. An outline of the object appears. 2 3 Move the object onto your workspace. 4 Select CreateInstance to create an instance of the Agilent 34401 driver. Double-click <Double-Click to Add Operation> in the To/From myDMM object. The Select an Operation dialog box appears. Note: At the bottom of the dialog box, the code for the operation appears along with an explanation of its function. 13 • • • • • • 5 6 Click OK. The Edit CreateInstance dialog box appears. Click OK. Initialize the Instrument 1 Double-click to add another operation. The Select an Operation dialog box appears. 2 Select Initialize to initialize the simulated Agilent 34401. Click OK. The Edit Initialize dialog box appears. 3 In the Edit Initialize dialog box, GPIB0::23::INSTR has already been entered in the ResourceName field. Enter or select the following: • False in the IdQuery field • True in the Reset field • simulate=true in the OptionString field 14 4 Click OK. Configure the Instrument 1 Double-click to add another operation. The Select an Operation dialog box appears. 2 Expand the treenode DCVoltage and select Configure. Click OK. The Edit Configure dialog box appears. 3 To set a range of 1.5 volts and resolution of 1 millivolt, enter the following in the Edit Configure dialog box: • 1.5 in the Range field • 0.001 in the Resolution field 4 Click OK. Set the Trigger Delay 1 Double-click to add another operation. The Select an Operation dialog box appears. 2 Expand the treenode Trigger and select Delay. Click Set. The Edit Delay dialog box appears. 3 4 To set a trigger delay of 0.01 seconds, enter 0.01 in the delay field. Click OK. Set the Reading Timeout 1 Double-click to add another operation. The Select an Operation dialog box appears. 2 Expand the treenode Measurement and select Read. Click OK. The Edit Read dialog box appears. 3 To take a reading with a timeout of 1 second, enter 1000 in the MaxTimeMilliseconds field. 4 Click OK. The To/From myDMM object includes an additional output node labeled return. This will hold the value returned from the Read Measurement operation. Close the Session Now that you have completed all of the driver operations, you should close the driver session to free resources. 1 Double-click to add another operation. The Select an Operation dialog box appears. 15 • • • • • • 2 Select Close to release all resources associated with the simulated Agilent 34401. Click OK. Display the Reading 1 To display the measurement, from the Main Menu select Display, and click AlphaNumeric. Place the AlphaNumeric object on your workspace. 2 Connect a wire from the return output terminal on To/From myDmm to the input terminal of the AlphaNumeric object. 3 Click F5 or the Right Arrow button on the toolbar to run the program. The Display returns a simulated result. Tips Another Method to Display the Reading You can display the measurement in another way as well. From the Main Menu, select select Data, Variable, and click Declare Variable. Declare a global variable named agilent34401Class with a Type Object and Sub Type .NET. Select Edit and in the Specify Object Type dialog, select the following: • Agilent.Agilent34401.Interop in the Assembly field • Agilent.Agilent34401.Interop in the Namespace field • Agilent34401Class in the Type field Then delete the agilent34401Class output terminal. You can now share this IVICOM object with other To/From objects or formula objects in VEE. This will let you use multiple objects for the same driver instance without creating all of your driver commands in one object. Further Information Learn more about VEE Pro at www.agilent.com/find/vee. 16