1
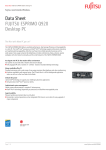
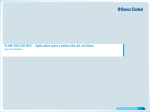
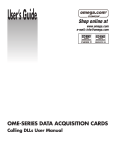
sel.
auto
h
min
www.moulinex.com
11
03
4
E
F
A
E
B
C
F
D
G A
J
B
D
C
sel.
auto
h
min
K
H
I
sel.
G
auto
h
min
J
11
03
7
1
2
2
1
3
4
4
sel.
auto
h
min
5
11
03
7
4
Français
p.
6
σ. 35
English
p.
8
s. 38
Deutsch
S. 11
Nederlands
p. 14
Suomi
s.
Ελληνικ
Türkçe
32
43
Русский
c. 44
Español
p. 17
Українсъка
c. 47
Português
p. 19
Latviešu
l.
Italiano
p. 22
Lietuvių
p. 52
Dansk
s. 24
Eesti
l.
Norsk
s. 27
Svenska
s.
50
55
5
29
- N’utilisez pas l’appareil s’il ne fonctionne pas
correctement ou s’il a été endommagé. Toute
intervention autre que le nettoyage et l’entretien usuel par le client doit être effectuée
par un centre service agréé Moulinex.
- Ne mettez pas l’appareil, le câble d’alimentation ou la fiche dans l’eau ou tout autre
liquide.
- Ne laissez pas pendre le câble d’alimentation à portée de mains des enfants.
- Le câble d’alimentation ne doit jamais être
à proximité ou en contact avec les parties
chaudes de votre appareil, près d’une source
de chaleur ou sur angle vif.
- N’utilisez pas la verseuse sur une flamme,
sur une plaque de cuisson électrique (tous
modèles).
- Si le câble d’alimentation ou la fiche sont
endommagés, n’utilisez pas l’appareil. Afin
d’éviter tout danger, faites-les obligatoirement remplacer par un centre service agréé
Moulinex.
- Pour votre sécurité, n’utilisez que des accessoires et des pièces détachées Moulinex
adaptés à votre appareil.
- Fermez toujours le couvercle du porte-filtre (F) lors de l’utilisation de la cafetière.
- Ne remettez pas d’eau dans l’appareil s’il
est encore chaud.
- N’oubliez pas de remettre le couvercle sur
la verseuse pour assurer la commande du
stop-goutte et éviter tout débordement du
porte-filtre.
- Tous les appareils sont soumis à un contrôle qualité sévère. Des essais d’utilisation
pratiques sont faits avec des appareils pris
au hasard, ce qui explique d’éventuelles traces d’utilisation.
Nous vous remercions d’avoir choisi un appareil de la gamme Moulinex qui est exclusivement prévu pour la préparation du café.
Description
A
Réservoir avec niveau d’eau
B
Stop-gouttes
C
Plaque chauffante
D
Verseuse
E
Porte-filtre amovible
F
Couvercle du porte-filtre
. TABLEAU DE COMMANDES
G
Voyant lumineux
Modéles programmables (BCB4) :Touches
avec double fonction :
H
. Mise à l’heure de l’horloge : «sel.» (sélection)
. Réglage de l’heure de mise en marche automatique : «sel.» (sélection)
I
. Démarrage automatique de la programmation : «auto»
. Réglage des heures : «h»
J
. Marche/Arrêt : «0/I»
. Réglage des minutes : «min»
K
Afficheur
Conseils de sécurité
- Lisez attentivement le mode d’emploi
avant la première utilisation de l’appareil
et conservez-le : une utilisation non conforme au mode d’emploi dégagerait
Moulinex de toute responsabilité.
- Ne laissez pas l’appareil à la portée des
enfants. L’utilisation de cet appareil par
des jeunes enfants ou des personnes
handicapées doit être faite sous surveillance.
- Vérifiez que la tension d’alimentation de l’appareil correspond bien à celle de votre installation électrique.
- Cet appareil doit être branché sur une prise
de courant avec terre.
Toute erreur de branchement annule la garantie.
- L’appareil est destiné uniquement à un
usage domestique et à l’intérieur de la maison.
- Débranchez l’appareil dès que vous cessez
de l’utiliser et lorsque vous le nettoyez.
- Ne débranchez pas la fiche de la prise de
courant en tirant sur le câble.
- Ne pas mettre d’eau chaude dans le réservoir.
Mise en service
1
2
3
4
6
- Faites fonctionner une première fois la cafetière, sans mouture, avec un plein réservoir d’eau.
- Remplissez le réservoir (A), gradué en petites et grandes tasses, avec de l’eau froide
jusqu’au niveau souhaité.
- Versez votre mouture dans un filtre papier
n°4 positionné dans le porte-filtre amovible
(E).
- Fermez le couvercle du porte-filtre (F).
- Placez la verseuse (D) sur la plaque chauffante (C).
- Mettez l’appareil en marche à l’aide de l’interrupteur (J) : le voyant s’allume.
Remarques :
- Cette cafetière est équipée d’un stop-goutte
permettant de se servir du café avant la fin
du passage de l’eau. Replacez rapidement
la verseuse pour éviter tout débordement.
- Après écoulement du café, la verseuse est
maintenue au chaud tant que l’interrupteur
n’est pas éteint.
5 - Vous pouvez ajuster la longueur du cordon
en le rangeant sous l’appareil.
Modéles programmables (BCB4)
. Votre cafetière programmable vous permet :
. de bénéficier de la fonction «horloge»,
. de régler la mise en marche de votre cafetière jusqu’à 24 heures à l’avance,
. d’avoir un arrêt automatique du maintien
au chaud au bout de 2 heures.
- Branchez l’appareil : l’afficheur clignote
«--:--».
Remarque : Lors du réglage de l’horloge ou
de l’heure programmée, tout arrêt d’action sur
les touches «sel.», «h» ou «min» pendant 30
secondes entraîne le retour automatique au
mode «horloge».
Entretien
Pour garantir le bon fonctionnement de la
cafetière, il est nécessaire de la détartrer
régulièrement :
. tous les 80 cycles pour une eau peu calcaire (environ tous les 2 mois),
. tous les 40 cycles pour une eau très calcaire (environ tous les mois).
Vous pouvez utiliser :
. soit un sachet de détartrant dilué dans 2
grandes tasses d’eau (300 ml),
. soit 2 grandes tasses de vinaigre d’alcool
blanc.
- Versez le mélange dans le réservoir et mettez l’appareil en marche à l’aide de l’interrupteur (J).
- Laissez couler l’équivalent d’une tasse, puis
arrêtez. Laissez agir pendant une heure.
- Redémarrez la cafetière pour terminer l’écoulement.
- Avant réutilisation, rincez la cafetière en la
faisant fonctionner 2 ou 3 fois avec de l’eau
claire (réservoir plein).
Attention : Ne laissez pas le sachet de détartrant entre les mains des enfants.
La garantie exclut les cafetières ne fonctionnant pas ou mal par absence de détartrage.
. MISE À L’HEURE DE L’HORLOGE :
- Appuyez une fois sur la touche «sel.» (H).
L’afficheur clignote «00:00».
- Appuyez sur la touche «h» (I) pour régler
les heures.
- Appuyez sur la touche «min» (J) pour régler les minutes.
- Validez le réglage effectué en appuyant deux
fois sur la touche «sel.» (H).
. FONCTIONNEMENT EN MODE MANUEL :
- Appuyez sur la touche «0/I» (J). Le voyant
lumineux (G) s’allume et le symbole
apparaît dans l’afficheur pour vous indiquer
que la cafetière fonctionne.
- Appuyez sur la touche «0/I» (J) pour arrêter
le fonctionnement.
. FONCTIONNEMENT EN MODE PROGRAMMATION :
Nettoyage
- Appuyez deux fois sur la touche «sel.» (H).
L’afficheur et le symbole
clignotent en
alternance avec le message «Prog».
- Appuyez sur la touche «h» (I) pour régler
les heures.
- Appuyez sur la touche «min» (J) pour régler les minutes.
- Appuyez une fois sur la touche «sel.» (H)
pour valider l’heure programmée et revenir
au mode horloge.
- Appuyez sur la touche «auto» (I) pour enclencher le fonctionnement automatique: le
symbole
clignote.
Votre cafetière est programmée.
A l’heure programmée, le voyant lumineux (G)
s’allume et le symbole
reste fixe pour
indiquer la mise en marche de la cafetière.
- Appuyez sur la touche «0/I» (J) pour arrêter
le fonctionnement.
- Débranchez toujours la cafetière avant toute
opération de nettoyage.
- Nettoyez le corps de l’appareil avec une
éponge humide.
- La verseuse, son couvercle démontable et
le porte-filtre amovible peuvent être nettoyés
au lave-vaisselle (panier supérieur).
Si votre appareil ne
fonctionne pas que faire ?
- Vérifiez le branchement.
- Assurez-vous que le témoin lumineux de l’interrupteur est allumé ou que le programmateur fonctionne bien.
7
. Le temps d’écoulement de l’eau est trop
long ou les bruits sont excessifs :
- Détartrez votre cafetière.
. Le porte-filtre déborde :
- Vérifiez son positionnement.
- Vérifiez le positionnement du filtre papier.
- La verseuse est mal engagée.
- Vous avez utilisé une mouture non appropriée.
. Le maintien au chaud est insuffisant
- Repositionnez correctement le bandeau sur
la verseuse pour assurer un bon contact du
verre sur la plaque chauffante (suivant modèle).
Thank you for choosing an appliance from the
Moulinex range, which is intended exclusively
for making coffee.
Description
A
B
C
D
E
F
Water tank with water level indicator
Drip-stop device
Heating plate
Coffee pot
Removable filter holder
Filter holder lid
. CONTROL PANEL
G
Indicator light
Programmable models (BCB4) : Buttons
with Double function
H
. Setting the clock : «sel.» (selector)
. Automatic start time control: «sel.»
(selector)
I
. Automatic programme start: «auto»
. Setting times: «h»
J
. On / off: «0/I»
. Setting the minutes: «min»
K
Display screen
Accessoires
. Verseuse sans bumper, blanche: A15B09
. Verseuse sans bumper, jaune : A15B0A
. Verseuse avec bumper, blanche : A15B0B
. Verseuse avec bumper, jaune : A15B0C
. Verseuse avec bumper, verte : A5B0D
. Verseuse «tonneau», avec bumper, poignée
ouverte, jaune : A15B0E
. Verseuse «tonneau», avec bumper, poignée
ouverte, verte : A15B0F
Ces verseuses sont compatibles quelque soit
le modèle.
Safety instructions
- Read the instructions for use carefully
before using your appliance for the first
time and retain them: any use which does
not conform to the instructions for use
will absolve Moulinex from any liability.
- Do not leave the appliance within reach
of children. The use of this appliance by
children or by disabled persons must be
supervised at all times.
- Check that the power rating of the appliance
does in fact match that of your electrical
system.
- This appliance must be connected to an
earthed socket.
Wiring instructions for U.K. and Ireland
only:
APPLIANCES WITH FITTED PLUG
Important: For your convenience this appliance
is supplied complete with a plug incorporating
a 13 amp fuse.
In the event of replacing a fuse in the plug
supplied, a 13 amp fuse approved by ASTA to
BS1362 must be used.
If the socket outlets are not of the 13A BS 1363
type, and therefore do not accept the plug
connected to this appliance, cut off the plug if
moulded type or remove the plug if connected
by screw terminals.
8
- Do not place the appliance, the power cord
or the plug in water or in any other liquid.
- Do not allow the power cord to hang down
within reach of children.
- The power cord must never be close to or
come into contact with the hot parts of your
appliance, close to any source of heat or a
sharp edge.
- Do not use the jug on a flame or an electric
hot plate (all models).
- If the power cord or the plug are damaged,
do not use the appliance. To avoid any risk
these must be replaced by an approved
Moulinex service centre (see list in the service booklet).
- For your own safety, use only the Moulinex
accessories and spare parts which are
suitable for your appliance.
- Always close the lid of the filter-holder (F)
when using the coffee maker.
- Do not pour water into the appliance while it
is still hot.
- Remember to replace the lid on the jug to
ensure the drip-stop device functions, and
to avoid overflow of the filter-holder.
- All appliances undergo strict quality controls.
Practical use tests are conducted with
appliances selected at random, which
explains any signs of use.
When the plug is a moulded type and this is cut
off from the appliance, the connected wires
are a shock hazard. Do not under any
circumstances connect a cut off plug into the
electrical socket outlet. The cut off plug must
be disposed of in a safe manner that prevents
any form of connection.
If the fuse cover is detachable, never use the
plug with the cover omitted. Replacement
covers can be obtained from your service
agent.
Fit the appropriate plug according to the instructions in paragraph “Fitting a plug”. With alternative plugs a 15 amp fuse must be fitted either in
the plug or adaptor or at the main fuse box.
APPLIANCES WITHOUT FITTED PLUG
FITTING A PLUG - IMPORTANT
The wires in the mains lead are coloured in
accordance with the following code:
GREEN & YELLOW : EARTH
BLUE
: NEUTRAL
BROWN
: LIVE
As the colours in the mains lead of this
appliance may not correspond with the
coloured markings identifying the terminals in
your plug, proceed as follows:
The wire which is coloured GREEN & YELLOW
must be connected to the terminal in the plug
which is marked with the letter ‘E’ or by the
earth symbol or coloured green or green and
yellow. The wire which is coloured BLUE must
be connected to the terminal which is marked
with the letter ‘N’ or coloured black. The wire
which is coloured BROWN must be connected
to the terminal which is marked with the letter
‘L’ or coloured red.
This appliance is manufactured to conform to
the Low Voltage Electrical Equipment (Safety)
Regulations 1989 and is designed to comply
with BS 3456. It complies with the requirements
of the EEC Directive (89/336/EEC).
Any connection error will nullify the
guarantee.
- This appliance is intended solely for
domestic and indoor use.
- Unplug the appliance as soon as you have
finished using it and when you clean it.
- Do not remove the plug from the socket by
pulling on the cord.
- Do not put hot water in the reservoir.
- Do not use the appliance if it is not working
properly or if it has been damaged. Any intervention apart from cleaning and normal
maintenance by the customer must be
carried out by an approved Moulinex service centre (see list in the service booklet).
Using your appliance for
the first time
1
2
3
4
5
9
- Operate the coffee maker for the first time
without ground coffee, with a full tank of
water.
- Fill the tank (A), which is graduated in small
and large cups, with cold water up the
desired level.
- Pour your ground coffee in a No. 4 filter paper
placed in the removable filter-holder (E).
- Close the lid of the filter-holder (F).
- Place the jug (D) on the hotplate (C).
- Start the appliance using the switch (J): the
indicator light will come on.
Notes:
- This coffee maker is fitted with a drip-stop
device, allowing you to serve coffee before
the water has finished running through. Replace the jug quickly to avoid any overflow.
- The coffee maker automatically switches to
keep-warm mode at the end of the cycle.
- You can adjust the length of the cord by
storing it under the appliance.
. FOR PROGRAMMABLE MODELS (BCB4)
You can use:
. either one sachet of descaler diluted in 2
large cups of water (300 ml),
. or 2 large cups of white wine vinegar.
- Pour the mixture into the tank and start the
appliance by pressing the switch (J).
- Allow the equivalent of one cup to run
through, then stop. Leave to work for one
hour.
- Restart the coffee maker to complete the runthrough.
- Before using again,rinse the coffee maker
by running it 2 or 3 times with fresh water
(full tank).
Please note: Keep the sachet of descaler
out of the reach of children.
The guarantee does not cover coffee
makers which do not work, or work badly,
because they have not been descaled.
. Your programmable coffe-maker has
many benefits:
. «time» function,
. setting the timer of the machine up to 24
hours in advance,
. automatic stop after 2 hours on the ‘keep
warm’ function.
- Plug the appliance in: the display flashes
«--:--».
. Setting the clock:
- Press «sel.» button (H) once. The display
will flash «00:00».
- Press button «h» (I) to set the hours.
- Press button «min» (J) to set the minutes.
- Confirm the setting by pressing «sel» button
(H) twice.
. Using in manual mode:
- Press button «0/I» (J). The indicator light will
symbol remains constant
light and the
to show that the machine is working.
- Press button «0/I» (J) to stop the machine.
. Using the appliance in programme mode:
- Press «sel» button (H) twice. The display and
symbol will flash, alternating with the
«Prog» message.
- Press «h» button (I) to set the hour.
- Press «min» button (J) to set the minutes.
- Press «sel.» button (H) once to confirm
programmed time and come back to clock
mode.
- Press «auto» button (I) to start automatic
function off: the
symbol will flash.
Your coffe-maker is programmed.
At the set time, the indicator light (G) will come
symbol remains constant to
on and the
show that the machine is in use.
- Press button «0/I» (J) to stop the machine.
Note: When setting the clock or programme
time, any stops in the setting process for more
than 30 seconds with the «sel.», «h» or «min»
buttons will send the machine back to «clock»
mode.
Cleaning
- Always unplug the coffee maker before
cleaning it in any way.
- Clean the body of the appliance using a
damp sponge.
- The jug and the removable filter holder can
be washed in the dishwasher (top basket).
What to do if your appliance
does not work
- Check the electrical connection.
- Make sure the switch is in the “I” position or
that the control panel is working correctly.
. If the water takes too long to run through
or there is excessive noise:
- Descale your coffee maker.
. The filter-holder is overflowing:
- Check it is placed correctly.
- Check the filter paper is placed correctly.
- The jug is not correctly engaged.
- You may have used an inappropriate ground
coffee.
. The coffee does not stay hot enough
- Correctly reposition the band on the jug to
ensure proper contact of glass on the hot
plate (according to model).
Maintenance
To guarantee that the coffee maker continues
to work correctly, it is necessary to descale it
at regular intervals:
. every 80 cycles for soft water (about once
every 2 months),
. every 40 cycles for very hard water (about
once every month).
10
Vielen Dank, dass Sie sich für den Kauf eines
Moulinex-Gerätes entschieden haben, das
ausschließlich der Zubereitung von Kaffee
dient.
Accessories
. Jug without bumper, white: A15B09
. Jug without bumper, yellow: A15B0A
. Jug with bumper, white: A15B0B
. Jug with bumper, yellow: A15B0C
. Jug with bumper, green: A15B0D
. “Barrel” jug with bumper, open handle,
yellow: A15B0E
. “Barrel” jug with bumper, open handle, green:
A15B0F
These jugs are compatible with every model.
Beschreibung
A
B
C
D
E
F
Wasserbehälter mit Wasserstandanzeige
Tropf-Stopp-Mechanismus
Warmhalteplatte
Aromakanne
Herausnehmbarer Schwenkfilter
Abnehmbarer Filterhalter
. BEDIENELEMENT
G
Kontrolleuchte
Programmierbare Modelle (BCB4) :Tasten
mit Doppel-Funktion:
H
. Einstellung der Uhrzeit: ‘sel.’
(Selektion - Auswahl)
. Einstellung der Vorprogrammierung:
‘sel’ (Selektion - Auswahl)
I
. Automatischer Start der programmierten Brühzeit: ‘auto’
. Einstellung der Stunden: ‘h’
J
EIN-/AUS-Schalter: ‘0/I’
. Einstellung der Minuten: ‘min’
K
Display
Sicherheitshinweise
- Lesen Sie diese Gebrauchsanleitung vor
dem ersten Einsatz Ihres Gerätes sorgfältig durch: Eine unsachgemäße Handhabung entbindet Moulinex von jeglicher
Haftung.
- Lassen Sie Kinder niemals unbeaufsichtigt das Gerät bedienen. Die Benutzung
dieses Geräts durch kleine Kinder darf
niemals ohne Aufsicht erfolgen.
- Stellen Sie sicher, dass die auf dem Typenschild angegebene Netzspannung mit der
Ihres Stromnetzes übereinstimmt.
- Schließen Sie das Gerät nur an eine geerdete Schutzkontakt-Steckdose an.
Bei fehlerhaftem Anschluss erlischt die
Garantie.
- Ihr Gerät ist ausschließlich für den
Haushaltsgebrauch und für die Benutzung
in geschlossenen Räumen bestimmt.
- Ziehen Sie den Netzstecker nach der
Benutzung und vor jeder Reinigung des
Gerätes.
11
BCB1/BCB2/BCB3/BCB4/BCBA
Eu11/Gr/Tu/Ar/Cei
0826 726-A