1
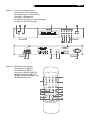
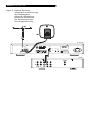
Owner’s manual
Manuel d’utilisation
Bedienungsanleitung
Manuale di istruzioni
Manual de instrucciones
Gebruiksaanwijzing
Bruksanvisning
RT-02
AM/FM Stereo Tuner
Tuner Stéréophonique AM/FM
AM/FM-Stereo-Tuner
Sintonizzatore Stereo AM/FM
Sintonizador Estereofónico de AM/FM
Middengolf/FM Stereo Afstemeenheid
AM/FM Stereo Radio
RT-02
POWER
RBDS
FM
RDS RT
TP TA AF STEREO TUNED
1
2
6
7
3
4
5
AUTO MEMORY PRESET
8
9
0
TUNE/
PRESET
PRESET
SCAN
BAND
AM
AUTO
MEMORY TUNING
TUNING
RT-02 AM/FM Stereo Tuner
CAUTION
RISK OF ELECTRIC SHOCK
DO NOT OPEN
CAUTION: TO REDUCE THE RISK OF ELECTRIC SHOCK, DO
NOT REMOVE COVER. NO USER-SERVICEABLE PARTS INSIDE
REFER SERVICING TO QUALIFIED SERVICE PERSONNEL.
2
Important Safety Instructions
WARNING: There are no user serviceable parts inside. Refer all servicing to qualified service personnel.
WARNING: To reduce the risk of fire or electric shock, do not
expose the unit to moisture or water. Do not allow foreign
objects to get into the enclosure. If the unit is exposed to moisture,
or a foreign object gets into the enclosure, immediately disconnect the power cord from the wall. Take the unit to a qualified
service person for inspection and necessary repairs.
APPLICABLE FOR USA, CANADA OR WHERE
APPROVED FOR THE USAGE
Read all the instructions before connecting or operating the component.
Keep this manual so you can refer to these safety instructions.
CAUTION: TO PREVENT ELECTRIC SHOCK, MATCH WIDE BLADE
OF PLUG TO WIDE SLOT. INSERT FULLY.
Heed all warnings and safety information in these instructions and on the
product itself. Follow all operating instructions.
ATTENTION: POUR EVITER LES CHOCS ELECTRIQUES,
INTRODUIRE LA LAME LA PLUS LARGE DE LA FICHE
DANS LA BORNE CORRESPONDANTE DE LA PRISE ET
POUSSER JUSQU AU FOND.
Clean the enclosure only with a dry cloth or a vacuum cleaner.
You must allow 10 cm or 4 inches of unobstructed clearance around the
unit. Do not place the unit on a bed, sofa, rug, or similar surface that could
block the ventilation slots. If the component is placed in a bookcase or
cabinet, there must be ventilation of the cabinet to allow proper cooling.
Keep the component away from radiators, heat registers, stoves, or any
other appliance that produces heat.
The unit must be connected to a power supply only of the type and voltage specified on the rear panel of the unit.
Connect the component to the power outlet only with the supplied power
supply cable or an exact equivalent. Do not modify the supplied cable in
any way. Do not attempt to defeat grounding and/or polarization provisions. Do not use extension cords.
Do not route the power cord where it will be crushed, pinched, bent at
severe angles, exposed to heat, or damaged in any way. The power cord
should be unplugged from the wall outlet if the unit is to be left unused for
a long period of time.
Immediately stop using the component and have it inspected and/or serviced by a qualified service agency if:
• The power supply cord or plug has been damaged.
• Objects have fallen or liquid has been spilled into the unit.
• The unit has been exposed to rain.
• The unit shows signs of improper operation
• The unit has been dropped or damaged in any way
Place the unit on a fixed, level surface strong enough to support its weight.
Do not place it on a moveable cart that could tip over.
NOTE TO CATV SYSTEM INSTALLER: Call the CATV system or antenna installer’s attention to Article 820-40 of the NEC. This provides guidelines for proper grounding and, in particular, specifies that the cable ground
shall be connected to the grounding system of the building, as close to the
point of cable entry as practical. See installation diagram.
NOTE: This equipment has been tested and found to comply with the limits
for a Class B digital device, pursuant to Part 15 of the FCC Rules. These
limits are designed to provide reasonable protection against interference
in a residential installation. This equipment generates and can radiate radio
frequency energy and, if not installed and used in accordance with the
instructions, may cause interference to radio or TV communications. There
is no guarantee that interference will not occur in a particular installation. If this equipment does cause interference to radio or television reception, which can determined by turning the equipment off and on, try
to correct the interference by one or more of the following measures:
• Reorient or relocate the receiving antenna.
• Increase the separation between the unit and the television tuner.
• Connect the unit to an AC power outlet on a different electrical circuit.
• Consult your authorized Rotel retailer for assistance.
English
3
Figure 1: Controls and Connections
Commandes et Branchements
Bedienelemente und Anschlüsse
Controlli e collegamenti
Controles y Conexiones
De bedieningsorganen en aansluitingen
Funktioner och anslutningar
1
2
3
4
5
6
RT-02
POWER
RBDS
RDS RT
1
2
3
4
5
6
7
8
9
0
TUNE/
PRESET
PRESET
SCAN
BAND
AUTO MEMORY PRESET
TP TA AF STEREO TUNED
FM
TUNING
AM
AUTO
MEMORY TUNING
7
FM
ANTENNA
AM
9
10 11
OUTPUT
G
WARNING: SHOCK HAZARD – DO NOT OPEN
AVIS: RISQUE DE CHOC ELECTRIQUE – NE PAS OUVRIR
LEFT
AM/FM STEREO TUNER
MODEL NO. RT-02
POWER CONSUMPTION : 10W
12V TRIG.
EXT.
REMOTE
IN
IN
RIGHT
DESIGN CERTIFIED TO COMPLY WITH
F.C.C. RULES, PART 15, SUBPART C.
12
8
13
14
Figure 2: RR-T92 Remote Control
Télécommande RR-T92
Fernbedienung RR-T92
Controllo a distanza RR-T92
Mando a Distancia RR-T92
De RR-T92 Afstandsbediening
RR-T92 Fjärrkontroll
DOUBLE INSULATION
When servicing use only
identical replacement parts
15 16
1
2
3
4
5
6
FM IF
NARROW
7
8
9
FM
MONO
17
DIMMER
H
A
I
0
ANT
AB
ANT
ATT
AUTO
TUNING
FREQUENCY
DIRECT
PRESET
SCAN
TUNE
/PRESET
J
MEMORY
B
C
D
E
K
DISPLAY
L
PTY
AF
TP
TA
M
N
F
BAND
< TUN/PRESET >
G
O
RR-T92
RT-02 AM/FM Stereo Tuner
4
Figure 3: Hook-up Illustration
Schéma de branchement type
Anschlußdiagramm
Schema di collegamento
Ejemplo de Conexionado
Het aansluitingsschema
Anslutningsbeskrivning
Rotel RT-02
FM
ANTENNA
AM
OUTPUT
G
WARNING: SHOCK HAZARD – DO NOT OPEN
AVIS: RISQUE DE CHOC ELECTRIQUE – NE PAS OUVRIR
LEFT
AM/FM STEREO TUNER
MODEL NO. RT-02
POWER CONSUMPTION : 10W
12V TRIG.
EXT.
REMOTE
IN
IN
RIGHT
DESIGN CERTIFIED TO COMPLY WITH
F.C.C. RULES, PART 15, SUBPART C.
DOUBLE INSULATION
When servicing use only
identical replacement parts
Amplifier
English
5
Contents
About Rotel
Boxed numbers refer to RT-02 illustration.
Boxed letters refer to RR-T92 illustration.
A family whose passionate interest in music
led them to manufacture high fidelity components of uncompromising quality founded Rotel
over 40 years ago. Through the years that
passion has remained undiminished and the
family goal of providing exceptional value for
audiophiles and music lovers regardless of their
budget, is shared by all Rotel employees.
Figure 1: Controls and Connections
Figure 2: RR-T92 Remote Control
Figure 3: Hook-up Illustration
3
3
4
About Rotel ............................................ 5
Getting Started ...................................... 5
Key Features
Unpacking
Placement
5
5
5
Rear Panel Connections ........................... 6
RCA Outputs
AM Loop Antenna
FM Antenna
AC Input
12V TRIGGER Connection
EXT REMOTE IN Jack
6
6
6
6
6
6
Basic Operating Controls ......................... 6
Power Button
and Power LED
Remote Sensor
Front Panel Display
DIMMER Button
MEMORY Button
Setting Country Mode
6
6
7
7
7
7
Basic Tuning Controls .............................. 7
BAND Button
TUNING Controls
NUMERIC Buttons:
Station Presets
FREQUENCY DIRECT Button:
Direct Access Tuning
Auto Tuning Button
TUNE/PRESET Button
PRESET SCAN Button
FM MONO Button
7
7
8
8
8
8
8
8
RDS and RBDS Broadcast Reception ......... 9
DISPLAY Button
PTY Button
TP Button
TA Button
AF Button
9
9
9
10
10
Specifications ....................................... 10
The engineers work as a close team, listening to, and fine tuning each new product until
it reaches their exacting musical standards.
They are free to choose components from
around the world in order to make that product
the best they can. You are likely to find capacitors from the United Kingdom and Germany, semi conductors from Japan or the
United States, while toroidal power transformers are manufactured in Rotel’s own factory.
Rotel’s reputation for excellence has been
earned through hundreds of good reviews and
awards from the most respected reviewers in
the industry, who listen to music every day.
Their comments keep the company true to its
goal – the pursuit of equipment that is musical, reliable and affordable.
All of us at Rotel, thank you for buying this
product and hope it will bring you many hours
of enjoyment.
Getting Started
Thank you for purchasing the RT-02 AM/FM
Stereo Tuner. Rotel’s Balanced Design Concept
combines advanced circuit board layout,
comprehensive parts evaluation, and extensive listening tests for superior sound and long
term reliability. The Rotel RT-02 will provide
years of listening enjoyment.
Key Features
• AM and FM tuning capabilities
• User-friendly Fluorescent Display
• 30 Station Presets for memorizing your favorite stations
• Manual frequency and preset tuning, autosearch tuning, preset scanning, and frequency direct tuning.
• RDS (Radio Data System) capability for Europe and RBDS (Radio Broadcast Data
Service) capability for the USA.
• Stereo/mono switching
• 12 volt trigger connections for remote turn
on/off by Rotel preamplifiers and surround
processors.
• Full-function wireless remote control
Unpacking
Remove the unit from its packing. Look for the
handheld remote control and other accessories. Install the supplied batteries in the remote
control. Save the packing and box as it will
protect the RT-02 if you move or need to return it for maintenance.
Placement
Place the RT-02 on a solid, dry, level surface
away from direct sunlight, excessive heat, high
humidity, or strong vibrations.
The RT-02 can generate some heat during
normal operation. If installed in a cabinet, make
sure that there is adequate ventilation. Make
sure there is enough room behind the RT-02
for easy hookup. Place the unit close to the
other components in your audio/video system and, if possible, place it on its own shelf.
This will make initial cable routing, hookup,
and any subsequent system changes easier.
It also minimizes potential interference or heat
buildup from other components.
Don’t stack heavy objects on top of the RT-02.
Do not expose the unit to moisture; this could
damage the circuitry and cause a safety hazard.
RT-02 AM/FM Stereo Tuner
Rear Panel Connections
The RT-02 provides rear panel connections for
audio line level output, an FM antenna, an AM
antenna, a 12V Trigger, a remote IR sensor,
and AC power input.
NOTE: Do not plug any system component into
an AC source until system hookup is complete
and you are confident that all component-tocomponent connections have been properly
made.
RCA Outputs
Line level RCA audio outputs send a fixed-level
stereo signal from the RT-02 to your preamplifier, system controller, or integrated amplifier.
Use a standard RCA audio cable to connect
the LEFT OUTPUT jack to the left channel tuner
input on your system controller and the RIGHT
OUTPUT jack to the right channel tuner input
on your system controller.
AM Loop Antenna
The RT-02 includes a loop antenna to receive
AM radio signals. Remove this antenna from
the box and locate it near the RT-02.
Connect the 300 ohm twin-conductor wire from
the loop antenna to the pair of screw terminals labeled AM LOOP, attaching one wire
to each terminal. It does not matter which wire
attaches to which terminal, but make sure that
the connections are solid and that the two wires
do not touch.
You may need to rotate or otherwise reorient
the antenna to find the best position.
NOTE: To use an outdoor antenna, connect
its 300 ohm twin-conductor wire to the G and
AM terminals in place of the loop antenna,
only after a professional contractor has installed the antenna system in accordance with
local electrical codes.
FM Antenna
The RT-02 is supplied with a T-shaped indoor
FM antenna. Remove this antenna from the
box and connect its attached coax F-type plug
to the FM antenna connector on the RT-02. For
best reception, unfold the T-shaped antenna.
Eyelets at both ends of the T allow tacking the
antenna to a wall, if desired. Experiment with
positioning for best reception.
6
NOTE: To use an outdoor antenna, connect
its 75 ohm coax lead wire to the FM connector in place of the indoor wire antenna, only
after a professional contractor has installed
the antenna system in accordance with local
electrical codes. In the USA, you will need to
use the supplied F-type converter to connect
the 75 ohm coax cable to the antenna input.
AC Input
Your RT-02 is configured at the factory for the
proper AC line voltage in the country where
you purchased it (115 volts AC at 60Hz in
the USA and 230 volts AC at 50Hz in Europe).
The AC line configuration is noted on a decal on the back of your unit. Make sure that
your unit is configured properly for your AC
line voltage.
Plug the supplied cord into the AC INPUT
receptacle on the back of the unit. Once all
other rear panel connections are completed,
plug the power cord into an AC wall outlet
or switched AC outlet on another system component.
12V TRIGGER Connection
The RT-02 can be activated by a 12 volt trigger signal from a Rotel preamplifier.
The trigger input accepts any control signal
(AC or DC) ranging from 3 volts to 30 volts.
When a cable is connected to the input and
a trigger signal is present, the tuner is activated. When the trigger signal is interrupted,
the tuner goes into standby mode. The front
panel indicator light remains lit, but the display goes dark and the unit will not operate.
NOTE: When using the 12V Trigger feature,
leave the POWER button in the ON position.
EXT REMOTE IN Jack
This 3.5mm mini-jack receives command codes
from industry-standard infrared receivers
(Xantech, etc.) via hard-wired connections. This
feature could prove useful when the unit is
installed in a cabinet and the front-panel sensor
is blocked. Consult your authorized Rotel dealer
for information on these external repeaters and
the proper wiring of a jack to fit the mini-jack
receptacle.
Basic Operating Controls
The following explanations will help you get
familiar with the features and controls. When
a function is available on both the front panel
and the remote, a number (see front panel
illustration) and a letter (see remote control
illustration) are shown in the instructions. For
example, to change from the AM to FM band,
you can either press the front panel button or
use the button on the remote. When only one
identifier appears, that control is available only
on the front panel or the remote, but not both.
NOTE: Controls used for tuning the AM/FM
receiver are described in the next sections of
this manual.
Power Button
Power LED
and
The POWER button is located on the front panel
of the RT-02 and is not duplicated on the remote control. Push the button IN to turn the
unit on. The LED above the switch and the front
panel display will light up. Push the button
again (returning it to the OUT position), to turn
the unit off.
NOTE: If you are using a switched outlet on
another component to power the RT-02 or if
you are using the 12 volt trigger feature, leave
the POWER switch in the ON position.
Remote Sensor
This front panel sensor receives infrared signals from the remote control. Make sure you
do not accidentally block this sensor with cables
or accessories.
English
7
Front Panel Display
The large fluorescent display in the center
portion of the RT-02 provides status information used in operating the AM/FM receiver
(such as station frequency display, band, preset
memory, RDS information, etc.).
DIMMER Button
Available only on the remote control, this button
selects three display brightness settings:
NORMAL, DIM, or OFF. When the display is
OFF, pressing any button or control will return it to the NORMAL mode. Press the button to cycle through the three settings.
NOTE: When the tuner is turned off and back
on, the display reverts to its normal setting.
MEMORY Button
The MEMORY button is used to confirm and
memorize various settings in the setup and
operation of the RT-02, including tuner station presets. Its use is described in detail in
the relevant sections below.
Setting Country Mode
The RT-02 has two default modes, one for the
USA and one for Europe. These configure the
unit for differences in local markets, including FM tuning intervals, AM tuning intervals,
and differences in the European RDS and
United States RBDS standards. Your unit has
been factory configured to the correct default
mode for the country in which it was purchased.
To switch to the USA default mode,
press and hold the POWER, MEMORY, and
9 buttons for 5 seconds. The word LOADING
will appear in the DISPLAY and the unit will
power up in the USA configuration.
To switch to the European default
mode, press and hold the POWER, MEMORY,
and 0 buttons for more than 5 seconds. The
word LOADING will appear in the DISPLAY
and the unit will power up in the European
configuration.
Basic Tuning Controls
The RT-02 features a digital synthesized AM/
FM tuner with RDS or RBDS capability and 30
station presets. The unit offers a wide range
of tuning options. Here is an overview of the
tuning options (more detailed information is
provided in subsequent sections of this manual):
• Manual frequency tuning lets you
tune up or down to the next station frequency. Set the TUNE/PRESET mode to
TUNE. Turn off AUTO TUNING. Use the
TUNING controls to tune up or down.
• Direct frequency tuning lets you enter the desired station frequency digits. Press
the FREQUENCY DIRECT button on the remote and enter the digits using the NUMERIC buttons.
• Automatic frequency search tuning lets you search up or down to find the
next receivable broadcast signal. Set the
TUNE/ PRESET mode to TUNE. Turn on
AUTO TUNING. Use the TUNING controls
to search up or down.
• Memory station preset tuning lets
you directly enter the number of a memorized station preset number. Enter the number of the memorized preset using the NUMERIC buttons.
• Preset scan tuning lets you scan up/
down through the memorized station presets. Press the PRESET SCAN button to begin
scanning.
• RDS (Europe) or RBDS (USA) tuning provides a range of special tuning and
search features based on data codes encoded with the broadcast signal. See the
RDS section of this manual for detailed
information.
NOTE: Three buttons on the remote (ANT
A/B, FM IF NARROW, and ANN ATT) are
not used with the RT-02 tuner.
BAND Button
The BAND button selects whether the tuner will
receive AM or FM broadcast signals. Press the
button to toggle back and forth between AM
and FM. A corresponding indicator will light
at the left portion of the front panel DISPLAY
to confirm your choice. The currently tuned
station frequency will be shown.
TUNING Controls
A pair of buttons, labeled < TUNING > on
the front panel and < TUN/PRESET > on the
remote, serve as the main tuning controls for
the RT-02. You can use either the front panel
or remote buttons; their function is identical.
These controls provides different tuning functions, depending on the mode of operation:
In the FREQUENCY TUNING mode
with AUTO TUNING off, press a TUNING button to manually jump to the next frequency, regardless of whether or not a station is broad-casting on that frequency. [See
the TUNE/PRE-SET button and AUTO TUNING button sections for details on changing
the tuning modes.]
In the FREQUENCY TUNING mode
with AUTO TUNING on, press a TUNING button to start auto tuning. The tuner
begins automatically scanning up or down
through the frequencies until the next receivable signal is detected. If this is not the desired station, repeat the automatic tuning procedure to find the next station. Weak stations
will be skipped during auto tuning. If no receivable signal is detected, the tuner will revert to the last previously tuned station. [See
the TUNE/PRESET button and AUTO TUNING
button sections for details on changing the
tuning modes.]
In the PRESET TUNING mode, press a
TUNING button to advance to the next memorized station preset. [See the TUNE/PRESET
button section for details on changing the tuning
modes.]
In the RDS PTY search mode, press a
TUNING button to select the desired program
type from the scrolling list in the display. See
the section on RDS tuning for more details. [See
the RDS PTY button section for details.]
NOTE: Several indicators in the front panel
display assist tuning. A large display shows
the tuned frequency and increases or decreases during tuning. A signal strength indicator shows the strength of the incoming
signal. A TUNED indicator lights when a sufficiently strong signal is received. A ST indicator lights when a stereo FM signal is
received. In addition, indicators show the
currently selected tuning mode.
RT-02 AM/FM Stereo Tuner
NUMERIC Buttons:
Station Presets
The RT-02 can store up to 30 station presets
for recall at any time using the NUMERIC
keypad. These station presets can be used for
any combination of AM stations and FM stations.
The RT-02 is delivered from the factory with
a set of generic station presets that may or may
not match any available stations in your area.
To memorize a new station preset:
1. Tune to the desired station, AM or FM.
2. Press the MEMORY button on the front
panel. A MEMORY indicator will flash in
the front panel display.
3. While the MEMORY indicator is flashing,
press the number of the preset where you
wish to store the station frequency. For
example, to memorize the station as preset 3, press the 3 button. To memorize preset
15, press the 1 button followed by the 5
button.
4. A previously stored frequency is erased
from memory when a new frequency is
memorized for the same preset number.
To tune to a previously memorized
station preset, press the preset number using the NUMERIC buttons. For
example, to tune to preset 3, press the 3 button. To tune to preset 30, press the 3 button
and then press the 0 button within 5 seconds.
NOTE: The NUMERIC buttons can also be
used for FREQUENCY DIRECT tuning.
FREQUENCY DIRECT Button:
Direct Access Tuning
Remote Only
If you know the exact frequency of the desired
station, you may tune it directly using the
FREQUENCY DIRECT button (remote only) and
the NUMERIC buttons.
1. Press the FREQUENCY DIRECT button to
change the NUMERIC buttons from station
preset to direct access mode. The station
frequency in the front panel display will
change to a series of bars, representing
the digits of a station frequency, with the
first bar blinking.
8
2. Enter the first digit of the station frequency
using the NUMERIC buttons. The digit will
appear in the frequency display and the
next bar will flash. Enter the remaining digits
of the frequency. When all of the digits have
been entered, the tuner will automatically
tune to the displayed station frequency.
NOTE: On the USA version only, pressing 1
in the FM mode will enter 10 as the digit in
the frequency display. On the European version, it is necessary to press 1 and then 0 to
enter 10. For US FM stations, press only one
digit following the decimal point as shown in
the first example following. For European FM
stations, press two digits after the decimal
point as shown in the second example.
EXAMPLES:
(USA FM) 87.50MHz
(Europe FM) 87.50MHz
(USA AM) 1610kHz
(Europe AM) 1611kHz
Press
Press
Press
Press
8>7>5
8>7>5>0
1>6>1
1>6>1>1
If no frequency is entered within 5 seconds,
the tuner will cancel FREQUENCY DIRECT
tuning mode and revert to the last previously
tuned station.
Auto Tuning Button
The AUTO TUNING button toggles between
the frequency search tuning feature and
manual frequency tuning. When using the
TUNING controls on the front panel or remote
in AUTO TUNING mode, the tuner will begin automatically scanning up or down through
the frequencies until the next receivable broadcast signal is detected. If this is not the desired
station, use the TUNING controls again to find
the next station. Weak stations will be skipped
during auto tuning. If no receivable signal is
detected, the tuner will revert to the previously
tuned station.
To toggle between FREQUENCY TUNING
mode and AUTO TUNING mode, press the
AUTO TUNING button. An AUTO indicator
will appear in the display.
NOTE: AUTO TUNING mode is disengaged
when the TUNE/PRESET button is set to PRESET tuning mode. See the following section.
TUNE/PRESET Button
The TUNE/PRESET button toggles between
FREQUENCY TUNING mode (the TUNING
controls advance to the next station frequency)
and PRESET TUNING mode (the TUNING
controls advance to the next memorized station preset). To toggle between the two modes,
press the TUNE/PRESET button. A PRESET
indicator in the front panel DISPLAY will light
when the PRESET mode is active.
NOTE: AUTO TUNING mode is disengaged
when the TUNE/PRESET button is set to PRESET tuning mode.
PRESET SCAN Button
This button activates a preset scanning feature. When you press the button, the tuner will
automatically scan through all memorized
station presets, playing each for five seconds
before moving to the next. To stop the station
scanning on the desired station preset, press
the button again.
NOTE: If a PRESET station is currently tuned
when the PRESET SCAN button is pressed,
scanning will start with the next higher preset number and continue through all preset
stations, stopping on the initial preset. If a
PRESET station is not currently tuned when
the button is pressed, scanning will start from
PRESET 1 and continue to PRESET 30.
FM MONO Button
Remote Only
The FM MONO button changes the FM mode
from stereo reception to mono reception. In
stereo mode, a stereo signal will be heard if
the station is broadcasting a stereo signal and
there is sufficient signal strength. A stereo
indicator will light in the front panel display.
In mono mode, a mono signal will be heard
even if the station is broadcasting a stereo
signal.
NOTE: Switching to mono mode can be a
useful way to improve the reception of weak
or distant FM signals. Less signal strength is
required for clean mono reception than for
stereo reception.
English
9
RDS and RBDS
Broadcast Reception
The Rotel RT-02 is equipped with RDS (Radio
Data Systems) reception capabilities for Europe and RBDS (Radio Broadcast Data Service) capabilities for the United States. These
broadcast systems provide additional functionality to FM radio reception by transmitting
encoded information along with the radio
signal. This signal is decoded by an RDS or
RBDS receiver and can provide a range of
informational features including:
1. a display of the station’s identifying name
(e.g. BBC1)
2. a display of the station’s program content
(e.g. ROCK or NEWS)
3. traffic information broadcasts
4. a scrolling text display for announcements
or information
In addition, RDS provides several advanced
search features including:
1. the ability to search for a station with the
desired program content (PTY)
2. the ability to search for traffic information
(TP)
3. the ability to automatically search stations
broadcasting special traffic announcements
(TA).
RDS broadcasting has been widely available
in many European markets for years. There
are a large number of RDS stations and most
users will be familiar with the features and
operation. In the USA, implementation of the
RBDS system is more recent. Fewer stations
are currently broadcasting RBDS signals and
the features may be less familiar to many users.
Consult your authorized Rotel dealer for more
information on RDS or RBDS broadcasting in
your market.
NOTE: The RDS and RBDS features are entirely dependent on the broadcaster sending
properly encoded signals. Thus, they will only
be available in markets where RDS or RBDS
is currently implemented and where stations
are broadcasting these data signals. If there
are no RDS or RBDS stations, the RT-02 will
function as a standard radio receiver.
NOTE: RDS and RBDS services are only
available on FM broadcasts. The features and
buttons described below are only operational
in FM mode.
DISPLAY Button
Remote Only
There are five display options when the currently tuned station is broadcasting RDS information and the RDS indicator in the front
panel display is lit. Press the DISPLAY button
to step sequentially through the five available
display options:
1. Standard FREQUENCY display.
2. PROGRAM SERVICE name. This is typically
the station’s call letters, such as BBC1). If
the current station is not broadcasting an
RDS signal, the display will show a blinking PS indication.
3. PROGRAM TYPE. This is a description of
the station’s content from a standardized
list of program types in each market (for
example: NEWS, CURRENT AFFAIRS,
INFO, SPORT, EDUCATION, DRAMA, CULTURE, SCIENCE, VARIED, POP, ROCK,
EASY LISTENING, LIGHT CLASSICAL,
SERIOUS CLASSICAL, OTHER MUSIC,
WEATHER, FINANCE, CHILDREN, SOCIAL
AFFAIRS, RELIGION, PHONE IN, TRAVEL,
LEISURE, JAZZ, COUNTRY, NATIONAL
MUSIC, OLDIES, FOLK, and DOCUMENTARY). If the current station is not broadcasting an RDS signal, the display will show
a blinking PT indication.
4. CLOCK TIME. A time and date display
broadcast by the station. If the current station is not broadcasting an RDS signal, the
display will show a blinking CT indication.
5. RADIO TEXT. Additional scrolling text
messages broadcast by the station. If the
current station is not broadcasting an RDS
signal, the display will show a blinking RT
indication.
PTY Button
Remote Only
The PTY search function permits you to scan
available signals for RDS stations broadcasting a particular type of program content.
1. Press the PTY button. The current RDS program content type will appear in the display.
2. If desired, change to a different PROGRAM
TYPE using the TUNING controls to scroll
through the list.
3. Press the PTY button a second time within
5 seconds. The tuner will attempt to find
an RDS station broadcasting the selected
type of program. If the button is not pressed
within 5 seconds after selecting a program
type, the PTY function will be cancelled.
4. If no station is located for the desired content
type, the tuner will return to the last previously tuned station.
5. Cancel the PTY function by pressing any
button (except DIMMER or FM MONO).
TP Button
Remote Only
Searches for an RDS station broadcasting traffic information programming:
1. Press the TP button. The tuner will attempt
to find an RDS station broadcasting the
traffic programming.
2. If no station is located, the tuner will return to the last previously tuned station.
3. Cancel the TP function by pressing any
button (except DIMMER or FM MONO).
TA Button
Remote Only
Searches for an RDS station broadcasting
special traffic announcements:
1. Press the TA button. The tuner will attempt
to find an RDS station broadcasting traffic announcements.
2. If no station is located, the tuner will return to the last previously tuned station.
3. Cancel the TA function by pressing any
button (except DIMMER or FM MONO).
RT-02 AM/FM Stereo Tuner
10
AF Button
Remote Only
In some cases, an RDS station is part of a
network of stations broadcasting the same
programming (for example, BBC1 programming in the UK may be available at several
different frequencies). Stations broadcasting
this programming may transmit an RDS data
signal providing the tuner with a list of alternate frequencies where this programming is
available. If this data list is transmitted, an AF
indicator will appear in the DISPLAY.
The AF button is used to scan the alternate
frequencies to find a stronger signal. The button
is only functional when the AF indicator is lit.
1. Press the AF button. The tuner will scan each
of the alternate frequencies for the same
programming in the stored list and tune
to the strongest signal.
2. If no station is located, the tuner will return to the last previously tuned station.
3. If the signal strength of the new station is
weaker, the tuner will revert to the previously tuned station.
4. Cancel the AF function by pressing any
button (except DIMMER or FM MONO).
Specifications
FM Tuner
Usable Sensitivity:
14.2 dBf
50dB Quieting Sensitivity:
20.2 dBf (mono)
45.3 dBf (stereo)
Signal to Noise Ratio (at 65 dBf):
73 dBf (mono)
70 dBf (stereo)
Harmonic Distortion (at 65 dBf):
0.2% (mono)
0.3% (stereo)
Frequency Response:
10 Hz-15 kHz, ±3 dB
Capture Ratio:
2.0 dB
Alternate Channel Selectivity:
47 dB (±400 kHz)
Spurious Response Ratio:
90 dB
Image Rejection Ratio:
80 dB
IF Rejection Ratio:
80 dB
AM Suppression Ratio:
55 dB
Stereo Separation (100Hz/1 kHz/10 kHz):
40 dB/45 dB/35 dB
Output level:
1V
Antenna Input:
75 ohms unbalanced
AM Tuner
Usable Sensitivity:
500 µV/m
Selectivity:
25 dB
Harmonic Distortion:
0.5%
Image Rejection Ratio:
45 dB
Signal to Noise Ratio:
40 dB
Output level:
500 mV
Antenna Input:
Loop Antenna
General
Power Consumption:
10 watts
Power Requirements (AC):
115 volts, 60 Hz (USA version)
230 volts, 50 Hz (European version)
Weight:
3.9 Kg/8.6 lb.
Dimensions (W x H x D):
435 x 72 x 319 mm
17 1/8" x 2 7/8" x 10 9/16"
Panel Height
60 mm / 2 3/8"
All specifications are accurate at the time of printing.
Rotel reserves the right to make improvements without notice.
Rotel and the Rotel HiFi logo are registered trademarks of The Rotel Co, Ltd., Tokyo, Japan.
54
The Rotel Co. Ltd.
10-10 Shinsen-Cho
Shibuya-Ku
Tokyo 150-0045
Japan
Phone: +81 3-5458-5325
Fax: +81 3-5458-5310
Rotel of America
54 Concord Street
North Reading, MA 01864-2699
USA
Phone: +1 978-664-3820
Fax: +1 978-664-4109
Rotel Europe
Dale Road
Worthing, West Sussex BN11 2BH
England
Phone: +44 (0)1903 221 600
Fax: +44 (0)1903 221 525
Rotel Deutschland
Kleine Heide 12
D-33790 Halle/Westf.
Germany
Phone: +49 05201-87170
Fax: +49 05201-73370
www.rotel.com
082 OMRT-02 020302
English • Français • Deutsch • Italiano • Español • Nederlands • Svenska