1
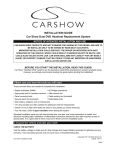
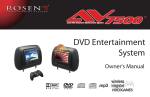
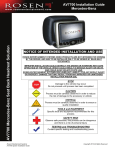
DVD Entertainment
System
Owner's Manual
R
wireless
.mp3 integrated
VIDEOGAMES
NOTICES
NOTICE OF INTENDED USE
Rosen Entertainment Systems are designed to enable
viewing of video ONLY for rear-seat occupants, and are
not intended for viewing by the driver when the vehicle is
in motion. Such use might distract the driver or interfere
with the driver’s safe operation of the vehicle, and thus result in serious injury or death. Such use might also violate
state or local laws.
Rosen Entertainment Systems disclaims any liability for
any bodily injury or property damage that might result
from any improper or unintended use.
About the Registered Marks
This product incorporates copyright protection technology that is protected by
method claims of certain U.S. patents and other intellectual property rights owned
by Macrovision Corporation and other rights owners. Use of this copyright protection technology must be authorized by Macrovision Corporation, and is intended for
home and other limited viewing uses only unless otherwise authorized by Macrovision Corporation. Reverse engineering or disassembly is prohibited.
NOTE: Features and specifications listed in this manual are subject to change
without notice
Manufactured under license from Dolby Laboratories.“Dolby” and the double-D
symbol are trademarks of Dolby Laboratories.
Table of Contents
Getting Started…………………………………………………………………………………………………………………………………............…………………...6
Introduction ……………………..........……………………………………………………………………………………………………………………………………..8
Discs Played………………………………………………………………………………………………………………..........………………………………………….9
Changing and Adjusting Display Settngs…………………………………………………………………………………………………………..........……….……..10
Using the Remote Control…………………………………………………………………………………………………………………………..........……….………11
Basic Remote Control Buttons……………………………………………………………………………………………………………………..........……….………12
Using Menu and Navigation Buttons, Using Audio Buttons……………………………………………………………………………………..........………………13
Using DVD Disc Features…………………………………………………………………………………………………………………………….........…….……….14
Replacing the Remote Battery……………………………………………………………………………………………………………………….........…….……….14
CD Audio and MP3 Playback………………………………………………………………………………………………………………………………...........……..15
Listening Over the Car Speakers...………………………………………………………………………………………………………………….............……..……15
Using the Included 2 Channel Wireless Headphones………………………………………………………………………………………………...........………….16
Replacing the Headphone Batteries ………………………………………………………………………………………………....................................………….16
Using the Integrated Game System……………………………………………………………………………………………………………………...........………...17
Using External Sources…………………………………………………………………………………………………………………………………..........……...….17
DVD Setup and Configuration.……………………………………………………………………………………………………………………………..........…..…..18
Frequently Asked Questions……………………………………………………………………………………………..…………………………..........……………..20
Rosen AV7500 Owner’s Manual
GETTING STARTED
Use the system with the vehicle running or with the ignition key switch
in the “accessory” position.
Make certain that the remote, the headphones, and the game controller
have fresh batteries and are properly installed.
To access the disc slot, press on the lower portion of the unit.(See FIG
1 below)
To switch the system on, press the power button on the unit or remote
control. Each headrest must be turned on independently.
To Watch a DVD:
1 Power the system on, unit will default to DVD player and resume play, if
a disc is present.
2 Press on the lower part of the display bezel to expose the DVD slot.
3 Press EJECT to remove any loaded disc.
4 Insert a DVD with the label facing away from you.
5 Most DVD discs begin playback
automatically. If a menu appears,
press PLAY or ENTER as instructed
on the screen.
DVD Slot (Label facing
away from you)
Reset
Button
Power Button
Press here to open
FIG 1
6
To Play the Integrated Video Game:
1 Press SOURCE until “INTERNAL GAME”
appears on the screen.
2 Turn the game controller on by setting
the game switch to A or B.
3 Use the arrow keys on the game controller to select a game.
4 Press the START button on the game controller. (see page 17 for more
information)
5 Remember to turn the controller “OFF” when not in use.
Rosen Entertainment Systems
To Use An External Video Source
Front View
1 Connect the RCA audio and video outputs of the device to the Rosen
RCA adapter cable. Plug into AUX input port on front of monitor.
2 Press MODE (SOURCE on the remote) until “AUX 1” appears on the
screen.
Listening Over the Vehicle Speakers
1 Make sure MUTE is off. Press SPEAKER button on the front panel of the
system or the remote control and “SPEAKER SOUND ON
FM _
_ . _ PRESS LEFT OR RIGHT TO ADJUST” will appear. (This must be
done each time the system is used.)
2 Turn on the car radio. Tune to the FM frequency displayed on the
screen. If radio interference is heard, try another frequency. (see pages
13 and 15 for more information)
Press here
to access
the DVD slot
Front Panel Control
The Front Panel Controls
Fast Forward/
Navigation Up
To View Same Image on both Screens:
1 Press SOURCE until “Second Unit” appears on the screen. Your
monitor will now display the same image as the other unit.
Power
Play/Pause
Mode/Source
Speaker Sound Control
USB port
IR Transmitter
Previous Chapter or
Track/Navigation Left
Enter
Fast Rewind/
Navigation Down
Next Chapter or
Track/Navigation
Right
AUX A/V
Input
7
Rosen AV7500 Owner’s Manual
INTRODUCTION
Congratulations on owning a Rosen Entertainment System! Here’s a
list of some things you can do with your system:
•
· Play DVD movies, music CDs, or discs with MP3 audio files.
•
· Play onboard video games.
· Play audio through the vehicle speakers or the wireless headphones
· Use external audio/video inputs from video game consoles,
camcorders, or optional units like a TV tuner or a DVD changer.
· View JPG photo files or playback compatible MPG videos using the
DVD or USB memory slot
Precautions
In order to operate the system, the
vehicle ignition key switch must be
in the ACC or engine ON position.
•
•
•
•
8
ACC or engine
ON position
ACC
engine
ACC oror
engine
ON position
ON
position
Use this system only if properly installed by a qualified installer.
If the unit shows any sign of malfunction, turn it off and consult your
dealer immediately. Do not open the unit - there are no serviceable
parts inside.
Do not press directly on the display surface - you may damage
it.
Clean the display surface with a slightly damp, soft cloth using
household glass cleaner. Do not use solvents such as benzene,
thinner, or commercial cleaners.
•
When using portable radios and telephones near the system, picture or sound interference may occur.
If your car was parked in a very cold or very hot place, you may see
a blank screen, distorted picture or the unit may not be able to load
a disc. The system will return to normal after the unit temperature
returns to a normal operating range. This may take more than an
hour depending on the temperature.
If your car battery charge is low or the vehicle battery is old, you
may see a blank screen, distorted picture or the unit may not be
able to load a disc. The system will return to normal after the unit
voltage returns to a normal operating range.
Note: The system’s operating voltage range is
11-16VDC operating voltage. The system operating temperature is 32o to 140o F ( 0o to 60o C).
Use of the system beyond the safe operating
ranges listed, can cause temporary or permanent damage to the unit, and such damage
may not be covered by the manufacturer’s
warranty.
Rosen Entertainment Systems
DISC COMPATIBILITY
Compatible Discs
Incompatible Discs
Note: Not all discs are supported by this system. You may find a disc
that will not play on this system, but works fine on other players. Various manufacturers of discs change technology from time to time which
may create compatibility issues. This is not a probelm with the unit and
is not covered by warranty.
The following disc types are incompatible with the system:
Most DVD and CD-Audio discs are compatible with the AV7500 system.
The unit can also play most CD-Recordable discs containing CD-Audio, MP3 files, and JPEG images - but not all such discs. Since these
discs are usually made on home computers, there is no certification process ensuring that all such discs play on all players.
DVD Regions
When a DVD disc is created, it is encoded with a “Region number.”
The disc will only play on DVD players with the same Region number
- for instance, a Region 3 disc won’t play on a Region 1 player.
Region 1: U.S. and U.S. Territories, Canada
Region 2: Japan, Western Europe, Middle East, South Africa
Region 3: South Korea, Hong Kong, Taiwan, Southeast and East Asia
Region 4: New Zealand, Australia, Pacific Islands, Mexico, Central/
South America
Region 5: Russia and the former Soviet Union, Africa, Indian
subcontinent, North Korea
Region 6: China
·
DVD-ROM/DVD-RAM/DVD+RAM discs.
·
Most DVD-R/DVD-RW/DVD+R/DVD+RW discs.
·
Some Photo CDs.
·
CD-ROM data discs.
·
CD-Audio discs made with certain copy protection methods.
·
Any DVD with a different Region number than the unit.
·
Any disc that does not meet DVD Forum standards.
Why the system doesn’t respond the same way to all discs
When a DVD disc is created, the creator has to define how the disc
will operate when loaded into a DVD player. For instance, some discs
begin playing immediately, while other discs only display a menu and
require a menu selection to be made before playback will start.
The DVD standard also allows the maker of a DVD disc to disable
functions at certain times, such as Fast-Forward and Stop (which is
why you can’t skip past the copyright warning screen). If some DVD
feature temporarily isn’t working for you, usually the disc is preventing
the player from performing that function.
Discs that don’t properly load and play
Some CD and DVD discs, especially homemade discs which do not
have all the data needed to properly initialize all DVD players, may not
load and play properly. They may even create a state where the DVD
player will not eject the disc at all. In these cases, use a paper clip to
press the Reset button (this button’s location is shown on page 6).
9
Rosen AV7500 Owner’s Manual
CHANGING AND ADJUSTING THE DISPLAY
Selecting a display mode: The system’s “widescreen” display has
a 16:9 aspect ratio - wider than a standard television. While many
DVDs provide widescreen video images that fit the screen, standard
broadcast TV and many video games do not.
• To view a widescreen DVD, press the DISPLAY button on the
remote until “WIDE” is displayed on the screen.
•
To watch a fullscreen DVD, the internal game system, or
broadcast television, select “STANDARD.”
Change the Display Adjustments Remote Control Only: The
display has adjustable video settings. To change these settings, press
and hold the DISPLAY button on the remote control to bring up the
following menu:
BRIGHTNESS
CONTRAST
COLOR
TINT
32
32
32
32
To select a setting to be changed: Press the DOWN arrow button to
move the cursor down the menu list. Once you have selected the item
to change, use the LEFT and RIGHT arrows on the remote or the
front panel to adjust the settings. After you have finished making your
desired changes, press the DISPLAY button on the remote to exit and
save the changes you have made.
To change the value of a setting: Use the LEFT and RIGHT arrow buttons. The range is from 0 to 63.
10
To exit the menu: Press the DISPLAY button to save settings and exit.
Set the brightness level in daytime conditions with plenty of ambient
light. You can use the Day/Night mode button to switch between Day
and Night modes.
Note: The internal DVD player can be configured for either a
16:9 “Wide” image output or a 4:3 “Standard” image output.
Since the unit has a wide screen display, the DVD player should
be configured for “Wide.” For more information, see page 19.
Note: The internal DVD player also has a set of video adjustments, which are separate from the main adjustments.
Rosen Entertainment Systems
USING THE REMOTE CONTROL
You can use the remote control to operate the system, including
access to features not available on the front panel. The unit has an
infrared sensor to receive signals located in the control panel. For
definitions of each remote control button’s specific function, see the
following pages.
1
2
3
4
5
6
7
8
9
10
11
12
13
14
Power
Pause/Frame Step
Stop
Play
Previous Chapter/Track
Fast Reverse
Fast Forward
Next Chapter/Track
Speaker Sound Control
RES Sound (not active)
Mute
Eject (Not Active)
Source
Navigate Up
15
16
17
18
19
20
21
22
23
24
25
26
Info Menu
Zoom
Navigate Left
Enter
Navigate Right
Display
Setup
Navigate Down
Disc Menu
Day/Night Mode
Repeat
Subtitle
1
2
3
4
5
6
7
8
9
10
11
12
13
14
15
16
17
18
19
20
23
24
21
22
25
26
Note: If you try to perform a DVD action when it is not permitted (such as accessing the disc menu while the disc is loading),
there will be no response from the unit. This is normal operation
and is not a problem with your system.
11
Rosen AV7500 Owner’s Manual
BASIC REMOTE CONTROL BUTTONS
1
Power
5
Previous Chapter/Track
Pressing this button powers on the unit. This button also powers on the
optional external source unit.
Press to jump to the previous title or chapter if available on a DVD, or
to the previous track on an audio CD. Not supported with some VCDs.
4
8
Play
Press to begin or resume playback of a DVD.
Note: When the disc is first inserted, you may have to press
PLAY or ENTER to begin playback.
3
Stop
Press once to temporarily stop playback of a DVD. To resume normal
playback from the same point, press PLAY.
To play the disc from the beginning, press STOP twice, then PLAY.
Note: Once STOP is pressed twice, the player can only begin
playing from the beginning of the disc.
2
Pause/Frame Step
Press once to pause playback. Press repeatedly to advance video
frame by frame. To resume normal playback, press PLAY.
12
Next Chapter/Track
Press to jump to the next title or chapter if available on a DVD, or to the
next track on an audio CD. Not supported with some VCDs.
6
Fast Reverse
Press to search in reverse. To resume normal playback, press PLAY.
Press the REVERSE button multiple times to adjust search direction
and speed. Choose from 2, 4, 8, and 16x. Press PLAY to resume
regular play.
7
Fast Forward
Press during playback to fast forward. Press the FAST FORWARD button multiple times to adjust search direction and speed. Choose from
2, 4, 8, and 16x. Press PLAY to resume regular play.
24
Day/Night Mode
This button decreases display brightness for optimum viewing in low
light conditions. For more information, see page 10.
Rosen Entertainment Systems
USING MENU AND NAVIGATION BUTTONS
USING AUDIO BUTTONS
13
9
Source
SOURCE
This button allows you select the Internal DVD/CD player, the Internal
Game, the Second Unit, or the Auxiliary Input. You can also select the
optional TV Tuner, DVD changer, or other optional auxiliary sources, if
installed.
Note: The Mode button on the control panel performs the same
function.
14, 22
When this button is pressed, “Speaker Sound On” appears on the
screen, along with the FM frequency to which you should tune your
radio, such as “FM 88.1.” To change the frequency, press the LEFT or
RIGHT arrow buttons on the remote control and wait two seconds for
the station to set. Headphone audio is not affected by this button.
FM frequencies available: Find a frequency in your geographic location
that has no static transmission and set it.
Up/Down Navigation Arrows
Note: If the frequency does not appear on screen when this
button is pressed, an external FM Modulator is probably being
used. See page 15 for more information.
Press to move up or down in a menu or to change channels when
watching TV.
17, 19
Left/Right Navigation Arrows
Press to move left or right in a menu. Also used to change frequencies
on the FMT, after the Speaker Sound button is pressed.
18
Speaker Sound Control
Enter
ENTER
11
Mute
Press once to mute all system audio. As long as the Mute function is
active, “Mute” will appear on the screen. Press again to turn Mute off.
Press to make a menu selection.
21
Setup
SETUP
Pressing this button brings up the DVD player setup screen.
15
Info Menu
INFO
MENU
Pressing this button brings you into the DVD player menu.
13
Rosen AV7500 Owner’s Manual
USING DVD DISC FEATURES
23 Disc Menu
DISC
MENU
Press to see the main menu for the DVD being played. To resume
normal playback, press PLAY.
CHANGING THE SHAPE AND SIZE OF THE IMAGE
16
Zoom
+
+
View the same scene on a DVD at different magnifications.
1 Press the ZOOM button during playback to select among the following options: Zoom 1, Zoom 2, Zoom 3, and Off.
2 To resume normal playback, press ZOOM until “Zoom off” is displayed.
20 Display
DISPLAY
•
To adjust the display settings (color, contrast, etc.), press and hold
the DISPLAY button for two seconds.
For more information about image shapes, see “Managing Black Bars,”
on page 18.
25 Repeat
This button enables chapter and title repeat.
26 Subtitle
SUB
TITLE
This button enables the DVD’s Subtitle menu.
REPLACING THE REMOTE BATTERY
Press tab here
and pull battery tray out
This button allows you select from the various screen display modes.
•
To view a widescreen DVD, press this button until “WIDE” is
displayed on the screen. This uses the full width of the screen.
•
To watch a fullscreen DVD or broadcast television, press until
“STANDARD” is displayed. This mode uses most of the screen,
but black bars will be visible on the sides, like this:
Battery
Use a single 3V battery, type CR2025. Insert as shown. Observe the
correct orientation of the battery as marked on the battery tray.
Battery life is approximately six months, depending on how often the
remote is used.
14
Rosen Entertainment Systems
CD AUDIO, MP3 AND JPEG PLAYBACK
LISTENING OVER THE CAR SPEAKERS
CD Playback
The system uses a wireless FM Transmitter (FMT) to send audio
through the vehicle’s speakers. To listen over your speakers:
1 Make sure system MUTE is off. Press SPEAKER. “SPEAKER
SOUND ON FM _ _ . _” appears. Select a FM frequency as described below.
When you insert an audio CD (label facing away from you), the
standard CD commands (PLAY, NEXT, etc.) will control the unit. Some
CDs recorded in CD-R or CD-RW mode may not play.
MP3, JPEG and MPEG Playback
When a disc containing MP3, JPEG or MPEG files is inserted, a menu
screen appears. Use the arrow buttons to select a file type and press
enter to play it.
USB Playback
Inserting a USB drive into the available connector will cause DVD playback to stop and open a directory of the USB drive contents.
This may take several minutes depending on the amount of data. Use
the arrow buttons to select a file type and press enter to play it.
2 Turn on the car radio. Tune to the FM frequency displayed on the
screen, such as “FM 88.1.”
3 If no system audio is heard, try changing the FMT frequency and
re-tuning the radio to the new frequency.
To change the FM Transmitter frequency:
Press SPEAKER. “Speaker Sound on FM _ _ . _” will be displayed.
Now use the LEFT and RIGHT buttons to change the frequency.
Select a frequency, re-tune your radio and check for clear sound.
The system saves the frequency you select, and returns to it each time
the system is turned on. You may want to store the FMT frequency as
a preset of your radio for ease of use.
Note: If there seems to be a strong station on the FM Transmitter frequency, and you are hearing a radio station mixed in with
the system audio, change the FM Transmitter frequency. Avoid
frequencies used by local radio stations.
If the words “HEADPHONES ONLY” appear, the internal FMT is
turned off. It can be turned on by pressing the SPEAKER button and
selecting a FM frequency. If the words “SPEAKER SOUND” appear,
an external FM Modulator (FMM) is probably being used. In this case,
the SPEAKER button turns the external FMM on and off. The Rosen
external FMM frequencies are FM 87.7, 87.9, 88.1, 88.3, 88.5, 88.7,
88.9. If you have any questions about your FMM, please contact your
Rosen dealer.
15
Rosen AV7500 Owner’s Manual
USING THE INCLUDED WIRELESS HEADPHONES
REPLACING HEADPHONE BATTERIES
The system comes with infrared (IR) wireless fold-flat headphones.
These headphones receive a signal from an IR transmitter built into the
unit. Headphones allow rear-seat passengers to listen without using
the vehicle speakers.
The wireless IR headphones require two (2) “AAA” batteries. To
replace the batteries, slide off the battery compartment door on the left
earpiece and insert batteries, as shown. Make certain that the battery
orientation matches the marks inside the battery compartment.
To turn the headphones on and off, push the Power ON/OFF button on
the earpiece. The Power LED on the earpiece indicates when headphone power is on. Power turns off automatically after three minutes of
no audio, in order to preserve battery life.
The headphones have a two-position slide switch labeled “A/B.” When
the switch is in the “A” position, the headphones play audio from the
source designated as “A.” When the switch is in the “B” position, the
headphones play audio from the source designated as “B.”
To adjust the headphone volume, rotate the thumb wheel on the headphones.
Adjust headphones
here
A/B Switch
On/Off
Batteries
16
Volume
Rosen Entertainment Systems
USING THE INTEGRATED GAME SYSTEM
USING EXTERNAL SOURCES
There are integrated video games built into the system. The Rosen
Game Controller is included.
You may use optional external video games, camcorders, and other
portable video units by connecting the unit to the auxiliary RCA input
jacks on the unit. To connect a USB key, the unit must be in DVD
mode. “USB” will appear on the screen.
Flashing Light
To play a game:
Set the A/Off/B switch to A or B to
turn the game controller on.
Press SOURCE on the remote or
MODE on the front control panel
until “INTERNAL GAME” appears,
along with the game startup menu.
Battery Indicator: A red light will flash when the buttons are pressed
indicating the batteries are ok.
Set the controller to channel A or B depending on which headrest unit
you will be using.
Use the left and right arrows on the controller to select which game you
want to play from the list.
Press START on the controller, to begin a game.
While playing, use A and/or B as fire, jump, or other action buttons,
depending on the game.
To return to the game main menu, press RESET on the controller.
USB Port
Aux A/V Input
To use an external game system, a 12VDC to 110VAC power inverter,
available at most electronic retail stores, is often required.
Note: If you want to watch non-widescreen, 4:3 images, press
the DISPLAY button on the remote control until “STANDARD”
is displayed on the screen. This will properly size the image,
instead of stretching the image across the wide screen. In
“STANDARD” mode, you will see black bars on the sides of the
image.
Note: The controller works using infrared “line-of-sight” technology. If the controller is held so that there is not a clear line of sight
to the system, intermittent operation or reset will result.
17
Rosen AV7500 Owner’s Manual
DVD TYPICAL SETUP AND CONFIGURATION
Video Settings
The following section explains how to customize various features of the
Internal DVD Player, including languages, display, and parental control
features.
This allows you to customize the Aspect Ratio and Video Output.
Note: Some features may not be available on your system.
Default Settings:
To change the settings for the internal DVD player:
1 Press SETUP on the remote.
2 Use the UP and DOWN navigation buttons to highlight a selection.
3 Press the ENTER button to confirm your selection.
→Aspect Ratio = 16:9
→TV System = NSTC
Language Settings
Several language settings can be customized on the DVD Player.
These languages can vary depending on the language supported by
the DVD disc.
Audio Settings
This allows you to customize the audio settings.
Note:Not all language settings are supported by all discs.
Default Settings:
→OSD = English
→Subtitle = Off
→DivX Subtitle = English
→Audio = English
→Disc Menu = English
18
Default Settings:
→Digital Output = PCM
→Night Mode = Off
→Pro Logic = Off
→LPCM = 96K
Rosen Entertainment Systems
Rating Settings
This setting allows you to set parental control on the DVD player.
Note: Changing the state of some settings can cause apparent
system failure. Do not change any settings other than those
described in this section.
→Default password = 3308
Misc Settings
This screen allows you to change the settings for the Screen Saver
and Closed Caption. Selecting “Use Default Settings” will reset the
system to the factory default settings.
Default Settings:
→Screen Saver = Off
→Closed Caption = Off
19
Rosen AV7500 Owner’s Manual
FREQUENTLY ASKED QUESTIONS
HOW DO I RESET MY SYSTEM?
To RESET the system, turn the vehicle off or press and hold the RESET button for 3 or more seconds. The RESET button is located near
the eject button. (see page 6)
MY SYSTEM IS NOT RESPONDING TO COMMANDS
Periodically, the DVD system may receive conflicting commands from
a DVD or remote control. When this happens, the system may not respond properly to the remote control, control buttons, or may be locked
up and not respond at all.
Solution: The system needs to be RESET as described above.
Solution: Replace the battery in the remote control.
MY AUDIO HAS STATIC ON THE RADIO
To receive audio over the radio, the radio must be tuned to a broadcast
station which is not in use by a local radio station.
Solution: Set the FM Transmitter to an alternate radio station. Then
tune the radio to the newly selected station. (see pages 7,15)
MY DVD WILL NOT PLAY
Some DVDs will not play properly due to compatibility, dirt, rough
edges, damage to the disc or the system may be beyond its operating
temperature.
Solution: Confirm the DVD is a compatible format. (see page 9)
Solution: Check and clean the DVD as needed.
Solution: Use a pencil or soft wood to smooth the edge of the disk.
Solution: Replace the DVD if scratched, cracked or warped.
Solution: Allow the system temperature to return to normal operating
temperatures. This may take up to an hour after the air temperature in
the vehicle is at a comfortable level.
MY SYSTEM RESETS WHEN I START MY VEHICLE
Voltage levels while starting the vehicle can fall below the minimum
operating levels for the system.
Solution: Ensure your battery is fully charged and in good condition.
Solution: Avoid operating your system without the engine running for
periods longer than 10 minutes.
20
I CAN NOT GET AUDIO ON THE RADIO
To receive audio over the radio, the system must have SPEAKERS
ENABLE selected, and the radio must be tuned to the proper station.
Solution: Press the SPEAKER button on the remote control to enable
the radio transmission.
Solution: Tune the radio to the proper FM station as directed in the
“Listening Over the Car Speakers” section of this manual. (see page 15)
Solution: Reset the system
MY DVD WILL NOT EJECT
Damaged DVDs, incompatible DVDs or improper system installation
will prevent the DVD from ejecting and may lock up the system.
Solution: Reset the system then quickly press EJECT while the disc is
spinning.
Solution: Check the DVD for damage, replace the DVD if scratched,
cracked or warped.
Solution: Confirm the DVD is a compatible format. (see page 9)
I DO NOT HAVE HEADPHONE AUDIO
The headphone audio should be present at all times, unless MUTE is
on, or a DVD setting has been changed in the DVD Settings Menu.
Solution: Press the MUTE button to enable the audio and turn the
MUTE OFF.
Solution: Confirm that the headphones are turned on, and the ON
LED indicator is illuminated. Change batteries if needed.
Solution: Check the DVD settings and restore them to FACTORY
SETTINGS if needed.
MY PICTURE FREEZES
Damaged or incompatible DVDs will cause the system to freeze and
lock up the system.
Solution: Check and clean the DVD as needed.
Solution: Replace the DVD if scratched, cracked or warped.
Solution: Confirm the DVD is a compatible format. (see page 9)
Solution: Allow the system to return to normal operating temperature.
Solution: Reset the system.
Rosen Entertainment Systems
MY RADIO LOSES ITS NORMAL STATIONS
With an external FM Modulator and while the system is set to broadcast over the radio with SPEAKERS ENABLED, the vehicle’s antenna
is temporarily disabled.
Solution: Press the SPEAKER button on the remote to restore the
vehicle antenna, “Headphones Only” will appear on the screen.
MY PICTURE IS DISTORTED
Excessive cold or hot temperatures will cause the picture on the display to become distorted or lose color or contrast.
Solution: Allow the system temperature to return to normal operating
temperatures. This may take up to an hour after the air temperature in
the vehicle is at a comfortable level.
SERVICE PARTS
Part Number
Description
AP1006
AP1007
AC3640
AP1021
IR Remote Control
IR Game Controller
Dual Channel Fold Flat IR Headphones
Owner’s Manual
MY PICTURE IS BLACK
The screen will appear black or dark blue if there is no video signal.
This may happen if the DVD fails to initialize properly or if a source is
selected which is not connected.
Solution: Eject the DVD and inspect it for damage, scratches or
cracks. Clean the DVD and re-insert the disc.
Solution: Reset the system.
WHY CAN’T I HEAR THE AUDIO OUT OF THE HEADREST OVER
THE CAR SPEAKERS?
Only one headrest at a time can be played through the car’s audio
system. To change this, press the speaker button on the monitor you
want to hear. When you do this you will see “Headphones Only” on the
other screen.
For other questions and capabilities please contact your authorized
Rosen dealer. To locate a Rosen Entertainment Systems authorized
dealer, please visit www.rosenentertainment.com.
21
RES PN AP1021 Rev B
© 2007 Rosen Entertainment Systems
www.rosenentertainment.com
All rights reserved.
No part of this publication may be reproduced, stored in a retrieval system or transmitted in any form, electronic, mechanical, recording or other means without prior written permission from Rosen.
INSTALLATION GUIDE
AV7500 Dual DVD Headrest Replacement System
NOTICE OF INTENDED INSTALLATION AND USE
E
ROSEN ENTERTAINMENT SYSTEMS VIDEO PRODUCTS ARE NOT INTENDED FOR VIEWING BY
THE DRIVER, AND ARE TO BE INSTALLED ONLY TO BE VIEWED BY REAR-SEAT OCCUPANTS.
IMPROPER INSTALLATION COULD DISTRACT THE DRIVER OR INTERFERE WITH SAFE
OPERATION OF THE VEHICLE, WHICH COULD RESULT IN SERIOUS INJURY OR DEATH, AND
COULD ALSO VIOLATE STATE LAW. ROSEN ENTERTAINMENT SYSTEMS DISCLAIMS ANY
LIABILITY FOR ANY BODILY INJURY OR PROPERTY DAMAGE THAT MAY RESULT FROM ANY
IMPROPER OR UNINTENDED INSTALLATION AND/OR USE.
BEFORE YOU START THE INSTALLATION, READ THIS GUIDE!
Rosen “Headrest DVD” systems are the easiest-to-install DVD entertainment systems available today.
However, we strongly recommend reading this guide before starting the installation!
For additional technical tips, please visit
www.Rosendealercentral.com
1 Make sure you have the tools you will need
These common items are needed to complete this installation:
· Digital multimeter (DMM)
· #2 Phillips screwdriver
· Appropriate tool for headrest removal · Allen wrench set
· Panel removing tools
· Cable routing tool (included)
· Security latch tool (included)
· Retractable knife
· Wire cutters, strippers, and a crimping tool
· 1/4” drive sockets are often needed for dashboard and trim disassembly
· Check if Torx or Allen-drive bolts are used on any panels you will be removing
· You will need a DVD in good condition when testing the system
Standard installation parts you will need include wire, wire ties, wire crimp connectors or solder, and
electrical insulating tape. Installation of aftermarket automotive electronics also often requires access to
special parts. It is a good idea to have a source for these common installation parts.
2 Inspect the vehicle and plan your work
k
CHECK THE BATTERY
Test the battery voltage to make sure it’s fully charged and inspect battery terminals for tightness and any
corrosion. This only takes seconds and can save hours of troubleshooting later.
DECIDE ON A LOCATION FOR THE INTERFACE UNIT
Location of the interface unit varies by vehicle, but is typically secured underneath a driver or passenger
seat out of sight and unobstructed by moving parts and passengers.
Rosen Entertainment Systems
AV7500 Installation Guide
Copyright 2007 all rights reserved
AP1024 Rev A
Page 1
IF YOU HAVE PURCHASED A PRE-ASSEMBLED HEADREST SYSTEM, SKIP TO SECTION 6
3 Installing the electronics mounting bracket
You will need to install the electronics mounting bracket. The following steps will guide you through this
process.
Step 1: Locate clean, non-abrasive working surface to
prepare the headrest units.
Step 2: Locate the mounting bracket as shown.
Step 3: Install the 4 supplied mounting screws to fully
attach the mounting bracket
Headrest cushion with electronics
mounting bracket installed
4 Running the cables through the headrest posts
You will need to route the cables through the headrest posts. The following steps will guide you through this
process.
Step 1: Place the AV7500 electronics system above the
headrest bucket as shown in figure 1.
Step 2: Position the cables on each side of the headrest
bucket and ensure they are smooth without kinks or knots.
Fig. 1
Step 3: Route the cables through the headrest posts,
being careful not to cross the cables.
Step 4: Position the AV7500 electronics unit in the
headrest bucket while constantly pulling the cable through
the headrest posts (see figure 2). This step is critical to
prevent damage to the cables or AV7500 unit.
Fig. 2
IMPORTANT!
Do NOT allow the cables to cross over one another or leave excess cable slack in the
headrest bucket. This will prevent the unit from closing properly, could permanently
damage the unit.
Rosen Entertainment Systems
AV7500 Installation Guide
Copyright 2007 all rights reserved
AP1024 Rev A
Page 2
5 Mounting the AV7500 electronics into the headrest bucket
You will need to mount the AV7500 electronics unit into the headrest bucket. The following steps will guide
you through this process.
to the LCD
CAUTION!
Do NOT press directly on the surface of the LCD. This will cause permanent damage
which will not be covered by warranty.
Always REMOVE ANY SLACK in the cables during assembly. Failure to follow this step may
cause damage to the cables.
Step 1: Place the lower edge of the AV7500 unit into the
headrest bucket first. Be sure that the lower edge of the
AV7500 unit does NOT go below the top surface of the
headrest bucket (see figure 3). Use caution so the material
on the bucket is not damaged.
Step 2: Pull any additional slack created in the cables
through the headrest posts.
Step 3: Align electronics on electronics mounting bracket.
Push firmly, the side latch will “click” to lock monitor in
place. Remove excess cable slack! Use caution NOT to
press on the LCD surface as this can cause permanent
damage to the LCD. (see figure 4)
Fig. 3
Fig. 4
IMPORTANT!
Do not force electronics into the bracket, the components are designed to easily align
when properly installed.
BE 100% CERTAIN TO REMOVE ALL SLACK in the cables during assembly of the
units. Failure to follow this step may damage the unit, internal cables or prevent the
unit from properly closing. If you feel resistance when closing the unit, please confirm
that all cable slack has been removed.
Rosen Entertainment Systems
AV7500 Installation Guide
Copyright 2007 all rights reserved
AP1024 Rev A
Page 3
Wiring diagram
Gray
Black
REMOTE
AUX 2
FMM OUTPUT
IR A
A/V OUTPUT
Gray
MONITOR A
IR B
A/V OUTPUT
Black
MONITOR B
POWER
Interface Harness
Red – 12V ACC (switched)
Black – Ground
Gray – 12V Switch-FMM
Black – Ground-FMM
Blue – 12V (Aux source)
Black – Ground (Aux source)
Purple – Antenna
6 Removing the factory headrests
IMPORTANT!
Do NOT start this step until you have inspected the seats and factory headrests for any
obstructions.
You will need to remove the existing factory headrests. The following steps will guide you through this
process.
Step 1: Determine if a locking device is present on the factory headrest. Locking devices are usually
a button or small push pin located at the base of the headrest post(s).
Step 2: If a locking device is present, press and hold the lock release, and pull firmly upward on the
headrest. If no locking device is visibly present refer to the vehicle’s owners manual or the vehicle’s
manufacturer for further instructions.
Rosen Entertainment Systems
AV7500 Installation Guide
Copyright 2007 all rights reserved
AP1024 Rev A
Page 4
7 Installing the AV7500 headrests
You will need to install the AV7500 headrests and route the cables through the seat backs. The following
steps will guide you through this process.
Step 1: Check the headrest down tubes in the seat backs for
any obstructions. Normally the down tubes are clear and allow
the AV7500 cables to exit from the bottom of the down tubes.
Step 2: Position the AV7500 headrest so the monitor will be facing the
rear of the vehicle once properly installed. Then drape the cables over
the seat back, being sure that the cables are NOT crossed. Place the
AV7500 safely on the seat cushion (see figure 6).
Step 3: Attach the cable routing tool to a cable. Slowly feed
each cable routing tool through its corresponding down tube until
the ends of the cable routing tool is visible at the bottom of each
seat back. Pull the cable until it extends out the base of the seat
back. Repeat for the second cable.
Fig. 6
Step 4: Remove the cable slack until only ½ inch is showing.
Insert the headrest into the down tubes. This step normally takes
some moderate force, and may be eased by using a very light
lubricant on the posts. Be certain to pull lightly on the cables as
the headrest is inserted to remove excess slack (see figure 7).
Step 5: Once the headrest is fully seated in the down position,
place a small service loop (6”-12”) of cable in the seat back, to
allow the headrest to easily adjust up or down.
Fig. 7
Step 6: Connect the interface cable to the monitor cable,
ensuring that the cables are matched gray-to-gray and blackto-black . Properly route the cables to ensure they are secured,
out of sight and unobstructed by moving parts and passengers.
CAUTION!
Use caution when pulling on the cables as some seats may have sharp edges or
objects in the seat back which could damage the cables. Sometimes it is necessary to
remove or partially remove the seat back covering to properly install the cables.
Rosen Entertainment Systems
AV7500 Installation Guide
Copyright 2007 all rights reserved
AP1024 Rev A
Page 5
8 Routing the harnesses and making the wiring connections
It is the installer’s responsibility to ensure that the safety equipment in the vehicle is
NOT adversely affected by installation of this system. Ensure that the routing of the
harnesses does NOT obstruct airbags, SRS or other safety devices.
You will need to route the harnesses and make the power connections to the vehicle. The following steps
will guide you through this process.
Step 1: This system requires a minimum of 12V (+) ACC Switched and Ground (-) to operate. The 12V (+)
ACC Switched source must be capable of supplying a minimum of 7A. These can be found at multiple
points in the vehicle. The Ground (-) should be located at a Factory Chassis ground point when possible.
Step 2: Select a location to mount the junction box for the AV7500 unit. Normally the junction box is best
located under either the driver or passenger seat. Be sure to locate it so that it will not obstruct any moving
parts in the seat or damaged by the feet of passengers.
.
Step 3: Route the power harness to the dash area where you have located the 12V (+) ACC connection
point. Be sure to protect the cable from any potential sharp edges which could damage the harness in the
future. To avoid vibration noise, use tape to secure the harness whenever possible.
Step 4: Route the FMT antenna wire (purple) toward the antenna/tuner. (Be sure to separate it
from the power wires and avoid any power seat modules or other vehicle harnesses as these
may induce noise into the FM transmission.)
Step 5: When connecting the power harness, Rosen recommends soldering all connections. When using
T-Tap or crimp connectors, always ensure the connections are made with the proper gauge connectors.
Failure to make a proper connection will result in a system failure in the future.
Step 6: With ACC off, plug all harnesses into the main interface unit. Note: Plug the main power
harness in last.
9 Initial test, reassembly, and pre-delivery re-test
You will need to fully test the system to ensure it is working and connected to the vehicle properly. The
following steps will guide you through this process.
Step 1: INITIAL TEST (Do this BEFORE you reassemble any trim panels)
a. Reconnect the vehicle battery if needed
b. Install batteries into the remote control, headphones and game controllers
c. Start the vehicle (ensure that it is safe to do so, there are no tools or people under the hood)
d. Perform the following steps on each headrest to ensure proper operation:
• Close and re-open the unit several times
• With the display open, insert a DVD (in good condition) and select play
• Check the audio on the IR headphones
• Press the Speaker button and adjust the vehicle radio frequency as needed to
check the audio
• Select and play the internal games
• Eject the disc
• Turn off the vehicle and wait for the unit to turn off
e. If the system does not function properly, reset the system by pressing and holding the reset
button located near the eject button
Step 2: REINSTALL all trim panels removed during the installation using care not to damage any
harnesses
Rosen Entertainment Systems
AV7500 Installation Guide
Copyright 2007 all rights reserved
AP1024 Rev A
Page 6
Step 3: PRE-DELIVERY AND RE-TEST
a. Start the vehicle (ensure that it is safe to do so, there are no tools or people under the hood)
b. Perform the following steps
• Insert a DVD (in good condition) and select play
• Re-check IR headphones and FMT audio
• Eject the disc
• Remove the protective films and clean the unit as needed
c. Place the Owners Information package in the glove compartment
d. Place the IR headphones, remote control and game controller in a convenient location
10 Installer Setup
To access install setup menu: use the remote control, press EJECT-ENTER-1-1-2-0
•
•
•
•
To change AUX 2 input labeling, highlight AUX 2 label and scroll left/right using arrows.
To select EXT FMM, highlight EXT FMM and select on.
POD ADDR is used to manually set pod address
Autoà address is based on which port the pod is plugged into.
Selecting A or B allows you to manually set the pod’s address
When manually selecting POD ADDR, an OSD will appear on opposite pod displaying what pod it
will be
Specifications
Supply Voltage
Current Consumption
Video Signal
Audio Signal
IR Audio Signal
Discs Played
:
:
:
:
:
:
12V (+) ACC negative ground system, 11-16VDC operating range
7A max operating
Composite video 1.0Vp-p 75 , NTSC/PAL
Audio Output : 2Vrms, line output
Channel A= 2.3 MHZ / 2.8 MHZ and Channel B= 3.2 MHZ / 3.8 MHZ
(1) 5” (12cm) DVD-VIDEO Disc
(2) Compact Disc (CD-DA/CD-R/CD-RW/MP3)
Operating Temperature
: 0C to +60C
Note: Specifications and designs are subject to modification without notice.
Rosen Entertainment Systems
AV7500 Installation Guide
Copyright 2007 all rights reserved
AP1024 Rev A
Page 7
FAQ’s
The monitor cables get stuck in the posts
Normally the cables will slide through the posts with very little effort. However, if you encounter difficulty,
please check the following:
Solution: Ensure that there are no obstructions inside the post.
Solution: Ensure that there are no metal burs at the entrance or exit of the posts.
Solution: Ensure that there are no kinks or knots in the cables.
Solution: Use a cable pulling lubricant.
The monitor does not fit into the headrest bucket
The AV7500 unit has been designed to fit tightly into the headrest bucket. This was done to ensure a high
quality fit with no gaps.
Solution: Use a mild soap and water solution to LIGHTLY moisten the mating surface of the
headrest bucket. CAUTION! – Do not get water on or in the electronics as damage WILL result
which will not be covered by warranty.
The FMT does not transmit audio
The system is designed to use either the internal FM Transmitter or an external FM Modulator. Select the
mode in the installation set up menu.
Solution: Check the FMT configuration to be sure that FMM is set to OFF. FMT is the default.
Resetting the system
It is a good practice to reset the system immediately after Power is FIRST connected.
Solution: To reset the system, open the DVD unit and locate the small reset button next to the
Eject button. Press and hold the Reset button for 3 or 4 seconds.
Finding the best Power Point
Avoid connection to wires which supply the following: fan/seat/mirror motors power, excessively large sized
wires, glow plug power lines, radio power lines, defroster power lines, etc.
Solution: Open power points can be located in the fuse box, which are designed for accessory
equipment.
The DVD restarts when the vehicle is started
When the vehicle is started, the DVD should resume from previous point. However, if the voltage falls below
10VDC during cranking, the system will restart at the beginning of the DVD.
Solution: Check if the battery is fully charged. New vehicles rarely have a fully charged battery.
Solution: Older batteries can not provide the necessary voltage during an engine cranking.
Vehicle battery may need replacement.
Solution: Extreme climate conditions (cold or hot) will reduce the efficiency of the battery. Be sure
the battery is fully charged and in good condition. Replace the battery if needed.
The System Stays On and Never Shuts Off
The System is designed to turn off when the key is turned off. If the ACC (Red) wire is connected to a
constant 12VDC (+) power point the system will system will stay on until the battery dies.
Solution: Check the ACC connection point to be sure it is switched with the key, and relocate as
needed.
No headphone audio
The Headphone audio should be preset at all times, unless the MUTE is set to on, or a DVD Setting has
been changed in the DVD Settings Menu.
Solution: Press the MUTE Button to enable the audio and turn the MUTE OFF.
Solution: Confirm the headphones have fresh batteries, are turned on, and the ON LED Indicator
is Illuminated.
Solution: Check the DVD Setting and restore them to FACTORY SETTINGS if needed (see the
Owners Manual).
Rosen Entertainment Systems
AV7500 Installation Guide
Copyright 2007 all rights reserved
AP1024 Rev A
Page 8
Selecting FMM pre-sets
For best operation, the FMM Pre-set selection should be on a station which is not in use or has weak
broadcast in your area.
Solution: You can also check www.RosenDealerCentral.com. This site provides you with the best
stations in your local area. Select a corresponding FMM Station when available.
Reducing audio or video noise
Audio or video noise may be induced into the system from sources ranging from harness location, power
point to poor grounding.
Solution: Re-route the wire harnesses to avoid passing over other harnesses or near electrical
motors.
Solution: Try relocating the ground point to factory ground point or factory ground wire.
Solution: In some cases, inline audio filters may be required. Contact Rosen for support on
selection of a filter.
Missing Channel B Audio
System includes a monitor A and monitor B. Monitor A is channel “A” on headphones and monitor B is
channel “B” on headphones. If audio is not present, check the following.
Solution: Check A/B switch on headphones.
Solution: Reset the system
Solution: Check all cable connections
Solution: Please refer to “Install Set-up Menu”.
Solution: Force channel B via Installer Setup menu
Service and optional parts list
Part Number
Description
Part Number
Description
AP1006
AP1007
AC3640
AP1008
AP1010
AP1012
AC3196
AP1021
IR Remote Control
IR Game Controller
2 Channel IR Headphones
Power Harness
Interface Extension Harness
Remote IR Harness
External Wired FMM
Owners Manual
AC3323
AP1003
AP1041
AP1042
AP1011
AP1019
AP1026
External Wireless FMT
Interface Module
Monitor Black Harness
Monitor Gray Harness
Monitor Aux Harness
Hardware Pack
Quick Reference Card
Rosen Entertainment Systems
AV7500 Installation Guide
Copyright 2007 all rights reserved
AP1024 Rev A
Page 9