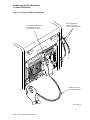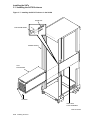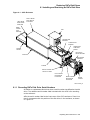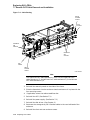
1
SA7x Enclosure
Service Manual
Order Number: EK–OSA7X–SM. C01
This manual explains how to operate, maintain, troubleshoot, and repair
the SA7x family of disk enclosures: the SA70, SA71, SA72, and SA73.
Digital Equipment Corporation
Maynard, Massachusetts
October 1993
While Digital believes the information included in this publication is correct as of the date of
publication, it is subject to change without notice.
Digital Equipment Corporation makes no representations that the interconnection of its products
in the manner described in this document will not infringe existing or future patent rights, nor
do the descriptions contained in this document imply the granting of licenses to make, use, or sell
equipment or software in accordance with the description.
NOTE: This equipment generates, uses, and may emit radio frequency energy. The equipment has
been type tested and found to comply with the limits for a Class A digital device pursuant to Part
15 of the FCC rules. These limits are designed to provide reasonable protection against harmful
interference in a commercial installation. This equipment generates, uses, and can radiate radio
frequency energy and, if not installed and used in accordance with the instruction manual, may
cause harmful interference to radio communications.
Any changes or modifications made to this equipment may void the user’s authority to operate the
equipment.
Operation of this equipment in a residential area may cause interference in which case the user,
at his own expense, will be required to take whatever measures may be required to correct the
interference.
Restricted Rights: Use, duplication, or disclosure by the U.S. Government is subject to restrictions
as set forth in subparagraph (c) (1) (ii) of the Rights in Technical Data and Computer Software
clause at DFARS 252.227-7013.
©Digital Equipment Corporation 1991, 1992, 1993.
All Rights Reserved.
Printed in the United States of America.
DEC, DSA, DSDF, HSC, HSC50, HSC70, KDA, KDA50, KDB50, KDM, MicroVAX, PDP-11, RA, SA,
SDI, UDA, UNIBUS, VAXsimPLUS, and the DIGITAL logo are trademarks of Digital Equipment
Corporation.
This document was prepared using VAX DOCUMENT Version 2.1.
Contents
Preface . . . . . . . . . . . . . . . . . . . . . . . . . . . . . . . . . . . . . . . . . . . . . . . . . . . . . . . . . . . .
ix
1 Introducing the SA7x Enclosure
1.1
1.2
1.3
1.4
1.4.1
1.4.2
1.4.3
SA7x Enclosure Overview . . . . . . . . . . . . .
RA7x and SA7x Configurations . . . . . . . . .
SA7x Specifications . . . . . . . . . . . . . . . . . .
User Precautions . . . . . . . . . . . . . . . . . . . .
Data Recovery . . . . . . . . . . . . . . . . . . .
Recommended Operating Temperature
Electrostatic Discharge Protection . . . .
.
.
.
.
.
.
.
.
.
.
.
.
.
.
.
.
.
.
.
.
.
.
.
.
.
.
.
.
.
.
.
.
.
.
.
.
.
.
.
.
.
.
.
.
.
.
.
.
.
.
.
.
.
.
.
.
.
.
.
.
.
.
.
.
.
.
.
.
.
.
.
.
.
.
.
.
.
.
.
.
.
.
.
.
.
.
.
.
.
.
.
.
.
.
.
.
.
.
.
.
.
.
.
.
.
.
.
.
.
.
.
.
.
.
.
.
.
.
.
.
.
.
.
.
.
.
.
.
.
.
.
.
.
.
.
.
.
.
.
.
.
.
.
.
.
.
.
.
.
.
.
.
.
.
.
.
.
.
.
.
.
.
.
.
.
.
.
.
1–1
1–6
1–9
1–10
1–10
1–11
1–11
.
.
.
.
.
.
.
.
.
.
.
.
.
.
.
.
.
.
.
.
.
.
.
.
.
.
.
.
.
.
.
.
.
.
.
.
.
.
.
.
.
.
.
.
.
.
.
.
.
.
.
.
.
.
.
.
.
.
.
.
.
.
.
.
.
.
.
.
.
.
.
.
.
.
.
.
.
.
.
.
.
.
.
.
.
.
.
.
.
.
.
.
.
.
.
.
.
.
.
.
.
.
.
.
.
.
.
.
.
.
.
.
.
.
.
.
.
.
.
.
.
.
.
.
.
.
.
.
.
.
.
.
.
.
.
.
.
.
.
.
.
.
.
.
2–1
2–3
2–5
2–6
2–10
2–14
SA7x Installation Overview . . . . . . . . . . . . . . . . . . . . . . . . . . . . . .
Power and Safety . . . . . . . . . . . . . . . . . . . . . . . . . . . . . . . . . . .
Recording Disk Drive Serial Numbers . . . . . . . . . . . . . . . . . . .
Selecting Line Input Voltage . . . . . . . . . . . . . . . . . . . . . . . . . . . . .
Performing a Post-Installation Checkout and Power-Up . . . . . . . .
Setting Drive Unit Numbers . . . . . . . . . . . . . . . . . . . . . . . . . . . . .
Installing an Add-On SA7x Enclosure in an SA900 Storage Array
General Installation Considerations . . . . . . . . . . . . . . . . . . . . .
Preparing the SA900 Cabinet . . . . . . . . . . . . . . . . . . . . . . . . . . . .
Guide Rail Plate Installation . . . . . . . . . . . . . . . . . . . . . . . . . . . . .
Left Position Guide Rail Plate Installation . . . . . . . . . . . . . . . . . .
Right Position Guide Rail Plate Installation . . . . . . . . . . . . . . . . .
Preparing the SA7X Enclosure . . . . . . . . . . . . . . . . . . . . . . . . . . . .
Installing the SA7X Enclosure . . . . . . . . . . . . . . . . . . . . . . . . . . . .
Completing the Installation . . . . . . . . . . . . . . . . . . . . . . . . . . .
.
.
.
.
.
.
.
.
.
.
.
.
.
.
.
.
.
.
.
.
.
.
.
.
.
.
.
.
.
.
.
.
.
.
.
.
.
.
.
.
.
.
.
.
.
.
.
.
.
.
.
.
.
.
.
.
.
.
.
.
.
.
.
.
.
.
.
.
.
.
.
.
.
.
.
.
.
.
.
.
.
.
.
.
.
.
.
.
.
.
3–1
3–1
3–1
3–2
3–2
3–5
3–6
3–6
3–9
3–11
3–11
3–13
3–14
3–15
3–19
2 SA7x Technical Description
2.1
2.2
2.3
2.4
2.5
2.6
SA7x
SA7x
SA7x
SA7x
SA7x
SA7x
Chassis . . . . . . . . . . . . . . . . . . . . . . .
Frame . . . . . . . . . . . . . . . . . . . . . . . .
Fan Assembly . . . . . . . . . . . . . . . . . .
OCP and Transition Board Assembly
Power Supply . . . . . . . . . . . . . . . . . .
Enclosure Internal Cabling . . . . . . . .
3 Installing the SA7x
3.1
3.1.1
3.1.2
3.2
3.3
3.4
3.5
3.5.1
3.6
3.7
3.8
3.9
3.10
3.11
3.11.1
iii
4 Operating the SA7x
4.1
4.1.1
4.1.2
4.2
4.3
4.4
4.4.1
4.4.2
SA7x Switches and Indicators . . . . . . . . . . . . . .
Using the Switches and Indicators . . . . . . . .
Using Drive Power Switches and Indicators
Using SA7x Rear Panel Switches and Indicator .
Applying Power to the SA7x Enclosure . . . . . . .
Placing RA7x Drives On Line and Off Line . . . .
Placing a Drive On Line . . . . . . . . . . . . . . . .
Taking a Drive Off Line . . . . . . . . . . . . . . . .
.
.
.
.
.
.
.
.
.
.
.
.
.
.
.
.
.
.
.
.
.
.
.
.
.
.
.
.
.
.
.
.
.
.
.
.
.
.
.
.
.
.
.
.
.
.
.
.
.
.
.
.
.
.
.
.
.
.
.
.
.
.
.
.
.
.
.
.
.
.
.
.
.
.
.
.
.
.
.
.
.
.
.
.
.
.
.
.
.
.
.
.
.
.
.
.
.
.
.
.
.
.
.
.
.
.
.
.
.
.
.
.
.
.
.
.
.
.
.
.
.
.
.
.
.
.
.
.
.
.
.
.
.
.
.
.
.
.
.
.
.
.
.
.
.
.
.
.
.
.
.
.
.
.
.
.
.
.
.
.
4–1
4–1
4–4
4–5
4–6
4–7
4–7
4–8
Identifying Problems . . . . . . . . . . . . . . . . . . . . . . . . . . . . . . .
Troubleshooting a Dead Enclosure . . . . . . . . . . . . . . . . . . . . .
If the Fault Indicator Is Lit . . . . . . . . . . . . . . . . . . . . . . .
If the Fault Indicator Is Not Lit . . . . . . . . . . . . . . . . . . . .
Troubleshooting a Flashing Drive Power Indicator . . . . . . . .
Troubleshooting Excessive Drive Errors or a Fault Condition
Reading OCP Error Codes . . . . . . . . . . . . . . . . . . . . . . . . . . .
Troubleshooting a Drive Not Visible to the Controller . . . . . .
Troubleshooting the OCP . . . . . . . . . . . . . . . . . . . . . . . . . . . .
.
.
.
.
.
.
.
.
.
.
.
.
.
.
.
.
.
.
.
.
.
.
.
.
.
.
.
.
.
.
.
.
.
.
.
.
.
.
.
.
.
.
.
.
.
.
.
.
.
.
.
.
.
.
.
.
.
.
.
.
.
.
.
.
.
.
.
.
.
.
.
.
.
.
.
.
.
.
.
.
.
.
.
.
.
.
.
.
.
.
5–1
5–1
5–1
5–2
5–3
5–5
5–5
5–6
5–6
5 Troubleshooting the SA7x
5.1
5.2
5.2.1
5.2.2
5.3
5.4
5.5
5.6
5.7
6 Replacing RA7x Disk Drives
6.1
6.1.1
6.1.2
6.1.3
6.1.4
6.2
Installing and Removing an RA7x Disk Drive . .
Recording RA7x Disk Drive Serial Numbers
Reversing the RA70 Shoe Plate . . . . . . . . . .
Installing an RA7x Disk Drive . . . . . . . . . . .
Removing an RA7x Disk Drive . . . . . . . . . . .
Installing and Removing a Drive Position Filler
.
.
.
.
.
.
.
.
.
.
.
.
.
.
.
.
.
.
.
.
.
.
.
.
.
.
.
.
.
.
.
.
.
.
.
.
.
.
.
.
.
.
.
.
.
.
.
.
.
.
.
.
.
.
.
.
.
.
.
.
.
.
.
.
.
.
.
.
.
.
.
.
.
.
.
.
.
.
.
.
.
.
.
.
.
.
.
.
.
.
.
.
.
.
.
.
.
.
.
.
.
.
.
.
.
.
.
.
.
.
.
.
.
.
.
.
.
.
.
.
6–2
6–3
6–4
6–6
6–6
6–8
.
.
.
.
.
.
.
.
.
.
.
.
.
.
.
.
.
.
.
.
.
.
.
.
.
.
.
.
.
.
.
.
.
.
.
.
.
.
.
.
.
.
.
.
.
.
.
.
.
.
.
.
.
.
.
.
.
.
.
.
.
.
.
.
.
.
.
.
.
.
.
.
.
.
.
.
.
.
.
.
.
.
.
.
.
.
.
.
.
.
.
.
.
.
.
.
.
.
.
.
.
.
.
.
.
.
.
.
.
.
.
.
.
.
.
.
.
.
.
.
.
.
.
.
.
.
.
.
.
.
.
.
.
.
.
.
.
.
.
.
.
.
.
.
.
.
.
.
.
.
.
.
.
.
.
.
.
.
.
.
.
.
.
.
.
.
.
.
.
.
.
.
.
.
.
.
.
.
.
.
.
.
.
.
.
.
.
.
.
.
.
.
.
.
.
.
.
.
.
.
.
.
.
.
.
.
.
.
.
.
.
.
.
.
.
.
.
.
.
.
.
.
.
.
.
.
.
.
.
.
.
.
.
.
.
.
.
.
.
.
.
.
.
.
.
.
.
.
.
.
.
.
.
.
.
.
.
.
.
.
.
.
.
.
.
.
.
.
.
.
.
.
.
.
.
.
.
.
.
.
.
.
.
.
.
.
.
.
.
.
.
.
.
.
.
.
.
.
.
.
.
.
.
.
.
.
.
.
.
.
.
.
.
.
.
.
.
.
.
.
.
.
.
.
.
.
.
.
.
.
.
.
.
.
.
.
.
.
.
.
.
.
.
.
.
.
.
.
.
.
.
.
.
.
.
.
.
.
.
.
.
.
.
.
.
.
.
.
.
.
.
.
.
.
.
.
.
.
.
.
.
.
.
.
.
.
.
.
.
.
.
.
.
.
.
.
.
.
.
.
.
.
.
.
.
.
.
.
.
.
.
.
.
.
.
.
.
.
.
.
7–2
7–4
7–4
7–4
7–4
7–4
7–5
7–6
7–6
7–8
7–9
7–9
7–9
7–10
7–10
7–10
7–11
7–12
7–13
7–15
7–15
7 Replacing SA7x FRUs
7.1
7.2
7.2.1
7.2.2
7.3
7.3.1
7.3.2
7.4
7.4.1
7.4.2
7.5
7.5.1
7.5.2
7.6
7.6.1
7.6.2
7.7
7.7.1
7.7.2
7.8
7.8.1
iv
Required Tools . . . . . . . . . . . . . . . . . . . . . . . .
Power Supply Removal and Installation . . . .
Removing the Power Supply . . . . . . . . . .
Installing the Power Supply . . . . . . . . . . .
OCP Removal and Installation . . . . . . . . . . . .
Removing the OCP . . . . . . . . . . . . . . . . . .
Installing the OCP . . . . . . . . . . . . . . . . . .
TB2 Removal and Installation . . . . . . . . . . . .
Removing Transition Board 2 . . . . . . . . . .
Installing Transition Board 2 . . . . . . . . . .
Transition Board 1 Removal and Installation
Removing Transition Board 1 . . . . . . . . . .
Installing Transition Board 1 . . . . . . . . . .
Fan Assembly Removal and Installation . . . .
Removing the Fan Assembly . . . . . . . . . .
Installing the Fan Assembly . . . . . . . . . .
Remote OCP Cable Removal and Installation
Removing a Remote OCP Cable . . . . . . . .
Installing a Remote OCP Cable . . . . . . . .
Power Harness Removal and Installation . . .
Removing a Power Harness . . . . . . . . . . .
.
.
.
.
.
.
.
.
.
.
.
.
.
.
.
.
.
.
.
.
.
.
.
.
.
.
.
.
.
.
.
.
.
.
.
.
.
.
.
.
.
.
7.8.2
7.9
7.9.1
7.9.2
7.10
Installing a Power Harness . . . . . .
SDI Cable Removal and Installation . .
Removing an Enclosure SDI Cable .
Installing an Enclosure SDI Cable .
SA7x Checkout . . . . . . . . . . . . . . . . . . .
.
.
.
.
.
.
.
.
.
.
.
.
.
.
.
.
.
.
.
.
.
.
.
.
.
.
.
.
.
.
.
.
.
.
.
.
.
.
.
.
.
.
.
.
.
.
.
.
.
.
.
.
.
.
.
.
.
.
.
.
.
.
.
.
.
.
.
.
.
.
.
.
.
.
.
.
.
.
.
.
.
.
.
.
.
.
.
.
.
.
.
.
.
.
.
.
.
.
.
.
.
.
.
.
.
.
.
.
.
.
.
.
.
.
.
.
.
.
.
.
.
.
.
.
.
.
.
.
.
.
.
.
.
.
.
7–16
7–18
7–18
7–20
7–20
Type I Data Errors . . . . . . . . . . . . . . . . .
Type II Data and Header Errors . . . . . .
Loss-of-Positioner Errors . . . . . . . . . . . .
Soft Errors . . . . . . . . . . . . . . . . . . . . . . .
Unrecoverable Error (Hard Data Error) .
Bad Block Replacement Rate . . . . . . . . .
RA7x System Error Rates . . . . . . . . . . .
.
.
.
.
.
.
.
.
.
.
.
.
.
.
.
.
.
.
.
.
.
.
.
.
.
.
.
.
.
.
.
.
.
.
.
.
.
.
.
.
.
.
.
.
.
.
.
.
.
.
.
.
.
.
.
.
.
.
.
.
.
.
.
.
.
.
.
.
.
.
.
.
.
.
.
.
.
.
.
.
.
.
.
.
.
.
.
.
.
.
.
.
.
.
.
.
.
.
.
.
.
.
.
.
.
.
.
.
.
.
.
.
.
.
.
.
.
.
.
.
.
.
.
.
.
.
.
.
.
.
.
.
.
.
.
.
.
.
.
.
.
.
.
.
.
.
.
.
.
.
.
.
.
.
.
.
.
.
.
.
.
.
.
.
.
.
.
.
.
.
.
.
.
.
.
.
.
.
.
.
.
.
E–1
E–1
E–2
E–2
E–2
E–2
E–2
SA7x Enclosure . . . . . . . . . . . . . . . . . . . . . . . . . . . . . . . . . . . . . . . . . .
RA70 Disk Drive . . . . . . . . . . . . . . . . . . . . . . . . . . . . . . . . . . . . . . . . .
RA71 Through RA73 Disk Drives . . . . . . . . . . . . . . . . . . . . . . . . . . . .
Using the ESD Grounding Strap . . . . . . . . . . . . . . . . . . . . . . . . . . . . .
SA70 Enclosure Assembly . . . . . . . . . . . . . . . . . . . . . . . . . . . . . . . . . .
Removing and Replacing a Disk Drive in the SA70 Enclosure . . . . . . .
SA7x Fan Assembly . . . . . . . . . . . . . . . . . . . . . . . . . . . . . . . . . . . . . . .
SA7x Enclosure Front Panel and OCP . . . . . . . . . . . . . . . . . . . . . . . . .
OCP, Transition Board Assembly, and Associated Circuits Block
Diagram . . . . . . . . . . . . . . . . . . . . . . . . . . . . . . . . . . . . . . . . . . . . . . . .
SA7x Enclosure Rear Panel and Power Supply . . . . . . . . . . . . . . . . . .
Power Supply Block Diagram . . . . . . . . . . . . . . . . . . . . . . . . . . . . . . . .
SA7x Enclosure Front Panel . . . . . . . . . . . . . . . . . . . . . . . . . . . . . . . .
Storage Device Add-On Sequence for the SA900 Storage Array (Front
View) . . . . . . . . . . . . . . . . . . . . . . . . . . . . . . . . . . . . . . . . . . . . . . . . . .
SA7x Front Clamping Assembly . . . . . . . . . . . . . . . . . . . . . . . . . . . . .
SA900 and SA7x Chassis Retaining Brackets . . . . . . . . . . . . . . . . . . .
SA7x Enclosure Guide Rail Assembly Installation . . . . . . . . . . . . . . . .
1–2
1–3
1–4
1–12
2–2
2–4
2–5
2–8
A SA7x Internal Cabling
B Environmental Stabilization
C Part Numbers
D OCP Error Codes
E RA7x Error Rates
E.1
E.2
E.3
E.4
E.5
E.6
E.7
F Revision Support
Index
Figures
1–1
1–2
1–3
1–4
2–1
2–2
2–3
2–4
2–5
2–6
2–7
3–1
3–2
3–3
3–4
3–5
2–9
2–11
2–13
3–4
3–7
3–8
3–9
3–10
v
3–6
3–7
3–8
3–9
4–1
4–2
5–1
6–1
6–2
6–3
6–4
7–1
7–2
7–3
7–4
7–5
7–6
7–7
7–8
7–9
7–10
A–1
A–2
A–3
A–4
A–5
A–6
SA900 Mounting Rail Holes . . . . . . . . . . . . . . . . . . . . . . . .
Installing the SA7x Enclosure in the SA900 . . . . . . . . . . .
SA900 SDI Cable Connections . . . . . . . . . . . . . . . . . . . . . .
SA900 Power Cords—SA7x Enclosures . . . . . . . . . . . . . . .
SA7x Enclosure Front Panel . . . . . . . . . . . . . . . . . . . . . . .
SA7x Enclosure Rear Panel . . . . . . . . . . . . . . . . . . . . . . . .
SA7x Enclosure Front Panel . . . . . . . . . . . . . . . . . . . . . . .
SA70 Enclosure . . . . . . . . . . . . . . . . . . . . . . . . . . . . . . . . .
RA7x Disk Drive Serial Number Location . . . . . . . . . . . . .
Reversing the RA7x Shoe Plate . . . . . . . . . . . . . . . . . . . . .
Replacing RA70 Disk Drive . . . . . . . . . . . . . . . . . . . . . . . .
SA7x Enclosure . . . . . . . . . . . . . . . . . . . . . . . . . . . . . . . . .
Cabinet with Stabilizer Foot . . . . . . . . . . . . . . . . . . . . . . .
SA7x Enclosure Rear Panel and Power Supply . . . . . . . . .
Transition Board 2 . . . . . . . . . . . . . . . . . . . . . . . . . . . . . . .
Removing TB1 . . . . . . . . . . . . . . . . . . . . . . . . . . . . . . . . . .
Installing the Fan Assembly . . . . . . . . . . . . . . . . . . . . . . .
Removing Acoustic Panels . . . . . . . . . . . . . . . . . . . . . . . . .
Cable Routing . . . . . . . . . . . . . . . . . . . . . . . . . . . . . . . . . .
SA7x Enclosure Power Harness . . . . . . . . . . . . . . . . . . . . .
SA7x Enclosure Internal SDI Cables . . . . . . . . . . . . . . . . .
SA7x Enclosure Cabling Block Diagram . . . . . . . . . . . . . .
Power Harness Cabling . . . . . . . . . . . . . . . . . . . . . . . . . . .
OCP to Transition Board Assembly to Disk Drive Cabling .
TB2 to Fan . . . . . . . . . . . . . . . . . . . . . . . . . . . . . . . . . . . . .
Rear Bulkhead to Drive SDI Connections . . . . . . . . . . . . .
4-Pin DC Power Connector . . . . . . . . . . . . . . . . . . . . . . . . .
.
.
.
.
.
.
.
.
.
.
.
.
.
.
.
.
.
.
.
.
.
.
.
.
.
.
.
.
.
.
.
.
.
.
.
.
.
.
.
.
.
.
.
.
.
.
.
.
.
.
.
.
.
.
.
.
.
.
.
.
.
.
.
.
.
.
.
.
.
.
.
.
.
.
.
.
.
.
.
.
.
.
.
.
.
.
.
.
.
.
.
.
.
.
.
.
.
.
.
.
.
.
.
.
.
.
.
.
.
.
.
.
.
.
.
.
.
.
.
.
.
.
.
.
.
.
.
.
.
.
.
.
.
.
.
.
.
.
.
.
.
.
.
.
.
.
.
.
.
.
.
.
.
.
.
.
.
.
.
.
.
.
.
.
.
.
.
.
.
.
.
.
.
.
.
.
.
.
.
.
.
.
.
.
.
.
.
.
.
.
.
.
.
.
.
.
.
.
.
.
.
.
.
.
.
.
.
.
.
.
.
.
.
.
.
.
.
.
.
.
.
.
.
.
.
.
.
.
.
.
.
.
.
.
.
.
.
.
.
.
.
.
.
3–12
3–16
3–18
3–20
4–2
4–6
5–4
6–3
6–4
6–5
6–7
7–2
7–3
7–5
7–7
7–8
7–11
7–13
7–14
7–17
7–19
A–2
A–3
A–4
A–5
A–6
A–7
Related Courses . . . . . . . . . . . . . . . . . . . . . . . . . . . . . .
Related Documentation . . . . . . . . . . . . . . . . . . . . . . . .
Authorized Disk Drive Installations . . . . . . . . . . . . . . .
RA7x Fixed Disk Configurations . . . . . . . . . . . . . . . . .
SA7x Configurations . . . . . . . . . . . . . . . . . . . . . . . . . .
SA7x Enclosure Recommended Environmental Limits .
SA7x Enclosure Specifications . . . . . . . . . . . . . . . . . . .
RA7x Drive Unit Numbers . . . . . . . . . . . . . . . . . . . . .
H9A00 External SDI Cables . . . . . . . . . . . . . . . . . . . .
SA7x Switch and Indicator Functions . . . . . . . . . . . . .
OCP Controls and Indicators . . . . . . . . . . . . . . . . . . . .
Power Supply Controls and Indicators . . . . . . . . . . . . .
SA7x Problems and Troubleshooting References . . . . .
Authorized Disk Drives Installations . . . . . . . . . . . . . .
Fan Connections . . . . . . . . . . . . . . . . . . . . . . . . . . . . .
Thermal Stabilization Specifications . . . . . . . . . . . . . .
SAxxx Cable Part Numbers . . . . . . . . . . . . . . . . . . . . .
.
.
.
.
.
.
.
.
.
.
.
.
.
.
.
.
.
.
.
.
.
.
.
.
.
.
.
.
.
.
.
.
.
.
.
.
.
.
.
.
.
.
.
.
.
.
.
.
.
.
.
.
.
.
.
.
.
.
.
.
.
.
.
.
.
.
.
.
.
.
.
.
.
.
.
.
.
.
.
.
.
.
.
.
.
.
.
.
.
.
.
.
.
.
.
.
.
.
.
.
.
.
.
.
.
.
.
.
.
.
.
.
.
.
.
.
.
.
.
.
.
.
.
.
.
.
.
.
.
.
.
.
.
.
.
.
.
.
.
.
.
.
.
.
.
.
.
.
.
.
.
.
.
x
x
1–1
1–6
1–7
1–9
1–9
3–5
3–17
4–3
4–4
4–5
5–1
6–1
A–7
B–1
C–1
Tables
1
2
1–1
1–2
1–3
1–4
1–5
3–1
3–2
4–1
4–2
4–3
5–1
6–1
A–1
B–1
C–1
vi
.
.
.
.
.
.
.
.
.
.
.
.
.
.
.
.
.
.
.
.
.
.
.
.
.
.
.
.
.
.
.
.
.
.
.
.
.
.
.
.
.
.
.
.
.
.
.
.
.
.
.
C–2
C–3
C–4
D–1
E–1
E–2
F–1
F–2
F–3
F–4
H9A00 External SDI Cable Part Numbers .
SAxxx Assembly Part Numbers . . . . . . . . .
RA7x Part Numbers . . . . . . . . . . . . . . . . . .
OCP Error Codes . . . . . . . . . . . . . . . . . . . .
RA7x Error Rate Table . . . . . . . . . . . . . . . .
Allowable RA7x System Error Rate . . . . . .
VAX Diagnostics for RA71–RA73 Drives . .
Retired VAX Supervisor Programs . . . . . . .
Operating Systems for RA71–RA73 Drives
SDI Controllers for RA71–RA73 Drives . . .
.
.
.
.
.
.
.
.
.
.
.
.
.
.
.
.
.
.
.
.
.
.
.
.
.
.
.
.
.
.
.
.
.
.
.
.
.
.
.
.
.
.
.
.
.
.
.
.
.
.
.
.
.
.
.
.
.
.
.
.
.
.
.
.
.
.
.
.
.
.
.
.
.
.
.
.
.
.
.
.
.
.
.
.
.
.
.
.
.
.
.
.
.
.
.
.
.
.
.
.
.
.
.
.
.
.
.
.
.
.
.
.
.
.
.
.
.
.
.
.
.
.
.
.
.
.
.
.
.
.
.
.
.
.
.
.
.
.
.
.
.
.
.
.
.
.
.
.
.
.
.
.
.
.
.
.
.
.
.
.
.
.
.
.
.
.
.
.
.
.
.
.
.
.
.
.
.
.
.
.
.
.
.
.
.
.
.
.
.
.
.
.
.
.
.
.
.
.
.
.
.
.
.
.
.
.
.
.
.
.
C–1
C–2
C–2
D–1
E–1
E–3
F–1
F–2
F–2
F–2
vii
Preface
The SA7x Enclosure Service Manual explains how to install, operate,
troubleshoot, and perform field level repairs of the SA7x family of enclosures: the
SA70, SA71, SA72, and SA73. The manual is intended for Digital Multivendor
Customer Services engineers.
The SA70, SA71, SA72, and SA73 enclosures are physically identical. They are
differentiated only by the RA7x disk drives they contain:
•
The SA70 accommodates one to four RA70 disk drives (280 MB each).
•
The SA71 accommodates one to four RA71 disk drives (700 MB each).
•
The SA72 accommodates one to four RA72 disk drives (1 GB each).
•
The SA73 accommodates one to four RA73 disk drives (2 GB each).
Conventions
Special terminology used in the publication includes:
The term ‘‘SA7x’’ refers to the SA70, SA71, SA72, and SA73 enclosures
collectively.
The term ‘‘RA7x’’ refers to the RA70, RA71, RA72, and RA73 disk drives
collectively.
The following notations are used in this manual:
•
Note—Identifies information that is of special interest.
•
CAUTION—Identifies information that pertains to the protection of the
equipment or loss of data.
•
WARNING—Identifies information that pertains to your safety.
ix
Related Courses and Documentation
Table 1 lists the Digital courses related to the SA7x enclosure.
Table 1 Related Courses
Title
Order Number
AC Power & Grounding
EY–B730–PO
DSA Architecture Level 1 Course
EY–5593E–IV
Electrical Safety
EY–B737E–PO
Electrical Safety and Lockout/Tagout Procedures
EY–E038E–SO
RA70/BA27 Disk Drive Maintenance Course
EY–5805E–IV
VAXsimPLUS Maintenance Course
EY–7687E–PO
Table 2 lists the documentation related to the SA7x enclosure.
Table 2 Related Documentation
x
Document Title
Document Order
Number
DSA Troubleshooting Flowchart
EK–DSATF–TM
Disk Drive Technical Description Manual
EK–ORA70–TD
BA27 Maintenance Print Set
MP–01429
SAxxx Configuration Guide
EK-SAXXX–CG
RA7x Disk Drive Service Manual
EK–ORA7X–SM
RA7x/SA7x Pocket Reference Guide
EK–RSA7X–PG
RA70 Field Maintenance Print Set
MP–01428
RA71/RA72 Support Print Set
EM–01434
RA71/RA72 Field Maintenance Print Set
MP–01434
RA73 Support Print Set
EM–01439
RA73 Field Maintenance Print Set
MP–01439
SA7x Enclosure User Guide
EK–OSA7X–UG
SA7x Support Print Set
EM–01435
SA7x Field Maintenance Print Set
MP–01435
1
Introducing the SA7x Enclosure
This chapter is an overview of the SA7x enclosure, lists SA7x configurations and
specifications, and discusses user precautions.
1.1 SA7x Enclosure Overview
The term ‘‘SA7x’’ refers to the family of enclosures that includes:
•
The SA70—Accommodates one to four RA70 disk drives (280 MB each)
•
The SA71—Accommodates one to four RA71 disk drives (700 MB each)
•
The SA72—Accommodates one to four RA72 disk drives (1 GB each)
•
The SA73—Accommodates one to four RA73 disk drives (2 GB each)
For all of these designations, the enclosure itself is physically identical. What
differentiates an SA70 enclosure from an SA71 enclosure is the type of drives
installed in each (RA70s and RA71s). See Figure 1–1 for an illustration of an
SA7x enclosure.
Table 1–1 lists the the types of disk drives that are authorized for installation in
each SA7x enclosure.
Table 1–1 Authorized Disk Drive Installations
Enclosure
RA70
RA71
RA72
RA73
SA70
SA71
SA72
SA73
Yes
Yes
Yes
Yes
No
Yes
Yes
Yes
No
Yes
Yes
Yes
No
Yes1
Yes1
Yes
1A
maximum of three drives may be installed.
The SA7x enclosure provides mounting space, power, cooling, and control for up
to four RA7x disk drives. Each disk drive is independently powered and operated
by the enclosure.
The enclosure is installed as a component in a storage array cabinet.
The RA7x disk drive used in the SA7x enclosure is a random-access Winchester
technology drive with a formatted storage capacity of 280 MB to 2 GB. The drive
features modular components that can be replaced with minimum down time.
Figure 1–2 shows an RA70 disk drive. Figure 1–3 shows an RA71 through RA73
disk drive.
Introducing the SA7x Enclosure 1–1
Introducing the SA7x Enclosure
1.1 SA7x Enclosure Overview
Figure 1–1 SA7x Enclosure
LEFT REAR
DISK DRIVE
POSITION
RIGHT REAR
DISK DRIVE
POSITION
REAR
COVER
(NOT
SHOWN)
FAN
TRANSITION
BOARD 2
TRANSITION
BOARD 1
OPERATOR
CONTROL
PANEL
POWER
SUPPLY
RA70 DISK
DRIVE SHOWN
CHASSIS
MOUNTING
SCREWS
FRAME
DRIVE POWER
SWITCH PANEL
LEFT FRONT
DISK DRIVE
POSITION
RIGHT FRONT
DISK DRIVE
POSITION
FRONT
COVER
CXO-1845D_S
You can combine SA7x enclosures into shadow sets. When using shadow sets,
remember that when replacing the power supply or transition boards 1 or 2, you
need to remove the power from the enclosure.
RA7x disk drive can be used with any disk drive controller using a standard
disk interface (SDI), including KDA50, KDB50, or KDM50 controller modules,
hierarchical storage controllers (HSCs), and UDA controllers. The drive is
compatible with the Digital Storage Architecture (DSA) and Mass Storage Control
Protocol (MSCP).
1–2 Introducing the SA7x Enclosure
Introducing the SA7x Enclosure
1.1 SA7x Enclosure Overview
Figure 1–2 RA70 Disk Drive
SERIAL
NUMBER
LABEL
HDA
CHASSIS
HDA
FRONT PANEL
CONTROLS AND
INDICATORS
SERIAL
NUMBER
LOCATION
CHASSIS
SHOE
PLATE
SHOE
PLATE
J4 4-PIN
POWER
J3 20-PIN REMOTE
OPERATOR CONTROL
PANEL CONNECTOR
ELECTRONIC
CONTROL
MODULE (ECM)
SET
J2 8-PIN SDI
CONNECTOR
(PORT B)
J1 8-PIN SDI
CONNECTOR
(PORT A)
CXO-1878B_S
Introducing the SA7x Enclosure 1–3
Introducing the SA7x Enclosure
1.1 SA7x Enclosure Overview
Figure 1–3 RA71 Through RA73 Disk Drives
FRONT VIEW
4-PIN
POWER
20-PIN
OCP
REAR VIEW
8-PIN
SDI-PORT B
8-PIN
SDI-PORT A
BOTTOM VIEW
SHOE
PLATE
CXO-3518A-MC
1–4 Introducing the SA7x Enclosure
Introducing the SA7x Enclosure
1.1 SA7x Enclosure Overview
The major subassemblies of the SA7x enclosure are:
•
Chassis
•
Frame
•
Operator control panel (OCP)
•
Transition board 1 (TB1)
•
Transition board 2 (TB2)
•
Power supply
•
Fan assembly
•
Enclosure-internal cables
Figure 1–1 shows the major subassemblies of the SA7x enclosure. Except for the
RA70 disk drive description, Figure 1–1 is accurate for all SA7x enclosures.
The frame slides into the chassis and contains the mounting facilities for the
other subassemblies. The disk drives fit into recesses located in the front and
rear of the frame. The OCP is mounted above the front disk drives and plugs
into TB1. TB1 interfaces the OCP to TB2. TB2 is located above the front disk
drives and interfaces drive signals through TB1 to the OCP. The power supply
is located in the rear of the frame, below the rear disk drives. The fan assembly
is fitted into the central portion of the frame. Interconnecting cables for the
subassemblies run along the outer sides of the frame behind acoustic paneling.
RA7x disk drives may be mounted in any of the four disk drive positions.
Installation procedures suggest to install the first two drives in the rear positions
and the second two drives in the front positions.
Caution
The SA7x enclosure will accommodate a single RA7x disk drive. However,
if only one drive is installed in the enclosure, a drive position filler is
required to route cooling air and prevent overheating. See Section 6.2 for
instructions on installing and removing a drive position filler.
The disk drive is installed in an enclosure with the rear panel of the drive, which
contains interface connectors, facing outward. The drives are operated from four
sets of switches and indicators on the enclosure OCP, one set for each disk drive
in the enclosure.
SDI bus cables from the disk drives are routed inside the enclosure to a cable
bulkhead at the top rear of the enclosure.
The enclosure power supply provides operating power to the major subassemblies
of the enclosure. The rear panel of the power supply contains the Master On/Off
switch for the enclosure.
Each RA7x disk drive is powered and controlled independently. A drive can be
operated with other disk drive positions unoccupied or while maintenance is
being performed on another drive. The power switches for the disk drives are
located on the front panel of the enclosure. Each drive power switch contains a
symbol to indicate its associated drive and an indicator that lights when power is
applied to the drive.
Introducing the SA7x Enclosure 1–5
Introducing the SA7x Enclosure
1.1 SA7x Enclosure Overview
The fan assembly circulates cooling air throughout the frame of the SA7x
enclosure. The air is drawn in through holes in the front panel on the enclosure
and is exhausted through holes in the rear panel.
The SA7x enclosure meets the following environmental and safety standards:
•
DEC Standard 102 for environment
•
DEC Standard 103 for electromagnetic emissions
•
DEC Standard 104 for computer room noise level
•
DEC Standard 119 for product safety
•
National and international regulatory agency requirements, including FCC,
UL, IEC, CSA, and VDE
Your Digital sales representative can answer specific questions related to the
various environmental and safety standards.
1.2 RA7x and SA7x Configurations
Tables 1–2 and 1–3 show authorized RA7x disk drive and SA7x enclosure
configurations.
The description column of the RA7x configuration table contains the following
information:
Authorized installation:
Factory installation—Only installed at the factory.
Field add-on—Only installed in the field.
Enclosure:
Enclosures in which the disk drive may be installed.
Table 1–2 RA7x Fixed Disk Configurations
Formatted
Storage
Capacity
RA7x Disk
Drive
Description
RA70–A
Field add-on: SA70 options in storage arrays.
0.28 GB
RA70E–SA
Factory installation: MicroVAX 3500, 3600, and 3900
0.28 GB
RA70E–SF
Field add-on: MicroVAX 3500, 3600, and 3900
0.28 GB
RA71–AF
Factory installation: SA71 enclosure
0.70 GB
RA71–AK
Field add-on: SA71 enclosure
0.70 GB
RA72–AF
Factory installation: SA71 enclosure
1.0 GB
RA72–AK
Field add-on: SA72 enclosure
1.0 GB
RA73–AF
Factory installation: SA73 enclosure
2.0 GB
RA73–AK
Field add-on: SA73 enclosure
2.0 GB
The description column of the SA7x configuration table contains the following
information:
Authorized installation:
Factory installation—Only installed at the factory.
Field add-on—Only installed in the field.
1–6 Introducing the SA7x Enclosure
Introducing the SA7x Enclosure
1.2 RA7x and SA7x Configurations
Storage Array:
Systems and storage arrays in which the disk drive or enclosure may be
installed.
Table 1–3 SA7x Configurations
RA70
Disk
Drive
RA71
Disk
Drive
RA72
Disk
Drive
RA73
Disk
Drive
Formatted
Storage
Capacity
Enclosure
Description
SA70–HK
Field add-on
SA550/SA650/SA8501
120-240 Vac, 50-60 Hz
2
0
0
0
0.56 GB
SA70–JK
Field add-on
SA550/SA650/SA8501
120-240 Vac, 50-60 Hz
4
0
0
0
1.12 GB
SA70–LK
Storage array building block
DECsystem 5800/VAX 60002
120-240 Vac, 50-60 Hz
2
0
0
0
0.56 GB
SA70–MK
Storage array building block
DECsystem 5800/VAX 60002
120-240 Vac, 50-60 Hz
4
0
0
0
1.12 GB
SA71–CK
Field add-on
SA550/SA650/SA850
120-240 Vac, 50-60 Hz
0
1
0
0
0.70 GB
SA71–EK
Field add-on
SA900
120-240 Vac, 50-60 Hz
0
1
0
0
0.70 GB
SA71–FK
Field add-on
SA900
120-240 Vac, 50-60 Hz
0
4
0
0
2.8 GB
SA71–GK
Factory installation
SA900
120-240 Vac, 50-60 Hz
0
1
0
0
0.70 GB
SA71–HK
Factory installation
SA900
120-240 Vac, 50-60 Hz
0
4
0
0
2.8 GB
SA71–JK
Field add-on
SA550/SA650/SA850
120-240 Vac, 50-60 Hz
0
4
0
0
2.8 GB
SA71–LK
Field add-on
SA600/SA800
120-240 Vac, 50-60 Hz
0
1
0
0
0.70 GB
SA71–MK
Field add-on
SA600/SA800
120-240 Vac, 50-60 Hz
0
4
0
0
2.8 GB
SA72–CK
Field add-on
SA550/SA650/SA850
120-240 Vac, 50-60 Hz
0
0
1
0
1.0 GB
1
To install in an SA600 or SA800 storage array first upgrade the storage array as described in Chapter 5.
2
Adding the first SA7x to a VAX 6000 or DECsystem 5800 system without internal storage devices requires an upgrade
kit:
60 Hz system—Upgrade Kit 62X34–UA
50 Hz system—Upgrade Kit 62X34–UB
Continued on next page
Introducing the SA7x Enclosure 1–7
Introducing the SA7x Enclosure
1.2 RA7x and SA7x Configurations
Table 1–3 (Continued) SA7x Configurations
RA70
Disk
Drive
RA71
Disk
Drive
RA72
Disk
Drive
RA73
Disk
Drive
Formatted
Storage
Capacity
Enclosure
Description
SA72–EK
Field add-on
SA900
120-240 Vac, 50-60 Hz
0
0
1
0
1.0 GB
SA72–FK
Field add-on
SA900
120-240 Vac, 50-60 Hz
0
0
4
0
4.0 GB
SA72–GK
Factory installation
SA900
120-240 Vac, 50-60 Hz
0
0
1
0
1.0 GB
SA72–HK
Factory installation
SA900
120-240 Vac, 50-60 Hz
0
0
4
0
4.0 GB
SA72–JK
Field add-on
SA550/SA650/SA850
120-240 Vac, 50-60 Hz
0
0
4
0
4.0 GB
SA72–LK
Field add-on
SA600/SA800
120-240 Vac, 50-60 Hz
0
0
0
1
1.0 GB
SA72–MK
Field add-on
SA600/SA800
120-240 Vac, 50-60 Hz
0
0
4
0
4.0 GB
SA73–CK
Field add-on
SA550/SA650/SA850
120-240 Vac, 50-60 Hz
0
0
1
0
2.0 GB
SA73–EK
Field add-on
SA900
120-240 Vac, 50-60 Hz
0
0
0
1
2.0 GB
SA73–FK
Field add-on
SA900
120-240 Vac, 50-60 Hz
0
0
0
4
8.0 GB
SA73–GK
Factory installation
SA900
120-240 Vac, 50-60 Hz
0
0
0
1
2.0 GB
SA73–HK
Factory installation
SA900
120-240 Vac, 50-60 Hz
0
0
0
4
8.0 GB
SA73–JK
Field add-on
SA550/SA650/SA850
120-240 Vac, 50-60 Hz
0
0
0
4
8.0 GB
SA73–LK
Field add-on
SA600/SA800
120-240 Vac, 50-60 Hz
0
0
0
1
2.0 GB
SA73–MK
Field add-on
SA600/SA800
120-240 Vac, 50-60 Hz
0
0
0
4
8.0 GB
1–8 Introducing the SA7x Enclosure
Introducing the SA7x Enclosure
1.3 SA7x Specifications
1.3 SA7x Specifications
Recommended environmental limits for operating the SA7x enclosure are listed in
Table 1–4. General specifications for the SA7x enclosure are shown in Table 1–5.
Caution
For the SA7x enclosure and installed RA7x disk drives to perform at
the optimal level and maintain high reliability, they should be used in
environments recommended in the following tables.
Table 1–4 SA7x Enclosure Recommended Environmental Limits
Characteristic
Min.
Max.
Units
Operating temperature
65
18
75
24
Degrees Fahrenheit
Degrees Celsius
Operating temperature rate of change
–
5.4
3
Degrees per hour Fahrenheit
Degrees per hour Celsius
Operating temperature step change
–
5.4
3
Degrees per hour Fahrenheit
Degrees per hour Celsius
Operating relative humidity
40
60
Percent relative humidity
(noncondensing)
Operating relative humidity rate of change
–
10
Percent relative humidity
(noncondensing) per hour
Storage temperature
65
18
85
29
Degrees Fahrenheit
Degrees Celsius
Storage humidity
–
50
Percent relative humidity
(noncondensing)
Table 1–5 SA7x Enclosure Specifications
Characteristic
Specification
Number of disk drive positions
Four
Maximum formatted storage capacity:
SA70 enclosure
SA71 enclosure
SA72 enclosure
SA73 enclosure
1.12 GB
2.8 GB
4.0 GB
8.0 GB
Dimensions (nominal)
26.7 cm (10.5 in) high
22.2 cm (8.75 in) wide
71.1 cm (28 in) deep
Weight (nominal):
SA70 enclosure
SA71, SA72, or SA73 enclosures
21 kg (46 lb) empty
40 kg (88 lb) with four disk drives
21 kg (46 lb) empty
31.7 kg (72 lb) with four disk drives
Continued on next page
Introducing the SA7x Enclosure 1–9
Introducing the SA7x Enclosure
1.3 SA7x Specifications
Table 1–5 (Continued) SA7x Enclosure Specifications
Characteristic
Specification
Operating temperature
+10° C to +40° C (+50° F to +104°
F). Derate 1.8° C for each 1,000 m
altitude or 1.0° F for each 1,000 ft
altitude.
Operating humidity
10% to 85% @ maximum wet bulb
temperature +32° C (+90° F) and
minimum dew point of +2° C (+36° F)
Operating altitude
Up to 2,400 m (8,000 ft)
Nonoperating temperature
-40° C to +66° C (-40° F to +151° F)
Nonoperating relative humidity
8% to 80% relative humidity,
noncondensing
Nonoperating altitude
4,900 m (16,000 ft)
Shock and vibration
Complies with DEC Standard 102
Enclosure acoustic noise
(with four RA7x disk drives)
Complies with DEC Standard 102
Fan operating parameters:
Low speed operation
Below +28° C (+82° F), +/- 1° C (1.8°
F)
High speed operation
Above +30° C (+86° F), +/- 1° C (1.8°
F)
Nominal airflow through the enclosure
Between 45 and 65 cubic ft per
minute
Input power requirements (47 to 63 Hz)
4.6 A @ 100 to 120 Vac (60 Hz), 2.3 A
@ 220 to 240 Vac (50 Hz)
1.4 User Precautions
Digital recommends that certain precautions be taken to protect equipment and
user data. These precautions involve backup methods, recommended operating
temperatures, and electrostatic discharge (ESD) protection, all of which are
discussed in this section.
1.4.1 Data Recovery
Data is not recoverable from an inoperable head disk assembly (HDA). Therefore,
it is your responsibility to make sure data is protected using proper backup
procedures. Digital recommends the following backup methods for RA7x disk
drives:
•
File duplication—This method normally involves copying data onto removable
media, such as magnetic tape.
•
Journaling—This method is recommended for files in a transaction processing
application. Journaling allows reconstruction of files up to the last checkpoint
or backup.
1–10 Introducing the SA7x Enclosure
Introducing the SA7x Enclosure
1.4 User Precautions
1.4.2 Recommended Operating Temperature
The SA7x enclosure and its installed drives can operate within a temperature
range of +10° to +40° C (+50° to +104° F). However, Digital recommends that the
enclosure and its drives be operated in a temperature range of +18° to +24° C
(+64° to +75° F) to increase reliability and product life.
Caution
Disk drives and enclosures must be environmentally stabilized in their
protective barrier bags at the installation site. Failure to environmentally
stabilize the equipment may result in damage to the drive media or
electronic components. For more information about environmental
stabilization, see Appendix B.
1.4.3 Electrostatic Discharge Protection
Electrostatic discharge (ESD) is caused by the buildup and release of static
electricity. An electrical charge from a person or object can damage hardware
components and result in premature device or option failure.
Observe the following guidelines when handling static-sensitive components:
1. Read all instructions and installation procedures included with static control
materials.
2. Wear a properly grounded ESD wrist strap. (See Figure 1–4.)
When using an ESD wrist strap:
•
Ensure that the wrist strap fits snugly for proper conductivity.
•
Connect the alligator clip securely to a clean, unpainted, grounded metal
surface, such as the drive or cabinet chassis.
•
Do not overextend the grounding cord.
3. Use static-protective containers to transfer modules and components.
Introducing the SA7x Enclosure 1–11
Introducing the SA7x Enclosure
1.4 User Precautions
Figure 1–4 Using the ESD Grounding Strap
ESD GROUNDING STRAP
GROUNDED TO SA7x
ENCLOSURE CHASSIS
ESD GROUNDING
STRAP SUPPLIED
WITH 60-INCH CABINET
OPERATOR’S ESD
GROUNDING STRAP
CXO-2609B_S
1–12 Introducing the SA7x Enclosure
2
SA7x Technical Description
This chapter describes the following major components of the SA7x enclosure:
•
Chassis
•
Frame
•
Fan assembly
•
Operator control panel (OCP)
•
Transition board assembly (TB1 and TB2)
•
Power supply
•
Enclosure-internal cabling
Figure 2–1 shows the SA7x enclosure with RA70 disk drives. The SA71, SA72,
and SA73 enclosures are virtually identical; they all have either an RA71, RA72,
or RA73 disk drive installed.
2.1 SA7x Chassis
The SA7x chassis is made of extruded aluminum with a protective finish.
The enclosure uses the paired upper and lower grooves on each side of the chassis
for mounting the cabinet uprights. Each side is identical, so the enclosure may be
mounted with either its left or right side facing the cabinet uprights.
The power supply slides on rails in the lower-rear portion of the chassis.
Matching rails in the upper half of the chassis are not functional.
SA7x Technical Description 2–1
SA7x Technical Description
2.1 SA7x Chassis
Figure 2–1 SA70 Enclosure Assembly
LEFT REAR
DISK DRIVE
POSITION
RIGHT REAR
DISK DRIVE
POSITION
REAR
COVER
(NOT
SHOWN)
FAN
TRANSITION
BOARD 2
TRANSITION
BOARD 1
OPERATOR
CONTROL
PANEL
POWER
SUPPLY
RA70 DISK
DRIVE SHOWN
CHASSIS
MOUNTING
SCREWS
FRAME
DRIVE POWER
SWITCH PANEL
LEFT FRONT
DISK DRIVE
POSITION
RIGHT FRONT
DISK DRIVE
POSITION
FRONT
COVER
CXO-1845D_S
2–2 SA7x Technical Description
SA7x Technical Description
2.2 SA7x Frame
2.2 SA7x Frame
The SA7x frame is made of plated steel panels fastened together with rivets.
Acoustic panels cover the sides of the frame. Internal cabling for the enclosure is
routed down the sides of the frame inside the acoustic panels.
Four rails, located on each side of the frame, slide on surfaces inside the chassis.
In its closed position, the frame is secured to the chassis with four mounting
screws on the front cover. The frame can be pulled out of the chassis for
servicing.
WARNING
Be careful when pulling out the SA7x frame to access internal
components. A stop mechanism located on the right side of the
enclosure between the frame and chassis locks the frame at a point
that allows access to the fan assembly. When the frame is pulled out and
locked, three-quarters of the frame is exposed. If you release the stop
mechanism, nothing prevents the frame from being pulled completely free
of the chassis, possibly causing personal injury.
The frame assembly has recesses for the disk drive positions, the fan assembly,
and the power supply. Internal ducts route the air flow through holes into the
front cover of the enclosure, through the center-located fan assembly, and out of
the holes in the enclosure’s rear cover.
Each disk drive position contains guides for the RA7x disk drive shoe plate. The
drive is locked into position with a retaining clip that latches into a tab on the
shoe plate. See Figure 2–2 to locate the retaining clip and shoe plate retaining
tab in an SA70 enclosure (with RA70 disk drives).
A configuration label is located inside the frame to show the proper placement of
the RA7x disk drives.
The frame is used to mount several important components of the enclosure,
including the transition board assemblies. (Refer to Figure 2–1.) The transition
board assembly consists of two boards: transition board 1 (TB1) and transition
board 2 (TB2). TB1 mounts to the front of the SA7x frame. The OCP mounts to
TB1. TB2 mounts to the frame above the disk drives. TB2 interfaces to TB1.
The upper-rear panel of the frame carries the standard disk interface (SDI)
connector bulkhead. The lower-front panel of the frame holds the four dc drive
power switches for the disk drive positions.
A front cover fits over the disk drives at the front of the enclosure; a rear cover
fits over the disk drives at the rear of the enclosure. Both covers include holes for
airflow. Each cover is secured with tabs at its lower edge and a mounting screw
in each upper corner.
SA7x Technical Description 2–3
SA7x Technical Description
2.2 SA7x Frame
Figure 2–2 Removing and Replacing a Disk Drive in the SA70 Enclosure
SILK SCREEN OF
CONFIGURATION RULES
LR
RR
1
2
LF
RF
4
3
SHOE PLATE
RETAINING CLIP
SHOE PLATE
SHOE PLATE
RETAINING TAB
LOCATION
SHOE PLATE
GUIDE
20-PIN
OCP
CABLE
INTERNAL
SDI CABLES
4-PIN DRIVE
POWER CABLE
RA70 DISK DRIVE
REAR PANEL
CXO-1870D_S
2–4 SA7x Technical Description
SA7x Technical Description
2.3 SA7x Fan Assembly
2.3 SA7x Fan Assembly
The SA7x fan assembly consists of an axial fan mounted in a case. The fan
assembly slides into a recess in the center portion of the frame and is secured
with four mounting screws, as shown in Figure 2–3.
Connector J1 on TB2 supplies +12.6 Vdc to the fan. Other fan-related signals
in this connector include the fan control signal to the fan and the fan rotation
sensor signal from the fan. The fan rotation signal is processed on TB2 for fan
speed control. A fan failure signal, derived from fan rotation, is sent to the power
supply.
Figure 2–3 SA7x Fan Assembly
FAN
MOUNTING
SCREWS
(4 PLACES)
FAN
CABLE
LATCH
FRAME
FRAME
SHEET
METAL
CXO-2613B
SA7x Technical Description 2–5
SA7x Technical Description
2.4 SA7x OCP and Transition Board Assembly
2.4 SA7x OCP and Transition Board Assembly
The OCP consists of a plastic bezel, an electronic emissions (EMI) shield, a
plastic retainer, and a three-module circuit board set. The OCP assembly is
designed to be a one-piece field replaceable unit (FRU). An associated transition
board assembly is fastened to the SA7x frame. The OCP connects to TB1 with a
96-pin male connector and two clip/bullet fasteners (located on either side of the
connector). TB2 interfaces to TB1 through two ribbon cables.
The OCP communicates through the transition board assembly with up to four
RA7x disk drives. Each OCP control set contains the following, as shown in
Figure 2–4:
•
Run switch
•
Fault/Set No. switch
•
Write Protect switch
•
Port A switch
•
Port B switch
•
Unit No. display
Note
The OCP Unit Selector switch puts the OCP into the unit select mode.
This unit select function allows you to change any drive unit number
without interrupting the operation of the remaining disk drives. The unit
numbers may be either from 000 to 255 or from 000 to 999, depending on
the revision level of TB2.
The OCP can be installed in either the right or left side of the enclosure frame,
depending upon the enclosure’s position in the cabinet. A block diagram of the
OCP and transition board assembly is shown in Figure 2–5.
The transition board assembly consists of two individual boards: TB1 and TB2.
TB2 transfers signals from each of the four disk drives through two 40-pin cables
to TB1. TB1 transfers the drive signals through the single OCP connector to the
OCP.
Circuits on TB2 determine the power up/down protocol for the disk drives. The
protocol is derived through comparator circuits that monitor the ACOK line and
individual drive power switch status on one input, and a reference voltage on the
other input. The comparator outputs provide individual ACOK signals for each
drive and provide dc control from the power supply to the disk drives through the
drive power switches. In the power supply, these control signals are the on/off
controls for the individual regulators that provide the power for each disk drive.
Each of the drive power switches is a grounded circuit when the switch is off;
turning the power switch on removes the ground and signals status back to TB2.
TB1 monitors the incoming ambient air temperature and sends a control signal to
a driver circuit in the fan assembly to operate in low-speed mode if the air inside
the enclosure is within operating limits. If the air temperature rises above preset
limits, the control signal is removed by TB1 and the fan changes to high-speed
operation.
2–6 SA7x Technical Description
SA7x Technical Description
2.4 SA7x OCP and Transition Board Assembly
Note
The supply voltage to the fan does not change when the fan speed is
changed. Rather, the presence or absence of a control signal to the fan
produces the two-speed operation.
A fan rotation signal from the fan assembly is processed on TB2 and sent to the
power supply as ‘‘fan OK.’’ When the fan OK signal is lost, or when abnormal
ambient air temperature in the enclosure is detected, logic in the power supply
shuts down the enclosure.
Power and ground signals for each set of switches and indicators on the OCP
come from the associated disk drive through TB2. When a drive is not installed
in a disk drive position, the associated OCP is inactive and the corresponding
display is blank.
Asserting an OCP switch places an active low on its line to the disk drive; status
signals from the disk drive are active low to identify it as a state on a logic line.
SA7x Technical Description 2–7
SA7x Technical Description
2.4 SA7x OCP and Transition Board Assembly
Figure 2–4 SA7x Enclosure Front Panel and OCP
PORT SWITCHES
PORT SWITCHES
U n i t Se l e ct
LEFT
REAR
Run
Fault/
Ready
Set No.
Unit No.
Wr i t e
Protect
A
B
Run
Ready
Fa u l t/
Unit No.
Se t N o .
Wr i te
Pr o te ct
A
B
RIGHT
REAR
RIGHT
FRONT
LEFT
FRONT
FRONT
COVER
DRIVE
POWER SWITCHES
LEFT
FRONT
LEFT
REAR
RIGHT
REAR
RIGHT
FRONT
CXO-1867D_S
2–8 SA7x Technical Description
SA7x Technical Description
2.4 SA7x OCP and Transition Board Assembly
Figure 2–5 OCP, Transition Board Assembly, and Associated Circuits Block Diagram
STATUS LINES
TYPICAL
DISK
DRIVE
(A)
DRIVE STATUS
INDICATORS
CONTROL LINES
ACOK A
TRANSITION
BOARD 2
TRANSITION
BOARD 1
UNIT NUMBER
DISPLAY
AND DRIVER
+12.6V
FAN
ASSEMBLY
FAN CONTROL
SWITCHES
FAN ROT
AMBIENT
AIR TEMP
SENSOR
TYPICAL CONTROL/
INDICATOR SET
ON OCP
+12.6V
FAN OK
ACOK
CONTROL A
SW A
+5V,+12V
DRIVE
POWER
POWER
SUPPLY
LED A
RETURN
FRONT
PANEL
DRIVE
POWER
SWITCH
(A)
CXO-1877B
SA7x Technical Description 2–9
SA7x Technical Description
2.5 SA7x Power Supply
2.5 SA7x Power Supply
The power supply slides into the chassis between tabs on its upper case and a
ridge on its lower case, as shown in Figure 2–6. An interface connector on the
power supply plugs into a self-aligning connector inside the enclosure frame.
Mounting screws on the rear panel of the power supply secure it in the frame of
the enclosure.
The rear panel of the power supply contains cutouts for exiting cooling air from
the enclosure and for access to the Master On/Off switch, Line Voltage connector,
and Line Voltage Selector switch. These components are physically part of the
power supply circuit board.
An enclosure Fault indicator is located on the power supply. This indicator is
visible, when lit, through holes in the upper-rear panel of the power supply.
The power supply provides operating voltages for all components of the SA7x
enclosure, including the fan assembly. The outputs of the power supply include:
•
Four +5.1 Vdc outputs at 3.9 amps maximum each
•
Four +12.1 Vdc outputs at 5.4 amps maximum, 3.6 amps steady state each
•
One +12.6 Vdc output at 2.0 amps maximum, 1.8 amps steady state
The supply features 120 Vac (60 Hz) or 240 Vac (50 Hz) single-phase, switchselectable, input line voltage, a fast transient response on the +12.1 Vdc outputs,
and overcurrent and overvoltage protection on all outputs. Each of the regulated
voltages supplied to the disk drives is independently controlled by logic signals,
and each of the four regulators provides a status signal output to show normal
operating voltages at the drive power switches. The power supply also monitors
enclosure temperature and fan rotation. The power supply automatically shuts
down when it detects an overtemperature condition.
Total average load power delivered from the power supply is 277 watts; full rated
load output power is 384 watts.
Line voltage is selected at 120 Vac (60 Hz) or 240 Vac (50 Hz) with the Line
Voltage Selector switch. This switch is located behind the rear panel of the power
supply and is manually set during installation or when the line source is changed.
See Figure 2–6.
A line voltage fuse is hard-wired to the supply circuit board. If this fuse blows,
the power supply must be replaced as a unit. There is no need to change the fuse
when switching between line voltages.
2–10 SA7x Technical Description
SA7x Technical Description
2.5 SA7x Power Supply
Figure 2–6 SA7x Enclosure Rear Panel and Power Supply
SDI INTERFACE
CONNECTOR
PORT B
REAR
BULKHEAD
PORT B
SILK SCREEN
SDI INTERFACE
CONNECTOR
PORT A
REAR
COVER
OVERTEMPERATURE
INDICATOR
(BEHIND PANEL)
PORT A
SILK SCREEN
MOUNTING
SCREW
POWER
SUPPLY
TABS
MOUNTING
SCREW
LINE VOLTAGE
CONNECTOR
LINE VOLTAGE
SELECTOR SWITCH
(BEHIND PANEL)
MASTER
ON/OFF
SWITCH
CXO-2658C
The following discussion is based on the block diagram in Figure 2–7.
The input voltage is applied to two paths. One path consists of the internal
regulated power supply which provides all internal operating voltages for the
power supply. The shutdown signal comes from the power supply’s output voltage
and environmental monitoring circuits. This signal turns off the +10 Vdc output
of the internal supply to shut down the entire power supply.
The second path for the input voltage is to a +300 Vdc unregulated supply. The
output of this supply is applied to +12.6 Vdc and +5.6 Vdc switching-regulated
supplies. The regulator outputs then go to individual regulators to provide
the final +5.1 Vdc and +12.1 Vdc voltages for each disk drive. There are no
adjustments on the power supply outputs.
The fan receives +12.6 Vdc directly from the output of the switching regulator.
SA7x Technical Description 2–11
SA7x Technical Description
2.5 SA7x Power Supply
The individual regulators are enabled or disabled by the control lines A through
D. These lines are connected to the dc drive power switches on the front panel.
Setting a switch controls both the +5.1 Vdc and +12.1 Vdc outputs for each drive.
The overcurrent protection circuit allows a short circuit to be present at any
one, or all, of the outputs for an unlimited time without permanent damage to
the supply. A hiccup timer on the output of the overcurrent protection circuit
continually attempts to reset the outputs during the overcurrent condition.
When the overload is removed, the power supply outputs automatically return to
normal.
The overvoltage protection circuit shuts down the power supply in the event
of an overvoltage condition at any one of the outputs. Because the overvoltage
protection circuit output is a latched shutdown signal, the supply must be turned
off, then on again, to reset this circuit.
In addition to monitoring at the pulse width regulator level, the individual
regulators for each disk drive are also monitored by sense circuits A through D.
These circuits sample the voltages out of the individual regulators and produce
both a latched shutdown signal and an indicator drive signal. The indicator drive
signal is displayed at the associated drive power switch to indicate that normal
power is being supplied to the drive.
The thermal shutdown signals come from the TB2 fan OK signal and from an
on-board temperature sensor. The overtemperature controller monitors both these
inputs and produces a thermal signal for a shutdown driver. Thermal shutdown
indicated by a red Fault indicator visible through the upper-rear panel of the
power supply. There are two temperature monitor circuits in the enclosure. TB1
contains a temperature sensor to monitor the incoming ambient air temperature
and regulate fan speed. The temperature monitor in the power supply monitors
the air temperature in the vicinity of the power supply, including enclosure
exhaust air, and produces the actual shutdown signal.
The THERMAL signal is also monitored by a power OK circuit which produces
an ACOK signal if the +300 Vdc regulator outputs are valid or if the temperature
in the enclosure is within operating limits. The ACOK signal is passed to TB2
and then to the disk drives. This signal warns the drives to complete operations
in the event of an enclosure shutdown.
2–12 SA7x Technical Description
SA7x Technical Description
2.5 SA7x Power Supply
Figure 2–7 Power Supply Block Diagram
LATCHED SD
ENCLOSURE
TEMP SENSOR
(INTERNAL TO SUPPLY)
OVERTEMP
SHUTDOWN THERMAL
CONTROL
PANEL
POWER
OK
J1
J1
+12V B SENSE B SENSE LED B
BULK SENSE
+5V C SENSE
SD
+5.6V SENSE
+12.6V SENSE
+12V A SENSE A SENSE LED A
+5V B SENSE
SHUTDOWN
ROTATION
+5V A SENSE
ACOK
J1
+12V C SENSE C SENSE LED C
OVERLATCHED SD
VOLTAGE
CONTROL
+5V D SENSE
+12V D SENSE D SENSE LED D
+12V SENSE LINES
OVERSD
CURRENT
CONTROL
+5V SENSE LINES
+5V A SENSE
+5.1V A
+12.6V OC
OUTPUT
REGULATOR A
+5.6V OC
+12.6V SENSE
+5.6V SENSE
+12V A SENSE
+12.1V A
+5V B SENSE
+5.1V B
PULSE
WITH
MODULATORS
REGULATORS
LINE
VOLTLINE
AGE
SELECT
SWITCH
LINE
IN
+12V B SENSE
+12.1V B
+5.6V OUT
+5V C SENSE
+12.6V OUT
J1
+5.1V C
ALL
INTERNAL
CIRCUITS
SD
OUTPUT
REGULATOR B
+12.6V
J1
INTERNAL
REGULATED
SUPPLY
OUTPUT
REGULATOR C
+12V C SENSE
+12.1V C
+5V D SENSE
+5.1V D
OUTPUT
REGULATOR D
300V
SUPPLY +300V
+12V D SENSE
+12.1V D
CONTROL A
CONTROL B
J1
CONTROL C
CONTROL D
CXO-1876B
SA7x Technical Description 2–13
SA7x Technical Description
2.6 SA7x Enclosure Internal Cabling
2.6 SA7x Enclosure Internal Cabling
Appendix A contains a complete listing of cable origins, destinations, and pinouts.
The subassemblies of the SA7x enclosure are linked through the power harness.
The power harness branches to each disk drive position, to TB2, to the fan, and
to the drive power switches.
Each disk drive position receives +5.1 Vdc, +12.1 Vdc, and ground from the power
supply. In addition, the power supply status line ACOK is monitored individually
by the disk drives through TB2. The fan assembly receives +12.6 Vdc and ground
for operation by way of TB2.
Separate cables connect the disk drive positions to the rear bulkhead of the
enclosure and provide SDI interface to Port A and Port B of each RA7x disk
drive.
Ribbon cables from the remote OCP connectors of each disk drive are routed to
TB2, combined into two 40-pin cables, and routed through TB1 to the OCP.
For further information about SA7x cabling, see Appendix A.
2–14 SA7x Technical Description
3
Installing the SA7x
This chapter is an overview of SA7x installation. This chapter also explains how
to select the correct line input voltage, set drive unit numbers on the operator
control panel (OCP), and perform a post-installation checkout.
Instructions for installing RA7x disk drives, installing a drive position filler, and
recording disk drive serial numbers are provided in Chapter 6.
3.1 SA7x Installation Overview
The SA7x enclosure can be installed in a variety of storage arrays. Complete
instructions for installing the enclosure in each of these arrays are provided in
the appropriate storage array guide.
3.1.1 Power and Safety
The SA7x enclosure does not present any unusual fire or safety hazards. Be
sure to verify that the site has adequate power reserves to support the planned
number of SA7x enclosures.
WARNING
Hazardous voltages are present inside the storage array cabinet and
enclosures. You must be a qualified Digital Multivendor Customer
Services engineer to perform installation procedures. Otherwise, you may
injure yourself or others and you may damage the equipment.
A Digital Multivendor Customer Services engineer is qualified to install the
SA7x enclosure upon successful completion of the courses listed in Table 1 in the
Preface.
3.1.2 Recording Disk Drive Serial Numbers
When installing add-on or replacement enclosures, verify that the serial number
on the disk drives are properly recorded on the enclosure. Also, record the serial
numbers in the site log and the labor activity reporting system (LARS).
For complete instructions on recording disk drive serial numbers, see Chapter 6.
Installing the SA7x 3–1
Installing the SA7x
3.2 Selecting Line Input Voltage
3.2 Selecting Line Input Voltage
The SA7x enclosure power supply can be set to operate from either 120 Vac (60
Hz) or 220 Vac (50 Hz). Use the following procedure to set the line voltage:
1. Verify that all front panel drive power switches and the Master On/Off power
switch on the rear panel of the power supply are off.
2. Locate the Line Voltage Selector switch on the power supply. The switch is
accessible through a cutout in the rear panel of the power supply just to the
right of the line input connector.
3. Using a small screwdriver, set the Line Voltage Selector switch to the correct
line voltage. The voltage selected, either 120 Vac or 240 Vac, is displayed on
the switch.
caution
The SA7x enclosure power supply is universal for both 120 Vac (60 Hz) or
240 Vac (50 Hz). The power supply voltage frequency is factory set to 240
Vac and must be reset for 120 Vac operation. Using the wrong setting will
damage the power supply.
3.3 Performing a Post-Installation Checkout and Power-Up
Use the following procedure to verify normal operation of the power supply, OCP,
and fan assembly before operating the SA7x enclosure. It is best to perform this
procedure after all disk drives are installed in all the enclosures in the storage
array cabinet, but not yet connected to power.
CAUTION
Before performing this checkout and power-up procedure, be sure the
enclosure frame is secured in the chassis and the front and rear enclosure
covers are installed. Failure to do so will defeat the cooling airflow of
the enclosure and may result in permanent damage to the disk drives or
power supply.
1. Verify that all power and interface connections to the rear of the enclosure
are correct and secure.
2. Verify that the Line Voltage Selector switch on the power supply of the SA7x
enclosure has been set to the proper source voltage. If not, set the switch as
described in Section 3.2.
3. Verify that the drive power switches are turned off.
4. Verify that the enclosure power cord is securely connected to the cabinet
power controller.
5. Set the enclosure Master On/Off switch to on.
6. Verify the power is on by checking that the fan is operating. Do this by
feeling for airflow out the rear of the enclosure. If the fan does not start,
recheck the power connections. If power connections are connected properly,
verify that the power supply is firmly seated in its connector. If the power
still does not come on, see Chapter 5 for more information.
3–2 Installing the SA7x
Installing the SA7x
3.3 Performing a Post-Installation Checkout and Power-Up
7. Turn on the drive power switch for one of the disk drives. This switch is
shown in Figure 3–1.
8. Verify power application to the disk drive position by noting that the indicator
element in the drive power switch lights. If the indicator element does not
light, verify that the power supply is firmly seated in its connector. If power
still does not come on, see Chapter 5.
Note
Turning a drive power switch on does not actually start the associated
drive motor.
9. Press the Run switch on the OCP for the desired drive. This action starts
the drive motor. When the Ready light comes on, the drive has completed its
internal diagnostics and is ready for operation. If the Fault light comes on,
see Chapter 5 for more information.
10. Set the drive unit number. (Refer to Section 3.4 for this procedure.)
11. Select Port A or Port B and Write Protect. The Write Protect indicator lights
when the switch is set; the Port A and B indicators light only when the host
system controller has selected that port for read/write operations. During the
checkout and power-up procedure, verify that the associated OCP indicators
light. If the indicators do not light, see the Chapter 5 for more information.
You can turn off write protection by pressing the Write Protect switch a
second time.
12. Complete the checkout of the disk drive by running the applicable diagnostics
from the host system controller as described in the RA7x Disk Drive Service
Manual.
13. Repeat steps 7 through 12 for each RA7x disk drive installed in the
enclosure.
Installing the SA7x 3–3
Installing the SA7x
3.3 Performing a Post-Installation Checkout and Power-Up
Figure 3–1 SA7x Enclosure Front Panel
PORT SWITCHES
PORT SWITCHES
U n i t Se l e ct
LEFT
REAR
Run
Fault/
Ready
Set No.
Unit No.
Wr i t e
Protect
A
B
Run
Ready
Fa u l t/
Unit No.
Se t N o .
Wr i te
Pr o te ct
A
B
RIGHT
REAR
RIGHT
FRONT
LEFT
FRONT
FRONT
COVER
DRIVE
POWER SWITCHES
LEFT
FRONT
LEFT
REAR
RIGHT
REAR
RIGHT
FRONT
CXO-1867D_S
3–4 Installing the SA7x
Installing the SA7x
3.4 Setting Drive Unit Numbers
3.4 Setting Drive Unit Numbers
When you install an RA7x disk drive in an enclosure, the drive unit number DIP
switches are disabled. You then set the drive unit number at the enclosure OCP
as described below.
The RA7x disk drives have two drive unit number ranges: 000 through 255, and
000 through 999, which are dependent on the following three factors:
•
The drive model
Note
The RA70 disk drive can only use the drive unit numbers in the range
000 through 255.
•
The RA7x microcode revision level
•
The TB2 revision level
The device unit number range available for the RA71, RA72, and RA73 are
determined as described in Table 3–1.
Table 3–1 RA7x Drive Unit Numbers
Microcode Version
TB2 Revision
1
Drive Unit Number Range
Old
New
Old
New
000-255
X
X
–
–
–
–
X
X
X
–
X
–
–
X
–
X
Yes
Yes
Yes
Yes
1 ‘‘D-Etch,
2 The
2
000-999
No
No
No
Yes
part revision F03’’ or later.
RA70 can only use this range.
Two factors ensure that you do not select an invalid address. First, the drive unit
number of the drive being replaced is stored by TB2 . Second is that the RA7x
drive automatically configures itself to match the TB2 version. When you insert
a drive in the enclosure whose address range is 000 through 255 and the TB2
stored unit number is greater than 255, TB2 will signal the drive to go off line
and cause the OCP display to flash until you reset the address to 255 or less. Use
the following procedure to reset the address to 255:
1. Press the Unit Select switch in the upper-right corner of the OCP until
it locks in the in position. The unit select numbers for all drives in the
enclosure will flash indicating that the OCP is in unit select mode.
2. Press the Fault/Set No. switch for the first drive. Pressing the switch once
increments the disk unit number by one. Pressing and holding the switch
rapidly increments the disk unit number.
a. When the drive microcode is an older revision level you can only set the
drive unit number to a number in the range of 000 through 255.
b. When the new microcode is installed you can set the drive unit number to
any number from 000 through 999 providing that the correct version TB2
is installed.
Installing the SA7x 3–5
Installing the SA7x
3.4 Setting Drive Unit Numbers
3. Repeat Steps 1 and 2 until all drive unit numbers have been set.
4. Restore the OCP to normal operation by pressing the Unit Select switch.
5. When you are changing the address to correct an error condition that caused
the unit select numbers to flash, you must press the drive dc power switch to
turn the drive off. After the drive has spun down, press the drive dc power
switch to spin up the drive and place it on line.
3.5 Installing an Add-On SA7x Enclosure in an SA900 Storage
Array
WARNING
To maintain cabinet stability, always install components in the order
shown in Figure 3–2.
3.5.1 General Installation Considerations
Internal SDI cables and power cords are installed in SA900 storage arrays only
when a storage device is installed. The internal SDI cables and power cords are
shipped with each add-on and you must install them. The contents of the SA7x
add-on kit are:
•
SA7x enclosure
•
Guide rail plate assembly
•
Hardware mounting kit
•
Internal SDI cables
•
Power cord
3–6 Installing the SA7x
Installing the SA7x
3.5 Installing an Add-On SA7x Enclosure in an SA900 Storage Array
Figure 3–2 Storage Device Add-On Sequence for the SA900 Storage Array
(Front View)
9
8
9
8
9
8
7
6
3
2
7
6
5
4
1
0
5
4
3
2
5
4
3
2
1
0
7
6
1
0
ADD-ON SEQUENCE
RA9x DISK DRIVES
ONLY
ADD-ON SEQUENCE
SA7x ENCLOSURES
ONLY
ADD-ON SEQUENCE
MIXED RA9x DISK DRIVES
AND SA7x ENCLOSURES
FIRST, LOAD ALL RA9x DISK
DRIVES SEQUENTIALLY.
THEN, LOAD SA7x ENCLOSURES
SEQUENTIALLY.
CXO-3568A-MC
The hardware mounting kit includes two sets of chassis retaining brackets.
•
The top and bottom chassis retaining brackets, shown in Figure 3–3, are for
the H9646 cabinet. These brackets mate to the chassis retainer attached to
the SA7x enclosure guide rail.
Installing the SA7x 3–7
Installing the SA7x
3.5 Installing an Add-On SA7x Enclosure in an SA900 Storage Array
Figure 3–3 SA7x Front Clamping Assembly
SA70
ENCLOSURE
CHASSIS
TOP
CHASSIS
RETAINING
BRACKET
FLATHEAD
SCREW
RAIL
CHASSIS
ASSEMBLY
CONICAL
WASHER/SCREW
CHASSIS
RETAINER
FLAT
WASHER
SEMS
SCREWS
GUIDE
RAIL
ASSEMBLY
FLATHEAD
SCREW
FLAT
WASHER
CABINET
FRONT
VERTICAL
UPRIGHT
CHASSIS
RETAINER
CONICAL
WASHER/SCREW
SEMS
SCREWS
BOTTOM
CHASSIS
RETAINING
BRACKET
CXO-2442B_S
•
The chassis retaining brackets, shown in Figure 3–4, are for the H9A00
cabinet. They attach to SA7x enclosure guide rail and the cabinet frame.
3–8 Installing the SA7x
Installing the SA7x
3.5 Installing an Add-On SA7x Enclosure in an SA900 Storage Array
Figure 3–4 SA900 and SA7x Chassis Retaining Brackets
TB1
ATTACH
RIGHT
OCP
ATTACH
LEFT
OCP
SHORT SEMS
PAN-HEAD
SCREWS
CHASSIS RETAINING
BRACKET
CXO-3939A-MC
3.6 Preparing the SA900 Cabinet
Each SA7x enclosure is mounted in the cabinet with one guide rail plate assembly
as shown in Figure 3–5. The guide rail plate is attached to the cabinet’s internal
vertical uprights, and it supports the enclosure from one side. Grooves machined
into the side of the enclosure mate with flanges along the sides of the chassis
rail, allowing the enclosure to slide onto the guide rail plate from the front of the
cabinet.
On one end of the guide rail plate is an adjustable mounting bracket. The
mounting bracket has four screws that when loosened, allow the guide rail plate
to be placed into the cabinet and then extended to make a secure fit.
Installing the SA7x 3–9
Installing the SA7x
3.6 Preparing the SA900 Cabinet
WARNING
While working in the cabinet interior, ac power must be removed from
cabinet components. Failure to do may result in personnel injury as a
result of electric shock.
Prior to performing any of the SA900 procedures, remove ac power from cabinet
components. If the cabinet is installed and operating, spin down all disk drives
and halt tape drives in the cabinet. Switch the circuit breaker on the front of the
cabinet power controller to the off position.
Figure 3–5 SA7x Enclosure Guide Rail Assembly Installation
#10-32 MACHINE
SCREW
FLAT HEAD
SCREWS
MOUNTING BRACKET
LOCKWASHER
U-NUT
NUT BAR
SHOULDER
SCREWS
SHOULDER
SCREWS
GUIDE RAIL
PLATE ASSEMBLY
LOCKWASHER
CABINET REAR
VERTICAL UPRIGHT
CABINET FRONT
VERTICAL UPRIGHT
MR-0305-92DG
3–10 Installing the SA7x
Installing the SA7x
3.7 Guide Rail Plate Installation
3.7 Guide Rail Plate Installation
Two round standoffs on each end of the guide rail plate are used to locate
the guide rail plate along the cabinet vertical uprights. The round standoffs
are inserted into front and rear cabinet vertical upright mounting holes to
position the guide rail plate while it is fastened to the cabinet. Guide rail plate
installation procedures for both left and right enclosure mounting positions are
presented in Sections Section 3.8 and Section 3.9.
If an ESD bolt is mounted to the vertical upright in your selected installation
position, remove the ESD bolt until your installation is complete, then fasten it to
an open space on the cabinet vertical upright.
3.8 Left Position Guide Rail Plate Installation
Install the guide rail plate in the left position within the cabinet as follows (refer
to Figure 3–5):
WARNING
Cabinet vertical upright edges may be sharp and can slice or abrade skin
or cable insulation.
1. Turn the cabinet power off as described in Section 3.6
2. This procedure installs an enclosure in add-on sequence position 3. Refer
to Figure 3–2 to select the optimum add-on sequence position for your
installation.
3. Open the front cabinet door.
4. Remove the rear panel.
5. From the cabinet door, remove the bezel filler that corresponds to add-on
sequence position 3.
a. Remove the four U-clips securing the bezel filler to the door.
b. Remove the bezel filler.
WARNING
Use care in supporting the guide rail plate. It is heavy and awkward to
position within the cabinet. If possible, use two persons to support and
position the guide rail plate. The guide rail plate may cause personnel
injury if dropped during installation.
6. Install the guide rail plate in add-on sequence position 3. Add-on sequence
position 3 corresponds to mounting hole numbers 65, 71, and 78 as shown in
Figure 3–6.
a. From the rear of the cabinet, position the guide rail plate with the
mounting bracket to the rear, making sure that the arrow on the
mounting bracket is pointing up.
b. Insert the two front round stand-offs into the cabinet so that hole 71
becomes the center mounting hole in the guide rail plate.
Installing the SA7x 3–11
Installing the SA7x
3.8 Left Position Guide Rail Plate Installation
c.
While supporting the guide rail plate against the cabinet front vertical
upright, extend the mounting bracket to engage the two rear round
stand-offs into hole numbers 64 and 79 on the cabinet rear vertical
upright.
Figure 3–6 SA900 Mounting Rail Holes
d. Insert and tighten the three shoulder screws and lockwashers in
mounting holes 65, 71, and 78.
e.
From the front, insert and tighten the three shoulder screws and
lockwashers in mounting holes 65, 71, and 78.
f.
Insert and tighten a flathead screw through the top hole in the guide rail
plate to the U-nut mounted on the cabinet front vertical upright.
g. From the rear, insert and tighten two flathead screws through the top and
bottom guide rail plate holes to the two U-nuts mounted on the cabinet
rear vertical upright.
3–12 Installing the SA7x
Installing the SA7x
3.8 Left Position Guide Rail Plate Installation
h. Tighten the four mounting bracket screws.
3.9 Right Position Guide Rail Plate Installation
Install the guide rail plate in the right position within the cabinet as follows
(refer to Figure 3–5):
WARNING
Cabinet vertical upright edges may be sharp and can slice or abrade skin
or cable insulation.
1. Turn the cabinet power off as described in Section 3.6
2. This procedure installs an enclosure in add-on sequence position 2. Refer
to Figure 3–2 to select the optimum add-on sequence position for your
installation.
3. Open the front cabinet door and remove the rear panel.
4. From the cabinet door, remove the bezel filler that corresponds to add-on
sequence position 2.
a. Remove the four U-clips securing the bezel filler to the door.
b. Remove the bezel filler.
WARNING
Use care in supporting the guide rail plate. It is heavy and awkward to
position within the cabinet. If possible, use two persons to support and
position the guide rail plate. The guide rail plate may cause personnel
injury if dropped during installation.
Note
Removing the door latch applies only to installing guide rail plates in
position 2.
5. Remove two mounting screws and kepnuts securing the door latch to cabinet
and remove the door latch.
6. Install the guide rail plate in add-on sequence position 2. Add-on sequence
position 2 corresponds to mounting hole numbers 65, 71, and 78 as shown in
Figure 3–6.
a. From the front of the cabinet, position the guide rail plate with the
mounting bracket to the front, making sure that the arrow on the
mounting bracket is pointing up.
b. Insert the two rear round stand-offs into the cabinet so that hole 71
becomes the center mounting hole in the guide rail plate.
Installing the SA7x 3–13
Installing the SA7x
3.9 Right Position Guide Rail Plate Installation
c.
While supporting the guide rail plate against the cabinet rear vertical
upright, extend the mounting bracket to engage the two front round
stand-offs into hole numbers 64 and 79 on the cabinet front vertical
upright.
Note
If installing in other than position 2, insert shoulder screw in middle
mounting hole.
d. Insert and tighten two shoulder screws and lockwashers in mounting
holes 65 and 78.
e.
Attach the door latch and secure with two mounting screws and kepnuts
in mounting holes 71 and 78.
f.
From the rear, insert and tighten the three shoulder screws and
lockwashers in mounting holes 65, 71, and 78.
g. Insert and tighten two flathead screws through the top and bottom guide
rail plate holes to the two U-nuts mounted on the cabinet rear vertical
upright.
h. From the front, insert and tighten a flathead screw through the top hole
in the guide rail plate to the U-nut mounted on the cabinet front vertical
upright.
i.
Tighten the four flathead mounting bracket screws as shown in
Figure 3–5.
3.10 Preparing the SA7X Enclosure
Use the following procedure to prepare the SA7x enclosure for installation:
1. Remove the OCP (refer to Figure 3–1).
a. Pull the OCP straight out from the front of the SA7x enclosure.
b. Put the OCP in a safe place.
2. Position the guide rail inserts for a SA900 cabinet left side installation.
Note
If the installation is a SA900 cabinet right side installation proceed to
step 3.
a. Loosen the two rear cover captive screws (or two screws) and remove the
rear cover.
b. Remove the two upper right chassis retainer screws and remove the
retainer bracket.
c.
Slide the upper right insert out the rear of the enclosure.
d. Slide the insert into the upper left side of the enclosure.
e.
3–14 Installing the SA7x
Install the retainer bracket and insert and tighten the two chassis
retainer screws.
Installing the SA7x
3.10 Preparing the SA7X Enclosure
f.
Install the rear cover and insert and tighten the two rear cover captive
screws (or two screws).
3. Position the guide rail inserts for a SA900 cabinet right side installation.
a. Loosen the two power supply captive screws and remove the power supply.
b. Remove the two lower left chassis retainer screws and remove the
retainer bracket.
c.
Slide the lower left insert out the rear of the enclosure.
d. Slide the insert into the lower right side of the enclosure.
e.
Install the retainer bracket and insert and tighten the two chassis
retainer screws.
f.
Install the power supply and tighten the two captive screws.
3.11 Installing the SA7X Enclosure
Use the following procedure to install the SA7X enclosure into a SA900 cabinet:
WARNING
The fully-populated enclosure, with four disk drives and a power supply,
weighs up to 40 kilograms (88 pounds) and can cause serious injury
if lifted improperly. If a lifting device is not available, two people are
required to lift and install the enclosure. One person can install the
enclosure if the disk drives and power supply are removed to lighten the
load. (Refer to the SA7x Enclosure Service Manual for instructions.)
1. Lift the SA7x enclosure to the installation position (see Figure 3–7).
a. Lift the enclosure to the front of the cabinet with the aid of a Digitalapproved lifting device or with two people.
b. Turn the enclosure so its side grooves are facing toward the cabinet rails.
(Refer to Figure 3–7.)
2. Seat the enclosure into the cabinet.
a. Slide the enclosure side grooves into the cabinet guide rails as shown in
Figure 3–7, and push the enclosure all the way to the rear of the cabinet.
b. Remove the lifting device.
c.
Using the two 10-32 x 1/2-inch screws that came with the enclosure,
connect the two chassis retaining brackets (mounted on the side of the
enclosure) to the cabinet. Tighten them securely. The recommended
torque is 8 to 10 inch-pounds. (Refer to Figure 3–7).
3. Install the OCP for a SA900 cabinet left side installation.
Note
If the installation is a SA900 cabinet right side installation proceed to
step 4.
Installing the SA7x 3–15
Installing the SA7x
3.11 Installing the SA7X Enclosure
Figure 3–7 Installing the SA7x Enclosure in the SA900
GUIDE RAIL
ENCLOSURE REAR
CABINET FRONT
SA7x
ENCLOSURE
SCREWS
GUIDE RAIL
PLATE ASSEMBLY
CXO-3574A-MC
3–16 Installing the SA7x
Installing the SA7x
3.11 Installing the SA7X Enclosure
a. Check that the three enclosure connector (TB1) mounting screws are
tight.
b. Align the OCP with the TB1 and push until the OCP is secure.
4. Install the OCP for a SA900 cabinet right side installation.
a. Loosen the two outer screws on TB1.
b. Remove the center screw under Attach Left Control Panel on TB1 and
slide TB1 to the left.
c.
Insert and tighten the center screw under Attach Right Control Panel on
TB1.
d. Tighten the two outer screws on TB1.
CAUTION
Do not bend the alignment or connector pins when installing the OCP.
The panel should fit without being forced.
e.
Align the OCP with the TB1 and push until the OCP is secure.
The SA900 storage array is shipped with internal cables and power cords
for storage devices installed at the factory. However, when you install SA7x
enclosures, you must install the internal SDI cables and connect the power cords.
If external SDI cables are required, they are ordered separately and shipped at
the same time the add-on is shipped. Table 3–2 lists the external SDI cables.
Table 3–2 H9A00 External SDI Cables
Standard
Part Number
Fire Code
Part Number
3.7 m (12 ft) cable
BC26V–12 or BC26G–12
BC26J–12
7.6 m (25 ft) cable
BC26V–25 or BC26G–25
BC26J–25
15.2 m (50 ft) cable
BC26V–50 or BC26G–50
BC26J–50
24.4 m (80 ft) cable
BC26V–80 or BC26G–80
BC26J–80
External SDI Cables
The H9A00 cabinet includes a left and a right vertical I/O bulkhead. (Refer to
Figure 3–8.) Storage devices are connected by SDI cables to one of the five sets
of eight connectors on each bulkhead. A total of ten devices can be connected to
the I/O bulkheads. The RA9x disk drive uses two SDI cables; the SA7x enclosure
uses two special one-to-four cables. Each cable terminates with four connectors.
The SA900 storage array can accommodate a maximum of ten RA9x disk drives,
or ten SA7x enclosures, or 80 ports.
Use the following procedure to install and connect SDI cables and power cords:
1. Ensure that the Line Voltage Selector switch is in the proper position and the
Master On/Off switch on the enclosure is off.
Installing the SA7x 3–17
Installing the SA7x
3.11 Installing the SA7X Enclosure
Figure 3–8 SA900 SDI Cable Connections
2. Install cables from drives and enclosures on the left side of the cabinet to
the left vertical I/O bulkhead; install cables from drives and enclosures on
the right side of the cabinet to the right vertical I/O bulkhead, as shown in
Figure 3–8.
3–18 Installing the SA7x
Installing the SA7x
3.11 Installing the SA7X Enclosure
3. Connect SDI cable connectors to the Port A and Port B connections on the
rear of the SA7x enclosure. Connect the other end of the cable connectors
to the vertical I/O bulkhead. (The top four ports in each group of eight
correspond to Port A, and the bottom four ports in each group of eight
correspond to Port B.)
4. Connect the power cords to the rear of the SA7x enclosure, as shown in
Figure 3–9.
5. Route the power cords from the storage devices on the right side of the
cabinet down the right vertical I/O bulkhead.
6. Route the power cords from the storage devices on the left side of the cabinet
down the left vertical I/O bulkhead.
7. Connect the power cord to the power controller connector shown in
Figure 3–9.
8. Coil any excess power cord in front of the power controller.
9. Connect the external SDI cables in the SA900 storage array. Be sure to
tighten the captive screws when connecting the external cables to the
bulkhead.
10. Slide the external SDI cables through the appropriate slot on the filler panel.
If necessary, remove the cable retainers on the filler panel to more easily
access the slot. Then, replace the cable retainers.
3.11.1 Completing the Installation
Complete the installation as follows:
1. Restore power to the cabinet.
2. Turn on all storage devices in the cabinet. Spin up all drives and place them
on line. Check out all storage devices as described in the component user
guide or service manual.
3. Ensure that the rear panel will clear the external cables. If necessary, adjust
the side panels to provide additional clearance.
4. Replace the rear panel and close the front panel.
Installing the SA7x 3–19
Installing the SA7x
3.11 Installing the SA7X Enclosure
Figure 3–9 SA900 Power Cords—SA7x Enclosures
3–20 Installing the SA7x
4
Operating the SA7x
This chapter describes the SA7x enclosure’s front and rear panel switches and
indicators and explains how to use them. It also explains how to apply power to
the enclosure and how to place drives on line and off line.
Note
You must be a qualified Digital Multivendor Customer Services engineer
to perform procedures that involve the drive power switches or internal
storage array cabinet switches and indicators.
4.1 SA7x Switches and Indicators
The SA7x switches and indicators are located on both the front and rear panels.
The front panel contains the operator control panel (OCP) and the drive dc
power switches. The rear panel contains the power supply related switches and
indicators. Figure 4–1 shows the SA7x enclosure front panel. The OCP is located
along the top enclosure and contains the Unit Select switch and four identical
sets of switches and indicators. Each set of switches and indicators is dedicated
to one of the four disk drive positions in the enclosure. Drive power switches and
indicators for the four disk drive positions are located at the bottom.
Note
The switch and indicator set for each disk drive position is operational
ONLY when the disk drive is powered up.
4.1.1 Using the Switches and Indicators
Table 4–1 is a summary of SA7x control and indicator functions. Table 4–2 is a
detailed description of OCP control and indicator functions. The following general
comments are also applicable:
•
During power-on and spin-up of a drive, the OCP switches and indicators
have slightly modified meanings, as described in Section 4.4.1.
•
The control set for each disk drive position contains Ready and Unit Number
indicators and switches for run operation, fault conditions, write protection,
unit number selection, and A/B port selection.
Operating the SA7x 4–1
Operating the SA7x
4.1 SA7x Switches and Indicators
Figure 4–1 SA7x Enclosure Front Panel
PORT SWITCHES
PORT SWITCHES
U n i t Se l e ct
LEFT
REAR
Run
Fault/
Ready
Set No.
Unit No.
Wr i t e
Protect
A
B
Run
Ready
Fa u l t/
Unit No.
Se t N o .
Wr i te
Pr o te ct
A
B
RIGHT
REAR
RIGHT
FRONT
LEFT
FRONT
FRONT
COVER
DRIVE
POWER SWITCHES
LEFT
FRONT
LEFT
REAR
RIGHT
REAR
RIGHT
FRONT
CXO-1867D_S
•
All switches, except the Fault/Set No. switch, are set by pressing them in.
These switches hold the set position until you release them by pressing them
again. An indicator lights in each switch to show the status of the drive
function.
4–2 Operating the SA7x
Operating the SA7x
4.1 SA7x Switches and Indicators
•
The Fault/Set No. switch is a momentary pushbutton. When you press the
switch and hold it, it is set; when you release the switch, it is reset.
Table 4–1 SA7x Switch and Indicator Functions
Operator Control Panel Controls and Indicators
Switch/(Indicator
Color)
Switch Function
Indicator Function
Run (yellow)
Press to spin up the drive.
Release to spin down the drive.
On when drive has spun
up.
Off when the drive spindle
has stopped.
Fault/Set No.
(red)
Changes the drive unit number when in
the Unit Select Mode.
Press and hold to test indicator functions.
All OCP indicators should be on.
On when a fault detected.
Ready (green)
None.
On when drive ready to
read/write.
Unit Number
(red)
None.
Displays the drive unit
number.
Write Protect
(yellow)
Press to enable write protect.
On when write protect
enabled.
Port A (yellow)
Press to enable Port A for controller
selection.
On when Port A is on line
to system drive controller.
Port B (yellow)
Press to enable Port B for controller
selection.
On when Port A is on line
to system drive controller.
Unit Select
Press to enable Unit Selected mode.
None.
Lower Front Panel
Drive Power
(green),
one switch for
each drive
Press to apply power and start drive
self-test.
On when power applied to
drive.
Rear Panel Power Supply Chassis
Master On/Off
Apply line voltage to the power supply.
None.
Line voltage
selector
Selects power supply operating voltage:
either 120 Vac, 60 Hz or 240 Vac, 50 Hz.
None.
Fault (red)
None.
On when there is a fault
or an overtemperature
condition.
This indicator is inside the
power supply and is visible
through the power supply
grillwork.
Operating the SA7x 4–3
Operating the SA7x
4.1 SA7x Switches and Indicators
Table 4–2 OCP Controls and Indicators
Control
(Indicator)
Function
Run
Pressing the Run switch spins up the drive. The yellow Run
indicator lights after the drive spindle reaches operating speed.
Pressing the Run switch again releases the switch and spins down
the drive. The yellow Run indicator goes out only after the drive
spindle comes to a complete stop.
Fault/Set No.
Pressing and holding the Fault/Set No. switch during normal
operation causes all OCP indicators to light as a lamp test. If all
indicators do not light, there may be a problem with the OCP. See
Chapter 5 for information.
When a fault condition is detected in a disk drive, the red Fault/Set
No. indicator lights. Pressing the Fault/Set No. switch once after a
drive fault places the drive off line and causes all indicators in the
drive’s control set, including the Fault/Set No. indicator, to blink an
error condition code. The light pattern converts to a two-character
error code. (See Chapter 5 for information.) Pressing the Fault/Set
No. switch a second time commands the drive to attempt to clear
the error and return on line.
You also use the Fault/Set No. to set the drive unit number, as
described in Section 3.4.
Ready
The green Ready indicator lights to show that the drive is ready
for read/write operations. This indicator is activated only after you
press the Run switch and the yellow Run indicator lights. After
spin-up, this indicator blinks during self-test. The Ready indicator
remains on during normal operations, but may blink or go out
during heavy disk accesses. The Ready indicator must light within
60 seconds after you press the Run switch; failure to do so indicates
a problem in the drive.
Unit Number
The unit number for the disk drive is displayed next to the Ready
indicator. The unit number can be set to any number from either
000 to 255, or 000 to 999, as described in Section 3.4. Placement of
unit numbers in an actual installation is shown in Figure 4–1 (unit
numbers 000 through 003 in this example).
Write Protect
Setting the Write Protect switch disables writing to the drive. This
function keeps the drive data from being written over and lost.
The yellow Write Protect indicator lights to show that a drive is
write protected. The drive may also be write protected by a system
controller command; this also causes the Write Protect indicator to
light.
Port A
Port B
Ports A and B are enabled with the Port A and Port B select
switches. Yellow indicators in each switch light to show that the
system controller has selected the port.
4.1.2 Using Drive Power Switches and Indicators
The lower part of the front panel contains a set of four drive power switches that
you use to apply power to the disk drives. Each drive power switch is associated
with a disk drive position, as shown in Figure 4–1. A green indicator in each
drive power switch lights to show that power is being applied to the associated
disk drive.
Setting a drive power switch connects power to the associated disk drive and
causes the drive to run a self-test. During self-test, all OCP indicators are lit.
After setting the drive power switch, you must press the Run switch on the OCP
to spin up the drive.
4–4 Operating the SA7x
Operating the SA7x
4.2 Using SA7x Rear Panel Switches and Indicator
4.2 Using SA7x Rear Panel Switches and Indicator
Two rear panel switches and an indicator are located on the power supply chassis,
as shown in Figure 4–2. These switches and indicator affect how the entire
SA7x enclosure operates. Table 4–3 is a summary of the rear panel switches and
indicators.
WARNING
Hazardous voltages are present inside the storage array cabinet and
enclosures. You must be a qualified Digital Services engineer to perform
installation procedures. Otherwise, you may injure yourself or others and
you may damage the equipment.
Table 4–3 Power Supply Controls and Indicators
Control/Indicator
Function
Master On/Off
The rocker-type Master On/Off switch for the SA7x enclosure
is located in the center of the rear panel.
Press the side of the switch labeled ‘‘1’’ (on) to apply power to
the SA7x enclosure.
Press the side of the switch labeled ‘‘0’’ (off) to remove power
from the enclosure.
Line Voltage Selector
switch
As you face the rear panel, the Line Voltage Selector switch is
located to the right of the Master On/Off switch. It is visible
through a hole in the rear panel. You must set this switch
to the available line voltage during installation. The selected
voltage is shown on the switch element.
CAUTION
The SA7x enclosure power supply is universal for both 120 Vac (60 Hz) or
240 Vac (50 Hz). The power supply is set to 240 Vac (50 Hz) at the factory
and must be reset to 120 Vac (60 Hz) for some installations. Selecting the
wrong voltage will damage the power supply.
Fault indicator (red)
The red Fault indicator is visible through holes in the right
side of the power supply back panel. When the power supply
detects an overtemperature or overvoltage condition, it
automatically shuts down power to the enclosure and the
Fault indicator lights. If the Fault indicator lights, turn off
the Master On/Off switch and refer to Chapter 5 to correct the
condition.
Operating the SA7x 4–5
Operating the SA7x
4.3 Applying Power to the SA7x Enclosure
Figure 4–2 SA7x Enclosure Rear Panel
SDI INTERFACE
CONNECTOR
PORT B
REAR
BULKHEAD
PORT B
SILK SCREEN
SDI INTERFACE
CONNECTOR
PORT A
REAR
COVER
OVERTEMPERATURE
INDICATOR
(BEHIND PANEL)
PORT A
SILK SCREEN
MOUNTING
SCREW
POWER
SUPPLY
TABS
MOUNTING
SCREW
LINE VOLTAGE
CONNECTOR
LINE VOLTAGE
SELECTOR SWITCH
(BEHIND PANEL)
MASTER
ON/OFF
SWITCH
CXO-2658C
4.3 Applying Power to the SA7x Enclosure
CAUTION
Before applying power to the SA7x enclosure, ensure that the Line
Selector Voltage switch on the enclosure, located behind the SA7x rear
panel, is set to the proper line voltage. Otherwise, you will damage the
power supply. (See Figure 4–2.)
To apply power to the SA7x enclosure, use the following procedure:
1. Verify that the Master On/Off switch on the power supply is set to off.
2. Verify that the drive power switches are set to off (switch button released).
4–6 Operating the SA7x
Operating the SA7x
4.3 Applying Power to the SA7x Enclosure
3. Restore power to the enclosure by turning on the Master On/Off switch.
4. Verify the power is on by checking that the fan is operating. Do this by
feeling for airflow out of the rear of the enclosure.
4.4 Placing RA7x Drives On Line and Off Line
This section explains how to place RA7x disk drives on line and off line.
4.4.1 Placing a Drive On Line
After applying power to the SA7x enclosure, use the following procedure to place
a drive on line:
1. Press the drive power switch for the drive you want to bring online. (Refer
to Figure 4–1.) If power to the drive is within specifications, the green drive
power indicator lights. If the indicator does not light, see Chapter 5.
Note
Setting a drive power switch to on does not spin up the associated drive.
Applying power to the disk drive starts the drive’s internal power-on
diagnostics. These diagnostics are signaled at the OCP by the following
sequence of indicator lights:
a. All indicators light for about eight seconds.
b. If the drive completes the power-on diagnostics without detecting a fault,
all indicators go out.
c.
If the Fault/Set No. indicator remains lit, the drive has detected a fault.
Press the Fault/Set No. switch to obtain a blinking OCP error code. The
light pattern converts to a two-character error code. (See Chapter 5.)
Pressing the Fault/Set No. switch a second time commands the drive to
attempt to clear the error and return online.
2. Press the Run switch on the OCP to spin up the drive. (Refer to Figure 4–1.)
The following sequence of indicator lights occurs during spinup:
a. The Run indicator lights to show that you have commanded spinup. All
other indicators remain off. (If you have powered up the drive with the
Run switch set, you must either momentarily release, then reset, the Run
switch, or enter a MOUNT command from your system to initiate spinup.
The Run indicator lights to show that spinup was initiated through either
of these actions.)
b. When the drive completes spinup, the Ready indicator lights to show that
the drive is read/write ready.
c.
The Ready indicator then flashes while the internal read/write and seek
diagnostics run.
d. Upon completion of the read/write and seek diagnostics, the Ready
indicator remains lit.
e.
The Fault/Set No. indicator lights if the drive detects fault during spinup.
Operating the SA7x 4–7
Operating the SA7x
4.4 Placing RA7x Drives On Line and Off Line
f.
If the Fault/Set No. indicator remains lit, the drive has detected a fault.
Press the Fault/Set No. switch to obtain a blinking OCP error code. The
light pattern converts to a two-character error code. (See Chapter 5.)
Pressing the Fault/Set No. switch a second time commands the drive to
attempt to clear the error and return online.
3. Press the Port A, Port B, and Write Protect switches as required. These
functions are turned off by pressing the switch a second time.
The Ready and Run indicators remain lit during normal operation, although the
Ready indicator may flicker during heavy activity. The Write Protect indicator is
lit if the drive is write protected and off if the drive is write enabled. The Port A
and Port B indicators light only while their respective ports are selected by the
system controller.
4.4.2 Taking a Drive Off Line
Taking a disk off line first requires you to dismount the drive as described in
Steps 1 and 2 of the following procedure. To remove the drive from the enclosure
you must complete Steps 3 through 5.
1. Dismount the disk drive using the proper system commands.
2. Press and release the Port A and Port B switches to turn off both ports of the
disk drive. (Refer to Figure 4–1.) Wait for the port indicators to go out.
3. Press and release the appropriate Run switch on the OCP. Wait for the Run
indicator to go out.
4. Set the drive power switch to off. The switch indicator goes out to show that
power has been removed from the drive. If the indicator does not go out,
there may be a faulty switch.
5. Remove power from the enclosure by turning off the Master On/Off switch.
(See Figure 4–2.)
You are now ready to remove the disk drive from the enclosure. Refer to
Chapter 6 for complete instructions.
4–8 Operating the SA7x
5
Troubleshooting the SA7x
This chapter explains how to troubleshoot the SA7x enclosure.
For complete information about troubleshooting RA7x disk drives, see the RA7x
Disk Drive Service Manual. For instructions on removing and replacing field
replaceable units (FRUs), see Chapter 7.
5.1 Identifying Problems
Table 5–1 lists the problems you might encounter with the SA7x enclosure. It
also refers you to the section in this chapter that explains how to troubleshoot
each problem.
Table 5–1 SA7x Problems and Troubleshooting References
Problem
Refer to
The entire enclosure is dead; the power supply Fault indicator is
lit.
Section 5.2.1
The entire enclosure is dead; the power supply Fault indicator is
not lit.
Section 5.2.2
A drive power indicator flashes.
Section 5.3
A drive shows excessive errors or displays a fault on the OCP.
Section 5.4
A drive is not ‘‘visible’’ to the controller.
Section 5.6
The OCP indicators are not lighting, a drive does not respond to
OCP commands, or the unit number changes after power-up.
Section 5.7
5.2 Troubleshooting a Dead Enclosure
A dead enclosure is usually caused by a power supply problem. Such a problem
can have two different indications. In one case, the Fault indicator is lit; in the
other, the Fault indicator is off. The following sections describe the procedures
for troubleshooting each of these problems.
5.2.1 If the Fault Indicator Is Lit
If the SA7x enclosure is dead and the power supply Fault indicator is lit, turn
off the Master On/Off switch located on the rear of the power supply. Check for
airflow obstructions. Also check whether the enclosure has been exposed to an
overtemperature condition at the operating site.
If the enclosure has been exposed to an overtemperature condition:
1. Allow the enclosure to cool, and then turn it back on.
Troubleshooting the SA7x 5–1
Troubleshooting the SA7x
5.2 Troubleshooting a Dead Enclosure
2. If the enclosure returns to normal operation, the fan operates, and the Fault
indicator does not light, an overtemperature condition at the operating site is
the likely cause of the failure. Investigate and correct the overtemperature
condition.
Note
An overtemperature may also show up through one of the error logs. If
an error log shows overtemperature and the Fault indicator is not lit, the
RA7x disk drive is most likely the cause of the failure. Refer to Chapter 7
for additional troubleshooting information.
If the enclosure has not been exposed to an overtemperature condition:
1. Leave the enclosure off for 10 seconds, and then turn it back on.
2. If the enclosure still does not operate, replace FRUs in the following order
until the problem is corrected:
a. Power supply
b. Fan assembly
c.
Transition board 1 (TB1)
d. Transition board 2 (TB2)
e.
The enclosure assembly (See the appropriate storage array guide for
instructions.)
5.2.2 If the Fault Indicator Is Not Lit
If the enclosure is dead and the power supply Fault indicator is not lit:
1. Verify site power by checking other equipment on the same line and the
circuit breakers to the cabinet.
2. Verify that the enclosure power plug is connected.
3. Verify that the cabinet power controller is connected to the site’s line voltage
outlet.
4. Verify that the Line Voltage Selector switch on the rear panel of the power
supply is set to the correct voltage.
5. Verify that the cabinet power controller and the enclosure power supply are
turned on.
6. If the enclosure still does not start, check for an overcurrent condition in the
power supply by removing power to the disk drives. Do this by pressing the
drive power switches on the front of the enclosure.
7. If the enclosure fan starts, proceed to Step 3 in Section 5.3.
8. If the enclosure fan does not start, replace FRUs in the following order until
the problem is corrected:
a. Power supply
b. TB1
c.
TB2
5–2 Troubleshooting the SA7x
Troubleshooting the SA7x
5.2 Troubleshooting a Dead Enclosure
d. The enclosure assembly (See the appropriate storage array guide for
instructions.)
5.3 Troubleshooting a Flashing Drive Power Indicator
Note
If power from the power supply is erratic, the drive may spin up and then
spin down. These on and off cycles may occur because the voltage monitor
in the device detects that power is going in and out of tolerance ranges.
When the monitor detects low power, the drive begins its shutdown
procedure. As the drive shuts down, power may again return to normal;
the drive receives initializing commands and spins up again.
Flashing drive power indicators indicate an overcurrent condition at the power
supply output. (See Figure 5–1.) If the drive power indicators are flashing:
1. Reset the operator control panel (OCP) switches:
a. Press both Port A and Port B switches to deselect these ports.
b. Press the Run switch to deselect the drive.
c.
Repeat this step for all disk drives in the enclosure.
2. Remove power to the disk drives by pressing each of the drive power switches.
3. Restore power to the disk drives by pressing each of the drive power switches
one at a time.
a. If the drive power indicator lights steadily when you press the switch,
that drive is not causing the overload.
b. If the drive power indicator flashes when you press the switch, that drive
is causing the overload.
4. Remove the disk drive causing the overload and install it in a different
position in the enclosure.
a. If the drive power indicator for that position flashes, the disk drive is at
fault. Replace the drive’s electronic control module (ECM) or head disk
assembly (HDA). (See Chapter 7 for instructions.)
b. If the drive power indicator for that position does not flash, the opening
that had the flashing drive power indicator is at fault. Replace the FRUs
in the following order until the problem is corrected:
a. Power supply
b. Power harness
c.
The enclosure assembly (See the appropriate storage array guide for
instructions.)
Troubleshooting the SA7x 5–3
Troubleshooting the SA7x
5.3 Troubleshooting a Flashing Drive Power Indicator
Figure 5–1 SA7x Enclosure Front Panel
PORT SWITCHES
PORT SWITCHES
U n i t Se l e ct
LEFT
REAR
Run
Fault/
Ready
Set No.
Unit No.
Wr i t e
Protect
A
B
Run
Ready
Fa u l t/
Unit No.
Se t N o .
Wr i te
Pr o te ct
A
B
RIGHT
REAR
RIGHT
FRONT
LEFT
FRONT
FRONT
COVER
DRIVE
POWER SWITCHES
LEFT
FRONT
LEFT
REAR
RIGHT
REAR
RIGHT
FRONT
CXO-1867D_S
5–4 Troubleshooting the SA7x
Troubleshooting the SA7x
5.4 Troubleshooting Excessive Drive Errors or a Fault Condition
5.4 Troubleshooting Excessive Drive Errors or a Fault Condition
If the system is displaying excessive drive errors or a fault condition, check to the
following resources to isolate the problem to a disk drive or enclosure FRU.
Note
When referring to error codes, note that power low or thermal errors on
any or all disk drives could indicate a problem with an enclosure FRU.
Media errors on all drives could indicate an enclosure power supply fault.
Check the power supply as explained in Sections 5.2.1 and 5.2.2.
The DSA Troubleshooting Flowchart has extensive information for troubleshooting
disk drives using the following resources:
•
OCP error code—Identify the OCP error code as explained in Section 5.5.
Refer to Chapter 7 to interpret OCP error codes.
•
VAXsimPLUS—Use VAXsimPLUS software to obtain theory codes
that can be referenced by VAXsimPLUS support personnel for servicing
recommendations.
•
Host error log—Refer to the host system documentation to access the host
error log and obtain an error code. This error code determines if the problem
is with the the SA7x enclosure or an RA7x disk drive.
•
HSC console log—If the RA7x disk drives are connected to an HSC
controller, check the HSC console log. Refer to the HSC documentation to
decode the console error log.
•
Internal drive error log—Refer to the RA7x Disk Drive Service Manual and
run the RA7x disk drive utility to extract the drive error log. The RA7x Disk
Drive Service Manual also explains how to decode the drive error log and
obtain the error code. With this information, you can determine if the fault is
in the disk drive or an enclosure FRU.
5.5 Reading OCP Error Codes
The SA7x enclosure OCP displays error codes on the indicator set for each drive.
(Refer to Figure 5–1.) These codes provide an initial clue to a drive fault prior to
the detailed analysis provided by the drive’s internal log.
If the Fault/Set No. indicator lights to signal that the disk drive has detected a
fault:
1. Press the Fault/Set No. switch once. This causes the drive to display an error
code on the drive’s indicator set on the OCP.
2. Note the error code. The code is displayed as flashing indicators on the OCP.
Note
While in the fault mode, the OCP indicators do not retain their normal
function; they act only as error code indicators until you press the Fault/
Set No. switch a second time.
Troubleshooting the SA7x 5–5
Troubleshooting the SA7x
5.5 Reading OCP Error Codes
3. Refer to the SA7x Enclosure Service Manual for a list of the OCP error codes
with the suggested FRU replacement.
4. Press the Fault/Set No. switch again. This commands the drive to clear the
fault and return to normal operation.
a. If the fault clears, you may resume operation. Note the fault code in the
system log in case you need it for future fault analysis.
b. If neither the Ready indicator nor the Fault/Set No. indicator lights, the
disk drive is at fault. See the RA7x Disk Drive Service Manual for more
information on troubleshooting RA7x disk drives.
5.6 Troubleshooting a Drive Not Visible to the Controller
If a drive is not visible to a controller:
1. Verify that the drive is properly installed in the enclosure.
2. Verify that the correct ports are selected.
3. Verify that the correct unit number is selected for the drive.
4. Verify that the SDI cables are properly connected to the I/O bulkhead.
5. If the preceding conditions are met, replace the FRUs in the following order
until the problem is corrected:
a. RA7x electronic control module (ECM) (See the RA7x Disk Drive Service
Manual for instructions.)
b. External SDI cables (See the appropriate storage array guide for
instructions.)
c.
Enclosure internal SDI cables
6. If the cabinet cables are not at fault, refer to the DSA Troubleshooting
Flowchart to determine if the controller is at fault. If the controller is not
at fault, replace the enclosure assembly. (See the appropriate storage array
guide for instructions.)
5.7 Troubleshooting the OCP
If one or more OCP indicators for a disk drive consistently fails to light:
1. Verify that the OCP is firmly seated in the enclosure.
2. Verify that a disk drive is installed and powered up in the disk drive position.
3. Press and hold the Fault/Set No. for that position as a lamp test.
4. If any indicator does not light, replace the FRUs in the following order until
the problem is corrected:
a. OCP
b. RA7x ECM (See the RA7x Disk Drive Service Manual for instructions.)
c.
The two OCP ribbon cables
d. TB1
e.
TB2
5–6 Troubleshooting the SA7x
Troubleshooting the SA7x
5.7 Troubleshooting the OCP
f.
The enclosure assembly (See the appropriate storage array guide for
instructions.)
If a disk drive does not respond to OCP commands, move it to another drive
position in the enclosure to see if the drive is at fault or if the drive position is at
fault.
1. If the disk drive is at fault, replace the RA7x ECM. (See the RA7x Disk Drive
Service Manual for instructions.)
2. If the disk drive is not at fault, replace the FRUs in the following order until
the problem is corrected:
a. OCP
b. The two OCP ribbon cables
c.
TB1
d. TB2
e.
The enclosure assembly (See the appropriate storage array guide for
instructions.)
3. If the unit number changes after power up, replace the FRUs in the following
order until the problem is corrected:
a. TB2
b. Power supply
c.
OCP
d. The two OCP ribbon cables
e.
TB1
f.
The enclosure assembly (See the appropriate storage array guide for
instructions.)
Troubleshooting the SA7x 5–7
6
Replacing RA7x Disk Drives
This chapter explains how to install and remove an RA7x disk drive in an SA7x
enclosure.
Table 6–1 lists the the types of disk drives that are authorized for installation in
each SA7x enclosure. Unless otherwise specified, a maximum of four disk drives
of each type, or a combination of disk drives can be installed in an enclosure.
Table 6–1 Authorized Disk Drives Installations
Enclosure
RA70
RA71
RA72
RA73
SA70
SA71
SA72
SA73
Yes
Yes
Yes
Yes
No
Yes
Yes
Yes
No
Yes
Yes
Yes
No
Yes1
Yes1
Yes
1A
maximum of three drives may be installed.
Figure 6–1 shows the major subassemblies of the SA7x enclosure. Except for
the RA70 disk drive designation, this illustration is accurate for all the SA7x
enclosures.
CAUTION
Do not attempt to install a disk drive unless you have received training
in electrostatic discharge (ESD) procedures and have taken proper
precautions against ESD. Wear an ESD grounding strap properly
connected to a known ground. Refer to Figure 1–4 for the proper use of
an ESD grounding strap.
Note
If the SA7x enclosure is installed in a storage array cabinet when you are
attempting to install or remove an RA7x disk drive, you must first remove
or open either the cabinet’s front or rear panel. See the appropriate
storage array guide for instructions on removing and installing cabinet
panels.
Replacing RA7x Disk Drives 6–1
Replacing RA7x Disk Drives
6.1 Installing and Removing an RA7x Disk Drive
6.1 Installing and Removing an RA7x Disk Drive
The RA70 disk drive is physically different from RA71, RA72, and RA73 disk
drives. The main physical difference between these drives (RA70 and RA71
through RA73), concerning installation, is the design of the shoe plate. The
procedures for installing and removing the disk drives (RA70 and RA71 through
RA73) are virtually the same.
CAUTIONs
•
The SA7x enclosure is designed to have disk drives installed in a
certain sequence for proper airflow, especially if the enclosure is not
fully configured. Digital recommends installing the first drive in one
of the two rear positions in the cabinet, the second drive in the other
rear position, the third drive in one of the two front positions, and the
fourth drive in the other front position.
•
The SA7x enclosure accommodates a single RA7x disk drive. However,
if only one drive is installed in the enclosure, a drive position filler
is required to route cooling air and prevent overheating. If you are
adding a second drive to an enclosure and the drive position filler is
already installed, you must remove it. See Section 6.2 for instructions
for installing and removing a drive position filler.
•
Disk drives and enclosures must be environmentally stabilized in
their protective barrier bags at the installation site. Failure to
environmentally stabilize the equipment may result in damage to the
drive media or electronic components. For more information about
environmental stabilization, see Appendix B.
Notes
•
When an RA7x disk drive is installed in an SA7x enclosure, it is not
possible to set the drive unit number using the dip switches on the
drive itself. Unit numbers for all RA7x disk drives are set from the
SA7x operator control panel (OCP) as explained in Chapter 3.
•
Before installing an RA71/RA72 disk drive, verify that the capacity
indicator switch on the drive is set correctly. See the RA7x Disk Drive
Service Manual for more information.
6–2 Replacing RA7x Disk Drives
Replacing RA7x Disk Drives
6.1 Installing and Removing an RA7x Disk Drive
Figure 6–1 SA70 Enclosure
LEFT REAR
DISK DRIVE
POSITION
RIGHT REAR
DISK DRIVE
POSITION
REAR
COVER
(NOT
SHOWN)
FAN
TRANSITION
BOARD 2
TRANSITION
BOARD 1
OPERATOR
CONTROL
PANEL
POWER
SUPPLY
RA70 DISK
DRIVE SHOWN
CHASSIS
MOUNTING
SCREWS
FRAME
DRIVE POWER
SWITCH PANEL
LEFT FRONT
DISK DRIVE
POSITION
RIGHT FRONT
DISK DRIVE
POSITION
FRONT
COVER
CXO-1845D_S
6.1.1 Recording RA7x Disk Drive Serial Numbers
All add-on or replacement disk drives have a serial number tag affixed to the disk
drive. The adhesive serial number label included with the drive is for mounting
on the enclosure.
Affix the serial number label to the front cover of the SA7x enclosure. Place it so
that it corresponds with the position of the disk drive in the enclosure, as shown
in Figure 6–2.
Replacing RA7x Disk Drives 6–3
Replacing RA7x Disk Drives
6.1 Installing and Removing an RA7x Disk Drive
Figure 6–2 RA7x Disk Drive Serial Number Location
LEFT REAR
DISK DRIVE
SERIAL NUMBER
LABEL
RIGHT REAR
DISK DRIVE
SERIAL NUMBER
LABEL
LEFT FRONT
DISK DRIVE
SERIAL NUMBER
LABEL
RIGHT FRONT
DISK DRIVE
SERIAL NUMBER
LABEL
SA7X ENCLOSURE
FRONT COVER
COM-0104
Record the disk drive serial number in the site log and the labor activity reporting
system (LARS) report. (You may also want to record the head disk assembly
[HDA] serial number at this time. This number is located on the front of the
HDA.)
Serial numbers are in the following format:
•
Manufacturing location code (two characters)
•
Date code (three digits)
•
Component serial number (five digits)
For LARS, record only the manufacturing (MFG) location code and the component
serial number in the following form:
•
MFG location code (two characters)
•
Component serial number (five digits)
6.1.2 Reversing the RA70 Shoe Plate
When the RA70 disk drive is to be installed in an SA7x enclosure, the shoe plate
may need to be reversed on the drive so that it will mate with the shoe plate
guide and shoe plate retaining clip in the SA7x enclosure. Figure 6–3 shows the
proper shoe plate alignment.
To reverse the shoe plate on the RA70 disk drive, see Figure 6–3 and use the
following procedure:
1. Wear an ESD grounding strap with the clip connected to the enclosure
chassis, not to the disk drive.
2. Place the disk drive on a grounded antistatic work surface with the shoe plate
facing up.
3. Remove the screws in each of the four corners of the drive chassis that secure
the shoe plate to the chassis.
6–4 Replacing RA7x Disk Drives
Replacing RA7x Disk Drives
6.1 Installing and Removing an RA7x Disk Drive
Figure 6–3 Reversing the RA7x Shoe Plate
FACTORY SHOE PLATE ORIENTATION
CONNECTOR
END
RA70
CHASSIS
SHOE PLATE
RETAINING TAB
SHOE
PLATE
SA70 SHOE PLATE ORIENTATION
CONNECTOR
END
SCREW
SCREW
RA70
CHASSIS
SHOE PLATE
RETAINING TAB
SHOE
PLATE
CXO-2610A
4. Grasp the shoe plate and pull upward to free it from the chassis. Hold the
drive down with the hand wearing the ESD strap.
5. Turn the plate around to orient the shoe plate tab at the connector end of the
drive. Replace the plate on the chassis.
Replacing RA7x Disk Drives 6–5
Replacing RA7x Disk Drives
6.1 Installing and Removing an RA7x Disk Drive
6. Reinstall the four shoe plate mounting screws. Do not over tighten.
WARNING
An RA70 disk drive weighs 4.8 kgs (10.5 lbs). The RA71 through RA73
disk drives weigh 2.9 kgs (6.4 lbs). Be prepared to handle this weight
when the drive comes free from the disk drive position. Otherwise, you
may cause personal injury or damage the equipment.
CAUTION
Do not place the disk drive on anything other than a properly grounded
antistatic work surface. Failure to observe this precaution may result in
ESD damage to the drives.
6.1.3 Installing an RA7x Disk Drive
Use the following procedure to install the RA7x disk drive:
1. Make sure the drive power switch for the drive position you are using is
turned off.
2. Depending on where the disk drive is located in the SA7x enclosure, remove
either the front or rear enclosure cover. Loosen or remove the two mounting
screws in the upper corners of the cover, then lift the cover up and outward to
clear the enclosure. (See Figure 6–1.)
3. Use the ESD grounding strap furnished with the cabinet, or connect your
ESD grounding strap to the enclosure chassis.
4. Orient the disk drive so that the shoe plate and shoe plate guide are side by
side. Hold the connectors clear of the drive and slide the disk drive into the
selected position in the enclosure as shown in Figure 6–4.
5. Verify the disk drive is locked into the enclosure with the shoe plate retaining
clip.
6. Connect the 4-pin drive power cable, the 20-pin OCP cable, and the two SDI
cables (in that order) to the rear panel of the disk drive.
7. Remove the ESD grounding strap and replace the covers on the enclosure.
You are now ready to place the drive on line. See Chapter 4 for instructions.
6.1.4 Removing an RA7x Disk Drive
To remove an RA7x disk drive from an SA7x enclosure, use the following
procedure:
1. Take off line the drive you are going to remove as explained in Chapter 4.
2. Make sure the drive power switch for the drive you are removing is turned
off.
3. Remove the front or rear enclosure cover, depending on which drive you are
going to remove.
6–6 Replacing RA7x Disk Drives
Replacing RA7x Disk Drives
6.1 Installing and Removing an RA7x Disk Drive
Figure 6–4 Replacing RA70 Disk Drive
SILK SCREEN OF
CONFIGURATION RULES
LR
RR
1
2
LF
RF
4
3
SHOE PLATE
RETAINING CLIP
SHOE PLATE
SHOE PLATE
RETAINING TAB
LOCATION
SHOE PLATE
GUIDE
20-PIN
OCP
CABLE
INTERNAL
SDI CABLES
4-PIN DRIVE
POWER CABLE
RA70 DISK DRIVE
REAR PANEL
CXO-1870D_S
Replacing RA7x Disk Drives 6–7
Replacing RA7x Disk Drives
6.1 Installing and Removing an RA7x Disk Drive
4. Loosen the two mounting screws in the upper corners of the cover, then lift
the cover up and outward to clear the enclosure, as shown in Figure 6–1.
5. Use the ESD grounding strap furnished with the cabinet, or connect your
ESD grounding strap to the enclosure chassis.
6. Disconnect the 4-pin drive power cable, the 20-pin OCP cable, and the two
internal SDI cables from the drive, as shown in Figure 6–4.
CAUTION
Grasp the paper tab on the OCP cable to disconnect the cable from drive.
Otherwise, you may damage the OCP connector strain relief.
7. The drive is held in place with a shoe plate retaining clip on the outside wall
of the chassis disk position. The retaining clip locks with a tab on the drive
shoe plate. (Refer to Figures 6–3 and 6–4.) Release this retaining clip and
pull the drive out straight. After the drive is released, pull it slightly forward.
8. Grasp the drive firmly and remove it from the disk drive position. Be careful
not to damage the cables as you slide the drive out of the enclosure frame.
6.2 Installing and Removing a Drive Position Filler
The SA7x enclosure accommodates a single RA7x disk drive. However, if only
one drive is installed in the enclosure, a drive position filler is required to route
cooling air and prevent overheating. If you are adding a second drive to an
enclosure and the drive position filler is already installed, you must remove it.
The drive position filler is a Styrofoam block in the shape of a disk drive with
a shoe plate attached. It is installed in the drive position next to the single
installed drive (which should be installed in the rear of the enclosure).
To install the drive position filler in the SA7x enclosure, use the following
procedure:
1. Make sure the drive power switch for the drive position you are using is
turned off.
2. Remove the rear cover from the enclosure. Loosen the two mounting screws
in the upper corners of the cover, then lift the cover up and outward to clear
the enclosure. (Refer to Figure 6–1.)
3. Position the drive position filler so that the shoe plate and shoe plate guide
are side by side. Hold the connectors clear of the filler and slide it into the
selected position in the enclosure. (Refer to Figure 6–4.)
4. Verify that the drive position filler is locked into the enclosure with the shoe
plate retaining clip.
To remove the drive position filler, use the following procedure:
1. Make sure the drive power switch for the drive position you are using is
turned off.
2. Remove the rear cover from the enclosure. Loosen the two mounting screws
in the upper corners of the cover, then lift the cover up and outward to clear
the enclosure. (Refer to Figure 6–1.)
6–8 Replacing RA7x Disk Drives
Replacing RA7x Disk Drives
6.2 Installing and Removing a Drive Position Filler
3. The drive position filler is held in place with a shoe plate retaining clip on
the outside wall of the chassis disk position. The retaining clip locks with
a tab on the drive shoe plate. (Refer to Figures 6–3 and 6–4.) Release this
retaining clip and pull straight out on the drive position filler. After the filler
is released, pull it slightly forward.
4. Grasp the drive position filler firmly and remove it from the disk drive
position.
Replacing RA7x Disk Drives 6–9
7
Replacing SA7x FRUs
This chapter explains how to remove and install the following major FRUs in an
SA7x enclosure:
•
Power supply
•
Operator control panel (OCP)
•
Transition boards 1 and 2 (TB1 and TB2)
•
Fan assembly
•
Remote OCP cables
•
Power harness
•
SDI cables
Figure 7–1 shows the major subassemblies of the SA7x enclosure. Except for the
RA70 disk drive, this illustration is accurate for all SA7x enclosures.
WARNING
Some storage arrays require the use of a cabinet stabilizer foot to prevent
the storage array cabinet from becoming unstable when an enclosure
frame is partially removed, as shown in Figure 7–2. Failure to extend the
cabinet stabilizer foot before sliding the enclosure frame out of the cabinet
may cause personal injury and damage to the equipment.
CAUTION
Do not attempt to remove and install SA7x FRUs unless you have
received training in electrostatic discharge (ESD) procedures and have
taken proper precautions against ESD. Wear an ESD grounding strap
properly connected to a known ground.
Note
If the SA7x enclosure is installed in a storage array cabinet when you are
attempting to perform the removal and installation procedures explained
in this chapter, you must first remove or open either the cabinet’s front or
rear panel. See the appropriate storage array guide for instructions on
removing and installing cabinet panels.
Replacing SA7x FRUs 7–1
Replacing SA7x FRUs
7.1 Required Tools
7.1 Required Tools
You need the following tools to perform removal and installation procedures
explained in this chapter:
#1 Phillips screwdriver
1/8-inch hex wrench
#2 Phillips screwdriver
5/32-inch hex wrench
1/4-inch flat-bladed
screwdriver
Figure 7–1 SA7x Enclosure
LEFT REAR
DISK DRIVE
POSITION
RIGHT REAR
DISK DRIVE
POSITION
REAR
COVER
(NOT
SHOWN)
FAN
TRANSITION
BOARD 2
TRANSITION
BOARD 1
OPERATOR
CONTROL
PANEL
POWER
SUPPLY
RA70 DISK
DRIVE SHOWN
CHASSIS
MOUNTING
SCREWS
FRAME
DRIVE POWER
SWITCH PANEL
LEFT FRONT
DISK DRIVE
POSITION
RIGHT FRONT
DISK DRIVE
POSITION
FRONT
COVER
CXO-1845D_S
7–2 Replacing SA7x FRUs
Replacing SA7x FRUs
7.1 Required Tools
Figure 7–2 Cabinet with Stabilizer Foot
STABILIZER FOOT
CXO-2448A
Replacing SA7x FRUs 7–3
Replacing SA7x FRUs
7.2 Power Supply Removal and Installation
7.2 Power Supply Removal and Installation
The power supply is accessible through the rear of the SA7x enclosure.
7.2.1 Removing the Power Supply
Use the following procedure to remove the power supply from the SA7x enclosure.
(See Figure 7–3.)
1. Take all of the drives in the enclosure off line to spin down the drives. (See
Section 4.4.)
2. Remove power to the enclosure by turning off the Master On/Off switch and
disconnecting the power cord. (See the appropriate storage array guide for
complete information about how the enclosure power supply power cord is
routed through the cabinet and connects to the cabinet power controller.)
3. Loosen the two mounting screws that secure the power supply to the
enclosure, as shown in Figure 7–3.
4. Grasp the power supply by its handle and pull straight back until the supply
is halfway out. Stop and note the set of tabs on each side of the power supply
case that slide on extruded rails in the SA7x chassis.
5. Remove the power supply from the enclosure.
6. Inspect the power supply recess in the enclosure chassis to verify there are no
loose wires or broken connector pins.
7.2.2 Installing the Power Supply
Use the following procedure to install the power supply:
1. Fit the tabs on the replacement power supply between the rails in the
enclosure and slide the power supply into the enclosure. Gently press the
power supply to seat it in its connector.
2. Tighten the two mounting screws. Do not use excessive force or you may strip
the threads in the chassis.
3. Perform the checkout and power-up procedures listed in Section 7.10.
7.3 OCP Removal and Installation
The OCP plugs into TB1 through the top of the enclosure’s front panel. (Refer to
Figure 7–1.)
7.3.1 Removing the OCP
Use the following procedure to remove the OCP.
1. Take all of the drives in the enclosure off line and release the Run switches to
spin down the drives. (See Section 4.4.)
2. Remove power to the enclosure by turning off the Master On/Off switch.
3. Grasp the OCP firmly in one hand and pull it straight out. The OCP is held
in place with two clip fasteners on TB1. Do not pry the OCP; the panel can
be removed easily if you pull it straight out.
7–4 Replacing SA7x FRUs
Replacing SA7x FRUs
7.3 OCP Removal and Installation
Figure 7–3 SA7x Enclosure Rear Panel and Power Supply
SDI INTERFACE
CONNECTOR
PORT B
REAR
BULKHEAD
PORT B
SILK SCREEN
SDI INTERFACE
CONNECTOR
PORT A
REAR
COVER
OVERTEMPERATURE
INDICATOR
(BEHIND PANEL)
PORT A
SILK SCREEN
MOUNTING
SCREW
POWER
SUPPLY
TABS
MOUNTING
SCREW
LINE VOLTAGE
CONNECTOR
LINE VOLTAGE
SELECTOR SWITCH
(BEHIND PANEL)
MASTER
ON/OFF
SWITCH
CXO-2658C
7.3.2 Installing the OCP
Use the following procedure to install the OCP:
1. If applicable, affix the appropriate foreign language labels to the front of the
replacement OCP.
2. Grasp the replacement OCP in one hand and align the OCP connector pins
with the OCP clip fasteners on TB1. Push the OCP straight in until it locks
in place.
Replacing SA7x FRUs 7–5
Replacing SA7x FRUs
7.3 OCP Removal and Installation
CAUTION
Do not bend the alignment or connector pins when reinstalling the OCP.
The panel should go into place without being forced.
3. Perform the checkout and power-up procedures explained in Section 7.10.
7.4 TB2 Removal and Installation
Transition board 2 (TB2) is located behind TB1 inside the enclosure.
7.4.1 Removing Transition Board 2
Use the following procedure to remove TB2:
1. Take all of the drives in the enclosure off line and release the Run switches
to spin down the drives. Wait until all Ready lamps are off. (Refer to
Section 4.4.)
2. Remove power to the enclosure by turning off the Master On/Off switch.
(Refer to Figure 7–3.)
3. If the cabinet has a cabinet stabilizer foot installed, extend it. (Refer to
Figure 7–2.)
4. Remove the OCP. (See Section 7.3.)
5. Loosen the four mounting screws (located at each corner of the enclosure) and
slide the enclosure frame partially out of the cabinet. Pull out only enough of
the frame to allow access to TB2.
WARNING
Be careful when pulling out the enclosure frame for access to its internal
components. A stop mechanism in the chassis locks the frame at a point
that allows access to the transition boards and the fan assembly. This
stop mechanism locks the chassis so that the frame is three-quarters of
the way out of the chassis. If you release this stop, nothing prevents the
frame from being pulled completely free of the chassis.
6. Disconnect the eight cables connected to TB2. (See Figures 7–4 and 7–5.)
7–6 Replacing SA7x FRUs
Replacing SA7x FRUs
7.4 TB2 Removal and Installation
Figure 7–4 Transition Board 2
TOOLING
HOLES
(4 PLACES)
J1
(FAN)
PLASTIC
MOUNTING
TABS
J7
(PWR)
TB2
(54-19015-01)
J8
J2
J5
J6
J4
J1
J2
PLASTIC
MOUNTING
TABS
J3
TB1
(54-19171-01)
CXO-2611A
There are eight cables connected to TB2: two ribbon cables from TB1, four
disk drive OCP data cables, one fan cable, and one power cable.
The four disk drive OCP data cables are labeled LF (left front drive position),
LR (left rear), RF (right front), RR (right rear):
•
LF connects to the connector labeled J2
•
LR connects to J8
•
RF connects to J3
•
RR connects to J5
7. Remove TB2 from the frame by releasing the four plastic mounting tabs and
pulling the board straight up.
Replacing SA7x FRUs 7–7
Replacing SA7x FRUs
7.4 TB2 Removal and Installation
Figure 7–5 Removing TB1
J1 40-PIN
CABLE
J2 40-PIN
CABLE
TRANSITION
BOARD 2
TRANSITION
BOARD 1
SLOTTED
HOLE
FRAME
HOLE FOR TB1
RIGHT POSITION
SLOTTED
HOLE
HOLE FOR TB1
LEFT POSITION
CXO-2612A
7.4.2 Installing Transition Board 2
Use the following procedure to install TB2:
1. Align the replacement TB2 and press it into place, using the four plastic tabs.
Note
The outer holes in each corner of TB2 are for tooling purposes only. Do
not use these holes for installing TB2.
2. Reconnect the eight cables to TB2.
3. Slide the enclosure frame back into the cabinet and secure it in place with the
four mounting screws.
4. If applicable, retract the cabinet stabilizer foot.
5. Reinstall the OCP. (See Section 7.3.)
6. Perform the checkout and power-up procedures explained in Section 7.10.
7–8 Replacing SA7x FRUs
Replacing SA7x FRUs
7.5 Transition Board 1 Removal and Installation
7.5 Transition Board 1 Removal and Installation
TB1 is located behind the OCP inside the SA7x enclosure.
7.5.1 Removing Transition Board 1
Use the following procedure to remove TB1:
1. Take all of the drives in the enclosure off line and release the Run switches to
spin down the drives. Wait until all Ready lamps are off. (See Section 4.4.)
2. Remove power to the enclosure by turning off the Master On/Off switch.
3. If the cabinet has a cabinet stabilizer foot installed, extend it. (Refer to
Figure 7–2.)
4. Remove the OCP. (See Section 7.3.)
5. Loosen the four mounting screws (located at each corner of the enclosure) and
slide the enclosure frame partially out of the cabinet. Pull out only enough of
the frame to give access to TB1.
WARNING
Be careful when pulling out the enclosure frame for access to its internal
components. A stop mechanism in the chassis locks the frame at a point
that allows access to the transition boards and the fan assembly. This
stop mechanism locks the chassis so that the frame is three-quarters of
the way out of the chassis. If you release this stop, nothing prevents the
frame from being pulled completely free of the chassis.
6. Disconnect the two ribbon cables from TB1. (Refer to Figure 7–5.)
Note
TB1 mounts to the frame with two corner screws (in slotted holes) and
one center screw. The center screw can be inserted through one of two
adjacent holes in the frame, depending upon the position of the enclosure
in the cabinet. The frame is marked with two cabinet symbols adjacent to
the holes. As you face the frame, the right hole is for enclosures mounted
in the left side of a cabinet; the left hole is for enclosures mounted in the
right side of the cabinet.
7. Remove the center screw and two corner screws that secure TB1 to the front
panel of the enclosure.
8. Lift TB1 out of the enclosure.
7.5.2 Installing Transition Board 1
Use the following procedure to install TB1:
1. Align the replacement TB1 and secure it in the enclosure with the three
screws.
2. Connect the two ribbon cables from TB2.
3. Slide enclosure frame back into the cabinet and secure it in place with the
four mounting screws.
Replacing SA7x FRUs 7–9
Replacing SA7x FRUs
7.5 Transition Board 1 Removal and Installation
4. If applicable, retract the cabinet stabilizer foot.
5. Reinstall the OCP. (See Section 7.3.)
6. Perform the checkout and power-up procedures explained in Section 7.10.
7.6 Fan Assembly Removal and Installation
The fan assembly is located in the center of the enclosure and is secured with
four mounting screws.
7.6.1 Removing the Fan Assembly
Use the following procedure to remove the fan assembly:
1. Take all of the drives in the enclosure off line and release the Run switches to
spin down the drives. Wait until all Ready lamps are off. (See Section 4.4.)
2. Remove power to the enclosure by turning off the Master On/Off switch and
disconnecting the power cord. (See the appropriate storage array guide for
complete information about how the enclosure power supply power cord is
routed through the cabinet and connects to the cabinet power controller.)
3. If the cabinet has a cabinet stabilizer foot installed, extend it. (Refer to
Figure 7–2.)
4. Remove the OCP. (See Section 7.3.)
5. Loosen or remove the four mounting screws (located at each corner of the
enclosure) and slide the enclosure frame partially out of the cabinet. Pull out
only enough of the frame to give access to the fan assembly.
WARNING
Be careful when pulling out the enclosure frame for access to its internal
components. A stop mechanism in the chassis locks the frame at a point
that allows access to the transition boards and the fan assembly. This
stop mechanism locks the chassis so that the frame is three-quarters of
the way out of the chassis. If you release this stop, nothing prevents the
frame from being pulled completely free of the chassis.
6. Disconnect fan connector J1 from TB2. (Refer to Figure 7–4.)
7. Loosen or remove the fan assembly’s four mounting screws as shown in
Figure 7–6.
8. Carefully move the SDI cables clear of the fan assembly; pull straight up on
the fan assembly and remove it from the enclosure.
7.6.2 Installing the Fan Assembly
Use the following procedure to install the fan assembly:
1. Orient the fan assembly with the fan motor facing the front of the enclosure
and the fan cable exiting on the left top of the assembly.
2. Carefully move the SDI cables aside and fit the fan assembly between the
tabs in the frame. Slide the assembly into place.
7–10 Replacing SA7x FRUs
Replacing SA7x FRUs
7.6 Fan Assembly Removal and Installation
Figure 7–6 Installing the Fan Assembly
FAN
MOUNTING
SCREWS
(4 PLACES)
FAN
CABLE
LATCH
FRAME
FRAME
SHEET
METAL
CXO-2613B
3. Tighten the four mounting screws.
4. Connect fan connector J1 to TB2.
5. Reposition the SDI cables.
6. Slide the enclosure frame back into the cabinet and secure it in place with the
four mounting screws.
7. If applicable, retract the cabinet stabilizer foot.
8. Perform the checkout and power-up procedures explained in Section 7.10.
7.7 Remote OCP Cable Removal and Installation
This section explains how to remove and install one of the four remote OCP
cables in the SA7x enclosure.
Two remote OCP cables are routed from their associated drives down each side
of the frame and connected to TB2. These cables interface the disk drives to the
OCP (through TB2 and TB1).
Replacing SA7x FRUs 7–11
Replacing SA7x FRUs
7.7 Remote OCP Cable Removal and Installation
7.7.1 Removing a Remote OCP Cable
Use the following procedure to remove a remote OCP cable.
1. Take all of the drives in the enclosure off line and release the Run switches to
spin down the drives. (See Section 4.4.)
2. Remove power to the enclosure by turning off the Master On/Off switch and
disconnecting the power cord. (See the appropriate storage array guide for
complete information about how the enclosure power supply power cord is
routed through the cabinet and connects to the cabinet power controller.)
3. Remove the front and rear enclosure covers. For each cover, loosen the two
mounting screws (located in the upper corners of the cover), then lift the cover
up and outward to clear the enclosure.
4. Disconnect the storage array SDI interface cables from the rear bulkhead of
the enclosure. (Refer to Figure 7–3.)
5. If the cabinet has a cabinet stabilizer foot installed, extend it. (Refer to
Figure 7–2.)
6. Remove the OCP. (See Section 7.3.)
7. Remove the power supply. (See Section 7.2.)
8. Remove all disk drives. (See Chapter 6.)
9. Loosen the four mounting screws (located at each corner of the enclosure) and
slide the enclosure frame partially out of the cabinet.
WARNING
Be careful when pulling out the enclosure frame for access to its internal
components. A stop mechanism in the chassis locks the frame at a point
that allows access to the transition boards and the fan assembly. This
stop mechanism locks the chassis so that the frame is three-quarters of
the way out of the chassis. If you release this stop, nothing prevents the
frame from being pulled completely free of the chassis.
10. Double check the enclosure to verify there is nothing to prevent the frame
from being pulled out farther. Reach into the chassis and release the chassis
latch. (It may be necessary to push the frame back in about a quarter inch
for the latch to release.)
WARNING
Releasing the chassis latch allows the frame to be removed from the
chassis for this operation. Be prepared to take the weight of the frame
when it comes free of the chassis. Have a work space ready to put the
frame on after it is removed.
11. Pull the frame free of the chassis by reaching into the frame and grasping the
sheet metal in front of the fan. Set the frame on an antistatic work surface.
12. Turn the frame so that the side with the defective remote OCP cable is facing
up.
7–12 Replacing SA7x FRUs
Replacing SA7x FRUs
7.7 Remote OCP Cable Removal and Installation
13. Remove the six Phillips screws that secure the acoustic panel to the frame,
and remove the panel as shown in Figure 7–7.
14. Disconnect the remote OCP cable from TB2 and remove the cable from the
frame. Note how the cable is routed.
Figure 7–7 Removing Acoustic Panels
ACOUSTIC
PANEL
SCREW HOLES
(6 PER PANEL)
PHILLIPS
SCREW
FRAME
ACOUSTIC
PANEL
PHILLIPS
SCREW
CXO-2615A
7.7.2 Installing a Remote OCP Cable
Use the following procedure to install a remote OCP cable:
1. Route the replacement remote OCP cable through the enclosure frame and
connect it to TB2 as shown in Figure 7–8.
Replacing SA7x FRUs 7–13
Replacing SA7x FRUs
7.7 Remote OCP Cable Removal and Installation
Figure 7–8 Cable Routing
DRIVE
POWER
CABLE
OCP
CABLE
INTERNAL
SDI
CABLES
INTERNAL
SDI
CABLES
OCP
CABLE
DRIVE
POWER
CABLE
CXO-2616A
Note
The right-front OCP cable connects to J3 on TB2; the right-rear OCP
cable connects to J5; the left-front OCP cable connects to J2; the left-rear
OCP cable connects to J8.
2. Reinstall the acoustic panels on the sides of the frame.
3. Slide the frame back into the enclosure chassis and secure it in place with the
four mounting screws.
4. If applicable, retract the cabinet stabilizer foot.
5. Reinstall the OCP. (See Section 7.3.)
6. Reinstall the power supply. (See Section 7.2.)
7. Reinstall the disk drives. (See Chapter 6.)
8. Reconnect the storage array SDI interface cables to the rear bulkhead of the
enclosure.
9. Reinstall the front and rear enclosure covers.
7–14 Replacing SA7x FRUs
Replacing SA7x FRUs
7.7 Remote OCP Cable Removal and Installation
10. Perform the checkout and power-up procedures explained in Section 7.10.
7.8 Power Harness Removal and Installation
The power harness distributes power throughout the enclosure. If a power
problem is diagnosed as a faulty power cable, the entire power harness must be
replaced. All power cables are considered part of the power harness.
The power harness cable is routed from the power supply connector on the bottom
of the frame, through holes in the frame, to the top of the enclosure. As the
harness is routed up the sides of the frame, power cables for each disk drive
branch off the harness.
7.8.1 Removing a Power Harness
Use the following procedure to remove the power harness from the SA7x
enclosure.
1. Take all of the drives in the enclosure off line and release the Run switches to
spin down the drives. Wait until all Ready lamps are off. (See Section 4.4.)
2. Remove power to the enclosure by turning off the Master On/Off switch and
disconnecting the power cord. (See the appropriate storage array guide for
complete information about how the enclosure power supply power cord is
routed through the cabinet and connects to the cabinet power controller.)
3. Remove the front and rear enclosure covers. For each cover, loosen the two
mounting screws (located in the upper corners of the cover), then lift the cover
up and outward to clear the enclosure.
4. Disconnect the storage array SDI interface cables from the rear bulkhead of
the enclosure. (Refer to Figure 7–3.)
5. If the cabinet has a cabinet stabilizer foot installed, extend it. (Refer to
Figure 7–2.)
6. Remove the OCP. (See Section 7.3.)
7. Remove the power supply. (See Section 7.2.)
8. Remove all disk drives. (See Chapter 6.)
9. Loosen the four mounting screws (located at each corner of the enclosure) and
slide the enclosure frame partially out of the cabinet.
WARNING
Be careful when pulling out the enclosure frame for access to its internal
components. A stop mechanism in the chassis locks the frame at a point
that allows access to the transition boards and the fan assembly. This
stop mechanism locks the chassis so that the frame is three-quarters of
the way out of the chassis. If you release this stop, nothing prevents the
frame from being pulled completely free of the chassis.
10. Double check the enclosure to verify there is nothing to prevent the frame
from being pulled out further. Reach into the chassis and release the chassis
latch. (It may be necessary to push the frame back in about a quarter inch
for the latch to release.)
Replacing SA7x FRUs 7–15
Replacing SA7x FRUs
7.8 Power Harness Removal and Installation
WARNING
Releasing the chassis latch allows the frame to be removed from the
chassis for this operation. Be prepared to take the weight of the frame
when it comes free of the chassis. Have a work space ready to put the
frame on after it is removed.
11. Pull the frame free of the chassis by reaching into the frame and grasping the
sheet metal in front of the fan. Set the frame on an antistatic work surface.
12. Lay the frame on either side and remove one of the two acoustic panels.
Remove the six Phillips screws that secure the acoustic panel to the frame,
and remove the panel. (Refer to Figure 7–7.)
13. Turn the frame upside down, as shown in Figure 7–9.
14. Remove the Phillips screw located on either side of the drive power switches
(two screws). This allows you to remove the protective covering for the drive
power switches.
15. Remove the protective covering for the drive power switches. This exposes
the cabling from the power harness to the drive power switches.
16. Remove the two Phillips screws holding the power supply connector to the
frame.
17. Tilt the power supply connector so that it can be removed from the bracket,
and disconnect it. The connector cannot be removed unless it is tilted.
18. Carefully disconnect all single and pigtail black and orange wires from each
of the drive power switch terminals. Each drive power switch wire is labeled
according to its intended switch. Wires in each group are color coded:
•
Single black is the SW A wire to TB2.
•
Orange is the LED wire from the power supply to the associated drive
power indicator.
•
The two pigtail black wires are returns.
19. Note how the power harness is routed, and then remove the power harness
from all disk drive positions.
7.8.2 Installing a Power Harness
Use the following procedure to install the power harness.
1. Route the replacement cable in the same manner as the original cable, as
shown in Figure 7–9.
2. Connect the power supply connector to the power supply bracket by first
tilting the connector until it is flush against the bracket. Secure the power
supply connector with the two Phillips screws.
3. Connect all single and pigtail black and orange wires to all drive power
switches (observing proper disk drive position).
7–16 Replacing SA7x FRUs
Replacing SA7x FRUs
7.8 Power Harness Removal and Installation
Figure 7–9 SA7x Enclosure Power Harness
SINGLE
BLACK
SWITCH
REAR
PIGTAIL
BLACK
SINGLE/
PIGTAIL
BLACK
SINGLE
ORANGE
DC DRIVE
POWER
SWITCHES
PHILLIPS
SCREWS
POWER SUPPLY
CONNECTOR
RF
RR
LR
LF
FRAME
BOTTOM
PHILLIPS
SCREWS
BOTTOM COVER REMOVED
CXO-2614A
Note
The left-rear and right-rear cables are 80 cm (31.5 in) long. The left-front
and right-front cables are 38 cm (15 in) long. Be sure to route the proper
cable to the proper disk position.
4. Connect the TB2 power cable to connector J7 on TB2.
5. Install the protective cover over the drive power switches and secure it with
the two Phillips screws.
6. Reinstall both acoustic panels.
7. Slide the frame back into the chassis and secure it in place with the four
mounting screws.
Replacing SA7x FRUs 7–17
Replacing SA7x FRUs
7.8 Power Harness Removal and Installation
8. If applicable, retract the cabinet stabilizer foot.
9. Reinstall the OCP. (See Section 7.3.)
10. Reinstall the disk drives in the enclosure. (See Chapter 6.)
11. Reinstall the power supply. (See Section 7.2.)
12. Reconnect the storage array SDI interface cables to the rear bulkhead of the
enclosure.
13. Install the front and rear enclosure covers.
14. Perform the checkout and power-up procedures explained in Section 7.10.
7.9 SDI Cable Removal and Installation
The SDI cables are routed from the rear bulkhead, over the top of the frame, and
down the sides to their respective drives. You actually install all the cables for a
port when you replace a single cable.
7.9.1 Removing an Enclosure SDI Cable
Use the following procedure to remove an enclosure SDI cable:
1. Take all of the drives in the enclosure off line and release the Run switches to
spin down the drives. Wait until all Ready lamps are off. (See Section 4.4.)
2. Remove power to the enclosure by turning off the Master On/Off switch and
disconnecting the power cord.
3. Remove the front and rear enclosure covers. For each cover, loosen the two
mounting screws (located in the upper corners of the cover), then lift the cover
up and outward to clear the enclosure.
4. Disconnect the SDI interface cables from the rear bulkhead of the enclosure.
(Refer to Figure 7–3.)
5. If the cabinet has a cabinet stabilizer foot installed, extend it. (Refer to
Figure 7–2.)
6. Remove the OCP. (See Section 7.3.)
7. Remove the power supply. (See Section 7.2.)
8. Remove all disk drives. (See Chapter 6.)
9. Loosen the four mounting screws in the corners of the enclosure frame and
slide the frame out of the chassis until it engages the chassis latch.
10. Double check the enclosure to verify there is nothing to prevent the frame
from being pulled out further, then each into the chassis and release the
chassis latch. (It may be necessary to push the frame back in about a quarter
inch for the latch to release.)
WARNING
Releasing the chassis latch allows the frame to be removed from the
chassis for this operation. Be prepared to take the weight of the frame
when it comes free of the chassis. Have a work space ready to put the
frame on after it is removed.
7–18 Replacing SA7x FRUs
Replacing SA7x FRUs
7.9 SDI Cable Removal and Installation
11. Pull the frame free of the chassis by reaching into the frame and grasping the
sheet metal in front of the fan. Set the frame on an antistatic work surface.
12. Lay the frame on either side and remove one of the two acoustic panels.
Remove the six Phillips screws that secure the acoustic panel to the frame,
and remove the panel. (Refer to Figure 7–7.) Turn the frame over and remove
the other acoustic panel.
13. Turn the frame right side up, exposing the internal enclosure SDI cables on
the top of the frame as shown in Figure 7–10.
14. Remove the stand-off screws securing the internal Port A or Port B SDI cable
to the frame.
15. Cut the tie-wraps to remove the SDI cable from the SDI harness.
16. Note how the SDI cable is routed, and then remove it from all disk drive
positions.
Figure 7–10 SA7x Enclosure Internal SDI Cables
STANDOFF
SCREW
(4 PLACES)
PORT B
PORT A
SDI CABLE
PORT A
SDI CABLE
PORT A
SDI CABLE
PORT B
SDI CABLE
PORT B
SDI CABLE
PORT A
CXO-2617A
Replacing SA7x FRUs 7–19
Replacing SA7x FRUs
7.9 SDI Cable Removal and Installation
7.9.2 Installing an Enclosure SDI Cable
Use the following procedure to install an enclosure SDI cable:
1. Connect the SDI port connector to the proper connector on the SDI bulkhead.
2. Route the SDI cable as shown in Figure 7–10. Verify connections using
Figure A–5 in Appendix A.
3. Secure the cable with tie-wraps.
4. Reinstall both acoustic panels.
5. Slide the frame back into the enclosure chassis and secure it in place with the
four mounting screws.
6. If applicable, retract the cabinet stabilizer foot.
7. Reinstall the OCP. (See Section 7.3.)
8. Reinstall the disk drives. (See Chapter 6.)
9. Reinstall the power supply. (See Section 7.2.)
10. Reconnect the SDI cables to the rear bulkhead of the enclosure.
11. Install the front and rear enclosure covers.
12. Perform the checkout and power-up procedures listed in Section 7.10.
7.10 SA7x Checkout
Perform the following checkout to verify normal operation of the disk drives,
power supply, OCP, and fan assembly before returning the SA7x enclosure to
service.
CAUTION
Before performing this checkout and power-up procedure, be sure the
enclosure frame is secured in the chassis and the front and rear enclosure
covers are installed. Failure to do so will defeat the cooling airflow of
the enclosure and may result in permanent damage to the disk drives or
power supply.
1. Verify that all power and interface connections to the rear of the enclosure
are correct and secure.
2. Verify that the Line Voltage Selector switch on the power supply of the SA7x
enclosure has been set to the proper source voltage. If not, set the switch as
described in Section 3.2.
3. Verify that the drive power switches are turned off.
4. Verify that the enclosure power cord is securely connected to the cabinet
power controller.
5. Turn the enclosure Master On/Off switch on.
6. Verify the power is on by checking that the fan is operating. Do this by
feeling for airflow out the rear of the enclosure. If the fan does not start,
recheck the power connections. If power connections are connected properly,
verify that the power supply is firmly seated in its connector. If the power
still does not come on, refer to Chapter 5.
7–20 Replacing SA7x FRUs
Replacing SA7x FRUs
7.10 SA7x Checkout
7. Turn on the drive power switch for one of the installed disk drives.
8. Verify power application to the disk drive position by noting that the indicator
element in the drive power switch lights. If the indicator does not light, verify
that the power supply is firmly seated in its connector. If power the still does
not come on, refer to Chapter 5.
Note
Turning a drive power switch on does not start the associated drive motor.
9. Press the Run switch on the OCP for the desired drive. This action starts
the drive motor. When the Ready light comes on, the drive has completed its
internal diagnostics and is ready for operation. If the Fault light comes on,
see Chapter 5.
10. Set the drive unit number. (See Section 3.4.)
11. Select Port A or Port B and Write Protect. The Write Protect indicator lights
when the switch is set; the Port A and B indicators light only when the host
system controller has selected that port for read/write operations. During the
checkout and power-up procedure, verify that the associated OCP indicators
light. If the indicators do not light, see Chapter 5. You can deselect write
protection by pressing the Write Protect switch a second time.
12. Complete checkout of the disk drive by running the applicable diagnostics
from the host system controller as described in the RA7x Disk Drive Service
Manual.
13. Repeat steps 7 through 12 for each RA7x disk drive installed in the enclosure.
Replacing SA7x FRUs 7–21
A
SA7x Internal Cabling
This appendix contains SA7x internal cabling information. Figure A–1 shows a
block diagram of the enclosure cables. The connectors referred to in this section
are as follows:
•
Power harness P6 (41-pin) to all RA7x disk power connectors, to transition
board #2 J7 (14-pin), and to front panel Drive Power switches
•
Operator control panel (OCP) connector J1 (96-pin) to transition board 1
(TB1) connector J3 (96-pin) (all OCP to transition board signals)
•
TB1 connector J1 (40-pin) to transition board #2 connector J6 (40-pin) (right
rear and right front drive signals)
•
TB1 connector J2 (40-pin) to transition board 2 (TB2) connector J4 (40-pin)
(left rear and left front drive signals)
•
TB2 connector J3 (20-pin) to right front drive J3 (20-pin) (all right front drive
signals)
•
TB2 connector J5 (20-pin) to right rear drive J3 (20-pin) (all right rear drive
signals)
•
TB2 connector J8 (20-pin) to left rear drive J3 (20-pin) (all left rear drive
signals)
•
TB2 connector J2 (20-pin) to left front drive J3 (20-pin) (all left front drive
signals)
•
TB2 connector J7 (14-pin) to power supply connector P6 (14-pin) (previously
mentioned)
•
TB2 connector J1 (4-pin) to fan
SA7x Internal Cabling A–1
SA7x Internal Cabling
Figure A–1 SA7x Enclosure Cabling Block Diagram
PI (PORT A)
PORT A
PI (PORT B)
SDI INTERFACE
REAR
BULKHEAD
PORT B
4
/
4
/
(P4)J1
RIGHT
FRONT
DISK
DRIVE
POSITION
(P4)J2
J3
REMOTE OCP
(P4)J4
J1(P5)
RIGHT
REAR
DISK
DRIVE
POSITION
(P3)J1
J2(P5)
J3
LEFT
FRONT
DISK
DRIVE
POSITION
(P3)J2
REMOTE OCP
J3
REMOTE OCP
J4(P5)
(P2)J4
J1(P2)
LEFT
REAR
DISK
DRIVE
POSITION
J2(P2)
J3
REMOTE OCP
TRANSITION
BOARD 2
J4(P3)
TRANSITION
BOARD 1
J3
J5
J8
J2
J6(P6)
POWER
SUPPLY
J6
J4
J1
J2
J3
POWER
HARNESS
J1
OPERATOR
CONTROL
PANEL
(P1)J7
J1
FAN
FRONT
PANEL
DRIVE
POWER
SWITCHES
CXO-1875B
A–2 SA7x Internal Cabling
SA7x Internal Cabling
Figure A–2 shows the cabling for the power harness.
Figure A–2 Power Harness Cabling
POWER
SUPPLY
CONNECTOR
P6
POWER HARNESS
70-26255-01
P5
P3
RR
LR
P1
FAN
74-24440-01
J-7
J-1
TB2
54-19015-01
P4
P2
LF
RF
FRONT PANEL
DC POWER
SWITCHES
CXO-2597A
SA7x Internal Cabling A–3
SA7x Internal Cabling
Figure A–3 is a block diagram of the OCP to transition board assembly to drive
cabling.
The operator control panel (OCP) assembly contains the OCP module and two
LED modules. Left and right LED modules route numeric display information
and the ready light signal between the LED modules and the OCP. Left and
right front and rear LED functions are controlled by the respective modules.
Because the OCP assembly is a field replaceable unit (FRU), the LED modules
are replaced with the OCP. Therefore, connectors between the OCP and the LED
modules are not shown in this section.
Figure A–3 OCP to Transition Board Assembly to Disk Drive Cabling
70-26254-02
J3
J3
LR
RR
J8
J5
TB2
54-19015-01
70-26254-01
J3
70-26254-01
J2
LF
J3
J-6
J3
RF
J-4
17-02717-01
J-1
J-2
TB1
54-19171-01
J3
J-1
PLUG-IN CONNECTOR
J-4
OCP
70-25696-01
CXO-2598A
Note
The latest version of transition board 2 is Revision F03.
A–4 SA7x Internal Cabling
SA7x Internal Cabling
Figure A–4 shows the TB2 connection to the fan.
Figure A–4 TB2 to Fan
1
1
2
2
3
3
4
4
+12.6V
+12.6V RTN
FAN CONTROL H
FAN ROT H
CXO-2607A
SA7x Internal Cabling A–5
SA7x Internal Cabling
Figure A–5 shows the connections from the rear bulkhead to the drive SDI.
Figure A–5 Rear Bulkhead to Drive SDI Connections
P4
P3
RF
LF
P4
P3
P5
P2
LR
RR
P5
P2
A
P1
P1
B
SDI BULKHEAD
RA70 17-01699-01
CXO-2608A
A–6 SA7x Internal Cabling
SA7x Internal Cabling
Table A–1 lists the fan connections.
Table A–1 Fan Connections
TB2
Fan
Signal Name
J1–1
J1–1
+12.6V
J1–2
J1–2
+12.6V RTN
J1–3
J1–3
Fan Control H
J1–4
J1–4
Fan Rotation H
Figure A–6 shows the dc power connections for the four RA7x disk drive
connectors (P2, P3, P4, and P5) shown in Figure A–2.
Figure A–6 4-Pin DC Power Connector
4
+5.0V DC
(RED WIRE)
3
GROUND
(BLACK WIRE)
2
SPINDLE MOTOR RETURN
(2 BLACK WIRES)
1
+12.0V DC
(2 GRAY WIRES)
CXO-3524A-MC
SA7x Internal Cabling A–7
B
Environmental Stabilization
Always ensure environmental stabilization of the RA7x disk drive or RA7x FRU
prior to installation or before operation if the disk drive has been removed from
its normal operating site. Otherwise, the drive media or associated electronics
may be damaged. Environmental stabilization includes temperature and
humidity stabilization.
If condensation is visible on the outside of the disk drive, stabilize the
disk drive or enclosure in the operating environment for 6 hours or until the
condensation is no longer visible, whichever is longer. Do not insert the disk
drive into the SA7x enclosure until it is fully stabilized.
If condensation is not visible on the drive, see Table B–1 for the correct
thermal stabilization time.
CAUTION
The disk drive can be stabilized in or outside the SA7x enclosure.
However, do not spin up the drive until it is stabilized.
Table B–1 Thermal Stabilization Specifications
Temperature Range
Degrees C
Temperature Range
Degrees F
Minimum stabilization time
60 to 66
l40 to 151
3 hours
50 to 59
122 to 139
2 hours
40 to 49
104 to 121
1 hour
30 to 39
86 to 103
30 minutes
18 to 29
65 to 85
No stabilization required
10 to 17
50 to 64
30 minutes
0 to 9
32 to 49
1 hour
–10 to –1
14 to 31
2 hours
–20 to –11
–4 to 13
3 hours
–30 to –21
–22 to –5
4 hours
–40 to –31
–40 to –21
5 hours
Environmental Stabilization B–1
C
Part Numbers
This appendix lists the field replaceable parts for both the SA7x enclosure (Tables
C–1 and C–3) and the RA7x disk drives (Table C–4). Table C–2 lists the parts for
the H9A00 cables.
Table C–1 SAxxx Cable Part Numbers
Power Cord
Part Number
2.74 m (9 ft)
17–00442–19
Internal SDI Cables
Part Number
H9646 Cabinet
SA7x—1.68 m (5.5 ft)
17–01699–01
H9A00 Cabinet
SA7x—.76 m (2.5 ft)
17–01699–03
Table C–2 H9A00 External SDI Cable Part Numbers
Standard
Part Number
Fire Code
Part Number
3.7 m (12 ft) cable
BC26V–12 or BC26G–12
BC26J–12
7.6 m (25 ft) cable
BC26V–25 or BC26G–25
BC26J–25
15.2 m (50 ft) cable
BC26V–50 or BC26G–50
BC26J–50
24.4 m (80 ft) cable
BC26V–80 or BC26G–80
BC26J–80
External SDI Cables
H9646 Cabinet and H9A00 Cabinet
Part Numbers C–1
Part Numbers
Table C–3 SAxxx Assembly Part Numbers
SA7x Field Add-On Kits
Part Number
SA550 Storage Array
70–29379–04
SA600 Storage Array
70–27967–01
70–29379-04
SA650 Storage Array
70–29379–04
SA800 Storage Array
70–27967–01
70–29379-04
SA850 Storage Array
70–29379–04
SA900 Storage Array
70–29379–01
Lifting Device
Digital-approved lifting device
Part Number
FC–10117–AC
Table C–4 RA7x Part Numbers
Part
Part Number
RA70 Disk Drive
ECM
HDA
Shoe Plate
70–22494–01
70–21946–01
70–22474–01
RA71 Disk Drive
ECM
HDA
Shoe Plate
54–20826–01
70–28492–01
70–29408–01
RA72 Disk Drive
ECM
HDA
Shoe plate
54–20826–01
70–28492–02
70–29408–01
RA73 Disk Drive
ECM
HDA
Shoe plate
54–21396–01
70–28699–01
70–29408–01
RA7x Disk Drive
Electronically conductive field
service grounding kit
C–2 Part Numbers
29–11762
D
OCP Error Codes
This appendix lists the OCP (operator control panel) error codes provided in
the host error log and the code displayed by the OCP. Use Table D–1 to convert
the pattern of lights to OCP codes and to obtain a list of recommended FRUs to
replace.
OCP error codes not listed may be an RA7x disk drive error code. RA7x disk
drive codes are listed in RA7x Disk Drive Service Manual with recommendations
for FRUs to replace for each code. For some OCP error codes you are specifically
directed to obtain the drive error code and then refer to the disk drive service
manual appendix for complete information.
Table D–1 OCP Error Codes
OCP
Code
Description and FRUs
Run
Stop
Flt
Rdy
Writ
Prot
Prt
A
Prt
B
00
No error
–
–
–
–
–
–
01
Logic input/output module
See Note1
–
–
–
–
–
On
02
SDI PSID interface
Electronic control module (ECM)
SDI controller
SDI cable
–
–
–
–
On
–
03
SDI gate array
ECM
–
–
–
–
On
On
04
MC 6803 microcomputer
ECM
–
–
–
On
–
–
05
27264 UVPROM
ECM
–
–
–
On
–
On
06
2716 static RAM
ECM
–
–
–
On
On
–
07
X2816A EEPROM
ECM
–
–
–
On
On
On
08
Bus decoders and drivers
See Note1
–
–
On
–
–
–
09
ZXENDEC
ECM
SDI controller
–
–
On
–
–
On
0A
Analog signal processor
head disk assembly (HDA)
ECM
–
–
On
–
On
–
1
Obtain the drive error code from the host error log, the internal drive error log, or the HSC console.
Then locate the drive error code in RA7x Disk Drive Service Manual for complete information.
Continued on next page
OCP Error Codes D–1
OCP Error Codes
Table D–1 (Continued) OCP Error Codes
OCP
Code
Description and FRUs
Run
Stop
Flt
Rdy
Writ
Prot
Prt
A
Prt
B
0B
Detector/qualifier
See Note1
–
–
On
–
On
On
11
Servo module digital circuits
ECM
HDA
–
On
–
–
–
On
12
Servo gate array
ECM
–
On
–
–
On
–
13
TMS 32020 processor
ECM
–
On
–
–
On
On
14
Static RAM
ECM
–
On
–
On
–
–
15
Servo analog
ECM
HDA
–
On
–
On
–
On
16
Voltage controlled oscillator (VCO)
ECM
HDA
–
On
–
On
On
–
17
Spindle motor control chip
ECM
HDA
–
On
–
On
On
On
18
Spindle power amp
ECM
HDA
–
On
On
–
–
–
19
Actuator power amp
HDA
ECM
–
On
On
–
–
On
1A
Actuator analog
ECM
HDA
–
On
On
–
On
–
1B
A-D and D-A converters
ECM
HDA
–
On
On
–
On
On
1C
Analog MUXs
ECM
HDA
–
On
On
On
–
–
1E
HDA Capacity Indicator switch setting
See Note2
ECM
HDA
–
On
On
On
On
–
1F
Head Disk Assembly (HDA)
HDA
ECM
–
On
On
On
On
On
30
Microprocessor module
ECM
On
On
–
–
–
–
31
OCP module
ECM
See Note1
On
On
–
–
–
On
1
Obtain the drive error code from the host error log, the internal drive error log, or the HSC console.
Then locate the drive error code in RA7x Disk Drive Service Manual for complete information.
2
The Capacity Indicator switch setting may be wrong. Verify the setting of the switch matches the type of HDA.
See RA7x Disk Drive Service Manual for information.
Continued on next page
D–2 OCP Error Codes
OCP Error Codes
Table D–1 (Continued) OCP Error Codes
OCP
Code
Description and FRUs
Run
Stop
Flt
Rdy
Writ
Prot
Prt
A
Prt
B
32
Fault module
See Note1
On
On
–
–
On
–
33
Spindle motor control module
See Note1
On
On
–
–
On
On
34
Digital signal processor module
ECM
HDA
On
On
–
On
–
–
35
SDI module
ECM
SDI cable
SDI controller
On
On
–
On
–
On
36
Microprocessor unit module
See Note1
On
On
–
On
On
–
37
Diagnostic module
ECM
HDA
On
On
–
On
On
On
3E
Debug error trap
See Note1
On
On
On
On
On
–
3F
Power supply
ECM
Power supply
See Note1
On
On
On
On
On
On
1
Obtain the drive error code from the host error log, the internal drive error log, or the HSC console.
Then locate the drive error code in RA7x Disk Drive Service Manual for complete information.
OCP Error Codes D–3
E
RA7x Error Rates
This appendix defines the acceptable error rates for the RA7x disk drive. If
error rates are no more than those indicated in Table E–1, the RA7x drive is
performing within specifications.
Table E–1 RA7x Error Rate Table
Error Type
Temperature Range Between
16°— 39° C (60°—103° F)
Type I
1 in 107 data bits read
Type II
2 in 1010 data bits read
Loss-of-position
1 in 106 seeks
Soft error
1 in 3.3 x 10⁶ data bits read (1 in 106 seeks)
Hard error
2 in 1013 data bits read
BBR rate
5 blocks per 1012 data bits read
CAUTION
For maximum performance and reliability, always operate the RA7x
between 18°—24° C (65° – 75° F).
E.1 Type I Data Errors
A type I data error is any recoverable data error detected with an error correcting
code (ECC) of less than six symbols in error. These errors are not normally
reported by controllers or host operating systems. The controller simply corrects
these errors and continues.
E.2 Type II Data and Header Errors
A type II data error is any recoverable data error detected with an ECC of six
to eight symbols in error and is not replaced upon invocation of a bad block
replacement (BBR) algorithm.
A type II header error is any recoverable error detected as a failure of the header
compare algorithm (for example, corrupted header, header sync timeout, and so
forth) when applied to the correct (desired) header block. This type of error is a
recoverable header error that is not due to servo positioning problems.
RA7x Error Rates E–1
RA7x Error Rates
E.3 Loss-of-Positioner Errors
E.3 Loss-of-Positioner Errors
A loss-of-positioner error is a recoverable error attributed to a disruption or
failure of the servo position control mechanism within the drive. Loss-ofpositioner errors include:
•
Write and off-track errors (drive error code 39)
•
Off-track errors (drive error code 25)
•
Positioner errors (drive error code E8, E9)
•
Controller detected positioning errors (MSCP status/event code 6B)
E.4 Soft Errors
A soft error is any recoverable error except:
•
Type I data errors
•
Type II data and header errors
•
Loss-of-positioner errors
•
Any recoverable fault causing a BBR
Soft errors include ‘‘soft uncorrectable’’ data errors. These are data errors that
were first detected as uncorrectable, but with controller retry operations and/or
hardware error recovery techniques, the data was subsequently recovered.
E.5 Unrecoverable Error (Hard Data Error)
An unrecoverable error is defined as an error which results in loss of data. A
single error involves the loss of one logical block (sector) of data. These errors
cannot be corrected by ECC and the retry/error recovery sequences cannot recover
the data.
E.6 Bad Block Replacement Rate
Each block of data replaced during BBR is counted against the BBR rate.
Recoverable errors causing BBR are only counted against the BBR rate and are
not counted against any recoverable error rate.
The recoverable errors causing BBR are counted against both the BBR rate and
the unrecoverable error rate.
E.7 RA7x System Error Rates
When using an RA7x drive a combination of factors, including track density, it is
possible that the system may occasionally report recoverable disk errors in the
host error log. The rate of these errors depends upon specific applications and the
resulting I/O rates. If error rates are no more than those listed in Table E–2, the
RA7x drive is performing within specifications.
E–2 RA7x Error Rates
RA7x Error Rates
E.7 RA7x System Error Rates
Table E–2 Allowable RA7x System Error Rate
Error Code
39
39
39
39
I/O Rate
(I/Os per Second)
10
20
30
40
Allowable Errors
(per 24 hours)
1
2
2-3
3-4
RA7x Error Rates E–3
F
Revision Support
This appendix lists the minimum versions of operating systems, diagnostics, and
SDI controllers that support RA71 through RA73 disk drives in Release 43.
The diagnostics and VAX Supervisor programs in Table F–1 all recognize RA71
through RA73 disk drives. The retired VAX Supervisor programs in Table F–2
do not recognize RA71 through RA73 disk drives. However, they will properly
test and operate the RA71 and RA72 with the above disk drive diagnostics if
the RA71 through RA73 disk drives are ‘‘attached as RA70 disk drives’’ during
program setup.
Table F–3 lists the operating systems and Table F–4 lists the SDI controllers for
the RA71 through RA73 disk drives.
Table F–1 VAX Diagnostics for RA71–RA73 Drives
Diagnostic/
Supervisor
Description
Minimum
Version
EVRAE
Generic MSCP Exerciser
4.3
EVRLB
UDA/KDB50 Basic Disk Formatter
8.3
EVRLF
UDA/KDB50 Basic Subsystem Diagnostic
10.4
EVRLG
UDA/KDB50 Disk Drive Exerciser
10.3
EVRLJ
VAX UDA/KDB50/KDM70 Exerciser
4.3
EVRLK
VAX Bad Block Replace Utility
4.3
EVRLL
VAX Disk Resident Error Log Utility
3.3
EVRLM
KDM70 EEPROM Update Utility
1.6
EVRLN
DUP Control Program
1.6
EBSAA
Supervisor, 8200, 8250, 8300, 8550 (Bereta)
14.4–PAT1
ELSAA
Supervisor, 5800, 6000-2xx, 6000-3xx
14.4–PAT1
EMSAA
Supervisor, 6000-5xx
14.4–PAT1
ERSAA
Supervisor, 6000-4xx
14.4–PAT1
EVSBA
VAX Diagnostic Autosizer
7.5
EVSBB
VAX Online Autosizer
4.0
Revision Support F–1
Revision Support
Table F–2 Retired VAX Supervisor Programs
Supervisor
Program
Description
ECSAA
Supervisor, 750
EDSAA
Supervisor, 8600, 8650
EJSAA
Supervisor, 8820/30/40
ENSAA
Supervisor, 725, 730
ESSAA
Supervisor, 780, 785
EWSAA
Supervisor, 9000
EZSAA
Supervisor, 8530, 8550, 8700, 8800, 8820N
Table F–3 Operating Systems for RA71–RA73 Drives
Operating Systems Software
RA71/RA72
Minimum
Version
RA73
Minimum
Version
VMS
5.4-21
5.5-2
VAXsimPLUS
1.6
2.0
ULTRIX-32
4.2
4.3
VAXELN
4.3
4.3-x
VAX System 5
3.2.1
Not planned
1 The
Error Log Formatter (ERF) version 5.4-2 must be upgraded to version 5.4-2 (0001) to support
RA71/RA72. Version 5.5-2 required to support RA73.
Table F–4 SDI Controllers for RA71–RA73 Drives
SDI
Controller
Minimum
Version
HSC40 (CRONIC)
V600
HSC50 (CRONIC)
V410
HSC60 (CRONIC)
V600
HSC70 (CRONIC)
V600
HSC90 (CRONIC)
V600
K.SI Interface SW Version 12
K.SDI Interface SW Version 39/40
KDM70
SW Version 30 (3.0)
HW Version 17
KDA50
SW Version 8
HW Version 4
KDB50
SW Version 20
HW Version 28
UDA50A
SW Version 6
HW Version 0
F–2 Revision Support
Index
B
Bad block replacement rate, E–2
C
Cabling
technical description, 2–14
Chassis
technical description, 2–1
Controller support, F–1
D
Diagnostics support, F–1
Disk drives
installing and removing a drive position filler,
6–8
installing and removing an RA7x disk drive,
6–2
placing off line, 4–8
placing on line, 4–7
serial numbers, 6–3
Documentation, related, x
Drive position filler
installing and removing, 6–8
Drive power switches and indicators
using, 4–4
E
Environmental limits, 1–9
Environmental stabilization, B–1
Error rate
for system, E–2
Error rates, E–1
Error types, E–1
F
Fan assembly
removing and installing, 7–10
technical description, 2–5
Frame
technical description, 2–3
FRUs, removing and installing
enclosure SDI cables, 7–18
fan assembly, 7–10
OCP, 7–4
performing a post-repair checkout and
power-up, 7–20
power harness, 7–15
power supply, 7–4
remote OCP cable, 7–11
required tools, 7–2
TB1, 7–9
TB2, 7–6
H
Hard data errors, E–2
Header errors, E–1
I
Installing add-on storage devices
SA7x enclosure installed in the SA900, 3–6
Internal cabling, A–1
L
Loss-of-positioner errors, E–2
M
MFG code, 6–4
O
OCP
error code table, D–1
removing and installing, 7–4
summary of functions, 4–3
technical description, 2–6
troubleshooting, 5–6
using, 4–1
Operation
applying power to the SA7x enclosure, 4–6
placing RA7x drives on line and off line, 4–7
using SA7x front panel switches and indicators,
4–1
using SA7x rear panel switches and indicators,
4–5
Index–1
Overview, 1–1
P
Part numbers
SA7x, C–1
Power harness
removing and installing, 7–15
Power supply
removing and installing, 7–4
technical description, 2–10
Precautions, 1–10
data recovery, 1–10
electrostatic discharge, 1–11
operating temperature, 1–11
Problems and troubleshooting references, 5–1
R
Remote OCP cable
removing and installing, 7–11
Revision support, F–1
S
SA7x enclosure
installed as add-on in SA900, 3–6
SDI cables, enclosure
removing and installing, 7–18
Serial numbers, disk drive, 6–3
Soft errors, E–2
Specifications, 1–9
Switches and indicators
front panel, 4–1
rear panel, 4–5
T
TB1
removing and installing, 7–9
TB2
removing and installing, 7–6
Technical description
chassis, 2–1
fan assembly, 2–5
frame, 2–3
internal cabling, 2–14
OCP and transition board assembly, 2–6
power supply, 2–10
Transition board assembly
technical description, 2–6
Troubleshooting
dead enclosure–Fault indicator lit, 5–1
dead enclosure–Fault indicator not lit, 5–2
drive not visible to the controller, 5–6
excessive drive errors or a fault condition, 5–5
flashing drive power indicator, 5–3
identifying problems, 5–1
Index–2
Troubleshooting (cont’d)
OCP, 5–6
reading OCP error codes, 5–5
Type I data errors, E–1
Type II data errors, E–1
U
Unrecoverable errors, E–2