1
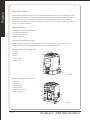
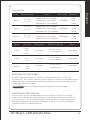
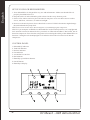
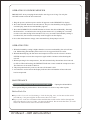
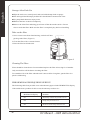
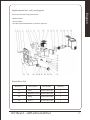
DRI BEAST SIM SERIES LGR DEHUMIDIFIER OWNER’S MANUAL st ea ri D B Operation and Service Instruction SIM-75, SIM-95, SIM-110 English Owner's Manual Dri Beast LGR Dehumidifier SIM Series 115-volt model READ AND UNDERSTAND THESE INSTRUCTIONS Read carefully before attempting to assemble, install, operate or maintain the product described. Protect yourself and others by observing all safety information. Failure to comply with instructions could result in personal injury and/or property damage! Retain instructions for future reference. IMPORTANT! If the unit needs repair, have the repairs fixed by a qualified technician; problems caused by an unauthorized person will void the warranty. DANGER! Never attempt to disassemble or alter the unit in any way not instructed by this manual. Electric shock may occur, resulting in injury or death. Do not handle the plug with wet hands. Electric shock may occur, DANGER! resulting in injury or death. CAUTION ! Do not block the grids when the unit is in use. Keep metal objects away from the unit. Bodily injury or property damage may occur. WARNING! Humidity sensor is easily damaged when used in gaseous locations. 1. Read all instructions before using this unit. Save these instructions for reference. 2. Do not use this unit outdoors. It is intended for indoor use only. 3. Do not allow children to play near the unit. 4. Do not use adaptors. 5. Inspect the power cord before use. If cord is damaged, do not use. Always grasp the plug (not the cord) to unplug. 6. Always unplug the power cord from the receptacle when the unit is not in use, before cleaning, replacing parts, etc. 7. Keep motor and wiring dry. 8. The maximum temperature indicated on the rating plate is relative to measurements made in normal operating conditions. These must be observed. 9. When the unit is set up for continuous drainage, make sure the hose is connected properly and is able to flow freely. 10. Continuous drainage is not recommended when the temperature is below freezing. 11. Do not use the unit as a bench or table. 12. It must always be used in the upright position. INFORMATION EMAIL: [email protected] Dri Beast - LGR dehumidifier -1- English INTRODUCTION The Dri Beast LGR dehumidifier series is designed with the end user in mind and provides outstanding performance. Our LGR technology helps remove moisture, eliminate mildew, musty odors, sweating on walls and windows, in the most demanding of environments. We offer three different size beasts which help you to solve your most demanding problems in any size room or building. What's in the box 1.Dri Beast LGR SIM Dehumidifier 2.20-foot drainage hose 3.10-foot power cord 4.Owner's manual Unpacking and Inspection Handle carefully. Check the packing list to account for all items. Visually inspect for shipping damage. If damaged, immediately file a claim with the carrier. FRONT OF THE UNIT(Figure 1) 1 1. Filter 2.Wheel 3. Base 4. Front Panel 5. Inlet grid 5 4 3 2 Figure 1 BACK OF THE UNIT (Figure 2) 1. Handle 2. Air outlet 3. Water outlet 4. Power plug 5. Power cord storage 6. Control panel 1 6 5 2 4 3 -2- Figure 2 Dri Beast - LGR dehumidifier Specification SIM-75 SIM-95 SIM-110 Model Temperature Range 41℉~90℉ 5℃~ 3 2℃ 41℉~90℉ 5℃~ 3 2℃ 41℉~90℉ 5℃~ 3 2℃ Rate Amps 8.3A Rated Power 760W 75Pt(36L)(80℉/26.7℃/60%RH) 130Pt(62L)(86℉/30℃/80%RH) 115V/60Hz 910W 180Pt(85L)(86℉/30℃/100%RH) 1100W 95Pt(45L)(80℉/26.7℃/60%RH) 860W 160Pt(76L)(86℉/30℃/80%RH) 115V/60Hz 1030W 228Pt(108L)(86℉/30℃/100%RH) 1220W 110Pt(52L)(80℉/26.7℃/60%RH) 1140W 187Pt(88L)(86℉/30℃/80%RH) 115V/60Hz Display Range 30-90%RH Weight Dimensions (WxDxH) 24.0"x23.0"x37.7" 1380W 1650W 288Pt(136L)(86℉/30℃/100%RH) 6.9A SIM-75 Rated Voltage Capacity 119lbs(54kgs) (610x584x957mm) 10.1A 7.8A SIM-95 9.5A 30-90%RH 10.2A 12.5A 128lbs(58kgs) (610x584x957mm) 11.1A SIM-110 24.0"x23.0"x37.7" 30-90%RH 14.8A 24.0"x23.0"x37.7" 130lb(59kgs) (610x584x957mm) HOW THE LGR UNIT WORKS Dri Beast refrigerant dehumidifiers operate by pulling moist air in across a very cold evaporator core. The moisture condenses (freezes) on the coil. At intervals, the machine will go into defrost mode, warming the frost back to water. The water collects in a tray and leaves the unit through a drain hose or pump. IMPORTANT! Before moving the unit, make sure there's no water in the pump. POSITIONING THE LGR UNIT For best results, operate your dehumidifiers in an enclosed area, as this creates a drying chamber. Close all doors and windows that open to the outside to maximize the unit's water removal efficiency. Also, keep traffic though the drying chamber to a minimum. Place your dehumidifier against a wall, away from obstructions, and keep it away from anything that could block airflow into and out of the unit. Dri Beast - LGR dehumidifier -3- English Model English SET UP YOUR LGR DEHUMIDIFIER 1. Your dehumidifier is designed for easy use and maintenance. Make sure that the filter is properly installed before use. 2. Keep the unit's air inlet and outlet grids at least 4 inches away from any wall. 3. Select a flat, stable surface to place the unit. Do not place on or near heat sources such as stoves, radiators, or heaters, or in direct sunlight. 4. Do not use the unit in places where chemicals are stored. Volatile chemicals might damage the unit and make the pump leak. NOTE: Do not tilt the unit move than 45 degrees to avoid damaging the compressor . NOTE: If you transport an SIM-Series dehumidifier in a horizontal position, set it upright and let it stand for at least 30 minutes before you turn it on. When the machine is horizontal, the oil from the compressor flows into the refrigerant coils reducing the ability of the dehumidifier to function. Letting the unit stand upright for 30 minutes allows the oil to flow back into the compressor. CONTROL PANEL 1. Dehumidify indicator 2. Tank full indicator 3. Defrost indicator 4. Fan indicator 5. Accumulative run time 6. Drain button 7. Humidity up and down buttons 8. On/Off button 9. Humidity% display -4- Dri Beast - LGR dehumidifier OPERATING YOUR DEHUMIDIFIER English IMPORTANT: Always unplug the unit before moving or servicing. Use only the ON/OFF button to turn the unit on and off. 1. Plug the power cord into a power outlet. Di appears on the HUMIDITY% display. 2. Press the ON/OFF button to turn the unit on. The previous humidity setting appears on the display, then the current humidity appears. 3. Press the HUMIDITY UP or DOWN button to choose the desired humidity. Pressing the button for 1 second raises the setting in increments of 1%; holding for 2 seconds or more raises the setting in increments of 5% every second. If the humidity setting is less than 30%, the unit runs constantly and CO appears on the display. 4. Press the drain button to empty water automatically from pump reservoir. OPERATING TIPS 1. When the humidity setting is higher than the current room humidity, the unit will not run. Maintaining the humidity between 45-65% is suggested for best results. 2. When dehumidifying, the fan motor and compressor must run for at least 3 minutes. NEVER attempt to restart the compressor again within 3 minutes after shutting the unit off. 3. When operating in low temperatures, the unit automatically determines when it needs to defrost. When defrosting, the DEFROST indicator comes on and the compressor runs. The fan motor is not used for defrost. 4. The pump automatically removes the water if the tank is full. 5. Accumulative work time on the display indicates the total number of hours the unit has been operated. MAINTENANCE WARNING! ELECTRIC SHOCK HAZARD. Unplug the dehumidifier before performing any maintenance. Do not immerse in water or any other liquids. Before Each Use Inspect the electrical cord for damage. Look for fraying, cuts, etc. Do not use the unit if you find any. Call your supplier for the nearest Service Center. Inspect filter. Look for accumulated dust and dirt that would restrict airflow through the filter into the unit. If any is visible, vacuum out the debris. Do not wash the filter, as it will reduce the effectiveness of the electrostatic material. Dri Beast - LGR dehumidifier -5- English Storage/ After Each Use Wipe the enclosure, control panel, and cord with a damp cloth or sponge. The outlet grid should simply be dusted. It should not be immersed in water. Use pump Drain button to empty water. Walk out the hose to drain it completely. Remove the inlet filter and using gas to blow off the dust on the surface. Do not rinse or wash the filter. Make sure the filter is completely dry before reinstalling. Take out the filter 1.Screw out two nuts from front housing, and take off inlet Screw out two nuts grid to get the filter. (Figure 3) 2.Clean the filter with a vacuum cleaner. 3.Place the filer back in the unit. Figure 3 Cleaning The Filter Filter should be cleaned once for a month and replace the filter after using for 12 months. Only need to blow off the dust to cleaning the filter. To extend the life of the filter when the unit is not sued for a long time, put the filter in a plastic sealable bag. ERROR MESSAGES REQUIRING SERVICE The following table lists possible error codes that may appear in the HUMIDITY% display if the unit detects a problem. In this event, the unit may need service. -6- Malfunction display Problem E3 Humidity sensor may need service E4 Pump may need service E5 Defrost sensor may need service Dri Beast - LGR dehumidifier Replacement Parts - call your Supplier English Please provide following information: -Model number -Serial number -Part description and number as shown in parts list Repair Parts List Reference # Description Part Number Quantity 11 Filter SGD-LGR-A011 1 36 Humidity sensor SGD-LGR-A036 1 26 Pump SGD-LGR-A026 1 28 Wheel SGD-LGR-A028 1 Dri Beast - LGR dehumidifier -7- English OPTIONAL PARTS - Air outlet duct ring M5 nuts (pre-installed) Duct ring M5X12screws TROUBLESHOOTING Symptom The dehumidifier will not turn on Reduced air flow or poor dehumidifying efficiency Possible Causse(s) Corrective Action 1. Bad fuse Replace the fuse 2. No Power Check power supply to the unit 1. Inlet grid or outlet grid may be blocked Check that nothing is in front of or in back of the dehumidifier 2. The filter may be clogged Clean the filter or replace it, if necessary 3. Doors or windows in the room are open Close the doors and windows 4. There is a leak in the refrigerant The unit may need service 1. The unit may be unstable or not upright Make sure the unit is stable and level 2. The pump or draining hose is clogged Check the pump or draining hose Water leaks from the unit When the above malfunctions occur and the unit must be repaired please contact your supplier - do not disassemble the unit. Hot wind from the air outlet is normal. -8- Dri Beast - LGR dehumidifier English NOTES Dri Beast - LGR dehumidifier -9- NOTES English -10- Dri Beast - LGR dehumidifier