1
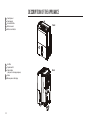
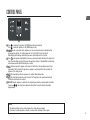
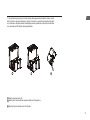
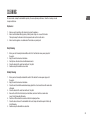
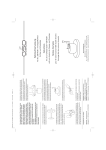
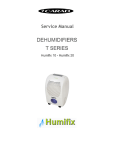
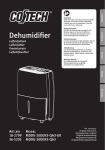
DE
EN
IT
FR
NL
DK
SE
NO
FI
PL
MDF2-12DEN3 MDF2-16DEN3 MDF2-20DEN3
ENTFEUCHTER DEHUMIDIFIER DEUMIDIFICATORE DESHUMIDIFICATEUR D’AIR ONTVOCHTIGER
LUFTAFFUGTER AVFUKTARE AVFUKTER ILMANKUIVAAJA ODWILŻACZ
INFORMATION
SAFETY TIPS
DESCRIPTION OF THE APPLIANCE
CONTROL PANEL
TECHNICAL SPECIFICATIONS
SETUP AND OPERATION
SWITCHING THE APPLIANCE ON AND OFF
EMPTYING WATER OUT OF THE APPLIANCE
CLEANING
CARE AND STORAGE
TROUBLESHOOTING
WEEE
CONDITION OF SALE/WARRANTY
OPERATING INSTRUCTIONS
20
22
23
24
24
26
26
29
30
31
33
33
WARNING
Dear customer,
we would like to thank you for purchasing this product, which has been developed and tested for the most sophisticated
of requirements. Please read these operating instructions in full before using the appliance for the first time to familiarise
yourself with how it works. Keep these operating instructions in a safe place for later reference.
INFORMATION
Air always contains a certain amount of water in the form of vapour. This determines the level of moisture in a room. The
ability of air to absorb water vapour increases when temperatures rise.
This is the reason why the air in our homes gives off water as soon as the temperature sinks. This then collects as condensation on any cold surfaces such as windows and walls.
The dehumidifier you have purchased is designed to extract some of the mositure from the air in rooms to prevent damage
caused by condensation such as mould. Experts have determined that a healthly and comfortable room climate exsists for
the people who stay in them and stops objects, appliances and equipment that are sensitive to moisture such as furniture,
furnishings, musical instruments, cameras and computers getting damaged, when a relative air humidity of between 40%
and 60% exists. When lower, the air is too dry and can cause skin problems or even static electricity.
SAFETY TIPS
1.
2.
3.
4.
20
Do not use the dehumidifier if it is faulty, damaged or does not function correctly. Always take the mains power plug out of the socket outlet.
Set the dehumidifier up in a place, which is not accessible to children.
Do not place the dehumidifier:
A. close to sources of heat such as radiators, heaters, tumble dyers or similar.
B. in places where it can get splashed with oil or water.
C. in open sunlight.
D. close to the baths, showers or swimming pools.
E. in a greenhouse.
F. close to easily flammable gases or material.
G. behind curtains or other objects or hindrances that could effect the circulation of air.
H. in the open.
Always store the appliance in an upright position to ensure that the compressor does not get damaged.
EN
5. If the mains power cable on the dehumidifier gets damaged, you need to have it repaired by the manufacturer‘s authorised repair service, since special tools are required.
6. Always take the mains plug out of the socket if you are not using the dehumidifier, or if you need to move, touch or clean it. Never pull on the cord to remove the plug.
7. Before taking the mains plug out of the socket, always switch the appliance off by pressing the POWER button on the control panel.
8. The dehumidifier functions best at a room temperature of between 4° C and 32° C. Faults may occur outside of this temperate range.
9. Never remove the water resevoir when using the dehumidifier.
10. Never stick your fingers or any other objects into the slits or openings on the appliance. If you do so, this may result in overheating, fire or electric shock. Make sure you warn children about these hazards.
11. Never submerge the dehumidifier in water or any other liquids, and never pour water or any other liquid over it or into the air intake or ventilation slots.
12. Clean the dehumidifier regularly. Refer to the cleaning instructions when doing so.
Take the mains plug out of the socket before cleaning the appliance.
13. Do not cover the humidier.
14. Do not spray the dehumidifier with fly spray or inflammable sprays.
15. The dehumidifier is completely maintenance-free. If the appliance or mains power cable gets damaged, return it to the manufacturer or customer service for repair.
16. Ensure you empty the water resevoir before transporting the appliance. To do so, take the mains plug out of the socket.
17. The appliance is equipped with an automatic deicing function. This switches on at room temperatures under 5° C to prevent ice forming. The dehumidifier operates cyclically and switches itself on and off.
21
DESCRIPTION OF THE APPLIANCE
1
2
3
4
5
Control panel
Carrying grip
Air outlet baffles
Water resevoir
Water level indictor
2
Front
1
3
4
5
6
7
8
9
10
Air-filter
Taphole outlet
Cable holder
(only use for storage purposes)
Roller
Mains power cable/plug
Back
6
7
8
9
22
10
CONTROL PANEL
4
EN
7
1
5
3
6
2
1 Press
to switch on the appliance. The POWER lamp lights up permanently.
Press
to switch the appliance off. The POWER lamp goes out.
2
As soon as you switch on the appliance, you can can increase/decrease the humidity setting
by pressing these buttons - the settings range from 35% R.H. to 80% R.H in increments of 5.
Dehumidifying starts and stops automatically as soon as the humidity level set is reached.
to start permanent dehumidifying. You can see the current ambient humidity in the display at all 3 Press
times. Press the button again to quit this mode. The appliance switches to "Standard Mode" automatically
and continues operating until the humidity set is reached.
4
: When you connect the appliance to the mains for the first time, this lamp flashes slowly. It stays permanently lit after you switch the appliance on (appliance ready for operation). After you switch the
appliance off, the lamp goes out.
5
: This lamp lights up when the appliance is in continual dehumidifying mode.
6
: This lamp lights up when the water resevoir is full. The appliance stop operating automatically.
The water resevoir needs to be emptied.
7 DISPLAY: When the appliance is switched on, the display always shows the current ambient air humidity.
If you press
, the setting chosen flashes briefly and then the current ambient air humidity is
displayed again.
NOTES
1. The appliance initially reacts up to five minutes after a setting has been changed.
2. If you chose to switch the appliance off, wait 3-5 minutes before switching it back on again.
23
TECHNICAL SPECIFICATIONS
Model
MDF2-12DEN3
MDF2-16DEN3
MDF2-20DEN3
Dehumidifier performance
12 litres/24 hr
16 litres/24 hr
20 litres/24 hr
Power supply
220-240V ~50 Hz
220-240V ~50 Hz
220-240V ~50 Hz
Ambient environment
5~35C
25% R.H. and above
5~35C
25% R.H. and above
5~35C
25% R.H. and above
Water tank volume
3 litres
3 litres
3 litres
Net weight
14 kg
14 kg
14 kg
Size in mm H x W x D
340 x 480 x 225
340 x 480 x 225
340 x 480 x 225
Performance varies according to the actual room temperature and humidity.
We reserve the right to modify these specifications without prior notification in cases of product enhancement.
SETUP AND OPERATION
1.
2.
3.
4.
5.
24
Read all the instructions carefully before using the dehumidifier for the first time. Make sure you make special reference to the Safety Tips in these operating instructions.
Place the appliance in an upright postion at least 24 hours before use. This particularly applies after transportation.
Place the dehumidifier on a solid and level surface. Make sure the position is stable to stop it tipping over. Any water that escapes may damage furniture and floor coverings.
Maintain a safe distance to other objects of approx. 20 cm from the back and the front of the appliance. It should never be placed under tables or cupboards, since this will affect the air flow.
Before using the dehumidifier, make sure the air inlet and outlet baffles are not covered. The air outlet nozzle must be freely accessible at all times when the dehumidifier is in use.
6. Removable covers must be correctly attached before the appliance is switched on.
7. Do not use an extension cable, a multiple socket outlet used by other electrical appliances, or a variable speed controller, otherwise overheating may occur and cause a fire.
8. Plug the dehumidifier into a functioning, single-phase, earthed socket outlet with the same mains voltage
as that stated on the type plate. The socket outlet must be easily accessible.
9. Completely unwind the mains cable off the cable holder and plug the mains plug into the socket outlet.
If not, overheating may occur and cause a fire. Never touch the mains cable with wet hands.
10. The
lamp flashes.
EN
WARNING: Maintain distances!
40 cm and more
20 cm and more
20 cm and more
20 cm and more
20 cm and more
25
SWITCHING THE APPLIANCE ON AND OFF
Press
to switch the appliance on– the
lamp lights up permanently.
The current air humidity in the room is now shown on the display. You now have the option of selecting one of
two operating modes:
Standard Dehumidication
Press the buttons to select the desired air humidity (this then flashes in the display). The appliance starts dehumidifying automatically and switches off as soon as the level set is reached. The current room temperature is shown
permanently in the display. We recommend a relative room humdity of approx. 60% for optimum comfort.
Continual Dehumidification
Press
to start permanent dehumidification irrespective of any previous settings made with the
buttons. The
appliance now removes moisture from the ambient air without shutting off – the
buttons are disabled. The
lamp shows that the appliance is set to this mode, and the current ambient air humidity is shown in the display. Press
to stop permanent dehumidifying and the appliance returns to standard mode.
Press
again to switch off the appliance.
EMPTYING WATER OUT OF THE APPLIANCE
The dehumidifier provides two ways of draining off water removed from the air:
Water Tank
1. The water flows into the water tank and is collected. As soon as the tank is full, dehumidifying stops automatically, the
lamps lights up and "P2" appears in the display.
2. Wait a couple of minutes before removing the water reservoir so that any remaining water can drip into
the tank. Do not remove the water tank if the appliance is still in operation. Overflowing water can damage
objects and floor coverings, and may cause an electric shock.
3. To empty the water tank remove the resevoir as illustrated and empty the water tank completely of water.
4. Slide the water tank back into its original position. The control lamps goes out.
26
5. If the control lamp does not go out, remove the water tank again and check whether the float is correctly fitted or if water or any other substances are stuck to it. Remove if necessary. Never remove the float under any circumstances, otherwise automatic dehumidifying cannot be guaranteed, and the water that overflows may cause damage. Refit the water tank again afterwards.
1
2
EN
3
1 Slide the water tank out a little.
2 Hold the water tank on both sides and pull smoothly out of the appliance.
3 Empty out the water that has collected in the tank.
27
Continual Water Drainage
If you wish to drain off water continually, follow the installation instructions below:
1. 2. 3. 4. 5. 6. 7. Make sure the dehumidifier is switched off, and take the mains power plug out of the socket.
Carefully remove the plastic cover on the back of the appliance (see illustration below) – the hose connector is located behind it.
If your remove the water tank, you will find the appliance‘s water run-off as represented in the illustration
(normally the condensation flows through the run-off into the water tank).
Push a hose through the new opening that has been created on the back of the appliance and connect the hose to the water run-off. Make sure the hose is connected tightly and cannot become detached.
Place the other end of the hose in the domestic drain. Make sure the hose slopes downwards along its whole length, and has no kinks, knots or blockages so that the water can drain off unhindered and safely.
You can now re-attach the water tank and use the appliance.
Check both ends of the hose regularly for a tight fit.
1
1
28
Remove the plastic cover and attach
the hose to the run-off.
CLEANING
We recommend cleaning the dehumidifier regularly. To ensure optimum performance, follow the cleaning, care and
storage instructions.
EN
Key basics:
1. 2. 3.
Never use petrol, spririts or other chemicals to clean the appliance.
Never clean the dehumidifier by placing it directly under a tap or in a vessel full of water.
This may damage the internal electrical components and result in electric shock.
Never clean the appliance in a dishwasher. This includes any small parts.
Daily Cleaning
1. 2. 3. 4. 5. Before your start cleaning the dehumidifier, switch it off and take the mains power plug out of
the socket.
Empty the water tank as described above.
Carefully rinse the water tank out with lukewarm water.
Clean the outside of the water tank with a soft, dry cloth.
Continue using the humidifer as described.
Weekly Cleaning
1. 2. 3. 4. 5. 6.
7. 8. Before you start cleaning the dehumidifier, switch it off and take the mains power plug out of
the socket.
Empty the water tank as described above.
Clean the water tank with household washing-up liquid. Rise it out several times with warm water afterwards.
Clean the outside of the water tank with a soft, dry cloth.
Remove the air-filter from the holder (see illustration) and clean it with clear, warm water.
Leave it to dry thoroughly afterwards.
Push the air-filter and water resevoir back into their original positions.
Clean the outer surfaces of the dehumidifier with a soft, damp cloth and then polish it with a dry
cloth afterwards.
Continue using the dehumidifier as described.
29
CARE AND STORAGE
1
2
1
2
30
Cable attachment clip
Cable
1. 2. 3. 4. 5. If you do not intend to use the dehumidifier for a longer period of time (one week or more), clean the
appliance as described unter "Weekly Cleaning".
Allow the dehumidifier and all its components to dry completely.
Wind the power cable onto the drum (see illustration).
Never store the dehumidifier with a dirty air filter or with water in the water tank.
Store the dehumidifier in an upright position in a cool and dry place.
TROUBLESHOOTING
EN
Please consider the options below before contacting the manufacturer or his agent:
Problem
Possible Cause
Solution
The appliance does not work.
1. The appliance is not switched on.
Switch the appliance on.
2. The mains power plug is not
plugged into the socket.
Plug the mains power plug into the
socket.
3. The socket is defective.
Check the domestic fuse box or
consult an electrician.
4. The water tank lamp is lit up.
Empty the water resevoir.
5. The water resevoir is not correctly
attached.
Attach the water resevoir correctly.
6. The humidity level in the room is
below the one selected.
Select a lower humidity level.
7. The room temperature is too low.
The automatic deicing function is
enabled. The appliance dehumidifies
again afterwards.
1. The air-filter is blocked.
Clean the filter as described under
"Weekly Cleaning".
2. Windows and doors in the room
are open.
Close the windows and doors in the
room.
3. The room temperature is too low.
The automatic deicing function is
enabled. The appliance dehumidifies
again afterwards.
The appliance does not dehumidify or
dehumidifies only a little.
31
Problem
Possible Cause
Solution
The appliance does not dehumidify, or
only dehumidifies a little.
4. The air intake or outlet opening is
blocked.
Make sure all openings are free.
5. The room is too large.
This is normal.
6. There are too many sources of
moisture in the room.
This is normal.
1. The dehumidifier is not correctly
installed, and is unlevel and shaky.
Place the dehumidifier on a flat and
solid surface. If neccesary, place an
insulating mat under the appliance to
reduce sound.
2. The air-filter is blocked.
Clean the filter as described under
"Weekly Cleaning".
3. Water is on the floor.
Attach the hose.
Ice forms on the evaporator coil.
This is normal.
The dehumidifier deices automatically.
E1, E2, P1, or P2 appears on the
display
E1 - Fault: moisture sensor
Remove the plug on the appliance and
plug it back in. If the fault continues to
occur, call customer services.
E2 - Fault: temperature sensor
Remove the plug on the appliance and
plug it back in. If the fault continues to
occur, call customer services.
P1 - Appiance is deicing
Let the appliance deice. The fault will
no longer occur once the appliance
is deiced.
P2 - Collection tank is full
Empty the collection tank and attach it
again correctly.
The appliance functions too loud.
Note: if more than one fault occurs,
the code display sequence is
P2 - E2 - E1 - P1
32
WEEE
You are not permitted to dispose of this appliance in the domestic waste. It is labelled in accordance with European Guideline 2002/96/EC on used electrical and electronic devices (WEEE). This guideline forms the framework
for returning and recycling used appliances. To return your used appliance, please take advantage of the return
and collection services available in your area.
EN
CONDITION OF SALE
The purchaser accepts responsibility for the correct use and care of the product in accordance with these operating instructions as the condition of sale. The purchaser must decide personally when and for how long he uses the appliance.
If you experience problems with this product, please refer to the instructions in the warranty conditions. Do not attempt to
open or repair the appliance yourself, since this makes the waranty void, and may cause harm to individuals and damage to
property.
WARRANTY
Read the operating instructions in full before using the appliance for the first time. Keep the sales receipt with the purchase
date in a safe place in case you need to make a warranty claim at any time. Please observe Items 1 and 3 below concerning
exceptions.
1.This 3-year warranty applies to replacement services or repairs to a product that demonstrates material or manufacturing faults. This warranty is not valid for commercial use, misuse or incorrect use, or any other damage. The manufacturer
accepts no liability for accompanying or consequential damage of any type. This limitation does not apply to United
States‘ citizens, where warranty exclusion for accompanying or consequential damage is not permitted. This warranty is
limited to the original purchase of the product. This warranty does not apply to filter elements that may be enclosed with
the product, except for material or manufacturing faults. Not all products are equipped with a filter.
2. The manufacturer repairs or replaces this product according to his own discretion, if material or manufacturing damage to
the product is determined. Please contact the addresses printed on the reverse side for more information.
3. This warranty does not cover damage caused by unauthorised attempts at repair or any other manner of use other than
the ones stated in the operating instructions.
Technical changes and printing errors reserved.
33
MIDEA EUROPE GmbH
Zülpicher Str. 5
40549 Düsseldorf
Germany
Service-Hotline DE 01805 - 12 16 17
(14 Cent pro Minute aus dem deutschen Festnetz)
Service-Hotline Europe 0049 - 1805 - 12 16 17
www.mideaaircon.de
[email protected]
11/2007
(german and english)