1
DISASSEMBLY INSTRUCTIONS
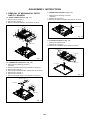
1-3: REMOCON PCB (Refer to Fig. 1-3)
1. REMOVAL OF MECHANICAL PARTS
AND P.C. BOARDS
1. Disconnect the following connector:
(CP2201).
2. Remove the 2 screws 1.
3. Remove the Remocon PCB in the direction of arrow.
1-1: BACK CABINET (Refer to Fig. 1-1)
1. Remove the 14 screws 1.
2. Remove the 7 screws 2.
3. Remove the Back Cabinet in the direction of arrow.
1
1
2
2
1
1
1
2 22 2
1
1
2
Remocon PCB
1
1
1
1
1
Fig. 1-3
1
1
1
1-4: LCD BLOCK (Refer to Fig. 1-4)
1
1. Remove the Holder Panel.
2. Remove the 4 screws 1.
3. Remove the LCD Block in the direction of arrow.
Back Cabinet
Holder Panel
1
1
LCD Block
1
Fig. 1-1
1
1-2: OPERATION PCB (Refer to Fig. 1-2)
Holder Panel
Front Cabinet
1. Disconnect the following connector:
(CP2203).
2. Remove the Plate Button in the direction of arrow (A).
3. Remove the 3 screws 1.
4. Remove the Operation PCB in the direction of arrow (B).
5. Remove the 7 screws 2.
6. Remove the 2 screws 3.
7. Remove the Angle Hinge in the direction of arrow (C).
Operation PCB
1
Fig. 1-4
1
1
(B)
Plate Button
3
32
22
2
(C)
(A)
2
2
2
Angle Hinge
Fig. 1-2
B1-1