1
MRA22, MRA31, MRA41
Installation
Before you begin installation
Before you begin you need to read the manual, to have
some tools, cables and other material available. There
is one such list of material on the following page.
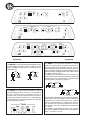
Amplifier location
Important
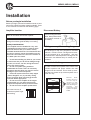
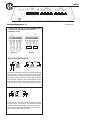
Allow air circulation around the amplifier.
The DLS Marine Audio amplifiers have a compact
design that allows great flexibility in mounting.
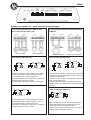
Safety Considerations:
Your amplifier must be installed in a dry, wellventilated environment and in a manner which
does not interfere with your vessel’s factory
installed electronic devices. You should also take
the time to securely mount the amplifier so that it
does not come loose in the event of a collision or
a sudden jolt to the vessel.
Check before drilling any holes in your vessel
to make sure that you will not be drilling through
the hull, a fuel tank, fuel line, wiring harness or
other vital vessel system.
Do not run system wiring outside or
underneath the vessel. This is an extremely
dangerous practice which can result in severe
damage to your vessel and person.
Protect all system wires from sharp edges
(metal, fiberglass, etc.) by carefully routing
them, tying them down and using grommets
and loom where appropriate.
Do not mount the amplifier in the engine
compartment or in any other area that will
expose the amplifier circuitry to the elements.
Do not mount the amplifier upside down!
This is the best way to
mount the amplifier to get
good cooling.
2
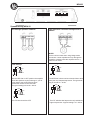
Disconnect Battery
Before starting the installation, always disconnect
the negative terminal of
the battery.
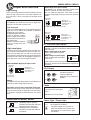
DLS logo on amplifier cooling flange
The DLS logo on top of the amplifier is attached
with two 1 mm hex. screws. The logo can be removed and twisted 90 or 180 degrees, and then
screwed back in wanted position. The logo can be
mounted in four different ways to match your installation.
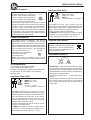
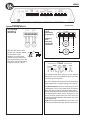
Removal of side flanges
In order to attach the amplifier to the surface and
connect speaker and power cables, the side
flanges must be removed. This is done by removing the hex screws on top of the amplifier. Use a
3 mm hex key.
Remove
these
screws using a 3
mm hex. key for
removal of side
flange. Remount
after attaching the
amplifier
and
connection of the
speaker and power
cables.