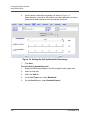
1
User’s Guide Fibre Channel Adapter 2600 Series FC0054609-00 B User’s Guide—Fibre Channel Adapter 2600 Series Information furnished in this manual is believed to be accurate and reliable. However, QLogic Corporation assumes no responsibility for its use, nor for any infringements of patents or other rights of third parties which may result from its use. QLogic Corporation reserves the right to change product specifications at any time without notice. Applications described in this document for any of these products2600 Series are for illustrative purposes only. QLogic Corporation makes no representation nor warranty that such applications are suitable for the specified use without further testing or modification. QLogic Corporation assumes no responsibility for any errors that may appear in this document. Document Revision History Revision A, May 18, 2012 Revision B, September 7, 2012 Changes ii Sections Affected Revised the first paragraph. Added a note. “Preface” on page ix Revised.FC0054609-00 B “What Is in This Guide” on page ix Revised. Added a note. “Intended Audience” on page x Added the QLogic QConvergeConsole Plug-in for VMware vCenter Server User’s Guide. “Related Materials” on page x Revised. “Downloading Firmware and Documentation” on page xii Removed the note about certification at the beginning of the section. Corrected the product numbers. “Warranty and Regulatory Information” on page xiii Revised. “EMI and EMC Requirements” on page xiv Revised. “Product Safety Compliance” on page xvi Revised. “Step 2. Install the Adapter Drivers” on page xviii Revised. “Step 3. Install QConvergeConsole” on page xix Corrected the product numbers. “Functional Description” on page 1-1 Revised. “Features” on page 1-1 Added Solaris and /ESXi. “Supported Operating Systems” on page 1-2 Removed all references to the QLogic QConvergeConsole Plug-in for VMware vCenter Server. Revised the first paragraph of the section. Added a note at the beginning of the section to refer to the QLogic QConvergeConsole Plug-in for VMware vCenter Server User’s Guide. Removed the “Operating System Support” section. Section 2 Added a description of the SuperInstaller. “Fibre Channel Adapter SuperInstaller Installation” on page 2-1 FC0054609-00 B User’s Guide—Fibre Channel Adapter 2600 Series Revised the procedure and revised the note. “Updating the Multi-boot Code” on page 2-2 Revised the section. “QLflash Command Line Options” on page 2-3 Revised the section. “Fibre Channel Adapter Function Configuration Utility” on page 2-3 Revised the note and the first paragraph of the section. Added “Personality” to the list of options. “Using Fast!UTIL for Custom Configuration” on page 2-3 Added more information about the Connection Options setting. “Adapter Settings” on page 2-4 Revised Step 6. Added information about booting from a SAN to the note. “Selectable Boot Settings” on page 2-5 Corrected the description of the Interrupt Delay Timer setting. “Advanced Adapter Settings” on page 2-7 Added. “Personality” on page 2-10 Added. “Using FCode for Custom Configuration (Oracle SPARC)” on page 2-10 Added. “Using UEFI for Custom Configuration” on page 2-13 Added a note at the beginning of the section. Revised the section (and subsections) to refer to ESX/ESXi 4.x and 5.x. “Installing Fibre Channel in VMware ESX/ESXi” on page 3-2 Added. “Installing Fibre Channel in Solaris” on page 3-3 Revised the note at the beginning of the section. “Target Persistent Binding” on page 3-4 Updated Figure 3-2 and Figure 3-3. “Setting QoS by Bandwidth” on page 3-9 Updated Figure 3-4. “Setting QoS by Priority” on page 3-11 Revised the section to refer to the QLogic QConvergeConsole Plug-in for VMware vCenter Server User’s Guide. “Configuring Fibre Channel Driver Parameters with the QLogic QConvergeConsole Plug-in for VMware vCenter Server” on page 3-13 Added. “Personality Configuration” on page 3-15 Added text and Figure A-1 to show the location of each LED. Corrected the title of Table A-1. Appendix A Revised. Glossary Added. Index FC0054609-00 B Page iii User’s Guide—Fibre Channel Adapter 2600 Series Page iv FC0054609-00 B Table of Contents Preface What Is in This Guide . . . . . . . . . . . . . . . . . . . . . . . . . . . . . . . . . . . . . . . . . . Intended Audience . . . . . . . . . . . . . . . . . . . . . . . . . . . . . . . . . . . . . . . . . . . . Related Materials . . . . . . . . . . . . . . . . . . . . . . . . . . . . . . . . . . . . . . . . . . . . . Documentation Conventions . . . . . . . . . . . . . . . . . . . . . . . . . . . . . . . . . . . . License Agreements. . . . . . . . . . . . . . . . . . . . . . . . . . . . . . . . . . . . . . . . . . . Technical Support. . . . . . . . . . . . . . . . . . . . . . . . . . . . . . . . . . . . . . . . . . . . . Downloading Firmware and Documentation . . . . . . . . . . . . . . . . . . . . Training . . . . . . . . . . . . . . . . . . . . . . . . . . . . . . . . . . . . . . . . . . . . . . . . Contact Information . . . . . . . . . . . . . . . . . . . . . . . . . . . . . . . . . . . . . . . Knowledge Database . . . . . . . . . . . . . . . . . . . . . . . . . . . . . . . . . . . . . Warranty and Regulatory Information. . . . . . . . . . . . . . . . . . . . . . . . . . . . . . Warranty . . . . . . . . . . . . . . . . . . . . . . . . . . . . . . . . . . . . . . . . . . . . . . . Regulatory Information . . . . . . . . . . . . . . . . . . . . . . . . . . . . . . . . . . . . Laser Safety . . . . . . . . . . . . . . . . . . . . . . . . . . . . . . . . . . . . . . . . Agency Certification. . . . . . . . . . . . . . . . . . . . . . . . . . . . . . . . . . . . . . . EMI and EMC Requirements . . . . . . . . . . . . . . . . . . . . . . . . . . . Product Safety Compliance . . . . . . . . . . . . . . . . . . . . . . . . . . . . ix x x x xi xi xii xii xiii xiii xiii xiii xiii xiv xiv xiv xvi Quick Start Installation Instructions. . . . . . . . . . . . . . . . . . . . . . . . . . . . . . . . . . . . . . . . . Step 1. Install the Adapter Hardware. . . . . . . . . . . . . . . . . . . . . . . . . . Step 2. Install the Adapter Drivers . . . . . . . . . . . . . . . . . . . . . . . . . . . . Step 3. Install QConvergeConsole . . . . . . . . . . . . . . . . . . . . . . . . . . . Additional Resources . . . . . . . . . . . . . . . . . . . . . . . . . . . . . . . . . . . . . . . . . . 1 xvii xvii xviii xix xx Product Overview Functionality and Features . . . . . . . . . . . . . . . . . . . . . . . . . . . . . . . . . . . . . . Functional Description . . . . . . . . . . . . . . . . . . . . . . . . . . . . . . . . . . . . . Features . . . . . . . . . . . . . . . . . . . . . . . . . . . . . . . . . . . . . . . . . . . . . . . Supported Operating Systems . . . . . . . . . . . . . . . . . . . . . . . . . . . . . . Physical Characteristics . . . . . . . . . . . . . . . . . . . . . . . . . . . . . . . . . . . Standards Specifications . . . . . . . . . . . . . . . . . . . . . . . . . . . . . . . . . . . FC0054609-00 B 1-1 1-1 1-1 1-2 1-2 1-2 v User’s Guide—Fibre Channel Adapter 2600 Series 2 Installing Software and Initial Setup Fibre Channel Adapter SuperInstaller Installation . . . . . . . . . . . . . . . . . . . . Multi-boot Image for Fibre Channel Adapter Function Configuration Utility . . . . . . . . . . . . . . . . . . . . . . . . . . . . . . . . . . . . . . . . . . Multi-boot Package Contents . . . . . . . . . . . . . . . . . . . . . . . . . . . . . . . Fibre Channel Adapter Function Configuration Utility Package Contents. . . . . . . . . . . . . . . . . . . . . . . . . . . . . . . . . . . . . . . Using QLflash . . . . . . . . . . . . . . . . . . . . . . . . . . . . . . . . . . . . . . . . . . . Updating the Multi-boot Code . . . . . . . . . . . . . . . . . . . . . . . . . . . QLflash Command Line Options . . . . . . . . . . . . . . . . . . . . . . . . Fibre Channel Adapter Function Configuration Utility . . . . . . . . . . . . . Using Fast!UTIL for Custom Configuration. . . . . . . . . . . . . . . . . Using FCode for Custom Configuration (Oracle SPARC). . . . . . Using UEFI for Custom Configuration . . . . . . . . . . . . . . . . . . . . 3 2-2 2-2 2-2 2-2 2-2 2-3 2-3 2-3 2-10 2-13 Configuring Fibre Channel Installing Fibre Channel . . . . . . . . . . . . . . . . . . . . . . . . . . . . . . . . . . . . . . . . Installing Fibre Channel in Linux . . . . . . . . . . . . . . . . . . . . . . . . . . . . . Linux OS Support . . . . . . . . . . . . . . . . . . . . . . . . . . . . . . . . . . . . Supported Features . . . . . . . . . . . . . . . . . . . . . . . . . . . . . . . . . . Deploying the Driver . . . . . . . . . . . . . . . . . . . . . . . . . . . . . . . . . . Driver System Parameters . . . . . . . . . . . . . . . . . . . . . . . . . . . . . Boot from SAN . . . . . . . . . . . . . . . . . . . . . . . . . . . . . . . . . . . . . . Installing Fibre Channel in VMware ESX/ESXi . . . . . . . . . . . . . . . . . . ESXi OS Support . . . . . . . . . . . . . . . . . . . . . . . . . . . . . . . . . . . . Using the Driver . . . . . . . . . . . . . . . . . . . . . . . . . . . . . . . . . . . . . Installing Fibre Channel in Windows . . . . . . . . . . . . . . . . . . . . . . . . . . Windows OS Support . . . . . . . . . . . . . . . . . . . . . . . . . . . . . . . . . Using the Driver . . . . . . . . . . . . . . . . . . . . . . . . . . . . . . . . . . . . . Installing Fibre Channel in Solaris . . . . . . . . . . . . . . . . . . . . . . . . . . . . Solaris OS Support . . . . . . . . . . . . . . . . . . . . . . . . . . . . . . . . . . . Updating the Driver. . . . . . . . . . . . . . . . . . . . . . . . . . . . . . . . . . . Fibre Channel Adapter Parameters . . . . . . . . . . . . . . . . . . . . . . . . . . . . . . . Setting Fibre Channel Adapter Parameters with the QCC GUI. . . . . . Setting Fibre Channel Adapter Parameters with the Interactive QCC CLI . . . . . . . . . . . . . . . . . . . . . . . . . . . . . . . . . . . . . Setting Fibre Channel Adapter Parameters with the Noninteractive QCC CLI . . . . . . . . . . . . . . . . . . . . . . . . . . . . . . . . . . vi 2-1 3-1 3-1 3-1 3-1 3-1 3-1 3-2 3-2 3-2 3-2 3-3 3-3 3-3 3-3 3-3 3-3 3-4 3-4 3-4 3-4 FC0054609-00 B User’s Guide—Fibre Channel Adapter 2600 Series Target Persistent Binding . . . . . . . . . . . . . . . . . . . . . . . . . . . . . . . . . . . . . . . Configuring Persistent Binding with the QCC GUI . . . . . . . . . . . . . . . Configuring Persistent Binding with the Interactive QCC CLI . . . . . . . Configuring Persistent Binding with the Noninteractive QCC CLI . . . . Boot Devices Configuration . . . . . . . . . . . . . . . . . . . . . . . . . . . . . . . . . . . . . Configuring Boot Devices with the QCC GUI . . . . . . . . . . . . . . . . . . . Configuring Boot Devices with the Interactive QCC CLI . . . . . . . . . . . Configuring Boot Devices with the Noninteractive QCC CLI . . . . . . . . Configuring Boot Devices with the BIOS . . . . . . . . . . . . . . . . . . . . . . . Virtual Ports (NPIV) . . . . . . . . . . . . . . . . . . . . . . . . . . . . . . . . . . . . . . . . . . . Configuring NPIV with the QCC GUI . . . . . . . . . . . . . . . . . . . . . . . . . . Configuring NPIV with the Interactive QCC CLI . . . . . . . . . . . . . . . . . Configuring NPIV with the Noninteractive QCC CLI . . . . . . . . . . . . . . NPIV Quality of Service . . . . . . . . . . . . . . . . . . . . . . . . . . . . . . . . . . . . Setting QoS by Bandwidth . . . . . . . . . . . . . . . . . . . . . . . . . . . . . Setting QoS by Priority . . . . . . . . . . . . . . . . . . . . . . . . . . . . . . . . Driver Parameters . . . . . . . . . . . . . . . . . . . . . . . . . . . . . . . . . . . . . . . . . . . . Configuring Fibre Channel Driver Parameters with the QCC GUI. . . . Configuring Fibre Channel Driver Parameters with the Interactive QCC CLI . . . . . . . . . . . . . . . . . . . . . . . . . . . . . . . . . . . . . Configuring Fibre Channel Driver Parameters with the Noninteractive QCC CLI . . . . . . . . . . . . . . . . . . . . . . . . . . . . . . . . . . Configuring Fibre Channel Driver Parameters with the QLogic QConvergeConsole Plug-in for VMware vCenter Server . . . . . . . . . Selective LUNs. . . . . . . . . . . . . . . . . . . . . . . . . . . . . . . . . . . . . . . . . . . . . . . Out-of-Order Frame Reassembly. . . . . . . . . . . . . . . . . . . . . . . . . . . . . . . . . Configuring OoOFR with the QCC GUI . . . . . . . . . . . . . . . . . . . . . . . . Configuring OoOFR with the Interactive QCC CLI . . . . . . . . . . . . . . . Configuring OoOFR with the Noninteractive QCC CLI . . . . . . . . . . . . Personality Configuration . . . . . . . . . . . . . . . . . . . . . . . . . . . . . . . . . . . . . . . Troubleshooting . . . . . . . . . . . . . . . . . . . . . . . . . . . . . . . . . . . . . . . . . . . . . . Fibre Channel Diagnostics . . . . . . . . . . . . . . . . . . . . . . . . . . . . . . . . . Fibre Channel Diagnostics Using the QCC GUI . . . . . . . . . . . . . Fibre Channel Diagnostics Using the Interactive QCC CLI . . . . Fibre Channel Diagnostics Using the Noninteractive QCC CLI. . . . . . . . . . . . . . . . . . . . . . . . . . . . . . . . . . . . . . . . . . Fibre Channel Troubleshooting Diagram . . . . . . . . . . . . . . . . . . FC0054609-00 B 3-4 3-4 3-5 3-5 3-6 3-6 3-6 3-6 3-6 3-7 3-7 3-7 3-7 3-7 3-9 3-11 3-12 3-12 3-12 3-13 3-13 3-13 3-14 3-14 3-14 3-14 3-15 3-15 3-15 3-15 3-16 3-16 3-17 vii User’s Guide—Fibre Channel Adapter 2600 Series A Adapter LEDs Glossary Index List of Figures Figure Page i Server Motherboard and Slots . . . . . . . . . . . . . . . . . . . . . . . . . . . . . . . . . . . . . . . . . xviii 3-1 Priority and Bandwidth-Based QoS . . . . . . . . . . . . . . . . . . . . . . . . . . . . . . . . . . . . . 3-8 3-2 Setting the QoS by Bandwidth Percentage . . . . . . . . . . . . . . . . . . . . . . . . . . . . . . . 3-10 3-3 Setting the QoS by Bandwidth Speed . . . . . . . . . . . . . . . . . . . . . . . . . . . . . . . . . . . 3-11 3-4 Setting the QoS by Priority. . . . . . . . . . . . . . . . . . . . . . . . . . . . . . . . . . . . . . . . . . . . 3-12 3-5 Fibre Channel Troubleshooting Diagram (Part 1 of 2) . . . . . . . . . . . . . . . . . . . . . . . 3-17 3-6 Fibre Channel Troubleshooting Diagram (Part 2 of 2) . . . . . . . . . . . . . . . . . . . . . . . 3-18 A-1 QLE267x LEDs . . . . . . . . . . . . . . . . . . . . . . . . . . . . . . . . . . . . . . . . . . . . . . . . . . . . A-1 List of Tables Table 2-1 2-2 2-3 2-4 2-5 A-1 viii Adapter Settings. . . . . . . . . . . . . . . . . . . . . . . . . . . . . . . . . . . . . . . . . . . . . . . . . . . . Selectable Boot Settings . . . . . . . . . . . . . . . . . . . . . . . . . . . . . . . . . . . . . . . . . . . . . Advanced Adapter Settings . . . . . . . . . . . . . . . . . . . . . . . . . . . . . . . . . . . . . . . . . . . NVRAM Parameters (Oracle SPARC) . . . . . . . . . . . . . . . . . . . . . . . . . . . . . . . . . . . Diagnostic Commands (Oracle SPARC) . . . . . . . . . . . . . . . . . . . . . . . . . . . . . . . . . QLE267x LED Scheme . . . . . . . . . . . . . . . . . . . . . . . . . . . . . . . . . . . . . . . . . . . . . . Page 2-4 2-5 2-7 2-11 2-13 A-1 FC0054609-00 B Preface This guide provides detailed instructions on the installation, configuration, and troubleshooting of the QLE2670/QLE2672 adapters (referred to as the 2600 Series Adapters) for Windows®, Linux®, Oracle® Solaris®, VMware® ESX®/ESXi, and VMware vCenter Server. It also provides details on the use of QLogic adapter features to enhance the value of server virtualization. Such features include virtual adapter configuration using node port ID virtualization (NPIV) and boot-from-SAN configuration. NOTE i For a detailed list of the currently supported operating systems, refer to the adapter’s Readme and Release Notes on the QLogic Web site: http://driverdownloads.qlogic.com What Is in This Guide This guide is organized into the following sections and appendices: This Preface describes the intended audience, related materials, documentation conventions, license agreements, technical support, warranty, and regulatory information. The Quick Start section provides high-level hardware and software installation instructions for advanced users and additional resources. The Product Overview section provides a product introduction. The Installing Software and Initial Setup section provides information about the multi-boot image (Fibre Channel Adapter Function Configuration Utility). The Configuring Fibre Channel section describes installing the Fibre Channel driver and agent across OSs; setting 2600 Series Adapter parameters; persistent binding; configuring the boot device, NPIV, and driver parameters; reassembling out-of-order frames; configuring the interface type (personality); and troubleshooting Fibre Channel issues. The Adapter LEDs section describes the QLE267x LEDs and defines the LED behavior. The Glossary describes many of the terms used in this guide. FC0054609-00 B ix Preface Intended Audience Intended Audience This guide is intended for those responsible for deploying 2600 Series Adapters on Windows, Linux, Solaris, VMware ESX/ESXi, and VMware vCenter Server: from end users (such as data center managers and system administrators) to the test and development community. NOTE i For a detailed list of the currently supported operating systems, refer to the adapter’s Readme and Release Notes on the QLogic Web site: http://driverdownloads.qlogic.com Related Materials For additional information, refer to following documents (available on the Downloads and Documentation page of the QLogic Web site: http://driverdownloads.qlogic.com): 2600 Series Adapters Readme and Release Notes files, QConvergeConsole® User’s Guide, QConvergeConsole CLI User’s Guide QLogic QConvergeConsole Plug-in for VMware vCenter Server User’s Guide Documentation Conventions This guide uses the following documentation conventions: NOTE provides additional information. CAUTION without an alert symbol indicates the presence of a hazard that could cause damage to equipment or loss of data. Text in blue font indicates a hyperlink (jump) to a figure, table, or section in this guide, and links to Web sites are shown in underlined blue. For example: x Table 9-2 lists problems related to the user interface and remote agent. See “Installation Checklist” on page 3-6. For more information, visit www.qlogic.com. FC0054609-00 B Preface License Agreements Text in bold font indicates user interface elements such as a menu items, buttons, check boxes, or column headings. For example: Click Start, point to Programs, point to Accessories, and then click Command Prompt. Under Notification Options, select the Warning Alarms check box. Text in Courier font indicates a file name, directory path, or command line text. For example: To return to the root directory from anywhere in the file structure: Type cd /root and press the ENTER key. Enter the following command: # sh ./install.bin Key names and key strokes are indicated with UPPERCASE: Press the CTRL+P keys. Press the UP ARROW key. Text in italics indicates terms, emphasis, variables, or document titles. For example: For a complete listing of license agreements, refer to the QLogic Software End User License Agreement. What are shortcut keys? To enter the date type mm/dd/yyyy (where mm is the month, dd is the day, and yyyy is the year). Topic titles between quotation marks identify related topics either within this manual or in the online help, which is also referred to as the help system throughout this document. License Agreements Refer to the QLogic Software End User License Agreement for a complete listing of all license agreements affecting this product. Technical Support Customers should contact their authorized maintenance provider for technical support of their QLogic products. QLogic-direct customers may contact QLogic Technical Support; others will be redirected to their authorized maintenance provider. Visit the QLogic support Web site listed in Contact Information for the latest firmware and software updates. FC0054609-00 B xi Preface Technical Support For details about available service plans, or for information about renewing and extending your service, visit the Service Program web page at http://www.qlogic.com/services. Downloading Firmware and Documentation To download firmware and documentation: 1. Go to the QLogic Downloads and Documentation page: http://driverdownloads.qlogic.com. 2. Under QLogic Products, type the QLogic model name in the search box. Alternatively, you can use the selection boxes to obtain assistance in locating the firmware and documentation to download. 3. In the search results list, locate and select the firmware and documentation, for your product. 4. View the product details Web page to ensure that you have the correct firmware and documentation. Click the Read Me and Release Notes icons under Support Files for additional information. 5. Click Download Now. 6. Save the file to your computer. 7. If you have downloaded firmware, follow the installation instructions in the Readme file. Training QLogic Global Training maintains a Web site at www.qlogictraining.com offering online and instructor-led training for all QLogic products. In addition, sales and technical professionals may obtain Associate and Specialist-level certifications to qualify for additional benefits from QLogic. xii FC0054609-00 B Preface Warranty and Regulatory Information Contact Information QLogic Technical Support for products under warranty is available during local standard working hours excluding QLogic Observed Holidays. For customers with extended service, consult your plan for available hours. For Support phone numbers, see the Contact Support link at support.qlogic.com. Support Headquarters QLogic Corporation 4601 Dean Lakes Blvd. Shakopee, MN 55379 USA QLogic Web Site www.qlogic.com Technical Support Web Site http://support.qlogic.com Technical Support E-mail [email protected] Technical Training E-mail [email protected] Knowledge Database The QLogic knowledge database is an extensive collection of QLogic product information that you can search for specific solutions. QLogic is constantly adding to the collection of information in the database to provide answers to your most urgent questions. Access the database from the QLogic Support Center: http://support.qlogic.com. Warranty and Regulatory Information This section provides warranty and regulatory information for the following products: QLE2670 QLE2672 Warranty For warranty details, please check the QLogic Web site at http://www.qlogic.com/Support/Pages/Warranty.aspx. Regulatory Information This section contains the following information: FC0054609-00 B “Laser Safety” on page xiv “Agency Certification” on page xiv xiii Preface Warranty and Regulatory Information Laser Safety FDA Notice This product complies with DHHS Rules 21CFR Chapter I, Subchapter J. This product has been designed and manufactured according to IEC60825-1 on the safety label of laser product. CLASS I LASER Class 1 Laser Product Caution—Class 1 laser radiation when open Do not view directly with optical instruments Appareil laser de classe 1 Attention—Radiation laser de classe 1 Ne pas regarder directement avec des instruments optiques Produkt der Laser Klasse 1 Vorsicht—Laserstrahlung der Klasse 1 bei geöffneter Abdeckung Direktes Ansehen mit optischen Instrumenten vermeiden Luokan 1 Laserlaite Varoitus—Luokan 1 lasersäteilyä, kun laite on auki Älä katso suoraan laitteeseen käyttämällä optisia instrumenttej Agency Certification The following sections contain a summary of EMC/EMI test specifications performed on the QLogic adapter(s) to comply with radiated emission, radiated immunity, and product safety standards. EMI and EMC Requirements FCC Rules, CFR Title 47, Part 15, Subpart B: Class A FCC compliance information statement: This device complies with Part 15 of the FCC Rules. Operation is subject to the following two conditions: (1) this device may not cause harmful interference, and (2) this device must accept any interference received, including interference that may cause undesired operation. Industry Canada, ICES-003:2004: Class A This Class A digital apparatus complies with Canadian ICES-003. Cet appareil numérique de la classe A est conformé à la norme NMB-003 du Canada. xiv FC0054609-00 B Preface Warranty and Regulatory Information CE Mark 2004/108/EC EMC Directive compliance Emission Standards EN55022:2010/CISPR 22:2009+A1:2010: Class A EN55024:2010 EN61000-3-2:2006 A1+A2:2009 EN61000-3-3:2008 Immunity Standards EN55024:1998 EN61000-4-2 : ESD EN61000-4-3 : RF Electro Magnetic Field EN61000-4-4 : Fast Transient/Burst EN61000-4-5 : Fast Surge Common/Differential EN61000-4-6 : RF Conducted Susceptibility EN61000-4-8 : Power Frequency Magnetic Field EN61000-4-11 : Voltage Dips and Interrupt VCCI: 20011-04; Class A AS/NZS; CISPR 22:2009+A1:2010 Class A Korea Certification KC-RRA KN22 KN24 (2011) Class A Product Name/Model—2600 Series Adapter Certification Holder—QLogic Corporation Manufactured Date—Refer to date code listed on product Manufacturer/Country of Origin—QLogic Corporation/USA A class equipment (Business purpose info/ telecommunications equipment) As this equipment has undergone EMC registration for business purpose, the seller and/or the buyer is asked to beware of this point and in case a wrongful sale or purchase has been made, it is asked that a change to household use be made. Korean Language Format—Class A FC0054609-00 B xv Preface Warranty and Regulatory Information Product Safety Compliance UL, cUL Product Safety UL60950-1 (2nd Edition), 2007 CSA C22.2 60950-1-07 (2nd Edition) 2007 Use only with listed ITE or equivalent. Complies with 21 CFR 1040.10 and 1040.11. 2006/95/EC Low Voltage Directive TUV: TUV EN60950-1:2006+A11+A1+A12 2nd Edition TUV IEC 60950-1:2005 2nd Edition Am 1:2009 CB xvi FC0054609-00 B Quick Start Installation Instructions This Quick Start section describes how to install and configure your new 2600 Series Adapter in three simple steps: Step 1. Install the Adapter Hardware Step 2. Install the Adapter Drivers Step 3. Install QConvergeConsole Step 1. Install the Adapter Hardware To install the adapter hardware, you need to open the computer and locate the appropriate bus slot. If necessary, consult your computer system manual for instructions on how to remove the computer cover. To install the adapter hardware: 1. Power off the computer and all attached devices such as monitors, printers, and external components. 2. Disconnect the power cable. 3. Remove the computer cover and find an empty PCIe® 8 (or larger) bus slot. 4. Pull out the slot cover (if any) by removing the screw or releasing the lever. 5. Install the low-profile bracket (if required). FC0054609-00 B xvii Quick Start Installation Instructions 6. Grasp the adapter by the top edge and seat it firmly into the appropriate slot (see Figure i). LEVER ADAPTER SCREW ® ADAPTER RETAINING BRACKET SLOT COVERS PCI EXPRESS x8 (OR LARGER) SLOT REQUIRED FOR QLOGIC ADAPTERS SYSTEM CHASSIS Figure i. Server Motherboard and Slots 7. Refasten the adapter’s retaining bracket using the existing screw or lever. 8. Close the computer cover. 9. Plug the optical cable into the adapter. 10. Plug in the power cable and turn on the computer. Step 2. Install the Adapter Drivers To install the adapter drivers: 1. Go to the QLogic Downloads and Documentation page: http://driverdownloads.qlogic.com 2. Under QLogic Products, type the QLogic model name in the search box. Alternatively, you can use the selection boxes to obtain assistance in locating the driver to download. 3. In the search results list, locate and select the driver for your operating system. 4. View the product details Web page to ensure that you have the correct driver. Click the Read Me and Release Notes icons under Support Files for additional information. 5. xviii Click Download Now. FC0054609-00 B Quick Start Installation Instructions 6. Save the file to your computer. 7. Follow the installation instructions in the Readme file. Step 3. Install QConvergeConsole NOTE i If you are using Windows or Linux or Solaris, install QConvergeConsole (QCC) (GUI or CLI). If you are using VMware ESX/ESXi, install the QLogic QConvergeConsole Plug-in for VMware vCenter Server. See the QLogic QConvergeConsole Plug-in for VMware vCenter Server User’s Guide for details. To install QConvergeConsole (GUI or CLI): 1. Go to the QLogic Downloads and Documentation page: http://driverdownloads.qlogic.com 2. Under QLogic Products, type the QLogic model name in the search box. Alternatively, you can use the selection boxes to obtain assistance in locating the QConvergeConsole version to download. 3. In the search results list, locate and select the QConvergeConsole version for your operating system. 4. View the product details Web page to ensure that you have the correct QConvergeConsole version. Click the Read Me and Release Notes icons under Support Files for additional information. 5. Click Download Now. 6. Save the file to your computer. 7. Follow the installation instructions in the Readme file. To install the QLogic QConvergeConsole Plug-in for VMware vCenter Server: See the QLogic QConvergeConsole Plug-in for VMware vCenter Server User’s Guide for details. FC0054609-00 B xix Quick Start Additional Resources Additional Resources xx To obtain the most current drivers, management tools, user instructions, and documentation, visit the QLogic Web site at http://driverdownloads.qlogic.com and download the latest versions. See What Is in This Guide for descriptions of the user instructions provided in this document. For important product information, including warranty, laser safety, and agency certification, see the Warranty and Regulatory Information section. For descriptions and procedures related to QConvergeConsole (GUI only), use the built-in help system. FC0054609-00 B 1 Product Overview Functionality and Features This section provides the following information: Functional Description Features Supported Operating Systems Functional Description The QLE2670/QLE2672 adapters (referred to as the 2600 Series Adapters) are QLogic’s sixth generation Fibre Channel Adapters. They boast industry-leading native Fibre Channel performance—achieving dual-port, line-rate, 16-gigabit Fibre Channel throughput—at extremely low CPU use with full hardware offloads. This extreme performance eliminates potential I/O bottlenecks in today’s powerful multiprocessor, multicore servers. In addition, support for powerful virtualization features make this adapter ideal for virtualized environments that need excellent I/O performance to service growing numbers of virtual machines (VMs). Features The 2600 Series Adapters provide the following features: Device management for SAN Connectivity to 16Gb/8Gb/4Gb Fibre Channel networks Greater than 500,000 IOPS per port PCIe Gen3 4 and PCIe Gen2 8 Full hardware offload for the Fibre Channel protocol Message-signaled interrupts (MSI-X) and legacy interrupts (INT-X) NPIV Boot from SAN Several advanced management features for 2600 Series Adapters: QCC (GUI and CLI) is available if you are running Windows or Linux. The QLogic QConvergeConsole Plug-in for VMware vCenter Server is available if you are running VMware ESX/ESXi. Conversion to 10GbE Converged Network Adapter (future firmware upgrade) FC0054609-00 B 1-1 1–Product Overview Functionality and Features Supported Operating Systems The 2600 Series Adapters support commonly used operating systems, including Windows, Linux, Solaris, and VMware ESX/ESXi. For a detailed list of the currently supported operating systems, refer to the adapter’s Readme and Release Notes on the QLogic Web site: http://driverdownloads.qlogic.com Physical Characteristics The 2600 Series Adapters are implemented as low-profile PCIe cards. The adapters ship with a full-height bracket for use in a standard PCIe slot or an optional spare low-profile bracket for use in a low-profile PCIe slot. Low-profile slots are typically found in compact servers. Standards Specifications The 2600 Series Adapters support the following standards specifications: 1-2 Fibre Channel Tape (FC-TAPE) Profile SCSI Fibre Channel Protocol-4 (FCP-4) Second Generation Fibre Channel Generic Services (FC-GS-2) Third Generation Fibre Channel Generic Services (FC-GS-3) FC0054609-00 B 2 Installing Software and Initial Setup This section provides information about using QLflash, updating the multi-boot code, and using Fast!UTIL and FCode for custom configuration. NOTE i If you are using VMware ESX/ESXi, see the QLogic QConvergeConsole Plug-in for VMware vCenter Server User’s Guide for details on installation and initial setup. Fibre Channel Adapter SuperInstaller Installation The SuperInstaller is an easy-to-use utility that installs such components as the following: Fibre Channel, Fibre Channel over Ethernet (FCoE), iSCSI, and Ethernet networking drivers QConvergeConsole command line interface management tool Fibre Channel, FCoE, iSCSI, and networking management agents to enable remote access using the QConvergeConsole (GUI) management tool For installation instructions for the QLogic Windows SuperInstaller, refer to the QLogic Windows SuperInstaller Readme file for information. For installation instructions for the QLogic Linux SuperInstaller, refer to the QLogic Linux SuperInstaller Readme file for information. FC0054609-00 B 2-1 2–Installing Software and Initial Setup Multi-boot Image for Fibre Channel Adapter Function Configuration Utility Multi-boot Image for Fibre Channel Adapter Function Configuration Utility This section contains the following information: Multi-boot Package Contents Fibre Channel Adapter Function Configuration Utility Package Contents Using QLflash Fibre Channel Adapter Function Configuration Utility Multi-boot Package Contents The multi-boot package for 2600 Series Adapters is a compressed file that contains the Host Bus Adapter BIOS, unified extensible firmware interface (UEFI) code, and firmware. This package also includes the QLflash utility. Fibre Channel Adapter Function Configuration Utility Package Contents The following files are included for updating the adapter multi-boot code: update.bat—DOS batch file that calls the executable files to update the adapter multi-boot QLflash.exe—Utility to update the multi-boot code and firmware DOS4GW.exe—File required to use the QLflash.exe hldyyyyyy.bin—Combined binary file, which includes the binaries for the BIOS, UEFI, and firmware Using QLflash QLflash is a native DOS utility. Refer to the Readme file for more information. To run this utility, boot to a DOS hard drive or a USB removable drive. Utility version: /VER = Display version of the QLflash utility Help options: /? = Help menu Updating the Multi-boot Code To write the multi-boot code to Flash memory: 1. 2-2 Insert the 2600 Series Adapter in the system. a. Create a DOS bootable USB. b. Copy the extracted multi-boot code. FC0054609-00 B 2–Installing Software and Initial Setup Multi-boot Image for Fibre Channel Adapter Function Configuration Utility 2. Boot to DOS. 3. Run the update script at the command prompt: C:\>update.bat This script program updates the multi-boot image on the adapter. 4. Reboot the system. NOTE You can also use QCC GUI/CLI plug-in to update the multi-boot image, depending on the OS. QLflash Command Line Options When you are running QLflash.exe, type /? for help. Fibre Channel Adapter Function Configuration Utility This section provides detailed configuration information for advanced users who want to customize the configuration of the 2600 Series Adapter and the connected devices. You can configure the 2600 Series Adapter using Fast!UTIL, FCode, or UEFI: Use Fast!UTIL in a pre-OS environment. Use FCode for Oracle SPARC® systems. Use UEFI for Dell®, IBM®, and Oracle x64 OEM adapters (where the platform supports UEFI). Using Fast!UTIL for Custom Configuration NOTE The Fast!UTIL BIOS utility does not run on Oracle SPARC systems. To access Fast!UTIL, press ALT+Q or CTRL+Q during the Host Bus Adapter BIOS initialization (it may take a few seconds for the Fast!UTIL menu to appear). When the Select Host Adapter window appears, select the adapter type to continue to the Adapter Settings window. After you have selected the adapter settings, a window appears indicating that the configuration settings have been modified. After you click Save changes, Fast!UTIL reboots your system to load the new parameters. CAUTION If the configuration settings are incorrect, your 2600 Series Adapter may not function properly. FC0054609-00 B 2-3 2–Installing Software and Initial Setup Multi-boot Image for Fibre Channel Adapter Function Configuration Utility The Fast!UTIL Options menu provides the following options: Configuration Settings Scan Fibre Devices Fibre Disk Utility Loopback Data Test Select Adapter Personality Exit Fast!UTIL Configuration Settings The following topics show and describe the 2600 Series Adapters configuration settings: Adapter Settings Selectable Boot Settings Restore Default Settings Raw NVRAM Data Advanced Adapter Settings Adapter Settings Table 2-1 describes the adapter settings. Table 2-1. Adapter Settings Setting 2-4 Values Default Description Host Bus Adapter BIOS Enabled/ Disabled Disabled Disabling this setting disables the ROM BIOS on the 2600 Series Adapter, which frees space in upper memory. If you are booting from a Fibre Channel disk drive attached to the 2600 Series Adapter, you must enable this setting. See “Selectable Boot Settings” on page 2-5 for details on specifying the boot device. Frame Size 512/1024/ 2048 2048 This setting specifies the maximum frame length supported by the 2600 Series Adapter. Loop Reset Delay 0–60 seconds 5 seconds After resetting the loop, the firmware refrains from initiating any loop activity for the number of seconds specified in this setting. Adapter Hard Loop ID Enabled/ Disabled Disabled If the Adapter Hard Loop ID setting is enabled, the adapter attempts to use the ID specified in the Hard Loop ID setting. Hard Loop ID 0–125 0 If the Adapter Hard Loop ID setting is enabled, the adapter attempts to use the ID specified in this setting. FC0054609-00 B 2–Installing Software and Initial Setup Multi-boot Image for Fibre Channel Adapter Function Configuration Utility Table 2-1. Adapter Settings (Continued) Setting Values Default Description Spin Up Delay Enabled/ Disabled Disabled When this setting is enabled, the BIOS waits up to two minutes to find the first drive. Connection Options 0/1/2 2 This setting defines the type of connection: 0—loop only (for the 4Gb and 8Gb data rate) 1—point-to-point only (for the 4Gb, 8Gb, and 16Gb data rate) 2—loop preferred, then point-to-point (for the 4Gb, 8Gb, and 16Gb data rate) Fibre Channel Tape Support Enabled/ Disabled Data Rate 2/3/4/5 Enabled This setting enables FCP-2 recovery. 2 This setting determines the data rate: 2—The adapter auto-negotiates and determines the data rate. 3—The adapter runs at 4Gbps. 4—The adapter runs at 8Gbps. 5—The adapter runs at 16Gbps. Loop mode is not supported. Selectable Boot Settings The Configuration Settings menu provides access to the Selectable Boot Settings option. If you enable the Host Bus Adapter BIOS in the adapter settings, you can select the boot device, as shown in Table 2-2. Table 2-2. Selectable Boot Settings Enable Selectable Boot Boot WWPN/ LUN No — The BIOS configures the first disk drive it finds as the boot device. Yes None specified The BIOS configures the first disk drive it finds that is also LUN 0 as the boot device. FC0054609-00 B Device Boot 2-5 2–Installing Software and Initial Setup Multi-boot Image for Fibre Channel Adapter Function Configuration Utility Table 2-2. Selectable Boot Settings (Continued) Enable Selectable Boot Boot WWPN/ LUN Yes Specified Device Boot The BIOS scans through the specified boot worldwide port name (WWPN)/LUN list until it finds a disk drive. This drive is configured as the boot device. This option allows you to specify up to four WWPNs/LUNs as boot devices. To enable the Selectable Boot option and insert devices into the boot device locations: 2-6 1. On the Configuration Settings menu, select Host Adapter Settings. 2. Enable the Host Bus Adapter BIOS and then press the ESC key to return to the Configuration Settings menu. 3. On the Configuration Settings menu, select Selectable Boot Settings. 4. Press the ENTER key to enable or disable (toggle) the Selectable Boot option. Use the DOWN ARROW key to move to the Primary location of the Selectable Boot List menu. 5. Press the ENTER key to see a list of accessible devices (in the Select Fibre Channel Device menu). 6. Select a drive (using the UP ARROW and DOWN ARROW keys or the PAGE UP and PAGE DOWN keys to scroll to the device you want to put into your Selectable Boot menu list) and then press the ENTER key to select the requested device and load it into the Selectable Boot menu list. 7. To specify an alternate boot device on the 2600 Series Adapter, use the arrow keys to move to the next available alternate entry, press the ENTER key, select the disk drive you want, and press the ENTER key. You can specify up to three alternate boot devices in this way. FC0054609-00 B 2–Installing Software and Initial Setup Multi-boot Image for Fibre Channel Adapter Function Configuration Utility NOTE System BIOS Compatibility: To boot from a QLogic host 2600 Series Adapter in a computer system with a multi-boot system BIOS, the 2600 Series Adapter must be included in the list of bootable devices in the system’s Boot menu. Solaris x86 Boot from a SAN: To boot from a Fibre Channel drive connected to a QLogic host 2600 Series Adapter, reboot the system and enter Fast!UTIL. Enter the Selectable Boot menu, enable the selectable boot and insert the boot drive in the primary location of the Selectable Boot menu before performing the OS (Solaris x86) installation. For these boot-from-SAN configurations, the Solaris x86 QLogic Corporation (QLC) driver supports booting only from the Primary location. The driver does not attempt to boot from the Alternate 1, Alternate 2, and Alternate 3 entries. Restore Default Settings The Restore Defaults option from the Configuration Settings menu restores the BIOS settings back to default. Raw NVRAM Data This option displays the 2600 Series Adapter’s NVRAM contents in hexadecimal format. This is a QLogic troubleshooting tool. You cannot modify the raw NVRAM data. Advanced Adapter Settings On the Configuration Settings menu in Fast!UTIL, select Advanced Adapter Settings. Table 2-3 describes the default settings for the 2600 Series Adapter. Table 2-3. Advanced Adapter Settings Setting Values Default Description LUNs per Target 0/8/16/32/ 64/128/ 256 128 This setting specifies the number of LUNs supported per target if the target does not support the Report LUN command. Multiple LUN support is typically for redundant array of independent disks (RAID) boxes that use LUNs to map drives. FC0054609-00 B 2-7 2–Installing Software and Initial Setup Multi-boot Image for Fibre Channel Adapter Function Configuration Utility Table 2-3. Advanced Adapter Settings (Continued) Setting Enable LIP Reset Values Yes/No Default Description No This setting determines the type of LIP reset used when the OS initiates a bus reset routine as follows: Yes = The driver initiates a global LIP reset to reset the target devices. No = The driver initiates a global LIP reset with full login. Enable LIP Full Login Yes/No Yes When this setting is Yes, the 2600 Series Adapter’s reduced instruction set computer (RISC) controller log in to all ports after any LIP. Enable Target Reset Yes/No Yes When this setting is Yes, the drivers issue a Target Reset command to all devices on the loop when a SCSI Bus Reset command is issued. Login Retry Count 0–255 8 This setting specifies the number of times the software tries to log in to a device. Port Down Retry Count 0–255 seconds 30 seconds This setting specifies the number of seconds the software waits before resending a command to a port whose status indicates that the port is down. Link Down Timeout 0–255 seconds 30 seconds This setting specifies the number of seconds the software waits for a link that is down to come up. Operation Mode 0/5/6 6 This setting specifies the reduced interrupt operation (RIO) modes if they are supported by the software driver. The RIO modes allow posting multiple command completions in a single interrupt. This setting supports the following modes: 0—Interrupt for every I/O completion 5—Interrupt when the interrupt delay timer expires 6—Interrupt when the interrupt delay timer expires or no active I/Os Interrupt Delay Timer 2-8 0–255 (100s units) 2 (200s) This setting contains the value used by a timer to set the wait time before generating an interrupt. FC0054609-00 B 2–Installing Software and Initial Setup Multi-boot Image for Fibre Channel Adapter Function Configuration Utility Table 2-3. Advanced Adapter Settings (Continued) Setting Enable Interrupt Values Yes/No Default No Description This setting enables or disables the interrupt: Yes—This setting enables the BIOS to use the interrupt request (IRQ) assigned to the 2600 Series Adapter. No—The BIOS polls for the 2600 Series Adapter's RISC controller mailbox command completion status. EV Controller Order Enabled/ Disabled Disabled This setting enables BIOS compatibility with older HP® (G3) systems such as the ML370G3, DL360G3, and DL380G3. In the default setting, the Host Bus Adapter BIOS loads in any CMOS location, allowing the system to boot off a Fibre Channel drive even after other devices, such as a CD-ROM. When enabled, the QLogic BIOS loads only if the 2600 Series Adapter is selected as the first controller in the system BIOS\boot controller order. Scan Fibre Devices This option scans the Fibre Channel loop and lists all the connected devices by loop ID. It lists information about each device; for example, vendor name, product name, and revision. This information helps when configuring your 2600 Series Adapter and attached devices. Fibre Disk Utility This option scans the Fibre Channel loop and lists all the connected devices by loop ID. You can select a Fibre Channel hard disk and do one of the following tasks: Perform a low-level format Verify the disk media Verify the disk data (Some targets do not support this feature.) Select a disk device CAUTION Performing a low-level format destroys all data on the disk. FC0054609-00 B 2-9 2–Installing Software and Initial Setup Multi-boot Image for Fibre Channel Adapter Function Configuration Utility Loopback Data Test This option allows you to perform loopback tests. You can select one of the following loopback tests: External loopback data test Internal loopback data test NOTE When running an external loopback data test, make sure that the Fibre Channel link is up or a loopback plug is attached to the 2600 Series Adapter before starting the test. Select Adapter If you have a multi-port or multiple 2600 Series Adapters in your system, use this option to select and then configure or view the settings of a specific 2600 Series Adapter or one of its ports. Personality NOTE i Dual personality will be enabled with a firmware upgrade. Please check with QLogic. This option changes the interface type (personality) between Fibre Channel Adapter and Converged Network Adapter. See the Glossary for a definition of personality. NOTE You must reboot for the new personality to take effect. If you change the personality of your adapter, you must also change the optical modules. Exit Fast!UTIL This option allows you to exit the utility and reboot the system. After making changes to the 2600 Series Adapter in Fast!UTIL, make sure you save the changes before you reboot the system. Using FCode for Custom Configuration (Oracle SPARC) For additional information, see the FCode for ORACLE_SPARC FC and FCoE Adapters Readme file. You can use FCode for selecting the 2600 Series Adapter device, setting and viewing NVRAM parameters, and running diagnostic commands. 2-10 FC0054609-00 B 2–Installing Software and Initial Setup Multi-boot Image for Fibre Channel Adapter Function Configuration Utility Setting and Viewing NVRAM Parameters Table 2-4 describes the NRAM parameters that you can set and view. Table 2-4. NVRAM Parameters (Oracle SPARC) Command Values Description show-commands N/A This command lists all NVRAM and diagnostic commands. show-settings N/A This command shows the current value of all of the NVRAM parameters, as well as the version, serial number, and adapter worldwide name. set-connection-mode 0, 1, 2 This command allows you to change or view the current host adapter Fibre Channel connection mode: 0—Loop only 1—Point-to-point only 2—Loop preferred; otherwise, point-to-point set-data-rate 2, 3, 4, 5 This command allows you to change or view the current host adapter Fibre Channel connection mode: 2—Auto-negotiated 3—4Gbps 4—8Gbps 5—16Gbps set-fc-mode qla, qlc This command allows you to set and view the FCode operation mode: qla—The qla mode requires a driver named QLA2300 or QLAxxxx. qlc—The qlc mode requires a driver named QLCxxxx. set-login-count 1h–FFh This command sets the Login Retry Count field in the initialize firmware control block (IFCB). This field specifies the number of login retries attempted by the firmware. The default value is 8h. set-link-timeout 2h–FFh This command determines the number of seconds to wait for the link to come up. The default value is 30 seconds (1Eh). FC0054609-00 B 2-11 2–Installing Software and Initial Setup Multi-boot Image for Fibre Channel Adapter Function Configuration Utility Table 2-4. NVRAM Parameters (Oracle SPARC) (Continued) Command Values Description set-port-down-count 1h–FFh This command determines the number of retries for the Start, Read, and Write SCSI commands. The default value is 30h. set-max-frame-size 1, 2, 3 This command sets the Maximum Frame Length field in the IFCB: 1—512 2—1024 3—2048. This setting is the default. set-boot-wait-time 8–65535 This command adjusts the time to wait in seconds for the boot device to become online. The default value is DISABLED, which sets it to 8 seconds. The maximum value is 65,535 seconds (18 hours, 6 minutes). The minimum value is 8 seconds, same as when disabled. Because this wait time can be very long, the boot process cap be aborted at any time by pressing the ESCAPE key. restore-default-settings NA This command restores the default values of all NVRAM parameters used by the FCode, except the fc-mode (FCode operation mode) and the boot-wait-time. set-personality FC, CNA This command sets or clears bits in the feature configuration section of the Flash memory, which controls the card personality. A power cycle is required for a change to take effect. Dual personality is currently disabled and will be enabled in a future firmware upgrade. FC—Fibre Channel only CNA—Converged Network Adapter 2-12 FC0054609-00 B 2–Installing Software and Initial Setup Multi-boot Image for Fibre Channel Adapter Function Configuration Utility Running Diagnostic Commands Table 2-5 describes the diagnostic commands. Table 2-5. Diagnostic Commands (Oracle SPARC) Command Description version This command lists the FCode version. beacon This command flashes an adapter’s LED. selftest This command tests the adapter’s memory and loopback. ext-loopback-test This command tests the external loopback. show-children This command lists all attached targets. disk-test This command tests a selected target. sel-dev This command selects a device for disk test. sel-lun This command selects the LUN number for disk test. Using UEFI for Custom Configuration Refer to the relevant server vendor documentation for details. FC0054609-00 B 2-13 2–Installing Software and Initial Setup Multi-boot Image for Fibre Channel Adapter Function Configuration Utility 2-14 FC0054609-00 B 3 Configuring Fibre Channel This section describes the driver and agent installation, configuration, operation, and troubleshooting of the Fibre Channel function of the 2600 Series Adapters. Installing Fibre Channel Installing Fibre Channel in Linux Refer to the Fibre Channel Adapter and Converged Network Adapter Inbox Driver Update for Linux Kernel 2.6.x and 3.x Readme file for information. Linux OS Support To obtain the latest information about supported operating systems, visit the QLogic Web site at http://driverdownloads.qlogic.com and download the associated Readme files and Release Notes. Supported Features The Fibre Channel Adapter and Converged Network Adapter Inbox Driver for Linux Kernel 2.6.x and 3.x supports the following: FCAL—direct attach loop, point-to-point, and fabric topologies Initiator mode only Fibre Channel tape MSI-X NPIV Device mapper Support for sysfs interface Support for an adapter API Deploying the Driver Refer to the Fibre Channel Adapter and Converged Network Adapter Inbox Driver Update for Linux Kernel 2.6.x and 3.x Readme file for information. Driver System Parameters Refer to the Fibre Channel Adapter and Converged Network Adapter Inbox Driver Update for Linux Kernel 2.6.x and 3.x Readme file for information. FC0054609-00 B 3-1 3–Configuring Fibre Channel Installing Fibre Channel Boot from SAN Booting from SAN means booting the OS from a Fibre Channel target device. QLogic recommends using the QLogic inbox driver to install the OS to the Fibre Channel target device that is attached to a QLogic adapter. If there is no QLogic inbox driver that supports the adapter, you should use a DD-kit to boot from SAN. NOTE The following procedure is only for RHEL 5.0 and later distributions. To boot from SAN when installing to a LUN other than LUN 0 and LUN 0 is present: 1. On the Boot Loader Configuration screen, select Configure Advance Boot Loader and then click Next. 2. On the Advanced Boot Loader Configuration screen, select Change Drive Order. 3. On the Edit Drive Order window, move the entry for the boot LUN. 4. To continue, click OK. 5. Continue with the OS installation as usual. Installing Fibre Channel in VMware ESX/ESXi Refer to the Readme file and Release Notes for VMware ESX/ESXi 4.x and 5.x for information. NOTE For specific service packs (SPs) and OS updates, refer to the descriptions where this software version is posted on the QLogic Web site: http://driverdownloads.qlogic.com ESXi OS Support To obtain the latest information about supported operating systems, visit the QLogic Web site at http://driverdownloads.qlogic.com and download the associated Readme files and Release Notes. Using the Driver Refer to the Readme file for VMware ESX/ESXi 4.x and 5.x for information on how to install the driver and remove the driver. 3-2 FC0054609-00 B 3–Configuring Fibre Channel Installing Fibre Channel Installing Fibre Channel in Windows Refer to the Fibre Channel Adapter STOR Miniport Driver Readme file for information. Windows OS Support To obtain the latest information about supported operating systems, visit the QLogic Web site at http://driverdownloads.qlogic.com and download the associated Readme files and Release Notes. Using the Driver Refer to the Fibre Channel Adapter STOR Miniport Driver Readme file for information on how to create the driver disk, install the driver, and remove the driver. Installing Fibre Channel in Solaris The Solaris drivers for this adapter are inbox in the Solaris OS. Refer to the OS documentation for further Solaris-specific information. NOTE i For a detailed list of the currently supported operating systems, refer to the adapter’s Readme and Release Notes on the QLogic Web site: http://driverdownloads.qlogic.com Solaris OS Support To obtain the latest information about supported operating systems, visit the QLogic Web site at http://driverdownloads.qlogic.com. Updating the Driver Refer to the Solaris OS documentation for information on how to create the driver disk, install the driver, and remove the driver. FC0054609-00 B 3-3 3–Configuring Fibre Channel Fibre Channel Adapter Parameters Fibre Channel Adapter Parameters Setting Fibre Channel Adapter Parameters with the QCC GUI Refer to the topic about managing Fibre Channel and FCoE adapter ports in the QConvergeConsole Help System for information. Setting Fibre Channel Adapter Parameters with the Interactive QCC CLI To set Fibre Channel Adapter parameters with the interactive QCC CLI: 1. On the Fibre Channel Adapter Configuration menu, select HBA Parameters. 2. On the port menu, select a port to open the HBA Parameters menu. 3. On the HBA Parameters menu, select the Configure HBA Parameters option to open the Configure Parameters menu. Refer to the section about the Fibre Channel interactive commands in the QConvergeConsole CLI User’s Guide for more information. Setting Fibre Channel Adapter Parameters with the Noninteractive QCC CLI Refer to the section about Fibre Channel noninteractive commands in the QConvergeConsole CLI User’s Guide for information. Target Persistent Binding NOTE Target persistent binding is supported for only Windows and Solaris. Configuring Persistent Binding with the QCC GUI To bind target devices attached to an adapter port using the QCC GUI: 3-4 1. In the system tree, expand a Fibre Channel node. 2. For a 2600 Series Adapter, select the physical port number in the system tree. 3. Click the Targets tab and then click the Target Persistent Binding subtab. 4. Click the Bind All check box to bind all the devices listed to adapter ports. FC0054609-00 B 3–Configuring Fibre Channel Target Persistent Binding 5. Click the Bind check box if you want to configure a specific port and bind it to the target ID that you have selected from the Target ID list. If you do not want to configure the port, clear the check box. If you clear the check box, the corresponding port is unconfigured. 6. Click Save to save the configuration changes. The Security Check dialog box may appear. 7. In the Enter Password box, type the password and click OK. The system overwrites any previously saved configuration for the current adapter and displays a message box. 8. Click OK to close the message box. Refer to the topic about binding target devices in the QConvergeConsole Help System for more information. Configuring Persistent Binding with the Interactive QCC CLI To bind a target using the interactive QCC CLI: 1. On the Fibre Channel Adapter Configuration menu, select Target Persistent Bindings. 2. On the port menu, select a port and then select Bind Target(s) to bind a target to a port. 3. Select a target and specify a target ID to open the Target Persistent Binding – FC Port Configuration menu with options to select more targets, save changes, or cancel the binding operation. Refer to the section about Fibre Channel interactive commands in the QConvergeConsole CLI User’s Guide for more information. Configuring Persistent Binding with the Noninteractive QCC CLI Type the following command to bind a selected target to a specific adapter: # qaucli -pr fc -p (<hba instance> | <hba wwpn>) (<target wwnn> <target wwpn> <target port id> <target id>) Where: hba instance = Adapter number (use the -g command to find) hba wwnn = Worldwide node name of the adapter hba wwpn = Worldwide port name of the adapter target wwnn = Worldwide node name of the target target wwpn = Worldwide port name of the target FC0054609-00 B 3-5 3–Configuring Fibre Channel Boot Devices Configuration target port id = Port ID of the target target id = ID to which the target is bound Refer to the section about Fibre Channel noninteractive commands in the QConvergeConsole CLI User’s Guide for information. Boot Devices Configuration Configuring Boot Devices with the QCC GUI Refer to the topics about HBA parameters, viewing or modifying port parameters, and boot device selection in the QConvergeConsole Help System for information. Configuring Boot Devices with the Interactive QCC CLI On the Fibre Channel Adapter Configuration menu, select Boot Devices Configuration to open the Boot Device Settings menu with options to view and configure boot devices. Refer to the section about the Fibre Channel interactive commands in the QConvergeConsole CLI User’s Guide for information. Configuring Boot Devices with the Noninteractive QCC CLI Type the following command to set a specific target as the boot device for a specific adapter: # qaucli -pr fc -e (<hba instance> | <hba wwpn>) <target wwnn> <target wwpn> <target id> <lun id> Where: hba instance = Adapter number (use the -g command to find) hba wwpn = Worldwide port name of the adapter target wwnn = Worldwide node name of the target target wwpn = Worldwide port name of the target target id = ID to which the target is bound lun id = ID of the LUN Refer to the “Fibre Channel Noninteractive Commands” section of the QConvergeConsole CLI User’s Guide for more information. Configuring Boot Devices with the BIOS Refer to Fibre Channel Adapter Function Configuration Utility for information. 3-6 FC0054609-00 B 3–Configuring Fibre Channel Virtual Ports (NPIV) Virtual Ports (NPIV) Configuring NPIV with the QCC GUI Refer to the topic about using virtualization (NPIV) in the QConvergeConsole Help System for information. Configuring NPIV with the Interactive QCC CLI Refer to the QConvergeConsole CLI User’s Guide for information. Configuring NPIV with the Noninteractive QCC CLI Type the following command to create a virtual port with an automatic WWPN: # qaucli -pr fc -vp (<hba instance> | <hba wwpn>) create auto Where: hba instance = Adapter number (use the -g command to find) hba wwpn = Worldwide port name of the adapter Refer to the section about Fibre Channel noninteractive commands in the QConvergeConsole CLI User’s Guide for more information. NPIV Quality of Service The QLogic 2600 Series Adapters solution provides for standards-based quality of service (QoS), ensuring high-quality performance for applications that require preferential delivery. The QLogic QoS solution is based on assigning QoS levels to virtual ports (NPIV ports). You can configure the QoS using the priority method or the bandwidth method, as shown in Figure 3-1. On a single physical port, you can configure QoS using the priority method or the bandwidth method but not both. FC0054609-00 B 3-7 3–Configuring Fibre Channel Virtual Ports (NPIV) Figure 3-1. Priority and Bandwidth-Based QoS The priority method assigns priority levels (low, medium, or high) to virtual ports based on the quality of service required for the applications or VMs using the virtual port. This method provides for various levels of latency requirements across virtual ports. The bandwidth method assigns a bandwidth percentage (0–100) or a bandwidth rate (16Gb) to applications or VMs that are using a virtual port. This method provides a minimum bandwidth guarantee. The bandwidth-based QoS configuration applies only when the total bandwidth requirement of the applications exceeds the available bandwidth. The bandwidth is not reserved for a particular virtual port, and unused bandwidth is shared among the other virtual ports. The physical port or WWN always has high priority, independent of the bandwidth or priority scheme chosen for created virtual ports. You need not assign a QoS level to every virtual port that you create. If a QoS level is not assigned to a virtual port, the default is low priority (best effort), independent of the bandwidth or priority scheme. This flexibility allows you to focus on critical applications to ensure that the highest service level is provided. You can modify QoS levels for virtual ports using the QConvergeConsole CLI. To modify QoS levels, the configuration must meet the following hardware and software requirements: 3-8 Server operating system: Microsoft® Windows Server® 2008 or later Server support for MSI-X A QLogic 2600 Series Adapter Latest version of the QLogic STOR miniport driver available from http://driverdownloads.qlogic.com FC0054609-00 B 3–Configuring Fibre Channel Virtual Ports (NPIV) Fibre Channel switch that supports NPIV Physical port attached in a point-to-point connection Setting QoS by Bandwidth Setting the QoS by bandwidth allocates up to 80 percent of the physical port’s bandwidth to its virtual ports. The remaining 20 percent is reserved to handle non-QoS applications and virtual ports. Setting QoS by bandwidth guarantees bandwidth for each virtual port and to the application or VM associated with that virtual port. The proper QoS setting can prevent bottlenecks that occur when VMs contend for port bandwidth. Consider how much bandwidth is required to maximize application or VM performance and set the QoS level to 105 percent of that value. For example, if a mission-critical application on a VM requires 1Gb of bandwidth to transmit its data over the fabric, the recommended bandwidth for the virtual port would be 1.05Gb. Alternatively, the virtual port QoS values can be set as a percentage of the total available bandwidth. NOTE Setting QoS by bandwidth guarantees a minimum bandwidth to a virtual port but not a maximum limit. If the application/virtual port requires more bandwidth than the QoS bandwidth value allows and the physical port has available bandwidth, the application receives the additional bandwidth. The port allocates additional bandwidth on demand up to the port capacity or until there is contention for bandwidth among the virtual ports. When the physical port is partitioned into four virtual ports, the port bandwidth is divided between the virtual ports according to traffic demands. The QConvergeConsole lets you set QoS for each virtual port by setting minimum and maximum percentages of the physical port’s bandwidth for each virtual port. Using this feature lets you guarantee a transmission rate for each port that requires a particular bandwidth to run mission-critical applications for business continuity using virtual ports. The setting for a given QoS can resolve bottlenecks that exist when VMs contend for port bandwidth. To set the QoS by bandwidth percentage: 1. Expand a 2600 Series Adapter in the QConvergeConsole system tree. 2. Select a virtual port. 3. Select the QoS tab. 4. On the QoS Type menu, select Bandwidth. 5. On the View By menu, select Bandwidth Percentage. FC0054609-00 B 3-9 3–Configuring Fibre Channel Virtual Ports (NPIV) 6. Use the slider to select the percentage, as shown in Figure 3-2. Select between 1 percent to 100 percent to set the bandwidth you want to guarantee for data transferred over the selected virtual port. Phy QLE2672 0: Virt QLE2672 0: Virt QLE2672 1: Figure 3-2. Setting the QoS by Bandwidth Percentage 7. Click Save. To set the QoS by bandwidth speed: 3-10 1. Expand a 2600 Series Adapter in the QConvergeConsole system tree. 2. Select a virtual port. 3. Select the QoS tab. 4. On the QoS Type menu, select Bandwidth. 5. On the View By menu, select Bandwidth Speed. FC0054609-00 B 3–Configuring Fibre Channel Virtual Ports (NPIV) 6. Use the slider to select the bandwidth speed, as shown in Figure 3-3. Phy QLE2672 12: Virt QLE2672 0: Virt QLE2672 1: Virt QLE2672 2: Virt QLE2672 3: Figure 3-3. Setting the QoS by Bandwidth Speed 7. Click Save. Setting QoS by Priority To set the QoS by priority: 1. Expand a 2600 Series Adapter in the QConvergeConsole system tree. 2. Select a virtual port. 3. Select the QoS tab. 4. On the QoS Type menu, select Priority. FC0054609-00 B 3-11 3–Configuring Fibre Channel Driver Parameters 5. Use the slider to select a low, medium, or high priority, as shown in Figure 3-4. Phy QLE2672 0: Virt QLE2672 0: Virt QLE2672 1: Figure 3-4. Setting the QoS by Priority 6. Click Save. Driver Parameters Configuring Fibre Channel Driver Parameters with the QCC GUI Refer to the topics about HBA parameters and viewing or modifying port parameters in the QConvergeConsole Help System for information. Configuring Fibre Channel Driver Parameters with the Interactive QCC CLI To configure Fibre Channel driver parameters using the interactive QCC CLI: 3-12 1. On the Fibre Channel Adapter Configuration menu, select HBA Parameters. 2. On the port menu, select a port to open the HBA Parameters menu. FC0054609-00 B 3–Configuring Fibre Channel Selective LUNs 3. On the HBA Parameters menu, select Configure HBA Parameters to open the Configure Parameters menu with options to configure connection options, data rate, frame size, hard loop ID, loop reset delay, BIOS, Fibre Channel tape support, operation mode, interrupt delay timer, login retry count, port down retry count, LIP full login, link down timeout, target reset, LUNS per target, and receive out-of-order frames. Refer to the section about the Fibre Channel interactive commands in the QConvergeConsole CLI User’s Guide for information. Configuring Fibre Channel Driver Parameters with the Noninteractive QCC CLI Type the following command to configure the driver settings: # qaucli -pr fc -fs (<hba instance> | <hba wwpn>) {(<param name> | <param alias>) <param value>} Where: hba instance = Adapter instance number of an adapter port (use the -g command to find) hba wwpn = Worldwide port name of the adapter param name = Name of the parameter param alias = Alias of the parameter param value = New value of the parameter Refer to the section about the Fibre Channel noninteractive commands in the QConvergeConsole CLI User’s Guide for information. Configuring Fibre Channel Driver Parameters with the QLogic QConvergeConsole Plug-in for VMware vCenter Server See the QLogic QConvergeConsole Plug-in for VMware vCenter Server User’s Guide for details on how to configure the Fibre Channel driver parameters. Selective LUNs The QCC GUI cannot be used for configuring selective LUNs. To configure selective LUNs with the interactive QCC CLI, refer to the section about the Fibre Channel interactive commands in the QConvergeConsole CLI User’s Guide. To configure selective LUNs with the noninteractive QCC CLI, refer to the section about the Fibre Channel noninteractive commands in the QConvergeConsole CLI User’s Guide. FC0054609-00 B 3-13 3–Configuring Fibre Channel Out-of-Order Frame Reassembly Out-of-Order Frame Reassembly Out-of-order frame reassembly (OoOFR) reassembles out-of-order frames as they are received, minimizing network congestion by eliminating the re-transmission of frames and exchanges. Configuring OoOFR with the QCC GUI To enable OoOFR with the QCC GUI: 1. In the QConvergeConsole system tree, select a Fibre Channel port. 2. Click Parameters. 3. Select the Advanced HBA Parameters subtab. 4. Select the Enable Receive Out of Order Frame check box. Configuring OoOFR with the Interactive QCC CLI To enable OoOFR with the interactive QCC CLI: 1. On the Fibre Channel Adapter Configuration menu, select HBA Parameters. 2. On the port menu, select a port to open the HBA Parameters menu. 3. On the HBA Parameters menu, select Configure HBA Parameters to open the Configure Parameters menu. 4. Select 13: Enable Receive Out Of Order Frame. Configuring OoOFR with the Noninteractive QCC CLI Type one of the following commands to enable OoOFR in the noninteractive mode: # qaucli -n <hba instance>|<hba wwpn> EnableReceiveOutOfOrderFrame 1 # qaucli -n <hba instance>|<hba wwpn> EO 1 Where: hba instance = Adapter number (use the -g command to find) hba wwpn = Worldwide port name of the adapter Type one of the following commands to disable OoOFR in the noninteractive mode: # qaucli -n <hba instance>|<hba wwpn> EnableReceiveOutOfOrderFrame 0 # qaucli -n <hba instance>|<hba wwpn> EO 0 3-14 FC0054609-00 B 3–Configuring Fibre Channel Personality Configuration Personality Configuration NOTE i Dual personality will be enabled with a firmware upgrade. Please check with QLogic. The 2600 Series Adapters are capable of changing the interface type (personality) between Fibre Channel Adapter and Converged Network Adapter. See the Glossary for a definition of personality. NOTE You must reboot for the new personality to take effect. If you change the personality of your adapter, you must also change the optical modules. Troubleshooting Fibre Channel Diagnostics Fibre Channel Diagnostics Using the QCC GUI The QConvergeConsole supports the internal and external loopback, read/write buffer, and beacon on/off diagnostic tests for Fibre Channel ports. To run the loopback or read/write buffer test: 1. Click the Loopback Test or Read/Write Buffer Test button. The diagnostic tests warning appears. 2. Click Yes if there are no I/Os active and you want to proceed with the test or click No to cancel the diagnostic test. 3. If you selected the loopback test, a dialog box allows you to select Internal Loopback or External Loopback. Click the appropriate test and then click OK. 4. If you selected Yes in Step 2, a dialog box appears with the data pattern generated. Click Stop when you want to end the test. To run the beacon on/off test: 1. Click an adapter port in the system tree on the QCC GUI main window. 2. Click the Information tab. The Information tabbed page appears. 3. FC0054609-00 B Click the Beacon On/Off button to run the test. 3-15 3–Configuring Fibre Channel Troubleshooting Refer to the topic about performing diagnostics in the QConvergeConsole Help System for more information. Fibre Channel Diagnostics Using the Interactive QCC CLI To run the loopback test, read/write buffer test, or beacon test: 1. On the Main Menu, select 4: Adapter Diagnostics. 2. On the Fibre Channel Diagnostics menu, select 1: Loopback Test to run the loopback test, select 2: Read Write Buffer Test to run the read/write buffer test, or select 3: Beacon Test to run the beacon test. Select 4: Transceiver Diagnostics Monitoring Interface (DMI) to view the transceiver diagnostics information. Refer to the section about Fibre Channel interactive commands in the QConvergeConsole CLI User’s Guide for information. Fibre Channel Diagnostics Using the Noninteractive QCC CLI Refer to the section about the Fibre Channel noninteractive commands in the QConvergeConsole CLI User’s Guide for information. 3-16 FC0054609-00 B 3–Configuring Fibre Channel Troubleshooting Fibre Channel Troubleshooting Diagram Start Cannot access all LUNS and devices LUNS and devices visible? 4 Less than all Zoning error? None Adapter logged into Fibre Channel switch? No Check zoning Contact Technical Support Yes No Correct the zoning error 3 Yes All LUNS and devices now visible? Storage device logged into Fibre Channel Switch? 1 Yes Yes CoŶĮguraƟon is okay No Check storage coŶĮguraƟon: LUN and device masking? Host assignment? Adapter logged into storage device? No Yes 1 2 All LUNS and devices now visible? No Check host conĮguraƟon Rescan disks Reboot host 4 Yes CoŶĮguraƟon is okay Figure 3-5. Fibre Channel Troubleshooting Diagram (Part 1 of 2) FC0054609-00 B 3-17 3–Configuring Fibre Channel Troubleshooting 3 Yes Adapter can log into fabric and name server? 2 CoŶĮgure Fibre Channel switch for autonegoƟaƟon and return to “Start” No Verify that cable is connected and link lights are lit No Cable is connected and link lights lit? Yes Contact Technical Support No Are opƟcs QLogic? Yes Check auto-negoƟaƟon on Fibre Channel Fibre Channel switch set for auto-negoƟaƟon? No Yes Replace opƟcs with QLogic opƟcs and return to “Start” Troubleshoot physical connecƟon Figure 3-6. Fibre Channel Troubleshooting Diagram (Part 2 of 2) 3-18 FC0054609-00 B A Adapter LEDs Each QLE267x port has three LEDs (see Figure A-1). The amber LED on the left is 16Gb. The green LED in the middle is 8Gb. The amber LED on the right is 4Gb. Figure A-1. QLE267x LEDs Table A-1 defines the LED behavior for the QLE267x adapters. Table A-1. QLE267x LED Scheme LEDs Power Power 4Gbps 8Gbps 16Gbps On On (After Power (Before Firmware Link Link Link Beaconing Off Fault UP/ UP/ UP/ Firmware Firmware InitialiACT ACT ACT Initialization) zation) Amber LED (16Gbps) Off On Flash Flash in sequence Off Off On/ Flash Flash Green LED (8Gbps) Off On Flash Flash in sequence Off On/ Flash Off Off Amber LED (4Gbps) Off On Flash Flash in sequence On/ Flash Off Off Flash FC0054609-00 B A-1 A–Adapter LEDs A-2 FC0054609-00 B Glossary adapter The board that interfaces between the host system and the target devices. Adapter is synonymous with Host Bus Adapter, Host Channel Adapter, host adapter, and adapter board. adapter port A port on the adapter board. adapter port beacon An LED on the adapter. Flashing it enables you to locate the adapter. alias A user-defined name for an adapter, adapter port, logical disk, or subsystem. basic input output system (BIOS) (typically in Flash PROM) The program (or utility) that serves as an interface between the hardware and the operating system and allows booting from the adapter at startup. boot device The device, usually the hard disk, that contains the operating system the BIOS uses to boot from when the computer is started. FC0054609-00 B boot from SAN The ability for each server on a network to boot their operating system from a Fibre Channel RAID unit located on the SAN, rather than from a local disk or direct-attached storage (DAS). This enables easier SAN management because you can replace a server and boot it from the Fibre Channel RAID unit. device A computer subsystem, such as an adapter card, that mediates data in a computer network. The term “device” is used interchangeably with “target” and “target device.” driver The software that interfaces between the file system and a physical data storage device or network media. Fast!UTIL QLogic Fast!UTIL Fibre Channel adapter BIOS utility. Fibre Channel High-speed serial interface technology that supports other higher layer protocols such as SCSI and IP, and is primarily used in SANs. Standardized under ANSI in 1994. Glossary-1 User’s Guide—Fibre Channel Adapter 2600 Series Flash Non-volatile memory where the boot code is saved. At times, Flash and boot code are used interchangeably. Host Bus Adapter An adapter that connects a host system (the computer) to other network and storage devices. Internet protocol (IP) A method by which data is sent from one computer to another over the Internet. IP specifies the format of packets, also called datagrams, and the addressing scheme. logical unit number (LUN) A subdivision of a SCSI target. It is the small integer handle that differentiates an individual disk drive or partition (volume) within a common SCSI target device such as a disk array. loopback Diagnostic tool that routes transmit data through a loopback connector back to the same adapter. message signaled interrupts (MSI/MSI-X) One of two PCI-defined extensions to support message signaled interrupts (MSIs), in PCI 2.2 and later and PCI Express. MSIs are an alternative way of generating an interrupt through special messages that allow emulation of a pin assertion or deassertion. MSI-X (defined in PCI 3.0) allows a device to allocate any number of interrupts between 1 and 2,048 and gives each interrupt separate data and address registers. Optional features in MSI (64-bit addressing and interrupt masking) are mandatory with MSI-X. Glossary-2 node port (N_Port) A port that connects by a point-to-point link to either a single N_Port or a single F_Port. N_Ports handle creation, detection, and flow of message units to and from the connected systems. N_Ports are end ports in virtual point-to-point links through a fabric, for example, N_Port to F_Port to F_Port to N_Port using a single Fibre Channel fabric switch. node port ID virtualization (NPIV) The ability for a single physical Fibre Channel end point (N_Port) to support multiple, uniquely addressable, logical end points. With NPIV, a host Fibre Channel adapter is shared in such a way that each virtual adapter is assigned to a virtual server and is separately identifiable within the fabric. Connectivity and access privileges within the fabric are controlled by identification of each virtual adapter and hence, the virtual server using each virtual adapter. non-volatile random access memory (NVRAM) A type of memory that retains data (configuration settings) even when power is removed. You can manually configure NVRAM settings or restore them from a file. path A path to a device is a combination of an adapter port instance and a target port as distinct from internal paths in the fabric network. A fabric network appears to the operating system as an opaque network between the adapter (initiator) and the target. FC0054609-00 B User’s Guide—Fibre Channel Adapter 2600 Series Because a path is a combination of an adapter and a target port, it is distinct from another path if it is accessed through a different adapter or it is accessing a different target port. Consequently, when switching from one path to another, the driver might be selecting a different adapter (initiator), a different target port, or both. This is important to the driver when selecting the proper method of failover notification. It can make a difference to the target device, which might have to take different actions when receiving retries of the request from another initiator or on a different port. PCI Express (PCIe) A third-generation I/O standard that allows enhanced Ethernet network performance beyond that of the older peripheral component interconnect (PCI) and PCI extended (PCI-x) desktop and server slots. personality When used in the context of an adapter, the term personality refers to the entire adapter. It includes all the I/O ports and the functions on that adapter. For example, a QLogic adapter can have dual personality, converting from Fibre Channel to Converged Network Adapter or vice versa. Therefore, all the I/O functions and all the I/O physical ports on the adapter changes from Fibre Channel Adapter to Converged Network Adapter. port Access points in a device where a link attaches. The most common port types are: N_Port—a Fibre Channel port that supports point-to-point topology. NL_Port—a Fibre Channel port that supports loop topology. FC0054609-00 B F_Port—a port in a fabric where an N_Port can attach. FL_Port—a port in a fabric where an NL_Port can attach. port instance The number of the port in the system. Each adapter may have one or multiple ports, identified with regard to the adapter as port 0, port 1 and so forth. To avoid confusion when dealing with a system containing numerous ports, each port is assigned a port instance number when the system boots up. So port 0 on an adapter might have a port instance number of 8, for example, if it is the eighth port discovered by the system. quality of service (QoS) Refers to the methods used to prevent bottlenecks and ensure business continuity when transmitting data over virtual ports by setting priorities and allocating bandwidth. redundant array of independent disks (RAID) Fault-tolerant disks that look like either single or multiple volumes to the server. small computer systems interface (SCSI) The original SCSI specification was a hardware bus specification and a packet-oriented protocol specification for communicating on that bus. SCSI over Fibre Channel uses the packet-oriented protocol to communicate with storage devices on the Fibre Channel. storage area network (SAN) Multiple storage units (disk drives) and servers connected by networking topology. Glossary-3 User’s Guide—Fibre Channel Adapter 2600 Series target The storage-device endpoint of a SCSI session. Initiators request data from targets (usually disk drives, tape drives, or other media devices). Typically, a SCSI peripheral device is the target but an adapter may, in some cases, be a target. A target can contain many LUNs. unified extensible firmware interface (UEFI) A specification detailing an interface that helps hand off control of the system for the pre-boot environment (that is, after the system is powered on, but before the operating system starts) to an operating system, such as Windows or Linux. UEFI provides a clean interface between operating systems and platform firmware at boot time, and supports an architecture-independent mechanism for initializing add-in cards. worldwide node name (WWNN) Unique 64-bit address assigned to a device. worldwide port name (WWPN) Unique 64-bit address assigned to each port on a device. One WWNN may contain multiple WWPN addresses. Glossary-4 FC0054609-00 B Index A adapter configuring 2-4, 2-7 LEDs A-1 selecting 2-10 B beacon on/off test 3-15 BIOS compatibility 2-7 boot devices configuring 3-6 specifying 2-5 booting from a SAN 2-7 booting from SAN 3-2 C certification xiv Korea xv conventions, documentation x customer support xi D diagnostics, Fibre Channel 3-15 documentation conventions x downloading xii related x driver installation xviii driver parameters, configuring 3-12 dual personality 2-10, 3-15 FC0054609-00 B E EMC requirements xiv EMI requirements xiv F FAQs xiii Fast!UTIL 2-3 FCode 2-10 features 1-1 Fibre Channel Adapter Function Configuration utility 2-2 configuring 2-3 multi-boot package 2-2 package contents 2-2 Fibre Channel adapter parameters, setting 3-4 Fibre Channel diagnostics 3-15 Fibre Channel driver parameters, configuring 3-12 Fibre Channel installation in Linux 3-1 in Solaris 3-3 in VMware ESX and ESXi 3-2 in Windows 3-3 firmware, downloading xii functional description 1-1 H hardware installation xvii Index-1 User’s Guide Fibre Channel Adapter 2600 Series I installation adapter hardware xvii drivers xviii Fibre Channel 3-1 QConvergeConsole xix K knowledge database xiii L laser safety xiv LEDs, adapter A-1 license agreements xi loopback tests 2-10, 3-15 LUNs, selective 3-13 M multi-boot code, writing to Flash memory 2-2 N N_Port, definition of Glossary-2 node port, definition of Glossary-2 NPIV 3-7 O OoOFR 3-14 operating systems, supported 1-2 out-of-order frame reassembly 3-14 physical characteristics 1-2 product safety compliance xvi Q QConvergeConsole, installation xix QLflash, using 2-2 QLogic, contact information xiii QoS setting by bandwidth 3-9 setting by priority 3-11 quality of service 3-7 setting by bandwidth 3-9 setting by priority 3-11 R read/write buffer test 3-15 regulatory information xiii S selective LUNs 3-13 standards specifications supported 1-2 support, technical xi T target persistent binding 3-4 technical support xi tests beacon on/off 3-15 loopback 3-15 read/write buffer 3-15 training xii troubleshooting 3-15 diagram 3-17 P persistent binding, configuring 3-4, 3-5 personality configuration 2-10, 3-15 Index-2 FC0054609-00 B User’s Guide Fibre Channel Adapter 2600 Series U UEFI 2-13 V virtual ports, configuring 3-7 W warranty xiii FC0054609-00 B Index-3 User’s Guide Fibre Channel Adapter 2600 Series Index-4 FC0054609-00 B Corporate Headquarters QLogic Corporation 26650 Aliso Viejo Parkway Aliso Viejo, CA 92656 949.389.6000 www.qlogic.com International Offices UK | Ireland | Germany | France | India | Japan | China | Hong Kong | Singapore | Taiwan © 2012 QLogic Corporation. Specifications are subject to change without notice. All rights reserved worldwide. QLogic, the QLogic logo, and QConvergeConsole are registered trademarks of QLogic Corporation. Dell is a registered trademark of Dell Inc. HP is a registered trademark of the Hewlett-Packard Company. IBM is a registered trademark of International Business Machine Corporation. Linux is a registered trademark of Linus Torvalds. Oracle is a registered trademark of Oracle Corporation. PCIe and PCI Express are registered trademarks of PCI-SIG Corporation. Microsoft, Windows, and Windows Server are registered trademarks of Microsoft Corporation. SPARC is a registered trademark of SPARC International, Inc. in the USA and other countries. Solaris is a registered trademark of Sun Microsystems, Inc. VMware and ESX are registered trademarks of VMware, Inc. All other brand and product names are trademarks or registered trademarks of their respective owners. Information supplied by QLogic Corporation is believed to be accurate and reliable. QLogic Corporation assumes no responsibility for any errors in this brochure. QLogic Corporation reserves the right, without notice, to make changes in product design or specifications.