1
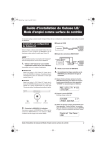
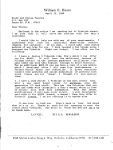
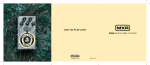
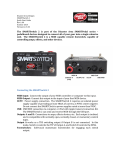
MXM User's manual
MXM1.1ENG
Masotti Guitar Devices
MXM
User's manual
1/11
MXM User's manual
MXM1.1ENG
2/11
Welcome to Masotti Guitar Devices world and thank you for your
choice. Our challenge is to bring new ideas in guitar amplification,
exploring new techniques and adopting the "no compromise"
philosophy.
MXM is a line mixer engineered for the absolute preservation of
guitar signal. It's dynamics, flexibility and transparency will make
you reach the best results with your multi-effects.
IMPORTANT:
BEFORE SWITCH ON THE DEVICE, PLEASE READ CAREFULLY THE
IMPORTANT SAFETY NOTES AT PAG. 10
MXM User's manual
MXM1.1ENG
3/11
Index
General description. .........................................................................................................................4
Front panel. ......................................................................................................................................4
Rear panel. .......................................................................................................................................4
Ground lift........................................................................................................................................5
Normal functioning. .........................................................................................................................5
MIDI programming..........................................................................................................................5
MIDI factory map. ...........................................................................................................................6
Connections......................................................................................................................................6
Aux1 e Aux2 contacts. .....................................................................................................................8
Maintenance. ....................................................................................................................................9
Troubleshooting. ..............................................................................................................................9
Mains fuse. .......................................................................................................................................9
Warranty...........................................................................................................................................9
Important safety notes....................................................................................................................10
Technical specs. .............................................................................................................................11
MXM1.1ENG
MXM User's manual
4/11
General description.
MXM is projected for preserve the integrità of the guitar sound when it is precessed by
digital multi-effects. Old and modern sound processors, even if equipped by high
performing AD/DA converters, if connected in serial mode, degrade guitar signal. So the
best result is reached through a parallel processing, made by a high quality mixer.
MXM is a line mixer equipped with two stereo loops controlled via MIDI. Signals to the
mfxs are buffered in order to avoid degradation and mutual coupling between effects
inputs. By MIDI it's possible to activate or cut WET1, WET2 and DRY signal on the output.
The three levels and the general volume are mixed by three corresponding pots on the
frontal panel. Passband is from 20Hz to 150KHz for the absolute transparency. Signals are
processed through gold plated, sealed relais and high-performancy operational amplifiers.
All signal capacitors are audio-grade polypropylene or polyester type. Dual power supply is
obtained by a toroidal transformer for a low waste flux and a double series stabilizer for the
best swing. Noise floor (hum+thermal noise) is near the measuring limit.
Front panel.
On the frontal panel, from left we can find the following controls:
a) Dry, Wet1 and Wet2 pots for levels adjusting. Near each pot there is a LED indicting
the presence of the signal on the output. When MXM is switched ON, all three
signals are enabled;
b) Volume pot for output level;
c) Aux 1 and Aux 2 state LED (see further);
d) Five switches for programming as described further;
e) Status LED (bright blue);
f) Mains switch.
Rear panel.
From right side::
a) Input Jack from preamplifier or head send;
b) Send 1 Jack for feed mfx associated to Wet1 level;
c) Send 2 Jack for feed mfx associated to Wet2 level;
MXM User's manual
MXM1.1ENG
d)
e)
f)
g)
h)
i)
j)
k)
l)
m)
5/11
Ret1L and Ret1R Jacks for stereo return from mfx #1;
Ret2L and Ret2R Jacks for stereo return from mfx #2;
Out L e Out R Jacks;
Stereo Jack for Aux1 contact : if corresponding LED is on, tip is connected to ring;
if corresponding LED is off, sleeve is connected to ring. Note that ring is isolated
from general ground.
Stereo Jack for Aux2 contact : if corresponding LED is on, tip is connected to ring;
if corresponding LED is off, sleeve is connected to ring. Note that ring is isolated
from general ground.
MIDI THRU connector;
MIDI IN connector;
ground lift switch;
fuse socket;
IEC mains plug.
Ground lift.
This switch disconnects signal ground from protective earth and it ca be switched for
reduce hum. Protective earth is permanently connected to case and central pin of IEC
plug.
Normal functioning.
Before switch on MXM, check that "Dry" prog switch is up. Now switch the unit on: Dry,
Wet1 and Wet2 are enabled, while Aux1 and Aux2 are off. It's possible use the unit as
normal mixer dosing levels trough front potentiometers. Via MIDI its' possible to cut single
signals and act on Aux contacts. MXM reacts to Program changes on MIDI channel 1.
Factory map is indicated in the next pages.
MIDI programming.
If you need to edit factory map please follow next steps:
1) Swhtch on and connect the pedalboard to MXM. Check that Pedalboard is on
channel 1.
2) With MXM switched off, put Dry switch down.
3) Swtich on MXM. Now its' in program mode, all signals and aux contacts are
disabled.
4) Select desired configuration trhough the five switches on the front panel: a switch
"up" will store the corresponding function enabled for a certain patch.
5) Select and send the patch in which you want to store that configuration. It's possible
to send more than one patch in sequence for store the same configuration in
different memories.
6) Repeat points 4 and 5 as your needs. Every storing is indicated by a blinking of
enabled signals.
Switch off MXM. Check "Dry" switch is up. Switch MXM on. Now it's working in normal
mode, ready to receive Program changes stored before.
MXM1.1ENG
MIDI factory map.
Factory sequence is the following:
patch1=dry
patch 2=wet1
patch 3=dry+wet1
patch 4=wet2
patch 5=dry+wet2
patch 6=wet1+wet2
patch 7=dry+wet1+wet2
patch 8=aux1
patch 9=dry+aux1
patch 10=wet1+aux1
patch 11=dry+wet1+aux1
patch 12=wet2+aux1
patch 13=dry+wet2+aux1
patch 14=wet1+wet2+aux1
patch 15=dry+wet1+wet2+aux1
patch 16= aux2
patch17=dry +aux2
patch 18=wet1 +aux2
patch 19=dry+wet1+aux2
patch 20=wet2+aux2
patch 21=dry+wet2+aux2
patch 22=wet1+wet2+aux2
patch 23=dry+wet1+wet2+aux2
patch 24=aux1+aux2
patch 25=dry+aux1+aux2
patch 26=wet1+aux1+aux2
patch 27=dry+wet1+aux1+aux2
patch 28=wet2+aux1+aux2
patch 29=dry+wet2+aux1+aux2
patch 30=wet1+wet2+aux1+aux2
patch 31=dry+wet1+wet2+aux1+aux2
After patch 31 sequence is repeated until patch 127.
Connections.
In the following two pictures are reported two possibile setups:
MXM User's manual
6/11
MXM User's manual
MXM1.1ENG
MONO HEAD AND TWO MULTIEFFECTS
MFX 1
IN
SEND1
IN
OUTL OUTR
RET1L
RET1R
MFX 2
IN
SEND2
OUTL OUTR
RET2L
RET2R
INPUT
OUT L
SEND
RETURN
7/11
MXM User's manual
MXM1.1ENG
8/11
PREAMP, ONE OR TWO MFXS, ONE STEREO OR TWO MONO POWER AMPLIFIERS
MFX 1
IN
SEND1
OUTL OUTR
RET1L
INPUT
IN
MFX 2
RET1R
IN
SEND2
OUT L
OUTL OUTR
RET2L
RET2R
OUT R
OUT
Aux1 e Aux2 contacts.
Warning! Never connect these contacts to mains or voltages greater than 50V!
Aux contacts are normally connected to tip (N.O.) ring (C) and sleeve (N.C.) of
corresponding jack plug. You can use them for switch the channel or reverb of an amp, or
use them for route directly guitar signal through two preamps or mfxs. For more
information and their applications, please contact us.
MXM1.1ENG
MXM user's manual
9/11
Maintenance.
Always disconnect mains during cleaning operations. Use a soft cotton cloth, wet with a
small quantity of water, for dust and dirt removal from the external of the case. Never use
solvents or aggressive cleaners.
Troubleshooting.
Here you have some possibile problems during MXM use. Don't hesitate to contact us for
any doubt or unsolved problem.
9 MXM does not turn ON. Check mains presence and cable. Check rear external
fuse. If MXM still remains OFF, contact MGD or qualified service.
9 MXM is ON but only blue LED is lit and no signal is present on the outputs.
Mixer has been switched ON in PROG mode. Put Dry switch in low position, switch
MXM off, wait 5 seconds and switch in ON again.
9 LEDS are regularly ON but no sound is present. Check cables, connectors and
their proper position. Check pots level.
9 MXM does not receive MIDI patches. Check MIDI cable and its proper
connection. Check MIDI footboard/controller channel (it must be #1) and mode (it
must be in Program Change).
9 One or more pots are noisy during rotation. Don't attempt to clean them by
spray or similar! Refer to MGD or qualified service for their replacement.
Mains fuse.
the only fuse accessibile to the user is the external mains fuse. Before replace it,
disconnect mains chord. Use only: 250mA –T dimensions 5X20mm type.
Warning: replace fuse only with identical type one! If, after a first replacement, fuse
is blown again, don't attempt to replace it again but refer to MGD or qualified
service!
Warranty.
Warranty is lifetime except connectors, switches and potentiometers. For these
components warranty is 2 (two) years according to EU laws. Warranty is not valid if the
device is opened or partially modified without our authorization. No responsibility is due for
Masotti Guitar Devices for damages to human, animals or things originated by a
manumission or a different use of MXM as described in this manual.
MXM user's manual
MXM1.1ENG
10/11
Important safety notes
MXM is projected and engineered to comply to EU safety and electromagnetlical
compatibiliy
CEI EN 60065, EN 55103-1 and EN55103-2. CE mark indicates the
compliance. Furthermore, even if ambient policy of MGD limits at the minimum the use of
potentially polluting components, according to current EU laws customer must waste this
device in special sites.
Nevertheless, in order to avoid shock or hurt risks, you should follow carefully the
indications reported in this manual and in the next list:
• Never open the case. No serviceable parts inside. For service, refer to MGD or
qualified and skilled personnel.
• Never remove any screw.
• Don't espose MXM to rain, water sparks, excessive humidity, chemical
vapours, heavy dust, heat fonts, strong vibrations.
• Never introduce in rear plugs objects different than corresponding
connectors.
• After storage or transport at very low temperatures, wait about 30 minutes
before switch the unit ON.
• Always use CE-approved and good conditions mains chords. Never break or
remove earth plug!
• Before switch MXM on, check mains value.
• In case of fuse blowing not due to extraordinary reasons (like violent mains
variations, thunderstorms or lightening), don't attempt to replace it but please
contact MGD or a qualified service.
• Dont' force pot knobs.
MXM1.1ENG
MXM user's manual
Technical specs.
Mains: 230V±10% 50Hz
Power consumption: 20VA
Input impedance: 47KΩ.
Output impedance: < 600Ω.
Maximum out level: +20dB(V) on 22KΩ.
Ambient conditions: 10-40’C, 30-90% humidity no condensation.
©Masotti Guitar Devices 05-2004– Via C. Battisti 107, 01010 Farnese (VT) Italy.
Tel. +39 0761 458076
URL: www.masottiamp.it
For info, please contact us at [email protected]
11/11