1
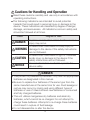
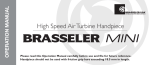
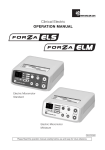
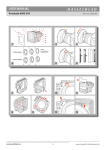
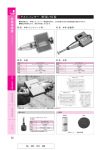
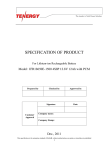
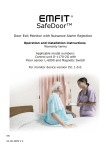
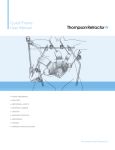
PAL
Precision Apex Locator
OPERATION MANUAL
MANUAL
OPERATION
OM-ER317E
Thank you for purchasing the PAL — Precision Apex Locator.
Please read this operation manual carefully and keep it for future
reference.
Classifications of Equipment
• Type of protection against electric shock :
- Internally powered equipment
• Degree of protection against electric shock :
- Type B applied part
• Method of sterilization or disinfection recommended by the
manufacturer :
- See 7.(2) Sterilization
• Degree of protection against ingress of water as detailed in the
current edition of IEC 60529 :
- Unit...IPX1 (Protected against vertically falling water drops)
• Degree of safety of application in the presence of a flammable
anesthetic mixture with air or with oxygen or nitrous oxide :
- EQUIPMENT not suitable for use in the presence of a
flammable anesthetic mixture with air or with oxygen or
nitrous oxide.
• Mode of operation :
- Continuous operation
CONTENTS
·····························
2
1. Features ···········································································
Cautions for handling and operation
5
2. Specifications ···································································
6
3. Component Names ··························································
6
4. Installation and Assembly ················································ 10
5. Operating Procedures ······················································ 12
6. Alarm Sound Volume Control ··········································· 15
7. Cleaning / Sterilization ····················································· 16
8. Changing Batteries ·························································· 17
9. Troubleshooting ······························································· 20
10. Warranty ········································································ 22
11. Disposing Product ·························································· 22
1
Cautions for Handling and Operation
Read these cautions carefully and use only in accordance with
operating instructions.
The following indications are intended to avoid potential
hazards that could result in personal injury or damage to the
device. These indications are classified by degree of danger,
damage, and seriousness. All indications concern safety and
should be followed at all times.
Class
DANGER
WARNING
CAUTION
NOTICE
Degree of Risk
Explains an instruction where death or serious
injury may occur.
A hazard that could result in bodily injury or
damage to the device if the safety instructions
are not followed.
A hazard that could result in light or moderate
bodily injury or damage to the device if the
safety instructions are not followed.
General information needed to operate the
device safely.
DANGER
• This product is powered by batteries. Only use the appropriate
batteries as designated in this manual.
• Be sure to replace four batteries of the same type from the
same manufacturer at the same time for use. Fluid leakage or
rupture may occur by mixing and using different types of
batteries or use of mixed old and new batteries or consumed
and fully charged batteries.
• This unit utilizes manganese dry batteries and alkali dry
batteries, which cannot be re-charged. Do not attempt to
charge these batteries. Attempts to re-charge these batteries
could result in rupture of fluid leakage.
• Do not disassemble or alter the device.
2
WARNING
• This product is not waterproof. Do not spill water or a
chemical solution onto or into the unit. Water or solution could
result in fire or electric shock due to a short-circuit or rusting.
• If you should notice battery fluid leakage within the unit,
deformation of the unit casing or partial discoloring,
immediately stop use and contact Brasseler USA.
• Should battery fluid get into your eyes, immediately wash eyes
thoroughly with clean water and see your doctor. Failure to do
so may result in loss of sight.
• Should the battery fluid leak and adhere to skin or clothing,
immediately wash the exposed skin thoroughly with clean
water until fluid is completely washed away. Failure to do so
may result in skin complications.
• If you do not intend to use the product for a prolonged period
of time, remove the batteries from the unit to avoid fluid
leakage.
CAUTION
• Exercise sufficient care in using the product by giving patient
safety first priority.
• The product is to be used only for dental treatment by
qualified personnel.
• Buy commercially available batteries designated in this
Manual. Thoroughly read each battery manufacturer’s manual
before using the respective batteries.
• Do not use or leave the product in a high-temperature
environment such as under direct sunlight, enclosed in a car,
near a fire, or near a stove.
• Check the product before use by rotating it, paying attention
to looseness, vibration, noise and temperature (heat
generation). If any abnormal condition is found, immediately
stop use and contact Brasseler USA.
3
• Do not drop the unit or allow other significant impacts to the
unit.
• Pay attention to the direction of batteries when setting.
Forcible setting in the wrong direction may cause damage and
fluid leakage due to a short circuit.
• Do not allow conductive materials such as wires, safety pins,
etc., to enter into the battery case.
• If chemical, solvent or antiseptic solution is deposited on this
product, immediately wipe it away. Otherwise, discoloration
or deformation may occur.
• The system functions normally in an environment where the
temperature is 0-40ºC (32-104º), humidity is 10-85% RH,
atmospheric pressure at 500-1060hPa, and where the
Control Unit is not exposed to moisture or condensation.
Malfunction may occur if used outside of these levels.
NOTICE
• The unit consumes electricity very slightly even when the
power supply is off. If you do not intend to use the product for
a prolonged period of time, remove the batteries from the unit.
• If batteries are consumed to the extent this product cannot
operate, replace with new batteries as soon as possible. If
spent batteries are kept in this product, fluid leakage may
occur. In particular, pay attention to the manganese dry
batteries from which fluid is more easily leaked due to its
structure as it gets older.
• When disposing of the unit, follow the instructions of your local
government for disposal, as they contain materials which may
be considered industrial waste.
• When the power is on, do not leave the measuring terminals
short-circuited. The auto power off function will not work while
recognizing that it is measuring, and the batteries will continue
to be consumed.
4
• This product has been designed on the assumption that
manganese dry batteries or alkali dry batteries are used.
Chargeable batteries such as nickel-cadmium batteries and nickel
metal hydride batteries of the same shape can also be used, but
are, however, limited by the following.
• This product does not have charging function.
• Even if nickel-cadmium batteries and nickel metal hydride
batteries are fully charged, they have lower voltage than
manganese batteries or alkali dry batteries; therefore, the
battery level indicator may display slightly less than full charge.
This is due to a difference in battery voltage, and is not a
product failure.
• Users are responsible for operational control, maintenance and
inspection.
• Store the system in a place where the temperature is at –10-60°C
(14-140º), humidity at 10-85% RH, atmospheric pressure at
500-1060 hPa, and the system is not subject to dust, sulfur, or
salinity.
• When trouble is found, contact Brasseler USA for assistance.
1. Features
• Lightweight and compact device.
• New manganese dry batteries can operate continuously for
approximately 40 hours. (This depends on the operating
conditions such as battery manufacturer and temperature)
• This unit includes a large and user-friendly LCD panel.
• Energy Saving - The power of the unit automatically turns off
when not used for 10 minutes. (Auto power-off function)
• Four AAA batteries (1.2V) are included. Re-chargeable
batteries (nickel-cadmium batteries, nickel metal hydride
batteries) can be also used.
5
2. Specifications
<Unit>
Type
Power Source
NE181
DC6V
About 40 hours
Operating Hours
(when using manganese dry batteries)
Dimensions
W80mm x D80mm x H95mm
Weight
185g
3. Component Names
1
2
4
5
3
6
7
Fig. 1
1. Control Unit
2. Probe
3. File Clip ·············3 pcs.
4. Extension Cord
5. Lip Hook ··········3 pcs.
6. Tester
7. Batteries ···········2 pack
(2 batteries in 1 pack)
6
*Key and LCD Panel
POWER Key
new
pic
<LCD Panel>
Bar Graph
Number
Display
Zone of
Precision
Dental Mark
Alarm Mark
Battery Level Indicator
Alarm Key
*This indicates that all displays are
lighted.
Fig. 2
*POWER Key
• When the POWER key is pressed for approximately one
second or longer, the alarm sounds, the power is turned ON,
and the liquid crystal display lights up.
• When the system is ON and the POWER key is pressed for
about one second or longer, the alarm sounds, the power is
turned OFF, and then the liquid crystal display lights off.
7
*Bar Graph
LCD
Displays the present position of the top of the file.
*Zone of Precision
LCD
Displays the position of the file tip from .5 mm to .0 mm
away from the apical constriction.
*Number Display
LCD
Displays the present position of the top of the file by
number.
*Dental Mark
LCD
This display indicates that the file is at a depth within the
“Zone of Precision” (.5 mm to .0 mm from the apical
constriction).
This display flashes as a warning that the file has reached
a canal depth past the apical constriction.
*Alarm Key
· The alarm sound volume can be adjusted. (See 6. Alarm
Sound Volume Control)
LCD
The present alarm mark is displayed.
High volume
8
Medium volume
Low volume
• Battery Level Indicator
LCD
Displays the approximate amount of battery life remaining.
Full charge or nearly full charge.
About 30-80% remains.
Less than 30% remains.
(Slowly flashing)
Extremely low voltage. Replace with new batteries.
Notice
The battery remaining mark indicates approximate available
battery voltage. When using rechargeable type batteries such
as nickel-cadmium batteries and nickel metal hydride
batteries, these have lower voltage than manganese dry
batteries and alkali dry batteries even when fully charged.
Therefore, the battery level indicator may display slightly less
than full charge. This is due to a difference in battery voltage
and is not a failure of the product or batteries. Low battery
voltage can affect the accuracy of an apex locator.
9
4. Installation and Assembly
(1) Installing Batteries
1) Remove the batteries after
sliding the battery cover on
the back of the unit in the
direction of the arrow.
(Fig. 3)
Fig. 3
2) Install the new batteries
according to the polarity
indication (positive (+),
negative (-)) in the battery
box. (Fig. 4)
Fig. 4
Caution
• Do not reverse positive (+) and negative (-).
• If you encounter resistance when inserting batteries, check
the battery direction. Do not apply excessive force when
inserting batteries.
3) Close the battery cover.
10
(2) Probe Connection
Insert the probe into the probe
connector at the side of the
unit. (Fig.5)
Fig. 5
(3) File Clip Connection
Connect the plug of the file clip
to the plug of either probe.
(Fig. 6)
Fig. 6
(4) Lip Hook Connection
Connect the lip hook to the
plug of the other probe.
(Fig. 7)
Fig. 7
11
(5) Extension Cord Connection
Use this for extension between
the file clip or lip hook and
probe if necessary. (Fig. 8)
Extension Cord
Fig. 8
5. Operating Procedures
(1) Inspection before use
Be sure to carry out an operation check with a tester before use
to confirm that it operates properly.
1) Press the power key for
about one second or longer
to turn ON power. (Liquid
crystal display lights up)
2) Pinch either one of the
electrodes on the tester with
a file clip. (Fig. 9)
Fig. 9
3) Expose a lip hook to the
other electrode on the
tester. (Fig. 10)
Fig. 10
12
4) Check that the number display on the liquid crystal display
reaches within “0.2 to 0.9.”
5) Remove the tester when measurement has ended.
Caution
• Prevent the tester and file clip from being moistened or
prevent the electrode on the tester from touching skin.
Otherwise, correct measurement cannot be made.
• If the number display is still out of “0.2 to 0.9” or not
properly displayed, check the following.
- Check whether the probe, file clip, and extension cord
are securely connected.
- If there is no problem
with connection of
the respective cords,
disconnect all of the
respective cords and
directly insert the
electrode on the
tester into the probe
connector. (Fig.11)
Fig. 11
• If the number displayed is within “0.2 to 0.9” at this
time, a cord (s) may be broken.
Contact Brasseler USA.
• If the number display is out of “0.2 to 0.9” or not
properly displayed at this time, there may be an
abnormality in the main body. Contact Brasseler USA.
13
(2) Use
1) Hang the lip hook on the
corner of the patient's
mouth. (Fig. 12)
2) Press the power key for
about one second or longer
to turn ON power. (Liquid
crystal display lights up)
3) Pinch the metallic shaft of
the file inside the root canal
with a file clip. (Fig. 13)
4) Carry out root canal
end-measurement.
Fig. 12
Caution
Set the target value of
the bar graph to 0.5.
5) When work is completed,
press the power key for
about one second or longer to turn OFF the power.
(Liquid crystal display lights off)
Notice
After approximately 10 minutes of not being used, the
apex locator (display shows “
”), the system will
automatically Power OFF. (Auto-Power OFF function)
6) Remove the probes etc.
Caution
When removing the probe, be sure to only grab the
connector; do not pull the cord alone.
14
Fig. 13
6. Alarm Sound Volume Control
The alarm sound volume can be controlled at three levels:
“High Volume,” “Medium Volume,” and “Low Volume.”
1) Lightly push the alarm key
with the thin bar. (Fig. 14)
2) The alarm mark on the LCD
panel changes, and the
alarm volume changes.
3) The alarm volume is
adjusted each time the
alarm key is pressed.
Fig. 14
Caution
• Do not push the alarm key with excessive force.
• Avoid using a hard bar such as metal for the thin bar.
Otherwise, the alarm key may be damaged.
• Do not insert the thin bar into the speaker by mistakenly
confusing it with the
alarm key. Otherwise,
the speaker may be
Speaker
damaged.
Notice
The sound level is retained, even if the power is turned off.
15
7. Cleaning / Sterilization
(1) Cleaning
If debris sticks on the unit, probe, file clip, lip hook, or extension
cord then, soak a clean cloth in water and squeeze cloth tightly
to drain water. Use the cloth to wipe away dirt. After that, wipe
off with an alcohol soaked clean cloth.
Caution
To clean the product, do not use any solvent such as
benzine or thinner.
(2) Sterilization
• Autoclave sterilization is recommended.
• Autoclave sterilization required after each patient as noted
below.
• Items to be autoclaved: file clip, lip hook, extension cord
Caution
Do not autoclave any parts (the unit, and probe) other
than those that can be subjected to autoclave sterilization.
Autoclave Procedure
1) Wipe away debris on the surface of the file clip and lip clip with
a clean, damp cloth followed by wiping with disinfecting
alcohol. (Refer to 7.(1) Cleaning)
2) Insert into an autoclave pouch. Seal the pouch.
3) Autoclavable up to a max. 135°C (275ºF).
Ex) Autoclave for 20 min. at 121°C (250ºF) or 15 min. at
132°C (270ºF).
16
Caution
· If the sterilizer has a drying process that exceeds 135°C,
the drying process should be bypassed for these items.
· Place instruments in the middle or top shelves of the
autoclave.
· Autoclaving with other instruments stained with chemical
solution can result in discoloration.
· File clip, lip hook and extension cord are consumables.
When they are discolored by repeated autoclave
sterilization, they can be replaced.
8. Changing Batteries
• If the battery level indicator flashes slowly, immediately replace
with new batteries.
• When replacing the batteries, be sure to observe the
“
Caution on Changing Batteries” below. Note that
Brasseler USA shall not be held liable for any malfunction or
failure resulting from misuse or not following recommended
procedures.
17
Caution on Changing Batteries
· Be sure to turn OFF the power when changing batteries.
· Do not open any part other than the battery cover.
· Use only batteries designated by Brasseler USA.
If recommended batteries are not used, breakage,
fluid leakage or rupture could occur.
Designated batteries: AAA cell Manganese dry batteries,
Alkali dry batteries 1.5V Nickel cadmium batteries,
Nickel metal hydride batteries 1.2V
* Use reliable manufacture batteries.
· Be sure to replace all four batteries simultaneously and
with batteries that are of the same type from the same
manufacturer. Fluid leakage or rupture may occur by
mixing and using different types of batteries or use of
mixed old and new batteries or spent and fully charged
batteries.
· Do not work with wet hands. This may cause trouble
due to short-circuiting of batteries and moisture
infiltrating this product.
18
Changing Batteries
1) Turn OFF the power.
2) Remove the batteries after
sliding the battery cover on
the back of the unit in the
direction of the arrow.
(Fig. 15)
3) Remove old batteries.
4) Set new batteries according
to the polarity indication
(positive (+), negative (-)) in
the battery box. (Fig. 16)
Fig. 15
Fig. 16
Caution
• Do not reverse positive (+) and negative (-).
• If you encounter resistance, be sure that the batteries
are being placed in the proper direction. Do not use
excessive force when inserting the batteries.
5) Close the battery cover.
Caution
The used nickel-cadmium batteries, nickel metal hydride
batteries are recyclable, but their disposal may be
regulated by the country within which they are being used.
19
9. Troubleshooting
If a problem occurs, check the following items. If none of these
are applicable or the problem is not remedied after
recommended action has been taken, contact Brasseler USA for
assistance.
Problem
Cause
Solution
No batteries are
inserted.
Are batteries
inserted according
to the polarity
The power will
indication (positive
not turn ON.
(+), negative (-)) in
the battery box?
Insert batteries.
Set batteries according to
the polarity indication
(positive (+), negative (-)) in
the battery box.
Are the batteries
spent/fully
Replace with new batteries.
consumed?
When the
power is turned Is the battery
ON, the system level indicator
immediately
flashing slowly?
turns back OFF.
Replace with new batteries.
Is the probe
Bar graph is
not displayed. connected?
Connect the probe.
Number display
becomes “ ”
during
operation.
Are the probe,
file clip and
extension cord
connected?
20
Connect probe, file clip and
extension cord.
Number
display
becomes
“ .”
When
measured with
a tester, the
number
display on the
LCD is out of
“0.2 to 0.9” or
not properly
displayed.
Internal
abnormality.
Insert the batteries, or
re-turn ON the power. If it is
still displayed, contact
Brasseler USA.
Are the probe,
file clip and
extension cord
connected?
Connect the probe, file clip
and extension cord.
Are the probe,
file clip and
extension cord
broken?
Disconnect all of the
respective cords and directly
insert the electrodes on the
tester into the probe
connector. If the number
display is displayed to reach
within “0.2 to 0.9” at this time,
a cord(s) may be broken.
Contact Brasseler USA.
Abnormality in
main body.
Disconnect all of the
respective cords and directly
insert the electrodes on the
tester into the probe
connector. If the number
display is out of “0.2 to 0.9”
or not properly displayed at
this time, there may be an
abnormality in the main body.
Contact Brasseler USA.
21
10.
Warranty
Brasseler USA warrants the handpiece against defects in
manufacturing workmanship and materials. Brasseler USA
reserves the right to analyze and determine the cause of any
problem. Warranty is voided should the handpiece not be
used in accordance with this manual.
11. Disposing Product
• Please consult with Brasseler USA regarding disposal
requirements.
• Spent or fully consumed nickel-cadmium batteries and nickel
metal hydride batteries are recyclable, but their disposal may
be regulated by the country within which it is used.
22
By Your Side
in Dentistry
One Brasseler Boulevard, Savannah, GA 31419
To order call 800.841.4522
or fax 888.610.1937.
Visit our website: www.BrasselerUSA.com