1
Pill ImagerTM Software
Users Manual
Smartview
Pill Imager
™
User's Manual
2nd Edition
VERSION 2.00g
Part No. SV74-626825-2
Smartview Imaging Systems, Inc.
2922 W. Pendleton Ave.
Santa Ana, CA 92704
smartview.com/imaging/pills/
Page 1 of 36
Pill ImagerTM Software
Users Manual
Launching Pill Imager
Before you launch Pill Imager, you must first turn on your PC. Depending on what
version of Windows you have (i.e. Window NT, 95, 98, or Windows 2000) you may see
different sign-on screens and be prompted to enter your password.
If your user name and password doesn't work on this system, it may be because one
has not been assigned to this machine. Talk to your IT department or onsite project
manager about establishing your user name and password on this system.
Typically you will not need to enter a password. However, if one is required, try using
USER NAME = " PILLS " and PASSWORD = "PILLS"
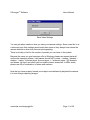
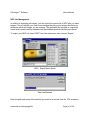
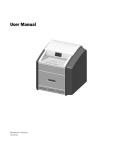
Once you see the familiar Windows desktop, you can launch the Pill Imager software by
clicking on its icon (shown below).
Click Icon to Launch
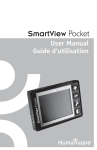
When clicked, the software will startup, then initialize the video capture hardware. This
should take about 30 seconds.
If it takes much longer than this than chances are your network is not responding
properly and Pill Imager is unable to inform you of this. If this happens, go to the
Windows desktop and click on the "Network Neighborhood" icon. Verify that you are
connected to the network and that ALL resources (like computers, drive-shares, drive
mappings, and printers) are all properly connected. It should rarely occur, if ever, that
you can't establish a network connection with Pill Imager. If this happens please notify
your IT department or onsite project manager.
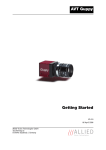
Once Pill Imager is initialized you should see live video on your VGA monitor and you
will be ready to proceed. If video doesn't appear check your connections to and from the
video system hardware such as camera, lighting, and the computer.
smartview.com/imaging/pills/
Page 2 of 36
Pill ImagerTM Software
Users Manual
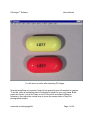
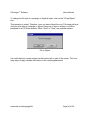
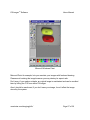
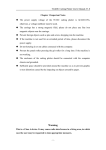
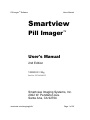
You will see Live Video after launching Pill Imager
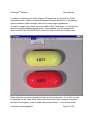
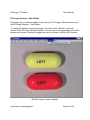
Now that everything is connected, begin by first preparing your pill samples for capture.
To do this, place a contrasting piece of construction paper on your copy stand. Black
paper also works. Look at the video on the VGA monitor and adjust lighting as
necessary. Also adjust the vertical lever to move the camera close to the pill or
photographed subject.
smartview.com/imaging/pills/
Page 3 of 36
Pill ImagerTM Software
Users Manual
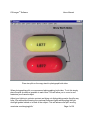
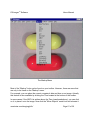
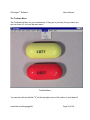
Place two pills on the copy stand to photograph both sides
When photographing pills, we recommend photographing both sides. To do this simply
place the pills as close as possible to each other. This will allow you to zoom in and
maximize your framed subject.
Adjust your lighting to optimize contrast and bring out distinguishing marks the pills may
have. We recommend lowering the overhead florescent lights while angling the light
dual light guides behind or in back of the subject. This will enhance the pill's scoring.
smartview.com/imaging/pills/
Page 4 of 36
Pill ImagerTM Software
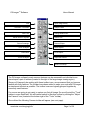
Quit
Still Mode / Live Mode
Write Text
Add an Arrow or Symbol
Draw a Rectangle
Users Manual
Open Image Library
Snap a Picture
Change Default Font
Draw a Line
Draw an Ellipse
Color an Object
Move Objects
Paint Order
Fill an Object
Erase an Object
Adjust the Camera
Date/Time Stamp
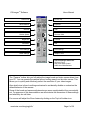
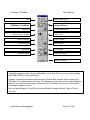
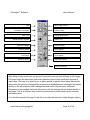
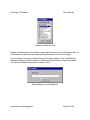
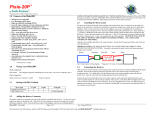
The Pill Imager software's most common features can be accessed from individual icons
placed upon a pair of toolbars (located to the right of the large image viewing region).
Since you'll frequently be working with these toolbar icons, we recommend that you become
familiar with their features. The toolbars have been added to make your work with Pill Imager
as simple and efficient as possible. The toolbar icons are logically grouped together by
commonly used features.
For now we are going to get ready to capture our first pill image. So we will revisit the "Tools"
toolbar in more detail later. We will instead switch to the other toolbar by clicking the "Adjust
the Camera" icon (located at the bottom-right of the "Tools" toolbar).
Once clicked the following Camera toolbar will appear (see next page).
smartview.com/imaging/pills/
Page 5 of 36
Pill ImagerTM Software
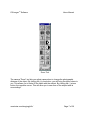
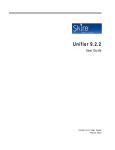
Zoom Lens
White Balance
Gamma
Shutter Speed
Users Manual
Focus Lens
Exposure
Gain
Reverse Video
Brightness
Contrast
Saturation
Hue
Load Settings
Save Settings
Reset Settings
Graphic Tools
Camera Settings Status Bar:
AF=Auto Focus
AGC=Auto Gain Control
AWB=Auto White Balance
The "Camera" toolbar lets you fully adjust the image board and video camera direct from
your PC. You can operate the camera without looking away from the video screen. This
allows you to quickly and effectively perfect the resolution of your video images.
Also what's nice is there's nothing mechanical to accidentally disable or undermine the
default behavior of the camera.
Some of the board and camera adjustments can seem complicated but they are actually
not. For purposes of this demonstration we will minimize the discussion of these settings
and what they do until later.
For now we will adjust the Zoom feature by clicking on the Top-Left toolbar icon.
smartview.com/imaging/pills/
Page 6 of 36
Pill ImagerTM Software
Users Manual
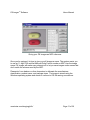
Zoom Tool
The camera "Zoom" tool lets you adjust camera lens to change the photographic
distance of the object. By clicking the (+) plus button, you will bring the object closer to
you. This allows you to better fill the frame with the subject. By clicking the (-) minus
button, the opposite occurs. This will allow you to see more of the subject and its
surroundings.
smartview.com/imaging/pills/
Page 7 of 36
Pill ImagerTM Software
Users Manual
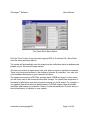
The following settings work in the same way: Exposure, Gamma, Brightness, Contrast,
Saturation, and Hue. In otherwords, after selecting one of these Icon, you will be
prompted to properly increase or decrease their settings.
The camera defaults to various automatic function settings. In most cases it is not
necessary to place the camera in manual mode and override its default behavior.
However, in situations of low light, or in artificially produced photographic environments
it is beneficial to manually condition the camera for optimal use.
There are four manual override adjustments you can make: Auto Focus, Auto White
Balance, Auto Gain Control, and Shutter Speed. In these situations you will first be
prompted to select either Auto or Manual mode.
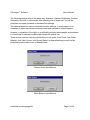
Camera Focus Auto/Manual
White Balance Auto/Manual
smartview.com/imaging/pills/
Page 8 of 36
Pill ImagerTM Software
Users Manual
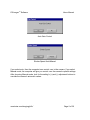
Auto Gain Control
Shutter Speed Auto/Manual
If you select auto, then the computer turns control over to the camera. If you select
Manual mode, the computer will give you control over the camera's optimal settings.
After choosing Manual mode, look for the setting's (+) and (-) adjustment buttons to
override the camera's automatic values.
smartview.com/imaging/pills/
Page 9 of 36
Pill ImagerTM Software
Users Manual
Camera Preset Selector
Once you create the desired photographic environment and you're familiar with the
camera's capabilities and settings, it is recommended that you make things easier for
Pill Imager's other users. This can be done by saving board and camera settings into
reusable presets and referenced by the types of objects commonly photographed.
The system will save and load the zoom, focus, and optical environment of the camera
and image board. The only thing typically left for the user is just snapping the picture.
To take advantage of this feature you should perfect the camera settings for each class
of items you'll typically photograph. For example, when photographing capsules you will
want to zoom in closer than normal. In addition, you will want to reduce the light more
than on other objects (this reduces glare). Now the next user doesn't have the
painstaking task of re-establishing the camera's settings.
smartview.com/imaging/pills/
Page 10 of 36
Pill ImagerTM Software
Users Manual
Save Video Settings
You can get rather creative in how you save your camera settings. Some users like to at
a minimum have their settings saved under their name so they always know where the
camera defaults to when they first start photographing.
There is virtually no limit to the number of presets you can have on the system.
Because the name you give becomes a file in Windows, please use names that won't
confuse the operating system. Valid names should NOT contain -- dashes, / hashes, \
slashes, ^ carets, % percent signs, # pound signs, +-* arithmetic signs, ()[]{} brackets
and braces, @ signs, and other such non-alpha-numeric characters. In other words,
please use only a combination of letters and numbers.
Now that you have properly framed your subject and satisfactorily adjusted the camera,
it is time to begin capturing images.
smartview.com/imaging/pills/
Page 11 of 36
Pill ImagerTM Software
Quit
Still Mode / Live Mode
Write Text
Add an Arrow or Symbol
Draw a Rectangle
Users Manual
Open Image Library
Snap a Picture
Change Default Font
Draw a Line
Draw an Ellipse
Color an Object
Move Objects
Paint Order
Fill an Object
Erase an Object
Adjust the Camera
Date/Time Stamp
Capturing images is simple. All you really need to do is click. This is done by simply locating
the "Snap a Picture" icon and clicking it.
However, we would recommend that new users Preview their captures by first clicking the
"Still Mode" icon which freezes the video. This allows you to see what you've captured before
saving it. If you don't like the image, simply click the "Live Mode" icon and you can readjust
your subject, camera, or both.
After you get the hang of it, you'll find its more efficient to simply click the "Snap a Picture"
icon only.
smartview.com/imaging/pills/
Page 12 of 36
Pill ImagerTM Software
Users Manual
Giving your Pill Images an NDC reference
Once you've captured, its time to give your pill images a name. The system wants you
to use an 11 digit FDA certified National Drug Control number or NDC # as the image
name. Pill Imager will make every attempt not to let you save images under names that
don't match the schema used by the NDC.
Please don't use dashes or other characters to delineate the manufacturer,
classification, product name, and package sizes. The image is stored using the
Windows operating system and needs to conform to OS file naming conventions.
smartview.com/imaging/pills/
Page 13 of 36
Pill ImagerTM Software
Users Manual
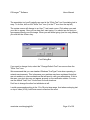
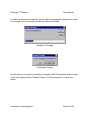
File | Save Photo Menu Option
Click the "Save" button to store the pill image by NDC #. Or choose File | Save Photo
from the menu (as shown above).
The system will automatically save the image into the verification station's database and
prepare you for the next pill image capture.
This lets you continue to capture and save over and over again in rapid fire succession.
There is not functional limitation in the number of pictures you can take. Your only limit
is the available disk space on your networks file server.
The images are stored as JPEG files and take about 100KB per image. In most cases,
you will never need to be concerned about disk storage. You usually can image tens of
thousands of pills before ever worrying about running out of disk space. For example, a
one gigabyte hard drive will store approximately 10,000 pill images. Most automated
mail-order pharmacies only maintain a library of a few thousand pills. So know that you
should have plenty of capacity on your system.
smartview.com/imaging/pills/
Page 14 of 36
Pill ImagerTM Software
Quit
Still Mode / Live Mode
Write Text
Add an Arrow or Symbol
Draw a Rectangle
Users Manual
Open Image Library
Snap a Picture
Change Default Font
Draw a Line
Draw an Ellipse
Color an Object
Move Objects
Paint Order
Fill an Object
Erase an Object
Adjust the Camera
Date/Time Stamp
After taking a few pictures you can see just how quickly you can build a library of pill images.
Pill Imager helps the automated mail-order pharmacy improve their verification process in
many ways. One way is by allowing you to place special notes and visual alerts that caution
those doing the verifying. Distinguishing marks can be highlighted and information annotated
directly on the pill image for better management and control of prescription fulfillment.
Reminders to place added disclosure information with the package can be written directly on
the image. This is an efficient way to alert the pharmacist to double check certain required
verification items.
(You should bookmark this page for we will continually reference the toolbar diagram above)
smartview.com/imaging/pills/
Page 15 of 36
Pill ImagerTM Software
Users Manual
The annotation tool you'll typically use most is the "Write Text" tool. Annotating text is
easy. To do this, click on the "Write Text" icon (it is the 3rd icon from the top-left).
The system cursor will change to an I-bar "|" text insert cursor. Click where you want
your text to appear. Once you've done that, start typing. You should see the text you
type appear directly over the image. When your are done typing (one line only please),
you must hit the <Enter> key.
Font Dialog Box
If you want to change fonts, select the "Change Default Font" icon across from the
"Write Text" icon.
We recommend that you use standard Windows TrueType Fonts when operating in
network environments. This is because your machine may have registered fonts that
are not resident on other workstations that will want to view your annotations. If this is
the case, your text also may not appear properly on the verification station. For now,
use the default "Arial" font. It looks best for most situations.
Feel free to change the other font attributes at will.
I would recommend working in the 12 to 36 point size range. And when overlaying text
on top of video (VGA), bold fonts seem to stand out the most.
smartview.com/imaging/pills/
Page 16 of 36
Pill ImagerTM Software
Users Manual
Add an Arrow or Symbol
To help denote information, yet not obstruct the view of the underlying objects, it is best
to use a call-out. A call-out is simply a line of text and accompanying arrow that points
to the offset subject.
Do this by first placing an arrow symbol next to the subject area. Use an angled arrow
when appropriate. The arrowhead should point at the subject and the tail should point to
a clearing so that a line and text can be drawn.
Now draw a line by clicking on the "Draw a Line" icon. Place the mouse cursor at the tail
of the arrow (without clicking a button). Once the mouse cursor is directly over the area,
click and hold the left mouse button while dragging the mouse cursor to the desired line
segment endpoint. Now release the left mouse button and you'll see a line appear.
Make fine level adjustments to the line by clicking and dragging (click-and-hold) one of
the line segment endpoints.
Drawing Rectangles and Ellipses follow the same sequence except that they will draw a
region instead of a line while dragging. Both the Rectangle and Ellipse will paint within
the desired region drawn.
smartview.com/imaging/pills/
Page 17 of 36
Pill ImagerTM Software
Users Manual
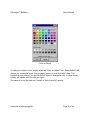
Color an Object
To change an object's color, simply select the "Color an Object" icon. Once clicked it will
change the operational mode from a drawing state to a "wait-to-modify" state. This
means that once clicked, you should click an object to change its color. In other words,
nothing will happen until you click an object.
The same is true of the next two "modal" or "wait-to-modify" options.
smartview.com/imaging/pills/
Page 18 of 36
Pill ImagerTM Software
Users Manual
Paint Order Layering
For the most part, the "Paint Order" tool will not be necessary. However, in some cases
objects need to be painted on top of other objects. Even so, this tool will only be
necessary when a small inset object needs to be painted entirely on top of another
object where the former completely engulfs the visual space of the latter.
To resolve this obvious conflict, you will want to establish an order or layering scheme.
The scheme simply allows you to determine the order in which one object paints versus
other on-screen objects. A value of one (1) represents the first object layer painted.
Therefore an object order # nine (9) represents the last object layer painted. In general,
you should assign a higher number to objects based on their relative size. Big objects
should paint first (order/layer 1-5) and small objects paint afterwards in upwards sliding
scale.
This operation is modal and waits for you to first click on an object to change its Paint
Order property.
smartview.com/imaging/pills/
Page 19 of 36
Pill ImagerTM Software
Users Manual
To change the fill style of a rectangle or elliptical object, click on the "Fill an Object"
icon.
This operation is modal. Therefore, once you have clicked the icon, Pill Imager will wait
until you click either a rectangle or ellipse. Once one of them is clicked, you will be
prompted for its Fill Style attribute. Either "Solid" or "Clear" are available options.
Fill an Object
Use solid objects to create a legend at the bottom left or right of the screen. This is an
easy way to supply valuable information to the verifying pharmacist.
smartview.com/imaging/pills/
Page 20 of 36
Pill ImagerTM Software
Users Manual
The Markup Menu
Most of the "Markup" tools can be found on your toolbar. However, there are some that
are only to be found on the "Markup" menu.
For example, you can place the current computer's date and time on an image. Actually
this feature is also available by clicking the Time located at the bottom of the toolbar.
In some cases, if the NDC # is written above the Time (mentioned above), you can click
on it, to place it onto the image. Now click the "Move Objects" modal tool and relocate it.
smartview.com/imaging/pills/
Page 21 of 36
Pill ImagerTM Software
Users Manual
Load stored Markup Files
Another valuable option is the ability to save and load previously stored Markup files. In
some cases you will reuse the same markup information over and over again.
Its convenient to save this markup information for later retrieval. This "Load Markup"
feature provides you with the ability to create a virtually limitless number of templates.
You can also establish templates for others to fill in.
Save Markups for Later Retrieval
smartview.com/imaging/pills/
Page 22 of 36
Pill ImagerTM Software
Users Manual
In addition, you can copy and paste individual markup objects. There are times where
you need to create several copies of an object (all being identical to the original). In this
case simply use the copy and paste tool from the Markup menu.
Copy and Paste Markup Objects
After you click "Copy" the above prompt will appear. This simply is a reminder that this
option is "modal" like many of the other markup tools. Pill Imager will patiently wait until
you click on an object you want copied.
After you've clicked on an object, you need to let Pill Imager paste the object onto an
image. It should be noted that you are not limited to pasting the object onto this image
only. Pill Imager lets you paste your object onto any of your pill images.
smartview.com/imaging/pills/
Page 23 of 36
Pill ImagerTM Software
Users Manual
You can also Delete Markups (all on-screen objects). Use this tool with caution, there's
no undo.
Remove an on-screen object
You can also Delete a single Object. This is a modal tool that can also be accessed
from the toolbar. You first click the tool, then click on the object you want to remove.
smartview.com/imaging/pills/
Page 24 of 36
Pill ImagerTM Software
Users Manual
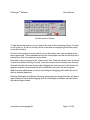
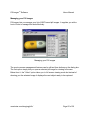
Managing your Pill Images
Pill Imager lets you manage your list of NDC based pill images. It supplies you with a
host of tools to manage this task effectively.
Managing your Pill Images
The most common management features can be utilized from buttons on the dialog box.
The first option simply lets you open a selected pill image for viewing full screen.
Below from it, the "Video" option takes you to full screen viewing mode but instead of
showing you the selected image it displays the next object ready to be captured.
smartview.com/imaging/pills/
Page 25 of 36
Pill ImagerTM Software
Users Manual
Paint the Selected Image
In addition to marking up (annotating) images, you can paint freehand directly on top of
an image using your favorite imaging software like Photoshop, Corel Draw, PhotoPaint,
PaintShop, and Microsoft Paint (which comes free with Windows).
Simply click the "Paint" button to further annotate your selected images.
smartview.com/imaging/pills/
Page 26 of 36
Pill ImagerTM Software
Users Manual
Microsoft Windows Paint
Microsoft Paint for example, lets you annotate your images with freehand drawing.
Please avoid resizing the image however you may destroy its aspect ratio.
Don't worry if you make a mistake, an original image is maintained and can be recalled
later by hitting the F10 from within Pill Imager.
Also it should be mentioned, if you don't save your image, it won't effect the image
stored by the system.
smartview.com/imaging/pills/
Page 27 of 36
Pill ImagerTM Software
Users Manual
In addition to painting an image file, various other file management features are useful.
For example, you can rename and delete a selected pill image.
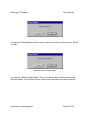
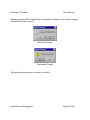
Rename a Pill Image
Confirmation Prompt
Occasionally you may find it necessary to change an NDC # associated with an image.
In this case simply click the "Rename" button. You'll be prompted to confirm your
choice.
smartview.com/imaging/pills/
Page 28 of 36
Pill ImagerTM Software
Users Manual
Deleting a selected NDC image works the similarly to renaming. First select an image,
then click the "Delete" button.
Delete a Pill Image
Confirmation Prompt
The system will prompt you to confirm your choice.
smartview.com/imaging/pills/
Page 29 of 36
Pill ImagerTM Software
Users Manual
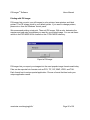
Printing with Pill Imager
Pill Imager lets you print your pill images to color printers, laser printers, and label
printers. The Pill Imager prints to your default printer. If you want to change printers,
please do so from the Windows' control panel.
We recommend printing a test print. Then exit Pill Imager. With a ruler, determine the
margins and page size coordinates you want for your printed image. You can set these
values in the PILLIMGR.INI file located on the C:\PILLIMGR\ directory.
Export a Pill Image
Pill Imager lets you export your images into the most popular image formats used today.
Files can be exported into formats such as PCX, TIF, GIF, BMP, JPEG, and TGA.
Each format has its unique special application. Choose a format that best suits your
unique application needs.
smartview.com/imaging/pills/
Page 30 of 36
Pill ImagerTM Software
Users Manual
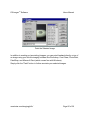
NDC List Management
In addition to exporting pill images, you can export the current list of NDC pills you have
imaged. The list will help you control and manage the pills you've imaged and help you
determine which pill images you are missing. The generated list is saved in a universal
format and is easily read by database and spreadsheet products like Microsoft Excel.
To export your NDC list, select "NDC" from the main menu, then choose "Export"
NDC | Export Menu Option
Enter the filename
Enter the path and name of the data file you want to be stored. Use the .CSV extension.
smartview.com/imaging/pills/
Page 31 of 36
Pill ImagerTM Software
Users Manual
In addition to Capturing Live Video images, Pill Imager lets you hook up any Twain
compatible device. Twain is a universal standard for image acquisition. It is a platform
used by scanners, digital cameras, and various other imaging peripherals.
To acquire images using Twain, you must install a 32 bit Twain driver. You will get this
from your imaging hardware device vendor. Once installed, you will reference the
device's name in the PILLIMGR.INI file under the Twain section and variable name.
When activated, your device should be shown on the Acquire menu. If you click, you will
be launched into the Twain driver that controls that device. After saving an image from
the device it will appear on the Live/Still video preview screen -- in full-screen mode.
smartview.com/imaging/pills/
Page 32 of 36
Pill ImagerTM Software
Users Manual
The Toolbars Menu
The Toolbars are there for your convenience. If they get in your way for any reason you
can turn them off / on from the main menu.
Toolbars Menu
You can also click on the little "X" on the top-right corner of the toolbox to turn them off.
smartview.com/imaging/pills/
Page 33 of 36
Pill ImagerTM Software
Users Manual
Pill Image Librarian -- Web Edition
Pill Imager lets you create a website of your library of Pill Images. Otherwise known as
the Pill Image Librarian -- Web Edition.
To create this Website is extremely simple. Just click on the "Website" menu and
choose "Build Pill Image Librarian Website". Now anyone in the organization with a Web
browser and access to these pill images can view your library of pills by NDC number.
Build Pill Image Librarian Website
smartview.com/imaging/pills/
Page 34 of 36
Pill ImagerTM Software
Users Manual
Pill Image Librarian -- Web Edition
This is a sample of how your Pill Image Librarian Website might look. If you ever modify
the generated Java enabled web page, save it with the .HTML extension so it doesn't
overwrite the original.
smartview.com/imaging/pills/
Page 35 of 36
Pill ImagerTM Software
Users Manual
This completes the Pill Imager software User's Manual. To exit Pill Imager, either click
"File" from the main menu and "Quit", or you can click the "X" at the top-right corner of
the Pill Imager software screen.
Quit Pill Imager
If you have any questions about this software, its configuration, its manual, or other
technical question pertaining to pill imaging we are here to help.
Smartview can be reach at:
Pill Imager About Screen
smartview.com/imaging/pills/
Page 36 of 36