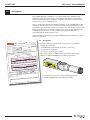
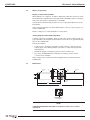
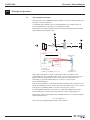
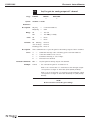
1
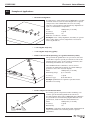
CONEX-LDS
Electronic
Autocollimator
RoHS
Compliant
USER’S MANUAL
Electronic Autocollimator
CONEX-LDS
Warranty
Newport Corporation warrants this product to be free from defects in
material and workmanship for a period of 1 year from the date of
shipment. If found to be defective during the warranty period, the product
will either be repaired or replaced at Newport’s discretion.
To exercise this warranty, write or call your local Newport representative,
or contact Newport headquarters in Irvine, California. You will be given
prompt assistance and return instructions. Send the instrument,
transportation prepaid, to the indicated service facility. Repairs will be
made and the instrument returned, transportation prepaid. Repaired
products are warranted for the balance of the original warranty period, or
at least 90 days.
Limitation of Warranty
This warranty does not apply to defects resulting from modification or
misuse of any product or part.
CAUTION
CAUTION
Please return equipment in
the original (or equivalent)
packing.
You will be responsible for
damage incurred from
inadequate packaging if the
original packaging is not
used.
Warranty does not apply to damages resulting from:
• Incorrect usage:
– Different use from that intended by NEWPORT.
– Use of a cable different from the one supplied by NEWPORT.
– Use or storage in environmental conditions other than those
indicated.
– Poor maintenance of the equipment, in particular, scratches on the
front optic, excessive humidity, shocks to the body.
• Modification of the product or any part thereof.
This warranty is in lieu of all other warranties, expressed or implied,
including any implied warranty of merchantability or fitness for a
particular use. Newport Corporation shall not be liable for any indirect,
special, or consequential damages.
No part of this manual may be reproduced or copied without the prior
written approval of Newport Corporation.
This manual has been provided for information only and product
specifications are subject to change without notice. Any changes will be
reflected in future printings.
EDH0322En1030 — 06/15
ii
Electronic Autocollimator
CONEX-LDS
Table of Contents
Warranty .................................................................................................................ii
EC Declaration of Conformity...............................................................................v
Definitions and Symbols.......................................................................................vi
Warnings and Cautions .......................................................................................vii
1.0
— Introduction .................................................................................1
2.0
— Description ...................................................................................2
2.1 Equipment..................................................................................................2
2.2 Modes of Operation ..................................................................................3
Display or Measurement Mode ...............................................................3
Analog Output or Data Gathering Mode ................................................3
2.3 Dimensions ................................................................................................3
3.0
— Principle of Operation............................................................4
3.1 Autocollimation Principle ........................................................................4
3.2 Electronic Autocollimator........................................................................5
4.0
— Characteristics ............................................................................7
4.1 Units of Measure .......................................................................................7
4.2 Specifications ............................................................................................7
4.3 Specification Limits ..................................................................................8
Calibration .................................................................................................8
Temperature ..............................................................................................9
Distance......................................................................................................9
Aperture Adjustment................................................................................9
Low Reflectivity.........................................................................................9
Polarization Effects .................................................................................10
Periodic Verification of Calibration ......................................................10
5.0
— Starting the Equipment ........................................................11
5.1 Set Up........................................................................................................11
Class II Laser Product.............................................................................11
Mounting Stability...................................................................................11
CONEX-LDS Supports.........................................................................12
Recommended Mirror and Mounts for Different Applications ....14
Wobble Measurements of Rotary Bearings ....................................14
Analysis of Structures........................................................................14
Vibration Tests ...................................................................................14
iii
EDH0322En1030 — 06/15
Electronic Autocollimator
CONEX-LDS
5.2 Electrical Connections ...........................................................................14
Grounding ................................................................................................15
Communication Mode ............................................................................15
5.3 Display or Measurement Mode .............................................................15
Alignment Procedure..............................................................................17
5.4 Gathering Angle Measurements Remotely ..........................................19
Analog Outputs Resolution vs. Gain ....................................................19
6.0
— Examples of Applications ...................................................20
7.0
— Maintenance ..............................................................................22
7.1 Sensor Maintenance ...............................................................................22
7.2 Cables .......................................................................................................22
7.3 Preventive Maintenance.........................................................................23
8.0
— Verification Kit (CONEX-LDS-VER) ..................................23
8.1 Description ..............................................................................................23
8.2 Function ...................................................................................................23
8.3 Verification Procedure ...........................................................................24
9.0
9.1
9.2
9.3
9.4
9.5
9.6
— Commands ..................................................................................25
Introduction.............................................................................................25
Communication Settings ........................................................................25
State Diagram ..........................................................................................25
Command Syntax ....................................................................................26
Command Execution Time.....................................................................27
Command Set...........................................................................................27
10.0 — Connector Interfaces .............................................................53
10.1 RS-422 Connector for Communication .................................................53
10.2 Analog Outputs Connector for Data Gathering ...................................53
Service Form .........................................................................................................55
EDH0322En1030 — 06/15
iv
Electronic Autocollimator
CONEX-LDS
EC Declaration of Conformity
CONEX-LDS
Year
mark affixed: 2015
EC Declaration of Conformity
The manufacturer:
MICRO-CONTROLE Spectra-Physics,
9, rue du Bois Sauvage
91055 Évry CEDEX, FRANCE
Hereby declares that the product:
Description: " CONEX-LDS "
Function: Electronic Autocollimator
Type of equipment: Electrical equipment for measurement, control and laboratory
use
–complies with all the relevant provisions of the Directive 2014/30/EU relating to electromagnetic compatibility (EMC).
– was designed and built in accordance with the following harmonised standards:
NF EN 61326-1:2013 « Electrical equipment for measurement, control and
laboratory use – EMC requirements – Part 1: General requirements »
NF EN 55011:2010/A1:2011 Class A
CEI 60825-1:2008 « Safety of laser equipment radiation »
– was designed and built in accordance with the following other standards:
NF EN 61000-4-2
NF EN 61000-4-3
NF EN 61000-4-4
NF EN 61000-4-6
Date : 26/06/2015
Dominique DEVIDAL
Quality Director
MICRO-CONTROLE Spectra-Physics
Zone Industrielle
F-45340 Beaune La Rolande, France
v
DC2-EN rev:A
EDH0322En1030 — 06/15
Electronic Autocollimator
CONEX-LDS
Definitions and Symbols
The following terms and symbols are used in this documentation and also
appear on the product where safety-related issues occur.
General Warning or Caution
The exclamation symbol may appear in warning and caution tables in this
document. This symbol designates an area where personal injury or
damage to the equipment is possible.
The following are definitions of the Warnings, Cautions and Notes that may
be used in this manual to call attention to important information regarding
personal safety, safety and preservation of the equipment, or important
tips.
WARNING
Warning indicates a potentially dangerous situation which can result in
bodily harm or death.
CAUTION
Caution indicates a potentially hazardous situation which can result in
damage to product or equipment.
NOTE
Note indicates additional information that must be considered by the
user or operator.
European Union CE Mark
The presence of the CE Mark on Newport Corporation equipment means
that it has been designed, tested and certified as complying with all
applicable European Union (CE) regulations and recommendations.
Warnings and Cautions
ATTENTION
This stage is a Class A device. In a residential environment, this device
can cause electromagnetic interference. In this case, suitable measures
must be taken by the user.
EDH0322En1030 — 06/15
vi
Electronic Autocollimator
CONEX-LDS
Warnings and Cautions
WARNING
IN ORDER TO COMPLY WITH SAFETY STANDARDS CONCERNING THE
USE OF THIS EQUIPMENT, THE USER MUST TAKE THE FOLLOWING
PRECAUTIONS AND HEED THE WARNINGS THAT APPEAR LATER IN
THIS MANUAL.
CAUTION
The user must read the warnings in the CONEX-LDS User’s Manual
before operating the equipment
CAUTION: LASER SAFETY
The CONEX-LDS is a CLASS II LASER INSTRUMENT according to the
IEC60825-1 standard:
DO NOT STARE INTO BEAM
Max. Power <1 mW @ 670 nm
RAYONNEMENT LASER
NE PAS REGARDER DANS LE FAISCEAU
LASER RADIATION
DO NOT STARE INTO BEAM
ATTENTION RAYONNEMENT LASER
EN CAS D'OUVERTURE, EXPOSITION
DANGEREUSE AU FAISCEAU
APPAREIL A LASER DE CLASSE 2
CLASS II LASER PRODUCT
P <1 mW; λ = 670 nm
IEC60825
DANGER. LASER RADIATION
WHEN OPEN, AVOID
DIRECT EXPOSURE TO BEAM
For safety reasons, using this instrument in a dark environment is NOT
recommended: The lower the level of light, the larger the diameter of
the eye's pupils allowing more of the laser beam to damage the retina.
This also reduces the energy level which can damage the retina.
Device
CONEX-LDS
Manufacturer:
Zone Industrielle
45340 Beaune-la-Rolande
France
S/N:
Manufactured:
Complies with CFR 21 Subchapter J
vii
EDH0322En1030 — 06/15
Electronic Autocollimator
CONEX-LDS
WARNING:
Stop using the autocollimator if it emits smoke, it is particularly warm, it
has an abnormal smell, makes an abnormal noise, or it shows any other
unusual signs.
Do not put anything in the CONEX-LDS autocollimator, and do not spill
any liquid on the sensor.
If it is integrated in a machine, ensure there is sufficient cooling: leave
enough space for air flow or use heat extraction means.
Never open the CONEX-LDS sensor, as there are risks of short circuits
and optical losses. Opening the CONEX-LDS voids the warranty.
Do not connect anything to the CONEX-LDS other than the cables
supplied by NEWPORT.
Do not use the CONEX-LDS autocollimator if you have noticed that it is
not working correctly.
CAUTION: SAFETY REGULATIONS
Do not use the instrument in an explosive environment.
Make sure there is no liquid near the instrument.
Make sure that the instrument is not exposed to excessive humidity
(more than 85%).
Do not replace any part and do not modify the equipment in any way.
Should it require servicing or repairs send it back to a Newport service
center.
NEWPORT SHALL NOT BE HELD LIABLE IF THE ABOVE-MENTIONED
WARNINGS ARE NOT FOLLOWED.
EDH0322En1030 — 06/15
viii
Electronic Autocollimator
CONEX-LDS
Electronic Autocollimator
CONEX-LDS
1.0 —Introduction
This manual describes the operation and conditions necessary for the
proper use of the NEWPORT CONEX-LDS autocollimator.
It also provides the basic maintenance to keep the instrument in good
working order.
IMPORTANT
The CONEX-LDS autocollimator is an optical angle measuring instrument.
A calibration certificate is provided by Newport with every new ConexLDS purchase, as well as with any recalibration service done by the
factory. It provides the values of the parameters that are stored in the
memory of the controller so that the instrument gives accurate
measurements. BEFORE any measurement, the operator must make sure
that the correct parameters are loaded in memory. Refer to the
corresponding chapter to check or update the correct parameters or
modify the angular units.
RECOMMENDATIONS
Read Section 5.0, “Starting the Equipment” before connecting the
autocollimator.
NOTE
The CONEX-LDS Controller GUI, software drivers and manuals can be
downloaded from www.newport.com/CONEX-LDS.
1
EDH0322En1030 — 06/15
Electronic Autocollimator
CONEX-LDS
2.0 —Description
The CONEX-LDS autocollimator is a compact and self-contained angle
measuring instrument. It measures the angular variations of a reflective
surface, a plane mirror for example, using the movement of the reflected
beam on its position sensing sensor.
A PC is required to display the angular readings of the CONEX-LDS via the
Controller GUI and also to record measurement data. A stand alone or PC
card data acquisition unit can also be connected to the analog outputs. The
XPS Universal Motion Controller can also be used to gather data from the
CONEX-LDS, see Section 5.4. The CONEX-LDS Controller GUI can be
downloaded from www.newport.com.
This manual describes the use of the CONEX-LDS autocollimator for all its
modes of operation.
!∀#∃!%&∃∋(!∃#
%∃#+(
!∀∀#∃%&∋(&)#∗
789:;9<:7<
2.1
14256
,−.&/&01,23
)&∗+#+
2∗=#∃>!%?#∗≅
The autocollimator is delivered in a protective case which
contains the following:
• A CONEX-LDS optical head (including controller).
• A calibration certificate.
• A 5 meter communication cable.
−>#
∃!%(Α∃
6#>&∋(&+Λ#∀Ε
6(∋∃+#!∃&∀+0∋
0#∗(ΒΧ,−.
Α?%
6#>&∋Α&∀∃#∋
,∃!−./#&∀+0∋
7<Χ<78Χ::Φ
6∆&∋(&≅Ε∃?(
1∋∃2+%&3.04∋∃
.
<Η<78Η::ΦΙϑΚ
78Η:;Η<:7<Η7
0#∗(ΒΗ,−.Η
6#>&∋Α&=?)Γ?(∃
52%∋&∀+0∋
∃!∃8
)&7∋+8.∃∋−&∋∃
∃Ε(≅
Κ∃∃(Α∃≅&>(≅Α
Α(
%!%?#∗&)!%!+#Μ
0∃?%Ε∃(&!))(∀
#2!∀&/∃2#∋∃2.0
+#+%!9.∋&+//∋(#+
:Ι;;&Ν
ϑ!Β&Ρ
Α∃&>(≅Α∃Ε(&Π
<Ν&∋(&+!&Ο!+(
9Χ&;&Θ∃!∋
The power supply, CONEX-LDS-PS and the RS-422 to USB
adapter, CONEX-USB-RS422 are ordered separately.
Χ:ΙΤ7&Ν
ϑ!Β&Σ
Equipment
!∀#∃%∃&∋()∋(∗
8:
Φ:
<:
7:
Θ∃!∋
:
Χ7:
Χ<:
ΧΦ:
Χ8:
Χ<&:::
Χ7&:::
Χ7&;::
:
Θ∃!∋
Χ;::
7&:::
;::
7&;::
<&:::
!∀#∃%∃&∋()∋(+
8:
Φ:
<:
7:
Θ∃!∋
:
Χ7:
Χ<:
ΧΦ:
Χ8:
Χ7&:::
Χ7&;::
Χ<&:::
ΥΡ
ΕΜ+!Μ(≅
ΥΣ
1∋##2∀98
8Τ:Τ
8ςΩΤ
≅
&Π9Χ&<∆0
Υ!∃!>Ε%∃(/&&&&&&
&&&&&&&&&&&&&&&&&<<
:
Θ∃!∋
Χ;::
5Ρ
ΞΙ8Ω8
5Σ
ΤΙς<
)&(+∃+0∋#∋∃8
>
>&&∴&−?!>&Φ:>
4(>∀Ε∃!%Α∃(&
& &Ξ:Ν&[&ςΤ:&∗
&&&&&&&&&&&&&&&&&&&&&
ϑ?∃#?∃&Α%?+?≅Ε&/
:&>>
!Ο!?+&/&&&&&&&&&&&&&&7:
−?≅%!∗)(&∋(&%∃
&&&&&&&&&3ς;8::Φ
/&&&&&&
!∗)&
∋Α&]
Ε=Ε∃(∗)(&
0#>>(∗%!?∃(
≅
EDH0322En1030 — 06/15
7&:::
;::
Ψ
,Ζ
7&;::
<&:::
<:<:
7:
Accessories and options can be ordered separately.
• 20-meter USB/RS-422 communication cable.
)& !00∋∀#8
2
Electronic Autocollimator
CONEX-LDS
2.2
Modes of Operation
2.2.1
Display or Measurement Mode
When linked to a computer, by USB or Ethernet to RS-422 connector cable,
the instrument communicates through ASCII commands. Refer to Chapter
9.0 for the description of mnemonic commands.
A dedicated Controller GUI provides access to the global functions of the
instrument.
This Controller GUI has its own manual. Please refer to it for a proper use
of the CONEX-LDS.
Refer to chapter 5.2 of this manual for connections.
2.2.2
Analog Output or Data Gathering Mode
2 analog outputs are available. They provide two output voltages that are
proportional to the angular measurements of the qX or qY (pitch and yaw)
axes of the CONEX-LDS.
This mode enables:
• Connection to an analog acquisition chain (can be connected to the
analog input of the Newport XPS controller or other data acquisition
instruments).
• Graphical display of angular positions on an oscilloscope.
• Use of the CONEX-LDS autocollimator for analog control, mirror
correction for example.
These outputs are converted from the digital values calculated by the
CONEX-LDS.
2.3
Dimensions
ø1.496-0.0008
-0.004
(38-0.02
-0.1 )
2.83
(72)
SQR 1.57
(40)
.35
(9)
.32
(8.1)
SQR 1.57
(40)
1.035”-40
THD
0
ø1.378-0.004
0
(35-0.1
)
1.89
(48)
5.39
(137)
10.60
(269)
HOLE M3 THD
USABLE DEPTH: .12 (3)
FOR GROUNDING
NOTE
A minimum 100 mm bend radius is needed to relieve stress on the
connectors.
3
EDH0322En1030 — 06/15
Electronic Autocollimator
CONEX-LDS
3.0 —Principle of Operation
3.1
Autocollimation Principle
The function of the CONEX-LDS autocollimator is based on the well known
principle of autocollimation.
A standard autocollimator uses a rear-illuminated cross light reticle A,
located behind the focal plane of a collimating lens B.
The light is projected to infinity which is reflected back to the instrument
with a plane reflecting mirror C.
A
B
E
C
D
CONEX-LDS
F
Measurement
Mirror
(Output Objective Lens Focal Length)
∆Y
PSD Sensor
2.∆θ
Beam
Splitter
Objective
Lens
Laser Diode
X = F.tan(2.∆θ)
α = 1/2 arctan(∆Y/F)
F = 250 mm => ∆θ = 2000 µrad => ∆Y = 1 mm
CONEX-LDS
Measurements = ∆θ
The reflected beam is focused on the back of the focal plane of the
collimating lens. A beamsplitter D is used to recover 50% of the returned
light to form an image at the source reticle. Most instruments use a
measuring eyepiece E with a dark cross reticle to observe this
autocollimated image.
If the reflected image is coincident with the incident beam, the mirror is in
an autocollimating position. In this case, the last image of the source reticle
will superpose with the dark cross line of the eyepiece reticle.
For an angular movement of the mirror C, a lateral displacement of the
reflected image is observed at the focal plane of the collimating lens.
If the value of the focal length of the collimated lens is “F”, then the lateral
displacement will be:
DY = F x tan(2Dq)
where Dq is the angular displacement of the mirror.
EDH0322En1030 — 06/15
4
Electronic Autocollimator
CONEX-LDS
This displacement can be measured in two ways, using the measuring
eyepiece:
• Mechanical angular movement Dα of the autocollimator in order to recenter the reflected image inside the dark reticle (then Dq = Dα).
• Lateral movement of the cross reticle to measure DY (then Dq = DY/2F).
Autocollimation is a common method to check and align optical elements,
such as laser cavities, Fabry-Pérot, and is used in all optical workshops to
measure prism characteristics and angular deviations. This is also a useful
tool for measuring table flatness. On the whole, these operations are done
manually.
3.2
Electronic Autocollimator
The advantage of the electronic autocollimator is that it automates angular
measurements.
Thus:
• It is possible to perform fast or slow measurements.
• It can average a large number of measurements.
• It enables automatic alignment.
For the CONEX-LDS autocollimator, the basic principles that are used to
obtain the values of angular displacements are as follows:
• The source reticle is a Laser diode.
• The measuring eyepiece is a position sensing device.
Laser Diode Specifications
• 1 mW laser diode; λ = 670 nm.
• 5 kHz modulation.
Position Sensing Device (PSD)
• 2 x 2 mm PSD sensing area: Delivers analog signals proportional to the
position (VX and VY) of the beam.
• Sensitivity: 0.003 µrad/√Hz
The reflected beam is focused onto the XY position sensing device and
thus the two PSD signals are used to calculate the angular deviations.
5
EDH0322En1030 — 06/15
Electronic Autocollimator
CONEX-LDS
F
H
C
E
D
B
G
I
A
Description
A Laser diode module
F Alignment eyepiece
B Beamsplitter I
G Magnifier
C Collimating lens
H Position sensing device
D Mirror
I
Lighting LED (red)
E Beamsplitter II
One portion of the light is used for coarse visual alignment (visible laser
diode). A centered circle indicates the acceptable zone for automatic
recording.
The equivalent focal length, combining the collimating lens, C, and the
magnifier, G, is equal to 250 mm.
EDH0322En1030 — 06/15
6
Electronic Autocollimator
CONEX-LDS
4.0 —Characteristics
4.1
Units of Measure
The angular values are given in µrad, which is also the unit used for
calibration.
ANGULAR CONVERSIONS
1 mrad ~ 206 arc-seconds
1 µrad ~ 0.206 arc-second
1 arc-second ~ 4.85 µrad
1 mdeg ~ 17.45 µrad
These different units can automatically be displayed by changing the units
in the Controller GUI.
4.2
Specifications
4.2.1
CONEX-LDS Optical Head
• Wavelength
• Peak power
• Pulse frequency
• Beam diameter
• Beam direction
• Equivalent focal length
• Beam divergence
• Ocular field
• Measurement range
• Max. working distance
• Weight
4.2.2
670 nm
<1 mW (Class II laser)
5 kHz
22.5 mm
<0.5 mrad in relation with autocollimator body
250 mm
0.1 mrad
±15 mrad
±2000 µrad
5m
2.4 lbs (1.1 kg)
CONEX-LDS Controller
• 2 x 16-bit analog outputs
• Power supply
•
•
•
•
±5 V = ±2000 µrad (gain sets to 1)
5 VDC (±5%), 0.25 A. Do not connect to a
DC power supply network.
Measurement Distortion
±(5 ±0.02 x measurement) µrad
±5 µrad around 0 (i.e. ±2%)
Measuring noise with maximum return
Resolution/dynamics
0.003 µrad/√Hz up to 2 kHz
Max. measuring frequency 2000 Hz
CONEX-LDS communication mode
RS-422/RS-485 4 wires full duplex without
handshaking (120 Ω resistor termination
included)
7
EDH0322En1030 — 06/15
Electronic Autocollimator
CONEX-LDS
4.2.3
Environment
The performance of an autocollimator largely depends on the conditions in
which it is used:
• At a long working distance, the field of acquisition is reduced and the
optical signal is disturbed by fluctuations in the air (see section 4.3.3).
• With low reflectivity mirrors, the influence of electrical noise is fairly
substantial (see section 4.3.5).
• If the diameter of the reflecting mirror is greatly reduced, the accuracy
of the measurement may be affected (see section 4.3.4).
The above characteristics are given for an autocollimator used with a
mirror grater than or equal to 25.4 mm in diameter with reflectivity higher
than 80% at 670 nm and a working distance of less than one meter.
The operating limits of the CONEX-LDS autocollimator are as follows:
• Min. reflector return
2% at 670 nm
• Operating temperature
+15 °C to +25 °C
• Humidity
10% to 80%
• Storage temperature
-10 °C to +50 °C
The next section, “Specification Limits” describes the specifications of the
CONEX-LDS autocollimator according to the conditions of use.
4.3
Specification Limits
4.3.1
Calibration
A calibration certification comes with every CONEX-LDS. Parameters to
correct for linear errors are listed in the certificate. To view the stored
parameters in the unit, use the CD command.
+X
Back
w
ard B
eam
+Y
+Y
+X
Rotation around horizontal and vertical axes; Z: Beam Axis.
All these parameters are stored in the non-volatile memory of the
instrument after calibration (dedicated factory calibration bench).
These calibrating parameters were optimized to obtain the best
measurement results. We strongly recommend not to change these
parameters.
These parameters have been defined for the following conditions:
• Temperature
22 °C ±2 °C
• Mirror diameter
≥1 in. (25.4 mm)
• Reflectivity
80% at 670 nm
• Working distance
0.1 m
EDH0322En1030 — 06/15
8
Electronic Autocollimator
CONEX-LDS
4.3.2
Temperature
The accuracy of the measurement is affected by changes in room
temperature.
The value measured is lower than the actual measurement when the
temperature drops.
4.3.3
Distance
When the working distance is increased to over 3 meters, the measurement
range decreases.
With the distance D in meters, the maximum angular measurement range, Amax
in µrad, which remains linear, is obtained by:
RG = ±6000 µrad/D (D >3 m)
Although the CONEX-LDS autocollimator uses a Laser source that is
perfectly collimated and of low divergence, the resulting calibration curves
may vary slightly for greater distances (>3 meters).
This does not apply to alignment applications (which returns a value 0.0).
Ambient air turbulence causes a considerable amount of noise on
measurements taken when the working distance increases. Turbulence in
the vicinity of the beam path should be minimized to obtain accurate
results.
4.3.4
Aperture Adjustment
MOTION OF REFLECTED BEAM
When the mirror diameter is smaller than the beam diameter, only a part
of the beam is returned into the CONEX-LDS head. If the mirror is
translated, the resulting motion of the reflected beam may generate a
measurement error.
To minimize the errors attributed to mirrors smaller than the beam
diameter, an aperture may be installed to reduce the output beam diameter
down to the mirror diameter. However, the usable measurement range
which is given relative to distance, decreases when the mirror diameter is
reduced.
4.3.5
Low Reflectivity
Using a CONEX-LDS autocollimator on low reflectivity mirrors does not
affect its linearity.
However, the measuring noise increases when the amount of light sent
back by the reflector is reduced. The multiplication factor due to noise is
obtained by:
K = (398 ÷ KS).(100 ÷ KR)
where:
• KS = Reflector-beam overlap in mm2 (aperture adjusting).
• KR = Reflector reflectivity in %.
The usable measurement range, which is given relative to distance,
decreases as mirror reflectivity is reduced.
9
EDH0322En1030 — 06/15
Electronic Autocollimator
CONEX-LDS
4.3.6
Polarization Effects
The CONEX-LDS autocollimator uses a circular polarized beam to reduce
the interference caused by internal components. The immediate result is
that the instrument is sensitive to the causes of depolarization.
We recommend not to use the autocollimator through birefringent
materials (ex.: Plexiglas), or to use high incidence reflections on the
trajectory of the measuring beam. The error can quickly reach values of
100 µrad.
4.3.7
Periodic Verification of Calibration
In order to guarantee valid measurements during the CONEX-LDS
autocollimator life, periodic calibration must be carried out.
When used in a normal, fixed setup, under constant temperature and no
vibration conditions, annual calibration is recommended. Contact our
service team to schedule calibration, after which a new calibration
certificate will be provided.
In more rigorous conditions of use, it is recommended that the calibration
be checked more frequently. NEWPORT offers a verification kit, (CONEXLDS-VER) comprised of a certified calibrated wedge window and a
mechanical mount. The kit enables a quick verification of the CONEX-LDS
outputs, thus making sure that the instrument is properly calibrated (see
chapter: “Calibration Verification of the CONEX-LDS Autocollimator”).
This function is available through the CONEX-LDS Controller GUI.
EDH0322En1030 — 06/15
10
Electronic Autocollimator
CONEX-LDS
5.0 —Starting the Equipment
5.1
Set Up
5.1.1
Class II Laser Product
RAYONNEMENT LASER
NE PAS REGARDER DANS LE FAISCEAU
LASER RADIATION
DO NOT STARE INTO BEAM
APPAREIL A LASER DE CLASSE 2
CLASS II LASER PRODUCT
P <1 mW; λ = 670 nm
IEC60825
CAUTION
CLASS II LASER RATED
FROM THIS APERTURE
22.5 mm
AVOID
EXPOSURE
Laser radiation is emitted
from this aperture
NOTE
Beam Divergence: 0.1 mrad
Wavelength: 670 nm
Peak Power: <1 mW @ 5 kHz
5.1.2
Mounting Stability
The stability of the mirror mount and the support of the CONEX-LDS is critical
to minimize the variations in angular measurements. Depending on the
application, the CONEX-LDS can be mounted on a fixed rail or on adjustable
supports.
Newport supplies adjustable and stable supports to facilitate the setup of the
CONEX-LDS autocollimator to the reference mirror. For fixed mounting, these
components are supplied with the CONEX-LDS-VER, calibration verification kit.
11
EDH0322En1030 — 06/15
Electronic Autocollimator
CONEX-LDS
5.1.2.1
CONEX-LDS Supports
1. Order the CONEX-LDS-SL support when tip/tilt adjustment is required.
– Axis height: 75 mm
– qX and qY Angular range: ±2°
– Resolution: 200 µrad
– Sensitivity: 20 µrad
4 HOLES ø.30 (7.5)
ON 3.98 x 2.0 (101 x 50.4)
4.72
(120)
CONEX-LDS
RANGE: ±2°
DIMENSIONS IN INCHES
(AND MILLIMETERS)
BM17.04N
RANGE: ±2°
SL51 BODY
ø4.88
(124)
5.39
(137)
2.95
(75)
3.74
(95)
2.11
(53.5)
3.15
(80)
Adjustable Support – Axis height: 75 mm
EDH0322En1030 — 06/15
12
CONEX-LDS-SL
Electronic Autocollimator
CONEX-LDS
2. Order the CONEX-LDS-SLXY support when tip/tilt and XY adjustment is
required.
– Axis height: 100 mm
– XY Travel range: ±12.5 mm
– XY Resolution: 1 µm
– qX, qY Angular range: ±2°
– qX, qY Sensitivity: 20 µrad
4 HOLES ø.30 (7.5)
ON 3.98 x 2.0 (101 x 50.4)
CONEX-LDS
DIMENSIONS IN INCHES
(AND MILLIMETERS)
BM17.25
RANGE: ±2°
SL51 BODY
BM17.04N
ø4.88
(124)
RANGE:
±2°
7.52
(191)
3.94 ±.49
(100 ±12.5)
M-UMR8.25XYZ
.98 ±.49
(25 ±12.5)
3.74
(95)
3.15
(80)
3.58
(91)
4.72
(120)
3.23
(82)
Adjustable Support – Axis height: 100 mm
13
CONEX- LDS-SLXY
EDH0322En1030 — 06/15
Electronic Autocollimator
CONEX-LDS
5.1.2.2
Recommended Mirror and Mounts for Different Applications
• The amount of light returned at 670 nm must be more than 2% (100% for
optimal results).
• Surface Flatness (PV) = λ/4 at 670 nm over the clear aperture of 25 mm
(0.97 in).
Mirror ø 1 in. (25.4 mm), thickness 0.24 in. (6 mm)
Suprema ø 1 in. (25.4 mm) mirror mount
5.1.2.3
10D20ER.1-PF
SS100-F3H
Wobble Measurements of Rotary Bearings
For wobble measurements, a surface flatness (PV) = λ/20 fringe is
recommended (mirror 20Z40DM.4).
The mirror mounts chosen will depend on the application. A TTN80 Tilt
Platform is suitable for wobble measurements.
5.1.2.4
Analysis of Structures
Mirror ø 2 in. (50.8 mm), thickness 0.24 in. (6 mm)
Ultima ø 2 in. (50.8 mm) mirror mount
20D10DM.4
U200-AC3K
The Ultima series mirror mount will be fixed onto the structure or onto an
adapter frame.
5.1.2.5
Vibration Tests
Mirror ø 1 in. (25.4 mm) - 0° to 45°
Flexure Industrial Optical Mount
10D20ER.1-PF
MFM-100
The mirror is glued to the vibrating structure either directly, or a rigid
mirror mount. The advantage of the MFM is that it can be mounted flat on a
surface, resulting in a more rigid setup.
For other mirror and mount options, please consult Newport technical
support.
5.2
Electrical Connections
CAUTION
Before connecting the communication cable, verify that the CONEX-LDS
is NOT powered.
CAUTION
Do not use any communication or power cable other than the one
supplied by NEWPORT.
EDH0322En1030 — 06/15
14
Electronic Autocollimator
CONEX-LDS
5.2.1
Grounding
To prevent damage to the CONEX-LDS due to static buildup, the device
must be properly grounded.
Failure to ground the unit may result in the unit shutting down
unexpectedly or ceasing to communicate with the computer. This problem
can be minimized by not touching the unit during operation. If the unit fails
due to static discharge, unplugging it and plugging it back in or sending a
Reset Controller (RS) command will usually fix the problem.
Most Newport devices are grounded via the shield wire of the data cables.
For proper operation, a ground lead should be connected to the grounding
screw located on the rear panel of the CONEX-LDS.
5.2.2
Communication Mode
• RS-422/RS-485 4 wires full duplex without handshaking. 120 ohms
resistor termination included.
• The configuration of the communication device such as CONEX-USBRS422 is described on a document provided with the device.
• The “COMM” connector pin-out is described chapter 10.1.
5.3
Display or Measurement Mode
The CONEX-LDS can be quickly setup to measure the variations in the
angular position of a mirror. Follow the steps below to setup the CONEXLDS Controller GUI and aligning the mirror to start taking angle
measurements.
Refer to the Controller GUI manual to load and start the CONEX-LDS
Controller GUI.
When the CONEX-LDS is power on and connected to your computer, start
the CONEX-LDS application. At its opening, a list of available serial COM
ports is displayed. Next, select the right COM port in relation to the
connected CONEX-LDS to use it with this user's interface.
15
EDH0322En1030 — 06/15
Electronic Autocollimator
CONEX-LDS
Select Laser power on.
NOTE
Allow 30 minutes for warm-up to gather reliable measurements.
The window shown is the main tab. To change the units, go to the Setup
window, Units Configuration, "FactoryConfig" for example.
Return to the Main tab. Notice that in this case, the beam is not reflected
back to the sensor - 0% light level.
EDH0322En1030 — 06/15
16
Electronic Autocollimator
CONEX-LDS
Proceed with Alignment of the mirror.
5.3.1
Alignment Procedure
To obtain an angular measurement, make sure that the beam returns to the
CONEX-LDS autocollimator and that the power is high enough. The usable
beam comes from a 1 mW laser diode emitting a 22.5 mm diameter beam at
670 nm wavelength.
When not aligned in Measurement mode, the Controller GUI displays the
value of the measuring range (the most frequent being a static 0) instead of
the value measured on the axes.
The beam must first be directed at a reflecting mirror.
To determine the location of the return beam, use a white piece of paper,
see figure below.
White
paper sheet
Reflecting
mirror
Adjust the mirror so that most of the return beam, if not all, enters the
CONEX-LDS. Move the white piece of paper closer to the autocollimator as
needed.
17
EDH0322En1030 — 06/15
Electronic Autocollimator
CONEX-LDS
Reflecting
Mirror
Closer visual alignment is now possible. The returned beam on the frosted
glass can be seen. A reticle formed by a circle indicates the angular range
in which measurement is possible: it is a circle corresponding to a 2 mrad
radius.
Working Area
(2 mrad)
Visual Area
(15 mrad)
Alignment is then initiated by positioning the return beam within this
working circle by adjusting the angular position of the mirror or
autocollimator.
The light level indicator will confirm that the beam is returning properly.
The window should now show the mirror's angular orientation relative to
the CONEX-LDS.
Refer to the Controller GUI manual for additional information about
features and capabilities.
EDH0322En1030 — 06/15
18
Electronic Autocollimator
CONEX-LDS
5.4
Gathering Angle Measurements Remotely
There are three ways of gathering and saving angular data remotely, first
two via the CONEX-LDS Controller GUI's Acquisition tab and the third
directly through the analog outputs.
NOTE
Refer to the CONEX-LDS Controller GUI and manual for Data Gathering
using an XPS.
Using the Acquisition tab in the Controller GUI, allows for Manual or
Dynamic acquisition. Manual acquisition is triggered by a button to take a
reading everytime the button is pushed. Dynamic acquisition is continuous
over specified number of samples and at a specified delay. The data can be
saved as a text file.
The second acquisition method utilizes the data logging and graphical
display capabilities of the XPS Universal controller. However, this requires
a cable to be connected from the CONEX-LDS analog out, to the XPS analog
in I/O port. Refer to Section 10 for the analog output connector type. The
analog voltage gathered by the XPS can also be saved in the XPS controller.
The third acquisition method via a third party datalogger requires a cable
between the analog output of the CONEX-LDS and the data logger. Since
data is constantly streaming through the analog output, the data logger
must be set up to accept the voltage signals.
Note that for any data gathering using the analog output of the CONEX-LDS,
a conversion must be made using this table of voltage gains.
5.4.1
Analog Outputs Resolution vs. Gain
AO Gain
GX, GY
commands
1
2
5
10
20
50
100
200
1)
2)
Full Scale
Range (1)
Resolution (2)
Output Ratio
(µrad)
±2000
±1000
±400
±200
±100
±40
±20
±10
(µrad)
0.0610
0.0305
0.0122
0.0061
0.0031
0.0012
0.0006
0.0003
(µrad/V)
400
200
80
40
20
8
4
2
The full scale ranges correspond to ±5 V output.
±5 V conversion on 16 bits. Analogue output resolution = 153 µV.
19
EDH0322En1030 — 06/15
Electronic Autocollimator
CONEX-LDS
6.0 —Examples of Applications
• Mechanical alignment
In a laboratory environment, the CONEX-LDS is a useful
tool that can be used in accurate alignment of optical
components. The CONEX-LDS can serve as a long,
reference optical path for quick and easy alignment of
optics or mechanical components.
Field:
±2000 µrad (±7 arcmin)
Accuracy:
±5 µrad
Reflectivity:
>2%
Diameter of reflector:>10 mm
Examples: Laser cavity alignment, assembly of optical
parts, wafer angle position, alignment of structures
over long distances.
// A
A
• 1 axis angular trajectory
• 2 axis angular trajectory (guide)
• Flatness measurement (metrology of a granite laboratory table)
The geometrical qualification of a precision structure
or machine requires special precautions as far as the
stability and accuracy of the results provided by the
measuring instrument are concerned.
The CONEX-LDS autocollimator, can be used to
generate an exhaustive mapping of a table making it
possible to trace the stresses rapidly.
Field:
±2000 µrad (±7 arcmin)
Measuring range:
up to 5 meters
Accuracy:
±5 µrad
Reflector type:
Ø 50 mm mirror
Example: Qualification of granite optical benches.
Machine-tool testing.
• Prism comparison and measurement.
For testing optical components in the workshop, non
contact optical measuring methods are the most
accurate and the safest. The CONEX-LDS autocollimator
is a powerful tool for measuring angular differences in
prism facets, both in reflection and transmission.
Field:
±2000 µrad (±7 arcmin)
Accuracy:
±5 µrad
Reflectivity:
>2%
Examples: Comparing work angles with standard block
angles. Automatic lens centering station. Optical
assemblies.
α, β
EDH0322En1030 — 06/15
20
Electronic Autocollimator
CONEX-LDS
• Goniometry
In this example, the CONEX-LDS autocollimator is used as
an angular reference for constant monitoring of the
indexing errors of a rotary stage. The errors are measured
in relation to the rotation of the lower plate which is
equipped with a precision encoder.
Field:
±2000 µrad (±7 arcmin)
Linearity:
<2%
Max. frequency:
2 kHz sampling rate (standard)
Accuracy:
±5 µrad at 2 kHz
Examples: Rotary stage and goniometer qualification.
• Trajectory or Run out measurements
The quality of translation is measured by an CONEX-LDS
autocollimator that provides the roll and pitch motion
over the entire travel range of the stage.
Field:
±2000 µrad (±7 arcmin)
Linearity:
<2%
Max. frequency:
2 kHz (standard)
Accuracy:
±5 µrad at 2 kHz
Example: Translation stage qualification.
• Vibration analysis
The CONEX-LDS autocollimator carries out fast
recording of angular variations of a mirror fixed onto a
vibrating structure. It is a practical, non-contact
method of locating frequency modes that are
transmitted by the tested structure.
Field:
±2000 µrad (±7 arcmin)
Linearity:
<2%
Accuracy:
±5 µrad at 2 kHz
Examples: Vibration detection, fast motion, non
contact acquisition.
y(ν)
ν
21
EDH0322En1030 — 06/15
Electronic Autocollimator
CONEX-LDS
7.0 —Maintenance
CAUTION: LASER SAFETY
The CONEX-LDS is a CLASS II LASER INSTRUMENTS according to the
IEC60825-1 standard:
DO NOT STARE INTO BEAM
Max. Power <1 mW @ 670 nm
RAYONNEMENT LASER
NE PAS REGARDER DANS LE FAISCEAU
ATTENTION RAYONNEMENT LASER
EN CAS D'OUVERTURE, EXPOSITION
DANGEREUSE AU FAISCEAU
LASER RADIATION
DO NOT STARE INTO BEAM
APPAREIL A LASER DE CLASSE 2
CLASS II LASER PRODUCT
P <1 mW; λ = 670 nm
IEC60825
DANGER. LASER RADIATION
WHEN OPEN, AVOID
DIRECT EXPOSURE TO BEAM
Device
CONEX-LDS
Manufacturer:
Zone Industrielle
45340 Beaune-la-Rolande
France
S/N:
Manufactured:
Complies with CFR 21 Subchapter J
7.1
Sensor Maintenance
The CONEX-LDS autocollimator is a precision instrument which must be
handled with the utmost care:
• Avoid shocks and sudden temperature variations.
• Avoid very humid environments, never put the instrument in water.
• When not in use, keep the autocollimator in its protective case.
• Frequently check that the autocollimator optics are clean and, if
necessary, clean them with a soft cloth and a little alcohol while the
instrument is not powered.
Finally, do not disassemble any part of the CONEX-LDS. Return to
Newport's service department for repairs.
7.2
Cables
CAUTION
Use only the cables supplied with the CONEX-LDS autocollimator.
For the analog output, use a HIROSE HR10A-7P-6P(73) 6 pin, male
connector to connect with the CONEX-LDS instrument.
EDH0322En1030 — 06/15
22
Electronic Autocollimator
CONEX-LDS
7.3
Preventive Maintenance
There is no particular preventive maintenance needed, except for proper
handling and periodic checks.
To prolong the useful life of the CONEX-LDS, follow the preventive
maintenance tips below:
• Check or have the accuracy of the results provided by the instrument
checked regularly (using the calibration verification kit).
• Send in your equipment for periodic calibration. Annual calibration is
recommended and the Controller GUI has a date reminder.
To facilitate the diagnosis and maintenance, NEWPORT offers a verification
kit, which includes a calibrated wedge window and all the accessories
needed to verify that the CONEX-LDS is still within factory calibration.
For further information contact NEWPORT.
8.0 —Verification Kit (CONEX-LDS-VER)
8.1
Description
This Calibration Verification Kit includes a calibrated optical wedge in a
mount and all clamps and rods (see picture in chapter 8.3). It comes with a
calibration certificate with the value of the Optical beam deviation angle.
Shown below are the dimensions of the calibrated optical wedge.
.49
(12.5)
ø1.97
(50)
ø1.32
(33.5)
ø1.48
(37.5)
ø.94 (24)
1,035”-40 THD
1.30
(33)
.18
(4.5)
Calibration Verification Kit (order separately)
8.2
CONEX-LDS-VER
Function
This verification kit is designed to easily check that the calibration of the
CONEX-LDS is still correct. Note that some components included in the
verification kit may be used in applications where the LDS is fixed.
The complete process is included in the CONEX-LDS Controller GUI where
it is described step by step.
23
EDH0322En1030 — 06/15
Electronic Autocollimator
CONEX-LDS
8.3
Verification Procedure
8.3.1
Assembly
The recommended layout is based on the CONEX-LDS-VER Verification kit
and it is composed of the following:
• A calibrated optical wedge in a mechanical mount.
• A X26-384 optical rail.
• A very stable mount for the CONEX-LDS and four M-CN26-12 carriers.
• A U100-A-LH-2K mirror mount with a 25.4 mm diameter mirror
(10D20ER.1-PF), a spacer and an M-CN26-40 carrier.
FLANGE
MOUNT
AUTOCOLLIMATOR
CONEX-LDS
RAIL CARRIERS
M-CN26-12
CALIBRATED
OPTICAL WEDGE
RAIL
X26-384
MIRROR
10D20ER.1-PF
SPACER
MIRROR MOUNT
U100-A-LH-2K
RAIL CARRIER
M-CN26-40
❶ Setup all mechanical components together, ensure that the carriage is
secure. Do not put the wedge on the CONEX-LDS in place yet.
❷ Set the power on, filter setting = 1 Hz and adjust the mirror mount in
order to get 0,0 displayed when the calibration optical wedge is not in
place. This can be easily done within ±10 µrad.
NOTE
Refer to the calibration verification table of the CONEX-LDS Controller
GUI for guidance.
8.3.2
Description of the Verification Process
The calibrated optical wedge induces an angular deviation on the return
beam. This deviation corresponding to the measurement angle variation is
delivered with each CONEX-LDS-VER Kit. Verification consists of 4
measurements, spaced 90° apart along the PSD axes. These measurements
are compared to the reference angles displayed in the Configuration tab of
the Controller GUI (the reference angle corresponds to the angle of the
calibrated optical wedge). Before performing this verification or inserting
the wedge in the beam path, the mirror has to be adjusted so the CONEXLDS reads X = 0 and Y = 0 ±10 µrad at the axis center. Verification can only
be done using the factory settings.
Call the technical support if you need assistance or calibration is required.
EDH0322En1030 — 06/15
24
Electronic Autocollimator
CONEX-LDS
9.0 —Commands
9.1
Introduction
Communication with the CONEX-LDS is achieved via an RS-422 serial link. A
USB to RS-422 adapter can be used. A Windows™ based software enables
reading measurements and configuring the devices. Advanced application
programming is simplified by an ASCII command interface and a set of two
letter mnemonic commands.
9.2
Communication Settings
Communication parameters are preset in the CONEX-LDS controller and do
not require any configuration:
Bits per second
Data bits
Parity
Stop bits
Flow control
Terminator
921,600
8
None
1
None
CRLF
Communication standard: RS-422 4 wires full duplex without handshaking.
120 Ω termination resistor on receiver channel.
The CONEX-LDS is not designed to be daisy chained.
9.3
State Diagram
For a safe and consistent operation, the CONEX-LDS uses 3 different
operational states: CONFIGURATION, READY, MEASURE. In each state, only
specific commands are accepted by the CONEX-LDS. Therefore, it is
important to understand the state diagram below and which commands
and actions cause transitions between the different states.
(Laser is emitting)
CONFIGURATION
RS
RS## (resets controller
address to 1)
PW0
MEASURE
LB0
PW1
LB1
READY
When powering the CONEX-LDS, the controller starts the initialization
sequence. When the initialization is successful, the controller goes to the
READY state. Then to the MEASURE state in which the laser is emitting.
The controller can go to the CONFIGURATION state using the PW1
command from the READY state. In the CONFIGURATION state, the CONEXLDS allows changes to all configuration parameters, like gains or the
controller address. Using the LB command in the CONFIGURATION state
enables the laser on ON or OFF at power up. The default is the laser is ON
at power up. The PW0 command saves all changes to the controller’s
memory and returns the controller back to the READY state.
25
EDH0322En1030 — 06/15
Electronic Autocollimator
CONEX-LDS
NOTE
It is recommended to keep the default settings until the user is more
knowledgeable with the configuration parameters. Since inappropriate
changes to the configuration parameters can affect the accuracy of
measurement, be certain about these changes.
The device is placed in the MEASURE state using the LB1 command. After
sending the command, the status LED blinks for 3 seconds, indicating that
the laser will be powered. At the end of this period, the LED stops blinking
and the laser starts emitting. Measurements or angular readings are
available through the Controller GUI, via command or via the two analog
outputs.
9.4
Command Syntax
The CONEX-LDS is a command driven controller. The general format of a
command is a two letter ASCII character preceded and followed by
parameters specific to the command.
Command format:
xx AA nn
xx — Controller address, may or may not be required.
AA — Command name.
nn — Value or “?” to query value. May or may not be required.
Both, upper and lower case characters are accepted. Depending on the
command, it can have an optional or required prefix (xx) for the controller
address and/or a suffix (nn) value or a “?”.
Blank spaces
Blanks are allowed and ignored in any position, including inside a
numerical value. The following two commands are equivalent, but the first
example might be confusing and uses more memory:
2P A1.43 6
2PA1.436
Decimal separator
A dot (“.”) is used as decimal separator for all numerical values.
Command terminator
Commands are executed as the command terminator CRLF (carriage-return
line-feed, ASCII 13 and ASCII 10) is received. The controller will analyze the
received string. If the command is valid and its parameters are in the
specified range, it will be executed. Otherwise it will memorize an error.
After the execution of the command, all remaining characters in the input
string, if any, will be ignored. In particular, it is not possible to concatenate
several commands on a single string from the PC to the CONEX-LDS
Each command will handle the memorization of related errors that can be
accessed with the TE command properly.
EDH0322En1030 — 06/15
26
Electronic Autocollimator
CONEX-LDS
9.5
Command Execution Time
The CONEX-LDS controller interprets commands continuously as received.
The typical execution time for a "get position command" (nGP?) is about
10 ms. Here, the command execution time is the time from sending the
command to the receipt of the answer.
9.6
CD
Command Set
Config.
Ready
Measure
Description
–
Get factory calibration information
GP
–
–
Get positions and power
GX
Set/Get gain for analog image of X channel
GY
Set/Get gain for analog image of Y channel
ID
–
–
Set/Get controller identifier
LB
Power ON/Power OFF the laser
LF
–
Set/Get low pass filter frequency
OX
–
Set/Get offset value for X channel
OY
–
Set/Get offset value for Y channel
PW
–
Enter/Leave CONFIGURATION state
PX
–
Set/Get calibration value for X channel
PY
–
Set/Get calibration value for Y channel
RG
–
Set/Get range
RS
Reset controller
RS##
Reset controller’s address to 1
SA
–
–
Set/Get controller’s RS-422 address
SL
–
–
Set/Get low level power threshold for valid measurements
SR
–
–
Set/Get high level power threslhod for valid measurements
SU
–
Set/Get units coefficient
TB
Get command error string
TE
Get last command error
TS
Get controller state
VE
Get controller revision information
ZT
–
Get all controller parameters
Changes configuration parameters. Those changes will be
stored in the controller’s non-volatile memory and remain
available after switching off the controller.
Changes working parameters only. These changes will be lost
when switching off the controller.
Accepted command.
–
Set command not accepted (will return an error).
Command Command passed without preceding the controller number
applies to all controllers (e.g. RS## resets all controllers).
27
EDH0322En1030 — 06/15
Electronic Autocollimator
CONEX-LDS
CD
Usage
Syntax
Get factory calibration information
CONFIG.
READY
MEASURE
–
xxCD?
Parameter
Description
xx [int]
—
Controller address.
Range
xx
—
1 to 31
Units
xx
—
None.
Defaults
Description
Error
Related Commands
Example
xx Missing: Error B.
Out of range: Error B.
Floating point: Error A.
This command returns the calibration values for the X and Y channels,
data is in µrad. It also gives the serial number of the device, the date of the
last calibration, and the date at which the device should be recalibrated.
The data is separated by semi-colons.
A
B
D
V
—
—
—
—
VE —
Unknown message code or floating point controller address.
Controller address not correct.
Execution not allowed.
Unknown axe reference.
Get controller revision information.
1CD?
| Get the factory calibration of controller #1.
CD S/N;DATE;DATE next;PX;PY;OF1;OF2;OF3;OF4;OX;OY;Range
1CD12-214-003;20/09/2011;20/09/2012;4500;4500;1;3;5;4;10;10;2000 | Controller returns calibration.
12-214-003;
20/09/2011;
20/09/2012;
4500;
4500;
1;
3;
5;
4;
10;
10;
2000
EDH0322En1030 — 06/15
|
|
|
|
|
|
|
|
|
|
|
|
S/N
Last calibration date
Next calibration date
PX
PY
OF1
OF2
OF3
OF4
OX
OY
Range.
28
Electronic Autocollimator
CONEX-LDS
GP
Usage
Syntax
Get X, Y and power values
CONFIG.
–
READY
–
MEASURE
xxGP?
Parameter
Description
xx [int]
—
Controller address.
Range
xx
—
1 to 31
Units
xx
—
None.
Defaults
Description
Error
Related Commands
xx Missing: Error B.
Out of range: Error B.
Floating point: Error A.
This command gets the current positions of X and Y channels and the
power level at the detector. The power level is given as a percentage of the
maximum power level.
A
B
D
I
J
—
—
—
—
—
Unknown message code or floating point controller address.
Controller address not correct.
Execution not allowed.
Execution not allowed in CONFIGURATION state.
Execution not allowed in READY state.
SU
—
Set/Get units.
Example 1GP?
1GP153, 20, 68
| Get controller #1 measured values.
| Controller returns 153 units for X channel, 20 units for Y channel
and 68% for the laser power returning from the mirror in
comparison to the power emitted by the autocollimator.
NOTE
If GP returns X = 0, Y = 0, PowerLevel = 0, then power is below SL value.
If GP returns X = 0, Y = 0, PowerLevel = 100 then power is higher than SR
value.
29
EDH0322En1030 — 06/15
Electronic Autocollimator
CONEX-LDS
GX
Usage
Syntax
Set/Get gain for analog output of X channel
CONFIG.
READY
MEASURE
xxGXnn or xxGX?
Parameter
Description
xx [int]
—
nn [float] —
Controller address.
Gain
Range
xx
nn
—
—
1 to 31
1 to 200, (? = Get)
Units
xx
nn
—
—
None.
None
Defaults
Description
Error
Related Commands
Example
xx Missing: Error B.
Out of range: Error B.
Floating point: Error A.
This command sets or gets the gain for the analog output of the X channel.
A
B
C
D
—
—
—
—
Unknown message code or floating point controller address.
Controller address not correct.
Parameter missing or out of range.
Execution not allowed.
GY —
Set/Get gain for analog output of X channel.
1GX10
| Set controller #1 gain for X channel to 10.
Gain set to 1 means that +5 V measured on the analogue output
correspond to an angle of +RG value (2000 µrad by default).
Gain set to 10 means that +5 V measured on the analogue output
correspond to an angle of +RG value divided by 10 (200 µrad by
default).
NOTE
Refer to Section 5.4 for the gain settings.
EDH0322En1030 — 06/15
30
Electronic Autocollimator
CONEX-LDS
GY
Usage
Syntax
Set/Get gain for analog output of Y channel
CONFIG.
READY
MEASURE
xxGYnn or xxGY?
Parameter
Description
xx [int]
—
nn [float] —
Controller address.
Gain
Range
xx
nn
—
—
1 to 31
1 to 200, (? = Get)
Units
xx
nn
—
—
None.
None
Defaults
Description
Error
Related Commands
Example
xx Missing: Error B.
Out of range: Error B.
Floating point: Error A.
This command sets or gets the gain for the analog output of the Y channel.
A
B
C
D
—
—
—
—
Unknown message code or floating point controller address.
Controller address not correct.
Parameter missing or out of range.
Execution not allowed.
GX —
Set/Get gain for analog output of X channel.
1GY10
| Set controller #1 gain for Y channel to 10.
Gain set to 1 means that +5 V measured on the analogue output
correspond to an angle of +RG value (2000 µrad by default).
Gain set to 10 means that +5 V measured on the analogue output
correspond to an angle of +RG value divided by 10 (200 µrad by
default).
NOTE
Refer to Section 5.4 for the gain settings.
31
EDH0322En1030 — 06/15
Electronic Autocollimator
CONEX-LDS
ID
Usage
Set/Get stage identifier
CONFIG.
READY
–
Syntax
MEASURE
–
xxIDnn or xxID?
Parameter
Description
xx [int]
—
nn [char] —
Controller address.
Model number.
Range
xx
nn
—
—
1 to 31
1 to 31 ASCII characters, (? = Get)
Units
xx
nn
—
—
None.
None.
Defaults
xx Missing: Error B.
Out of range: Error B.
Floating point: Error A.
nn Missing:
Out of range:
Description
Returns
Error
Related Commands
The ID? command returns the product name. In the CONFIGURATION
mode, this command changes the controller identifier.
If the sign “?” takes the place of nn, this command returns the current
programmed value.
A
B
C
D
J
K
—
—
—
—
—
—
Unknown message code or floating point controller address.
Controller address not correct.
Parameter missing or out of range.
Execution not allowed.
Execution not allowed in READY state.
Execution not allowed in MEASURE state.
ZT
—
Get configuration parameters.
Example 1ID?
1ID CONEX-LDS
EDH0322En1030 — 06/15
Error C.
Error C.
| Get stage identifier for controller #1.
| Controller returns product name: CONEX-LDS.
32
Electronic Autocollimator
CONEX-LDS
LB
Usage
Syntax
Power the laser ON/OFF
CONFIG.
READY
MEASURE
xxLBnn or xxLB?
Parameter
Description
xx [int]
nn [int]
—
—
Controller address.
Laser State 0: OFF, 1: ON
Range
xx
nn
—
—
1 to 31
0 or 1, (? = Get)
Units
xx
nn
—
—
None.
None.
Defaults
Description
xx Missing: Error B.
Out of range: Error B.
Floating point: Error A.
In the READY state, the LB1 command sets the controller to the MEASURE
state. In the transition from READY to MEASURE states, the LED will blink
for 3 seconds to indicate that the laser is about to start emitting.
The LB0 command turns off the LED, powers off the laser, and returns the
controller to the READY state.
In the CONFIGURATION state, the LB command modifies the laser power
up state. LB1 will set the controller to go to MEASURE mode and the laser
to emit after powering up the device. LB0 sets the laser to stay off after
power up and be in READY mode.
Returns
Error
Related Commands
Example
If the sign “?” is used in place of nn, this command returns the state of the
laser.
A
B
C
—
—
—
Unknown message code or floating point controller address.
Controller address not correct.
Parameter missing or out of range.
GP —
Get X, Y and power values.
1LB1
| Power on the laser of controller #1.
33
EDH0322En1030 — 06/15
Electronic Autocollimator
CONEX-LDS
LF
Usage
Syntax
Set/Get low pass filter frequency
CONFIG.
READY
MEASURE
–
xxLFnn or LF?
Parameter
Description
xx [int]
—
nn [float] —
Controller address.
Frequency.
Range
xx
nn
—
—
1 to 31
≥1 & ≤2000 (? = Get)
Units
xx
nn
—
—
None.
Hertz.
Defaults
Description
xx Missing: Error B.
Out of range: Error B.
Floating point: Error A.
The LF command sets or gets the digital 2nd order low pass filter
frequency.
NOTE
The low pass filter has a response time before outputing relevant values
that are inversely proportional to the cut off frequency.
For example, if the cut off frequency is set to 1 Hz, there is a 1 second
wait before getting filtered data.
Error
Related Commands
Example
A
B
C
D
K
Unknown message code or floating point controller address.
Controller address not correct.
Parameter missing or out of range.
Execution not allowed.
Execution not allowed in MEASURE state.
PX —
PY —
Set/Get calibration value for X channel.
Set/Get calibration value for Y channel.
1LF5
| Set the controller #1 low pass filter frequency to 5 Hz.
Resolution vs. Bandwidth (1)
Low Pass Filter
Cutting Frequency
LF command
(Hz)
1
20
50
100
200
500
1000
2000
1)
EDH0322En1030 — 06/15
—
—
—
—
—
Resolution
(RMS noise)
(µrad)
0,003
0,013
0,021
0,030
0,042
0,067
0,095
0,134
In case of spectral signal analysis, a noiselimitated resolution of <0.003 µrad/√Hz applies.
34
Electronic Autocollimator
CONEX-LDS
OX
Usage
Syntax
Set/Get offset value for X channel
CONFIG.
READY
MEASURE
–
xxOXnn or xxOX?
Parameter
Description
xx [int]
—
nn [float] —
Controller address.
Offset.
Range
xx
nn
—
—
1 to 31
>0 (? = Get)
Units
xx
nn
—
—
None.
None.
Defaults
Description
Error
Related Commands
Example
xx Missing: Error B.
Out of range: Error B.
Floating point: Error A.
The OX command sets or gets the offset value for the X channel.
A
B
C
D
K
—
—
—
—
—
Unknown message code or floating point controller address.
Controller address not correct.
Parameter missing or out of range.
Execution not allowed.
Execution not allowed in MEASURE state.
LF —
SU —
CD —
Set/Get low pass filter frequency.
Set/Get units.
Get factory calibration information.
1OX10
| Sets #1 controller’s X offset to 10.
35
EDH0322En1030 — 06/15
Electronic Autocollimator
CONEX-LDS
OY
Usage
Syntax
Set/Get offset value for Y channel
CONFIG.
READY
MEASURE
–
xxOYnn or xxOY?
Parameter
Description
xx [int]
—
nn [float] —
Controller address.
Offset.
Range
xx
nn
—
—
1 to 31
>0 (? = Get)
Units
xx
nn
—
—
None.
None.
Defaults
Description
Error
xx Missing: Error B.
Out of range: Error B.
Floating point: Error A.
The OY command sets or gets the offset value for the Y channel.
A
B
C
D
K
—
—
—
—
—
Unknown message code or floating point controller address.
Controller address not correct.
Parameter missing or out of range.
Execution not allowed.
Execution not allowed in MEASURE state.
Related Commands
LF —
SU —
CD —
Set/Get low pass filter frequency.
Set/Get units.
Get factory calibration information.
Example
1OY20
| Set the #1 controller’s Y offset to 20.
EDH0322En1030 — 06/15
36
Electronic Autocollimator
CONEX-LDS
PW
Usage
Syntax
Enter/Leave CONFIGURATION state
CONFIG.
READY
MEASURE
–
xxPWnn or xxPW?
Parameter
Description
xx [int]
—
nn [float] —
Controller address.
Mode.
Range
xx
nn
—
—
1 to 31
1: Go from READY state to CONFIGURATION state.
0: Go from CONFIGURATION state to READY state.
?: Get state
Units
xx
nn
—
—
None.
None.
Defaults
xx Missing: Error B.
Out of range: Error B.
Floating point: Error A.
nn Missing:
Out of range:
Description
Error C.
Error C.
PW1 changes the controller’s state from READY to CONFIGURATION. In
CONFIGURATION state, all parameter settings are saved in the controller’s
memory and remain available after switching off the controller.
PW0 checks all stage parameters, and if they are acceptable, saves them in
the flash memory of the controller. After that, it changes the controller’s
state from CONFIGURATION to READY.
The execution of a PW0 command may take up to 5 seconds. During that
time the controller will not respond to any other command.
NOTE
The maximum capacity of the memory to store parameters is 100 write
cycles. Users should limit the use of PW command.
Returns
Error
Example
If the sign “?” takes place of nn, this command returns the current state.
A
B
C
D
K
—
—
—
—
—
1PW1
Unknown message code or floating point controller address.
Controller address not correct.
Parameter missing or out of range.
Execution not allowed.
Execution not allowed in MEASURE state.
| Changes #1 controller to CONFIGURATION state.
37
EDH0322En1030 — 06/15
Electronic Autocollimator
CONEX-LDS
PX
Usage
Syntax
Set/Get calibration value for X channel
CONFIG.
READY
MEASURE
–
xxPXnn or xxPX?
Parameter
Description
xx [int]
—
nn [float] —
Controller address.
Calibration coefficient.
Range
xx
nn
—
—
1 to 31
>0 (? = Get)
Units
xx
nn
—
—
None.
None.
Defaults
Description
Error
Related Commands
Example
EDH0322En1030 — 06/15
xx Missing: Error B.
Out of range: Error B.
Floating point: Error A.
The PX command sets or gets the calibration value for the X channel. The
default calibration is given in µrad units. To return to a known state, users
can read the factory calibration data given by the CD command and set the
values using PX or PY and set the units using the SU command.
A
B
C
D
K
—
—
—
—
—
LF —
SU —
CD —
Unknown message code or floating point controller address.
Controller address not correct.
Parameter missing or out of range.
Execution not allowed.
Execution not allowed in MEASURE state.
Set/Get low pass filter frequency.
Set/Get units.
Get factory calibration information.
1PX2086 | Set the #1 controller’s X calibration to 2086.
38
Electronic Autocollimator
CONEX-LDS
PY
Usage
Syntax
Set/Get calibration value for Y channel
CONFIG.
READY
MEASURE
–
xxPYnn or xxPY?
Parameter
Description
xx [int]
—
nn [float] —
Controller address.
Calibration coefficient.
Range
xx
nn
—
—
1 to 31
>0 (? = Get)
Units
xx
nn
—
—
None.
None.
Defaults
Description
Error
Related Commands
Example
xx Missing: Error B.
Out of range: Error B.
Floating point: Error A.
The PY command sets or gets the calibration value for the Y channel. The
default calibration is given in µrad units. To return to a known state, users
can read the factory calibration data given by the CD command and set the
values using PX or PY and set the units using the SU command.
A
B
D
K
—
—
—
—
LF —
SU —
CD —
Unknown message code or floating point controller address.
Controller address not correct.
Execution not allowed.
Execution not allowed in MEASURE state.
Set/Get low pass filter frequency.
Set/Get units.
Get factory calibration information.
1PY2086 | Set the #1 controller’s Y calibration to 2086.
39
EDH0322En1030 — 06/15
Electronic Autocollimator
CONEX-LDS
RG
Usage
Syntax
Set/Get range
CONFIG.
READY
MEASURE
–
xxRGnn or xxRG?
Parameter
Description
xx [int]
—
nn [float] —
Controller address.
Range.
Range
xx
nn
—
—
1 to 31
>0 (? = Get)
Units
xx
nn
—
—
None.
None.
Defaults
Description
Error
Related Commands
Example
EDH0322En1030 — 06/15
xx Missing: Error B.
Out of range: Error B.
Floating point: Error A.
The RG command sets or gets the measurement range.
A
B
C
D
K
—
—
—
—
—
LF —
SU —
CD —
Unknown message code or floating point controller address.
Controller address not correct.
Parameter missing or out of range.
Execution not allowed.
Execution not allowed in MEASURE state.
Set/Get low pass filter frequency.
Set/Get units.
Get factory calibration information.
1RG4500 | Set the controller #1 X range to 4500.
40
Electronic Autocollimator
CONEX-LDS
RS
Usage
Syntax
Reset controller
CONFIG.
READY
MEASURE
xxRS
Parameter
Description
xx [int]
—
Controller address.
Range
xx
—
1 to 31
Units
xx
—
None.
Defaults
Description
Error
Example
xx Missing: Error B.
Out of range: Error B.
Floating point: Error A.
The RS command issues a hardware reset of the controller, equivalent to a
power-cycle.
A
B
D
1RS
—
—
—
Unknown message code or floating point controller address.
Controller address not correct.
Execution not allowed.
| Reset controller #1.
41
EDH0322En1030 — 06/15
Electronic Autocollimator
CONEX-LDS
RS##
Usage
Syntax
Reset controller’s address
CONFIG.
READY
MEASURE
xxRS## or RS##
Parameter
Description
xx [int]
—
Controller address.
Range
xx
—
1 to 31
Units
xx
—
None.
Defaults
Description
xx Missing: Change to 0.
Out of range: Error B.
Floating point: Error A.
The RS## command resets the controller’s address to 1.
NOTE
The maximum capacity of the memory to store parameters is 100 write
cycles. Users should limit the use of RS## command.
Error
Example
EDH0322En1030 — 06/15
A
B
D
—
—
—
RS##
Unknown message code or floating point controller address.
Controller address not correct.
Execution not allowed.
| Reset controller’s address to 1.
42
Electronic Autocollimator
CONEX-LDS
SA
Usage
Syntax
Set/Get controller’s RS-422 address
CONFIG.
READY
MEASURE
–
xxSAnn or xxSA?
Parameter
Description
xx [int]
nn [int]
—
—
Controller address.
New 422 controller address.
Range
xx
nn
—
—
1 to 31
1 to 31 and ≠ xx (? = Get)
Units
xx
nn
—
—
None.
None.
Defaults
xx Missing: Error B.
Out of range:
Error B.
Floating point: Error A.
nn Missing:
Out of range:
Description
Returns
Error
Related Commands
Example
Error C.
Error C.
The SA command sets the controller’s RS-422 address.
If the sign “?” is used in place of nn, this command returns the current
programmed value.
A
B
C
D
J
K
—
—
—
—
—
—
Unknown message code or floating point controller address.
Controller address not correct.
Parameter missing or out of range.
Execution not allowed.
Execution not allowed in READY state.
Execution not allowed in MEASURE state.
ZT
—
Set controller configuration information.
1SA3
3SA?
| Set #1 controller’s RS-422 address to 3.
| Get the #3 controller’s address.
43
EDH0322En1030 — 06/15
Electronic Autocollimator
CONEX-LDS
SL
Usage
Syntax
Set/Get low level power threshold for valid data
CONFIG.
READY
MEASURE
–
xxSLnn or xxSL?
Parameter
Description
xx [int]
nn [int]
—
—
Controller address.
Low level power threshold.
Range
xx
nn
—
—
1 to 31
≥0 and ≤SR (? = Get)
Units
xx
nn
—
—
None.
%.
Defaults
xx Missing: Error B.
Out of range: Error B.
Floating point: Error A.
nn Missing:
Out of range:
Description
Returns
Error
Related Commands
Example
EDH0322En1030 — 06/15
Error C.
Error C.
The SL command is used to set or get the power level relative to the
emitted light, in percentage of light coming into the autocollimator, below
which the measurement can be considered as not accurate enough. Below
that power threshold, the GP command returns 0 for both X and Y
channels.
If the sign “?” is used in place of nn, this command returns the current
programmed value.
A
B
C
D
J
K
—
—
—
—
—
—
Unknown message code or floating point controller address.
Controller address not correct.
Parameter missing or out of range.
Execution not allowed.
Execution not allowed in READY state.
Execution not allowed in MEASURE state.
SR —
GP —
Set/Get the high level power threshold for valid data.
Get X, Y and power values.
1SL10
| Sets #1 controller’s low level power threshold to 10%.
44
Electronic Autocollimator
CONEX-LDS
SR
Usage
Syntax
Set/Get high level power threshold for valid data
CONFIG.
READY
MEASURE
–
xxSRnn or xxSR?
Parameter
Description
xx [int]
nn [int]
—
—
Controller address.
High level power threshold.
Range
xx
nn
—
—
1 to 31
≥SL and ≤100 (? = Get)
Units
xx
nn
—
—
None.
%.
Defaults
xx Missing: Error B.
Out of range:
Error B.
Floating point: Error A.
nn Missing:
Out of range:
Description
Returns
Error
Related Commands
Example
Error C.
Error C.
The SR command is used to set or get the power level relative to the
emitted light, in percentage of light coming into the autocollimator, above
which the measurement can be considered as not accurate enough due to
saturation of the detector. Above that power threshold, the GP command
returns 0 for both X and Y channel and PL = 100.
If the sign “?” is used in place of nn, this command returns the current
programmed value.
A
B
C
D
J
K
—
—
—
—
—
—
Unknown message code or floating point controller address.
Controller address not correct.
Parameter missing or out of range.
Execution not allowed.
Execution not allowed in READY state.
Execution not allowed in MEASURE state.
SR —
GP —
Set/Get the low level power threshold for valid data.
Get X, Y and power values.
1SR90
| Sets #1 controller’s high level power threshold to 90%.
45
EDH0322En1030 — 06/15
Electronic Autocollimator
CONEX-LDS
SU
Usage
Syntax
Set/Get units
CONFIG.
READY
MEASURE
–
xxSUnn or SU?
Parameter
Description
xx [int]
—
nn [char] —
Controller address.
Units.
Range
xx
nn
—
—
1 to 31
max length: 5 chars (? = Get)
Units
xx
nn
—
—
None.
None.
Defaults
Description
xx Missing: Error B.
Out of range:
Error B.
Floating point: Error A.
The SU command sets or gets the user units. Usual units are µrad, mrad,
sec, nm, µm, mm, unit and µin. The configured value is for information
only. It is not automatically related to PX and PY values. Users should take
care about the consistency of the configuration and the units.
NOTE
Linear units are useful when measuring eccentricity or straightness.
To return to a known state, users can read the factory calibration data
given by the CD command and set the values using PX, PY and SU
commands.
Error
Related Commands
Example
EDH0322En1030 — 06/15
A
B
D
J
K
—
—
—
—
—
PX —
PY —
Unknown message code or floating point controller address.
Controller address not correct.
Execution not allowed.
Execution not allowed in READY state.
Execution not allowed in MEASURE state.
Set/Get calibration value for X channel.
Set/Get calibration value for Y channel.
1SUµrad | Sets #1 controller’s units to µrad.
46
Electronic Autocollimator
CONEX-LDS
TB
Usage
Syntax
Get command error string
CONFIG.
READY
MEASURE
xxTB
Parameter
Description
Range
Units
Defaults
xx [int]
—
xx
—
nn [char] —
1 to 31
Error code (refer to TE command).
xx
None.
—
xx Missing: Error B.
Out of range: Error B.
Floating point: Error A.
nn Missing:
Out of range:
Description
Returns
Error
Related Commands
Controller address.
Returns explanation of current error.
Error C.
The TB command returns a string that explains the meaning of the error
code nn (see TE command for complete list).
Error code (refer to TE command).
A
B
C
D
—
—
—
—
Unknown message code or floating point controller address.
Controller address not correct.
Parameter missing or out of range.
Execution not allowed.
TE
—
Get error code.
Example 1TB@
1TB@ No error
| Get explanation of error code @.
| Controller returns: @ = means no error.
47
EDH0322En1030 — 06/15
Electronic Autocollimator
CONEX-LDS
TE
Usage
Syntax
Get last command error
CONFIG.
READY
MEASURE
xxTE
Parameter
Description
xx [int]
—
Controller address.
Range
xx
—
1 to 31
Units
xx
—
None.
Defaults
Description
xx Missing: Error B.
Out of range: Error B.
Floating point: Error A.
The TE command returns the currently memorized error. When a
command is not executed, it memorizes an error. This error can be read
with the TE command. After the execution of a TE command, the error
buffer is erased and another TE command will return @, means no error.
When a new command error is generated before the previous command
error is read, the new command error will overwrite the current
memorized error.
For safe program flow, it is recommended to always query the command
error after each command execution.
Error
Related Commands
Example
A
B
D
—
—
—
Unknown message code or floating point controller address.
Controller address not correct.
Execution not allowed.
TB —
Get error string.
1TE
| Get last error memorized on controller #1.
| Controller returns: 1TE@, means no error.
List of errors and corresponding strings (see TB command):
@
— No error.
A
— Unknown message code or floating point controller address.
B
— Controller address not correct.
C
— Parameter missing or out of range.
D
— Command not allowed.
I
— Command not allowed in CONFIGURATION state.
J
— Execution not allowed in READY state.
K
— Execution not allowed in MEASURE state.
S
— Communication Time Out.
EDH0322En1030 — 06/15
48
Electronic Autocollimator
CONEX-LDS
TS
Usage
Syntax
Get positioner error and controller state
CONFIG.
READY
MEASURE
xxTS
Parameter
Description
xx [int]
—
Controller address.
Range
xx
—
1 to 31
Units
xx
nn
—
—
None.
None.
Defaults
xx Missing: Error B.
Out of range: Error B.
Floating point: Error A.
Description
The TS command returns the positioner error and the current controller
state. The motion time out flag is always set with one of the two associated
following errors.
Returns
The TS command returns six characters (1TSabcdef). The first 4 characters
(abcd) represent the positioner error. The last two characters (ef)
represent the controller state. All characters in hexadecimal, see table
below.
Error code (abcd): Convert each hexadecimal to a binary.
F
E
D
C
B
A
9
8
7
6
5
4
3
2
1
0
1111 1110 1101 1100 1011 1010 1001 1000 0111 0110 0101 0100 0011 0010 0001 0000
Each bit represents one possible error:
Examples:
• Error map 0000 = No errors.
• Error map 0001 = Laser driver error.
49
EDH0322En1030 — 06/15
Electronic Autocollimator
CONEX-LDS
Controller states (ef):
– 14: CONFIGURATION.
– 28: MEASURE.
– 32: READY.
NOTES
THE ERROR BUFFER IS UPDATED PERIODICALLY, APPROX. EVERY
1 ms.
THE TS COMMAND READS THE ERROR BUFFER AND CLEARS THE
ERROR BUFFER AT THE SAME TIME (SAME AS FOR COMMANDS TE, TB).
SO WHEN LAUNCHING THE TS COMMAND, IT IS IMPORTANT TO
PROCESS THE TS FEEDBACK ACCORDINGLY.
Error
Related Commands
A
B
—
—
Unknown message code or floating point controller address.
Controller address not correct.
TE
—
Get last error.
Example 1TS
1TS000032
EDH0322En1030 — 06/15
| Get error and state of controller #1.
| Controller returns: no errors and READY.
50
Electronic Autocollimator
CONEX-LDS
VE
Usage
Syntax
Get controller version information
CONFIG.
READY
MEASURE
xxVE
Parameter
Description
xx [int]
—
Controller address.
Range
xx
—
1 to 31
Units
xx
—
None.
Defaults
Description
Error
Related Commands
xx Missing: Error B.
Out of range: Error B.
Floating point: Error A.
This command returns the controller’s version information.
A
B
—
—
CD —
Example 1VE
1VE CONEX-LDS V1.0.0.
Unknown message code or floating point controller address.
Controller address not correct.
Get factory calibration information.
| Get controller #1 version information.
| Controller returns version number.
51
EDH0322En1030 — 06/15
Electronic Autocollimator
CONEX-LDS
ZT
Usage
Syntax
Get all configuration parameters
CONFIG.
READY
MEASURE
–
xxZT
Parameter
Description
xx [int]
—
Controller address.
Range
xx
—
1 to 31
Units
xx
—
None.
Defaults
Description
Error
Related Commands
Example
xx Missing: Error B.
Out of range: Error B.
Floating point: Error A.
The ZT command returns the list of all current configuration parameters.
A
B
K
—
—
—
Unknown message code or floating point controller address
Controller address not correct
Execution not allowed in MEASURE state.
TE
—
Get error code.
1ZT
1PW1
1IDAG-M100D
1CD2086;1989;20/09/2011;20/09/2012;
1GX10
1GY10
…
1PW0
EDH0322En1030 — 06/15
| Get #1 controller’s configuration data.
52
Electronic Autocollimator
CONEX-LDS
10.0 —Connector Interfaces
10.1
RS-422 Connector for Communication
Communication standard: RS-422 4 wires full duplex without handshaking.
120 Ω termination resistor on receiver channel.
1
6
2
COMM
Connector
Pin#
1
2
3
4
5
6
5
3
4
Pin
Assignment
N.C.
GND
Rx +
Rx –
Tx +
Tx –
P4-x Link
(Schematics)
N.C.
P4-2
P4-3
P4-4
P4-6
P4-5
COMM CONNECTOR: Male Type Hirose HR10A-7R-6P
Appropriate Female Type Connector Ref.: Hirose HR10A-7P-6S
1
P4
R210
GND2
VISIOIN
U37
20
C236
C237
2
11
R205
R212
R206
R207
J11
J11
1
2
3
4
R208
R213
J12
J12
1
2
5
C245
1
2
1
2
6
P4
P4
P4
P4
C243
U45
U44
ADM2582E
• Termination resistor:
R212 = 120 Ω installed
• Jumper J11 closed
• R213 not installed
10.2
P4
19
A 18
17
B
16
GND2
15
Z
14
GND2
13
Y
12
VISIOOUT
3
3
Analog Outputs Connector for Data Gathering
6
1
5
Pin Assignment
1 AO1 (Y)
2
GND
3 AO2 (X)
4
GND
5
N.C.
6
N.C.
2
4
3
OUT CONNECTOR: Female Type Hirose HR10A-7R-6S
Appropriate Male Type Connector Ref.: Hirose HR10A-7P-6P(73)
Both ±5 V analog outputs AO1 and AO2 follow this schematic:
PT11
3
+
U29
2
1
R155
A0
C164
–
R163
R168
53
With:
• U29 = ADA4841
• R163 = 10 kΩ
• C168 = 470 pF
• R155 = 33 Ω
• C164 = 10 nF
EDH0322En1030 — 06/15
Electronic Autocollimator
CONEX-LDS
EDH0322En1030 — 06/15
54
Service Form
Your Local Representative
Tel.:
Fax:
Return authorization #:
Name:
(Please obtain prior to return of item)
Company:
Address:
Date:
Country:
Phone Number:
P.O. Number:
Fax Number:
Item(s) Being Returned:
Model #:
Serial #:
Description:
Reasons of return of goods (please list any specific problems):
55
EDH0322En1030 — 06/15
Visit Newport Online at:
w w w. n e w p o r t . c o m
North America & Asia
Europe
Newport Corporation
MICRO-CONTROLE Spectra-Physics S.A.S
1791 Deere Ave.
Irvine, CA 92606, USA
9, rue du Bois Sauvage
91055 Évry CEDEX
France
Sales
Sales & Technical Support
Tel.: (800) 222-6440
Tel.: +33 (0)1.60.91.68.68
e-mail: [email protected]
e-mail: [email protected]
Technical Support
Service & Returns
Tel.: (800) 222-6440
Tel.: +33 (0)2.38.40.51.55
e-mail: [email protected]
Service, RMAs & Returns
Tel.: (800) 222-6440
e-mail: [email protected]