1
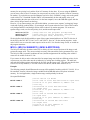
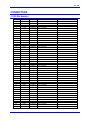
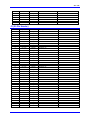
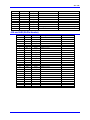
^1 USER MANUAL
^2 Accessory 34B
^3 64-Bit Standard I/O Interface Board
^4 3Ax-602375-xUxx
^5 November 7, 2003
Single Source Machine Control
Power // Flexibility // Ease of Use
21314 Lassen Street Chatsworth, CA 91311 // Tel. (818) 998-2095 Fax. (818) 998-7807 // www.deltatau.com
Copyright Information
© 2003 Delta Tau Data Systems, Inc. All rights reserved.
This document is furnished for the customers of Delta Tau Data Systems, Inc. Other uses are
unauthorized without written permission of Delta Tau Data Systems, Inc. Information contained
in this manual may be updated from time-to-time due to product improvements, etc., and may not
conform in every respect to former issues.
To report errors or inconsistencies, call or email:
Delta Tau Data Systems, Inc. Technical Support
Phone: (818) 717-5656
Fax: (818) 998-7807
Email: [email protected]
Website: http://www.deltatau.com
Operating Conditions
All Delta Tau Data Systems, Inc. motion controller products, accessories, and amplifiers contain
static sensitive components that can be damaged by incorrect handling. When installing or
handling Delta Tau Data Systems, Inc. products, avoid contact with highly insulated materials.
Only qualified personnel should be allowed to handle this equipment.
In the case of industrial applications, we expect our products to be protected from hazardous or
conductive materials and/or environments that could cause harm to the controller by damaging
components or causing electrical shorts. When our products are used in an industrial
environment, install them into an industrial electrical cabinet or industrial PC to protect them
from excessive or corrosive moisture, abnormal ambient temperatures, and conductive materials.
If Delta Tau Data Systems, Inc. products are directly exposed to hazardous or conductive
materials and/or environments, we cannot guarantee their operation.
ACC-34B
Table of Contents
INTRODUCTION .....................................................................................................................................................1
Connectors...................................................................................................................................................................1
J1.............................................................................................................................................................................1
J2.............................................................................................................................................................................1
J3.............................................................................................................................................................................1
J4A (JTHW).............................................................................................................................................................1
J4B ..........................................................................................................................................................................2
TB1 ..........................................................................................................................................................................2
TB2 ..........................................................................................................................................................................2
MULTIPLEX ADDRESS MAP ...............................................................................................................................5
M-Variable Assignments.............................................................................................................................................6
Processing ACC-34x Inputs and Outputs....................................................................................................................7
When to Access ACC-34x...........................................................................................................................................7
Image Word Variables.................................................................................................................................................7
Location of Image Words ........................................................................................................................................7
Preventing Conflicts in Output Image Words .........................................................................................................8
M103 = (M101 & $00000FFF) | (M102 & $FFFFF000) ......................................................................................9
Power Supply and Opto-Isolation Considerations.....................................................................................................11
Watchdog Timer (Role of Jumper E2) ......................................................................................................................12
CONNECTORS.......................................................................................................................................................13
J1 (50 Pin Header) .....................................................................................................................................................13
J2 (50 Pin Header) .....................................................................................................................................................14
J3 (50 Pin Header) .....................................................................................................................................................15
J4A and J4B (26-Pin Header)....................................................................................................................................16
TB1 (2-Pin Terminal Block)......................................................................................................................................17
TB2 (2-Pin Terminal Block)......................................................................................................................................17
SCHEMATICS ........................................................................................................................................................19
Table of Contents
i
ACC-34B
ii
Table of Contents
ACC-34B
INTRODUCTION
PMAC's Accessory 34B(ACC-34B) is a discrete input/output (I/O) board designed for easy connection to
Opto-22 and compatible mounting racks. The board interfaces with several third party opto modules (e.g.
Opto-22 Models G4PB24 & G4PB16H) via standard 50-pin flat cables (see ACC-21 cables). ACC-34B
provides 32 lines of optically isolated inputs and 32 lines of optically isolated outputs. Both the inputs
and the outputs are TTL compatible negative logic (low true) types. The actual I/O Reads and Writes are
carried out using a special form of M-variables which will be described later.
ACC-34B is one of a series of I/O accessories for PMAC that use the JTHW connector. Others are:
ACC-34
ACC-34A
ACC-18
ACC-8D-Opt.7
ACC-8D-Opt.8
The Opto 64 Bit Input/Output board
The Opto 32 Bit Input/32 Bit Output board
The Thumbwheel Multiplexer board
The Resolver to Digital Converter board
The Absolute Encoder Interface board
All of the above accessories use the JTHW multiplex address scheme and several of them may be daisychained to a single PMAC. In addition for enhanced noise reduction and long distance installation,
accessories 35A and 35B provide differential buffer capability for the JTHW signals. The use of the long
distance buffer pair (ACC-35A and ACC-35B) is recommended whenever the required cable length
between PMAC and ACC-34x is beyond 3 meters (10 feet).
Up to 32 ACC-34Bs may be connected to a single PMAC, giving the possible total number of 1024 input
and 1024 output lines in addition to those available on the PMAC board and those available on the
parallel I/O expansion board(s) (ACC-14). Accessory 34B communicates to PMAC via its JTHW
connector through the supplied flat cable. In situations where the I/O modules are a long distance away
from PMAC, ACC-35A& ACC-35B may be used as local and remote buffers between PMAC and ACC34B.
ACC-34B also supports a local watchdog timer feature independent of that of PMAC's. The mode of
operation of this function is explained at the end of this manual (see also the enclosed schematic).
Connectors
Refer to the layout diagram of ACC-34B for the location of the connectors on the board. A pin definition
listing for each connector is provided at the end of this Manual.
J1
This is a 50-pin header which provides the connection for the input and the output lines numbered 24 to
31. In addition, on this connector a 5V (maximum 0.5 A) power supply outlet is provided for external
logic circuits.
J2
This is a 50-pin header which provides the connection for the input lines numbered 0 to 23. In addition,
on this connector a 5V (maximum 0.5 A) power supply outlet is provided for external logic circuits.
J3
This is a 50-pin header which provides the connection for the output lines numbered 0 to 23. In addition,
on this connector a 5V (maximum 0.5 A) power supply outlet is provided for external logic circuits.
J4A (JTHW)
This is a 26-pin header which provides the link between PMAC's JTHW (J3) and this board. Using the
supplied flat cable PMAC's J3 should be connected to J4A. Through this connector PMAC sets the
outputs and reads the inputs. In addition, the power for the processor side of the opto-isolation circuitry is
provided from the PMAC board through this connector.
Introduction
1
ACC-34B
J4B
This is a 26-pin header which brings out the JTHW signals for the next accessory board on the JTHW
multiplex memory map. This connector is pin-to-pin compatible with J4A.
TB1
This a 2-pin terminal block through which a 5 volt power supply may be brought in for the optically
isolated side of the digital circuitry on ACC34B (50 mA is required). If the same supply is to be brought
out for the opto boards via J1 to J3 then, depending on the requirements of the opto boards, the current
needed may be considerably higher. Remove jumper E1 if the power is supplied to the board via TB1.
Note that with jumper E1 is installed, whenever a 12 to 24 volt supply is brought in from TB2, then TB1
can be used as a 5 volt power source for the logic circuits on the external opto boards (see the enclosed
schematic).
TB2
This is a 2-pin terminal block through which a 12 to 24 volt unregulated power supply may be brought for
the optically isolated side of the digital circuitry on ACC34B. The voltage is reduced to 5V via the on
board regulator. Install jumper E1 if the required power is supplied via TB2. Do not supply power
through both TB1 and TB2.
2
Introduction
.13 in
(3.18 mm)
TB1
TB2
E1
J1
J2
ACC-34B
J3
E2
J4A
J4B
TP1
OPEN
.13 in
(3.18 mm)
1
1
11.50in(281.75mm)
2.88in(70.5mm)
NEW IDEAS IN MOTION . . .
3
Introduction
1 2 3 4 5
ACC-34B
1
1
TB1
J2
J3
JTHW
TP1
J4B
J4A
E2
J3
To additional
ACC-34x
PMAC-PC
Connecting ACC-34B to PMAC
J1
E1
TB2
NEW IDEAS IN MOTION . . .
Introduction
4
1 2 3 4 5
OPEN
ACC-34B
ACC-34B
MULTIPLEX ADDRESS MAP
Each ACC-34B occupies 8 bytes of address space on the PMAC'S JTHW multiplex memory space. This
memory space is 8-bit wide, providing the ability to daisy-chain 32 (256/8) ACC-34Bs together (or a
combination of ACC-34Bs, ACC-34As, ACC-34s, ACC-18s and ACC-8D OPT7s). The 5-bit dipswitch,
SW1, determines the address of each ACC-34B board on the allocated memory space. Port A, the input
port, occupies the base address (i.e. bytes 0, 8, 16 etc.) and Port B, the output port, occupies the base
address plus 4 (i.e. bytes 4, 12, 20 etc.). Table 1 shows how SW1 should be set for one or more ACC-34B
boards connected to the same PMAC.
SW1 Dip Switch Setting
BOARD # BYTE # SW1 DIP SWITCH SETTING
Port A &
Port B
5
4
3
2
1
#1
0&4
ON
ON
ON
ON
ON
#2
8 & 12
ON
ON
ON
ON
OFF
#3
16 & 20
ON
ON
ON
OFF
ON
#4
24 & 28
ON
ON
ON
OFF
OFF
#5
32 & 36
ON
ON
OFF
ON
ON
#6
40 & 44
ON
ON
OFF
ON
OFF
#7
48 & 52
ON
ON
OFF
OFF
ON
#8
56 & 60
ON
ON
OFF
OFF
OFF
#9
64 &68
ON
OFF
ON
ON
ON
#10
72 & 76
ON
OFF
ON
ON
OFF
#11
80 & 84
ON
OFF
ON
OFF
ON
#12
88 &92
ON
OFF
ON
OFF
OFF
#13
96 & 100
ON
OFF
OFF
ON
ON
#14
104 & 108
ON
OFF
OFF
ON
OFF
#15
112 & 116
ON
OFF
OFF
OFF
ON
#16
120 & 124
ON
OFF
OFF
OFF
OFF
#17
128 & 132
OFF
ON
ON
ON
ON
#18
136 & 140
OFF
ON
ON
ON
OFF
#19
144 & 148
OFF
ON
ON
OFF
ON
#20
152 & 156
OFF
ON
ON
OFF
OFF
#21
160 & 164
OFF
ON
OFF
ON
ON
#22
168 & 172
OFF
ON
OFF
ON
OFF
#23
176 & 180
OFF
ON
OFF
OFF
ON
#24
184 &188
OFF
ON
OFF
OFF
OFF
#25
192 & 196
OFF
OFF
ON
ON
ON
#26
200 & 204
OFF
OFF
ON
ON
OFF
#27
208 & 212
OFF
OFF
ON
OFF
ON
#28
216 & 220
OFF
OFF
ON
OFF
OFF
#29
224 & 228
OFF
OFF
OFF
ON
ON
#30
232 & 236
OFF
OFF
OFF
ON
OFF
#31
240 & 244
OFF
OFF
OFF
OFF
ON
#32
248 & 252
OFF
OFF
OFF
OFF
OFF
The daisy-chain board address relationship with respect to the 5-bit (SW1) DIP
position setting.
Note: ON=CLOSED, OFF=OPEN. To turn off a switch, push down on the open
side. To turn on a switch, push down on the numbered side.
Multiplex Address Map
5
ACC-34B
M-Variable Assignments
Port A is always configured as a negative logic input port which can be read through TWS type Mvariables (see below). The output lines are driven by writing to port B.
There is a special format 32-bit wide M-variable for reading the data from, and writing the data to, an
ACC-34B card TWS.
Note
This special M-variable definition is implemented in PMAC's firmware with a
version number equal to or higher than 1.13. In version 1.14D, the TWS format
was modified in its address designation field to prevent un-intentional reads from
an output port or unintentional writes to an input port. If your PROM version is
between 1.13 to 1.14C, you may request for a free PROM update to version 1.14D
or above.
The definition format is of the form:
M{constant}->TWS:{m-plex}
For an input port, {m-plex} is a legal byte number (from column 2 of Table 1) plus 1. Any attempt to
write to a TWS type M-variable defined with bit zero of its address set to 1, is automatically prevented by
PMAC's firmware. For an output port, {m-plex} is a legal byte number (from column 2 of Table 1)
plus 2. An attempt to read a TWS type M-variable defined with bit one of its address set to 1, returns zero
and the actual read is prevented by PMAC's firmware (no error is reported). Note that individual bits
cannot be directly assigned to an M-variable of this type. Rather banks of 32 bits (ports) can be assigned
to M-variables. For example to address Port A (bits 0 to 31) of board #1 as an input using M100, we
would use the following definition:
M100->TWS:1
ON
;Port A (AIO 0-31) of an ACC-34B with SW1 switches all
;assigned for read only (1=0+1)
Similarly to address Port B of the same board #1 as an output using M101, we would use the following
definition:
WARNING
TWS type M-variable definition addresses which point to the base address directly (e.g.
M300->TWS:40) are still valid (i.e. they do not generate error). However their use is very
strongly discouraged. This because both reads and writes are enabled when the least
significant and the next least significant addresses bits are both zero (e.g. decimal 40 =
01000000 in binary). In this situation, any accidental read of an output port (say via the
Executive programs watch window) will cause all the output to be turned on! It is
therefore safer and more predictable when bits 0 & 1 of the M-variable definition are
intentionally used to disable either the read function or the write function.
M101->TWS:6
;Port B (BIO 0-31) of an ACC-34B with SW1 switches
;all ON assigned for write only (6=4+2)
Yet another example: to address Port A of board #6 as an input using M300, we would use the following
definition:
M300->TWS:41
6
;Port A (AIO 0-31) of an ACC-34B with SW1 switches
;ON,ON,OFF,ON,OFF assigned for read only (41=40+1)
Multiplex Address Map
ACC-34B
Note
A 32-bit Read or a 32-bit Write to an individual port takes approximately 64
microseconds of time in the PMAC's background time slot. As a result excessive
and unnecessary references to TWS type M-variables is not recommended (see
below for efficient ACC-34x I/O processing).
Processing ACC-34x Inputs and Outputs
Because the PMAC interface to the Accessory 34 family of I/O boards (ACC-34x) is by full 32-bit words
transmitted serially, even when access to only a single bit is desired, the user must consider carefully how
the interface is done and how frequently. Care must also be taken to work efficiently with the data so that
PMAC is not bogged down with slow serial reads and writes, and time-consuming logic to assemble and
disassemble I/O words.
The recommended strategy is to keep "images" of each input or output word in PMAC's internal memory,
or in the dual-ported RAM. The input words are copied into their image words, and the output words are
copied from their image words. Most program operations deal with these image words; much less
frequently is the slow transfer to or from an ACC-34x board performed. During the act of copying, bit
inversion can also be performed with the exclusive-or function.
When to Access ACC-34x
The actual reads and writes for an ACC-34x board can only be done in a background PLC program (PLC
1-31) or through on-line commands, which are executed between PLC programs. Motion programs and
PLC 0 cannot directly access this I/O -- they can work only with the image words. Reading an input word
from an ACC-34x is simply a question of using the TWS-form M-variable for that word on the right side
of an equation. Usually this operation simply copies the input word into its internal image variable.
Similarly, writing an output word to an ACC-34x just involves using the M-variable for that word on the
left side of an equation, typically just copying it from its internal image word.
Most users will treat ACC-34x I/O the same way that a traditional PLC treats its I/O; all of the inputs are
read at the beginning of a PLC software scan, and all of the outputs are written to at the end of the scan.
In between, all the processing of the variables is done working with the internal image words. It is
possible to make the write operation to the output word conditional on a change in the image word for the
output from the previous scan, but the time involved in making the decision and storing each scan's value
is about the same as the actual writing to the output.
Image Word Variables
It is best to use fixed-point M-variables as the internal image variables for the I/O words. When this is
done, a single M-variable representing the entire I/O word can be used for the copying operation. Then
separate M-variables can be used to access individual bits or segments of the image word. Use of these
smaller M-variables allows PMAC's efficient firmware to do the masking and logic necessary to pick out
portions of the I/O word, rather than slower user program code.
Location of Image Words
Where should these internal image variables reside in PMAC's memory? If the system has dual-ported
RAM, it is probably best to use a 32-bit register in DPRAM. This way, the host computer always has
immediate access to the I/O. In fact, it is possible to use PMAC just as a pass-through between the host
computer and the ACC-34x boards, letting the host computer do all the processing. A 32-bit fixed-point
register in DPRAM is defined by the DP format of M-variable (e.g. M60-> DP:$DF00). This type of
variable occupies the low 16 bits (bits 0 to 15) of PMAC Y-memory, and the low 16 bits of PMAC Xmemory at the same address, with the less significant bits in Y-memory. It appears to the host computer
as 2 16-bit registers at consecutive even addresses, with the less significant bits at the lower address.
Multiplex Address Map
7
ACC-34B
If there is no DPRAM, the image word will be in an otherwise unused double register in PMAC's
own memory. There are several places to find unused registers. There are sixteen open registers that are
automatically set to zero on power-up at PMAC addresses $0770 to $077F. There are sixteen more open
registers whose values are held when power is off at PMAC addresses $07F0 to $07FF. Also, it is
possible to use the registers of otherwise unused P and Q-variables for this purpose.
These registers should be accessed with fixed-point M-variables, not floating-point P or Q-variables! A
double fixed-point register in PMAC's internal memory is defined by the D format of M-variable (e.g.
M61->D:$07F0). This is a 48-bit register -- only the low 32 bits will be used. The low 24 bits of the I/O
will be in Y-memory, and the high 8 bits of the I/O will be in the low 8 bits of X-memory.
When working with the ACC-34x I/O with this method of using fixed-point image variables, the only
software overhead is the actual copying between image and I/O. Including program interpretation time,
this amounts to about 100 microseconds per 32-bit word. Aside from this, working with the I/O through
the image words is at least as fast as direct (parallel) PMAC I/O. Of course, there is a potential latency of
a full PLC scan on the actual I/O which must be respected. Many systems will have a few critical I/O
points that cannot tolerate this latency; these typically use PMAC's JOPTO port or ACC-14 I/O for these
time-critical points, then use ACC-34x for I/O that do not need to be so fast.
Preventing Conflicts in Output Image Words
Care must be taken if tasks of different priority levels are trying to write to the same output image word,
or if both the host computer and PMAC are trying to write to the same DPRAM output image word. If
the proper techniques are not used, occasional output changes will not be executed, and because of the
intermittent nature of the problem will make it very difficult to diagnose. If the application has two
priority levels or two computers that write to the same ACC-34x output word, separate partial image
words must be used, then these words combined as the output word is sent. Note that there is no conflict
in having different tasks or different processors read from the same input word.
Remember that a computer cannot actually write to less than a word of memory at a time, even if it only
wants to change one bit. In PMAC the word length is 24 bits; for the DPRAM, it is 16 bits. If a computer
wants to change less than a full word, it must read the full word, modify the bits it wants with mask
words, and then write back the full word.
There are two priority levels in PMAC that can write to these image words: the foreground level, which
includes all of the motion programs and PLC 0; and the background level, which includes PLCs 1-31 and
on-line commands. The problem can occur when a higher priority task interrupts a lower priority task
that is in the middle of changing the image word with a read-modify-write operation. When the lower
priority task resumes, it will undo the changes made by the higher priority task. Similarly, if the image
word is in the DPRAM, and one side starts its read-modify-write cycle on the word but does not finish it
before the other side starts its own cycle, the side that starts later can undo the changes made by the side
that starts first.
(Note that two tasks at the same priority level cannot interrupt each other; one will always finish an
operation before the other starts. Therefore, there is no need to worry about two motion programs writing
to the same image word; or a motion program and PLC 0; because these tasks are at the same priority
level. Similarly, there is no need to worry about two background PLC programs writing to the same
image word, or a background PLC and on-line commands.)
To prevent this possible conflict, the different priority levels or different processors must use different
image words, even if they each represent only a part of the same total output word. These partial words
are then combined in the act of writing to the actual output word.
The simplest way to split an image word is to use the natural X-memory vs. Y-memory split in PMAC's
memory. If you are using a double word in PMAC's internal memory, you can reserve the 24 bits in Y8
Multiplex Address Map
ACC-34B
memory for one priority level, and the 8 bits in X-memory for the other. If you are using the DPRAM,
you can reserve the 16 bits in Y-memory for one processor or priority level, and the 16 bits in X-memory
for another. If you do this, no special techniques need to be used. On PMAC, simply write to the partial
words with a X or Y format M-variable; PMAC will automatically do the read-modify-write cycle
without touching the other part of the word. On the host computer, access the DPRAM register with the
short (16-bit) integer format, not the long.
However, if you cannot arrange your split in this fashion, you must create separate "overlapping" image
words and explicitly combine them. As an example, take a system where the low 12 bits will be written
to by background PLCs and the high 20 bits will be written to by motion programs. We create two
separate image words, one for each priority level, and the actual output word:
M101->D:$0770
M102->D:$0771
M103->TWS:6
; Image word for PLC programs (background)
; Image word for motion programs (foreground)
; ACC-34x output word; write-only
We also define single-bit M-variables to parts of these same internal addresses: at Y:$0770, bits 0 to 11
for the PLCs; then at Y:$0771, bits 12 to 23, and X:$0771, bits 0 to 7 for the motion programs. At the
end of a PLC scan, to create the actual output word on an ACC-34x from the image words, we would use
the program statement:
M103 = (M101 & $00000FFF) | (M102 & $FFFFF000)
The bit-by-bit AND (&) operations make sure no falsely set bits in unused portions of the image words
get into the output word. They are not strictly necessary if the unused bits can be guaranteed to be zero.
The bit-by-bit OR (|) operation combines the word, and the assignment of the resulting value to M103
causes it to be written to the ACC-34x.
If you want to be able to write to the same bit of an output image word with two different priority levels
or processors, one of the tasks must do so indirectly by writing into a holding register. The other task
must take this holding register and transfer the bit value into the image word. This task must decide what
to do in case of any conflict (i.e. one task wants to clear the bit, and the other wants to set it).
Example:
The following example should illustrate the concept of this method of working with ACC-34x I/O. It is a
bit unrealistic, because it shows the image variables both in DPRAM and several places in internal
memory. In a real application, a single location range would probably be chosen.
Set-up and Definitions:
M1000->TWS:1
M1002->TWS:6
M1004->TWS:9
M1006->TWS:14
Multiplex Address Map
;
;
;
;
;
;
;
;
;
;
;
;
;
;
;
;
Actual ACC-34 I/O Words
First side of first ACC-34x board an
Location is at port address 0; added
read only
Second side of first ACC-34x board
an output here
Location is at port address 4; added
write only
First side of second ACC-34x board
an input here
Location is at port address 8; added
read only
Second side of second ACC-34x board
an output here
Location is at port address 12
added 2 for write only
input here
1 for
2 for
1 for
9
ACC-34B
M1001->DP:$D800
M1003->D:$0770
M1005->D:$07F0
M1007->D:$13FF
M100->Y:$D800,0
M101->Y:$D800,1
...
M115->Y:$D800,15
M116->X:$D800,0
M117->X:$D800,1
...
M131->X:$D800,15
M300->Y:$0770,0
M301->Y:$0770,1
...
M323->Y:$0770,23
M324->X:$0770,0
M325->X:$0770,1
...
M331->X:$0770,7
M500->Y:$07F0,0
...
M523->Y:$07F0,23
M524->X:$07F0,0
...
M531->X:$07F0,7
M700->Y:$13FF,0
...
M724->X:$13FF,0,8
10
;
;
;
;
;
;
;
;
Image Words
32-bit fixed-point DPRAM register
48-bit fixed-point register, set to zero on
power-up
48-bit fixed-point register, value held thru
power down
Register for P1023, treated as 48-bit fixedpoint value
;
;
;
;
Individual Pieces of Image Words
Least significant bit (bit 0) of first
image word
Second bit (bit 1) of first image word
; Bit 15 of first image word
; Bit 16 of first image word
;
;
;
;
;
Most significant bit (bit 31) of first
image word
Least significant bit (bit 0) of second
image word
Second bit (bit 1) of second image word
; Bit 23 of second image word
; Bit 24 of second image word
; Bit 25 of second image word
;
;
;
;
Most significant bit (bit 31) of second
image word
Least significant bit (bit 0) of third
image word
; Bit 23 of third image word
; Bit 24 of third image word
;
;
;
;
Most significant bit (bit 31) of third
image word
Least significant bit (bit 0) of fourth
image word
; Top eight bits (bits 24-31) of fourth
; image word
Multiplex Address Map
ACC-34B
Programs:
; "Reset" PLC program that only runs once on
; power-up or reset
OPEN PLC 1 CLEAR
M1003=0
M1007=0
...
DISABLE PLC 1
; Clear output image word to make sure all
; outputs off
; Ditto
; To make sure this only runs once on
; power-up/reset
CLOSE
; PLC program to copy the inputs into image words
at beginning of each scan
OPEN PLC 2 CLEAR
M1001=M1000
; Copy first input word into its image register
M1005=M1004^$FFFFFFFF ; Copy second input word into its image register,
; inverting
...
CLOSE
; PLC program that works with individual bits of
; image words
OPEN PLC 3 CLEAR
IF (M100=1 AND M101=0
AND P43>50)
M301=1
ELSE
M301=0
ENDIF
...
CLOSE
; PLC program that copies image words to outputs
; at end of scan
OPEN PLC 31 CLEAR
M1002=M1003
M1004=M1005^$FFFFFFFF
; Copy first output image word to ACC-34x
; Copy second output image word to ACC-34x,
; inverting
Power Supply and Opto-Isolation Considerations
The power for the PMAC processor side of the opto-isolation circuitry is brought in directly from J1
(JTHW). The power for the external side of the opto-isolation circuitry should be from a separate supply
brought in through TB1 (5V) or TB2 (12-24V). Note either TB1 or TB2 should be used. Do not supply
power through both TB1 and TB2. E1 should be installed when +12 to 24V supply is brought in through
TB2. It should be removed if +5V supply is brought in through TB1. The current requirement for on
board logic circuit on the external side of the opto isolation is approximately 50 mA. However, if the
power is also supplied for the external opto boards digital circuits, then up to 550 mA may be required.
Multiplex Address Map
11
ACC-34B
Watchdog Timer (Role of Jumper E2)
ACC-34B has a local watchdog timer which is enabled unless the jumper E2 is removed. In the default
factory setup this jumper is installed. A 1.5 second period watchdog timer circuitry is enabled on ACC34A when jumper E2 is installed. When the timer is enabled, if PMAC (either through a PLC program or
a motion program) does not read from or write to the ACC-34B board at least once per 1.5 second the
watchdog timer trips. When this occurs the outputs go high which in turn switches off the outputs of opto
board(s) connected to ACC-34B.
12
Multiplex Address Map
ACC-34B
CONNECTORS
J1 (50 Pin Header)
Pin #
Symbol
1
2
3
4
5
6
7
8
9
10
11
12
13
14
15
16
17
18
19
20
21
22
23
24
25
26
27
28
29
30
31
32
33
34
35
36
37
38
39
40
41
42
43
44
45
46
N.C
GND
N.C.
GND
N.C
GND
N.C
GND
N.C
GND
N.C
GND
N.C
GND
N.C
GND
OUT31
GND
OUT30
GND
OUT29
GND
OUT28
GND
OUT27
GND
OUT26
GND
OUT25
GND
OUT24
GND
IN31
GND
IN30
GND
IN29
GND
IN28
GND
IN27
GND
IN26
GND
IN25
GND
Connectors
Function
Description
Notes
Not connected
Common
Opto Common
Common
Opto Common
Common
Opto Common
Common
Opto Common
Not connected
Not connected
Not connected
Not connected
Common
Opto Common
Common
Opto Common
Common
Opto Common
Common
Output
Common
Output
Common
Output
Common
Output
Common
Output
Common
Output
Common
Output
Common
Output
Common
Input
Common
Input
Common
Input
Common
Input
Common
Input
Common
Input
Common
Input
Common
Opto Common
Port B Bit 31
Opto Common
Port B Bit 30
Opto Common
Port B Bit 29
Opto Common
Port B Bit 28
Opto Common
Port B Bit 27
Opto Common
Port B Bit 26
Opto Common
Port B Bit 25
Opto Common
Port B Bit 24
Opto Common
Port A Bit 31
Opto Common
Port A Bit 30
Opto Common
Port A Bit 29
Opto Common
Port A Bit 28
Opto Common
Port A Bit 27
Opto Common
Port A Bit 26
Opto Common
Port A Bit 25
Opto Common
Not connected
Not connected
Not connected
13
ACC-34B
47
48
49
50
IN24
GND
A +5V
GND
Input
Common
Output
Common
Port A Bit 24
Opto Common
+5V supply
Opto Common
See J1, TB1 & TB2 description
J2 (50 Pin Header)
14
Pin #
Symbol
Function
Description
1
2
3
4
5
6
7
8
9
10
11
12
13
14
15
16
17
18
19
20
21
22
23
24
25
26
27
28
29
30
31
32
33
34
35
36
37
38
39
40
41
42
43
IN23
GND
IN22
GND
IN21
GND
IN20
GND
IN19
GND
IN18
GND
IN17
GND
IN16
GND
IN15
GND
IN14
GND
IN13
GND
IN12
GND
IN11
GND
IN10
GND
IN9
GND
IN8
GND
IN7
GND
IN6
GND
IN5
GND
IN4
GND
IN3
GND
IN2
Input
Common
Input
Common
Input
Common
Input
Common
Input
Common
Input
Common
Input
Common
Input
Common
Input
Common
Input
Common
Input
Common
Input
Common
Input
Common
Input
Common
Input
Common
Input
Common
Input
Common
Input
Common
Input
Common
Input
Common
Input
Common
Input
Port A Bit 23
Opto Common
Port A Bit 22
Opto Common
Port A Bit 21
Opto Common
Port A Bit 20
Opto Common
Port A Bit 19
Opto Common
Port A Bit 18
Opto Common
Port A Bit 17
Opto Common
Port A Bit 16
Opto Common
Port A Bit 15
Opto Common
Port A Bit 14
Opto Common
Port A Bit 13
Opto Common
Port A Bit 12
Opto Common
Port A Bit 11
Opto Common
Port A Bit 10
Opto Common
Port A Bit 9
Opto Common
Port A Bit 8
Opto Common
Port A Bit 7
Opto Common
Port A Bit 6
Opto Common
Port A Bit 5
Opto Common
Port A Bit 4
Opto Common
Port A Bit 3
Opto Common
Port A Bit 2
Notes
Connectors
ACC-34B
44
45
46
47
48
49
50
GND
IN1
GND
IN0
GND
A +5V
GND
Common
Input
Common
Input
Common
Output
Common
Opto Common
Port A Bit 1
Opto Common
Port A Bit 0
Opto Common
+5 V supply
Opto Common
See J1, TB1 & TB2 description
J3 (50 Pin Header)
Pin #
Symbol
Function
Description
1
2
3
4
5
6
7
8
9
10
11
12
13
14
15
16
17
18
19
20
21
22
23
24
25
26
27
28
29
30
31
32
33
34
35
36
37
38
39
40
OUT23
GND
OUT22
GND
OUT21
GND
OUT20
GND
OUT19
GND
OUT18
GND
OUT17
GND
OUT16
GND
OUT15
GND
OUT14
GND
OUT13
GND
OUT12
GND
OUT11
GND
OUT10
GND
OUT9
GND
OUT8
GND
OUT7
GND
OUT6
GND
OUT5
GND
OUT4
GND
Output
Common
Output
Common
Output
Common
Output
Common
Output
Common
Output
Common
Output
Common
Output
Common
Output
Common
Output
Common
Output
Common
Output
Common
Output
Common
Output
Common
Output
Common
Output
Common
Output
Common
Output
Common
Output
Common
Output
Common
Port B Bit 23
Opto Common
Port B Bit 22
Opto Common
Port B Bit 21
Opto Common
Port B Bit 20
Opto Common
Port B Bit 19
Opto Common
Port B Bit 18
Opto Common
Port B Bit 17
Opto Common
Port B Bit 16
Opto Common
Port B Bit 15
Opto Common
Port B Bit 14
Opto Common
Port B Bit 13
Opto Common
Port B Bit 12
Opto Common
Port B Bit 11
Opto Common
Port B Bit 10
Opto Common
Port B Bit 9
Opto Common
Port B Bit 8
Opto Common
Port B Bit 7
Opto Common
Port B Bit 6
Opto Common
Port B Bit 5
Opto Common
Port B Bit 4
Opto Common
Connectors
Notes
15
ACC-34B
41
42
43
44
45
46
47
48
49
50
OUT3
GND
OUT2
GND
OUT1
GND
OUT0
GND
A +5V
GND
Output
Common
Output
Common
Output
Common
Output
Common
Output
Common
Port B Bit 3
Opto Common
Port B Bit 2
Opto Common
Port B Bit 1
Opto Common
Port B Bit 0
Opto Common
+5 V supply
Opto Common
See J1, TB1 & TB2 description
J4A and J4B (26-Pin Header)
16
Pin #
Symbol
Function
Description
1
2
3
4
5
6
7
8
9
10
11
12
13
14
15
16
17
18
19
20
21
22
23
24
25
26
GND
GND
DAT0
SEL0
DAT1
SEL 1
DAT2
SEL2
DAT3
SEL3
DAT4
SEL 4
DAT5
SEL5
DAT6
SEL6
DAT7
SEL7
N.C.
GND
N.C.
GND
N.C.
GND
+5V
N.C.
Common
Common
Output
Input
Output
Input
Output
Input
Output
Input
Output
Input
Output
Input
Output
Input
Output
Input
PMAC Common
PMAC Common
Data Bit 0
Address Line 0
Data Bit 1
Address Line 1
Data Bit 2
Address Line 2
Data Bit 3
Address Line 3
Data Bit 4
Address Line 4
Data Bit 5
Address Line 5
Data Bit 5
Address Line 6
Data Bit 6
Data Bit 7
Notes
Not connected
Not connected
Not connected
Not connected
Not connected
Not connected
Not connected
Not connected
Common
PMAC Common
Common
PMAC Common
Common
Input
PMAC Common
+5V DC Supply
Not connected
Not connected
Not connected
Connectors
ACC-34B
TB1 (2-Pin Terminal Block)
Pin #
Symbol
Function
Description
Notes
1
AGND
Common
2
A+5V
Power Supply
External Supply
Ground
External Supply for
Optically Isolated
Part of Circuitry
Regulated +5V
This a 2-pin terminal block through which a 5 volt power supply may be brought in for the optically
isolated side of the digital circuitry on ACC34B (50 mA is required). If the same supply is to be brought
out for the opto boards via J1 to J3 then, depending on the requirements of the opto boards, the current
needed may be considerably higher. Remove jumper E1 if the power is supplied to the board via TB1.
Note that with jumper E1 is installed, whenever a 12 to 24V supply is brought in from TB2, then TB1 can
be used as a 5V power source for the logic circuits on the external opto boards (see the enclosed
schematic).
TB2 (2-Pin Terminal Block)
Pin #
Symbol
Function
Description
1
AGND
Common
2
A+24V
Power Supply
External Supply
Ground
External Supply for
Optically Isolated
Part of Circuitry
Notes
12V to 24V
Unregulated
This is a 2-pin terminal block through which a 12 to 24V unregulated power supply may be brought for
the optically isolated side of the digital circuitry on ACC34B. The voltage is reduced to 5V via the on
board regulator. Install jumper E1 if the required power is supplied via TB2. Do not supply power
through both TB1 and TB2.
Connectors
17
ACC-34B
18
Connectors
ACC-34B
SCHEMATICS
Schematics
19