1
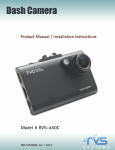
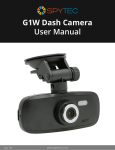
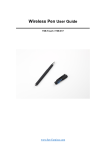
Thank you for purchasing this Gator Digital driving recorder. This product will help maintain the original appearance of your car by providing hard evidence in the event of an accident. Specially developed as a sleek, convenient and durable multi-vehicle driving recorder, it’s the best choice for escorting you on your trip and can also work as a personal video recorder. Product Overview: This product is a Gator Digital Car driving recorder, It can record high resolution video as well as high pixel pictures, Using the TF card for storage equipment, ultra-small, saving power, easy& convenient to take anywhere. This user manual will detail how to use, operate, technical specifications and precautions. Before use, please read this manual thoroughly and fully understand, Please keep this manual, we hope our products can meet your needs and long-term service to you! product constructon 1) menu 2) UP 3) OK Confirm Button 4) DOWN 5) mode key 6)HDMI-OUT 7) TF Card Slot 8) USB port 9) reset hole 10) Power On/Off Button 11) Power Indicator Light 12) Battery Charging Indicator Light 13) MIC The function description of Buttons Menu: Short press to bring up the function setting menu, press this button continuously to switch between each setting. And short press to lock current video in the process of video recording; Up: While in the menu, acts as select up button. While in standby or video recording, enables the digital zoom OK/Confirm Button: The confirm button for video recording and photographing, under the video recording mode, short press to start recording, short press again to stop recording; under the photographing mode, short press to take pictures; while under the menu mode it’s a confirm button. Down: While in the menu, acts as select down button. Short press to open or close the audio recording function, after first press the digital zoom function button, this key will zoom out. Mode Button: Short Press to switch between: video recording / photograph / playback. While in the video mode short press this key to lock the current screen. HDMI:High definition output interface. TF Card Slot:Memory card slot. USB Data Cable Interface ①Transmit the data by connecting computer. ②Charge for the battery or provide the working power by connecting the external power. Reset: reset button. Power On/Off Button:Short press to power on and long press to power off, Short press to turn on or turn off the IR night vision. Power Indicator Light:It will illuminate when the power is on. Battery Charging Indicator Light:It will turn on after USB cable is connected and indicates the unit is charging properly. It will turn off after the battery is full. MIC: Audio receiver Special function description G-sensor When gravity acceleration reaches up to 1g=9.80 meter/second squared, the machine will automatically save the current video of the incident and not delete the file; G-sensor could be set 2G-4G-6G-8G in the menu, factory default set 4G. SOS function Press the mode button during recording, the current video will be saved automatically and not be deleted Power on/off automatically When connected with car charger, device will turn on automatically when car starts up, and save the video recording automatically when car power off. Video recording/photographing basic operation instructions: Power on and off Long press power button to be power on and the blue indicator light will turn on. Long press the power button again to be power off and the blue indicator light will turn off. Attention:DVR will shutdown automatically after the reminder of low power when the battery is low. Video recording mode Short press mode button to switch the video recording mode, the icon of recording will appear on the upper left corner of screen; Short press the OK button to start recording, the icon of recording will flicker; and the record indicator light will flicker, means it’s recording. Photographing mode Short press mode button to switch the photographing mode, the photographing icon will flicker on the upper left corner of screen; short press the OK button to take photos, the screen will flicker once when photographing, it means photographing is finished. Video/photo playback Short press mode button to switch the playback mode , the playback icon will flicker on the upper left corner of screen. Short press up button to choose the files upwards ; Short press down button to choose the files downwards;Short press OK button choose the files need to be played. Menu setting Short press menu button to bring up the setting menu ; Switch each other between each setting up and down by short pressing up or down button; Choose the setting need to change and make change by short pressing OK button; Exit the setting menu Short press menu button, to exit the setting; Time setting Short press menu button continuously to enter into the setting option, short press down button to choose the date setting, Short press OK button to enter, Short press OK button, to switch among the year/month/date/hour/minute/second options, adjust the number you need by pressing up and down button and confirm the change by pressing OK button. USB Mode Connect the USB cable with the computer, press the power on button, this will bring up the USB menu ,and appears options as following: USB-Disk: Under this mode, you can access the video and photo files, it could be also charge at the same time. Battery instruction Battery indication image please refer as below: Full a bit low very low empty There are three methods to charge, the red indicator light up when charging, the entire charging time is about 30 minutes, and the red indicator light automatically off when charging completed. 1: Use power adapter to charge 2: Use PC-USB to charge 3: Use vehicle power to charge Remark: If the DVR is powered but not responding, remove battery or press “reset” button to restart. Product feature High definition lens and video recording G-sensor Built-in(Save car accident case in emergency, will not be deleted) The size of LCD 2.7 LTPS Lens 140 degree high resolution ultra wide angle Language Russian, English, Chinese (simplified), Chinese (Traditional), Korean, Japanese etc. Video resolution 1920x1080 Video Codec AVI Color Standard Loop recording Loop recording (records over old footage) Power on and off Support to power on when car starts up and power off when car stop accompanying the car Motion detection Support (not while loop recording) Year/Month/Date/Hour/Min Support ute Photo format JPEG xMemory card TF (Max Support 32GB) MIC Support Built-in sound Support IR night vision Support Video format PAL/NTSC Current frequency 50HZ/60HZ USB Function 1:storage 2:camera Power interface 5V 1A Battery Built-in :300mAh FAQ: For problems in normal operating situation ,please try these methods below: Can’t take photo and recording Check the TF card space, whether it’s enough or just be locked Automatically stops when recording Use the compatible high-speed TF card with SDHC because of big HD video data, the high-speed TF card have mark of C4 and C6 Appear “files error” when replay photo or video Uncompleted files because of TF card storage error, please format your TF card. Unclear video Checks if there are any dirt or fingerprint on the lens; and use lens paper to clear the camera lens. Black image when recording sky or water scene Scenes with big contrast will influence the automatic exposure function of camera; you can adjust “EV ” in setting mode to correct. Colour is not perfect in cloudy day and outdoor light Please check the “white balance” function and set it to be automatic Cross stripe interference in image This is because of the wrong “power frequency”, please set it to 50Hz or 60Hz according to the local power supply current frequency System does not respond while powered Restart by pressing shortly on “RESET” button.