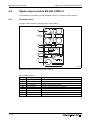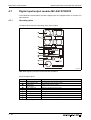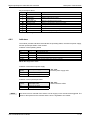
1
MITSUBISHI ELECTRIC
MELSEC A/Q series
Programmable logical controller
User`s Manual
MC Modules
AS-Interface Slave I/O Modules
Art.-no.: 144181
22 10 2002
Version A
MITSUBISHI ELECTRIC
INDUSTRIAL AUTOMATION
About this Manual
The texts, illustrations, diagrams and examples in this manual are only intended
as aids to help explain the functioning, operation, use and programming of the
slave I/O modules of the MC-ASI series.
If you have any questions regarding the installation and operation of the
equipment described in this manual, please do not hesitate to contact your
sales office or one of your Mitsubishi distribution partners (see cover page).
You can also obtain information updates and answers to frequently asked
questions from our Internet website:
http://www.mitsubishi-automation.com
No part of this manual may be reproduced, copied, stored in any kind of
information retrieval system or distributed without the prior express written
consent of MITSUBISHI ELECTRIC EUROPE B.V.
MITSUBISHI ELECTRIC EUROPE B.V. reserves the right to change the
specifications of its products and/or the contents of this manual at any time and
without prior notice.
© 10/2002
User’s Manual
Slave I/O Modules of the MC-ASI Series
Article No.: 144181
A
Version
10/02
pdp-rs
Changes / Additions / Corrections
First issue
Safety Information
For qualified staff only
This manual is only intended for use by properly trained and qualified electrical technicians who
are fully acquainted with automation technology safety standards. All work with the hardware
described, including system design, installation, setup, maintenance, service and testing, may
only be performed by trained electrical technicians with approved qualifications who are fully
acquainted with the applicable automation technology safety standards and regulations. Any
operations or modifications of the hardware and/or software of our products not specifically
described in this manual may only be performed by authorised Mitsubishi staff.
Proper use of equipment
The MC-ASI modules are only intended for the specific applications explicitly described in this
manual. Please take care to observe all the installation and operating parameters specified in
the manual. The design, manufacturing, testing and documentation of these products have all
been carried out in strict accordance with the relevant safety standards. Under normal circumstances the products described here do not constitute a potential source of injury to persons or
property provided that you precisely observe the instructions and safety information provided for
proper system design, installation and operation. However, unqualified modification of the hardware or software or failure to observe the warnings on the product and in this manual can result
in serious personal injury and/or damage to property. Never use any peripheral or expansion
equipment with the MC-ASI modules other than that specifically approved and recommended by
Mitsubishi Electric.
Any other use or application of the products is deemed to be improper.
Relevant safety regulations
All safety and accident prevention regulations relevant to your specific application must be
observed in the system design, installation, setup, maintenance, servicing and testing of these
products.
The regulations listed below are particularly important. This list does not claim to be complete;
however, you are responsible for knowing and applying the regulations applicable to you.
● VDE Standards
– VDE 0100 (regulations for electrical installations with rated voltages up to 1000 V)
– VDE 0105 (operation of electrical installations)
– VDE 0113 (electrical systems with electronic equipment)
– VDE 0160 (configuration of electrical systems and electrical equipment)
– VDE 0550/0551 (regulations for transformers)
– VDE 0700 (safety of electrical appliances for household use and similar applications)
– VDE 0860 (safety regulations for mains-powered electronic appliances and their accessories for household use and similar applications)
● Fire prevention regulations
● Accident prevention regulations
– VBG No. 4 (electrical systems and equipment)
User’s manual MC-ASI modules
V
Safety warnings in this manual
In this manual special warnings that are important for the proper and safe use of the products
are clearly identified as follows:
P
DANGER:
E
CAUTION:
VI
Personnel health and injury warnings. Failure to observe the precautions described
here can result in serious health and injury hazards.
Equipment and property damage warnings. Failure to observe the precautions described here can result in serious damage to the equipment or other property.
General safety information and precautions
The following safety precautions are intended as a general guideline for using the MC-ASI modules together with other equipment. These precautions must always be observed in the design,
installation and operation of all control systems.
P
DANGER:
● Observe all safety and accident prevention regulations applicable to your specific
application. Installation, wiring and opening of the assemblies, components and devices may only be performed with all power supplies disconnected.
● Assemblies, components and devices must always be installed in a shockproof
housing fitted with a proper cover and protective equipment.
● Devices with a permanent connection to the mains power supply must be integrated
in the building installations with an all-pole disconnection switch and a suitable
fuse.
● Check power cables and lines connected to the equipment regularly for breaks and
insulation damage. If cable damage is found, immediately disconnect the equipment
and the cables from the power supply and replace the defective cabling.
● Before using the equipment for the first time check that the power supply rating
matches that of the local mains power.
● You are responsible for taking the necessary precautions to ensure that programs
interrupted by brownouts and power failures can be restarted properly and safely.
In particular, you must ensure that dangerous conditions cannot occur under any
circumstances, even for brief periods. If necessary you must make provision for
forcing an EMERGENCY OFF condition to prevent such conditions.
● EMERGENCY OFF facilities pursuant to EN 60204/IEC 204 VDE 0113 must remain
fully operative at all times and in all control system operating modes. The EMERGENCY OFF facility reset function must be designed so that it cannot cause an uncontrolled or undefined restart.
● You must also implement hardware and software safety precautions to prevent the
possibility of undefined control system states caused by signal line cable or core
breaks.
User’s manual MC-ASI modules
VII
Typographic conventions
Important information
Notes containing important information are clearly identified as follows:
NOTE
Note text
Numbering in figures and illustrations
Reference numbers in figures and illustrations are shown with white numbers in a black circle
and the corresponding explanations shown beneath the illustrations are identified with the same
numbers, like this:
Procedures
In some cases the setup, operation, maintenance and other instructions are explained with numbered procedures. The individual steps of these procedures are numbered in ascending order
with black numbers in a white circle, and they must be performed in the exact order shown:
Text
Text
Text
Footnotes in tables
Footnote characters in tables are printed in superscript and the corresponding footnotes shown
beneath the table are identified by the same characters, also in superscript.
If a table contains more than one footnote, they are all listed below the table and numbered in
ascending order with black numbers in a white circle, like this:
�
Text
Text
� Text
�
VIII
Contents
Contents
1
Introduction
1.1
Introduction. . . . . . . . . . . . . . . . . . . . . . . . . . . . . . . . . . . . . . . . . . . . . . . . . . . .1 - 1
2
Basics
2.1
Features of the MC-ASI series . . . . . . . . . . . . . . . . . . . . . . . . . . . . . . . . . . . . .2 - 1
2.1.1
Mounting . . . . . . . . . . . . . . . . . . . . . . . . . . . . . . . . . . . . . . . . . . . . . . .2 - 1
2.1.2
Connection of the modules . . . . . . . . . . . . . . . . . . . . . . . . . . . . . . . . .2 - 1
2.1.3
Addressing . . . . . . . . . . . . . . . . . . . . . . . . . . . . . . . . . . . . . . . . . . . . .2 - 1
3
System Configuration
3.1
AS-Interface . . . . . . . . . . . . . . . . . . . . . . . . . . . . . . . . . . . . . . . . . . . . . . . . . . .3 - 1
3.1.1
Data exchange . . . . . . . . . . . . . . . . . . . . . . . . . . . . . . . . . . . . . . . . . .3 - 1
3.1.2
Structure . . . . . . . . . . . . . . . . . . . . . . . . . . . . . . . . . . . . . . . . . . . . . . .3 - 2
3.1.3
Cable types . . . . . . . . . . . . . . . . . . . . . . . . . . . . . . . . . . . . . . . . . . . . .3 - 3
3.1.4
Slave addressing. . . . . . . . . . . . . . . . . . . . . . . . . . . . . . . . . . . . . . . . .3 - 3
4
Description of the Modules
4.1
Module overview. . . . . . . . . . . . . . . . . . . . . . . . . . . . . . . . . . . . . . . . . . . . . . . . 4 - 1
4.2
4.3
4.1.1
Input modules . . . . . . . . . . . . . . . . . . . . . . . . . . . . . . . . . . . . . . . . . . .4 - 1
4.1.2
Output modules . . . . . . . . . . . . . . . . . . . . . . . . . . . . . . . . . . . . . . . . . 4 - 1
4.1.3
Combined input/output modules . . . . . . . . . . . . . . . . . . . . . . . . . . . . 4 - 1
Digital input module MC-ASI X4M12 . . . . . . . . . . . . . . . . . . . . . . . . . . . . . . . .4 - 2
4.2.1
Operating items . . . . . . . . . . . . . . . . . . . . . . . . . . . . . . . . . . . . . . . . . .4 - 2
4.2.2
Indicators. . . . . . . . . . . . . . . . . . . . . . . . . . . . . . . . . . . . . . . . . . . . . . .4 - 3
4.2.3
Pin assignment of the M12 circular connectors . . . . . . . . . . . . . . . . .4 - 4
4.2.4
Connection of the ASI bus . . . . . . . . . . . . . . . . . . . . . . . . . . . . . . . . .4 - 5
Digital input module MC-ASI X8M12 . . . . . . . . . . . . . . . . . . . . . . . . . . . . . . . .4 - 6
4.3.1
Operating items . . . . . . . . . . . . . . . . . . . . . . . . . . . . . . . . . . . . . . . . . .4 - 6
4.3.2
Indicators. . . . . . . . . . . . . . . . . . . . . . . . . . . . . . . . . . . . . . . . . . . . . . .4 - 7
4.3.3
Pin assignment of the M12 circular connectors . . . . . . . . . . . . . . . . .4 - 8
4.3.4
Connection of the ASI bus . . . . . . . . . . . . . . . . . . . . . . . . . . . . . . . . .4 - 9
4.3.5
Addressing . . . . . . . . . . . . . . . . . . . . . . . . . . . . . . . . . . . . . . . . . . . . .4 - 9
User’s manual MC-ASI modules
IX
Contents
4.4
4.5
4.6
4.7
4.8
X
Digital output module MC-ASI Y4M12-05. . . . . . . . . . . . . . . . . . . . . . . . . . . .4 - 10
4.4.1
Operating items . . . . . . . . . . . . . . . . . . . . . . . . . . . . . . . . . . . . . . . . .4 - 10
4.4.2
Indicators. . . . . . . . . . . . . . . . . . . . . . . . . . . . . . . . . . . . . . . . . . . . . .4 - 11
4.4.3
Pin assignment of the M12 circular connectors . . . . . . . . . . . . . . . .4 - 12
4.4.4
Connection of the ASI bus . . . . . . . . . . . . . . . . . . . . . . . . . . . . . . . .4 - 13
4.4.5
Connection of the power supply . . . . . . . . . . . . . . . . . . . . . . . . . . . .4 - 13
Digital output module MC-ASI Y4M12-2. . . . . . . . . . . . . . . . . . . . . . . . . . . . .4 - 14
4.5.1
Operating items . . . . . . . . . . . . . . . . . . . . . . . . . . . . . . . . . . . . . . . . .4 - 14
4.5.2
Indicators. . . . . . . . . . . . . . . . . . . . . . . . . . . . . . . . . . . . . . . . . . . . . .4 - 15
4.5.3
Pin assignment of the M12 circular connectors . . . . . . . . . . . . . . . .4 - 16
4.5.4
Connection of the ASI bus . . . . . . . . . . . . . . . . . . . . . . . . . . . . . . . .4 - 17
4.5.5
Connection of the power supply . . . . . . . . . . . . . . . . . . . . . . . . . . . .4 - 17
Digital output module MC-ASI Y8M12 . . . . . . . . . . . . . . . . . . . . . . . . . . . . . . 4 - 18
4.6.1
Operating items . . . . . . . . . . . . . . . . . . . . . . . . . . . . . . . . . . . . . . . . .4 - 18
4.6.2
Indicators. . . . . . . . . . . . . . . . . . . . . . . . . . . . . . . . . . . . . . . . . . . . . .4 - 19
4.6.3
Pin assignment of the M12 circular connectors . . . . . . . . . . . . . . . .4 - 20
4.6.4
Connection of the ASI-Bus . . . . . . . . . . . . . . . . . . . . . . . . . . . . . . . .4 - 21
4.6.5
Connection of the power supply . . . . . . . . . . . . . . . . . . . . . . . . . . . .4 - 21
4.6.6
Addressing . . . . . . . . . . . . . . . . . . . . . . . . . . . . . . . . . . . . . . . . . . . .4 - 21
Digital input/output module MC-ASI X2Y2M12. . . . . . . . . . . . . . . . . . . . . . . . 4 - 22
4.7.1
Operating items . . . . . . . . . . . . . . . . . . . . . . . . . . . . . . . . . . . . . . . . .4 - 22
4.7.2
Indicators. . . . . . . . . . . . . . . . . . . . . . . . . . . . . . . . . . . . . . . . . . . . . .4 - 23
4.7.3
Pin assignment of the M12 circular connectors . . . . . . . . . . . . . . . .4 - 24
4.7.4
Connection of the ASI-Bus . . . . . . . . . . . . . . . . . . . . . . . . . . . . . . . .4 - 25
4.7.5
Connection of the power supply . . . . . . . . . . . . . . . . . . . . . . . . . . . .4 - 25
Digital input/output module MC-ASI X4Y4M12. . . . . . . . . . . . . . . . . . . . . . . . 4 - 26
4.8.1
Operating items . . . . . . . . . . . . . . . . . . . . . . . . . . . . . . . . . . . . . . . . .4 - 26
4.8.2
Indicators. . . . . . . . . . . . . . . . . . . . . . . . . . . . . . . . . . . . . . . . . . . . . .4 - 27
4.8.3
Pin assignment of the M12 circular connectors . . . . . . . . . . . . . . . .4 - 28
4.8.4
Connection of the ASI-Bus . . . . . . . . . . . . . . . . . . . . . . . . . . . . . . . .4 - 29
4.8.5
Connection of the power supply . . . . . . . . . . . . . . . . . . . . . . . . . . . .4 - 29
Contents
5
Installation
5.1
Safety precautions . . . . . . . . . . . . . . . . . . . . . . . . . . . . . . . . . . . . . . . . . . . . . .5 - 1
5.2
Ambient conditions . . . . . . . . . . . . . . . . . . . . . . . . . . . . . . . . . . . . . . . . . . . . . .5 - 1
5.3
Mounting of the MC-ASI modules. . . . . . . . . . . . . . . . . . . . . . . . . . . . . . . . . . . 5 - 1
5.4
5.3.1
Mounting the mounting plate . . . . . . . . . . . . . . . . . . . . . . . . . . . . . . . .5 - 2
5.3.2
Earth protection . . . . . . . . . . . . . . . . . . . . . . . . . . . . . . . . . . . . . . . . . .5 - 2
5.3.3
Connection of the ASI bus . . . . . . . . . . . . . . . . . . . . . . . . . . . . . . . . .5 - 3
5.3.4
Connection of the external power supply . . . . . . . . . . . . . . . . . . . . . .5 - 3
5.3.5
Cable preparation . . . . . . . . . . . . . . . . . . . . . . . . . . . . . . . . . . . . . . . .5 - 4
5.3.6
Mounting the module to the mounting plate . . . . . . . . . . . . . . . . . . . .5 - 5
5.3.7
Connection of the sensors and actors. . . . . . . . . . . . . . . . . . . . . . . . . 5 - 5
Wiring (general) . . . . . . . . . . . . . . . . . . . . . . . . . . . . . . . . . . . . . . . . . . . . . . . .5 - 6
5.4.1
EMC conforming installation in cabinet . . . . . . . . . . . . . . . . . . . . . . . .5 - 6
5.4.2
EMC conforming cable routing and shielding . . . . . . . . . . . . . . . . . . .5 - 7
5.4.3
Wiring instructions . . . . . . . . . . . . . . . . . . . . . . . . . . . . . . . . . . . . . . . .5 - 8
6
Configuration
6.1
Addressing . . . . . . . . . . . . . . . . . . . . . . . . . . . . . . . . . . . . . . . . . . . . . . . . . . . .6 - 1
6.2
Slave profile . . . . . . . . . . . . . . . . . . . . . . . . . . . . . . . . . . . . . . . . . . . . . . . . . . .6 - 1
7
Parametrization (only for experts)
7.1
Parameter bytes for all MC modules . . . . . . . . . . . . . . . . . . . . . . . . . . . . . . . .7 - 1
8
Maintenance and Inspection
8.1
Daily inspection . . . . . . . . . . . . . . . . . . . . . . . . . . . . . . . . . . . . . . . . . . . . . . . .8 - 1
8.2
Periodic inspection . . . . . . . . . . . . . . . . . . . . . . . . . . . . . . . . . . . . . . . . . . . . . .8 - 1
9
Troubleshooting
9.1
Basic troubleshooting . . . . . . . . . . . . . . . . . . . . . . . . . . . . . . . . . . . . . . . . . . . .9 - 1
9.2
Toubleshooting via LEDs . . . . . . . . . . . . . . . . . . . . . . . . . . . . . . . . . . . . . . . . . 9 - 1
9.3
Short-circuit handling . . . . . . . . . . . . . . . . . . . . . . . . . . . . . . . . . . . . . . . . . . . . 9 - 1
User’s manual MC-ASI modules
XI
Contents
10
Specifications
10.1
General operating conditions . . . . . . . . . . . . . . . . . . . . . . . . . . . . . . . . . . . . .10 - 1
10.2
General specifications . . . . . . . . . . . . . . . . . . . . . . . . . . . . . . . . . . . . . . . . . .10 - 1
10.3
Specifications of the MC-ASI modules . . . . . . . . . . . . . . . . . . . . . . . . . . . . . .10 - 2
10.3.1 Digital input modules . . . . . . . . . . . . . . . . . . . . . . . . . . . . . . . . . . . . . 10 - 2
10.3.2 Digital output modules. . . . . . . . . . . . . . . . . . . . . . . . . . . . . . . . . . . .10 - 3
10.3.3 Digital input/output modules . . . . . . . . . . . . . . . . . . . . . . . . . . . . . . .10 - 4
10.3.4 Characteristic curve areas IEC 1131-2, type 2 . . . . . . . . . . . . . . . . .10 - 5
A
Appendix
A.1
Dimensions. . . . . . . . . . . . . . . . . . . . . . . . . . . . . . . . . . . . . . . . . . . . . . . . . . . A - 1
A.2
XII
A.1.1
Modules with 4 x M12 circular connectors . . . . . . . . . . . . . . . . . . . . A - 1
A.1.2
Modules with 8 x M12 circular connectors . . . . . . . . . . . . . . . . . . . . A - 2
Index. . . . . . . . . . . . . . . . . . . . . . . . . . . . . . . . . . . . . . . . . . . . . . . . . . . . . . . . A - 3
Introduction
Introduction
1
Introduction
1.1
Introduction
This manual describes the MC-ASI modules (Input/output modules according to IP67 for ActorSensor-Interface).
The MC-ASI modules act as slaves in a network according to the standards AS-Interface 2.04
(1997) and CENELEC EN 50295.
It also meets the standards IEC 947-5-2: 1992 and IEC 1131-2: 1992.
The AS-Interface is an international standard for the lowest field bus level. The network suits versatile demands, is very flexible, and easy to install. Controlled are sensors, actors, I/O units, and
gateways.
The MC-ASI modules process the signals of digital inputs and outputs. Because of the high protection rating IP67 the modules can be mounted directly within a plant or on a machine. For labelling the inputs and outputs the modules provide labelling fields for labelling the inputs or outputs
individually.
The slave station numbers are assigned to the MC-ASI modules across the AS-Interface via the
masters QJ71AS92, A1SJ71AS92 and FX2N-32ASI-M or directly via an optional programming
unit.
Of course, the MC-ASI modules can be used in combination with third party manufacturers.
User’s manual MC-ASI modules
1–1
Introduction
1–2
Introduction
Features of the MC-ASI series
Basics
2
Basics
2.1
Features of the MC-ASI series
The MC-ASI series includes the following modules with M12 circular connectors:
Article
Item
Description
Digital input module
MC-ASI X4M12
Digital input module with 4 inputs
MC-ASI X8M12
Digital input module with 8 inputs
MC-ASI Y4M12-05
Digital output module with 4 outputs
MC-ASI Y4M12-2
Digital output module with 4 outputs
Digital output module
MC-ASI Y8M12
Digital output module with 8 outputs
Digital input/output
module
MC-ASI X2Y2M12
Digital input/output module with 2 inputs and 2 outputs
MC-ASI X4Y4M12
Digital input/output module with 4 inputs and 4 outputs
Accessories
MC-ASI PS
AS-I bus power supply module
IP67-M12_CAP
Black (4 pieces) M12 blind plugs
Tab. 2-1: Overview of the MC-ASI modules and accessories
2.1.1
Mounting
Due to the high protection rating IP67 the MC-ASI modules can be mounted via a mounting plate
directly on any mounting panel or machine. The mounting plate has to be screwed onto the
mounting surface and the module can be hung and screwed onto to the mounting plate.
2.1.2
Connection of the modules
The module is connected to the AS-Interface via profile-coded flat cable. The flat cable is laid
through the mounting plate. By hanging the the module onto the mounting plate the electrical
contact is established. Terminating resistors are not required.
The sensors and actors are directly connected to M12 circular connectors.
For the AS-Interface a special ASI power supply unit is available for the power supply of the network.
2.1.3
Addressing
The module is addressed via the bus system by the bus master or via an adress socket by an
addressing unit.
User’s manual MC-ASI modules
2–1
Basics
2–2
Features of the MC-ASI series
AS-Interface
System Configuration
3
System Configuration
3.1
AS-Interface
In the following the main characteristics of the AS-Interface network are described.
3.1.1
Data exchange
The AS-Interface is an international standard for the lowest field bus level. The network suits versatile demands, is very flexible, and easy to install.
Controlled in master-slave configuration are:
● Actors
● Sensors
● I/O units
● Gateways
FX1N/FX2N
Power supply unit
Alpha
MC-ASI modules
MC-ASI modules
MC-ASI modules
MCA0001C
Abb. 3-1: System configuration AS-Interface
User’s manual MC-ASI modules
3–1
System Configuration
3.1.2
AS-Interface
Structure
MELSEC SPS
AS-I
Master
30 V DC AS-I
Fower supply
conf. to IEC 364-4-41
AS-I Bus
MC-ASI
MC-ASI
AS-I
MC-ASI
Slave
Slave
Slave
Slave
24 V DC
Extern.
power
supply
MCA0002T
Abb. 3-2: AS-I network structure
AS-Interface networks can be set up in any random tree structure.
The maximum extension without repeaters is 100 m and with 2 repeaters 300 m. Terminating
resistors are not required. One master can control up to 31 slave adresses. Per slave address
up to 4 inputs and 4 outputs can be controlled (A slave module with 8 inputs or 8 outputs occupies two slave address).
The slave modules and sensors are supplied with power via the AS-I flat cable (yellow, 30 V DC)
of the ASI bus. For this purpose an AS-I power supply unit is available designated ASI-PS-2,8.
The actors are supplied with power via AS-I flat cable (black, 24 V DC) by an external power supply.
The table below shows the specifications of the AS-Interface network for the ASI masters
QJ71AS92, A1SJ71AS92, and FX2N-32ASI-M:
Item
Master QJ71AS92
Master A1SJ71AS92
Master FX2N-32ASI-M
Application range
System Q
AnS(H)/QnAS series
FX1N and FX2N series
Cable type
AS-I flat cable conforming to IEC 62026-2
Max. total distance
Communication
protocol
100 m without repeater, 300 m with 2 repeaters
ASI standard V2.11
Communication
method
ASI standard 2.04, EN 50295
APM (Alternating Pulse Modulation)
Error handling
Parity check
Data transfer rate
I/O refresh time
167 kbit/s
5 ms (digital I/Os);
35 ms (analog I/O slaves)
Slaves per master
Assignable I/O points
Max. 5 ms
62 (2 channels x 31)
248 digital I/Os,
124 analog I/Os
2 x 124 inputs,
2 x 124 outputs
I/O points per slave
Occupied I/O points
256
Max. 4 inputs and 4 outputs
32
Tab. 3-1: Specifications of the ASI master modules
3–2
31
8
AS-Interface
3.1.3
System Configuration
Cable types
For the data transfer a special 2-core AS-I flat cable or a circular cable is used. When using the
flat cable the modules can easily be connected via vampire connection. The profile coding of the
flat cable ensures a polarity protection.
3.1.4
Slave addressing
Each slave within the bus system must be assigned an individual address in the range of 1–31.
The slave address can either be changed via an addressing unit on the address socket of the
slave or via the master module in the bus system.
The slave address resides in the slave memory. Each slave can be re-addressed at least 14
times.
User’s manual MC-ASI modules
3–3
System Configuration
3–4
AS-Interface
Module overview
4
Description of the Modules
Description of the Modules
The MC-ASI series comprises digital input, output, and combined input/output modules conforming to IP 67 with M12 connectors.
The sensors are supplied by the ASI bus (ASI flat cable, yellow). The actors are supplied via an
external power supply (ASI flat cable, black).
Modules providing 4 inputs or 4 outputs occupy one slave address. Modules providing 8 inputs
or 8 outputs include two independent slaves and occupy two slave addresses. Combined modules providing maximum 4 inputs and 4 outputs occupy one slave address (multiplex operation).
4.1
Module overview
4.1.1
Input modules
Module
Inputs
Occupied slave addresses
MC-ASI X4M12
4
1
MC-ASI X8M12
8
2
Tab. 4-1: Input modules of the MC-ASI series
4.1.2
Output modules
Module
Outputs
Occupied slave addresses
MC-ASI Y4M12-05
4
1
MC-ASI Y4M12-2
4
1
MC-ASI Y8M12
8
2
Tab. 4-2: Output modules of the MC-ASI series
4.1.3
Combined input/output modules
Modulu
Inputs
Outputs
Occupied slave addresses
MC-ASI X2Y2M12
2
2
1
MC-ASI X4Y4M12
4
4
1
Tab. 4-3: Combined input/output modules of the MC-ASI series
User’s manual MC-ASI modules
4-1
Description of the Modules
4.2
Digital input module MC-ASI X4M12
Digital input module MC-ASI X4M12
The module MC-ASI X4M12 provides 4 digital inputs. It occupies one slave address.
4.2.1
Operating items
The figure below shows the operating items of the module.
MCA0003C
Abb. 4-1: Digital input module MC-ASI X4M12
Key to the figure above
Number
Item
Description
M12 circular connectors
Connection of the sensors
Status indication LED
Status indication of the inputs
Labelling field input
Labelling of the inputs
Diagnostics LED
Indication of the operating status of the module
Labelling field slave
Labelling of the slave address
Labelling field module
Labelling of the module
Central screw
Fixing the module on the mounting plate
Address socket
Connection of a programming unit to re-address the slave.
Tab. 4-4: Operating items MC-ASI X4M12
4–2
Digital input module MC-ASI X4M12
4.2.2
Description of the Modules
Indicators
The module provides indicators that indicate the operating status and the input status of the
module.
Indication of operating status
ERR (red)
ASI (green)
Operating status
Off
Off
No power supply ASI
On
Off
No data transfer
Off
On
Module OK
On
Flashing
Slave address is 0
Flashing
Off
Sensor supply: Short-circuit or overload
Tab. 4-5: Diagnostics LEDs
Indication of input status
LED
(yellow)
Input status
Off
Input not active
On
Input active
Tab. 4-6: Status indication LEDs
NOTE
If a short-circuit or overload of the sensor supply occurs a reset will be triggered. The slave is
decoupled from the network and the error is signalled to the master.
User’s manual MC-ASI modules
4-3
Description of the Modules
4.2.3
Digital input module MC-ASI X4M12
Pin assignment of the M12 circular connectors
The sensors are directly connected to the M12 circular connectors.
1
2
Abb. 4-2:
Pin assignment M12 circular connectors
5
3
4
MCA0004C
M12
circular connector
I0, I2
Digital inpus
I1, I3
Digital outputs
Pin
Assingment
1
Sensor supply +
2
DI1, DI3
3
Sensor supply -
4
DI0, DI2
5
PE
1
Sensor supply +
2
Not assigned
3
Sensorversorgung -
4
DI1, DI3
5
PE
Tab. 4-7: Pin assignment M12 circular connectors
The inputs DI1 and DI3 are bridged to pin 2 of the M12 circular connectors of the inputs DI0 and
DI2 respectively. Therefore, Y- or T-connectors can be connected to DI0 and DI1.
NOTE
4–4
To maintain the protection rating IP67 M12 blind plugs have to be screwed on unused M12
circular connectors.
Digital input module MC-ASI X4M12
4.2.4
Description of the Modules
Connection of the ASI bus
The module is connected to the ASI bus via ASI bus flat cable (yellow). The flat cable is laid
through the cable guide "ASI" of the mounting plate. The sensors are supplied via the ASI bus.
NOTE
The module provides a bus branching feature. Do not connect the external power supply
(ASI flat cable, black).
ASI
ASI
MCA0005C
Abb. 4-3: Connection of the ASI bus
Number
Item
, ASI bus flat cable (yellow)
, Cable guide
ASI contact (internal connection)
User’s manual MC-ASI modules
Tab. 4-8:
Connection of the ASI bus
4-5
Description of the Modules
4.3
Digital input module MC-ASI X8M12
Digital input module MC-ASI X8M12
The module MC-ASI X8M12 provides 8 digital inputs. It occupies two slave addresses.
4.3.1
Operating items
The figure below shows the operating items of the module.
MCA0006C
Abb. 4-4: Digital input module MC-ASI X8M12
4–6
Digital input module MC-ASI X8M12
Description of the Modules
Key to the figure above
Number
Item
Description
M12 circular connectors
Connection of the sensors
Status indication LED
Status indication of the inputs
Labelling field input
Labelling of the inputs
Diagnostics LED (I4–I7)
Indication of the operating status of the module
Diagnostics LED (I0–I3)
Indication of the operating status of the module
Labelling field slave
Labelling of the slave address
Labelling field module
Labelling of the module
Central screw
Fixing the module on the mounting plate
Address socket
Connection of a programming unit to re-address the slave.
Tab. 4-9: Operating items MC-ASI X8M12
4.3.2
Indicators
The module provides indicators that indicate the operating status and the input status of the
module.
Indication of the operating status
ERR (red)
ASI (green)
Operating status
Off
Off
No power supply ASI
On
Off
No data transfer
Off
On
Module OK
On
Flashing
Slave address is 0
Flashing
Off
Sensor supply: Short-circuit or overload
Tab. 4-10: Diagnostics LEDs
Indication of input status
LED
(yellow)
Input status
Off
Input not active
On
Input active
Tab. 4-11: Status indication LEDs
NOTE
If a short-circuit or overload of the sensor supply occurs a reset will be triggered. The slave is
decoupled from the network and the error is signalled to the master.
User’s manual MC-ASI modules
4-7
Description of the Modules
4.3.3
Digital input module MC-ASI X8M12
Pin assignment of the M12 circular connectors
The sensors are directly connected to the M12 circular connectors.
1
2
Abb. 4-5:
Pin assignment M12 circular connectors
5
3
4
MCA0004C
M12
circular connector
I0, I2, I4, I6
Digital inputs
I1, I3
Digital inputs
Pin
Assingment
1
Sensor supply +
2
DI1, DI3, DI5, DI7
3
Sensor supply -
4
DI0, DI2, DI4, DI6
5
PE
1
Sensor supply +
2
Not assigned
3
Sensor supply -
4
DI1, DI3, DI5, DI7
5
PE
Tab. 4-12: Pin assignment M12 circular connectors
The inputs DI1, DI3, DI5, and DI7 are bridged to pin 2 of the M12 circular connectors of the inputs
DI0, DI2, DI4, and DI6 respectively. Therefore, Y- or T-connectors can be connected to DI0, DI2,
DI4, and DI6.
NOTE
4–8
To maintain the protection rating IP67 M12 blind plugs have to be screwed on unused M12
circular connectors.
Digital input module MC-ASI X8M12
4.3.4
Description of the Modules
Connection of the ASI bus
The module is connected to the ASI bus via ASI bus flat cable (yellow). The flat cable is laid
through the cable guide "ASI" of the mounting plate. The sensors are supplied via the ASI bus.
NOTE
The module provides a bus branching feature. Do not connect the external power supply
(ASI flat cable, black).
ASI
ASI
MCA0005C
Abb. 4-6: Connection of the ASI bus
4.3.5
Number
Item
, ASI bus flat cable (yellow)
, cable guide
ASI contact (internal connection)
Tab. 4-13:
Connection of the ASI bus
Addressing
The module includes two independent slaves that have to be addressed individually.
As long as the first ASI slave (ASI1) is addressed to 0 the second slave can not be accessed.
At default settings the slave addresses can not be changed via the auto configuration mode.
When replacing a module at least one slave has to be pre-assigned an address (default setting:
2 x adress "0").
User’s manual MC-ASI modules
4-9
Description of the Modules
4.4
Digital output module MC-ASI Y4M12-05
Digital output module MC-ASI Y4M12-05
The module MC-ASI Y4M12-05 provides 4 digital outputs. It occupies one slave address.
4.4.1
Operating items
The figure below shows the operating items of the module.
MCA0007C
Abb. 4-7: Digital output module MC-ASI Y4M12-05
Key to the figure above
Number
Item
Description
M12 circular connectors
Connection of the actors
Status indication LED
Status indication of the actors
Labelling field output
Labelling of the outputs
Power supply LED
Indication of the external power supply
Diagnostics LED
Indication of the operating status of the module
Labelling field slave
Labelling of the slave address
Labelling field module
Labelling of the module
Central screw
Fixing the module on the mounting plate
Address socket
Connection of a programming unit to re-address the slave.
Tab. 4-14: Operating items MC-ASI Y4M12-05
4 – 10
Digital output module MC-ASI Y4M12-05
4.4.2
Description of the Modules
Indicators
The module provides indicators that indicate the operating status, the external power supply,
and the output status of the module.
Indication of the operating status
ERROR (red)
ASI (green)
Operating status
Off
Off
No power supply ASI
On
Off
No data transfer
Off
On
Module OK
On
Flashing
Slave address is 0
Flashing
Off
Actor supply: Short-circuit or overload
Tab. 4-15: Diagnostics LEDs
Indication of the external power supply
POWER
(green)
External power supply
Off
No external power supply
On
External power supply OK
Tab. 4-16:
External power supply LED
Indication of the output status
NOTE
LED
(yellow)
Output status
Off
Output not active
On
Output active
Tab. 4-17:
Status indication LEDs
If a short-circuit or overload of the actor supply occurs a reset will be triggered. The slave is
decoupled from the network and the error is signalled to the master.
User’s manual MC-ASI modules
4 - 11
Description of the Modules
4.4.3
Digital output module MC-ASI Y4M12-05
Pin assignment of the M12 circular connectors
The actors are directly connected to the M12 circular connectors.
1
2
Abb. 4-8:
Pin assignment M12 circular connectors
5
3
4
MCA0004C
M12
circular connector
O0, O2
Digital outputs
O1, O3
Digitale Outputs
Pin
Assingment
1
Not assigned
2
DO1, DO3
3
0V
4
DO0, DO2
5
PE
1
Not assigned
2
Not assigned
3
0V
4
DO1, DO3
5
PE
Tab. 4-18: Pin assignment M12 circular connectors
The outputs DO1 and DO3 are bridged to pin 2 of the M12 circular connectors of the outputs
DO0 and DO2 respectively. Therefore, Y- or T-connectors can be connected to DO0 and DO2.
NOTE
4 – 12
To maintain the protection rating IP67 M12 blind plugs have to be screwed on unused M12
circular connectors.
Digital output module MC-ASI Y4M12-05
4.4.4
Description of the Modules
Connection of the ASI bus
The module is connected to the ASI bus via ASI bus flat cable (yellow). The flat cable is laid
through the cable guide "ASI" of the mounting plate.
4.4.5
Connection of the power supply
The module is connected to the external power supply via ASI flat cable (black). The flat cable
is laid through the cable guide "ext Pow." of the mounting plate. The actors are supplied via the
external power supply.
ASI
ext. Pow.
MCA0008C
Abb. 4-9: Connection of ASI bus and external power supply
Number
Item
ASI bus flat cable (yellow)
, Cable guide
ASI flat cable (black)
external power supply
User’s manual MC-ASI modules
Tab. 4-19:
Connection of ASI bus and
external power supply
4 - 13
Description of the Modules
4.5
Digital output module MC-ASI Y4M12-2
Digital output module MC-ASI Y4M12-2
The module MC-ASI Y4M12-2 provides 4 digital outputs. It occupies one slave address.
4.5.1
Operating items
The figure below shows the operating items of the module.
MCA0009C
Abb. 4-10: Digital output module MC-ASI Y4M12-2
Key to the figure above
Number
Item
Description
M12 circular connectors
Connection of the actors
Status indication LED
Status indication of the actors
Labelling field output
Labelling of the outputs
Power supply LED
Indication of the external power supply
Diagnostics LED
Indication of the operating status of the module
Labelling field slave
Labelling of the slave address
Labelling field module
Labelling of the module
Central screw
Fixing the module on the mounting plate
Address socket
Connection of a programming unit to re-address the slave.
Tab. 4-20: Operating items MC-ASI Y4M12-2
4 – 14
Digital output module MC-ASI Y4M12-2
4.5.2
Description of the Modules
Indicators
The module provides indicators that indicate the operating status, the external power supply,
and the output status of the module.
Indication of the operating status
ERROR (red)
ASI (green)
Operating status
Off
Off
No power supply ASI
On
Off
No data transfer
Off
On
Module OK
On
Flashing
Slave address is 0
Flashing
Off
Actor supply: Short-circuit or overload
Tab. 4-21: Diagnostics LEDs
Indication of the external power supply
POWER
(green)
External power supply
Off
No external power supply
On
External power supply OK
Tab. 4-22:
External power supply LED
Indication of the output status
NOTE
LED
(yellow)
Output status
Off
Output not active
On
Output active
Tab. 4-23:
Status indication LEDs
If a short-circuit or overload of the actor supply occurs a reset will be triggered. The slave is
decoupled from the network and the error is signalled to the master.
User’s manual MC-ASI modules
4 - 15
Description of the Modules
4.5.3
Digital output module MC-ASI Y4M12-2
Pin assignment of the M12 circular connectors
The actors are directly connected to the M12 circular connectors.
1
2
Abb. 4-11:
Pin assignment M12 circular connectors
5
3
4
MCA0004C
M12
circular connector
O0, O2
Digital outputs
O1, O3
Digitale Outputs
Pin
Assingment
1
Not assigned
2
DO1, DO3
3
0V
4
DO0, DO2
5
PE
1
Not assigned
2
Not assigned
3
0V
4
DO1, DO3
5
PE
Tab. 4-24: Pin assignment M12 circular connectors
The outputs DO1 and DO3 are bridged to pin 2 of the M12 circular connectors of the outputs
DO0 and DO2 respectively. Therefore, Y- or T-connectors can be connected to DO0 and DO2.
NOTE
4 – 16
To maintain the protection rating IP67 M12 blind plugs have to be screwed on unused M12
circular connectors.
Digital output module MC-ASI Y4M12-2
4.5.4
Description of the Modules
Connection of the ASI bus
The module is connected to the ASI bus via ASI bus flat cable (yellow). The flat cable is laid
through the cable guide "ASI" of the mounting plate.
4.5.5
Connection of the power supply
The module is connected to the external power supply via ASI flat cable (black). The flat cable
is laid through the cable guide "ext Pow." of the mounting plate. The actors are supplied via the
external power supply.
ASI
ext. Pow.
MCA0008C
Abb. 4-12: Connection of ASI bus and external power supply
Number
Item
ASI bus flat cable (yellow)
, Cable guide
ASI flat cable (black)
external power supply
User’s manual MC-ASI modules
Tab. 4-25:
Connection of ASI bus and
external power supply
4 - 17
Description of the Modules
4.6
Digital output module MC-ASI Y8M12
Digital output module MC-ASI Y8M12
The module MC-ASI Y8M12 provides 8 digital outputs. It occupies two slave addresses.
4.6.1
Operating items
The figure below shows the operating items of the module.
MCA0010C
Abb. 4-13: Digital output module MC-ASI Y8M12
4 – 18
Digital output module MC-ASI Y8M12
Description of the Modules
Key to the figure above
Number
Item
Description
M12 circular connectors
Connection of the actors
Status indication LED
Status indication of the actors
Labelling field output
Labelling of the outputs
Diagnostics LED (O4–O7) Indication of the operating status of the module
Diagnostics LED (O0–O3) Indication of the operating status of the module
Power supply LED
Indication of the external power supply
Labelling field slave
Labelling of the slave address
Labelling field module
Labelling of the module
Central screw
Fixing the module on the mounting plate
Address socket
Connection of a programming unit to re-address the slave.
Tab. 4-26: Operating items MC-ASI Y8M12
4.6.2
Indicators
The module provides indicators that indicate the operating status, the external power supply,
and the output status of the module.
Indication of the operating status
ERROR (red)
ASI (green)
Operating status
Off
Off
No power supply ASI
On
Off
No data transfer
Off
On
Module OK
On
Flashing
Slave address is 0
Flashing
Off
Actor supply: Short-circuit or overload
Tab. 4-27: Diagnostics LEDs
Indication of the external power supply
POWER
(green)
External power supply
Off
No external power supply
On
External power supply OK
Tab. 4-28:
External power supply LED
Indication of the output status
NOTE
LED
(yellow)
Output status
Off
Output not active
On
Output active
Tab. 4-29:
Status indication LEDs
If a short-circuit or overload of the actor supply occurs a reset will be triggered. The slave is
decoupled from the network and the error is signalled to the master.
User’s manual MC-ASI modules
4 - 19
Description of the Modules
4.6.3
Digital output module MC-ASI Y8M12
Pin assignment of the M12 circular connectors
The actors are directly connected to the M12 circular connectors.
1
2
Abb. 4-14:
Pin assignment M12 circular connectors
5
3
4
MCA0004C
M12
circular connector
O0, O2, O4, O6
Digital outputs
O1, O3, O5, O7
Digital outputs
Pin
Assingment
1
Not assigned
2
DO1, DO3, DO5, DO7
3
0V
4
DO0, DO2, DO4, DO6
5
PE
1
Not assigned
2
Not assigned
3
0V
4
DO1, DO3, DO5, DO7
5
PE
Tab. 4-30: Pin assignment M12 circular connectors
The outputs DO1, DO3, DO5, and DO7 are bridged to pin 2 of the M12 circular connectors of the
outputs DO0, DO2, DO4, and DO6 respectively. Therefore, Y- or T-connectors can be connected
to DO0, DO2, DO4, and DO6 .
NOTE
4 – 20
To maintain the protection rating IP67 M12 blind plugs have to be screwed on unused M12
circular connectors.
Digital output module MC-ASI Y8M12
4.6.4
Description of the Modules
Connection of the ASI-Bus
The module is connected to the ASI bus via ASI bus flat cable (yellow). The flat cable is laid
through the cable guide "ASI" of the mounting plate.
4.6.5
Connection of the power supply
The module is connected to the external power supply via ASI flat cable (black). The flat cable
is laid through the cable guide "ext Pow." of the mounting plate. The actors are supplied via the
external power supply.
ASI
ext. Pow.
MCA0008C
Abb. 4-15: Connection of ASI bus and external power supply
4.6.6
Number
Item
ASI bus flat cable (yellow)
, Cable guide
ASI flat cable (black)
external power supply
Tab. 4-31:
Connection of ASI bus and
external power supply
Addressing
The module includes two independent slaves that have to be addressed individually.
As long as the first ASI slave (ASI1) is addressed to 0 the second slave can not be accessed.
At default settings the slave addresses can not be changed via the auto configuration mode.
When replacing a module at least one slave has to be pre-assigned an address (default setting:
2 x adress "0").
User’s manual MC-ASI modules
4 - 21
Description of the Modules
4.7
Digital input/output module MC-ASI X2Y2M12
Digital input/output module MC-ASI X2Y2M12
The module MC-ASI X2Y2M12 provides 2 digital inputs and 2 digital outputs. It occupies one
slave address.
4.7.1
Operating items
The figure below shows the operating items of the module.
MCA0011C
Abb. 4-16: Digital input/output module MC-ASI X2Y2M12
Key to the figure above
Number
Item
Description
M12 circular connectors
Connection of the sensors or actors
Power supply LED
Indication of the external power supply
Diagnostics LED
Indication of the operating status of the module
Labelling field slave
Labelling of the slave address
Labelling field module
Labelling of the module
Status indication LED
Status indication of the inputs or outputs
Labelling field
input or output
Labelling of the inputs or outputs
Central screw
Fixing the module on the mounting plate
Address socket
Connection of a programming unit to re-address the slave.
Tab. 4-32: Operating items MC-ASI X2Y2M12
4 – 22
Digital input/output module MC-ASI X2Y2M12
4.7.2
Description of the Modules
Indicators
The module provides indicators that indicate the operating status, the external power supply,
and the input/output status of the module.
Indication of the operating status
ERROR (red)
ASI (green)
Operating status
Off
Off
No power supply ASI
On
Off
No data transfer
Off
On
Module OK
On
Flashing
Slave address is 0
Flashing
Off
Sensor or actor supply: Short-circuit or overload
Tab. 4-33: Diagnostics LEDs
Indication of the external power supply
POWER
(green)
External power supply
Off
No external power supply
On
External power supply OK
Tab. 4-34:
External power supply LED
Indication of the input/output status
LED
(yellow)
NOTE
Input/output status
Off
Input/output not active
On
Input/output active
Tab. 4-35:
Status indication LEDs
If a short-circuit or overload of the sensor or actor supply occurs a reset will be triggered. The
slave is decoupled from the network and the error is signalled to the master.
User’s manual MC-ASI modules
4 - 23
Description of the Modules
4.7.3
Digital input/output module MC-ASI X2Y2M12
Pin assignment of the M12 circular connectors
The sensors and actors are directly connected to the M12 circular connectors.
1
2
Abb. 4-17:
Pin assignment M12 circular connectors
5
3
4
MCA0004C
M12
circular connector
I0, I1
Digital inputs
O0, O1
Digital outputs
Pin
Assingment
1
Sensor supply +
2
On I0 DI1, on I1 not assigned
3
Sensor supply -
4
DI0, DI1
5
PE
1
Not assigned
2
On O0 DO1, on O1 not assigned
3
0V
4
DO0, DO1
5
PE
Tab. 4-36: Pin assignment M12 circular connectors
The inputs and outputs DI1 and DO1 are bridged to pin 2 of the M12 circular connectors of the
inputs and outputs DI0 and DO0 respectively. Therefore, Y- or T-connectors can be connected
to DI0 and DO0 .
NOTE
4 – 24
To maintain the protection rating IP67 M12 blind plugs have to be screwed on unused M12
circular connectors.
Digital input/output module MC-ASI X2Y2M12
4.7.4
Description of the Modules
Connection of the ASI-Bus
The module is connected to the ASI bus via ASI bus flat cable (yellow). The flat cable is laid
through the cable guide "ASI" of the mounting plate.
4.7.5
Connection of the power supply
The module is connected to the external power supply via ASI flat cable (black). The flat cable
is laid through the cable guide "ext Pow." of the mounting plate. The actors are supplied via the
external power supply.
ASI
ext. Pow.
MCA0008C
Abb. 4-18: Connection of ASI bus and external power supply
Number
Item
ASI bus flat cable (yellow)
, Cable guide
ASI flat cable (black)
external power supply
User’s manual MC-ASI modules
Tab. 4-37:
Connection of ASI bus and
external power supply
4 - 25
Description of the Modules
4.8
Digital input/output module MC-ASI X4Y4M12
Digital input/output module MC-ASI X4Y4M12
The module MC-ASI X4Y4M12 provides 4 digital inputs and 4 digital outputs. It occupies one
slave address.
4.8.1
Operating items
The figure below shows the operating items of the module.
MCA0012C
Abb. 4-19: Digital input/output module MC-ASI X4Y4M12
4 – 26
Digital input/output module MC-ASI X4Y4M12
Description of the Modules
Key to the figure above
Number
Item
Description
M12 circular connectors
Connection of the sensors or actors
Power supply LED
Indication of the external power supply
Diagnostics LED
Indication of the operating status of the module
Labelling field slave
Labelling of the slave address
Labelling field module
Labelling of the module
Status indication LED
Status indication of the inputs or outputs
Labelling field
input or output
Labelling of the inputs or outputs
Central screw
Fixing the module on the mounting plate
Address socket
Connection of a programming unit to re-address the slave.
Tab. 4-38: Operating items MC-ASI X4Y4M12
4.8.2
Indicators
The module provides indicators that indicate the operating status, the external power supply,
and the input/output status of the module.
Indication of the operating status
ERROR (red)
ASI (green)
Operating status
Off
Off
No power supply ASI
On
Off
No data transfer
Off
On
Module OK
On
Flashing
Slave address is 0
Flashing
Off
Sensor or actor supply: Short-circuit or overload
Tab. 4-39: Diagnostics LEDs
Indication of the external power supply
POWER
(green)
External power supply
Off
No external power supply
On
External power supply OK
Tab. 4-40:
External power supply LED
Indication of the input/output status
LED
(yellow)
NOTE
Input/output status
Off
Input/output not active
On
Input/output active
Tab. 4-41:
Status indication LEDs
If a short-circuit or overload of the sensor or actor supply occurs a reset will be triggered. The
slave is decoupled from the network and the error is signalled to the master.
User’s manual MC-ASI modules
4 - 27
Description of the Modules
4.8.3
Digital input/output module MC-ASI X4Y4M12
Pin assignment of the M12 circular connectors
The sensors and actors are directly connected to the M12 circular connectors.
1
2
Abb. 4-20:
Pin assignment M12 circular connectors
5
3
4
MCA0004C
M12
circular connector
I0–I3
Digital inputs
O0–O3
Digital outputs
Pin
Assingment
1
Sensor supply +
2
On I0 DI1, on I1 not assigned, on I2 DI3, on I3 not assigned
3
Sensor supply -
4
DI0–DI3
5
PE
1
Not assigned
2
On O0 DO1, on O1 not assigned, on O2 DO3, on O3 not assigned
3
0V
4
DO0–DO3
5
PE
Tab. 4-42: Pin assignment M12 circular connectors
The inputs DI1 and DI3 are bridged to pin 2 of the M12 circular connectors of the inputs DI0 and
DI2 respectively. Therefore, Y- or T-connectors can be connected to DI0 and DI2.
The outputs DO1 and DO3 are bridged to pin 2 of the M12 circular connectors of the outputs
DO0 and DO2 respectively. Therefore, Y- or T-connectors can be connected to DO0 and DO2.
NOTE
4 – 28
To maintain the protection rating IP67 M12 blind plugs have to be screwed on unused M12
circular connectors.
Digital input/output module MC-ASI X4Y4M12
4.8.4
Description of the Modules
Connection of the ASI-Bus
The module is connected to the ASI bus via ASI bus flat cable (yellow). The flat cable is laid
through the cable guide "ASI" of the mounting plate.
4.8.5
Connection of the power supply
The module is connected to the external power supply via ASI flat cable (black). The flat cable
is laid through the cable guide "ext Pow." of the mounting plate. The actors are supplied via the
external power supply.
ASI
ext. Pow.
MCA0008C
Abb. 4-21: Connection of ASI bus and external power supply
Number
Item
ASI bus flat cable (yellow)
, Cable guide
ASI flat cable (black)
external power supply
User’s manual MC-ASI modules
Tab. 4-43:
Connection of ASI bus and
external power supply
4 - 29
Description of the Modules
4 – 30
Digital input/output module MC-ASI X4Y4M12
Safety precautions
5
Installation
5.1
Safety precautions
Installation
Observe the safety information in the first part of this manual.
E
5.2
CAUTION:
Before mounting the MC-ASI modules always switch off the power supply.
Ambient conditions
Only expose the MC-ASI modules to the following ambient conditions
E
5.3
E
CAUTION:
Expose the modules only to the operating conditions listed in Sec. 10.1.
If the module is operated under different conditions, module units might be damaged,
and you risk electrical hazards, fire or malfunction.
Mounting of the MC-ASI modules
CAUTION:
To prevent tensions from being generated in the housing, make sure that the mounting
surface is even when mounting the modules.
Do not expose the modules to mechanical loads or strong shocks, since the housing
is made of plastics.
Tighten the central screw for fixing the modules to the mounting plate to a specified
torque of 0.4 Nm.
When installing the modules, ensure that no wires or metal chips get into the housing.
Never remove the printed circuit boards from the MC modules.
User’s manual MC-ASI modules
5–1
Installation
5.3.1
Mounting of the MC-ASI modules
Mounting the mounting plate
The mounting plate for the module can directly be mounted on a mounting panel or a machine.
For this purpose the mounting plate provides several fixing holes (A, B, C) (see also "Dimensions" in appendix). For fixing the mounting plate 3 screws M4x12 are required.
(C)
(A)
(B)
MCA0013C
Abb. 5-1: Mounting plate with fixing holes (A, B, C) for the module mounting
5.3.2
Earth protection
The module has a low resistance path to earth via the PE earthing plate and the fixing screws
of the mounting plate. The PE earthing plate and the fixing screws must be connected lowly
resistive to the protective earth of the plant.
PE earthing plate
MCA0014C
Abb. 5-2: Connection of the protective earth (PE)
5–2
Mounting of the MC-ASI modules
5.3.3
Installation
Connection of the ASI bus
The modules are connected to ASI bus via flat cable (yellow) (see also chapter 4, "Description
of the modules). The flat cable is laid through the cable guide "ASI" of the mounting plate. The
sensors are supplied with voltage via the ASI bus.
Input modules provide a bus branching feature. This feature branches the ASI bus via the
second (lower) cable guide "ASI" to another ASI flat cable (yellow).
ASI
ASI
MCA0005C
Abb. 5-3: Connection of the ASI bus on the mounting plate (here showing the bus branching)
NOTE
5.3.4
Tab. 5-1:
Connection of the ASI bus
Number
Item
, ASI bus flat cable (yellow)
, Cable guide
ASI contact (internal connection)
Input modules provide a bus branching feature. The external power supply (ASI flat cable,
black) must not be connected.
Connection of the external power supply
Output modules and combined input/output modules are connected to an external power supply
(24 V DC) via ASI flat cable (black) (see also chapter 4, "Description of the modules). The flat
cable is laid through the cable guide "ext Pow." of the mounting plate. The actors are supplied
with voltage via the external power supply.
ASI
ext. Pow.
MCA0008C
Abb. 5-4: Connection of the external power supply on the mounting plate
NOTE
Number
Item
ASI bus flat cable (yellow)
, Cable guide
ASI flat cable (black)
external power supply
Tab. 5-2:
Connection of ASI bus and
external power supply
The inputs are galvanically coupled with the ASI bus. They must not be connected to the
external power supply (ASI flat cable, black).
The external power supply should be galvanically isolated twice from the ASI bus voltage.
User’s manual MC-ASI modules
5–3
Installation
5.3.5
Mounting of the MC-ASI modules
Cable preparation
Leading through
ASI flat cable that is lead through a module does not need any cable preparation. It is laid into
the respective cable guide.
Cable end
ASI flat cable that begins or ends in a module has to be prepared as follows:
Cut off the flat cable straight
Fit the plug cap
Lay the flat cable entry into the cable guide and the flat cable end with plug cap into the plug
cap holder.
MCA0015C
Abb. 5-5: Cable preparation for leading through (1) or cable end (2)
5–4
Mounting of the MC-ASI modules
5.3.6
Installation
Mounting the module to the mounting plate
Hang the MC-ASI module onto the mounting plate and fix it with the central screw. This also
establishes the electrical contacts to the ASI flat cables.
1 ± 0.1 Nm
MCA0016C
Abb. 5-6: Mounting the module to the mounting plate
5.3.7
Connection of the sensors and actors
The sensors and actors are directly connected to the M12 circular connectors.
1
2
Abb. 5-7:
M12 circular connector
5
4
3
MCA0004C
Refer to chapter 4, "Description of the modules" for the pin assignments of the different MC-ASI
modules.
NOTE
To maintain the protection rating IP67 M12 blind plugs have to be screwed on unused M12
circular connectors.
User’s manual MC-ASI modules
5–5
Installation
5.4
E
Wiring (general)
Wiring (general)
CAUTION:
Ensure a proper earthing. Earth all equipment before connecting the power and control
circuits.
For the wiring keep the EMC directive and the European norm EN 60204.
For keeping the EMC directive there are several basic measures that are described more
detailed in the following sections:
● Install equipment in a closed, earthed metal cabinet (Reduces the radiated emissions)
● Use a supply filter (Reduces the mains conducted emissions)
● Ensure good earthing (No antenna effect)
● Use shielded wire (Reduces the radiated emissions)
● Keep sensitive equipment away from sources of disturbances or install the source in a
separate cabinet (Reduces coupling)
5.4.1
EMC conforming installation in cabinet
Cabinet design and layout is very important for controlling EMC. Take the following recommendations as a guideline:
● Use an earthed metal cabinet.
● Use shield gasket or other conductive material between the cabinet cover or door and
cabinet. Also use short and thick wire (preferably braided) to connect the cover and cabinet.
MCA0017T
Shield gasket
Metal cabinet
Cover
Conductive packing
The part of the cabinet that
the shielded gasket touches
should be conductive (i.e. no
paint).
Short thick
braided cable
Abb. 5-8: Recommended design of a cabinet
5–6
Wiring (general)
Installation
● When fitting a mains filter mask or remove the paint or plating from the cabinet to make a
good electrical connection between filter and cabinet. Confirm that the equipment mounting
panel is also electrically earthed to the cabinet chassis.
● Weld or screw all cabinet plates at a maximum of 10 cm intervals. Also, the maximum
dimension of holes in the cabinet should be less than 10 cm. If there is an interval (space),
the shielding effect may be lost. Holes larger than this should be covered with a wire mesh,
electrically connected to the cabinet. No part of the enclosure should be electrically
"floating". Where insulating connections like painted metal are used, remove the paint to
create good contact.
MCA0018C
Cabinet
Connection must
be conductive
Metal mesh cover
Cutout larger than
10 cm
Abb. 5-9: Beispiel für Metallgitterabdeckung
5.4.2
EMC conforming cable routing and shielding
● Use shielded cable or route the cable in a metal conduit.
● Connect the cable shield or conduit to the cabinet using a metal cable gland, a "P"-clip or a
"U"-clip to create the shortest earth path.
MCA0019T
Insulating material must be removed
from the cable gland mounting area.
Metal cable gland designed for
shield connection
Abb. 5-10: Cable routing and shielding via metal cable gland
User’s manual MC-ASI modules
5–7
Installation
Wiring (general)
● The position of the "P"-clip or "U"-clip should be as close a possible to the cable entry point.
Shield
"U"-clip
"P"-clip
Do not twist
shield into tail!
MCA0020T
Abb. 5-11: Cable routing and shielding via "P"-clip or "U"-clip
● Separate control signal wires as far as possible (min. 30 cm) from all high voltage or high
current cables.
● Do not route control signal wires and high voltage or high current cables in parallel.
5.4.3
Wiring instructions
Connection of the power supply
● If the voltage fluctuation are higher than the stipulated value, a constant-voltage transformer
has to be installed.
Constant-voltage
transformer
I/O equipment
MCA0021C
Abb. 5-12: Connection of a constant-voltage transformer
● The power supply unit must not generate noise across wire, the controllers, and ground. If
excessive noise is generated an isolating transformer has to be connected.
MC-ASI module
Isolating transformer
I/O equipment
MCA0022C
Fig. 5-13: Connection of an isolating transformer
5–8
Wiring (general)
Installation
● The main supply and the DC 24 V cables must not be bundled with the main-circuit wires
or with the I/O signal lines (high-voltage, large-current). Also, the wires mentioned must not
be laid too close together. If possible, provide more than 100 mm distance between them.
Wiring of the external equipment with the inputs and outputs.
● The cross-section of the connecting wires for the input and output terminals is 0,75 to
1,5 mm2 with end sleeves, and 2,5 mm2 without end sleeves. However, a cross-section of
0,75 mm2 is recommended.
● Input and output lines should always be laid separately.
● I/O signal lines have to be laid with a minimum distance of 100 mm to high-voltage and largecurrent main circuit wires.
● If no sufficient distance beween the I/O signal lines and high-voltage and large-current can
be kept, shielded cables have to be used. Preferably, ground the shielding at the modul side.
MC-ASI-Modul
Input
shielded cable
LOAD
Output
DC
MCA0023C
Abb. 5-14: Anschluss und Erdung der E/A-Signalleitung
● If wiring is done with a piping, ground the piping.
● Separate the DC 24 V I/O cables from the AC cables.
Shielding
For the communication of a MELSEC system with peripheral equipment shielded data lines
have to be used only. At best, the shielding is made of twisted copper. The density of the braiding
determines the effectiveness of the shielding. Make sure to follow the bending instructions of the
cable manufacturer, otherwise the shielding might fan out. For longer distances connect the
shielding each 20 m to ground.
Digital signal transmission
Follow the specifications of the interface concerning transfer rate and transfer distance, for an
error free digital signal transmission.
User’s manual MC-ASI modules
5–9
Installation
5 – 10
Wiring (general)
Addressing
Configuration
6
Configuration
6.1
Addressing
Each slave within the bus system must be assigned an individual address in the range of 1–31.
The default setting of the slaves is 0. The slave address can either be changed via an addressing
unit on the address socket of the slave or via the master module in the bus system. Instructions
for changing the re-addressing the slaves are included in the manuals of the master module or
the addressing unit.
The slave address resides in the slave memory. Each slave can be re-addressed at least 14
times.
Modules providing 4 inputs or 4 outputs occupy one slave address. Combined modules providing maximum 4 inputs and 4 outputs occupy one slave address either (multiplex operation).
Modules providing 8 inputs or 8 outputs include two independent slaves and occupy two slave
addresses. The independent slaves have to be addressed individually. As long as the first ASI
slave (ASI1) is addressed to 0 the second slave (ASI2) can not be accessed.
At default settings the slave addresses can not be changed via the auto configuration mode.
When replacing a module at least one slave has to be pre-assigned an address (default setting:
2 x adress "0").
6.2
Slave profile
The slave profile is written by the manufacturer into a non-volatile memory of the slave. It
describes the ID code and the I/O range of the ASI slave.
Only modules with the same slave profile can be exchanged.
User’s manual MC-ASI modules
6–1
Configuration
6–2
Slave profile
Parameter bytes for all MC modules
Parametrization (only for experts)
7
Parametrization (only for experts)
7.1
Parameter bytes for all MC modules
The following table shows the meaning of the parameter bytes:
Byte
Function
Bit position
b7
b6
b5
b4
b3
b2
b1
b0
WD
Base
0
0
0
0
0
0
EN
Sammel
Dia
Mask for Diaport2
0
0
0
0
0
0
0
0
User_Def_PRM2
0
0
0
0
0
0
0
0
User_Def_PRM3
0
0
0
0
0
0
0
0
0
User_Def_PRM1
1
Mask for Diaport1
2
3
4
Tab. 7-1: Parameter bytes
Byte 0: User_Def_PRM1
Bit 0,1,4,5,6,7:
These bits are reserved and must be set to 0.
Bit 2:
The WD_Base-Bit specifies the time base for the watchdog
0 = Time base 10 ms (status after reset)
1 = Time base 1 ms
Bit 3:
The EN_Sammel_Dia-Bit enables the group diagnostic mode:
0 = A group diagnostic error will always be returned.
1 = A group diagnostic error will only be returned, if an additional channel diagnostic error
has occurred.
For input modules EN_Sammel_Dia = 0 must be parametrized.
Byte 1: Mask for Diaport1
This byte contains mask bits for the channel diagnostic byte. The mask bits are assigned to the
respective bit positions of the channel diagnostic byte. A "1" at the respective bit position masks
the diagnostics, i. e. these bits are masked out. After a reset all masks are cleared.
For input modules the mask byte must be parametrized 00hex.
Byte 2, 3, 4: Mask for Diaport2, User_Def_PRM2, User_Def_PRM3
These mask bytes are not used by the MC modules and must be parametrized 00hex.
User’s manual MC-ASI modules
7–1
Parametrization (only for experts)
Parameter bytes for all MC modules
Example:
● WD_Base = 1ms
● A group diagnostic error will only be returned, if an additional channel diagnostic error
has occurred.
● No short-circuit monitoring for the outputs 1, 2, 6, 8
Byte Enter the format KH
0
0C A3 00 00 00
10
20
Tab. 7-2: Example for a DP slave parametrizing frame
7–2
Daily inspection
8
Maintenance and Inspection
Maintenance and Inspection
This chapter describes items for daily and periodic maintenance and inspection to maintain the
MC-ASI modules in errorfree and best condition.
8.1
Daily inspection
Check the mounting screws of the modules for proper tightening. Retighten loose mounting
screws.
8.2
Periodic inspection
This section describes the inspection items to be checked every six to twelve months. Also check
these items, if the system configuration or wiring was changed.
No.
Check Item
Check Method
Judgement
Corrective Action
1
Ambient
conditions
Ambient
temperature
Check ambient tempera- 0 – 55 °C
ture.
If the MC modules are
installed in a cabinet, the
conditions inside the
cabinet are relevant.
2
Condition of
the modules
Loose seating of the
modules
Check mounting of the
modules.
The MC modules must
be mounted properly.
Mount MC modules properly.
3
Condition of
connections
M12
circular
connectors
Check M12 circular connectors for firm seating
M12 circular connectors
must be seated firmly on
the module
Connect M12 circular
connectors firmly
Tab. 0-1: Periodic inspection
User’s manual MC-ASI modules
8–1
Maintenance and Inspection
8–2
Periodic inspection
Basic troubleshooting
9
Troubleshooting
Troubleshooting
This chapter describes various troubleshooting procedures, as well as corrective actions.
9.1
Basic troubleshooting
The system reliability does not depend only on reliable peripheral devices but also on short
down-times in case of trouble. In the following the most important points for troubleshooting are
listed.
Visual checks
● Is the power ON or OFF?
● Status of inputs and outputs?
● Condition of wiring (I/O lines, cables)?
● Status of LED indicators (AS-I, ERR, POWER, Status LEDs inputs/outputs)?
Trouble check
Observe any changes of the error during a short switching OFF and ON of the power supply.
9.2
Toubleshooting via LEDs
The modules provide several LEDs supporting the troubleshooting. The status of the LEDs and
corresponding diagnostic procedures are described in chapter 4, "Description of the modules".
9.3
Short-circuit handling
If a short-circuit or overload of the sensor or actor supply occurs a reset will be triggered. The
slave is decoupled from the network and the error is signalled to the master.
User’s manual MC-ASI modules
9–1
Troubleshooting
9–2
Short-circuit handling
General operating conditions
Specifications
10
Specifications
10.1
General operating conditions
Operating conditions
Specification
Ambient conditions
Operating ambient temperature
0 °C to +55 °C
Storage ambient temperature
−25 °C to +70 °C
Air condition
No corrosive gases
Protection rating DIN 40050
IP 67
Installation position
Machine
Mechanical ambient conditions
Vibration resistance acc. to
DIN IEC 68 part 2-6
10 - 58 Hz
const. amplitude 0.35 mm
58 - 150 Hz
const. acceleration 5 G
Shock resistance
IEC 1131-2
EMC conformity
HF-Field, EN 61000-4-3
10 V/m
HF-Field GSM, ENV 50204
10 V/m
Burst, EN 61000-4-4
± 1 kV / ± 2 kV
ESD, EN 61000-4-2
± 4 kV / ± 8 kV
Interference field strength,
EN 50081-1
QP 30 dBµV/m (30 - 230 MHz)
QP 37 dBµV/m (230 - 1000 MHz)
Tab. 10-1: General operating conditions
10.2
General specifications
Item
Specification
AS-I connection
AS-I standard
2.04, EN 50295
AS-I bus voltage
26.5 - 31.6 V DC
Polarity protection
Integrated
Flat cable
AS-I standard profile cable, yellow, 2 x 1.5 mm2, ASI+, ASI-
External power supply
(modules with outputs only)
Nominal voltage
Ub 20 - 30 V DC (double galvanic isolation from AS-I bus voltage)
Polarity protection
Integrated
Flat cable
AS-I standard profile cable, black, 2 x 1.5 mm2, 24 V, 0 V
Safe separation distance
optocoupler
(PEL V condition)
8 mm min., IEC 364-4-41
Tab. 10-2: General specifications
User’s manual MC-ASI modules
10 – 1
Specifications
Specifications of the MC-ASI modules
10.3
Specifications of the MC-ASI modules
10.3.1
Digital input modules
Item
Specification
MC-ASI X4M12
MC-ASI X8M12
Connections
AS-I bus
Vampire connection for profile coded AS-I flat cable, yellow
AS-I bus branching
Vampire connection for profile coded AS-I flat cable, yellow
External power supply
No
Inputs
4 x 5-pin M12 circular connectors
Adressing
Address socket
8 x 5-pin M12 circular connectors
AS-I connection
AS-I profile (IO/ID code)
0/0
Occupied slave addresses
1
2 x 0/0
2
Total power consumption
≤ 50 mA
≤ 450 mA
Inputs
Number of inputs
4
Voltage range
0 - 30 V DC acc. to IEC 1131-2
8
Signal 0: lin ≤ 2 mA, Uin ≤ 5 V
Signal 1: lin ≥ 6 mA, Uin ≥ 11 V
Input current
≤ 11 mA
Sensor supply
200 mA max.
Short-circuit protection
Integrated
Overload protection
Integrated
400 mA max.
Others
Dimensions in mm (LxWxH)
105 x 50 x 38
154 x 50 x 38
Weight
Approx. 100 g
Approx. 140 g
Tab. 10-3: Digital input modules
NOTE
10 – 2
Input modules provide a bus branching feature. Do not connect the external power supply
(ASI flat cable, black).
Specifications of the MC-ASI modules
10.3.2
Specifications
Digital output modules
Item
Specification
MC-ASI Y4M12-05
MC-ASI Y4M12-2
MC-ASI Y8M12
Connections
AS-I bus
Vampire connection for profile coded AS-I flat cable, yellow
AS-I bus branching
No
External power supply
Vampire connection for profile coded AS-I flat cable, black
Outputs
4 x 5-pin
M12 circular connectors
Adressing
Address socket
4 x 5-pin
M12 circular connectors
8 x 5-pin
M12 circular connectors
AS-I connection
AS-I profile (IO/ID code)
8/0
8/0
2 x 8/0
Occupied slave addresses
1
1
2
Total power consumption
≤ 50 mA
Outputs
Number of outputs
4
Current load per output
IL 0.5 A, 100 % ED
IL 2 A, 100 % ED
IL 0.5 A, 100 % ED
Max. total current
2A
2A
4A
Output voltage
Ub - 0.8 V typical
Switching frequency
4
8
Resistive load: 100 Hz
Inductive load: 0.2 Hz
Short-circuit protection
Integrated
Overload protection
1A
2A
1A
Others
Dimensions in mm (LxWxH)
105 x 50 x 38
105 x 50 x 38
154 x 50 x 38
Weight
Approx. 100 g
Approx. 100 g
Approx. 140 g
Tab. 10-4: Digital output modules
User’s manual MC-ASI modules
10 – 3
Specifications
10.3.3
Specifications of the MC-ASI modules
Digital input/output modules
Item
Specification
MC-ASI X2Y2M12
MC-ASI X4Y4M12
Connections
AS-I bus
Vampire connection for profile coded AS-I flat cable, yellow
AS-I bus branching
No
External power supply
Vampire connection for profile coded AS-I flat cable, black
Inputs/outputs
4 x 5-pin M12 circular connectors
Adressing
Address socket
8 x 5-pin M12 circular connectors
AS-I connection
AS-I profile (IO/ID code)
3/0
Occupied slave addresses
1
Total power consumption
≤ 250 mA
7/0
Inputs
Number of inputs
2
Voltage range
0 - 30 V DC acc. to IEC 1131-2
4
Signal 0: lin ≤ 2 mA, Uin ≤ 5 V
Signal 1: lin ≥ 6 mA, Uin ≥ 11 V
Input current
≤ 11 mA
Sensor supply
200 mA max.
Short-circuit protection
Integrated
Overload protection
Integrated
Outputs
Number of outputs
2
Current load per output
IL 2 A, 100 % ED
Max. total current
4A
Output voltage
Ub - 0.8 V typical
Switching frequency
4
IL 0.5 A, 100 % ED
2A
Resistive load: 100 Hz
Inductive load: 0.2 Hz
Short-circuit protection
Integrated
Overload protection
2A
1A
Others
Dimensions in mm (LxWxH)
105 x 50 x 38
154 x 50 x 38
Weight
Approx. 100 g
Approx. 100 g
Tab. 10-5: Digital input/output modules
NOTE
10 – 4
The inputs are galvanically coupled with the ASI bus. They must not be connected to the
external power supply (ASI flat cable, black).
Specifications of the MC-ASI modules
10.3.4
Specifications
Characteristic curve areas IEC 1131-2, type 2
The following figure defines the input characteristic curve areas according to IEC standard.
U[V ]
30
20
Area 1
11
10
5
Area 0
0
1
2
3
4
5
6
7
8
9
10
11
12
13
14
I [ mA ]
-3
MCA0024C
Abb. 10-1: Characteristic curve areas IEC 1131-2, type 2
User’s manual MC-ASI modules
10 – 5
Specifications
10 – 6
Specifications of the MC-ASI modules
Dimensions
Appendix
Appendix
A.1
Dimensions
A.1.1
Modules with 4 x M12 circular connectors
38
A
50
39
33
50
105
73
All measures in mm
MCA0025C
Abb. A-1: Dimensions of the MC-ASI modules with 4 x M12 circular connectors
User’s manual MC-ASI modules
A–1
Appendix
Modules with 8 x M12 circular connectors
38
.A.1.2
Dimensions
50
39
33
50
154
73
All measures in mm
107
MCA0026C
Abb. A-2: Dimensions of the MC-ASI modules with 8 x M12 circular connectors
A–2
Index
A.2
Index
A
Accessories . . . . . .
Addressing
AS-Interface . . .
Configuration . .
Ambient conditions
Inspection . . . .
Installation . . . .
AS-Interface . . . . . .
................... 2-1
................... 3-3
................... 6-1
................... 8-1
................... 5-1
................... 3-1
C
Cable types . . . . . . . . . . . . . . . .
Characteristic curve . . . . . . . . . .
Connection . . . . . . . . . . . . . . . . .
Connection of sensors and actors
......... 3-3
. . . . . . . . 10 - 5
......... 2-1
......... 5-5
D
Dimensions
4 x M12
8 x M12
......................... A-1
......................... A-2
E
Earth protection
...................... 5-2
I
Indicators
X2Y2M12 .
X4M12 . . .
X4Y4M12 .
X8M12 . . .
Y4M12-05
Y4M12-2 .
Y8M12 . . .
Inspection . . .
Installation . . .
. . . . . . . . . . . . . . . . . . . . . . 4 - 23
....................... 4-3
. . . . . . . . . . . . . . . . . . . . . . 4 - 27
....................... 4-7
. . . . . . . . . . . . . . . . . . . . . . 4 - 11
. . . . . . . . . . . . . . . . . . . . . . 4 - 15
. . . . . . . . . . . . . . . . . . . . . . 4 - 19
....................... 8-1
....................... 5-1
MC-ASI X8M12 module . . .
MC-ASI Y4M12-05 module .
MC-ASI Y4M12-2 module . .
MC-ASI Y8M12 module . . .
Mounting
Installation . . . . . . . . . .
Module features . . . . . .
............. 4-6
. . . . . . . . . . . . 4 - 10
. . . . . . . . . . . . 4 - 14
. . . . . . . . . . . . 4 - 18
............. 5-1
............. 2-1
O
Operating conditions
Operating items
X2Y2M12 . . . . .
X4M12 . . . . . . .
X4Y4M12 . . . . .
X8M12 . . . . . . .
Y4M12-05 . . . . .
Y4M12-2 . . . . . .
Y8M12 . . . . . . .
. . . . . . . . . . . . . . . . . 10 - 1
. . . . . . . . . . . . . . . . . 4 - 22
.................. 4-2
. . . . . . . . . . . . . . . . . 4 - 26
.................. 4-6
. . . . . . . . . . . . . . . . . 4 - 10
. . . . . . . . . . . . . . . . . 4 - 14
. . . . . . . . . . . . . . . . . 4 - 18
P
Parametrier-Bytes . . . . . . . . . . . . .
Pin assignment circular connectors
X2Y2M12 . . . . . . . . . . . . . . . .
X4M12 . . . . . . . . . . . . . . . . . .
X4Y4M12 . . . . . . . . . . . . . . . .
X8M12 . . . . . . . . . . . . . . . . . .
Y4M12-05 . . . . . . . . . . . . . . . .
Y4M12-2 . . . . . . . . . . . . . . . . .
Y8M12 . . . . . . . . . . . . . . . . . .
Power supply . . . . . . . . . . . . . . . . .
Protective earth . . . . . . . . . . . . . . .
....... 7-1
. . . . . . 4 - 24
....... 4-4
. . . . . . 4 - 28
....... 4-8
. . . . . . 4 - 12
. . . . . . 4 - 16
. . . . . . 4 - 20
....... 5-8
....... 5-2
S
Safety precautions . .
Shielding . . . . . . . . .
Short-circuit handling
Slave profile. . . . . . .
Specifications . . . . .
System configuration
.................. 5-1
.................. 5-9
.................. 9-1
.................. 6-1
. . . . . . . . . . . . . . . . . 10 - 2
.................. 3-1
L
LEDs .
T
............................. 9-1
Troubleshooting .
..................... 9-1
M
Maintenance. . . . . . . . . . .
Masters . . . . . . . . . . . . . .
MC-ASI X2Y2M12 module.
MC-ASI X4M12 module. . .
MC-ASI X4Y4M12 module.
.............. 8-1
.............. 1-1
. . . . . . . . . . . . . 4 - 22
.............. 4-2
. . . . . . . . . . . . . 4 - 26
User’s manual MC-ASI modules
W
Wiring .
............................ 5-6
A–3
Index
A–4
MITSUBISHI ELECTRIC
HEADQUARTERS
EUROPEAN REPRESENTATIVES
MITSUBISHI ELECTRIC
EUROPE
EUROPE B.V.
German Branch
Gothaer Straße 8
D-40880 Ratingen
Phone: +49 (0) 21 02 / 486-0
Fax: +49 (0) 21 02 / 4 86-11 20
E-mail: [email protected]
Getronics
BELGIUM
Control Systems
Pontbeeklaan 43
B-1731 Asse-Zellik
Phone: +32 (0) 2 / 467 17 51
Fax: +32 (0) 2 / 467 17 45
E-mail: [email protected]
MITSUBISHI ELECTRIC
FRANCE
EUROPE B.V.
French Branch
25, Boulevard des Bouvets
F-92741 Nanterre Cedex
Phone: +33 1 55 68 55 68
Fax: +33 1 55 68 56 85
E-mail: [email protected]
MITSUBISHI ELECTRIC
EUROPE B.V.
UK Branch
Travellers Lane
GB-Hatfield Herts. AL10 8 XB
Phone: +44 (0) 1707 / 27 61 00
Fax: +44 (0) 1707 / 27 86 95
UK
MITSUBISHI ELECTRIC
ITALY
EUROPE B.V.
Italian Branch
Via Paracelso 12
I-20041 Agrate Brianza (MI)
Phone: +39 (0) 39 6053 1
Fax: +39 (0) 39 6053 312
E-mail: [email protected]
MITSUBISHI ELECTRIC
EUROPE B.V.
Spanish Branch
Carretera de Rubí 76-80
E-08190 Sant Cugat del Vallés
Phone: +34 9 3 / 565 3131
Fax: +34 9 3 / 589 2948
E-mail: [email protected]
SPAIN
MITSUBISHI ELECTRIC
CORPORATION
Office Tower “Z” 14 F
8-12,1 chome, Harumi Chuo-Ku
Tokyo 104-6212
Phone: +81 3 / 622 160 60
Fax: +81 3 / 622 160 75
JAPAN
MITSUBISHI ELECTRIC
AUTOMATION
500 Corporate Woods Parkway
Vernon Hills, IL 60061
Phone: +1 847 / 478 21 00
Fax: +1 847 / 478 22 83
USA
TELECON CO.
BULGARIA
4, A. Ljapchev Blvd.
BG-1756 Sofia
Phone: +359 (0) 2 / 97 44 05 8
Fax: +359 (0) 2 / 97 44 06 1
E-mail: —
louis poulsen
industri & automation
Geminivej 32
DK-2670 Greve
Phone: +45 (0) 43 / 95 95 95
Fax: +45 (0) 43 / 95 95 91
E-mail: [email protected]
DENMARK
UTU Elektrotehnika AS
Pärnu mnt.160i
EE-11317 Tallinn
Phone: +372 (0) 6 / 51 72 80
Fax: +372 (0) 6 / 51 72 88
E-mail: [email protected]
ESTONIA
Beijer Electronics OY
FINLAND
Ansatie 6a
FIN-01740 Vantaa
Phone: +358 (0) 9 / 886 77 500
Fax: +358 (0) 9 / 886 77 555
E-mail: [email protected]
UTECO A.B.E.E.
5, Mavrogenous Str.
GR-18542 Piraeus
Phone: +30 10 / 42 10 050
Fax: +30 10 / 42 12 033
E-mail: —
GREECE
MITSUBISHI ELECTRIC
IRELAND
EUROPE B.V. – Irish Branch
Westgate Business Park
IRL-Dublin 24
Phone: +353 (0) 1 / 419 88 00
Fax: +353 (0) 1 / 419 88 90
E-mail: [email protected]
INEA CR d.o.o.
Drvinje 63
HR-10000 Zagreb
Phone: +385 (0)1/ 36 67 140
Fax: +385 (0)1/ 36 67 140
E-mail: —
CROATIA
POWEL SIA
Lienes iela 28
LV-1009 Riga
Phone: +371 784 / 22 80
Fax: +371 784 / 22 81
E-mail: [email protected]
UTU POWEL UAB
Savanoriu pr. 187
LT-2053 Vilnius
Phone: +370 (0) 232-2980
Fax: +370 (0) 232-2980
E-mail: [email protected]
LATVIA
LITHUANIA
Beijer Electronics AS
Teglverksveien 1
N-3002 Drammen
Phone: +47 (0) 32 / 24 30 00
Fax: +47 (0) 32 / 84 85 77
E-mail: —
NORWAY
GEVA
AUSTRIA
Wiener Straße 89
A-2500 Baden
Phone: +43 (0) 2252 / 85 55 20
Fax: +43 (0) 2252 / 488 60
E-mail: [email protected]
MPL Technology Sp. z o.o.
ul. Sliczna 36
PL-31-444 Kraków
Phone: +48 (0) 12 / 632 28 85
Fax: +48 (0) 12 / 632 47 82
E-mail: [email protected]
POLAND
Sirius Trading & Services srl
Bd. Lacul Tei nr. 1 B
RO-72301 Bucuresti 2
Phone: +40 (0) 21 / 201 7147
Fax: +40 (0) 21 / 201 7148
E-mail: [email protected]
ROMANIA
Beijer Electronics AB
Box 426
S-20124 Malmö
Phone: +46 (0) 40 / 35 86 00
Fax: +46 (0) 40 / 35 86 02
E-mail: —
SWEDEN
ECONOTEC AG
SWITZERLAND
Postfach 282
CH-8309 Nürensdorf
Phone: +41 (0) 1 / 838 48 11
Fax: +41 (0) 1 / 838 48 12
E-mail: [email protected]
ACP Autocomp a.s.
SLOVAKIA
Chalupkova 7
SK-81109 Bratislava
Phone: +421 (02) / 5292-22 54, 55
Fax: +421 (02) / 5292-22 48
E-mail: [email protected]
INEA d.o.o.
Stegne 11
SI-1000 Ljubljana
Phone: +386 (0) 1-513 8100
Fax: +386 (0) 1-513 8170
E-mail: [email protected]
SLOVENIA
AutoCont
Control Systems s.r.o.
Nemocnicni 12
CZ-702 00 Ostrava 2
Phone: +420 59 / 6152 111
Fax: +420 59 / 6152 562
E-mail: [email protected]
CZECHIA
GTS
TURKEY
Darülaceze Cad. No. 43 KAT: 2
TR-80270 Okmeydani-Istanbul
Phone: +90 (0) 212 / 320 1640
Fax: +90 (0) 212 / 320 1649
E-mail: [email protected]
Meltrade Automatika Kft.
55, Harmat St.
HU-1105 Budapest
Phone: +36 (0)1 / 2605 602
Fax: +36 (0)1 / 2605 602
E-mail: [email protected]
HUNGARY
AFRICAN REPRESENTATIVE
CBI Ltd
SOUTH AFRICA
Private Bag 2016
ZA-1600 Isando
Phone: +27 (0) 11/ 928 2000
Fax: +27 (0) 11/ 392 2354
E-mail: [email protected]
MIDDLE EAST REPRESENTATIVE
TEXEL Electronics LTD.
Box 6272
IL-42160 Netanya
Phone: +972 (0) 9 / 863 08 91
Fax: +972 (0) 9 / 885 24 30
E-mail: —
ISRAEL
EURASIAN REPRESENTATIVE
AVTOMATIKA SEVER
Krapivnij Per. 5, Of. 402
RUS-194044 St Petersburg
Phone: +7 812 / 1183 238
Fax: +7 812 / 3039 648
E-mail: [email protected]
RUSSIA
CONSYS
Promyshlennaya St. 42
RUS-198099 St Petersburg
Phone: +7 812 / 325 36 53
Fax: +7 812 / 325 36 53
E-mail: [email protected]
RUSSIA
ICOS
RUSSIA
Industrial Computer Systems Zao
Ryazanskij Prospekt 8a, Office 100
RUS-109428 Moscow
Phone: +7 095 / 232 - 0207
Fax: +7 095 / 232 - 0327
E-mail: [email protected]
NPP Uralelektra
Sverdlova 11a
RUS-620027 Ekaterinburg
Phone: +7 34 32 / 53 27 45
Fax: +7 34 32 / 53 24 61
E-mail: [email protected]
RUSSIA
STC Drive Technique
Poslannikov Per. 9, str.1
RUS-107005 Moscow
Phone: +7 095 / 786 21 00
Fax: +7 095 / 786 21 01
E-mail: [email protected]
RUSSIA
JV-CSC Automation
15, Marina Raskovoyi St.
U-02002 Kiev
Phone: +380 (0)44 / 568 5316
Fax: +380 (0)44 / 568 5317
E-mail: [email protected]
UKRAINE
TEHNIKON
BELARUS
Oktjabrskaya 16/5, Ap 704
BY-220030 Minsk
Phone: +375 (0) 17 / 22 75 704
Fax: +375 (0) 17 / 22 76 669
E-mail: [email protected]
PLC 10/02 - Printed in Germany
Getronics
NETHERLANDS
Control Systems
Donauweg 2 B
NL-1043 AJ Amsterdam
Phone: +31 (0) 20 / 587 67 00
Fax: +31 (0) 20 / 587 68 39
E-mail: [email protected]
EUROPEAN REPRESENTATIVES
MITSUBISHI ELECTRIC
Gothaer Straße 8
D-40880 Ratingen
Telefon: 02102 486-0
Hotline: 01805 000-7650
INDUSTRIAL AUTOMATION
Fax:
02102 486-7170
[email protected]
www.mitsubishi-automation.de
www.mitsubishi-automation.com