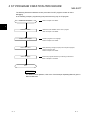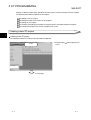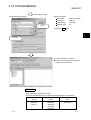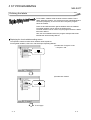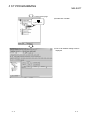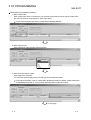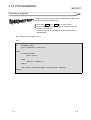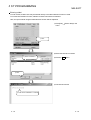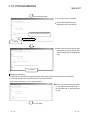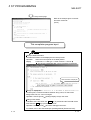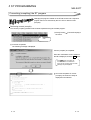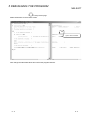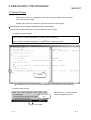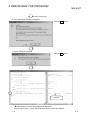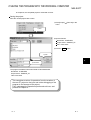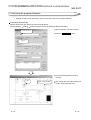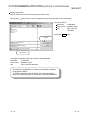
1
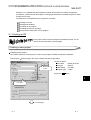
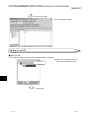
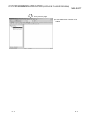
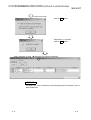
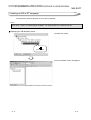
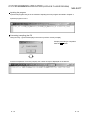
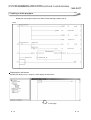
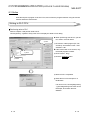
MITSUBISHI ELECTRIC MELSOFT Programmable Logic Controllers Programming Guide Book Structured Text (ST) Art. no.: 158554 01 02 2003 IB(NA)-0800248E Version A MITSUBISHI ELECTRIC INDUSTRIAL AUTOMATION • SAFETY PRECAUTIONS • (Always read these instructions before using this equipment.) Before using this product, please read this manual and the relevant manuals introduced in this manual carefully and pay full attention to safety to handle the product correctly. The instructions given in this manual are concerned with this product. For the safety instructions of the programmable controller system, please read the CPU module user's manual. In this manual, the safety instructions are ranked as "DANGER" and "CAUTION". DANGER Indicates that incorrect handling may cause hazardous conditions, resulting in death or severe injury. ! CAUTION Indicates that incorrect handling may cause hazardous conditions, resulting in medium or slight personal injury or physical damage. ! Note that the ! CAUTION level may lead to a serious consequence according to the circumstances. Always follow the instructions of both levels because they are important to personal safety. Please save this manual to make it accessible when required and always forward it to the end user. [Designing Precautions] ! DANGER • For data change, program change and status control to be performed for the running programmable logic controller from a personal computer, configure interlock circuits in the outside of the PLC system so that the whole system will always operate safely. Also, for online operations to be performed from the personal computer to the PLC CPU, predetermine as a system the corrective actions for communication errors that will occur due to poor cable connection, etc. [Startup/Maintenance Precautions] ! CAUTION • Before performing online operations (program change during PLC CPU RUN, forced I/O operation, RUN-STOP or similar operating condition change, remote operation) with the personal computer connected to the running PLC CPU, read the manual carefully and ensure safety fully. Note that program change during PLC CPU RUN (online change) may cause such problems as program corruption depending on the operation condition. Use the equipment after fully understanding the precautions given in the GX Developer Operating Manual. A-1 A-1 REVISIONS * The manual number is given on the bottom left of the back cover. Print Date Feb., 2003 * Manual Number IB(NA)-0800248E-A First printing Revision Japanese Manual Version SH-080365-A This manual confers no industrial property rights or any rights of any other kind, nor does it confer any patent licenses. Mitsubishi Electric Corporation cannot be held responsible for any problems involving industrial property rights which may occur as a result of using the contents noted in this manual. 2003 MITSUBISHI ELECTRIC CORPORATION A-2 A-2 INTRODUCTION Thank you for choosing the Mitsubishi MELSOFT series Integrated FA software. Read this manual and make sure you understand the functions and performance of MELSEC series sequencer thoroughly in advance to ensure correct use. Please make this manual available to the end user. CONTENTS SAFETY PRECAUTIONS...............................................................................................................................A- 1 REVISIONS .....................................................................................................................................................A- 2 CONTENTS.....................................................................................................................................................A- 4 About Manuals ................................................................................................................................................A- 5 How to Use This Manual.................................................................................................................................A- 6 About the Generic Terms and Abbreviations Used in This Guidebook ........................................................A- 7 1 OVERVIEW 1- 1 to 1- 2 2 ST PROGRAM CREATION PROCEDURE 2- 1 to 2- 2 3 ST PROGRAMMING 3- 1 to 3- 16 Creating a new ST project .............................................................................................................................. 3- 1 Defining the labels........................................................................................................................................... 3- 3 Entering a program.......................................................................................................................................... 3- 8 Converting (compiling) the ST program ........................................................................................................ 3-14 4 READ/WRITE FROM/TO PLC CPU 4- 1 to 4- 2 5 DEBUGGING THE PROGRAM 5- 1 to 5- 5 5.1 Monitoring the Sequence Program........................................................................................................... 5- 1 5.2 Device Test................................................................................................................................................ 5- 2 5.3 Online Change .......................................................................................................................................... 5- 4 6 SAVING THE PROGRAM INTO THE PERSONAL COMPUTER 6- 1 to 6- 2 7 INTRODUCTION TO USEFUL FUNCTIONS FOR ST PROGRAM EDITING 7- 1 to 7- 2 A-3 A-3 8 ST PROGRAMMING APPLICATION (PASTING FB TO LADDER PROGRAM) 8- 1 to 8- 20 8.1 Creating an FB .......................................................................................................................................... 8- 1 Creating a new project .............................................................................................................................. 8- 1 Adding a new FB ....................................................................................................................................... 8- 2 Defining FB variables ................................................................................................................................ 8- 5 Creating an FB in ST language ................................................................................................................ 8- 9 8.2 Pasting the FB to a Main Program .......................................................................................................... 8-11 Defining the local variables ...................................................................................................................... 8-11 Creating a main program ......................................................................................................................... 8-13 8.3 Online ....................................................................................................................................................... 8-16 Writing to PLC CPU.................................................................................................................................. 8-16 Monitoring the sequence program........................................................................................................... 8-17 Confirming the program behavior ............................................................................................................ 8-18 Index A-4 Index- 1 to Index- 2 A-4 About Manuals The following manuals are also related to this product. In necessary, order them by quoting the details in the tables below. Related Manuals Manual Number (Model Code) Manual Name GX Developer Version8 Operating Manual (Startup) IB-0800242E Explains the system configuration, installation method and startup method of GX Developer. (Option) GX Developer Version8 Operating Manual Explains the program creation method, printout method, monitoring method, debugging method, etc. IB-0800243E using GX Developer. (Option) GX Developer Version8 Operating Manual (Structured Text) IB-0800247E Explains the operation methods for creating structured text programs. (Option) GX Developer Version8 Operating Manual (Function Block) IB-0800246E Explains the program creation method, printout method, etc. using GX Developer. (Option) QCPU (Q mode) Programming Manual (Structured Text) SH-080366E (13JF68) Explains the programming methods in structured text language. (Option) QCPU (Q mode)/QnACPU Programming Manual (Common Instructions) Explains the methods of using the sequence instructions, basic instructions and application instructions. SH-080039 (13JF58) (Option) REMARK Each Operating Manual is contained in the CD-ROM together with the software package as a set. The Programming Manual is available separately in printed form as an option. Please place an order with the manual number (model code) in the above table. A-5 A-5 How to Use This Manual This Guidebook ... This guidebook is a commentary written for those who will use the GX Developer Version 8 software package (hereafter abbreviated to GX Developer) to create structured text (hereafter abbreviated to ST) programs for the first time. "Chapter 1" introduces the overview of the ST language and the features of the ST language in the MELSEC-Q series. "Chapter 2 to Chapter 6" introduce a series of basic operation methods, such as the methods of creating, debugging and saving programs in ST language through sample programs. "Chapter 7" introduces useful functions available from GX Developer. "Chapter 8" introduces the method of creating a program, which uses an ST-written function block (FB) in a ladder program from the main program created in ladder form, as an application program. "Chapters 4, 5 and 8" use the PLC CPU for explanation. Programming Manual ... Use the "QCPU (Q mode) Programming Manual (Structured Text)" to perform structured text (ST) programming with GX Developer. It is suitable for the users who have the knowledge and programming experience of PLC ladder programs and for the users who have the knowledge and programming experience of high-level languages such as the C language. Operating Manual ... The "GX Developer Version 8 Operating Manual (Structured Text)" is a commentary that gives in-depth explanation of the operation methods for creating structured text programs using GX Developer. Refer to the manual when information on operations details is necessary. When information on other than structured text programming is necessary ... Refer to the "GX Developer Version 8 Operating Manual" or "GX Developer Version 8 Operating Manual (Startup)". A-6 A-6 About the Generic Terms and Abbreviations Used in This Guidebook In this guidebook, the following generic terms and abbreviations are used to represent the GX Developer software package and PLC CPU. The package name is given when the target model name must be pointed out explicitly. Generic Terms and Abbreviations Description/ target unit ST Stands for structured text. FB Stands for function block. Generic product name for model names SWnD5C-GPPW, SWnD5C-GPPW-A, GX Developer SWnD5C-GPPW-V and SWnD5C-GPPW-VA. n means Version 8 or later. QCPU (Q mode) Generic term for Q00(J)CPU, Q01CPU, Q02(H)CPU, Q06HCPU, Q12HCPU, Q25HCPU, Q12PHCPU and Q25PHCPU. The following explains the symbols and information used in this guidebook. Symbol Description Gives the section-related knowledge and useful Point information. [ ] Menu name of menu bar ( ) Icon of toolbar >> Tab name of dialog box << Command button of dialog box A-7 Example [ Project ] <<Select file>> Jump Button A-7 1 OVERVIEW MELSOFT The ST language is defined in the International Standard IEC61131-3 that stipulates the logic description system in open controllers. The ST language supports operators, control syntaxes and functions to permit the following descriptions. 1 Control syntaxes such as conditional sentence-dependent selective branch and repetitive sentence-based repetition Expressions using operators (*, /, +, -, <, >, =, etc.) Call of user-defined function blocks (FB) Call of functions (MELSEC functions, IEC functions) Description of comments The following introduces the main features of ST programs in the MELSEC-Q series. Design efficiency improved by defining processings as parts. With often used processings defined as parts in the form of function blocks (FB) in ST language, they can be used in necessary areas of each program. This not only enhances the efficiency of program development but also reduces program mistakes, improving program quality. Program change during system operation (online change). Part of a running program can be changed without the PLC CPU being stopped. Connection with other language programs. Since other languages than the ST are also supported, the language adequate for processing can be used to increase the efficiency of program development. For example, write sequence control in a ladder program, and operation processing in ST language. Multiple languages support widespread application under optimum control. A wealth of functions available. The MELSEC functions compatible with various common instructions for the MELSEC-Q series and the IEC functions defined in IEC61131-3 are available for ST programs. 1-1 1-1 1 OVERVIEW MELSOFT MEMO 1 1-2 1-2 2 ST PROGRAM CREATION PROCEDURE MELSOFT The following flowchart indicates the basic procedure from ST program creation to online debugging. In the following example, programming was performed using only an ST program. Creation of new project Refer to Chapter 3 for details. 2 Definition of labels Creation of ST program Define the local variables used in an ST program. Refer to Chapter 3 for details. Create a program in ST language. Refer to Chapter 3 for details. Write to PLC CPU After performing change (compile) into a sequence program, write it to the PLC CPU. Refer to Chapter 4 for details. Online debugging Confirm the program behavior by conducting a device test. Refer to Chapter 5 for details. End REMARK For details of each operation, refer to the "GX Developer Operating Manual" given in Relevant Manuals. 2-1 2-1 2 ST PROGRAM CREATION PROCEDURE MELSOFT MEMO 2 2-2 2-2 3 ST PROGRAMMING MELSOFT Chapter 3 explains general basic operations from the input to convert (compile) of an ST program. The following items will be explained in this chapter. Creating a new ST project. Defining the labels to be used in an ST program. Creating an ST program. Converting (compiling) the created ST program into an executable sequence program. Correcting the program if a convert (compile) error occurs. Creating a new ST project. 3 Creating a new ST project The operation method to create a new project will be explained. 1) Click [Project] menu. 1) Click. [New project] in the To next page 3-1 3-1 3 ST PROGRAMMING MELSOFT From previous page Set the New project dialog. 3) Click. 2) Enter as follows. PLC series PLC Type Label setting Program type : QCPU (Q mode) : Q02 (H) : Use label : ST 3) Click the OK button 3 2) Set these. 4) A new ST project is created. The ST edit screen opens and an ST program can be entered. REMARK Here, "Q02(H)" is set as the PLC type. There are the following PLC CPU types that are applicable to ST programs. Basic model QCPU Q00CPU Q00JCPU Q01CPU 3-2 High performance model QCPU Q02CPU Q02HCPU Q06HCPU Q12HCPU Q25HCPU Process CPU Q12PHCPU Q25PHCPU 3-2 3 ST PROGRAMMING MELSOFT Defining the labels To use labels, variables used as labels must be clarified. This is called "defining the labels". If a program that uses undefined labels is converted (compiled), an error occurs and a sequence program cannot be created. There are two different labels; global variables and local variables. The global variables can be used in the whole project. The local variables can be used in only the program where the labels have been defined. Here, the local variables used in the program example that will be entered later will be actually defined. Displaying the Local variables setting screen The operation method to define local variables will be explained. For the global variables, refer to the "GX Developer Operating Manual". 1) Double-click "Program" in the <<Project>> tab. 1) Double-click. 2) Double-click "MAIN". 2) Double-click. To next page 3-3 3-3 3 ST PROGRAMMING MELSOFT From previous page 3) Double-click "Header". 3) Double-click. 4) The Local variables setting screen is displayed. 3-4 3-4 3 ST PROGRAMMING MELSOFT Setting the local variables (Header) 1) Enter a label name. Enter a label name within 16 characters. The character strings that cannot be used as a label name are reserved words and actual devices. Enter other labels. For the reserved words, refer to the "GX Developer Operating Manual". 2) Enter a device type. Enter it directly or make selection from the list box. 3) Enter a comment into the label. Enter it within 64 characters. The comment can be displayed in the tool tip format of the label information. For the label information, refer to "CHAPTER 7 INTRODUCTION TO USEFUL FUNCTIONS FOR ST PROGRAM EDITING" or "GX Developer Operating Manual (Structured Text)". To next page 3-5 3-5 3 ST PROGRAMMING MELSOFT From previous page 4) When entering labels continuously, click the Insert or Add button under Edit operation to add a line. The buttons under Edit operation have the following functions. Insert button ... Inserts a blank line into the current cell position. Add button ...... Inserts a blank line into the place one line below the current cell position. Delete button ... Deletes one line in the current cell position. 5) After input is complete, click the Register button. Click the OK button. To next page 3-6 3-6 3 ST PROGRAMMING MELSOFT From previous page Registration is completed. Click the OK button. When registration is made, " " displayed on the title bar disappears. REMARK For details of the local variables, refer to the "GX Developer Operating Manual" given in Relevant Manuals. 3-7 3-7 3 ST PROGRAMMING MELSOFT Entering a program A program can be input freely in text format using the ST edit screen. Note the following points during input. Use a space, Tab key or Enter key to enter a blank. When the defined label, control syntax or comment is input, the character color changes. If it does not change, the possible cause is an input mistake or undefined label. Now, actually input a program in List-1. List-1. IF Initialization THEN good := 0; Defective := 0; Yield := 0.0; ELSE IF Inspection THEN good := good +1; ELSE Defective := Defective + 1; END_IF; Yield := DINT_TO_REAL(good)/DINT_TO_REAL(good + Defective); END_IF; 3-8 3-8 3 ST PROGRAMMING MELSOFT Displaying the ST edit screen 1) Double-click "Body" in the <<Project>> tab. 1) Double-click. 2) The ST edit screen is displayed. Entering the characters Enter "IF". If entered in lower case, a control syntax is converted automatically into upper case. 3-9 3-9 3 ST PROGRAMMING MELSOFT Entering a label To enter a label, a label name may be entered directly or the label selection function be used. To use the label selection function, labels must have been entered in advance. Here, the input method using the label selection function will be explained. 1) Click [Edit] menu. [Select label] in the 1) Click. 2) Select the label to be entered. 2) Select "Initialization". 3) Click the OK button. 3) Click. 4) The label is inserted. 4) Label name "Initialization" is inserted. 3 - 10 3 - 10 3 ST PROGRAMMING MELSOFT Entering a function Enter a function in upper case. To enter, a function may be entered directly or the function selection function be used. Here, the input method using the function selection function will be explained. 1) Click [Edit] [Select function] in the menu. 1) Click. 2) Select the label to be entered. 3) Click the OK button. 2) Select "DINT_TO_REAL". 3) Click. To next page 3 - 11 3 - 11 3 ST PROGRAMMING MELSOFT From previous page 4) The function name is inserted. The function argument type is displayed in the tool tip format. Function argument type is displayed. 4) Inserted. 5) Refer to the function argument type displayed in the tool tip format, and enter the argument to complete the entry. 5) Complete Entering a comment Comments do not affect the program behavior at all. When program processings are described as comments, they give the at-a-glance pictures of the processings. First, enter a comment on Line 1 of the program. Enter a comment by enclosing it with "(*" that represents the beginning of the comment and "*)" that represents an end. To next page 3 - 12 3 - 12 3 ST PROGRAMMING MELSOFT From previous page Refer to the example given on the left and enter comments. (List-2) This completes program input. Display of label information The label information can be displayed in the tool tip format. Operation : Place the mouse pointer in the label position. Display : Label name -> Label type -> Label comment -> Device : The device is displayed after convert (compile) is performed. Label information is displayed. Change of display color Control syntax, comment and label character string colors, ST edit screen background color, etc. can be changed. Operation: Choose [Tools] [Change display color] in the menu. Setting of auto indent Indentation at the time when the Enter key is pressed and the Tab width at the time when the Tab key is pressed can be set. Operation: Choose [Tools] [ST editor settings] in the menu. For details, refer to the "GX Developer Operating Manual (Structured Text)". 3 - 13 3 - 13 3 ST PROGRAMMING MELSOFT Converting (compiling) the ST program Changing the program created on the ST edit screen into a sequence program that can be executed by the PLC CPU is called convert (compile). Performing convert (compile) The convert (compile) operation method will be explained using the created program. 1) Click [Convert] the menu. [Convert/Compile] in Click. (1) At normal completion The following message is displayed. Convert (compile) is completed. Since the confirmation screen shown on the left is displayed, click the No button. If the Yes button is clicked, the "Comment data to be referred to (comment by program) does not exist" message may be displayed. At normal completion of convert (compile), the number of steps is displayed on the title bar. 3 - 14 3 - 14 3 ST PROGRAMMING MELSOFT (2) When error occurs The Compile error (Detail) dialog is displayed. Now, actually see the debugging operation at occurrence of a compile error. 1) Change the program so that a compile error will occur. Change Line 3 in List-2. RYOUHIN := 0; RYOUHIN : = 0. 0; Click [Convert] the menu. [Convert/Compile] in Change. 2) Perform convert (compile). Click. 3) A compile error occurs and the dialog is displayed. Confirm the error step/line and error definition. 4) Confirm the line on which the error has occurred. 1) Select the error definition with the mouse. 2) Click the Jump button. 1) Select. 2) Click. To next page 3 - 15 3 - 15 3 ST PROGRAMMING MELSOFT From previous page 5) Track down the cause and correct the faulty part. The error indication mark is displayed on the ST edit screen. Confirm the error definition and program contents, and correct the program. Correct Line 3 in List-2. good : = 0. 0; Error indication mark Click [Convert] the menu. good := 0; [Convert/Compile] in The error location and actually corrected part may be different. Identify the faulty part from the error definition displayed in the "Compile error (Detail)" dialog and the program contents of the line where the error indication mark is displayed. 3 - 16 3 - 16 4 READ/WRITE FROM/TO PLC CPU MELSOFT Chapter 4 explains the procedure to write the converted (compiled) sequence program to the PLC CPU and the procedure to read the sequence program from the PLC CPU. Performing write to PLC The operation method for write to PLC will be explained. Display the Write to PLC dialog and write the program and parameters to the PLC CPU. When performing write to PLC, put the PLC CPU in a STOP status. 1) Click. 1) Click [Online] menu. [Write to PLC] in the 4 4) Click. 3) Click. 2) Select the "Label program (ST, FB, structure)" check button in the <<File selection>> tab. When the check button is not selected, only the actual program is written. 3) Click "Param + Prog". 4) Click the Execute button. 2) Select. Reset the PLC CPU and put it in a RUN status. If an error occurs, choose [Diagnostics] [PLC diagnostics] in the menu of GX Developer, and confirm the error definition. 4-1 4-1 4 READ/WRITE FROM/TO PLC CPU MELSOFT Performing read from PLC The operation method for read from PLC will be explained. Display the Read from PLC dialog and read the program and parameters from the PLC CPU. 1) Click [Online] - [Read from PLC] in the menu. 1) Click. 2) Click "Param + Prog" in the <<File selection>> tab. 3) Click. 2) Click. 3) Click the [Execute] button. If an error occurs, choose [Diagnostics] - [PLC diagnostics] in the menu of GX Developer, and confirm the error definition. 4-2 4-2 4 5 DEBUGGING THE PROGRAM MELSOFT Chapter 5 explains the online debugging operation of the sequence program written to the PLC CPU using the monitor function and device test function. Monitoring the sequence program. Changing the bit device value and conducting a device test. Changing part of the sequence program and writing it to the PLC CPU in RUN status. 5.1 Monitoring the Sequence Program This section explains the operation method to monitor the sequence program. Displaying the monitor screen 1) Click [Online] [Monitor] monitor] in the menu. 5 [Start 1) Click. ST edit screen Monitor screen The labels displayed on the ST edit screen are displayed on the same lines of the monitor screen. 5-1 5-1 5 DEBUGGING THE PROGRAM MELSOFT 5.2 Device Test The value of the label (bit device/word device) in the PLC CPU can be changed directly. Here, the bit device value is changed to confirm the program behavior. Confirming the program behavior The operation to change the bit device value will be explained. [Debug] 1) Click [Online] test] in the menu. [Device 1) Click. Forcibly turn ON the label "Inspection" that represents the bit device. 5 2) Input " Inspection" into the bit device. 2) Enter "Inspection". 3) Click the FORCE ON button. 3) Click. To next page 5-2 5-2 5 DEBUGGING THE PROGRAM MELSOFT From previous page Make confirmation on the monitor screen. ON "good" value increases. Also change the other label values and confirm the program behavior. 5-3 5-3 5 DEBUGGING THE PROGRAM MELSOFT 5.3 Online Change When the PLC CPU is in a RUN status, part of the sequence program can be changed. This is called online change. Actually change part of the sequence program and perform online change. Changing part of the program and performing online change Change the calculation expression of "Yield" and perform online change. 1) Change part of the program. Yield := DINT_TO_REAL (good)/DINT_TO_REAL (good + Defective); Yield := (DINT_TO_REAL (good)/DINT_TO_REAL (good + Defective))*100.0; Changed. " " indicating the line to be online changed is displayed on the indicator bar of the target line. 2) Execute online change. [Convert/Compile Click [Convert] (Online change)] in the menu. Click. To next page 5-4 5-4 5 DEBUGGING THE PROGRAM MELSOFT From previous page 3) The confirmation message is displayed. Click the Yes button. 4) Online change is completed. Click the OK button. Reflected. " " that indicates the online change target line disappears. On the monitor screen, confirm that the present value of "Yield" has changed. 5-5 5-5 6 SAVING THE PROGRAM INTO THE PERSONAL COMPUTER MELSOFT In Chapter 6, the completed project is saved with a name. Saving the project Save the created project with a name. 1) Click [Project] menu. [Save as] in the 1) Click. 2) Input as follows. Drive/Path : C:\MELSEC Project name : SAMPLE_ST Title : work-check 3) Click the Save button. 3) Click. 6 2) Set these. The program created this time was saved as described below. Drive/Path : C:\MELSEC Project name : SAMPLE_ST Title :work-check This completes a series of operations from the creation of the new ST project to the input and online debugging of the program to the storage of the project. Fully understand the operations performed until now, and proceed to Chapter 8. 6-1 6-1 6 SAVING THE PROGRAM INTO THE PERSONAL COMPUTER MELSOFT MEMO 6 6-2 6-2 7 INTRODUCTION TO USEFUL FUNCTIONS FOR ST PROGRAM EDITING MELSOFT This chapter introduces useful functions for editing ST programs. For more information, refer to the "GX Developer Operating Manual (Structured Text)". (1) Window division Every time it is desired to confirm the contents midway through editing of a large program, it is troublesome to scroll the screen to see the program ... At such a time, use "Window division". Choosing [Window] [Divide into two] in the menu displays the screen in vertically divided windows. The divided windows can be scrolled/edited individually. (2) Bookmark When it is desired to jump to a specific line, it is troublesome to search the program from the beginning ... At such a time, use "Bookmark". Preset the bookmark by choosing [Find/Replace] [Bookmark setting/release] or [Find/Replace] [Find] "Set bookmark" in the menu. [Bookmark list] in the menu, any line can be selected from the Bookmark By choosing [Find/Replace] list dialog to make a jump to that line. (3) Display of label information It is desired to know the device assigned to the label ... At such a time, use "Label information". When the mouse pointer is placed on the label, Label name -> Label type -> Label comment -> Device is displayed in the tool tip format for at-a-glance confirmation of the contents. Note: Applicable to converted (compiled) programs. Confirmation can also be made by activating "Show assigned device" on the Local variables setting screen. (4) Select function It is desired to input the function whose name has been forgotten ... At such a time, use "Select function". Choosing [Edit] [Select function] displays the Select function dialog to allow the function name to be selected. Also, since the function argument type is displayed in the tool tip format when the function is inserted, the argument can be input with reference to that argument type. (5) Change of display color and font It is difficult to differentiate between the character strings on the edit screen since they have the same color, or it is desired to change the character size ... At such times, use "Change display color" or "Font". Choosing [Tools] [Change display color] in the menu displays the Change display color dialog to allow the comment, control syntax, character, label and background colors to be selected. Changing the display color improves readability. Choosing [Tools] [Font] in the menu displays the Font dialog to allow the font type, style and size to be selected. Making easy-to-use setting improves operability. 7-1 7-1 7 7 INTRODUCTION TO USEFUL FUNCTIONS FOR ST PROGRAM EDITING MELSOFT MEMO 7 7-2 7-2 8 ST PROGRAMMING APPLICATION (PASTING FB TO LADDER PROGRAM) MELSOFT Chapters 1 to 7 explained the basic operation methods and functions for creating ST programs. In Chapter 8, create a function block (FB) in ST language and paste it to a ladder program to create a program to be used. The main items to be explained in this chapter are as follows. Adding a new FB. Defining FB variables. Creating an ST program. Creating an FB in ST language. Using the ST-written FB in a main program. 8.1 Creating an FB An FB, where often used processings are predefined as parts, can be used in the necessary area of each program. Creating a new project Creating a new project The creation method of a new project to create a main program in ladder format will be explained. Click [Project] [New project] in the menu to display the New project dialog. 2) Click. 1) Enter as follows. PLC series PLC type Label setting Program type :QCPU (Q mode) :Q02(H) :Use label :Ladder 2) Click the OK button. 8 1) Set these. To next page 8-1 8-1 8 ST PROGRAMMING APPLICATION (PASTING FB TO LADDER PROGRAM) MELSOFT From previous page 3) A new project is created. Adding a new FB Adding an FB The operation method to add a new ST-written FB will be explained. 1) Right-click "Function Block" in the <<FB>> tab to display the menu. 1) Right-click. 8 To next page 8-2 8-2 8 ST PROGRAMMING APPLICATION (PASTING FB TO LADDER PROGRAM) MELSOFT From previous page 2) Click "New". 2) Click. Set the New dialog. 4) Click. 3) Enter as follows. Data type : Function Block Program type : ST Data name : CALCULAT Title : The yield is calculated 4) Click the OK button. 3) Set these. 5) Click the Yes button. 5) Click. To next page 8-3 8-3 8 ST PROGRAMMING APPLICATION (PASTING FB TO LADDER PROGRAM) MELSOFT From previous page 6) A new data name: CALCULAT is added. 8-4 8-4 8 ST PROGRAMMING APPLICATION (PASTING FB TO LADDER PROGRAM) MELSOFT Defining FB variables The labels used in the FB are called FB variables (FB labels). Displaying the FB variable (FB labels) setting screen Here, the operation method to define FB variables (FB labels) will be explained. 1) Double-click "Header" in the <<FB>> tab. 2) The FB variable (FB labels) setting screen is displayed. 8-5 8-5 8 ST PROGRAMMING APPLICATION (PASTING FB TO LADDER PROGRAM) MELSOFT Setting the FB variables (FB labels) 1) Select the Input/Output type. Select the label type. There are the following four types. VAR_INPUT ......... Variable input from FB outside VAR_OUTPUT..... Variable output to FB outside VAR_IN_OUT....... Variable having the input and output functions "Blank" .................. Variable used in FB inside 2) Enter the label name. Enter the label name within 16 characters. To next page 8-6 8-6 8 ST PROGRAMMING APPLICATION (PASTING FB TO LADDER PROGRAM) MELSOFT From previous page 3) Enter the device type. Enter it directly or make selection from the list box. 4) Enter a comment into the label. Set it within 64 characters. 5) After input is complete, click the Register button. To next page 8-7 8-7 8 ST PROGRAMMING APPLICATION (PASTING FB TO LADDER PROGRAM) MELSOFT From previous page Click the OK button. Registration is completed. Click the OK button. When registration is made, " " displayed on the title bar disappears. REMARK For details, refer to the "GX Developer Operating Manual (Function Block)" given in Relevant Manuals. 8-8 8-8 8 ST PROGRAMMING APPLICATION (PASTING FB TO LADDER PROGRAM) MELSOFT Creating an FB in ST language The operation to input the program in List-3 will be explained. List-3 YIELD_OUT := DINT_TO_REAL(GOOD_IN)/DINT_TO_REAL(GOON_IN + DEFECTIVE_IN); Displaying the FB definition screen 1) Double-click "Body". 1) Double-click. 2) The FB definition screen is displayed. 8-9 8-9 8 ST PROGRAMMING APPLICATION (PASTING FB TO LADDER PROGRAM) MELSOFT Inputting the program Input the FB program body as in the method of inputting the main program described in Chapter 3. Input the program in List-3. Converting (compiling) the FB Click [Convert] [Convert/Compile] in the menu to perform convert (compile). Compile processing is completed. Click the OK button. At normal completion of convert (compile), the number of steps is displayed on the title bar. 8 - 10 8 - 10 8 ST PROGRAMMING APPLICATION (PASTING FB TO LADDER PROGRAM) MELSOFT 8.2 Pasting the FB to a Main Program Create a main program (ladder) using the FB created in Section 8.1. Defining the local variables Define the labels used in the main program. Displaying the Local variables setting screen 1) Double-click "Header". 1) Double-click. 2) Local variable setting screen is displayed. 8 - 11 8 - 11 8 ST PROGRAMMING APPLICATION (PASTING FB TO LADDER PROGRAM) MELSOFT Setting the local variables (headers) Refer to Chapter 3 and make setting as follows. After input is complete, click the Register button. The registration of the local variables is completed. Click the OK button. When registration is made, " " displayed on the title bar disappears. 8 - 12 8 - 12 8 ST PROGRAMMING APPLICATION (PASTING FB TO LADDER PROGRAM) MELSOFT Creating a main program Display the main program edit screen and input the following program (List-4). List-4 Displaying the edit screen Double-click "Body" in the <<Project>> tab to display the edit screen. To next page 8 - 13 8 - 13 8 ST PROGRAMMING APPLICATION (PASTING FB TO LADDER PROGRAM) MELSOFT From previous page Inputting the program in ladder format Refer to the following diagram and input the program. Pasting the FB Switch to the <<FB>> tab, and drag and drop the FB program to the target place. The FB is inserted into the main program. To next page 8 - 14 8 - 14 8 ST PROGRAMMING APPLICATION (PASTING FB TO LADDER PROGRAM) MELSOFT From previous page Inputting the input ladder section and output ladder section Refer to the following diagram, and input the input ladder section and output ladder section. Input ladder section Output ladder section Performing convert (compile) Click [Convert] [Convert/Compile] in the menu to perform convert (compile). Convert (compile) is completed. Click the No button. When convert (compile) is completed, the number of steps is displayed on the title bar. 8 - 15 8 - 15 8 ST PROGRAMMING APPLICATION (PASTING FB TO LADDER PROGRAM) MELSOFT 8.3 Online Write the sequence program to the PLC CPU, and confirm the program behavior using the monitor function and device test function. Writing to PLC CPU Performing write to PLC Refer to Chapter 4 and perform write to PLC. Choose [Online] [Write to PLC] in the menu to display the Write to PLC dialog. When performing write to PLC, put the PLC CPU in a STOP status. 3) Click. 2) Click. 1) Choose the "Label program (ST, FB, structure)" check button in the <<File selection>> tab. If the check button is not chosen, only the actual program is written. 2) Click "Param + Prog". 3) Click the Execute button. 1) Select. 3) Write to PLC is completed. Reset the PLC CPU and put it in a RUN status. If an error occurs, choose [Diagnostics] [PLC diagnostics] in the menu of GX Developer, and confirm the error definition. 8 - 16 8 - 16 8 ST PROGRAMMING APPLICATION (PASTING FB TO LADDER PROGRAM) MELSOFT Monitoring the sequence program Monitor and confirm the sequence program. The monitor start/stop operation is as follows. When starting monitor [Online] [Monitor] [Monitor mode] When stopping monitor [Online] [Monitor] [Stop monitor] When resuming monitor [Online] [Monitor] [Start monitor] Monitor display Comment display The comments set on the Local variables setting screen can be displayed by choosing [View] [Comment] in the menu. 8 - 17 8 - 17 8 ST PROGRAMMING APPLICATION (PASTING FB TO LADDER PROGRAM) MELSOFT Confirming the program behavior Change the value of the bit device in the PLC CPU and confirm the program behavior. Conducting a device test Refer to Section 5.2 and change the value of the bit device. [Debug] [Device test] in the menu to display the Device test dialog. Choose [Online] 1) Input "Inspection" into the bit device. 1) Input "Inspection". 2) Click the FORCE ON button. 2) Click. 3) Check that the program is running correctly. ON 8 - 18 "good" value increases. Also change the other label values and confirm the program behavior. 8 - 18 8 ST PROGRAMMING APPLICATION (PASTING FB TO LADDER PROGRAM) MELSOFT Saving the project Refer to Section 6 and save the created project with a name. Click [Project] [Save as] in the menu to display the Save the project with a new name dialog. 1) Enter as follows. Drive/Path : C:\MELSEC Project name : SAMPLE_FBST Title : FB is used and calculated. 2) Click the Save button. 2) Click. 1) Set these. The program created this time was saved as described below. Drive/Path : C:\MELSEC Project name : SAMPLE_FBST Title : FB is used and calculated This ends the explanation of a series of operation methods for program creation. To further proceed to the next step, it is recommended to refer to the manuals given in the section "Relevant Manuals". 8 - 19 8 - 19 8 ST PROGRAMMING APPLICATION (PASTING FB TO LADDER PROGRAM) MELSOFT MEMO 8 - 20 8 - 20 INDEX Ind [A] Adding an FB.................................................. 8- 2 Alarm history display function ....................... 6-16 Alarm list display function System alarm............................................. 6-19 User alarm ................................................. 6-18 [M] Monitor Monitoring the Sequence Program ........................................................... 5- 1, 8-17 [O] Online change.................................................5- 4 [C] Convert (compile) Converting (compiling) the FB .................. 8-10 Error indication mark ................................. 3-16 Performing convert (compile).................... 3-14 The compile error (Detail) ......................... 3-15 What is convert (compile).......................... 3-14 [D] Device Test Confirming the program behavior ..... 5- 2, 8-18 Displaying the FB definition screen ............... 8- 9 Inputting the program ................................ 8-10 Displaying the FB variable screen ................. 8- 5 Displaying the ST edit screen ........................ 3- 9 [E] Editing Bookmark.................................................... 7- 1 Change of font ............................................ 7- 1 Change of display font................................ 7- 1 Display of label information ........................ 7- 1 Select function ............................................ 7- 1 Window division.......................................... 7- 1 [L] Label What does defining the labels mean ......... 3- 3 Local variable Displaying the setting screen ............ 3- 3, 8-11 Enter a comment into the label .................. 3- 5 Enter a device type..................................... 3- 5 Enter a label name ..................................... 3- 5 Setting the local variables ................. 3- 5, 8-12 Index - 1 [P] Pasting the FB ...............................................8-14 Performing read from PLC .............................4- 2 Performing write to PLC ....................... 4- 1, 8-16 Program Entering a comment...................................3-12 Entering a function .....................................3-11 Entering a label ..........................................3-10 Entering the characters...............................3- 9 Function argument .....................................3-12 Function selection function .............. 3- 11, 7- 1 Inputting the input ladder section and output ladder section ............................................ 8-15 Inputting the program in ladder format ......8-14 What should be noted during input.............3- 8 Project Creating a new project ................................8- 1 Creating a new ST project ..........................3- 1 Save as.............................................. 6- 1, 8-19 [S] Enter a comment into the label.......................8- 7 Enter the device type ......................................8- 7 Enter the label name.......................................8- 6 Select the Input/Output type...........................8- 6 Setting the FB variables .................................8- 6 [W] What is a function block (FB) What is a function block (FB)......................8- 1 What is the ST language ................................1- 1 Index - 1 MEMO Ind Index - 2 Index - 2 MITSUBISHI ELECTRIC HEADQUARTERS EUROPEAN REPRESENTATIVES EUROPEAN REPRESENTATIVES EUROPEAN REPRESENTATIVES MITSUBISHI ELECTRIC EUROPE EUROPE B.V. German Branch Gothaer Straße 8 D-40880 Ratingen Phone: +49 (0) 21 02 / 486-0 Fax: +49 (0) 21 02 / 4 86-11 20 e mail: [email protected] MITSUBISHI ELECTRIC FRANCE EUROPE B.V. French Branch 25, Boulevard des Bouvets F-92741 Nanterre Cedex Phone: +33 1 55 68 55 68 Fax: +33 1 55 68 56 85 e mail: [email protected] MITSUBISHI ELECTRIC UK EUROPE B.V. UK Branch Travellers Lane GB-Hatfield Herts. AL10 8 XB Phone: +44 (0) 1707 / 27 61 00 Fax: +44 (0) 1707 / 27 86 95 MITSUBISHI ELECTRIC ITALY EUROPE B.V. Italian Branch Via Paracelso 12 I-20041 Agrate Brianza (MI) Phone: +39 039 6053 1 Fax: +39 039 6053 312 e mail: [email protected] MITSUBISHI ELECTRIC SPAIN EUROPE B.V. Spanish Branch Carretera de Rubí 76-80 E-08190 Sant Cugat del Vallés Phone: +34 9 3 / 565 3131 Fax: +34 9 3 / 589 2948 e mail: [email protected] MITSUBISHI ELECTRIC JAPAN CORPORATION Office Tower “Z” 14 F 8-12,1 chome, Harumi Chuo-Ku Tokyo 104-6212 Phone: +81 3 6221 6060 Fax: +81 3 6221 6075 MITSUBISHI ELECTRIC USA AUTOMATION 500 Corporate Woods Parkway Vernon Hills, IL 60061 Phone: +1 847 / 478 21 00 Fax: +1 847 / 478 22 83 GEVA AUSTRIA Wiener Straße 89 A-2500 Baden Phone: +43 (0) 2252 / 85 55 20 Fax: +43 (0) 2252 / 488 60 e mail: [email protected] TEHNIKON BELARUS Oktjabrskaya 16/5, Ap 704 BY-220030 Minsk Phone: +375 (0) 17 / 22 75 704 Fax: +375 (0) 17 / 22 76 669 e mail: [email protected] Getronics b.v. BELGIUM Control Systems Pontbeeklaan 43 B-1731 Asse-Zellik Phone: +32 (0) 2 / 467 17 51 Fax: +32 (0) 2 / 467 17 45 e mail: [email protected] TELECON CO. BULGARIA 4, A. Ljapchev Blvd. BG-1756 Sofia Phone: +359 (0) 2 / 97 44 05 8 Fax: +359 (0) 2 / 97 44 06 1 e mail: — INEA CR d.o.o. CROATIA Drvinje 63 HR-10000 Zagreb Phone: +385 (0) 1 / 36 67 140 Fax: +385 (0) 1 / 36 67 140 e mail: — AutoCont CZECHIA Control Systems s.r.o. Nemocnicni 12 CZ-702 00 Ostrava 2 Phone: +420 59 / 6152 111 Fax: +420 59 / 6152 562 e mail: [email protected] louis poulsen DENMARK industri & automation Geminivej 32 DK-2670 Greve Phone: +45 (0) 43 / 95 95 95 Fax: +45 (0) 43 / 95 95 91 e mail: [email protected] UTU Elektrotehnika AS ESTONIA Pärnu mnt.160i EE-11317 Tallinn Phone: +372 (0) 6 / 51 72 80 Fax: +372 (0) 6 / 51 72 88 e mail: [email protected] Beijer Electronics OY FINLAND Ansatie 6a FIN-01740 Vantaa Phone: +358 (0) 9 / 886 77 500 Fax: +358 (0) 9 / 886 77 555 e mail: [email protected] PROVENDOR OY FINLAND Teljänkatu 8 A 3 FIN-28130 Pori Phone: +358 (0) 2 / 522 3300 Fax: +358 (0) 2 / 522 3322 e mail: — UTECO A.B.E.E. GREECE 5, Mavrogenous Str. GR-18542 Piraeus Phone: +302 (0) 10 / 42 10 050 Fax: +302 (0) 10 / 42 12 033 e mail: [email protected] Meltrade Automatika Kft. HUNGARY 55, Harmat St. HU-1105 Budapest Phone: +36 (0)1 / 2605 602 Fax: +36 (0)1 / 2605 602 e mail: [email protected] MITSUBISHI ELECTRIC IRELAND EUROPE B.V. – Irish Branch Westgate Business Park IRL-Dublin 24 Phone: +353 (0) 1 / 419 88 00 Fax: +353 (0) 1 / 419 88 90 e mail: [email protected] SIA POWEL LATVIA Lienes iela 28 LV-1009 Riga Phone: +371 784 / 22 80 Fax: +371 784 / 22 81 e mail: [email protected] UAB UTU POWEL LITHUANIA Savanoriu pr. 187 LT-2053 Vilnius Phone: +370 (0) 52323-101 Fax: +370 (0) 52322-980 e mail: [email protected] INTEHSIS SRL MOLDOVA Cuza-Voda 36/1-81 MD-2061 Chisinau Phone: +373 (0)2 / 562 263 Fax: +373 (0)2 / 562 263 e mail: [email protected] Getronics b.v. NETHERLANDS Control Systems Donauweg 2 B NL-1043 AJ Amsterdam Phone: +31 (0) 20 / 587 67 00 Fax: +31 (0) 20 / 587 68 39 e mail: [email protected] Beijer Electronics AS NORWAY Teglverksveien 1 N-3002 Drammen Phone: +47 (0) 32 / 24 30 00 Fax: +47 (0) 32 / 84 85 77 e mail: [email protected] MPL Technology Sp. z o.o. POLAND ul. Sliczna 36 PL-31-444 Kraków Phone: +48 (0) 12 / 632 28 85 Fax: +48 (0) 12 / 632 47 82 e mail: [email protected] Sirius Trading & Services srl ROMANIA Bd. Lacul Tei nr. 1 B RO-72301 Bucuresti 2 Phone: +40 (0) 21 / 201 7147 Fax: +40 (0) 21 / 201 7148 e mail: [email protected] ACP Autocomp a.s. SLOVAKIA Chalupkova 7 SK-81109 Bratislava Phone: +421 (02) / 5292-22 54, 55 Fax: +421 (02) / 5292-22 48 e mail: [email protected] INEA d.o.o. SLOVENIA Stegne 11 SI-1000 Ljubljana Phone: +386 (0) 1-513 8100 Fax: +386 (0) 1-513 8170 e mail: [email protected] Beijer Electronics AB SWEDEN Box 426 S-20124 Malmö Phone: +46 (0) 40 / 35 86 00 Fax: +46 (0) 40 / 35 86 02 e mail: [email protected] ECONOTEC AG SWITZERLAND Postfach 282 CH-8309 Nürensdorf Phone: +41 (0) 1 / 838 48 11 Fax: +41 (0) 1 / 838 48 12 e mail: [email protected] GTS TURKEY Darülaceze Cad. No. 43 KAT: 2 TR-80270 Okmeydani-Istanbul Phone: +90 (0) 212 / 320 1640 Fax: +90 (0) 212 / 320 1649 e mail: [email protected] CSC Automation Ltd. UKRAINE 15, M. Raskova St., Fl. 10, Office 1010 UA-02002 Kiev Phone: +380 (0) 44 / 238-83-16 Fax: +380 (0) 44 / 238-83-17 e mail: [email protected] MITSUBISHI ELECTRIC Gothaer Strasse 8 Phone: +49 2102 486-0 D-40880 Ratingen Hotline: +49 1805 000-765 AFRICAN REPRESENTATIVE CBI Ltd SOUTH AFRICA Private Bag 2016 ZA-1600 Isando Phone: +27 (0) 11/ 928 2000 Fax: +27 (0) 11/ 392 2354 e mail: [email protected] MIDDLE EAST REPRESENTATIVE TEXEL Electronics LTD. ISRAEL Box 6272 IL-42160 Netanya Phone: +972 (0) 9 / 863 08 91 Fax: +972 (0) 9 / 885 24 30 e mail: [email protected] AVTOMATIKA SEVER RUSSIA Krapivnij Per. 5, Of. 402 RU-194044 St Petersburg Phone: +7 812 / 1183 238 Fax: +7 812 / 3039 648 e mail: [email protected] CONSYS RUSSIA Promyshlennaya St. 42 RU-198099 St Petersburg Phone: +7 812 / 325 36 53 Fax: +7 812 / 325 36 53 e mail: [email protected] ELEKTROSTYLE RUSSIA Ul Garschina 11 RU-140070 Moscowskaja Oblast Phone: +7 095/ 261 3808 Fax: +7 095/ 261 3808 e mail: — ICOS RUSSIA Industrial Computer Systems Zao Ryazanskij Prospekt 8a, Office 100 RU-109428 Moscow Phone: +7 095 / 232 - 0207 Fax: +7 095 / 232 - 0327 e mail: [email protected] NPP Uralelektra RUSSIA Sverdlova 11a RU-620027 Ekaterinburg Phone: +7 34 32 / 53 27 45 Fax: +7 34 32 / 53 27 45 e mail: [email protected] STC Drive Technique RUSSIA Poslannikov Per. 9, str.1 RU-107005 Moscow Phone: +7 095 / 786 21 00 Fax: +7 095 / 786 21 01 e mail: [email protected] INDUSTRIAL AUTOMATION Fax: +49 2102 486-7170 www.mitsubishi-automation.de [email protected] www.mitsubishi-automation.com PLC07/03 - Printed in Germany EURASIAN REPRESENTATIVE