1
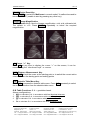
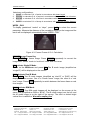
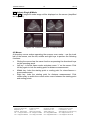
1609899 Multiscan
1
1-Nov-06
1609899
Multiscan
Schippers Europe BV
Bleijenhoek 17
5531 BK
Bladel
Phone: +31 (0) 497 339774
Fax: +31 (0) 497 339779
Schippers Bladel BV
Bleijenhoek 17
5531 BK Bladel (NL)
Tel: +31(0)497-339771
Fax: +31(0)497-382096
Schippers BVBA
Grens 114
2370 Arendonk (B)
Tel: +32(0)14-672356
Fax:+32(0)14-672285
Schippers GMBH
Kölnerstrasse 62
47647 Kerken (D)
Tel: +49(0)2833-92360
Fax:+49(0)2833-923611
Schippers France SARL
La Martinière – BP10
35310 Bréal sous Montfort (F)
Tel: +33(0)2.99.85.47.47
Fax:+33(0)2.99.85.47.48
1609899 Multiscan
2
1-Nov-06
Contents
Chapter 1 Overview.......................................................................................... 3
1.1 Features ....................................................................................................... 3
1.2 Application Range ........................................................................................ 3
1.3 Manufacturing Standards.............................................................................. 3
Chapter 2 System Introduction ....................................................................... 4
2.1 Outline .......................................................................................................... 4
2.2 Technical Specification ................................................................................. 5
2.3 Schematic Diagram ...................................................................................... 6
2.4 Basic Principles ............................................................................................ 6
Chapter 3 Installation ....................................................................................... 7
3.1 Environmental Requirements ....................................................................... 7
3.2 Unpacking .................................................................................................... 7
3.3 Installation .................................................................................................... 7
3.4 Charging the Battery Pack............................................................................ 9
Chapter 4 Operating Panel + Mouse ............................................................. 10
4.1 Operating Panel ......................................................................................... 10
4.2 Mouse......................................................................................................... 13
Chapter 5 Operating Instructions ................................................................. 14
5.1 Power On ................................................................................................... 14
5.2 Scanning .................................................................................................... 14
5.3 Measurement ............................................................................................. 15
5.4 Data Input................................................................................................... 15
5.5 Photo Shots + Image Printing..................................................................... 16
5.6 Power Off ................................................................................................... 16
Chapter 6 Routine Maintenance.................................................................... 17
6.1 Power Supply ............................................................................................. 17
6.2 Display Unit ................................................................................................ 17
6.3 Probe.......................................................................................................... 17
6.4 Battery Information ..................................................................................... 18
Chapter 7 Transportation + Storage.............................................................. 19
7.1 Environmental Requirements for Transportation + Storage ........................ 19
7.2 Transportation ............................................................................................ 19
7.3 Storage ....................................................................................................... 19
Chapter 8 Troubleshooting............................................................................ 20
8.1 Examination................................................................................................ 20
8.2 Malfunction Solution ................................................................................... 20
Schippers Bladel BV
Bleijenhoek 17
5531 BK Bladel (NL)
Tel: +31(0)497-339771
Fax: +31(0)497-382096
Schippers BVBA
Grens 114
2370 Arendonk (B)
Tel: +32(0)14-672356
Fax:+32(0)14-672285
Schippers GMBH
Kölnerstrasse 62
47647 Kerken (D)
Tel: +49(0)2833-92360
Fax:+49(0)2833-923611
Schippers France SARL
La Martinière – BP10
35310 Bréal sous Montfort (F)
Tel: +33(0)2.99.85.47.47
Fax:+33(0)2.99.85.47.48
1609899 Multiscan
3
1-Nov-06
Chapter 1 Overview
1.1 Features
The Multiscan uses the latest micro computer technology: digital scanning
conversion (DSC), variable aperture, high dynamics, low noise, wide band
receiver, log compression, dynamic filtering and border imaging. These features
produce a clear, stable image with high resolution.
The main features of the Multiscan are:
•
Display modes: B, B+B, B+M, M
•
256 grey scale
•
Real time scanning or freeze frame for analysis
•
Soft-touch keyboard and mouse for fast, convenient and flexible operation
•
Hand-held display unit with plastic cover, TFT 5” LCD display and
detachable power supply
•
Filed Programmable Gate Arrays (FPGA) and Surface Mounted
Technology (SMT).
•
Integrated circuits making the system smaller and lighter
•
Conformation to latest standards for clinical safety and diagnosis
verification
1.2 Application Range
The Multiscan is suitable for use in hospitals and clinics for human liver, gall
bladder, spleen, kidney, pancreas, heart, bladder, uterus, etc investigations as
well as for similar veterinary applications.
1.3 Manufacturing Standards
The Multiscan has been designed and manufactured in accordance with
normal standards for electro-medical equipment. It carries the CE Mark.
The Multiscan displays the following symbols on the outside:
Type B equipment symbol
Class Ⅱ equipment symbol
Caution! Please refer to the user manual
Mains power On symbol
Mains power Off symbol
Schippers Bladel BV
Bleijenhoek 17
5531 BK Bladel (NL)
Tel: +31(0)497-339771
Fax: +31(0)497-382096
Schippers BVBA
Grens 114
2370 Arendonk (B)
Tel: +32(0)14-672356
Fax:+32(0)14-672285
Schippers GMBH
Kölnerstrasse 62
47647 Kerken (D)
Tel: +49(0)2833-92360
Fax:+49(0)2833-923611
Schippers France SARL
La Martinière – BP10
35310 Bréal sous Montfort (F)
Tel: +33(0)2.99.85.47.47
Fax:+33(0)2.99.85.47.48
1609899 Multiscan
4
1-Nov-06
Chapter 2 System Introduction
2.1 Outline
Figure 2-1. Front Panel
Figure 2-2. Side View
Figure 2-3. Bottom Surface
Schippers Bladel BV
Bleijenhoek 17
5531 BK Bladel (NL)
Tel: +31(0)497-339771
Fax: +31(0)497-382096
Schippers BVBA
Grens 114
2370 Arendonk (B)
Tel: +32(0)14-672356
Fax:+32(0)14-672285
Schippers GMBH
Kölnerstrasse 62
47647 Kerken (D)
Tel: +49(0)2833-92360
Fax:+49(0)2833-923611
Schippers France SARL
La Martinière – BP10
35310 Bréal sous Montfort (F)
Tel: +33(0)2.99.85.47.47
Fax:+33(0)2.99.85.47.48
1609899 Multiscan
5
1-Nov-06
Figure 2-4. Back Cover
2.2 Technical Specification
Model
Multiscan
Standard probe
5.0MHz mechanical sector scanner
Scanning depth
192 mm
Detection depth
≥140 mm
Resolution
Lateral
≤3 mm(depth≤80mm)
≤4 mm(80mm<depth≤130mm)
Geometric position precision (%)
Axial
≤2 mm(depth≤80mm)
Horizontal
≤20
Vertical
≤10
Monitor
TFT 5.0 inch LCD
Battery capacity
2200mAh, continuous use - 2.5 hours
Display mode
B; B+B; B+M; M
Image grey scale
256
Image magnification
×1.0, ×1.2, ×1.5, ×2.0
Measurement
Distance, circumference, area, heart rate
Data Input
ID, Age, Sex
Power consumption
17VA;
Power supply
DC 14V
AC-Adaptor
110V AC / 60Hz or 220V AC / 50-60Hz
Adaptor power
45VA
Weight
800g (hand-held display unit only)
Schippers Bladel BV
Bleijenhoek 17
5531 BK Bladel (NL)
Tel: +31(0)497-339771
Fax: +31(0)497-382096
Schippers BVBA
Grens 114
2370 Arendonk (B)
Tel: +32(0)14-672356
Fax:+32(0)14-672285
Schippers GMBH
Kölnerstrasse 62
47647 Kerken (D)
Tel: +49(0)2833-92360
Fax:+49(0)2833-923611
Schippers France SARL
La Martinière – BP10
35310 Bréal sous Montfort (F)
Tel: +33(0)2.99.85.47.47
Fax:+33(0)2.99.85.47.48
1609899 Multiscan
6
1-Nov-06
2.3 Schematic Diagram
Figure 2-1. Schematic Circuit Diagram
2.4 Basic Principles
The principles of B mode scanning are as follows: human/animal organs have
differing densities and ultrasound speeds, i.e. their level of acoustic impedance
varies (= average density x acoustic speed). The piezoelectric crystal
(transducer) is triggered by an electrical pulse to produce an ultrasound wave of
definite frequency. The ultrasound wave is transmitted into the body. An echo
wave is formed when the ultrasound wave passes through the surface of
different organs. These echoes, with different amplitudes, are received back via
the same transmitting transducer. The receiving echoes (acoustic energy) are
converted into electrical pulses. After the pulses are amplified, demodulated
and DSC, etc., a standard video signal is formed and a sectional image of the
organ is displayed on the monitor screen.
Schippers Bladel BV
Bleijenhoek 17
5531 BK Bladel (NL)
Tel: +31(0)497-339771
Fax: +31(0)497-382096
Schippers BVBA
Grens 114
2370 Arendonk (B)
Tel: +32(0)14-672356
Fax:+32(0)14-672285
Schippers GMBH
Kölnerstrasse 62
47647 Kerken (D)
Tel: +49(0)2833-92360
Fax:+49(0)2833-923611
Schippers France SARL
La Martinière – BP10
35310 Bréal sous Montfort (F)
Tel: +33(0)2.99.85.47.47
Fax:+33(0)2.99.85.47.48
1609899 Multiscan
7
1-Nov-06
Chapter 3 Installation
3.1 Environmental Requirements
Temperature: +5°C~+40°C
Humidity: <80%
Atmospheric pressure: 80kpa~106kpa
Power supply: AC 220V±22V, 50Hz/60Hz or AC 110V±11V, 60Hz;
Display unit: DC 14 V±0.5V
Keep the Multiscan away from powerful electrical fields, magnetic fields and
high voltage equipment. Keep the screen away from direct sunlight. Shading
the screen will improve image observation. Store the Multiscan in a well
ventilated, dry and dustproof environment.
3.2 Unpacking
Carefully unpack the Multiscan and check the contents in accordance with the
packing list, ensuring that there are no defective parts.
3.3 Installation
•
Check the power supply of the AC-adapter and make sure it is in the
proper range. Connect the power supply to the Multiscan. Making sure
the power is switched off (power light off), connect the 5-pin probe
connector to the Multiscan (the socket is located on the right hand side of
the scanner). Switch on the Multiscan.
Caution
Do not connect or disconnect the plug for the power supply whilst the
Multiscan is switched on. This could damage both the probe and the
scanner. Avoid repeated unplugging of the probe once it has been
connected to the scanner. This helps to prevent connection problems and
damage to the socket and plug.
Schippers Bladel BV
Bleijenhoek 17
5531 BK Bladel (NL)
Tel: +31(0)497-339771
Fax: +31(0)497-382096
Schippers BVBA
Grens 114
2370 Arendonk (B)
Tel: +32(0)14-672356
Fax:+32(0)14-672285
Schippers GMBH
Kölnerstrasse 62
47647 Kerken (D)
Tel: +49(0)2833-92360
Fax:+49(0)2833-923611
Schippers France SARL
La Martinière – BP10
35310 Bréal sous Montfort (F)
Tel: +33(0)2.99.85.47.47
Fax:+33(0)2.99.85.47.48
1609899 Multiscan
8
1-Nov-06
Figure 3-1. Attaching/Detaching Probe to Holder
•
Attaching/detaching the probe to the holder:
The Multiscan has a holder to safely secure the probe. To attach, press
the probe against the holder until it snaps into place. To detach, push the
probe upwards and take it out (See figure 3-1)
•
Detaching the battery pack from the display unit:
Remove the battery cover by sliding the release catch, and then take out
the battery pack (See figure 3-2)
Figure 3-2. Detaching the Battery Pack
Schippers Bladel BV
Bleijenhoek 17
5531 BK Bladel (NL)
Tel: +31(0)497-339771
Fax: +31(0)497-382096
Schippers BVBA
Grens 114
2370 Arendonk (B)
Tel: +32(0)14-672356
Fax:+32(0)14-672285
Schippers GMBH
Kölnerstrasse 62
47647 Kerken (D)
Tel: +49(0)2833-92360
Fax:+49(0)2833-923611
Schippers France SARL
La Martinière – BP10
35310 Bréal sous Montfort (F)
Tel: +33(0)2.99.85.47.47
Fax:+33(0)2.99.85.47.48
1609899 Multiscan
9
1-Nov-06
3.4 Charging the Battery Pack
There are two ways to charge the battery pack
(1 ) Charging via Display Unit
Make sure that the battery pack is in the display unit. Connect the power cord of
the “Input” port in the AC-adaptor to the power outlet, and then connect the
power cord of the “Output DC14V/3A” port in the AC-adaptor to the “DC 14V”
jack in the display unit. The 4 “Charge” indicators on the front panel will light up
and charging will begin.
(2) Charging via AC-Adaptor (optional)
Detach the battery pack from the display unit. Connect one end of the power
cord to the “Charge DC 12.6V/1A” port on the AC-adaptor, and the other end to
the “golden connector” on the battery pack. The “Charge” indicator on the
AC-adaptor will light up and charging will begin.
Note
The status of charging is indicated by:
On the Display Unit front panel:
a) 4 indicators pulsing continuously - battery not fully charged
b) 4 indicators alight simultaneously - battery fully charged (charge complete)
On the AC-adaptor:
a) Red light - battery not fully charged
b) Green light – battery fully charged (charge complete)
Caution
Do not use the “Output DC14V/3A” port and the “Charge DC12.6V/1A” port
on the AC-adaptor at the same time.
Schippers Bladel BV
Bleijenhoek 17
5531 BK Bladel (NL)
Tel: +31(0)497-339771
Fax: +31(0)497-382096
Schippers BVBA
Grens 114
2370 Arendonk (B)
Tel: +32(0)14-672356
Fax:+32(0)14-672285
Schippers GMBH
Kölnerstrasse 62
47647 Kerken (D)
Tel: +49(0)2833-92360
Fax:+49(0)2833-923611
Schippers France SARL
La Martinière – BP10
35310 Bréal sous Montfort (F)
Tel: +33(0)2.99.85.47.47
Fax:+33(0)2.99.85.47.48
1609899 Multiscan
10
1-Nov-06
Chapter 4 Operating Panel + Mouse
4.1 Operating Panel
Figure 4-1. Operating Panel
Key functions
The Multiscan has 2 operating modes:
1) Real-time scanning: selection of scanning modes (B and/or M modes).
2) Freeze frame: for measurements and data input
Numeric Characters + Directional Keys
Numeric characters are used for inputting data: ID number, age etc. You can
only activate numeric characters in “freeze frame” mode.
Directional keys are used for moving the measurement cursor.
CLS Graphics + Character Clear Key
Press CLS to clear all measurement traces, marks and characters (excludes
fixed characters and image).
NOTE Data Input Menu Key
Press NOTE to access the data input menu and to enter information such as ID
number, age, sex, etc.
Note
You can only activate NOTE in “freeze frame” mode (numeric key valid).
Schippers Bladel BV
Bleijenhoek 17
5531 BK Bladel (NL)
Tel: +31(0)497-339771
Fax: +31(0)497-382096
Schippers BVBA
Grens 114
2370 Arendonk (B)
Tel: +32(0)14-672356
Fax:+32(0)14-672285
Schippers GMBH
Kölnerstrasse 62
47647 Kerken (D)
Tel: +49(0)2833-92360
Fax:+49(0)2833-923611
Schippers France SARL
La Martinière – BP10
35310 Bréal sous Montfort (F)
Tel: +33(0)2.99.85.47.47
Fax:+33(0)2.99.85.47.48
1609899 Multiscan
11
1-Nov-06
RESET Device Reset Key
Press RESET to restart the Multiscan in normal mode if it malfunctions and/or
becomes “DEAD” (unable to start by pressing any other key).
ZOOM/1 Image Magnification
The Multiscan offers 4 levels of image magnification: ×1.0, ×1.2, ×1.5 and × 2.0.
The default is ×1.2. Press ZOOM/1 repeatedly to select the required
magnification.
Figure 4-2. 4 Levels of Image Magnification
+/2 Cursor “+” Key
Press +/2 at any time to display the cursor “+” on the screen; it can be
moved using the “directional keys” or mouse.
DIST Distance Measurement Key
Press DIST to lock the cursor at the starting point or to switch the current active
cursor between the starting point and ending points.
O.B. Obstetric Table Menu Key
Press O.B. to access the obstetric table menu. Press O.B. repeatedly to select
the required function from the obstetric table menu.
O.B. Table Functions: G. A. = gestational week
Human configurations:
1.
2.
3.
4.
BPD: to calculate G. A. in accordance with fetal biparietal diameter;
CRL: to calculate G. A. in accordance with crown-rump length;
GS: to calculate G. A. in accordance with gestational sac;
FL: to calculate G. A. in accordance with fetal thighbone length.
Schippers Bladel BV
Bleijenhoek 17
5531 BK Bladel (NL)
Tel: +31(0)497-339771
Fax: +31(0)497-382096
Schippers BVBA
Grens 114
2370 Arendonk (B)
Tel: +32(0)14-672356
Fax:+32(0)14-672285
Schippers GMBH
Kölnerstrasse 62
47647 Kerken (D)
Tel: +49(0)2833-92360
Fax:+49(0)2833-923611
Schippers France SARL
La Martinière – BP10
35310 Bréal sous Montfort (F)
Tel: +33(0)2.99.85.47.47
Fax:+33(0)2.99.85.47.48
1609899 Multiscan
12
1-Nov-06
Veterinary configurations:
1.
2.
3.
4.
SWINE: to calculate G. A. of swine In accordance with heart length
EQUINE: to calculate G. A. of equine in accordance with gestational sac diameter;
BOVINE: to calculate G. A. of bovine in accordance with body length;
SHEEP: to calculate G. A. of sheep in accordance with umbilicus to spine distance;
WEEK·DAY:
To display gestational “weeks” or “days”, press O. B. to select the correct
parameter. Measure the distance of the correlative region on the image and the
result will be displayed automatically below “WEEK·DAY”.
Figure 4-3. Freeze Frame of G. A. Calculation
FREEZE Image Freeze Key
Press FREEZE to freeze image. Press FREEZE repeatedly to convert the
image from “frozen” mode to “real time” mode and vise versa.
B/7 Activate Single B Mode
Switch on the Multiscan and press B/7. The B mode image (simplified as
“single B”) will be displayed on the screen.
B B/8 Activate Dual B Mode
Press B B/8. Two B mode images (simplified as “dual B” or “B+B”) will be
displayed on the screen. One is a “freeze frame” image; the other is a “real
time” image. Press B B/8 repeatedly to switch between the freeze frame or real
time images.
B M/9 Activate B/M Mode
Press B M/9. Two B/M mode images will be displayed on the screen at the
same time (simplified as “B/M or “B+M”). The B mode image is on the left, and
the M mode image is on the right of the screen. The solid or dotted bright
vertical line is called the “M mode sampling line”.
Schippers Bladel BV
Bleijenhoek 17
5531 BK Bladel (NL)
Tel: +31(0)497-339771
Fax: +31(0)497-382096
Schippers BVBA
Grens 114
2370 Arendonk (B)
Tel: +32(0)14-672356
Fax:+32(0)14-672285
Schippers GMBH
Kölnerstrasse 62
47647 Kerken (D)
Tel: +49(0)2833-92360
Fax:+49(0)2833-923611
Schippers France SARL
La Martinière – BP10
35310 Bréal sous Montfort (F)
Tel: +33(0)2.99.85.47.47
Fax:+33(0)2.99.85.47.48
1609899 Multiscan
13
1-Nov-06
M/0 Activate Single M Mode
Press M/0. A single M mode image will be displayed on the screen (simplified
as “single M”).
Figure 4-4. Freeze Frames of 4 Display Modes
4.2 Mouse
A three-key mouse makes operating the scanner even easier - use the track
ball of the mouse, and the left, middle and right keys to perform the following
functions:
•
Gliding the mouse has the same function as pressing the directional keys
on the operating panel
•
Left key - in freeze frame mode: activates cursor “+” on the screen. Click
left key again to lock the ending point for distance measurement.
•
Middle key: locks the starting point or ending point for circumference +
area measurement.
•
Right key: locks the starting point for distance measurement. Click
continuously to switch the current active cursor between the starting point
and ending points.
Schippers Bladel BV
Bleijenhoek 17
5531 BK Bladel (NL)
Tel: +31(0)497-339771
Fax: +31(0)497-382096
Schippers BVBA
Grens 114
2370 Arendonk (B)
Tel: +32(0)14-672356
Fax:+32(0)14-672285
Schippers GMBH
Kölnerstrasse 62
47647 Kerken (D)
Tel: +49(0)2833-92360
Fax:+49(0)2833-923611
Schippers France SARL
La Martinière – BP10
35310 Bréal sous Montfort (F)
Tel: +33(0)2.99.85.47.47
Fax:+33(0)2.99.85.47.48
1609899 Multiscan
14
1-Nov-06
Chapter 5 Operating Instructions
5.1 Power On
Turn the Multiscan on by pressing the power switch on the right side of the
display unit and the “power” indicator will light up. Pressing any key (except
RESET) will enter scanning mode, after the startup logo has appeared. Adjust
brightness, contrast and gain controls on the side of the mainframe to achieve
the best visual display.
Figure 5-1. Startup Logo
The number of “Voltage” indicators alight indicates the current working voltage
of the scanner. If less than 4 “Voltage” indicators light up when the scanner is
powered by the AC-adaptor, it means that the DC power voltage of the “Output
DC14V/3A” port is low. If all “Voltage” indicators go off, accompanied by a short
beep, when the scanner is powered by battery, it means that the battery is low
and needs to be recharged.
Caution
Do not cover the emission holes on the back of the display unit.
Note
The Multiscan automatically enters “power saving mode” (black screen)
after two minutes if there is no key operation in “freeze frame” mode or
startup interface. Pressing any key (except RESET), or moving the mouse,
will resume “normal mode”.
5.2 Scanning
Apply ultrasound transmission gel to the scanning area. Place the probe face
onto the body using only sufficient pressure to make a good contact with the
surface. Note: Be careful not to damage the probe. Adjust the position of the
probe so that both the cross audio and video image of the scan is on the screen.
Adjust the magnification, gain, brightness and contrast controls to obtain the
clearest image.
Schippers Bladel BV
Bleijenhoek 17
5531 BK Bladel (NL)
Tel: +31(0)497-339771
Fax: +31(0)497-382096
Schippers BVBA
Grens 114
2370 Arendonk (B)
Tel: +32(0)14-672356
Fax:+32(0)14-672285
Schippers GMBH
Kölnerstrasse 62
47647 Kerken (D)
Tel: +49(0)2833-92360
Fax:+49(0)2833-923611
Schippers France SARL
La Martinière – BP10
35310 Bréal sous Montfort (F)
Tel: +33(0)2.99.85.47.47
Fax:+33(0)2.99.85.47.48
1609899 Multiscan
15
1-Nov-06
5.3 Measurement
● Heart rate measurement (for “B/M” or “M” mode only)
In “B+M” or “M” mode, measure the distance between two wave crests of the
heart beat. The result will appear on the screen; EF indicates slope (mm/s), HR
indicates heart rate, T indicates time (ms).
● Distance measurement
“Left” click mouse to activate cursor “+”. Place the “+” at the start of the
measurement, “Right” click mouse to lock. Place the “+” at the end point of the
measurement (repeatedly “Right” click mouse to switch between the start and
ending points). “Left” click mouse to get distance value. Repeat the process to
obtain additional measurements.
● Circumference and area measurement
“Left” click mouse to activate cursor “+”. Move the “+” to the measurement
position. “Middle” click mouse to lock “+” at the starting point. Move the “+” to
circle the area of measurement. “Middle” click mouse to get the value. Repeat
the process to obtain additional measurements.
Note
In circumference and area measurement, when the trace is not totally
closed, the starting point and the ending points are automatically
connected to form the closed measurement trace.
5.4 Data Input
To input data, “freeze frame” image, and then press NOTE. Shift cursor to “ID”
and enter data – limit 6 numeral characters. After entering ID, the cursor will
shift to “AGE”, enter data – limit 3 numeral characters. After entering age, the
cursor will shift to “SEX”. Press M/0 to input female symbol, or press B M/9 to
input male symbol.
Pressing NOTE again will clear all input data.
Schippers Bladel BV
Bleijenhoek 17
5531 BK Bladel (NL)
Tel: +31(0)497-339771
Fax: +31(0)497-382096
Schippers BVBA
Grens 114
2370 Arendonk (B)
Tel: +32(0)14-672356
Fax:+32(0)14-672285
Schippers GMBH
Kölnerstrasse 62
47647 Kerken (D)
Tel: +49(0)2833-92360
Fax:+49(0)2833-923611
Schippers France SARL
La Martinière – BP10
35310 Bréal sous Montfort (F)
Tel: +33(0)2.99.85.47.47
Fax:+33(0)2.99.85.47.48
1609899 Multiscan
16
1-Nov-06
5.5 Photo Shots + Image Printing
• Photo Shots
Freeze frame image, then use Polaroid camera or digital camera to take photos.
• Image Printing
Connect “video out” of Multiscan to the video input on printer (connection cable
sold separately). Switch on power supply and operate printer in accordance
with the manufacturer’s instructions.
5.6 Power Off
Turn off the power supply switch. Disconnect the AC-adaptor if the scanner is
not being used for a long time.
Note
Do not disconnect or re-connect the power supply until the scanner has
shut down.
Wait 2 or 3 minutes before restarting the scanner.
Schippers Bladel BV
Bleijenhoek 17
5531 BK Bladel (NL)
Tel: +31(0)497-339771
Fax: +31(0)497-382096
Schippers BVBA
Grens 114
2370 Arendonk (B)
Tel: +32(0)14-672356
Fax:+32(0)14-672285
Schippers GMBH
Kölnerstrasse 62
47647 Kerken (D)
Tel: +49(0)2833-92360
Fax:+49(0)2833-923611
Schippers France SARL
La Martinière – BP10
35310 Bréal sous Montfort (F)
Tel: +33(0)2.99.85.47.47
Fax:+33(0)2.99.85.47.48
1609899 Multiscan
17
1-Nov-06
Chapter 6 Routine Maintenance
6.1 Power Supply
• Check the AC-adaptor power supply regularly. Do not use if voltage exceeds
the recommended rating (AC220V±22V, 50Hz).
• Examine the AC-adaptor cable and probe cable regularly. Replace
immediately if defective in any way.
6.2 Display Unit
• Operating conditions should be in accordance with the requirements detailed
under “3.1 Environmental Requirements”.
• Power off the display unit when cleaning. Use alcohol wipes to clean the
case and an air duster to clean inner parts.
• Do not power on or power off too quickly - wait for 2 or 3 minutes before
restarting the scanner.
If the Multiscan is not being used for a long period of time, re-pack it in its
original case. Store the scanner in accordance with the conditions detailed
under “7.1 Environmental Requirements for Transportation + Storage”.
6.3 Probe
• The probe is expensive and can be easily damaged - avoid knocking or
dropping the probe. After scanning, put the probe into its box and press
FREEZE to keep it in the “frozen” mode.
• Only use “Ultrasound Transmission Gel” as the coupling medium for the
probe.
• The probe itself is waterproof. It can be immersed in water in order to clean it
after use. However, the connector must be kept clear of water during
cleaning, and kept dry during use. Regularly check the body of the probe to
ensure there are no cracks through which liquid might enter.
• Examine the probe frequently to ensure that it is completely filled with oil,
without bubbles. Bubbles in the oil can occur, which will affect the image
quality. When there are bubbles, please contact your supplying dealer in
order to arrange for a repair to the probe.
• Cleaning, sterilization, and disinfection of probe:
After scanning, use alcohol wipes to clean, sterilize and disinfect the probe,
then return it to its box.
• Avoid unnecessary connection and disconnection of the probe to the display
unit in order to minimize possible damage to plugs and sockets.
Schippers Bladel BV
Bleijenhoek 17
5531 BK Bladel (NL)
Tel: +31(0)497-339771
Fax: +31(0)497-382096
Schippers BVBA
Grens 114
2370 Arendonk (B)
Tel: +32(0)14-672356
Fax:+32(0)14-672285
Schippers GMBH
Kölnerstrasse 62
47647 Kerken (D)
Tel: +49(0)2833-92360
Fax:+49(0)2833-923611
Schippers France SARL
La Martinière – BP10
35310 Bréal sous Montfort (F)
Tel: +33(0)2.99.85.47.47
Fax:+33(0)2.99.85.47.48
1609899 Multiscan
18
1-Nov-06
6.4 Battery Information
• The Multiscan is powered by a rechargeable polymer Li-ion battery.
• Please note, a new battery only reaches its optimum performance after 2 or 3
complete charge and discharge cycles.
• The battery can be charged and discharged hundreds of times but it will
eventually wear out. When the operating time (scanning time and standby
time) is noticeably shorter than normal, it is time to replace the battery.
• Use only batteries approved by the manufacturer of the Multiscan and only
recharge batteries with an AC-adaptor approved by the manufacturer. Unplug
the charger when not in use. Do not leave the battery connected to the
charger for longer than 3 days - overcharging may shorten its lifetime. If left
unused a fully charged battery will discharge itself over time.
• Temperature extremes can affect the ability of the battery to charge.
• Only use the battery for its intended purpose.
• Never use any charger or battery that is damaged.
• Do not short-circuit the battery. Accidental short circuiting can occur when a
metallic object, ie: coin, clip or pen, comes into direct contact with either the +
or - terminals (metal strips on the battery), for example when carrying a spare
battery. Short circuiting the terminals may damage the battery or the
connecting object.
• Leaving the battery in hot or cold places, such as in a closed car in summer or
winter conditions, will reduce its capacity and lifetime. Always try to keep the
battery between 15°C and 25°C (59°F and 77°F). Using an extremely hot or
cold battery in the scanner may temporarily cause it to malfunction, even if the
battery is fully charged. A battery's performance is particularly limited in
temperatures well below freezing.
• Do not dispose of batteries in a fire!
• Dispose of batteries according to local recycling regulations. Do not dispose
of batteries as household waste.
• Switch off the Multiscan before removing the battery.
Schippers Bladel BV
Bleijenhoek 17
5531 BK Bladel (NL)
Tel: +31(0)497-339771
Fax: +31(0)497-382096
Schippers BVBA
Grens 114
2370 Arendonk (B)
Tel: +32(0)14-672356
Fax:+32(0)14-672285
Schippers GMBH
Kölnerstrasse 62
47647 Kerken (D)
Tel: +49(0)2833-92360
Fax:+49(0)2833-923611
Schippers France SARL
La Martinière – BP10
35310 Bréal sous Montfort (F)
Tel: +33(0)2.99.85.47.47
Fax:+33(0)2.99.85.47.48
1609899 Multiscan
19
1-Nov-06
Chapter 7 Transportation + Storage
7.1 Environmental Requirements for Transportation + Storage
Environmental temperature: - 5˚C ~+55°C
Relative humidity: <80%
Atmospheric pressure: 80kpa~106kpa
7.2 Transportation
The Multiscan packaging is marked in accordance with the requirements of
GB191 ”Packing, Storage and Transportation Marks”. The packing box contains
shockproof protection for the Multiscan. The scanner packaging provides
adequate protection for transportation by road, rail, sea or air. Exposure to rain,
inversion and impact should be avoided.
The combination on the two locks of the carry case is set to “000” and locked in
place with a plastic protector strip. To set the lock to a chosen combination,
remove the plastic protector and slide the catch towards the middle of the case
(the opposite way to opening it). With the slider held in this position, select the
chosen combination by rotating the 3 wheels. Once the slider has been
released, the chosen number will be the combination required to open the catch.
Repeat the operation on each side of the case. Ensure that these numbers
are carefully noted.
7.3 Storage
• If the Multiscan has been stored for more than 6 months, remove the
scanner from the carry case and recharge it for 4 hours. Return the scanner
to the carry case in accordance with the instructions. Do not stack scanners
on top of one another or store them directly against the floor, wall or ceiling.
• Store in a well ventilated, dry and dustproof environment. Avoid direct
sunlight and caustic gas.
Schippers Bladel BV
Bleijenhoek 17
5531 BK Bladel (NL)
Tel: +31(0)497-339771
Fax: +31(0)497-382096
Schippers BVBA
Grens 114
2370 Arendonk (B)
Tel: +32(0)14-672356
Fax:+32(0)14-672285
Schippers GMBH
Kölnerstrasse 62
47647 Kerken (D)
Tel: +49(0)2833-92360
Fax:+49(0)2833-923611
Schippers France SARL
La Martinière – BP10
35310 Bréal sous Montfort (F)
Tel: +33(0)2.99.85.47.47
Fax:+33(0)2.99.85.47.48
1609899 Multiscan
20
1-Nov-06
Chapter 8 Troubleshooting
8.1 Examination
• Ensure the power supply is working normally. Make sure the power cable
has been connected to the display unit correctly and inserted into the electric
socket.
• Make sure the probe has been connected to the Multiscan correctly.
8.2 Malfunction Solution
No.
1
Malfunction symptom
The indicator light on the
AC-adaptor is not on.
2
The indicator light on the
display unit is not on.
3
Striations and snow appear on 1. Check the power supply of the
the screen.
AC-adaptor
2. Check the environment - make sure
there is no interference from nearby
electrical fields, magnetic fields or
high-tension equipment
3. Make sure the power supply and
probe plugs have been connected
correctly
The image is not clear.
1. Adjust gain control
2. Adjust brightness and contrast
controls
4
Schippers Bladel BV
Bleijenhoek 17
5531 BK Bladel (NL)
Tel: +31(0)497-339771
Fax: +31(0)497-382096
Schippers BVBA
Grens 114
2370 Arendonk (B)
Tel: +32(0)14-672356
Fax:+32(0)14-672285
Malfunction solution
1. Check the power supply
2. Check the cable and plug of the
AC-adaptor
1. Check the cable and plug
Schippers GMBH
Kölnerstrasse 62
47647 Kerken (D)
Tel: +49(0)2833-92360
Fax:+49(0)2833-923611
Schippers France SARL
La Martinière – BP10
35310 Bréal sous Montfort (F)
Tel: +33(0)2.99.85.47.47
Fax:+33(0)2.99.85.47.48