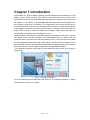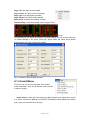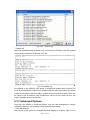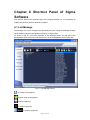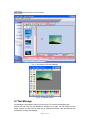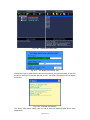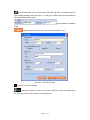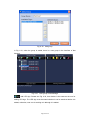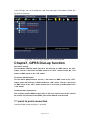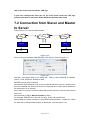
1
Sigma 3000
User’s manual
Version 4.1x
Table of Contents
Chapter 1 Introduction ...................................................................................................................1
Chapter 2 Sigma Editor .................................................................................................................2
2.1 Menu Bar.............................................................................................................................3
2.1.1 File Menu ...............................................................................................................3
2.1.2 Edit Menu...............................................................................................................7
2.1.3 Insert Menu............................................................................................................8
2.1.4 Help Menu ...........................................................................................................12
2.2 Tool Bar.............................................................................................................................13
2.3 Mode Bar...........................................................................................................................14
2.4 Editing Area ......................................................................................................................15
2.5 Status Bar ..........................................................................................................................15
Chapter 3 True Font Editor .........................................................................................................16
3.1 Menu Bar...........................................................................................................................16
3.1.1 File Menu .............................................................................................................16
3.1.2 Edit Menu.............................................................................................................16
3.1.3 Insert Menu..........................................................................................................17
3.1.4 Help Menu ...........................................................................................................17
3.2 Tool Bar.............................................................................................................................17
3.3 Mode Bar...........................................................................................................................18
3.4 Editing Area ......................................................................................................................18
3.5 Status Bar ..........................................................................................................................18
Chapter 4 Font Manager .............................................................................................................18
4.1 Menu Bar...........................................................................................................................19
4.1.1 File Menu .............................................................................................................19
4.1.2 Font List Menu ....................................................................................................22
4.1.3 Window Menu .....................................................................................................23
4.1.4 Help Menu ...........................................................................................................23
4.2 Tool Bar.............................................................................................................................23
4.3 Font List Bar .....................................................................................................................24
4.4 Shortcut Button .................................................................................................................24
4.5 Status Bar ..........................................................................................................................24
Chapter 5 Tools of Sigma Software ...........................................................................................25
5.1 File Menu ..........................................................................................................................25
5.1.1 Communication Setting .....................................................................................25
5.1.2 Operation of Play List.........................................................................................26
5.1.3 Change user........................................................................................................26
5.1.4 Log on to Hardware............................................................................................27
5.1.5 Others Operations ..............................................................................................27
5.2 Function Menu ..................................................................................................................27
5.2.1 Function of Play List...........................................................................................28
5.2.2 Function of Sign Play List..................................................................................28
5.2.3 Function of Backup/Recover.............................................................................28
5.2.4 Other Functions ..................................................................................................29
5.3 Tool Menu .........................................................................................................................32
5.3.1 Display Test .........................................................................................................32
5.3.2 Time Adjustment .................................................................................................32
5.3.3 Brightness Adjustment .......................................................................................33
5.3.4 Temp. Adjustment ...............................................................................................34
5.3.5 Default Display Setting ......................................................................................34
5.3.6 Information...........................................................................................................35
5.3.7 Advanced Options ..............................................................................................38
5.3.8 Display My Logo .................................................................................................41
5.3.9 over temperature computer shutdown ....................................................................42
5.3.10 Video Monitor ......................................................................................................42
5.3.11 Video to FLW Conversion Mode..................................................................43
5.3.10 FLW Editor.........................................................................................................45
5.3.13 Picture Resizer .................................................................................................50
5.3.14 COM TEST........................................................................................................50
5.3.15 Send Files Tool .................................................................................................52
5.3.16 Dial-up................................................................................................................55
5.3.17 Update................................................................................................................57
5.4 Help Menu.........................................................................................................................60
Chapter 6 Shortcut Panel of Sigma Software ..........................................................................61
6.1 List Manage.......................................................................................................................61
6.2 System Set.........................................................................................................................62
6.3 Simulator...........................................................................................................................67
6.4 File Schedule.....................................................................................................................68
6.5 File Manage.......................................................................................................................70
6.6 Picture Manage .................................................................................................................75
6.7 Net Manage .......................................................................................................................76
Chapte7, GPRS Dial-up function ...............................................................................................86
7.1 point to point connection...................................................................................................86
7.2 Connection from Slaver and Master to Server ..................................................................89
Chapter 8 Advanced ....................................................................................................................92
Chapter 9 Items for Your Attention..........................................................................................94
Chapter 1 Introduction
Sigma 3000 is a type of display software specially designed and developed for LED
display off-line control systems. This software is powerful with many function tools.
Sigma 3000 can be used to make NMG files and display the contents which would need
the support of a font library, or to make PMG files and display the dot matrix files which
don’t need the support of a font library. The software can also convert AVI/GIF files to
FLW animation files. Users can use the Sigma 3000 to check or modify the parameters
of the display, or use it to monitor the working status of the sign. At the same time, the
Sigma 3000 is also a wonderful display file manager, which allows the users to
schedule files and update their own display contents.
Users will see the following log-in interface whenever they open the software. There are
two default users under the software—The Administrator (short for Admin, with the
password “admin”) and the User (with the password “user”). Only the Admin can update
the sign parameters and change the configurations. General users are allowed just to
do the normal operation, like sending message files or programming the files/pictures.
But a user does not have the right to change any configuration/parameter.
In the following chapters, we will log-in as the Admin and get to know every usage of
Sigma 3000.
Fig. 1.1 The log-in interface
Input User Name and the password, and click OK. The following interface of Sigma
3000 will show up as Fig 1.2 shows.
Page 1 of 98
Fig. 1.2 Sigma 3000 Software Interface
As we can see from the above figure, there are 4 main parts that constitute Sigma’s
interface. ① is the menu bar, where the user can find all tools and functions. ② is the
panel of short-cut keys, where user can realize the setting and send all types of files.③
is the work area. ④ is the key editing area in Sigma, where all display control buttons
can be found here.
In the following chapters, we will separately introduce the usage and functions of the
software in Sigma; in chapter 2, we are going to talk about the Sigma Editor; in chapter
3, we will introduce True Font Editor; in Chapter 4, here comes the Font Manager; in
chapter 5, we will know how we can use the tools in Sigma; and in the final chapter 6,
we will tell the usage of the panel of short-cut keys and the rules to follow when using.
System platform:Windows 95, Windows 98, Windows 2000, Windows XP and Vista
System :CPU 500MHz, Memory 64M
Chapter 2 Sigma Editor
Sigma Editor, which has an independent version number, is professional and powerful
software that aims at editing and programming display files. Users can use the Sigma
Editor to send files to the LED sign after editing, or preview the files in the simulator.
With the help of the Sigma Editor, users can insert pictures to the sign, or make the
picture to be the background of other files. What is more, the functions of time
count-down and count-up can also be found in Editor.
Sigma Editor consists of 5 parts: ① menu bar; ② tool bar; ③Mode bard; ④Editing bard;
Page 2 of 98
⑤ Status bar.
To open Sigma Editor, users can do the following steps: Open Sigma Play. Click Tools
Æ Edit FileÆ Text File.
Fig. 2.1 Sigma Editor Interface
2.1 Menu Bar
2.1.1 File Menu
As Fig 2.2 shows, there are 8 items under the Menu File.
New: Open a new file;
Open: Open an NMG file;
Save: Save the file;
Save as: Save the file under the name…;
Communicate: The setup information of communicating between the computer and the
sign;
Send to sign: Send the edited files to the sign;
Exit: Exit Sigma Editor.
Page 3 of 98
Fig. 2.2 File Menu
Fig. 2.3 Communication Setting
As is seen from Fig 2.3, the communication interface tells us the following information:
current Trans Mode is Ethernet, IP address 169.254.10.160, Port 8887. Group address:
01. Unite address: 01. (Note: we will refer to the Group Address and the Unite
Address as GGUU in the following chapters. E.g.: 0102 means Group address 01,
Unite Address 02)
Here we need to know what Port, Group address and Unit Address are.
Now let’s get to know what Port is and what port is for first.
What is port?
We can say it in a simple way. Port is the pathway that enables the computer to
communicate with the outside world. Without port, the computer will be both deaf and
mute. Under the Internet language, Port has several meanings. It can refer to the port of
HUB, switchboard or router, like the RJ 45 COM PORT, SERIAL COM PORT. When we
are talking about the PORT here, we are not talking about its ordinary physical meaning;
we are talking about its logical meaning. Here Port refers to the port in the TCP/IP
protocol.
Then what is Port referring to under the TCP/ IP protocol?
Let’s say, we take the IP address as a house, then Port is the door of the house. Usually,
a real house can have no more than 10 doors, but for the IP address house, it can have
65536 doors. That is 65536 ports. Generally, we will mark these ports by the port serial
numbers, ranging from 0~65536.
What is port for?
As we know, a host computer can provide us many services—Web service, FTP, SMTP
etc. All those services can be realized though one IP address. Then how can the host
computer distinguish these different services? Apparently, using one IP address only is
impossible to realize so many services, because IP address and these services is not a
biunique relationship. In fact, the host computer distinguishes these services by “IP
address + Port serial number”.
As it is noticed to all of us, the Ports are not counterpart. For example, a user is visiting
a WWW service as a client computer. WWW service is using Port “80” to communicate
Page 4 of 98
with the user’s computer though Port “3457”, as Fig 2.4 shows. That is to say, WWW
service does not need to communicate with Port “80” in the user’s computer.
Fig. 2.4
Under the definition of counterpart protocol type, there are two types of Ports: TCP Port
and UDP Port. These two types of Ports are mutually independent, because the
protocols of TCP and UDP are separate. These two types of Ports do not have conflicts.
Either TCP or UDP has 235 Ports.
How do the Ports allocate?
Same as the IP address, we do not use Port randomly. When we allocate them, we are
following certain rules. There are several types of Ports according to classification
standard. Here would not explain all of the classifications in detail but the Well Known
Ports and the Dynamic Ports.
1. Well Known Ports
As the terms explains, Well Known Ports refer to the Ports that are known to all of us,
ranging from 0~1023. For example, when we type www.cce.com.ce in the address bar
of IE, we do not need to point out the Port series number. Usually, the default Port of
WWW service is “80”.
The web service can use other Ports to provide the service. If it is not the default Port
series number that is used, users should input the appointed Port series number in IE’
address bar. That is to say, users should add a COLON “:” (Semi-angel) + Port series
number in the end of the address bar. Here is an example; we will use “8080” as the
port of WWW service. In this case, we need to input “www.gonetn8.com
gonet8.com:8080”.
Please note that some of the Ports are fixed under certain protocols. They are not
allowed to be changed manually.
For example, Port 139 is fixed for the
communication between NetBIOS and TCP/IP.
2. Dynamic Ports
Dynamic Ports range from 1024~65535. Those Dynamic Ports are not fixed for any
certain service. They are dynamically allocated. Dynamic allocation means those ports
are temporary applied from the host computer. Let’s say, now there is a system program
or application program that is performing the network communication. Under such
circumstance, the program will apply a Port from the host computer. Then the host
computer allocates one Port to the program, and once the program is shutdown, the
Port will be released.
Now we can have a general idea of what Port is and what Port is for. Here Fig 2.5
shows how the Ports are used in an LED sign.
Page 5 of 98
Fig. 2.5 Drawing of the Port interface
As we can read from Fig 2.5, in inner-Net 2, 219.128.254.98 is the IP address of the
router. 169.254.19.84 is the IP address of the gateway. From the figure, we can see
that in Inner-Net 2, there are 4 dynamic ports –8000~8003, corresponding to the related
IP: 169.254.10.160~169.254.10.163 .
How can we control Sign 1 though PC1 in Inner-Net 1? Apparently, if we just input
169.254.10.160 to the interface of Fig 2.3, we will not be able to program Sign 1 by PC
1. Under such circumstance, we need to introduce an outside net in to connect the two
inner-nets.
So in Fig. 2.3, instead of inputting the IP address 169.254.10.160, we should input the
IP address of the router in Inner-Net 2----19.128.254.98, with the Port 8000 if we would
like to program Sign 1. If it is Sign 2 that we want, then we should input Port 8001. And
so on for Sign 3 and sign 4. Only the IP address of the router in Inner-Net 2 is
unchanged.
Here Fig.2.6 shows the setting of communicating Sign A with PC 1.
Fig. 2.6 Communication through an outside net
Now let’s get to know more about Group Address and Unit Address. As we explained in
the last chapter before, GG stands for Group Address, while UU stands for Unite
Address. With the help of GGUU, we can communicate with 99x99 LED signs.
Please note that 0000 means the broadcast address. If we are searching for one certain
Page 6 of 98
LED sign, we can use the broadcast address to communicate with other GGUU.
GGUU is meaningful to our management of the LED signs. For example, we can set up
the signs in the workshop as a group. In this case, all the signs in the workshop are with
the GG “01”. Every LED sign is a separate unit, with the UU ranging from 01~99. What
is more, we can set all the signs in the office as group 2, with GG 02, and different UU to
communicate with.
Under such circumstance, we can manage all the signs according to different groups.
Even with the same IP address, we can still tell the signs apart from the different
GGUU.
The other Trans Mode is serial port. As shown in Fig 2.7, Serial Port refers to COM 1 in
the computer, with GGUU 0101.
Sigma Play will check the Baud rate of the sign if Serial Port is used for the 1st time. The
communicating interface will disappear once the Serial Port receives the data back from
the sign, which means communication succeeds. Otherwise the software will tell that
communication failed.
Fig. 2.7 Serial Port Interface
2.1.2 Edit Menu
As show in Fig 2.8, most of the function is the same as
the tool bar.
Undo: Cancel the last operation
Cut: Cut chosen text or graphics in the editing area
Copy: Copy the chosen text or graphics in the editing area
Paste: Paste the chosen text or graphics to the editing area
shadow:You can add a box around a character
or some characters, but you cannot see the box unless in
simulator or display mode. The display effect is as in A1:
Select All: Choose all the content in the editing area
Delete Back Image: Delete the background picture in the
editing file.
Word Wrap: Automatic line-change
Page 7 of 98
Fig. 2.8 Edit Menu
Align Left: Text align left horizontally
Align Center: Text align center horizontally
Align right: Text align right horizontally
Align Vertical: Text align center vertically
Spell Check: Checking the spelling of words
Default setting: The default editing mode in Sigma Editor
Fig.A1
The following Fig 2.9 shows the interface of default setting. We can see that there are
12 default settings in the figure. Press OK, Sigma Editor will follow those default
settings when a new file is opened for editing.
Fig. 2.9 Default Display Setting Interface
2.1.3 Insert Menu
From Fig 2.10, we can see that there are 6 options
under Insert Menu. Here we will introduce the functions
of these 6 options.
Fig. 2.10 Insert
Insert Picture: Users can insert the picture (BMP format) to the editing area, as Fig
2.11 shows. Choose one BMP file, click OPEN. The BMP file will be added to the editing
area. Users can send the file to the sign.
Page 8 of 98
Fig. 2.11 Insert a picture
Fig. 2.12A
Fig. 2.12B Picture in the Editing area
As can be seen in Figure 2.11, if the inserted picture is larger in size than the size of the
LED screen, you will see a prompt asking you whether you want to stretch the picture
size to the LED screen size. If you press Yes, you will see the picture in Figure2.12B.
Insert Symbols: This function helps the user to insert some special symbols whenever
they need. Sometime we find that it is not that convenient to insert some special
symbols, because they can’t be found on the keyboard. That is why we need the
function of “Insert Symbols”. As shown in Fig 2.13, we can see the special symbols
and characters of font Normal130. The symbols and the characters vary with different
types of fonts.
Page 9 of 98
Fig. 2.13 Insert Symbols Interface
Insert Special Time, Date, etc.
With this function, users are able to insert time of different world time zones,
temperature, date, week, and humidity to the sign. Before inserting any time and date,
we should correct the time of the sign with the computer’s first, otherwise we might think
that there were some problem with the time. Before we insert humidity and temperature,
we also need to be sure that we already have the humidity and temperature sensor.
Otherwise, humidity and temperature will be shown as NA on the sign.
Special note: Even with the temperature and humidity sensor, when we insert temp &
humidity, it would be shown as NA in the editing area, but this would not affect the
information shown on the sign.
Fig. 2.14 Interface of inserting Time, date
Page 10 of 98
Insert Text File: This function enables the user to insert the txt. File directly without
inputting any message again to the editing area. Sigma Editor will paste the txt. File
directly to the editing area once the file is chosen. This function accelerates the
programming speed and reduces the inconvenience during programming.
As shown in Fig 2.15, click Open to choose the txt. File that we want.
Fig. 2.15 Interface of inserting txt. File
Insert Counter: With this function, users will be able to insert a counter, either
down-counter or up-counter. From Fig 2.16, we can see that in the counter interface, we
can count either time or objects. The coefficient of correlation rang from 0.1~999. We
can notice that there are two count types—counting up and counting down. We can
also choose to count by days, hours, or by seconds. Or we can choose to input %d(%of
days), %h(% of hours ), %s ( % of seconds) directly to the editing area.
What is coefficient of correlation?
For example, we set the coefficient as 100. If we would like to count down for 2 days
time, the coefficient will multiply the number, which makes 200. Only till the days
remains 1 day left then it makes the outcome 100.
Fig. 2.16 Insert counter interface
Insert Back Image
Page 11 of 98
With this function, users can find it convenient to edit and program the file with both text
and graphic. With this function, user is able to program the same content to every frame,
or set different background picture in each frame. Or users can even edit some text
suspending above the picture.
Here is an example, as shown in Fig 2.17. We now would like to choose one picture
(BMP file) as the background. We will see an interface asking us if we would like to set
for “All frame”, “Current frame” or “Select frame”. After we select the function that we
want, we can add some text to the back ground.
Fig. 2.17 Insert Back Image Interface
From Fig 2.18, we can see the effect of a file which is added with some text.
Special note: Only one display mode is available for the test that insert.
Fig. 2.18 Back-ground picture with text
2.1.4 Help Menu
In the Help Menu, we can find the version number of Sigma Editor, as Fig 2.19 shows.
Fig. 2.19
About Sigma Editor
Page 12 of 98
2.2 Tool Bar
There are several types of tools in Tool Bar: File tool, Color tool, Align tool and
other tool. Here we are going to introduce the usage of these several types of tools.
File Tools
: Open a new NMG file;
: Open the NMG files;
: Save the file;
Color Tools
: Palette of the font color;
: Back-ground palette of fonts;
: Back-ground palette of frame;
:Shadow;
Align Tools
: Horizontal left align;
: Horizontal center align;
: Horizontal right align;
: Vertical center align;
Other Tools
: Short cut key for sending files;
: Set flashing feature for a certain character or picture;
: Simulated display, as Fig 2.20 shows;
: Insert a title, as Fig 2.21 shows;
: choose the font type.
Page 13 of 98
Fig. 2.20 Simulated display
Fig. 2.21 Insert a title
2.3 Mode Bar
Fig 2.22 shows the Mode Selecting Bar in the Editor
Fig. 2.22
Mode Bar
In mode: The display mode of a file when it goes into the sign
Out mode: The display mode of a file when it goes out of the sign.
Speed: Display speed of each frame
Pause: Pause/hold time of each frame. Fig 2.23 shows the interface of Set Hold time.
We can see that the pause time of the in-mode can also be included. That is the pause
time = in mode time + out mode time.
Page 14 of 98
Fig. 2.23
Set hold time
Zooming: If the sign is too large, we can zoom the editing area in order to make the
program more convenient.
Line Space: Users can set the space of between 2 lines, with the Max value 9 and Min
value 0. The unit of the line space is by pixel.
Display mode: Only Jump out and chasing mode is available.
2.4 Editing Area
The Editing Area provides the users a platform to edit
the files and display the message. Users can perform
the operation like inserting picture, time, temperature,
humidity, text files, counter down and counter up etc. All
files that saved will be with the suffix name of NMG.
If we click the right key, we will see a Right-key menu,
as it is shown in Fig 2.24. We have introduced these
functions in the previous parts. This menu makes the
program more convenient and quicker.
2.5 Status Bar
Fig. 2.24 Shortcut Menu
Status Bar indicates the current information of the current editing file. For example:
means the current editing page and the position of the cursor.
indicates that the current editing file can be used for the sign
with 64 pixels height and 128 pixels wide.
Page 15 of 98
Chapter 3 True Font Editor
True Font Editor is a kind of editing tool for editing dot matrix files. The most obvious
advantage is that it can edit any font in the computer system and show them on the LED
display without downloading font list onto the display.
Fig 3.1 shows the process of opening
the True Font Editor.
Choose ToolÆEdit fileÆTrue Font file.
Fig 3.1 Choose dot matrix
As Fig 3.2 illustrates, True Font Editor has the same layout as Sigma Editor. 1--- Menu
Bar, 2---Tool Bar, 3---Mode Bar, 4---Edit Area, and 5---Status Bar. The following is the
introduction of their functions.
Fig. 3.2 True Font Editor Interface
3.1 Menu Bar
3.1.1 File Menu
Fig 3.3 shows the pull-down menu of File Menu, which has the
same functions as Sigma Editor. Please refer to the above Sigma
Editor for more information about Communicate setting and
Send to sign.
Fig. 3.3 File Menu
3.1.2 Edit Menu
Fig 3.4 is the pull-down menu of Edit Menu. Since it is simple,
it is quite easy to understand.
Page 16 of 98
LED Sign
3.1.3 Insert Menu
The Insert Menu has only one function--inserting pictures to edit area. The picture
format it supports are: BMP、JPG、JPEG and ICO. You can pull the pictures randomly to
change their sizes.
3.1.4 Help Menu
The Help Menu has only the version information about True Font Editor. See Fig 3.5.
Fig. 3.5 Version information about True Font Editor
3.2 Tool Bar
Tool Bar of True Font Editor can be divided into file tool, color tool, alignment tool and
other tools. All the tools in True Font Editor have almost the same function as those in
Sigma Editor except that True Font Editor doesn’t have frame back-ground color and
the button of headline choice.
Color tools:
: Foreground colors of characters
: Background color of characters
Other tools:
: Sending button, the same as Sigma Editor
: Font choosing tool, supporting fonts in the PC system
: Simulating button, the same as Sigma Editor
Fig 3.6 Font choosing
Page 17 of 98
3.3 Mode Bar
From Fig 3.7 we can see that the setting modes and their related functions are the
same as Sigma Editor’s, which include in mode, out mode, speed, pause and line
spacing. The only difference lies in the display time.
Fig. 3.7 Mode Bar
3.4 Editing Area
Different from Sigma Editor, True Font Editor doesn’t
regulate the boundary line to separate the editing information frame by frame. In the area, lines can be changed
automatically. The same as table editing in Word file, it
can enter another line to show a complete word.
If the words technology doesn’t enter lines automatically, then there will come several letters following
behind LTI LED. Thus, due to the automatic line
changing, there will come space of each line.
3.5 Status Bar
: The location of the cursor, in which line and which column
: In the status of editing information
: Size of panel, width: 128, height: 64.
Chapter 4 Font Manager
As Fig 4.1 shows, press Tool and then Font Manager to open the Font Manager
software.
Fig 4.2 is the interface of Font Manager, which is mainly made up of five parts:
1---Menu Bar, 2---Tool Bar, 3---Font List Bar, 4---Shortcut Button, The following is their
detailed functions.
Page 18 of 98
Fig. 4.2 Font Manager Interface
4.1 Menu Bar
4.1.1 File Menu
Fig 4.3 illustrates the pull-down menu of File Menu.
We will focus on some special functions.
New Font: It means a customized font based on user’s special
need and preference. Fig 4.4 is the interface of establishing new
font. Set the height and width of the font you want, and then
choose the saving path, you can create your own fonts now.
Suppose you want a font of 10dots height and 7 dots width, just
input the related information, choose saving path, and press button
Menu
OK. Fig 4.5 is the interface of customized font.
Page 19 of 98
Fig. 4.3 File
Fig 4.4 New font interface
41
Fig 4.5 Interface of customized font
There is a ruler of line and column in Fig 4.5. Actually it is the ASCII location of each
font you are creating. So the fonts should be established in accordance with ASCII
principle, otherwise you won’t get what you want through the input on the keyboard. In
ASCII code, the big letter A is at 0041(hexadecimal), so we can make a big letter A just
at this place. Double click the place of 0041, there will appear an editing interface like
Fig 4.6.
Fig 4.6 Font editing interface
Page 20 of 98
From Fig 4.6 we learn that the editing area is made up of 5 parts, 1--- Menu Bar,
2---Tool Bar, 3---Character Information, 4---System Font, 5---Font Editing Area.
Notes:
Menu Bar, Tool Bar are bonded together with the Font Manager, only partial functions
belong to this edit interface.
Area 3 shows the character information: font—10*7, ASCII code—0041H (H represents
Hexadecimal)
System font means users can create any fonts on the base of the current fonts in the
computer system. Press button OK after choosing a kind of font and you can download
the system font into the font editing area.
Font editing area: Click the left key of the mouse, the block will turn to black, and click
the right key, the block turns to white.
After editing your own font, you should save it and then exit.
Font Style: It is the tool to examine a certain font style in the font list. Fig 4.7 discloses
the way.
First choose a kind of font, Normal15, for example, and then choose the font style. Via
the following figure, we know that the font style is 15*8 Standard English Fonts. The
moment font style changes, the nature of the font varies. So we only recommend
checking here, no modification.
Fig 4.7 Font Style
For example:
Suppose we want to switch to Arial Font 16. We will open the font conversion dialogue
as shown in Fig 4.7. We select a font and size, and then a path to save the file. Then we
select a language.
Finally, we press the button
progress bar changing, and the button
and we will see the
changes to
. The
conversion is completed and you will see Figure 4.8, with the font file name being
Arial16.FNT. You can add it to the font library and send it to the LED screen.
Page 21 of 98
Figure 4.8 Conversion completed
Communication setting: Consult the counterpart in Chapter 2 Sigma Editor.
Font Conversion:
The function of this tool is to convert the font to be a FNT
format one in Font Manager which can be downloaded to the display. See Fig 4.8, the
converting interface. Choose a fixed font and size you want to change, and set the
saving path and the font size you want, press Convert button, then you can realize this
function.
Fig 4.8 Font Converting Interface
4.1.2 Font List Menu
See Fig 4.9, the pull down menu of font list menu, we will introduce
the functions and meanings.
Add: Add new font to the font list.
Delete: Delete font from the font list.
Edit: Edit the font in the font list.
Move Up: Move the chosen font up.
Move Down: Move the chosen font down.
Update Font List: Send the font list to the display.
Fig. 4.9 Font List Menu
Page 22 of 98
4.1.3 Window Menu
As Fig 4.10 shows, in the window menu, there are three functions: tile, cascade, and
arrange icons. The following is the window converting bar of the open font list. The
current chosen item is the first font list.
Fig 4.10 Window Menu
4.1.4 Help Menu
As Fig 4.11 shows, the help menu mainly gives the version information of Font
Manager.
Fig 4.11 About Font Manager
4.2 Tool Bar
The buttons here are the same as the ones in Menu bar.
: Open the font list file.
: Save the font list.
: Add the font to the font list.
: Edit the font in the font list.
: Examine the font style.
: Update the font list to the display
: Move down the chosen font.
: Move up the chosen font.
Page 23 of 98
: Exit from the Font Manager.
4.3 Font List Bar
Font list area shows the fonts users have added. If you want to
send some fonts to the display, you need to add those fonts to the
list. There is a right key menu of the font list bar. See Fig 4.12. The
function is the same as those pull down menu of the main menu.
Suppose we want to send the font file Normal5-40 to the LED screen. We
first add Normal5.fnt~Normal40.fnt to the font library. Then we click
Fig. 4.12 Shortcut Menu
and we will see a communication interface. We select a mode that is workable for the
LED screen, press the button OK, and we will see the progress bar moving towards
100%. If the data is sent, we will see the figures 4.13 and 4.14.
Figure 4.13 Font library being sent.
Figure 4.14 Data sent successfully
4.4 Shortcut Button
It is the repetition of the font list pull down menu. Being placed at the right side, users
can use it quickly.
4.5 Status Bar
Status bar gives related information with the chosen font.
:Width of the font is 9 dots.
:Height of the font is 15 dots.
Page 24 of 98
: Size of the font is 6588 byte. (About 6k).
Chapter 5 Tools of Sigma Software
In the first chapter we have divided the Sigma Software interface to four
parts, Menu Bar, Shortcut Panel, Work Station and Play Controller. We
will focus on Menu Bar’s function in this chapter.
5.1 File Menu
Fig 5.1 shows the pull down menu list of Sigma Play File
Menu.
5.1.1 Communication Setting
Fig 5.2 is communication setting interface which is the
same as the counterpart in chapter 2 in function except a
quick connection function.
Fig. 5.1 File Menu
Press the expansion button > to open the
connection displays. These items are searched
in the Net Manager. Only those displays that can
be searched in the Net Manager can be connected quickly. As Fig 5.3 shows, there are three
displays to be chosen from the connection list.
Choose any one and you can realize the communication with it.
If the display is found by Ethernet in Net
Manage, then the display will be connected by
network when connecting rapidly. If it is found
by serial port, then it will be connected via
serial port.
Fig. 5.2 Communication Setting
When connecting quickly, the related information about the display will be recorded
automatically.
So once the GGUU or IP address or other correlated information about the
communication changes, the seeking have to be executed once again. Or the quick
connection will fail.
Page 25 of 98
Fig. 5.3 Quick Connection Setting
5.1.2 Operation of Play List
There are six operating functions about the play list in the file menu. They are: New
Play List, Open Play list, Save Play List, Save the Play List as, Open the List File
Package, and Save List as well as File in a Package.
The final function means you can make a package for the chosen play list and its files in
order to make the saving convenient. So you can open the list file package to open it
when use next time. If you like, you can send it to other users to avoid unnecessary
trouble.
See Fig 5.4. When packing the play list and files into a package, there will popup a save
as window. Input Play-list in the file name bar and then press the Save button you can
finish packing the play list with format flf.
Fig 5.4 Packing play list
Note: Only after choosing a play list can you save the list and file in a package.
5.1.3 Change user
Fig 5.5 is the login interface from which you can change login users. The following
table shows the login way.
Page 26 of 98
Fig 5.5 Login interface
User rank
User name
Password
Manager
admin
admin
Ordinary user
user
user
5.1.4 Log on to Hardware
The login hardware mainly includes log on to hardware and logout. The function can be
set in the System Set panel. Once set, you have to choose Login on to Hardware to
communicate with the display hardware. In this way, you can avoid the parameter
changing by unprofessional persons or some illegal operations.
Fig 5.6 illustrates the login interface. The default user name is administrator and default
password 000000. Press OK, and the login is successful. See Fig 5.7.
Fig 5.6 Login on to hardware
Fig 5.7 Login successfully
5.1.5 Others Operations
The last two items about the file menu is language and exit.
Only English and Chinese is available.
5.2 Function Menu
Fig 5.8 is the pull-down menu of function
menu. We will divide them to several parts and
introduce them one by one.
Page 27 of 98
Fig. 5.8 Function Menu
5.2.1 Function of Play List
The four items above the separation line are
functions operated on play list. The first one is
add file to play list, the second one is delete file
from play list and the third one move up in play list, and the final move down in play list.
These functions are available only in list manage panel and simulating display panel.
5.2.2 Function of Sign Play List
The two items above the second separate line are deleting play list from sign and
deleting all messages in sign. After deleting the play list from sign, the display can show
all the files automatically on without the control of the play list. Fig 5.9 gives an
indication whether you are sure to delete the play list from the sign.
If you delete all messages in sign, then there is nothing left on the sign.
Fig 5.9 Hint of delete the play list from sign
Fig 5.10 Delete all messages from sign
5.2.3 Function of Backup/Recover
The two items of the third separate line are Backup System Files and Recover System
Files.
As shown in Fig 5.11, the indication window will appear when you choose to back up
system files, click Yes and it starts. In Fig5.12.The major files that can be backed up are
FPGA files, configuration information, r files and palette files and so on.
Fig. 5.11 Backup System File indication
Page 28 of 98
Fig. 5.12 Back up the system file
See Fig 5.13, when choosing Recover System Files, the indication window will appear,
and then you click Yes to start recovering system files.
In fact, the current CPU program has already backed up configuration files, Gamma
files and palette files, so that formatting Disk C will not erase system files, and the only
thing you need to do is refresh FPGA program.
Fig. 5.13
Recovering system files
5.2.4 Other Functions
The last three functions in this menu shall be explained as Other Functions.
The first of them is sending e-mail; this function enables the customers to send us email
about configuration information and system information of the sign. Both this function
and the next can be available only in the System Set panel. Then, the user just needs
to choose sending e-mail, and click Yes in the following window.
Fig. 5.13 Indication window of sending e-mail to us
With this function, we can get to know if there are problems with the system set at
customers’ end, or whether the system information is right or not, so that we can help
customers correct the mistakes. The Email is to be sent to our Supports’ mail box. More
Email settings can be done in ToolÆAdvanced OptionsÆE-Mail Setting. Customers
can choose the sender and the receiver of the E-Mail according to their need. When all
is set, the only thing left is to click OK, as shown in Fig 5.14.
Page 29 of 98
Imposa receiver
[email protected]
imposa@exemple
Imposa_customer
smtp.imposa.com
Fig. 5.14 E-Mail Setting
Next is to Save System Information. What is saved by this function is the information
the E-mail has sent. As shown in Fig 5.15, the path in the first blank is to save the
picture of the system set interface, the path in the second blank is to save the text file of
system set information.
Fig. 5.15 Save System Information
Click OK, and the following window as Fig.5.16 will appear when the saving finishes.
Page 30 of 98
Fig. 5.16 Saving finishes
As shown in Fig.5.17, it is the image of Sigma.jpg saved above.
Fig. 5.17 An image of Sigma.jpg
As shown in Fig.5.18, it is the interface of SysInfo.txe saved above.
Fig. 5.18 A grabbed image from SysInfo.txt
And the last function is Refreshing content. It is designed to send the information in the
current shortcut panel to the sign. This function equals to Send Configuration, Send List
Files, etc., but it is not available in Net Manage. Don’t use this function in Net Manage.
Page 31 of 98
5.3 Tool Menu
The Figure 5.19 is a pull-down menu of Tool menu.
Edit File and Font Manager have been introduced in
detail in previous Chapters, and please refer to the
previous explanation.
5.3.1 Display Test
Display Test is a special tool for screen test. It has
test of single color full-on, scan test and test of gradual
change of gray degree in single color. These tests can
check if the sign is working abnormally or has flashing pixels.
As shown in Fig 5.20, Display Test is consisted of two parts, the
left is General Test and the right is Gray Test. These tests are
carried out in the status of off-line, thus they are invalid in VGA screen. As for the Gray
Test, you can input any number from 1 to 256 into Gray Scale, and there are two styles
available, they are Color and Gradual Change. Color means the sign will be in only one
color you choose, and its brightness is decided by gray degree. And Gradual Change
means a static process of changing from bright gradually to less bright.
Fig. 5.20 Display Test
5.3.2 Time Adjustment
Fig 5.21 is an interface for Time Adjustment. As for the time in sign, we sometimes have
to adjust it to make it synchronized with the time in computer. Because there are
different time zones, and user should choose a right time zone before adjusting the
time.
This tool supports time adjustment of main board and slave board, i.e. if these two
boards are linked; only an adjustment to the main board will make the time in slave
board adjusted too.
Page 32 of 98
Fig. 5.21 Time Adjustment
5.3.3 Brightness Adjustment
Fig 5.22 is an interface for Brightness Adjustment. This tool enables you to set the
brightness of a small unit block so that you can have the white balance of a sign
coordinated. Detailed operations as following: first of all, select 4*8 blocks, you can
select one block at a time, or many blocks by means that indicated in the state bar
below. Then, in the right panel, you can set the value of brightness by clicking up or
down buttons, and also you can input numbers in to RGB blocks. When everything is
set, you just click Set to send the value of brightness to the sign.
Fig. 5.22 Brightness Adjustment
At the bottom of the right panel are tests of full Red, full Green, full Blue and full White
for the whole sign, which is for the sake of a comparison of brightness between
adjusted block and the whole sign.
Page 33 of 98
5.3.4 Temp. Adjustment
As shown in Fig 5.23, Temperature Adjustment can adjust the temperature of exterior
temperature sensor of LED sign, and you can adjust the temperature in Celsius or
Fahrenheit degree.
Fig. 5.23 Temp. Adjustment
5.3.5 Default Display Setting
Fig 5.24 is an interface of Default Display Setting. This tool is valid only to string
command, but not to files edited by Sigma Editor. This tool is different from the Default
Setting in Sigma Editor.
For example, after setting Default Display Setting, we send JetFile II command file to
the sign. The command is <0x01>Z00<0x02>AA<0x06>Welcome<0x04>, a simple
JetFile II command. When it is sent successfully, the sign will display Welcome, which is
displayed in accordance with the Default Display Setting. This means that Welcome has
a black Background Color, red Text Color, and it is saved in Folder T of Disk D, its
Default Font is Normal 7,In Mode and Out Mode Random, Speed Medium Fast, Pause
time on the sign 3 seconds, Hor Justification Center and so on.
If you change the Default Display Setting, the outcome of Welcome will change
accordingly. For example, if you set Default Font as Normal 14, Welcome will be
displayed in Normal 14.
Page 34 of 98
Fig. 5.24 Default Display Setting
Default Disk:
default saving path is Disk D;
Text Color:
default color of text file is Red
Background Color:
default background color of text file is Black
Default Font:
default font of text file is Normal 7.
Line spacing:
default line space is 1 pixel.
Word-wrap:
default value is ON
Time Format:
to set default time format. H: M means when time value is less
than10, 0 will not be displayed before the value; while HH: MM means 0 will be
displayed when time value is less than 10.
In Mode:
default In Mode is Random.
Out Mode:
default Out Model is Random
Speed:
default Speed is Fast.
Pause:
default Pause time is 3 seconds.
Hor Justification:
default horizontal justification is Center
Ver Justification:
default vertical justification is to Fill.
Save Play List:
to set default Disk for saving Play List, and the default Disk is Disk
C.
5.3.6 Information
There are five kinds of information in Information List, they are System Information, Disk
Information, Play Log, System Log and Update Log.
①System Information
Page 35 of 98
As shown in Fig 5.25, what is taken down is the information of the control board
QS5006 of the sign, and you can educe the information as a txt file.
Fig. 5.25 System Information
②Disk Information
As shown in Fig 5.25, it is specialized in reading the size of system Disk, and it can
format the partitions. After clicking Format, an indication window will appear (as in
Fig5.27), then click Yes to format Disk C.
Fig. 5.26 Disk Information
Page 36 of 98
Fig. 5.27 Indication for formatting
Note: Disk C is a System Disk, FPGA program will be lost after Disk C is formatted, but
other information is backed up. If font library is saved in Disk C, it will also be lost.
③Play Log
Fig 5.28 is an interface of Play Log. In this Play Log, there is serial Number
marking the Play Files. The number ranges from 0 to 65536, and if the number of files
are more than 65536, the beginning files will be deleted automatically. There is Time
Period to record time period of display files, and the unit of Time Period is 1 hour. The
path and file name of display files are recorded. The length of File Name should be no
more than 8 characters, and is recorded with 8.3 principle. This Play Log records the
times and period (total amount of display time) of displaying.
Fig. 5.28
Play Log
④System Log
As shown in Fig 5.29, System Log records the main operation of the system. It reflects
the working status of the control card of a sign.
Page 37 of 98
Fig. 5.29
System Log
⑤Update Log
Fig5.30 is a grabbed image of Update Log. It records the information, time and updated
communication method of FPGA and CPU files.
Fig. 5.30 Update Log
For example, in the UPDATE CPU above, it records that updated time is 2007-07-02
16:22:28, the Hardware Version of the updated object is main board 5006, the version
number of the pervious CPU is 873B-01, and the new CPU version number is 873F-02,
the name of sign is DISPLAY, new IP address is 169.254.10.160, GGUU is 0101, the
result of updating is Sent Successfully.
5.3.7 Advanced Options
There are four options in Advanced Options, they are User Management, Change
Hardware Password, Get Hardware Password and E-mail Setting.
①User Management
The function of this option is to manage the users logging in to Sigma. Fig5.31 is an
Page 38 of 98
interface of User Management.
Fig. 5.31 User management
②Change Hardware Password
As Fig. 5.32 shows, input old password, whose default value is 000000, into Old
Password, then input the new one into the blanks of New Password and Repeat
Password, and then the old password can be changed.
Fig. 5.32 Change Hardware Password
③Get Hardware Password
As Fig. 5.33 shows, open the window of Get Hardware Password; firstly choose the
path of the file which has saved password data.
Fig. 5.33 Get Hardware Password
As Fig. 5.34 shows, after choosing the path, click “Get”, and then turn off the power of
the Display Control Board immediately. Turn on the power and wait for the opening
information of the display.
Note: Because the data of the password is given during the process of turning on the
Page 39 of 98
Display, so we should get the data at the beginning of boot-strap.
Fig. 5.34 Choose the saving path of file
As Fig. 5.35shows, reading data is successful.
Fig. 5.35 Reading Data successful
After successfully get the password data, users cannot see the passwords, the data
should be sent back to our company and decoded by our engineers, then the password
can be got finally. Therefore, in case to prevent any unnecessary trouble, users have to
remember the password after setting it.
④E-Mail Setting
As Fig. 5.36 shows, it is the interface of E-mail Setting. We have mentioned how to use
this interface before (Fig. 5.14). Here we would like to repeat it.
In this setting, the default receiver is our company after-sale service mail box
[email protected]. If users want to change it to be their own mail address, they
can do it here. The default sender is our company. Users can modify it to be their own
sending address (if there is something wrong when sending email).
Imposa receiver
[email protected]
[email protected]
Imposa_customer
[email protected]
smtp.imposa.com
Fig. 5.36 E-Mail Setting Interface
Page 40 of 98
5.3.8 Display My Logo
As Fig. 5.37 shows, it is the setting interface of “Display My Logo”. There are functions
of setting position, size and display modes of the Logo.
Fig. 5.37 LOGO Setting Interface
Position is for setting the Logo with the left corner to be the coordinate. Size is for
setting width and Height of the Logo. There are two options--visible and transparent.
Under Transparent, the Logo will flow on the characters of the Display.
: Open the edited Logo files.;
: Save the current Logo files;
: As Fig. 5.38 shows, click “Edit” and you will open Logo Editor, the function
of which is similar with Sigma Editor. It is simplified version of Sigma Editor. For more
details please refer to Chapter 2.
Fig. 5.38 Logo Editor Interface
: Read the Logo files of the Display;
Page 41 of 98
: Send the current Logo files to the Display.
5.3.9 over temperature computer shutdown
This software can be off the computer when the internal temperature of the sign
over 70℃
when using QS52002, please check in “over temperature computer shutdown” and open “over
temperature monitoring”, connecting the COM of the QS5202 with the COM of the computer,
then can be communicated .
An icon will be appeared at the lower right corner when set up successful .
5.3.10 Video Monitor
picture 5.3.9 is the interface of Video Monitor, please insert an IP adds of network camera in the
address bar, then will see a frame of that camera.
Figure 5.3.9
Check in
,to add a Monitor clipper key of the sign, can add more .
Page 42 of 98
Name: shown the name of sign(can be any number or letters)
Address: IP address of network camera.
Sign IP: IP address of LED sign
Figure 5.3.9
5.3.11
Video to FLW Conversion Mode
If you want to display an animation file in the offline mode, you will need this tool to
convert the file into the FLW so that the LED screen can display. The current software
version supports converting AVI, SWF, GIF, ASF, WMV, MPG, MPEG, MP4, 3GP, MOV,
QT, RM or RMVB files into FLW format files.
The Figure 5.39 shows an interface of a video file converted into the FLW mode. ①
is the animation file preview window;② is the modification or setting window;③ is the
animation file conversion and simulator display window ; ④ is the animation file
conversioin ratio setting window;⑤ is the animation size setting window;⑥ is the
animation file output window;⑦ is the animation addition window. Functions and
methods of use are explained as follow.
Page 43 of 98
Figure 5.39 Video to FLW conversion interface
② Preview window:We can preview added animation files and FLW files.
② Modification window: Here we can set an image and title. These settings are for
optimizing FLW files.
First let’s look at the location for editing a picture or image. In the window, the
coordinates X and Y represent the location picture or image in the FLW window as
related to the upper left corner. Width and Height represent the size of the picture or
image. If you like to, you can also tick Show Image and click Edit Image. There you can
opt to choose placing the picture in the foreground of the FLW animation file.
Finally,
you need to select a path for saving the picture file.
Now let’s set the title. The first line is “Character for title” and “Font and size for title”.
The second line is color of characters. The third line is font setting. And then there is
title font editing area.
③ Animation file conversion and simulator display. Here to begin and stop conversion,
to simulate display, and to close the window.
④ Conversion ratio setting window:The default setting is for width and height be to
identical with those of the LED screen. We can change these value settings to play
FLW animation files in our preferred way.
Selections
Descriptions
Width/Height
Can be changed. FLW animation files can be generated according
to the width and height.
Mode
For single color animation, select 1:1. For 256 color animation files,
select 8:8. For 16 bit color animation files, select 5:6:5. For 24 bit
color animation, select 8:8:8. Selecting a proper mode can help
save file storage size, speed up data transmission speed and
achieve ideal display effect.
Preview window
Enlarge preview window
Page 44 of 98
Speed(frame/sec)
You can use the default speed for normal use
Compress
If you compress a picture, the display quality will be degraded. If
you do not compress a picture, the FLW file size may be too large.
⑤ Animation file output window:This is where you save the converted file.
⑦ Window for adding animation files: This is where you add the animation file which
you want to add.
5.3.10 FLW Editor
Figure 5.3.1 shows a video editing window. You can edit a video file which is in the FLW
format.
Figure 5.3.1
1) Menu Bar:
File Menu
Open: To open a video file;
Save:To save a video file;
Exit: To exit the system;
Operate Menu:
Add:To add a frame;
Insert:To insert a frame;
Delete:To delete a frame;
2)
Icon Bar:
:To open a video file;
Page 45 of 98
:To save a video file;
:To add a frame;
:To delete a frame;
:Move up;;
:Move down;
:To insert a frame;
:Cut;
:Copy;
:Paste;
3) Video upload area
When the video file is added, it will be uploaded in the sequence of one frame after
another.
4) Preview area
When a video file is being edited or played, a corresponding picture is displayed in the
preview area.
5) Video control area
It can be used to control the play and stop of a video file.
6) Character editing area.
If you want to add characters to the video pictures, you can type characters in the editing
area. You can see the typed characters in the preview area.
7)
Saving characters.
:Save the edited characters in the current frame.
:Save the selected frame. See Figure 5.3.2;
Page 46 of 98
Figure 5.3.2
:Current frame/Total frames.
8)
Character font area
:Bold
:Slanting
:Underline
:Align to left
:Align to middle
:Align to right
:Frame editing
:Font
:Font size
:Font color.
9)Animation editing
Select a frame
Page 47 of 98
Then click this button.
Now you will see the following picture.
You can edit the animation frame in the window.
Now please save it.
Page 48 of 98
Completed!!
Page 49 of 98
5.3.13 Picture Resizer
Picture Resizer is to convert the picture of any size to BMP picture in a designated
size.
Fig.5.40 is the interface of Picture Resizer.
Fig. 5.40 Interface of Picture Resizer
Step 1: Add picture file, the valid formats are BMP, JPG, JPEG, GIF, ICO, EMF, and
WMF;
Step 2: Choose the saving path of the converted file;
Step 3: Set the width and height of the designated picture;
Step 4: Click
and the converting will start. In Fig.5.41, the indication
window appears when the converting finishes.
Fig. 5.41
The converting finishes
5.3.14 COM TEST
COM TEST is to test whether the com port communication of the local computers are
normal or not.
Fig.5.42 is the interface of COM TEST.
Page 50 of 98
Fig. 5.42 Tool for Com Port test
According to the indication of the interface, when testing, please connect the Pin2 and
Pin3 of the COM, and click Start. Then COM 1 will be tested. User can test other serial
ports by choosing other COM ports in the column “COM Port”.
In Fig.5.43,if it shows Communication OK,it means the com port of the local computer
is no problem.
Otherwise, if it shows Request time out like Fig.5.44,there is some problem with the
serial port of the local computer.
Fig. 5.43 Communication OK
Page 51 of 98
Fig. 5.44 Communication fail
5.3.15 Send Files Tool
The function of Send Files Tool is to send the designated file to the appointed sign in a
certain time period.
Fig.5.45 is the interface of Send Files. We will introduce how to make the setting of
sending files at a certain time period.
Fig. 5.45 Interface of Send Files (1)
Step 1: Click
,add the appointed files to “The Files to send”, these files
Page 52 of 98
can be in the format of NMG, PMG, BMP, JPG and JPEG etc..
Step 2: Click
Fig.5.46 shows,click
,add the designated LED sign to “Selected Signs”;As
in the window of Choose Signs, then all the signs on the left
will be added to the right column, then click
.
Fig. 5.46 Choose Signs
When the user finishes adding files and choosing signs, the window in Fig.5.47 will
appear.
Fig. 5.47 Interface of Send Files (2)
Step 3: Set the time of sending and click
Page 53 of 98
,then a clock icon will appear in
the taskbar of the computer like Fig.5.48. It is counting down and when it goes to the
pre-scheduled time, the files will be sent.
Fig. 5.48
Down-counter for sending files
Note: when it is counting down to send the files, Sigma software can not be closed,
otherwise the count-down clock will disappear immediately. The computer can not be
turned off either. After the file is sent to the designated sign, it will not be displayed right
away because there is no File list in the files which have been sent. The LED sign will
only display File List. Then we need to do the following to make the files displayable.
Step 4: Display the designated file which has been sent. Open the Sigma software,
enter List Manage as shown in Fig.5.49,and click
,then the Play List Files like
Fig.5.50 appears, choose “Add Files From Sign”, and another window like Fig.5.51 will
appear. In this window, user can choose the designated files to display. The files ticked
are added into the File Display List. After choosing display files, click
,
then we can see the added files in Play List Files as shown in Fig.5.52. At last, click
, the Play list will be sent to the LED sign, then the LED sign will display
these files.
Fig. 5.49 List Manage
Fig. 5.50
Add List
Page 54 of 98
Fig. 5.51 Add List File
Fig. 5.52
Play List Files
5.3.16 Dial-up
Dial-Up provides users a communication channel through telephone, then long distance
communication is realized. It is useful for the users in the areas where internet is not
available.
Fig.5.53 is the interface of Dial-Up, telephone number, communication Com Port of the
local computer, and the communication Baud Rate of the LED sign’s Com Port.
Page 55 of 98
Fig. 5.53 Dial-Up
To realize Dial-Up connection, Modem and the required communication cables are
needed. Please see Fig.5.54 for the connection diagram.
Fig. 5.54 Connection diagram of Dial-Up
Click
and Dial-Up connection begins. When the connection is successful, we
can use that channel to communicate with the sign. Since we use COM1 for the
connection, we choose COM1 for the communication with the sign as shown in
Fig.5.55.
Fig. 5.55 Choose COM1 for Communication
Page 56 of 98
5.3.17 Update
There are 5 tools in Update, they are CPU Update, FPGA Update, Palette Update,
Create Update Package and Update Wizard. These tools are used to update the sign,
and only the Administrator can do the operation.
①CPU Update
We use this function when we need to update the CPU of the sign. Fig.5.56 is the
interface of CPU Update. Only the files with cpu as suffix can be updated. Click the
button Send and the update begins. After the update finishes, please wait for about 1
minute. Then turn off the sign and reboot it, the CUP has been updated to the control
card of the sign.
Fig. 5.56 CPU Update
②FPGA Update
When updating FPGA, user must choose the FPGA program which is suited with the
LED sign. Otherwise, the sign will display randomly or display nothing, the worst
situation is the control card may be burnt. Fig.5.57 is the interface of FPGA Update.
Only the files with PGA as the suffix can be updated, click Send and the update begins.
Fig. 5.57 FPGA Update
③Palette Update
Pallet Update is to send the palette to the sign. Palette may lose because of some
unsuitable operation to the sign, as a result, some colors can not be shown on the sign.
Then we need to send the pallet to the sign. Fig. 5.58 is the interface of Palette Update.
It is seldom that the Palette would lose and palette is included in CPU, so Palette
Update will be used only in special case.
Fig. 5.58
Palette Update
④Create Update Package
Create Update Package is to combine CPU file, FPGA file, Palette file and Gamma file
together and make an Update Package. Fig.5.59 is the interface of Create Update
Page 57 of 98
Package, users can choose files according to their needs to make the package. Please
tick the files needed and click OK.
Fig. 5.59 Create Update Package
Suggestion: the update package is used only for updating the system from all aspects.
Otherwise, it is not suggested to update with package since the efficiency of updating
with package is low, what’s more, palette and Gamma files are already included in CPU.
⑤Update Wizard
Please see Fig.5.60, Update Wizard is to update the package above. Please choose
the correct communication device and address in the left columns, the right column will
show the update files in the package. Click Update, and it starts.
Page 58 of 98
Fig. 5.60 Update Wizard
Fig.5.61 shows the update progress and the current updating CPU program.
Fig.5.62 shows the CPU update has finished, but we have to wait for the display to
reset; now we can reset the display manually.
As shown in Fig.5.63, an indication window will appear after the display is reset, click
Yes and the FPGA update begins.
Fig. 5.61
Fig. 5.62
Update Progress
CPU update finishes
Page 59 of 98
Fig. 5.63 Resent the display and continue
After the FPGA update finishes, another indication window like Fig.5.63 will appear,
now we don’t need to reset the display, click Yes and the update will continue.
As shown in Fig.5.64,all the update tasks are completed successfully.
Fig. 5.64 Task completed
5.4 Help Menu
There are two options in the Help Menu. One is the edition information about Sigma
software, and the other is this Manual.
As shown in Fig 5.65, this window is the edition information about Sigma software.
Fig. 5.65 About
Page 60 of 98
Chapter 6 Shortcut Panel of Sigma
Software
The shortcut panel is an important part of the Sigma software, so it is necessary to
explain the shortcut panel in detail as a chapter.
6.1 List Manage
List manage is a tool to manager play files and play lists. Using List Manage properly
will be helpful to improve the sending efficiency of display files.
As shown in Fig 6.1, this is the interface of List Manage Panel. The left part is the
management area of play list, and the right one is the management area of play files.
Fig. 6.1 List Manage Panel
: To create a new play list;
: To open a file of the play list;
: To save a play list;
: To delete a play list;
: To rename a play list;
Page 61 of 98
: To read the play list on the sign;
: To add the play file from the computer or LED sign;
: To delete the play file;
: To move down the play file;
: To move up the play file;
: To edit the play file; if the NMG file is selected, the Sigma Editor will be opened for
editing; if the PMG file is selected, the True Font Editor will be opened for editing; if the
BMP file is selected, the Picture Editor of Windows will be opened for editing;
: To switch to File Schedule;
: To send the play file and list immediately.
Note: The maximum amount of files added to the play list is 128. If the file amount
exceeds 128, the control board can’t play this list.
6.2 System Set
Only the administrator can operate the function of sending in System Set. The common
users can just read the configuration information, but can’t modify the configuration of
the display.
As shown in Fig 6.2, this is the interface of System Set. In this panel, some characters
in some columns are covered by light yellow color, which means that information can be
read but can’t be modified.
Page 62 of 98
Fig. 6.2 Interface of System Set
Firstly, let’s talk about the functions of the above buttons:
: To open the configuration file with the suffix of dat;
: To save the current setting;
: To read the configuration of the display;
: To send the current setting to the display;
: To send through E-mail, it is a shortcut for “Email” in the Function Bar.
The following explains in detail the functions and meanings of other items in the System
Set.
a.
It shows the name of the display. And the name can be modified here.
b.
It shows the width of the display. The value is set in accordance to the width of the
display.
c.
It shows the height of the display. The value is set in accordance to the height of the
display screen.
Page 63 of 98
d.
It is the setting for the Start Column of the display. The value of the Start Column of
QS5006 main board is 2. And if the value is set to be 1, the first Column of the display
will display abnormally (The first Column is counted from the right side). And the value
of other main board is set according to the actual situation.
e.
It is the setting for the Start Row on the display. The value is 0 usually.
f.
It is the style options of the display. It is decided by the actual use of display. E.g. the
RG bi-color indoor display can’t be set as the 8:8:8 Style. The setting is in detail as the
following table:
Style
Usage
1:1
For display with single color shade, it is used with QS0712
main board with 4000 FPGA program
8:8
For the RG bi-color display
5:6:5
For the outdoor full color display
8:8:8
For the outdoor full color display
g.
The calculation formula of FPGA Length as the following table:
Display
8:8:8
4bytes
5:6:5 or 8:8
2bytes
1:1
2bits
>= Actual width of
the screen /4 + 2
>= Actual width of
the screen /8 + 2
>= Actual width of
the screen /16 + 2
Mode
Value
FPGA Length
E.g.: the size of the display is 96*256, its value of FPGA Length is as the following table.
Display
8:8:8
4bytes
5:6:5 或 8:8
2bytes
1:1
2bits
>= 256/4 + 2
That is >= 66
>= 256/8 + 2
That is >= 34
>= 256/16 + 2
That is >= 18
Mode
Value
FPGA Length
h.
The setting relationship between Gray Grade and FPGA Length is as the following
table:
Style
1:1
8:8
5:6:5
8:8:8
FPGA
Length(L)
L>Width of
the
screen/16
L=Width of the screen/8+2,
L minimum is 18
L= Width of the screen
/4+2,
L minimum is 34
Gray Grade
3076
2564
4872, 6152, 9744
i.
It is the setting of the screen brightness. Auto is automatic brightness (it is only
available for the screen equipped with a brightness sensor). 1~128 is the value for
manual setting. This brightness setting here is different from the brightness adjustment
in the Tool Bar. The brightness adjustment just adjusts the brightness roughly, and it will
Page 64 of 98
not affect the white balance of the screen. But brightness setting adjusts the brightness
accurately and improves the white balance.
j.
It is for changing the IP address of the screen, user can input the expected IP address
here.
After the IP address, there is the icon
. You can click it to enter configure for
network.
If the local network supports automatic IP function, you can select “Obtain an IP
address automatically”. Then an IP address will be assigned to every LED display on
the net.
k.
It is used for checking the MAC address of the display, but MAC address can’t be
modified here. If this MAC address is changed, the setting being sent is invalid, and the
read-back configuration information is still the former MAC address. There is another
special tool to set the MAC address.
l.
It is used to set the communication Baud rate of Com port 1 in the display.
m.
It is used to set the communication Baud rate of Com port 2 in the display.
n.
It is used to set the GG address of the display. The GG address is also called Com port
group address.
o.
It is used to set the UU address of the display. The UU address is also called Com port
unit address.
p.
It is used to set whether it needs to login before communicating with the hardware.
When this option is on, users have to login before communication.
q.
There are two play modes: Immediate-play mode and Awaiting-play mode. When the
Page 65 of 98
display screen is playing a file and the user sends a new play file to the screen, for the
Immediate-play mode, the playing file will be paused and the new one will be played; as
for the Awaiting-play mode, the new one will not be played until the current file finishes.
r.
It is used to set the summer time. When it is on, the time of screen will self-adjust
according to the summer time, and when it is off, the time won’t adjust according to the
summer time. The summer time adjustment will automatically add one more hour at
zero o’clock on the morning of the second Sunday in March every year, then
automatically reduce one hour at zero o’clock on the morning of the first Sunday in
November every year.
s.
There are three optional settings in the initial status of the screen: .
Schedule mode: When the display is in this mode, the information displayed in the
screen is played according to the file schedule. This is a default mode in the system.
Continuous display: It is the mode for displaying Ticker files.
Head-tail display: All files sent to the list of the screen are connected and played
circularly without pause.
t.
There are two options in this mode. One is displaying the same content, the other is
displaying different content. Their usages are as the following table:
Display Mode
Number of
slave boards
QS5006
the
Single
board
control
Main board
slave board
QS0712
and
Single control board
Same content
P1-P4 same as
P5-P8
Different
panels
display the same
content
P1 port and P2 port
display the same
content
Different content
Play normally
Different
panels
display
independently
P1 port and P2 port
display
independently
u.
There are two options in this mode. One is VGA mode, the other is Off-line mode. Only
QS0712 and QS5003 main board can support the VGA and Off-line modes. The default
value of other main boards is Off-line mode.
v.
It is used to control the communication connection of the display effectively. If the value
of TCP Timeout is 3 seconds (equal to 3000 milliseconds), the communication chain
between PC and the display screen is connected in this 3 seconds. If the time exceeds
3 seconds, the communication chain will be disconnected automatically. Then the chain
should be reconnected before communicating with the screen. If the communication
distance is far, it maybe takes a long time to reconnect the communication chain.
w.
It is used to define the style of display modules by the user. This bar only can be input
one character which classifies the display modules. E.g. the user can input A to sort the
Page 66 of 98
display of 1/2 scanning into A class, input B to sort the screens of 1/4 scanning into B
class, and so on. Therefore, the user can define the modules as he likes.
x.
It is used to set the number of the slave boards in the display. E.g. the main board is
QS5006 and the maximum amount of the slave board is seven. And the connection of
this hardware is as the following Fig 6.3.
Fig. 6.3 The connection of the main and slave boards
y.
It is used to set the time period of half brightness of the display screen.
E.g.
, it sets the duration of half brightness from 8:00 to
18:00.It means that the screen will start being in the half brightness status from 8:00 to
18:00.Then after that, the screen will be all bright.
z.
It is used to set the ON/OFF time of the display.
E.g.
, it means the sign will be on at 8:00 and will display
files; and the sign will be off at 18:00, and the screen is black—display nothing..
Note: This switch is not the switch of the hardware. It is the operation on the software.
The power supply of the screen is still on, the control board is still working.
aa.
It is used to read the CPU edition number of the display.
bb.
It is used to read the hardware edition number of the display.
cc.
It is used to read the serial number of control board of the display.
dd.
It is used to read the written-in time of system parameter in the control board.
ee.
It is used to set whether to show the start-up information. If it is ticked, it means that
when the display is turned on every time , the start-up information will be shown..
ff.
You can modify it only under control mode.
6.3 Simulator
The simulator is for the users to preview the display files.
As is shown in the Fig 6.5, the Simulator supplies a window for previewing play files.
Page 67 of 98
Through it, the users can know the effect of the play files which will be sent to the
display screen. This function supports the display simulation of NMG, PMG, BMP, ICO,
JEG, JPEG, FLW, GIF, WMF and EMF files. The buttons as Fig 6.4 can control the play
of the simulation. And at the same time if the screen is connected with Sigma, the
buttons can simultaneously control the play status of the screen.
Play
Stop
Previous
FB
FF
Replay current file
Next file
Fig. 6.4 Play Control Button
Fig. 6.5 Interface of Simulator
6.4 File Schedule
File Schedule is used to set a time sequence for displaying files.
The Figure 6.6 is an interface for file scheduling. The operation of File Schedule is very
simple. For example, if we want to set the display time of a file to be from 8:00am to
8:00pm every Monday through Friday from May 15, 2008 to June 15, 2008, we can do
as follow:
Step 1:Set date. Click the beginning date to be May 15, 2008 and ending date to be
June 15, 2008;
Step 2:Set time. Set beginning time to be 8:00am and ending time to be 8:00pm;
Step 3:Set day. Unclick Saturday and Sunday;
Step4:Set display time for displaying other files in the same way as you do to the first
Page 68 of 98
file;
Step5:Send file list. After you have set time for displaying all the files, click the Send
button to send the file list to the LED screen.
NOTES: If in the play list there is a file that has not been assigned a play time, the LED
display will recognize it by default the file should be played on and on without stop.
Another point that needs attention is that you must adjust the internal clock of the LED
display. Otherwise, it may incur early or late display, or even no-display of files.
Figure 6.7 shows the interface of File Schedule after the first file has been assigned a
time of display.
Fig. 6.6 Interface of File Schedule
Figure 6.7 Set time for displaying the first file
Page 69 of 98
please set up the dispatching massage ,then check in
situation which files run in any period .
,can see and simulate the
6.5 File Manage
File manage panel is used to manage the disks of control board of the display screen
and the windows of the disks’ system files
As is shown in Fig 6.8, it is the file manage interface. There are four disks C, D, E and F
in the figures.
Fig. 6.8 Interface of File Manage
Page 70 of 98
: Go back to the former directory;
: Refresh the current directory;
Firstly, let’s explain the function and property of each disk.
Disk C: This system disk includes important system files, such as System Set, FPGA
file, Font list file, Play list and so on. The directory of the Disk C can be opened by
double clicks, as is shown in Fig 6.9.
FONT: It is the file folder of the font list in Disk C. If there isn’t Disk F, the font list will be
downloaded to this folder. The capability of this folder is limited, and the Chinese font
list can’t be saved in this folder.
FPGA Folder: When the FPGA program is downloaded, this program file will be saved
in this FPGA folder.
TEMP Folder: Temporary file folder;
CONFIG.SYS: The files of current system configuration. And all system parameter will
be saved in this folder.
DEFAULT.SYS: The defaulted system configuration files;
SEQUENT.SYS: The play list of the current system. The list records the name of the
current play files;
LOGO.SYS: Logo display files;
COLORTY.BIN: palette files.
Fig. 6.9
Directory of Disk C
Disk D: Disk D is Flash disk which save the play files of systems. As is shown in
Fig 6.10, it is the directory of Disk D.
Page 71 of 98
Fig. 6.10
Directory of Disk D
T Folder: It is used to save the NMG file which is edited by Sigma Editor);
S Folder: It is used to save the character string file,
P Folder: It is used to save the BMP picture file. All pictures sent to the main board will
be transferred to the picture files of BMP format;
A Folder: It is used to save the PMG file which is edited by True Font Editor;
L Folder: It is used to save the NMG file which is transferred from AVI or GIF file;
TEMP Folder: Temporary file folder;
FILELST.SYS: The list of all files in the disk. And it is different from the list of play files in
C disk.
Note: Disk D is Flash disk. If files in Disk D are refreshed often, Disk D will be damaged
easily. The lifetime of Disk D is about 100 thousand times rewriting. Therefore, if it
needs to refresh the files often, it is suggested change the default disk to be Disk E.
Disk E: This disk is RAM disk, the files in it can be refreshed frequently, and the refresh
speed is fast. But after the power is off, the files will be lost. As is shown in Fig 6.11, it is
the directory of Disk E. The structure and the folder function of Disk E is same as those
of Disk D. But there is no FILELST.SYS file in Disk E.
Fig. 6.11
Directory of Disk E
Disk F: Disk F is NandFlash disk or CF or SD Card. The capability of Disk F is very big.
Page 72 of 98
As is shown in Fig 6.122, there is FONT folder in the directory of Disk F. This font list
folder also is used to save the font list file. And because of its big capability, Disk F can
save bigger font list file. Therefore, when the font list file is sent, the control board with
Disk F will default to download the file to Disk F, but not Disk C. The function of other
files in Disk F is as same as those in Disk D.
LOGFILE.LOG: It is the file recording play log. When the play log is read, this file will be
created.
TEMPLOG.LOG: It is the file recording temperature log. It records the temperature of
the display.
Fig. 6.12 Content of F Disk
Now we can double-click the FONT folder in F Disk, and see the font information in
it. There are a lot of font files in the folder, please see Fig. 6.13.
Page 73 of 98
Fig. 6.13 Content of FONT file
Choose one of the font files, click the right key of the mouse and the menu as Fig.6.14
will appear. There are four sub-menus.
Fig. 6.14 Right-key Menu
Read Back: it can read back the font file to the computer and save it;
Page 74 of 98
Delete: it can delete the font file from the control card of the LED display, and after the
file is deleted, that type of font can not be shown on the display;
Rename: it can re-name that font file. But font files are system files, if they are
re-named, the system can not find them, so please don’t re-name them. But other
display files like NMG files can be re-named;
Properties: it shows the information such as the size and foundation date of the file, etc.
Please see the Fig.6.15, it is the properties of that font file. And users can see the
properties of display files too.
In the same way, if you point other files and click the right key of the mouse, the
right-key menu will appear. But please don’t delete the system files randomly.
Fig. 6.15 Properties of font
6.6 Picture Manage
Picture Manage is used to manage the display pictures of the LED screen, and it can
modify the pictures or edit some words on the picture, etc.
Fig. 6.16 is the Picture Manage, ① is Tool bar; ② is List of pictures; ③ is picture
preview; ④ is Information of the picture; ⑤ is Status column. The following is the
introduction of the tools in Tool bar.
: Open the List of pictures;
: Save the List of pictures;
: Add the picture to the List;
: Delete the picture from the List;
: Move up the picture in the List;
: Move down the picture in the List;
: Zoom it the picture;
: Zoom out the picture;
: Edit the picture, open the Picture Editor which already exists in Windows to edit
the picture like Fig.6.17.
Page 75 of 98
: Send the picture to LED screen;
Fig. 6.16 Interface of Picture Manage
Fig. 6.17 Edit the picture
6.7 Net Manage
Net Manage is supposed to mainly control many LED screens and display files.
Please see Fig.6.18, the Net Manage is divided into 4 parts, we will mainly use the
upper 2 parts, and the lower 2 parts are for related information. Now let’s discuss the
procedures in using Net Manage.
Page 76 of 98
Fig. 6.18 Interface of Net Manage
Step 1: Search LED screen.
Click the button
for searching,and a window named Display Search will appear,
like Fig.6.19, there are 3 devices for choice in the column of Communication Device.
Ethernet is used to search the LED screen in the current window, please input the Start
IP and End IP (for the use of Port, please see Chapter Ⅱ), click the button “Start” and it
finds out 3 LED screen shortly like Fig. 6.20
Other methods of searching:
Please see Fig.6.21,it uses com port to search the LED display. Now it must guarantee
that the com port cables of all displays can communicate with the control computer and
are being connected. Com port search carries out according to GGUU address, so the
pre-set GGUU of every screen should be different. GG means the same Group, but UU
should be different or otherwise GG is different.
Please see Fig.6.22, it uses phone number to search LED display. Here the LED
display must be searched one by one, and the telephone number, the computer com
port, the baud rate and GGUU must all be correct. This is an accurate search, so all the
parameters must be correct.
Page 77 of 98
Fig. 6.19 Window of Display Search
Fig. 6.20
Search finishes
Page 78 of 98
Fig. 6.21
Display search with com port
Fig. 6.22 Display search with telephone number
Step 2: Add display file.
After Display Search finishes, there are 3 displays in the interface of Net Manage
like Fig.6.23.
Page 79 of 98
Fig. 6.23
Click the button
Displays searched
and the files in the List will be added. Click the button
,and the display files are added directly. Now we add display files to Net Manage
like Fig.6.23.
Page 80 of 98
Fig. 6.23
Display files added
: Edit file(NMG file will open Sigma Editor for editing);
: Set the time schedule of files like Fig. 6.24, user can set the display schedule for
the file in the window of Schedule;
: Send display files to the chosen LED screen to display;
Fig. 6.24 Window of file Schedule
Please see Fig. 6.25, after the user sets the schedule, the display time of the file can be
seen in the column of Message Information.
Fig. 6.25 Information of display file
Step 3: Send the display file.
Add the display file, and set the display time(if user doesn’t set the display time, the file
will display all the time ),choose the LED screen like Fig.6.26, and click Send, then the
file will be sent like Fig.6.27.
Page 81 of 98
Fig. 6.26
Choose the LED screen
Fig. 6.27 The display file is being sent
Please see Fig.6.28, after the files are sent successfully, the files have been in the LED
screens of 169.254.10.159 and 169.254.10.160,but other LED screens will not display
these files.
Fig. 6.28 File sent successfully
The above talks about simply how to use it, and the following talks about other
applications.
Page 82 of 98
: Edit the parameter of the chosen LED screen like Fig.6.29. If “hardware login” is
set in Display Manage, then user must “√” in the Login column and input the password.
(The default password is all 0 ).
:set the status of Hardware
Login;
: Test whether that LED screen can be searched back or not.
Fig. 6.29
Edit the LED sign
: Delete the chosen LED sign;
: Add group. Please see Fig.6.30, to add a new group, user just needs to drag
the LED sign from the left window to the right window.
Page 83 of 98
Fig. 6.30
Add group
In Fig. 6.31, when the group is added, there is a new group in the interface of Net
Manage.
Fig. 6.31
New group in Net Manage
: Add LED sign. Please see Fig. 6.32, that window is the same as the one for
editing LED sign. The LED sign must be tested whether it can be searched before it is
added, otherwise, user can do nothing to it although it is added.
Page 84 of 98
Fig. 6.32
Add an LED sign
: Refresh all the LED signs searched back, which means search all the LED
signs once again. In Fig. 6.33, the Refresh finishes.
Fig. 6.33
Refresh finishes
Page 85 of 98
If the LED sign can not be searched, it will show that sign in Red letters. Please see
Fig.6.34 for reference.
Fig. 6.34
The LED sign QS5006 can not be searched
Chapte7, GPRS Dial-up function
Dip switch setting:
For the Master QS5136 board: Set the 4 bit switches on SW2 need to be “ON”
status; The No. 2 bit switch on SW3 needs to be “OFF” status and the No. 1 bit
switch on SW3 needs to be “ ON” status.
For Slaver QS5136 board:
For the Slaver QS5136 board: The No. 1 bit switch on SW2 needs to be “OFF”
status; other dip switches on SW2 need to be “ON” status. The No. 2 bit switch
on SW3 needs to be “OFF” status and the No. 1 bit switch on SW3 needs to be
“ ON” status.
Communication requirement:
The common parallel RS232 signal cable is OK. One end connect to the control
PC, anther end connect to the COM 2 port on the QS5136 control board
7.1 point to point connection
Connect GPRS system as Figure 7.10 shown
Page 86 of 98
RS232
PC
GPRS model(master)
GPRS
GPRS model (Slave)
Figure 7.10
RS232
Display
Open Sigma3000 software, select tool—Dial-up, enter GPRS model slave SIM card
number into “Number to Dial” (area code should be added), select Serial port which
connects PC and GPRS model (master) in “COM Port”, select the baud rate of displays
in “Baud rate”, see Figure 7.11
Figure 7.11
And then click
, you will see a progress box as Figure 7.12
Figure 7.12
if what you see next is the same as Figure 7.13, it means that GPRS system has been
connected.
Page 87 of 98
Figure 7.13
After connection, we can communicate with the displays by this channel. Because we
use COM1 to connect them, we can communicate with the dislplays by only selecting
COM1. See Figure 7.14
Figure 7.14 selecting COM 1
We can operate the screen after communicating successfully. Finish the operation, we
can stop the connection, select Tool----Dial-up, you will see Figure 7.11, and then
click
, there is a progress box, when you see Figure 7.15, you
disconnect it
Figure 7.15
Notes: We strongly suggest customer use 19200 baud rate for GPRS model. If the
baud ratefor the Mater board and the Slaver board is the same, the
communication will be better. The slaver control board will be adapted the baud
Page 88 of 98
rate of the control board inside the LED sign
If you have changed the baud rate for the main board inside the LED sign,
pleased remember to reboot the Slaver GPRS model board and re-dial
7.2 Connection from Slaver and Master
to Server
Follow Figure 7.20, connect GPRS system;
GPRS
Master
Internet
PC(Server)
PC
GPRS
Slave
DISPLAYS
Figure 7.20
First, run a server software VMS SERVER in PC (Server), Follow Figure 7.21
Figure 7.21
And then, open Sigma 3000 in PC, select Toll--- Dial-up, enter SERVER, IP Address,
PORTL, Port2, Slave into “Number to Dial”,
SERVER is keyword in command
[IP Address]: the IP Address of server, this command should be used in a system which
has only a module, but Server should connect with internet, it means that IP Address is
the same as the IP on internet.
Port1 and Port 2 are two monitors, master will connect with Port1, and laver will connect
with Port2
Phone number of Slave: SIM card number of slave
For example: SERVER, 219.128.254.187.8761, 8762,+ 8613425877445
Select Serial port which connects PC and GPRS model (master) in “COM Port”, select
the baud rate of GPRS model (master) in “Baud rate”, and see Figure 7.22
Page 89 of 98
:
Figure 7.22
Click
, appear a progress box as Figure 7.23
Figure 7.23
What you see next is the same as Figure 7.24; it means that GPRS system is
connected
Figure 7.24
After connection, we can communicate with the screen by this channel. Because we
use COM1 to connect them, we can communicate with the diaplays by only selecting
COM1. See Figure 7.25
Page 90 of 98
Figure 7.25
We can operate the screen after communicating successfully. Finish the operation, we
can stop the connection, select Tool----Dial-up, you will see Figure 7.11, and then
click
, there is a progress box, when you see Figure 7.26, you
disconnect it
Figure 7.26
Page 91 of 98
Chapter 8 Advanced
First of all, log onto the Sigma Play as the administrator in the way as described in
Chapter 1. After you have opened the software, first confirm communication with the
LED screen in the way as described in Chapter 5. Then switch to System set interface.
Click the button
button
, and then press Ctrl+Alt+A. You will see the
at the lower right corner. See Figure 8.01
Figure 8.01
Click the button
, and you will see Figure 8.02;
Figure 8.02
1:selecting Chinese fonts:
Sigma 3000 is based on English characters, please using the Chinese Character if insert
Page 92 of 98
the Chinese fonts. Chinese fonts including Sub-simplified Chinese and Traditional Chinese, there
are repeated internal code at both characters. So please select one character when you input
Chinese fonts
GBK stand for Sub-simplified Chinese, BIG5 stand for Traditional Chinese. If displays the
,and check
Traditional Chinese on the sign, please select BIG5,then check in
in the” System set”, after that ,the screen will be restarted, and default selection
in
is BIG5. After
that ,can send the Traditional Chinese to the screen. There are three Traditional Chinese
character in the Sigma: BIG5A_16、BIG5A_24、BIG5A_32. Also can convert the operating
system character with the conversion function in Sigma. Please see the chapter 4.
2: New- line setting
when the screen width is bigger than the maximum displays width which the main board is
supported ,and when the screen height is smaller than the half of maximum displays height
which the main board is supported, it can use the new-line to extend. For example:
LED Screen :W:H= 480:48
Main board ; the maximum supported to the LED screen W:H=256:96
connection:
480
240
display
Signal output
Main board
Software sep up:
Page 93 of 98
Then check in
in the “System set”
3. Choose the type of the driver board
The size of the driver board is differernt from its pitch. For example 10mm (16x16)
means the display module is with the pitch of 10mm, which compose 16x16 dots
4. Use radar to set the speed limit
When the LED display is connected to the radar equipment, users can user this
setting to set the highest speed limit of the road .
5. Set black screen when sending the message
Users can set if the LED display would go black or not when sending the
message file.
6. Users can check if the fiels is succefully sent and the sending time of the file.
Chapter 9
Items for Your Attention
1. When you want to use Sigma software to send a file to the sign, please make sure the
sign is in Schedule status (display status). If the sign is in remote control status (you can
see remote control list), please press “program” key in remote to switch to Schedule
status from remote control status; if the sign is in shut down status, please set the sign
back to schedule status by press “ESC” button and then “Shift +F1” buttons.;Figure 9.01
Figure 9.01
2. If you use remote to change the content of file “B” which was received originally from
Sigma software before, when you use Sigma software to send file “B” to LED sign,
please change the file name or change the display content and then send to the LED sign.
Page 94 of 98
Otherwise, the LED sign will not display this file content even you send it to the sign
successfully.
3. Some LED screens are built with the CPU board QS5202. In such a case, you can
use Sigma 4.10 to set single-side or double-side mode.See Figure 9.02
Figure 9.02
Page 95 of 98