1
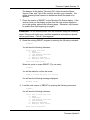
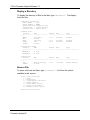
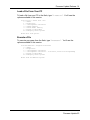
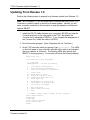
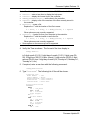
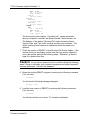
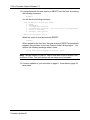
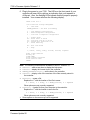
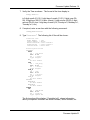
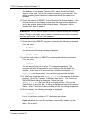
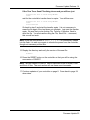
Firmware Update Release 1.4 Firmware Update Release 1.4 (Update: January 13, 2013) Overview The firmware of the 7330 is easily updated over its serial port. Simple commands allow all firmware to be upgraded to a new version. The following files can be updated: File Description SBOOT 7330 S-COM Bootloader DIAG 7330 Diagnostics 7330 Repeater 7330 Repeater Controller Speech Library 7330 Standard Speech Library Custom Audio Library Your Custom Audio Library Note: These instructions apply to any update from previous versions of firmware to the current release of firmware. You can skip all the intermediate versions. See the Where To Start section on page 2 for tips on how to identify the software that’s currently loaded in your controller and where to begin your update. Warning: this update procedure may erase your controller programming. Be sure you have your configuration recorded so that it can be reloaded after updating the firmware, if required. We recommend that controller commands be typed into a text file for easy downloading following an update. See Chapter 8, Serial Port, for more information on serial command formats. Firmware Update-1 7330 Firmware Update Release 1.3 Materials Required The following materials are required to update the 7330 firmware: An RS-232 cable connection to the Console Port of the controller. By default and in Beta releases, this cable is a straight-through RS-232 cable, DE9S-to-DE9P connected to the RS232-2 connector of the controller. (See Chapter 8, Serial Port, for more information.) A terminal program that supports X-Modem protocol. For Windows, HyperTerm and TeraTerm have been tested. Linux users successfully use Minicom. On other operating systems, choose an appropriate terminal program. The 7330 files for this release. Note: At S-COM, we prefer to use TeraTerm on Windows instead of HyperTerm. We’ve found that HyperTerm is just too difficult to get configured. See the Chapter 8, Serial Port, in the User Manual for additional configuration details. Where To Start There are separate procedures to update the firmware in your controller depending on the version of firmware currently installed in your controller. Here’s a table you can use to identify the firmware release installed on your controller: Release Go To Repeater Version SBOOT Version 1.1 or Newer Page 3 3.06 or Newer 1.1.0 or Newer 1.0 Page 24 3.05 1.0.0 Beta Page 29 3.01 thru 3.04 0.3.1 Firmware Update-2 Firmware Update Release 1.4 Updating From Release 1.1 and newer Perform the following steps to prepare for a firmware update from Release 1.1 or newer: Note: As of Release 1.0, you no longer have to remove the cover of the 7330 Controller to install a jumper to perform a firmware update. Instead, you will enter a console command to the controller to stop the repeater controller and execute SBOOT. 1. Install the RS-232 cable between your computer’s RS-232 port and the Console serial port on the rear panel of the 7330. By default, the Console Port is assigned to RS232-2. If you changed the assignment of the Console Port, install the cable to RS232-1. 2. Run the terminal program. (Note: Examples will use Tera Term.) 3. At the 7330 controller serial port prompt, type sboot<enter>. The LEDs on the front panel of your controller will scan left-to-right as an indication that your repeater is off-the-air. The flashing LEDs also indicate that SBOOT is running properly. Your screen will show the following display: SCOM 7330 SBOOT V1.1.0 7330 Controller Storage Management T - Show Time Tmmddyyhhmmssw - Set Time (w=0=Sunday) S R - Save Repeater Configuration - Restore Repeater Configuration E L U D - P N W - Set Baudrate of Console Port - Set Baudrate of Auxiliary Port - Set Console Port Number B X H - Boot from Flash - Reboot SBOOT from Flash - Help Erase Files Load File from a PC to Flash Upload File from Flash to a PC Flash Directory Time: 091708-091211-3 Battery OK. SBOOT> Firmware Update-3 7330 Firmware Update Release 1.3 Note: The following commands are available in SBOOT version 1.1.0 and newer: H<enter> – enter at any time to display the help menu. T<enter> – display the current time in the controller. Tmmddyyhhmmssw<enter> – set the time in the controller. D<enter> -- display a list of the versions of the files currently stored in the controller. E<enter> -- erase a file. A submenu is presented. L<enter> -- Load a file from your computer to the controller using X-Modem. A submenu is presented. Some options on the menu may not be supported. 4. Verify the Time as shown. The format of the time display is : mmddyy-hhmmss-w is the 2-digit month (01-12), 2-digit day-of-month (01-31), 2-digit year (00-99), 2-digit hour (00-23, 24 hour format), 2-digit minute (00-59), 2digit second (00-59), and the 1-digit day-of-week (0-6, Sunday is 0, Monday is 1, Tuesday is 2, etc.) 5. If required, enter a new time with the following command: tmmddyyhhmmssw<enter> 6. Enter D<enter>. The following list of files will be shown: : Controller Information Model Number : 7330 Serial Number : Proto2 Manufactured DT: 091709-065554-4 Formatted DT : 091709-065458-4 Customer Name : Dave's Beta Firmware Files Location ------------SYSTEM SBOOT MFG DIAG SCOM_A SCOM_B Name ---------------BootROM 7330_SBoot No File 7330_Diag 7330 No File Version Date Type -------- ---------------- -------------------1.2.0 1.2.1 12/22/2009 Program 1.2.0 3.2.2 9/4/2009 11/7/2010 Program Program Configuration Files Location Name Version Date Type ------------- ---------------- -------- ---------------- -------------------RESTORE_A No File RESTORE_B No File Speech Files Location ------------LIB CUSTOM Name ---------------SCOM Sp Lib Eng SCOM Cust ALib Version -------1.2.0 1.0.0 Date ---------------5/8/2011 09/09/09 12:00 Type -------------------Speech Library Custom Audio Library The first section of the display, “Controller Info”, shows information about your specific controller: the Model Number, Serial Number, etc. Firmware Update-4 Firmware Update Release 1.4 The balance of the display “Directory/File” status shows the Name, Version, Date, and Type of file currently stored in your controller. We will be checking these versions to determine which files need to be updated. 7. Check the version of SBOOT on the Directory/File Status display. If the version shown on the display is older than the new version shipped to you in the update, perform the following steps. Otherwise, skip forward to update other files beginning on page 9. Caution: do not remove power from the controller during the following steps! Doing so will make your controller inoperative and require a special recovery procedure. Call us if this happens! 8. Erase the existing SBOOT program by entering the following command: e<enter> You will see the following submenu: Erase a File from Flash: 0 - SBOOT 1 - Diagnostics 2 - 7330 Repeater Controller 3 - Speech Library Q - Return to Main Menu H - Redisplay these options Enter File Erase Option> Select the option to erase SBOOT (Tip: use zero): 0<enter> You will be asked to confirm the erase: Enter Y to erase the file, N to cancel>y You will see the following message displayed: Erasing...Done. 9. Load the new version of SBOOT by entering the following command: L<enter> You will see the following submenu: Load 0 1 2 3 Q H a - File to Flash from a PC: SBOOT Diagnostics 7330 Repeater Controller Speech Library Return to Main Menu Redisplay these options Enter File Load Option>l Firmware Update-5 7330 Firmware Update Release 1.3 Select the option to load SBOOT (Tip: use zero): 0<enter> You will be asked to confirm the load: Enter Y to load the file, N to cancel>y You will see will see one or more “C” characters displayed. These are being sent by your terminal emulator to tell the controller it’s ready to send the file. Transfer the file to flash using XModem… CCCCC The controller will wait 60 seconds for you to select a file and begin the transfer. At the end of 60 seconds, the controller will display Load Cancelled and the prompt. You can then begin another transfer. 10. In TeraTerm, send the new SBOOT_x.y.z.bin file using the X-Modem protocol. Click File,Transfer, X-Modem, then Send... The TeraTerm: XMODEM Send dialog is displayed. Select the new SBOOT_x.y.z.bin file from the list of displayed files. Click on the Open button to send the file. A dialog is displayed showing the transfer status. When TeraTerm is done sending the file, the dialog disappears. 11. On the display, the following message is displayed: Transfer the file to flash using XModem… CCCCC Done. It is ok if a different number of “C” characters are shown. If you see Done, the new file has been successfully loaded into the flash. Go to step 12. If the Tera Term: Send File dialog closes and you still see just: Transfer the file to flash using XModem… CCCCC wait for the controller’s transfer timer to expire. You will then see: Transfer the file to flash using XModem… CCCCC Load Cancelled. Go back to step 9 and start the transfer again. It is not necessary to erase the file again if the load does not complete. Just start the transfer again. Be sure that you’re clicking File, Transfer, X-Modem, Send to send the file. You must not be using the File, Send File… command; this one will not work. Firmware Update-6 Firmware Update Release 1.4 Note: Once the new version of SBOOT_x.y.z.bin is successfully loaded into the flash, it is safe once again to remove the power from the controller, though not necessary at this time. 12. Display the directory and verify the version of the new file: D<enter> 13. Load and execute the new version of SBOOT from the flash by entering the following command: B<enter> You will see the following submenu: Load 0 1 2 3 Q H and Execute a Program from Flash: - SBOOT - Diagnostics - 7330 Repeater Controller - 7330 Repeater Controller - Cold Start, Erase Your Programming - Return to Main Menu - Redisplay these options Enter Load and Execute Option> Select the option to load and execute SBOOT (Tip: use zero): 0<enter> If you’re updating from SBOOT version 1.1.0, the new version of SBOOT automatically prepares the controller for the new Custom Audio Library support. You will see the following message when it starts: Custom Audio Library upgrade in progress...Done. If you’re updating a newer version, you will not see this message. You’re controller already supports the Custom Audio Library. 14. Continue updates of your controller on the next page. Firmware Update-7 7330 Firmware Update Release 1.3 Updating DIAG (Diagnostics) Check the version of DIAG on the Directory/File Status display as shown on page 4 by typing d<enter>. If the version shown on the display is older than the new version shipped to you in the update, perform the following steps. Otherwise, skip to Updating 7330 Repeater Controller Program on page 11. Note: The restriction on power cycling of the controller does not apply to DIAG. If you turn off the power during a DIAG update, you should start over at step 1 on this page. 1. Erase the existing DIAG program by entering the following command: E<enter> You will see the following submenu: Erase a File from Flash: 0 - SBOOT 1 - Diagnostics 2 - 7330 Repeater Controller 3 - Speech Library 4 – Custom Audio Library Q - Return to Main Menu H - Redisplay these options Enter File Erase Option> Select the option to erase Diagnostics 1<enter> You will be asked to confirm the erase: Enter Y to erase the file, N to cancel>y You will see the following message displayed: Erasing...Done. Firmware Update-8 Firmware Update Release 1.4 2. Load the new version of DIAG by entering the following command: L<enter> You will see the following submenu: Load 0 1 2 3 4 Q H a – - File to Flash from a PC: SBOOT Diagnostics 7330 Repeater Controller Speech Library Custom Audio Library Return to Main Menu Redisplay these options Enter File Load Option> Select the option to load Diagnostics 1<enter> You will be asked to confirm the load: Enter Y to load the file, N to cancel>y You will see will see one or more “C” characters displayed. These are being sent by your terminal emulator to tell the controller it’s ready to send the file. Transfer the file to flash using XModem… CCCCC The controller will wait 60 seconds for you to select a file and begin the transfer. At the end of 60 seconds, the controller will display Load Cancelled and the prompt. You can then begin another transfer. 3. In TeraTerm, send the new DIAG_x.y.z.bin file using the X-Modem protocol. Click File, Transfer, X-Modem, then Send... The TeraTerm: XMODEM Send dialog is displayed. Select the new DIAG_x.y.z.bin file from the list of displayed files. Click on the Open button to send the file. A dialog is displayed showing the transfer status. When TeraTerm is done sending the file, the dialog disappears. 4. On the display, the following message is displayed: Transfer the file to flash using XModem… CCCCC Done. It is ok if a different number of “C” characters are shown. If you see Done, the new file has been successfully loaded into the flash. Go to step 5. Firmware Update-9 7330 Firmware Update Release 1.3 If the Tera Term: Send File dialog closes and you still see just: Transfer the file to flash using XModem… CCCCC wait for the controller’s transfer timer to expire. You will then see: Transfer the file to flash using XModem… CCCCC Load Cancelled. Go back to step 2 and start the transfer again. It is not necessary to erase the file again if the load does not complete. Just start the transfer again. Be sure that you’re clicking File, Transfer, X-Modem, Send to send the file. You must not be using the File, Send File… command; this one will not work. Note: A normal upload usually takes less than 30 seconds. If SBOOT recognizes a file compatibility issue, it could take up to 2 minutes for the transfer to be canceled. 5. Display the directory and verify the version is of the new file: D<enter> Firmware Update-10 Firmware Update Release 1.4 Updating 7330 Repeater Controller Program (SCOM_A) Note: The SBOOT Directory display uses the name SCOM_A to refer to the storage location for the 7330 Repeater Controller program. Check the version of SCOM_A on the Directory/File Status display. If the version shown on the display is older than the new version shipped to you in the update, perform the following steps. Otherwise, skip to Updating The Standard Speech Library on page 14. Note: The restriction on power cycling of the controller does not apply to the 7330 Repeater Controller program. 1. Erase the existing SCOM_A program by entering the following command: E<enter> You will see the following submenu: Erase a File from Flash: 0 - SBOOT 1 - Diagnostics 2 - 7330 Repeater Controller 3 - Speech Library 4 – Custom Audio Library Q - Return to Main Menu H - Redisplay these options Enter File Erase Option> Select the option to erase the 7330 Repeater Controller program: 2<enter> You will be asked to confirm the erase: Enter Y to erase the file, N to cancel>y You will see the following message displayed: Erasing...Done. Firmware Update-11 7330 Firmware Update Release 1.3 2. Load the new version of SCOM_A by entering the following command: L<enter> You will see the following submenu: Load 0 1 2 3 4 Q H a – - File to Flash from a PC: SBOOT Diagnostics 7330 Repeater Controller Speech Library Custom Audio Library Return to Main Menu Redisplay these options Enter File Load Option> Select the option to load the 7330 Repeater Controller program: 2<enter> You will be asked to confirm the load: Enter Y to load the file, N to cancel>y You will see will see one or more “C” characters displayed. These are being sent by your terminal emulator to tell the controller it’s ready to send the file. Transfer the file to flash using XModem… CCCCC The controller will wait 60 seconds for you to select a file and begin the transfer. At the end of 60 seconds, the controller will display Load Cancelled and the prompt. You can then begin another transfer. 3. In TeraTerm, send the new 7330_x.y.z.bin file using the X-Modem protocol. Click File, Transfer, X-Modem, then Send... The TeraTerm: XMODEM Send dialog is displayed. Select the new 7330_x.y.z.bin file from the list of displayed files. Click on the Open button to send the file. A dialog is displayed showing the transfer status. When TeraTerm is done sending the file, the dialog disappears. 4. On the display, the following message is displayed: Transfer the file to flash using XModem… CCCCC Done. It is ok if a different number of “C” characters are shown. If you see Done, the new file has been successfully loaded into the flash. Go to step 5. Firmware Update-12 Firmware Update Release 1.4 If the Tera Term: Send File dialog closes and you still see just: Transfer the file to flash using XModem… CCCCC wait for the controller’s transfer timer to expire. You will then see: Transfer the file to flash using XModem… CCCCC Load Cancelled. Go back to step 2 and start the transfer again. It is not necessary to erase the file again if the load does not complete. Just start the transfer again. Be sure that you’re clicking File, Transfer, X-Modem, Send to send the file. You must not be using the File, Send File… command; this one will not work. Note: A normal upload usually takes less than 30 seconds. If SBOOT recognizes a file compatibility issue, it could take up to 2 minutes for the transfer to be canceled. 5. Display the directory and verify the version of the new file: D<enter> Firmware Update-13 7330 Firmware Update Release 1.3 Updating The Standard Speech Library Check the version of LIB on the Speech Files section of the SBOOT Directory/File Status display. If the version shown on the display is older than the new version shipped to you in the update, perform the following steps. Otherwise, skip to Updating Your Custom Audio Library on page 17. Note: The restriction on power cycling of the controller does not apply to speech files. Note: As of Release 1.1, the full Speech Library is quite large and will require extra time to complete erase and load operations. For the shortest load time, we recommend that you set the baudrate of the Console Port to 57,600 baud. See Chapter 8, Serial Port, of the 7330 Repeater Controller manual on configuring the serial port. 1. Erase the existing Speech Library file by entering the following command: E<enter> You will see the following submenu: Erase a File from Flash: 0 - SBOOT 1 - Diagnostics 2 - 7330 Repeater Controller 3 - Speech Library 4 – Custom Audio Library Q - Return to Main Menu H - Redisplay these options Enter File Erase Option> Select the option to erase the Speech Library: 3<enter> You will be asked to confirm the erase: Enter Y to erase the file, N to cancel>y You will see the following message displayed: Erasing...Done. Erasing of this file can take up to 2 minutes. 2. Load the new version of the Speech Library file by entering the following command: L<enter> Firmware Update-14 Firmware Update Release 1.4 You will see the following submenu: Load 0 1 2 3 4 Q H a – - File to Flash from a PC: SBOOT Diagnostics 7330 Repeater Controller Speech Library Custom Audio Library Return to Main Menu Redisplay these options Enter File Load Option> Select the option to load the Speech Library: 3<enter> You will be asked to confirm the load: Enter Y to load the file, N to cancel>y You will see will see one or more “C” characters displayed. These are being sent by your terminal emulator to tell the controller it’s ready to send the file. Transfer the file to flash using XModem… CCCCC The controller will wait 60 seconds for you to select a file and begin the transfer. At the end of 60 seconds, the controller will display Load Cancelled and the prompt. You can then begin another transfer. 3. In TeraTerm, send the new SpLibEng_x.y.z.bin file using the XModem protocol. Click File, Transfer, X-Modem, then Send... The TeraTerm: XMODEM Send dialog is displayed. Select the new SpLibEng_x.y.z.bin file from the list of displayed files. Click on the Open button to send the file. A dialog is displayed showing the transfer status. Loading of this file can take up to 30 minutes at 57,600 baud. Lower baudrates take proportionately longer. When TeraTerm is done sending the file, the dialog disappears. 4. On the display, the following message is displayed: Transfer the file to flash using XModem… CCCCC Done. It is ok if a different number of “C” characters are shown. If you see Done, the new file has been successfully loaded into the flash. Go to step 5. Firmware Update-15 7330 Firmware Update Release 1.3 If the Tera Term: Send File dialog closes and you still see just: Transfer the file to flash using XModem… CCCCC wait for the controller’s transfer timer to expire. You will then see: Transfer the file to flash using XModem… CCCCC Load Cancelled. Go back to step 2 and start the transfer again. It is not necessary to erase the file again if the load does not complete. Just start the transfer again. Be sure that you’re clicking File, Transfer, X-Modem, Send to send the file. You must not be using the File, Send File… command; this one will not work. Note: In the current version of firmware, there have been reports of the “Done” message not being displayed when TeraTerm reports that the transfer is complete. If this happens, start the download again at step 2. 5. Display the directory and verify the version of the new file: D<enter> Firmware Update-16 Firmware Update Release 1.4 Updating Your Custom Audio Library During firmware updates of the controller, your Custom Audio Library file has not been modified. At any time, you can check your version of CUSTOM on the Speech Files section of the SBOOT Directory/File Status display. If you wish to replace your Custom Audio Library file with a different one, follow the instructions below. If you do not need to update your Custom Audio Library at this time, skip to Finishing Up on page 19. Note: The restriction on power cycling of the controller does not apply to speech files. Note: A Custom Audio Library is quite large and will require extra time to complete erase and load operations. For the shortest load time, we recommend that you set the baud rate of the Console Port to 57,600 baud. See chapter 8 of the 7330 Repeater Controller manual. 1. Erase the existing Custom Audio Library file by entering the following command: E<enter> You will see the following submenu: Erase a File from Flash: 0 - SBOOT 1 - Diagnostics 2 - 7330 Repeater Controller 3 - Speech Library 4 – Custom Audio Library Q - Return to Main Menu H - Redisplay these options Enter File Erase Option> Select the option to erase the Custom Audio Library: 4<enter> You will be asked to confirm the erase: Enter Y to erase the file, N to cancel>y You will see the following message displayed: Erasing...Done. Erasing of this file can take up to 2 minutes. 2. Load the new version of the Custom Audio Library file by entering the following command: L<enter> Firmware Update-17 7330 Firmware Update Release 1.3 You will see the following submenu: Load 0 1 2 3 4 Q H a – - File to Flash from a PC: SBOOT Diagnostics 7330 Repeater Controller Speech Library Custom Audio Library Return to Main Menu Redisplay these options Enter File Load Option> Select the option to load the Custom Audio Library: 4<enter> You will be asked to confirm the load: Enter Y to load the file, N to cancel>y You will see will see one or more “C” characters displayed. These are being sent by your terminal emulator to tell the controller it’s ready to send the file. Transfer the file to flash using XModem… CCCCC The controller will wait 60 seconds for you to select a file and begin the transfer. At the end of 60 seconds, the controller will display Load Cancelled and the prompt. You can then begin another transfer. 3. In TeraTerm, send the new CustomAudioLib.bin file using the XModem protocol. Click File,Transfer, X-Modem, then Send... The TeraTerm: XMODEM Send dialog is displayed. Select the new CustomAudioLib.bin file from the list of displayed files. Click on the Open button to send the file. A dialog is displayed showing the transfer status. When TeraTerm is done sending the file, the dialog disappears. The time it takes to load this file depends on the size of your CustomAudioLib.bin file. It can take approximately 5 minutes per megabyte at 57,600 baud. Lower baud rates take proportionately longer. 4. On the display, the following message is displayed: Transfer the file to flash using XModem… CCCCC Done. It is ok if a different number of “C” characters are shown. If you see Done, the new file has been successfully loaded into the flash. Go to step 5. Firmware Update-18 Firmware Update Release 1.4 If the Tera Term: Send File dialog closes and you still see just: Transfer the file to flash using XModem… CCCCC wait for the controller’s transfer timer to expire. You will then see: Transfer the file to flash using XModem… CCCCC Load Cancelled. Go back to step 2 and start the transfer again. It is not necessary to erase the file again if the load does not complete. Just start the transfer again. Be sure that you’re clicking File, Transfer, X-Modem, Send to send the file. You must not be using the File, Send File… command; this one will not work. Note: In the current version of firmware, there have been reports of the “Done” message not being displayed when TeraTerm reports that the transfer is complete. If this happens, start the download again at step 2. Do not erase the file before reloading. 5. Display the directory and verify the version of your new file: D<enter> Firmware Update-19 7330 Firmware Update Release 1.3 Finishing Up When Updating From Release 1.1 or Newer Your files have been updated. Only a few more steps are required to finish up: Do you need to erase all your programming (Cold Start)? The need for a Cold Start depends on what files you changed. Here’s a table to help you decide: File Do you need to ColdStart? SBOOT Yes DIAG No 7330 Repeater Yes Speech Library No Custom Audio Library No If required, to Cold Start your controller using the RESET and INIT buttons: 1. Hold the INIT button and press the RESET button on the back of your 7330. It will start with the speech message “SCOM 7330 Version version number” played on Port 1 and a text message on the console port. The front panel will light the PTT LED for Port 1 while the speech message is played. If the front panel LEDs are lighting left-toright as before, there was a problem in updating the 7330 Repeater Firmware. Repeat that step. 2. If you changed your serial port configuration to perform the update, change your Console Port configuration back to the way you had it. 3. Send the programming commands to your controller to change your messages, macros, timers, etc., since the Cold-Start erased them. If you did not Cold Start: 1. If you changed your serial port configuration to perform the update, change your Console Port configuration back to the way you had it. The update is complete! Firmware Update-20 Firmware Update Release 1.4 Using SBOOT V1.2.0 (Included with Release 1.3) This version of SBOOT improves the Erase and Load options with support for the Custom Audio Library. The directory display format has been improved to be easier to read. The SBOOT V1.2.0 menu looks like this: SCOM 7330 SBOOT V1.2.0 7330 Controller Storage Management T - Show Time Tmmddyyhhmmssw - Set Time (w=0=Sunday) S R - Save Repeater Configuration - Restore Repeater Configuration E L U D - P N W - Set Baudrate of Console Port - Set Baudrate of Auxiliary Port - Set Console Port Number B X H - Boot from Flash - Reboot SBOOT from Flash - Help Erase Files Load File from a PC to Flash Upload File from Flash to a PC Flash Directory Time: 091708-083617-3 Battery OK. SBOOT> When started for the first time, the new version of SBOOT automatically prepares the controller for the new Custom Audio Library support. You will see the following message when it starts: Custom Audio Library upgrade in progress...Done. There are new warning messages that are displayed each time SBOOT starts. These messages warn of the AUX1 or AUX2 jumpers being installed: WARNING: AUX1 Jumper Installed. operation! Must be removed for unattended repeater WARNING: AUX2 Jumper Installed. operation! Must be removed for unattended repeater Firmware Update-21 7330 Firmware Update Release 1.3 Display a Directory To display the directory of files in the flash, type “d<enter>”. The display looks like this: Controller Information Model Number : 7330 Serial Number : BETA1 Manufactured DT: 090409-074702-5 Formatted DT : 090309-211338-4 Customer Name : Dave's Proto Firmware Files Location ---------------SBOOT MFG DIAG SCOM_A SCOM_B Name Version Date Type ------------------ -------- ------------ ---------------7330_SBoot No File 7330_Diag 7330 No File 1.2.0 9/4/2009 Program 1.2.0 3.2.0 9/4/2009 9/4/2009 Program Program Configuration Files Location Name Version Date Type ------------- ------------------ -------- ------------ ------------------RESTORE_A No File RESTORE_B No File Speech Files Location ---------------LIB CUSTOM Name Version Date Type ------------------ -------- ------------ ---------------SCOM Sp Lib Eng No File 1.0.0 7/16/2008 Speech Library Erase a File To erase a file from the flash, type “e<enter>”. You’ll see the options available in this version: Erase a File from Flash: 0 - SBOOT 1 - Diagnostics 2 - 7330 Repeater Controller 3 - Speech Library 4 – Custom Audio Library Q - Return to Main Menu H - Redisplay these options Enter File Erase Option> Firmware Update-22 Firmware Update Release 1.4 Load a File From Your PC To load a file from your PC to the flash, type “l<enter>”. You’ll see the options available in this version: Load 0 1 2 3 4 Q H a – - File to Flash from a PC: SBOOT Diagnostics 7330 Repeater Controller Speech Library Custom Audio Library Return to Main Menu Redisplay these options Enter File Load Option> Execute a File To execute a program from the flash, type “b<enter>”. You’ll see the options available in this version: Load 0 1 2 3 Q H and Execute a Program from Flash: - SBOOT - Diagnostics - 7330 Repeater Controller - 7330 Repeater Controller - Cold Start, Erase Your Programming - Return to Main Menu - Redisplay these options Enter Load and Execute Option> Firmware Update-23 7330 Firmware Update Release 1.3 Updating From Release 1.0 Perform the following steps to prepare for a firmware update from Release 1.0: Note: As of Release 1.0, you no longer have to remove the cover of the 7330 Controller to install a jumper to perform a firmware update. Instead, you will enter a console command to the controller to stop the repeater controller and execute SBOOT. 1. Install the RS-232 cable between your computer’s RS-232 port and the Console serial port on the rear panel of the 7330. By default, the Console Port is assigned to RS232-2. If you changed the assignment of the Console Port, install the cable to RS232-1. 2. Run the terminal program. (Note: Examples will use TeraTerm.) 3. At the 7330 controller serial port prompt, type “sboot<enter>”. The LEDs on the front panel of your controller will scan left-to-right as an indication that your repeater is off-the-air. The flashing LEDs also indicate that SBOOT is running properly. Your screen will show the following display: SBOOT S7330 V1.0.0 7330 Controller Storage Management T - Show Time Tmmddyyhhmmssw - Set Time (w=0=Sunday) S R C - Save Repeater Configuration - Restore Repeater Configuration - Cold Init of Repeater Configuration I Ef Lf Uf D - P N W - Set Baudrate of Console Port - Set Baudrate of Auxiliary Port - Set Console Port Number B X H - Boot from Flash - Reboot SBOOT from Flash - Help Format Flash Erase Files or Flash Load File from PC to Flash Upload File from Flash to PC Flash Directory f, 0=SBOOT, 1=DIAG, 2=Mfg, 3=CtrlA, 4=CtrlB, 5=Speech Time: 032308-142947-0 Battery OK. 512KB SRAM Flash already formatted. Flash Sectors: 0x80 SBOOT> Firmware Update-24 Firmware Update Release 1.4 Note: The following commands are available in SBOOT version 1.0.0: H<enter> – enter at any time to display the help menu. T<enter> – display the current time in the controller. Tmmddyyhhmmssw<enter> – set the time in the controller. D<enter> -- display a list of the versions of the files currently stored in the controller. Ef<enter> -- erase a file. Replace the “f” with the location of the file to erase: 0 = Boot, 1 = Diag, 3 = SCOM_A/CtrlA, 5 = Speech Other options are not currently supported. Lf<enter> -- Load a file from your computer to the controller. Replace the “f” with the location to store the file: 0 = Boot, 1 = Diag, 3 = SCOM_A/CtrlA, 5 = Speech Other options are not currently supported. Some options on the menu may not be supported. 4. Verify the Time as shown. The format of the time display is : mmddyy-hhmmss-w is 2-digit month (01-12), 2-digit day-of-month (01-31), 2-digit year (0099), 2-digit hour (00-23, 24 hour format), 2-digit minute (00-59), 2-digit second (00-59), and 1-digit day-of-week (0-6, Sunday is 0, Monday is 1, Tuesday is 2, etc.) 5. If required, enter a new time with the following command: tmmddyyhhmmssw<enter> 6. Type “D<enter>”. The following list of files will be shown: : Controller Info Model Number : Serial Number : Manufactured DT: Formatted DT : Customer Name : 7330 Proto2 070307-110844-2 070307-110815-2 Dave's Beta Directory/File Status PROGRAMS SBOOT FN : 7330_SBoot Ver : 1.0.0 DT : 3/23/2008 Type: Program MFG No File Loaded DIAG FN : 7330_Diag Ver : 1.0.0 DT : 3/23/2008 Type: Program SCOM_A FN : 7330 Firmware Update-25 7330 Firmware Update Release 1.3 Ver : 3.0.5 DT : 3/23/2008 Type: Program SCOM_B No File Loaded RESTORE RESTORE_A No File Loaded RESTORE_B No File Loaded SPEECH LIB FN : 7XXX Words Ver : 0.0.1 DT : 12/28/05 Type: Speech Lib The first section of the display, “Controller Info”, shows information about your specific controller: the Model Number, Serial Number, etc. The balance of the display “Directory/File” status shows the Name, Version, Date, and Type of file currently stored in your controller. We will be checking these versions to determine which files need to be updated. 7. Check the version of SBOOT on the Directory/File Status display. If the version shown on the display is older than the new version shipped to you in the update, perform the following steps. Otherwise, go back to page 8 to update other files. Caution: do not remove power from the controller during the following steps! Doing so will make your controller inoperative and require a special recovery procedure. Call us if this happens! 8. Erase the existing SBOOT program by entering the following command (Tip: use zero): E0<enter> You will see the following message displayed: Erasing...Done. 9. Load the new version of SBOOT by entering the following command (Tip: use zero): L0<enter> You will see will see one or more “C” characters displayed. Firmware Update-26 Firmware Update Release 1.4 10. In TeraTerm, send the new SBOOT_x.y.z.bin file using the X-Modem protocol. Click File, Transfer, X-Modem, then Send... The TeraTerm: XMODEM Send dialog is displayed. Select the new SBOOT_x.y.z.bin file from the list of displayed files. Click on the Open button to send the file. A dialog is displayed showing the transfer status. When TeraTerm is done sending the file, the dialog disappears. 11. On the display, the following message is displayed: CCCCC Done. It is ok if a different number of “C” characters are shown. If you see Done, the new file has been successfully loaded into the flash. Go to step 12. If the Tera Term: Send File dialog closes and you still see just: Transfer the file to flash using XModem… CCCCC wait for the controller’s transfer timer to expire. You will then see: Transfer the file to flash using XModem… CCCCC Load Cancelled. Go back to step 9 and start the transfer again. It is not necessary to erase the file again if the load does not complete. Just start the transfer again. Be sure that you’re clicking File, Transfer, X-Modem, Send to send the file. You must not be using the File, Send File… command; this one will not work. Note: Once the new version of SBOOT_x.y.z.bin is successfully loaded into the flash, it is safe once again to remove the power from the controller, though not necessary at this time. 12. Display the directory and verify the version of the new file: D<enter> Firmware Update-27 7330 Firmware Update Release 1.3 13. Load and execute the new version of SBOOT from the flash by entering the following command: B<enter> You will see the following submenu: Load 0 1 2 3 Q H and Execute a Program from Flash: - SBOOT - Diagnostics - 7330 Repeater Controller - 7330 Repeater Controller - Cold Start, Erase Your Programming - Return to Main Menu - Redisplay these options Enter Load and Execute Option> Select the option to load and execute SBOOT: 0<enter> When started for the first time, the new version of SBOOT automatically prepares the controller for the new Custom Audio Library support. You will see the following message when it starts: Custom Audio Library upgrade in progress...Done. Note: The new version of SBOOT uses a new menu style for Erase, Load and Boot of files. The next section will use these new commands. 14. Continue updates of your controller on page 8. Come back to page 34 when done. Firmware Update-28 Firmware Update Release 1.4 Updating From Any Beta Release Perform the following steps to prepare for a firmware update from a beta release: 1. Unplug the power to your 7330. 2. Remove the cover of your 7330 3. Install a jumper at the AUX2 position of jumper block J33. (Hint: this is the block with the PTT inversion jumpers.) You can borrow a jumper from one of the other jumper blocks while performing the firmware update. Note: When you have finished all the file updates, you must remove the AUX2 jumper for the 7330 to operate as a repeater controller once again. See the Finishing Up section, below. 4. Install the RS-232 cable between your computer’s RS-232 port and the serial port on the rear panel of the 7330 marked RS232-2. 5. Run the terminal program. (Note: Examples will use TeraTerm.) Firmware Update-29 7330 Firmware Update Release 1.3 6. Plug in the power to your 7330. The LEDs on the front panel of your controller will scan left-to-right as an indication that your repeater is off-the-air. Also, the flashing LEDs indicate that the jumper is properly installed. Your screen will show the following display: SBOOT S7330 V0.3.1 7330 Controller Storage Management T - Show Time Tmmddyyhhmmssw - Set Time (w=0=Sunday) S R C - Save Repeater Configuration - Restore Repeater Configuration - Cold Init of Repeater Configuration I Ef Lf Uf D - Format Flash Erase Files or Flash Load File from PC to Flash Upload File from Flash to PC Flash Directory Bf - Boot from Flash H - Help f, 0=Boot, 1=Diag, 2=Mfg, 3=CtrlA, 4=CtrlB, 5=Speech Time: 071807-064614-3 Battery OK. 512KB SRAM Flash already formatted. Flash Sectors: 0x80 SBOOT> Note: The following commands are available in SBOOT version 0.3.1: H<enter> – enter at any time to display the help menu. T<enter> – display the current time in the controller. Tmmddyyhhmmssw<enter> – set the time in the controller. D<enter> -- display a list of the versions of the files currently stored in the controller. Ef<enter> -- erase a file. Replace the “f” with the location of the file to erase: 0 = Boot, 1 = Diag, 3 = SCOM_A/CtrlA, 5 = Speech Other options are not currently supported. Lf<enter> -- Load a file from your computer to the controller. Replace the “f” with the location to store the file: 0 = Boot, 1 = Diag, 3 = SCOM_A/CtrlA, 5 = Speech Other options are not currently supported. Some options on the menu may not be supported. Firmware Update-30 Firmware Update Release 1.4 7. Verify the Time as shown. The format of the time display is : mmddyy-hhmmss-w is 2-digit month (01-12), 2-digit day-of-month (01-31), 2-digit year (0099), 2-digit hour (00-23, 24 hour format), 2-digit minute (00-59), 2-digit second (00-59), and 1-digit day-of-week (0-6, Sunday is 0, Monday is 1, Tuesday is 2, etc.) 8. If required, enter a new time with the following command: tmmddyyhhmmssw<enter> 9. Type “D<enter>”. The following list of files will be shown: Controller Info Model Number : Serial Number : Manufactured DT: Formatted DT : Customer Name : 7330 Proto2 070307-110844-2 070307-110815-2 Dave's Beta Directory/File Status PROGRAMS SBOOT FN : 7330_SBoot Ver : 0.3.1 DT : 7/3/2007 Type: Program MFG No File Loaded DIAG FN : 7330_Diag Ver : 0.5.1 DT : 7/14/2007 Type: Program SCOM_A FN : 7330 Ver : 3.0.1 DT : 7/15/2007 Type: Program SCOM_B No File Loaded RESTORE RESTORE_A No File Loaded RESTORE_B No File Loaded SPEECH LIB FN : 7XXX Words Ver : 0.0.1 DT : 12/28/05 Type: Speech Lib The first section of the display, “Controller Info”, shows information about your specific controller: the Model Number, Serial Number, etc. Firmware Update-31 7330 Firmware Update Release 1.3 The balance of the display “Directory/File” status shows the Name, Version, Date, and Type of file currently stored in your controller. We will be checking these versions to determine which files need to be updated. 10. Check the version of SBOOT on the Directory/File Status display. If the version shown on the display is older than the new version shipped to you in the update, perform the following steps. Otherwise, skip to update other files on page 8. Caution: do not remove power from the controller during the following steps! Doing so will make your controller inoperative and require a special recovery procedure. Call us if this happens! 11. Erase the existing SBOOT program by entering the following command (Tip: use zero): E0<enter> You will see the following message displayed: Erasing...Done. 12. Load the new version of SBOOT by entering the following command (Tip: use zero): L0<enter> You will see will see one or more “C” characters displayed. The controller will wait 60 seconds for you to select a file and begin the transfer. At the end of 60 seconds, the controller will display Load Cancelled and the prompt. You can then begin another transfer. 13. In TeraTerm, send the new SBOOT_x.y.z.bin file using the X-Modem protocol. Click File, Transfer, X-Modem, then Send... The TeraTerm: XMODEM Send dialog is displayed. Select the new SBOOT_x.y.z.bin file from the list of displayed files. Click on the Open button to send the file. A dialog is displayed showing the transfer status. When TeraTerm is done sending the file, the dialog disappears. 14. On the display, the following message is displayed: CCCCCDone. It is ok if a different number of “C” characters are shown. If you see Done, the new file has been successfully loaded into the flash. Go to step 5. Firmware Update-32 Firmware Update Release 1.4 If the Tera Term: Send File dialog closes and you still see just: Transfer the file to flash using XModem… CCCCC wait for the controller’s transfer timer to expire. You will then see: Transfer the file to flash using XModem… CCCCC Load Cancelled. Go back to step 2 and start the transfer again. It is not necessary to erase the file again if the load does not complete. Just start the transfer again. Be sure that you’re clicking File, Transfer, X-Modem, Send to send the file. You must not be using the File, Send File… command; this one will not work. Note: Once the new version of SBOOT_x.y.z.bin is successfully loaded into the flash, it is safe once again to remove the power from the controller, though not necessary at this time. 15. Display the directory and verify the version of the new file: D<enter> 16. Press the RESET button on the controller so that you will be using the new version of SBOOT. Note: The new version of SBOOT uses a new menu style for Erase, Load and Boot of files. The next section will use these new commands. 17. Continue updates of your controller on page 8. Come back to page 34 when done. Firmware Update-33 7330 Firmware Update Release 1.3 Finishing Up When Updating From a Beta Release or Release V1.0 Your files have been updated. Only a few more steps are required to finish up: 1. Unplug the power to your 7330. 2. Unplug the RS-232 cable. 3. Remove the jumper you installed at the AUX2 position of jumper block J33. 4. Install the cover of the controller. Note: It is important to Cold-Start your controller at this time! Changes were made that are incompatible with the previous configuration. 5. Hold the INIT button and plug the power into your 7330. It will start by playing the speech message “SCOM 7330 Version version number” to Port 1 and send text to the console port. The front panel will light the PTT LED for Port 1 while the speech message is played. If the front panel LEDs are lighting left-to-right as before, or the SBOOT menu has been displayed to the console port, the AUX2 jumper hasn’t been removed. 6. Send the programming commands to your controller to changes your messages, macros, timers, etc., since the Cold-Start erased them. 7. The update is complete! Firmware Update-34